
Image Compositing
Compositing is the act of putting together two images, allowing features of both images to be seen.
In the Android SDK, we can accomplish compositing by first drawing one Bitmap to a Canvas and then drawing a second Bitmap to the same Canvas. The only difference is that we specify a transfermode (Xfermode) on the Paint when drawing the second image.
The set of classes that can be used as a transfermode all derive from the Xfermode base class and include one called PorterDuffXfermode. The PorterDuffXfermode class is named for Thomas Porter and Tom Duff, who published a paper entitled “Compositing digital images” in the ACM SIGGRAPH Computer Graphics publication in 1984, detailing a series of different rules for drawing images on top of one another. These rules define which portions of which images will appear in the resulting output.
The rules devised by Porter and Duff and more are enumerated in the PorterDuff.Mode class in Android.
They include the following:
android.graphics.PorterDuff.Mode.SRC: This rule means that only the source, in our case, the paint that we are applying this to, will be drawn.android.graphics.PorterDuff.Mode.DST: This rule means that only the destination, the original image, already on the canvas, will be shown.
Following the SRC and DST rules, there is a set that works with them to determine which parts of each image will be drawn in the end. These generally apply when the images are different sizes or when they have transparent portions.
android.graphics.PorterDuff.Mode.DST_OVER: The destination image will be drawn over the top of the source image.android.graphics.PorterDuff.Mode.DST_IN: The destination image will be drawn only where the source and destination images intersect.android.graphics.PorterDuff.Mode.DST_OUT: The destination image will be drawn only where the source and destination images do not intersect.android.graphics.PorterDuff.Mode.DST_ATOP: The destination image will be drawn where it intersects with the source; elsewhere the source will be drawn.android.graphics.PorterDuff.Mode.SRC_OVER: The source image will be drawn over the top of the destination image.android.graphics.PorterDuff.Mode.SRC_IN: The source image will be drawn only where the destination and source images intersect.android.graphics.PorterDuff.Mode.SRC_OUT: The source image will be drawn only where the destination and source images do not intersect.android.graphics.PorterDuff.Mode.SRC_ATOP: The source image will be drawn where it intersects with the destination; elsewhere the destination will be drawn.android.graphics.PorterDuff.Mode.XOR: The source and destination images will be drawn everywhere except where they overlap, where neither will be drawn.
Four additional rules are defined that define how two images can be blended together when one is placed above the other.
android.graphics.PorterDuff.Mode.LIGHTEN: Takes the lightest pixel of the two images from each position and shows that.android.graphics.PorterDuff.Mode.DARKEN: Takes the darkest pixel from the two images in each position and shows that.android.graphics.PorterDuff.Mode.MULTIPLY: Multiplies the two pixels from each position, divides by 255, and uses that value to create a new pixel for display. Result Color = Top Color * Bottom Color / 255android.graphics.PorterDuff.Mode.SCREEN: Inverts each of the colors, performs the same operation (multiplies them together and divides by 255), and then inverts once again. Result Color = 255 - (((255 - Top Color) * (255 - Bottom Color)) / 255)
Let's illustrate how these rules may be used with an example application.
package com.apress.proandroidmedia.ch3.choosepicturecomposite;


import java.io.FileNotFoundException;


import android.app.Activity;

import android.content.Intent;

import android.graphics.Bitmap;

import android.graphics.BitmapFactory;

import android.graphics.Canvas;

import android.graphics.Paint;

import android.graphics.PorterDuffXfermode;

import android.net.Uri;

import android.os.Bundle;

import android.util.Log;

import android.view.Display;

import android.view.View;

import android.view.View.OnClickListener;

import android.widget.Button;

import android.widget.ImageView;


public class ChoosePictureComposite extends Activity implements OnClickListener {
We are creating a standard activity-based application, which we'll call Choose Picture Composite. The activity will implement OnClickListener so it can respond to Button clicks.
Since we are going to be compositing two images, we'll need to make sure the user picks two images before we attempt to draw the composited version. To do this, we'll make two constants, one for each Button press and then two Booleans to track whether a Button has been pressed. Of course, we'll have two Button objects as well.
    static final int PICKED_ONE = 0;

    static final int PICKED_TWO = 1;


    boolean onePicked = false;

    boolean twoPicked = false;


    Button choosePicture1, choosePicture2;
We'll have one ImageView to display the final composited image. Also, we'll need to have two Bitmap objects, one for each of the chosen images.
    ImageView compositeImageView;


    Bitmap bmp1, bmp2;
As in our previous examples, we'll need a Canvas to draw on and a Paint object to draw with.
    Canvas canvas;

    Paint paint;


    @Override

    public void onCreate(Bundle savedInstanceState) {

        super.onCreate(savedInstanceState);

        setContentView(R.layout.main);


        compositeImageView = (ImageView) this.findViewById(R.id.CompositeImageView);


        choosePicture1 = (Button) this.findViewById(R.id.ChoosePictureButton1);

        choosePicture2 = (Button) this.findViewById(R.id.ChoosePictureButton2);


        choosePicture1.setOnClickListener(this);

        choosePicture2.setOnClickListener(this);

    }
Since we set the OnClickListener for each Button to be this class, we need to implement an onClick method that will respond. To tell which one was clicked, we compare the View object that is passed in with each of the Button objects. If they are equal, that is the button that was clicked.
We are setting a variable called which to the value of one of the constants defined previously to keep track of which Button was pressed. This variable is then passed through to our Gallery Application, which is being instantiated with the ACTION_PICK intent. As shown in our previous examples, this will launch that application in a mode that allows the user to pick an image.
    public void onClick(View v) {


        int which = -1;


        if (v == choosePicture1){

            which = PICKED_ONE;

        }

        else if (v == choosePicture2){

            which = PICKED_TWO;

        }


        Intent choosePictureIntent = new Intent(Intent.ACTION_PICK,android.provider.

MediaStore.Images.Media.EXTERNAL_CONTENT_URI);

        startActivityForResult(choosePictureIntent, which);

    }
After the user has selected an image, our onActivityResult method is called. The variable that we passed in via the startActivityForResult method is passed back to us in the first parameter, which we are calling requestCode. Using this we know which image, the first or second, the user just chose. We use this value to decide which Bitmap object to load the chosen image into.
    protected void onActivityResult(int requestCode, int resultCode, Intent intent)

    {

        super.onActivityResult(requestCode, resultCode, intent);


        if (resultCode == RESULT_OK){

            Uri imageFileUri = intent.getData();


            if (requestCode == PICKED_ONE){

                bmp1 = loadBitmap(imageFileUri);

                onePicked = true;

            }

            else if (requestCode == PICKED_TWO){

                bmp2 = loadBitmap(imageFileUri);

                twoPicked = true;

            }
When both images have been selected and both Bitmap objects have been instantiated, we can then move forward with our compositing operations. This will be a very similar process to our previous examples in this chapter. First we'll create an empty mutable Bitmap that is the same size and configuration as our first Bitmap, bmp1. Following that we'll construct a Canvas from that and a Paint object. We'll simply draw our first Bitmap (bmp1) into that canvas. This will cause that to be our destination for the compositing operations.
Now we can set the transfer mode on the Paint object. We instantiate a new PorterDuffXfermode object by passing in one of the constants that defines the mode that it will operate in. After we do that, we draw the second Bitmap on the Canvas and set the ImageView to be our new Bitmap. In the following version, we are using the MULTIPLY mode.
            if (onePicked && twoPicked){

                Bitmap drawingBitmap = Bitmap.createBitmap(bmp1.getWidth(),

 bmp1.getHeight(), bmp1.getConfig());
                canvas = new Canvas(drawingBitmap);

                paint = new Paint();

                canvas.drawBitmap(bmp1, 0, 0, paint);

                paint.setXfermode(new PorterDuffXfermode(android.graphics.

PorterDuff.Mode.MULTIPLY));

                canvas.drawBitmap(bmp2, 0, 0, paint);


                compositeImageView.setImageBitmap(drawingBitmap);

            }

        }

    }
Here is a helper class such as we defined in Chapter 1 to load a Bitmap from a URI scaled to be no larger than the size of the screen.
    private Bitmap loadBitmap(Uri imageFileUri){

        Display currentDisplay = getWindowManager().getDefaultDisplay();


        float dw = currentDisplay.getWidth();

        float dh = currentDisplay.getHeight();

        // ARGB_4444 is desired


        Bitmap returnBmp = Bitmap.createBitmap((int)dw, (int)dh,

 Bitmap.Config.ARGB_4444);


        try {

            // Load up the image's dimensions not the image itself

            BitmapFactory.Options bmpFactoryOptions = new BitmapFactory.Options();

            bmpFactoryOptions.inJustDecodeBounds = true;

            returnBmp = BitmapFactory.decodeStream(getContentResolver().

openInputStream(imageFileUri), null, bmpFactoryOptions);


            int heightRatio = (int)Math.ceil(bmpFactoryOptions.outHeight/dh);

            int widthRatio = (int)Math.ceil(bmpFactoryOptions.outWidth/dw);


            Log.v("HEIGHTRATIO",""+heightRatio);

            Log.v("WIDTHRATIO",""+widthRatio);


            // If both of the ratios are greater than 1, one of the sides of the

 image is greater than the screen

            if (heightRatio > 1 && widthRatio > 1){

                if (heightRatio > widthRatio){

                    // Height ratio is larger, scale according to it

                    bmpFactoryOptions.inSampleSize = heightRatio;

                }

                else{

                    // Width ratio is larger, scale according to it

                    bmpFactoryOptions.inSampleSize = widthRatio;

                }

            }


            // Decode it for real

            bmpFactoryOptions.inJustDecodeBounds = false;

            returnBmp = BitmapFactory.decodeStream(getContentResolver().

openInputStream(imageFileUri), null, bmpFactoryOptions);

        }

        catch (FileNotFoundException e) {
            Log.v("ERROR",e.toString());

        }


        return returnBmp;

    }

}
Here is the Layout XML to be used with the foregoing activity.
<?xml version="1.0" encoding="utf-8"?>
<LinearLayout xmlns:android="http://schemas.android.com/apk/res/android"

    android:orientation="vertical"

    android:layout_width="fill_parent"

    android:layout_height="fill_parent">

    <Button

        android:layout_width="fill_parent"

        android:layout_height="wrap_content"

        android:id="@+id/ChoosePictureButton1" android:text="Choose Picture 1"/>

    <Button

        android:layout_width="fill_parent"

        android:layout_height="wrap_content"

        android:id="@+id/ChoosePictureButton2" android:text="Choose Picture 2"/>

    <ImageView android:layout_width="wrap_content" android:layout_height=

"wrap_content" android:id="@+id/CompositeImageView"></ImageView>

</LinearLayout>
The result of the foregoing example with different transfer modes is illustrated in Figures 3–17 through 3–22

Figure 3–17. The output from the foregoing example using android.graphics.PorterDuff.Mode.DST as the PorterDuffXfermode; as you can see, only the image selected as Picture 1 is displayed.

Figure 3–18. The output from the foregoing example using android.graphics.PorterDuff.Mode.SRC as the PorterDuffXfermode; as you can see, only the image selected as Picture 2 is displayed.

Figure 3–19. The output from the foregoing example using android.graphics.PorterDuff.Mode.MULTIPLY as the PorterDuffXfermode; as you can see, the two images are combined.
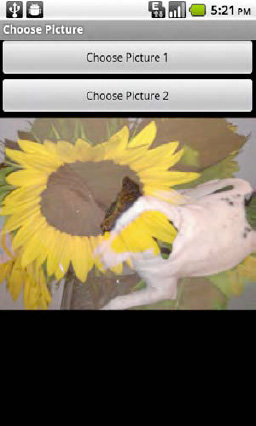
Figure 3–20. The output from the foregoing example using android.graphics.PorterDuff.Mode.LIGHTEN as the PorterDuffXfermode

Figure 3–21. The output from the foregoing example using android.graphics.PorterDuff.Mode.DARKEN as the PorterDuffXfermode
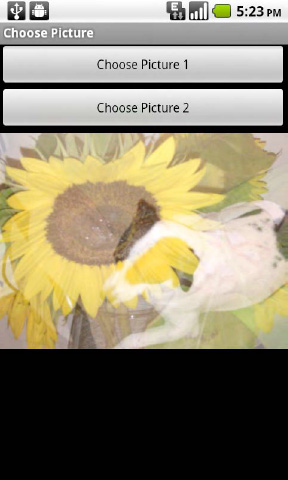
Figure 3–22. The output from the foregoing example using android.graphics.PorterDuff.Mode.SCREEN as the PorterDuffXfermode