All the examples since Chapter 11 have relied on static data that has been hardwired into the application. In this chapter, I demonstrate how to use asynchronous HTTP requests, often called Ajax requests, to interact with a web service to get real data into an application. Table 24-1 puts HTTP requests in context.
Table 24-1.
Putting Asynchronous HTTP Requests in Context
Question
Answer
What are they?
Asynchronous HTTP requests are HTTP requests sent by the browser on behalf of the application. The term asynchronous refers to the fact that the application continues to operate while the browser is waiting for the server to respond.
Why are they useful?
Asynchronous HTTP requests allow Angular applications to interact with web services so that persistent data can be loaded into the application and changes can be sent to the server and saved.
How are they used?
Requests are made using the HttpClient class, which is delivered as a service through dependency injection. This class provides an Angular-friendly wrapper around the browser’s XMLHttpRequest feature.
Are there any pitfalls or limitations?
Using the Angular HTTP feature requires the use of Reactive Extensions Observable objects, as described in Chapter 23.
Are there any alternatives?
You can work directly with the browser’s XMLHttpRequest object if you prefer, and some applications—those that don’t need to deal with persistent data—can be written without making HTTP requests at all.
Use the HTTP method and URL to specify an operation and a target for that operation
9–11
Making cross-origin requests
Use the HttpClient service to support CORS automatically (JSONP requests are also supported)
12–13
Including headers in a request
Set the headers property in the Request object
14–15
Responding to an HTTP error
Create an error handler class
16–19
Preparing the Example Project
This chapter uses the exampleApp project created in Chapter 22. For this chapter, I rely on a server that responds to HTTP requests with JSON data. Run the command shown in Listing 24-1 in the exampleApp folder to add the json-server package to the project.
Tip
You can download the example project for this chapter—and for all the other chapters in this book—from https://github.com/Apress/pro-angular-9. See Chapter 1 for how to get help if you have problems running the examples.
I added an entry in the scripts section of the package.json file to run the json-server package, as shown in Listing 24-2.
...
"scripts": {
"ng": "ng",
"start": "ng serve",
"build": "ng build",
"test": "ng test",
"lint": "ng lint",
"e2e": "ng e2e",
"json": "json-server --p 3500 restData.js"
},
...
Listing 24-2.
Adding a Script Entry in the package.json File in the exampleApp Folder
Configuring the Model Feature Module
The @angular/common/http JavaScript module contains an Angular module called HttpClientModule, which must be imported into the application in either the root module or one of the feature modules before HTTP requests can be created. In Listing 24-3, I imported the module to the model module, which is the natural place in the example application because I will be using HTTP requests to populate the model with data.
import { NgModule } from "@angular/core";
import { StaticDataSource } from "./static.datasource";
import { Model } from "./repository.model";
import { HttpClientModule } from "@angular/common/http";
@NgModule({
imports: [HttpClientModule],
providers: [Model, StaticDataSource]
})
export class ModelModule { }
Listing 24-3.
Importing a Module in the model.module.ts File in the src/app/model Folder
Creating the Data File
To provide the json-server package with some data, I added a file called restData.js to the exampleApp folder and added the code shown in Listing 24-4.
The Contents of the restData.js File in the exampleApp Folder
The json-server package can work with JSON or JavaScript files. If you use a JSON file, then its contents will be modified to reflect change requests made by clients. I have chosen the JavaScript option, which allows data to be generated programmatically and means that restarting the process will return to the original data.
Updating the Form Component
In Chapter 23, I configured the component that manages the HTML form to ignore events generated by the table component until the first time that the Create New Product button is clicked. To avoid confusing results, Listing 24-5 disables the skipWhile and distinctUntilChanged methods that were applied to the Observable.
...
constructor(private model: Model,
@Inject(SHARED_STATE) public stateEvents: Observable<SharedState>) {
Disabling Event Skipping in the form.component.ts File in the src/app/core Folder
Running the Example Project
Open a new command prompt, navigate to the exampleApp folder, and run the following command to start the data server:
npm run json
This command will start the json-server, which will listen for HTTP requests on port 3500. Open a new browser window and navigate to http://localhost:3500/products/2. The server will respond with the following data:
Leave the json-server running and use a separate command prompt to start the Angular development tools by running the following command in the exampleApp folder:
ng serve
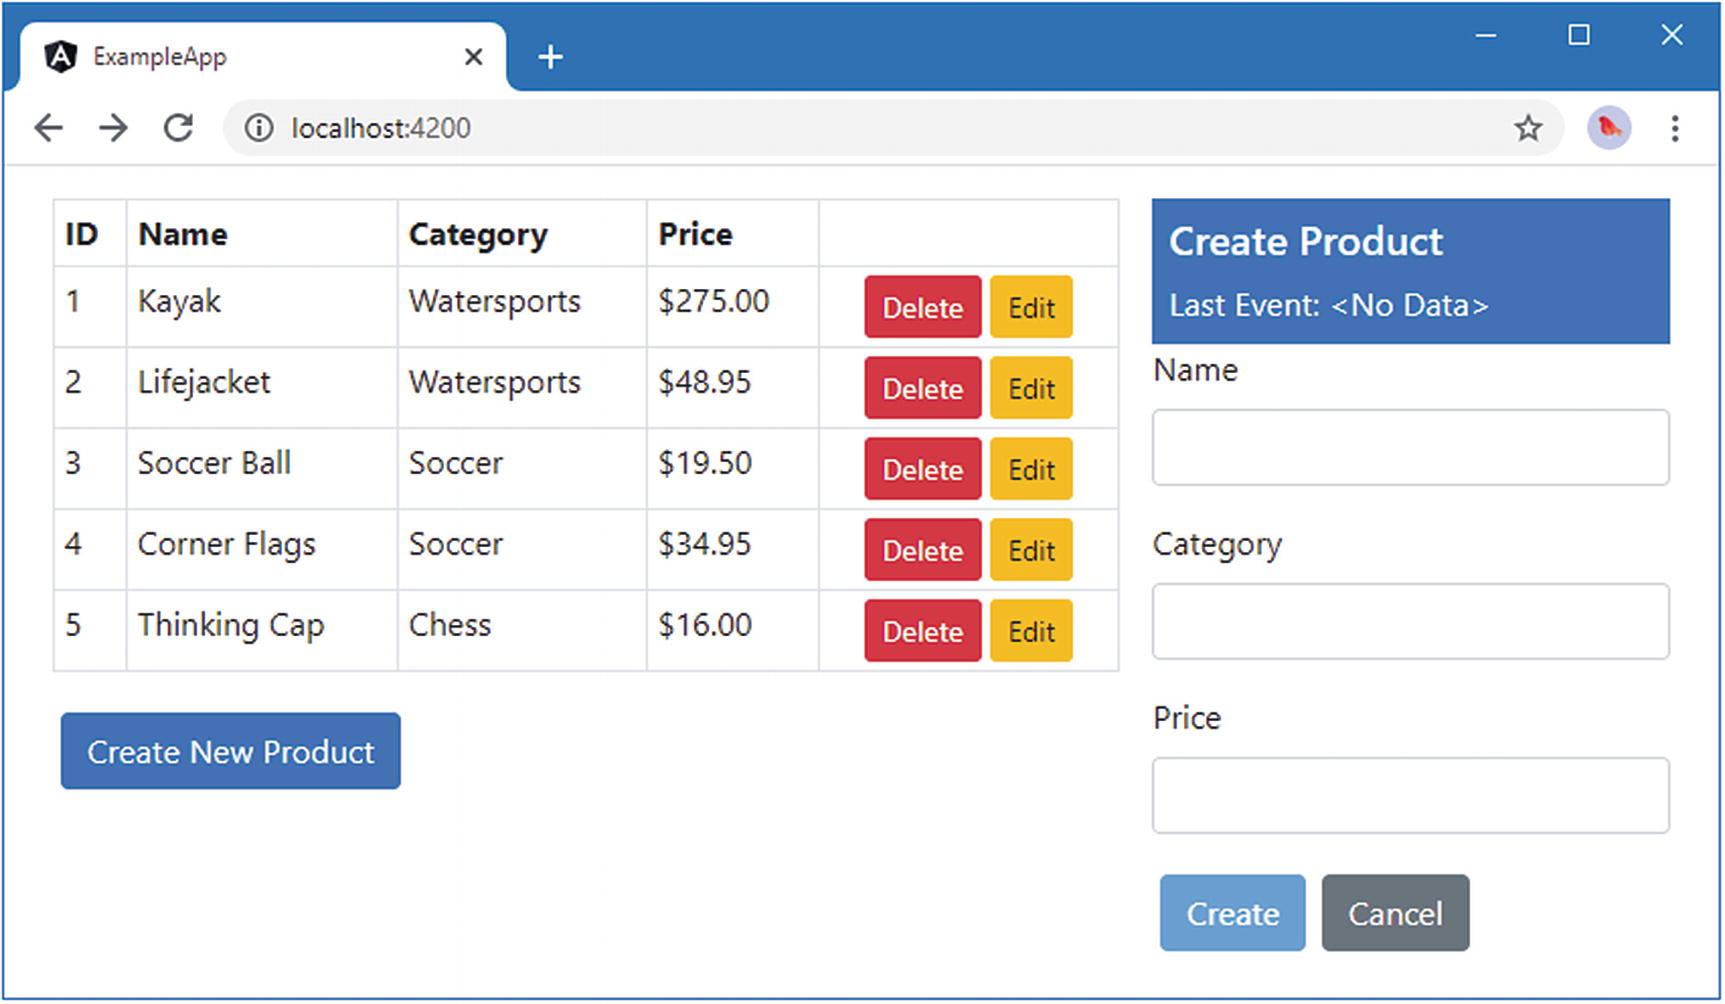
Use the browser to navigate to http://localhost:4200 to see the content illustrated in Figure 24-1.
Figure 24-1.
Running the example application
Understanding RESTful Web Services
The most common approach for delivering data to an application is to use the Representational State Transfer pattern, known as REST, to create a data web service. There is no detailed specification for REST, which leads to a lot of different approaches that fall under the RESTful banner. There are, however, some unifying ideas that are useful in web application development.
The core premise of a RESTful web service is to embrace the characteristics of HTTP so that request methods—also known as verbs—specify an operation for the server to perform, and the request URL specifies one or more data objects to which the operation will be applied.
As an example, here is a URL that might refer to a specific product in the example application:
http://localhost:3500/products/2
The first segment of the URL—products—is used to indicate the collection of objects that will be operated on and allows a single server to provide multiple services, each of which with its own data. The second segment—2—selects an individual object within the products collection. In the example, it is the value of the id property that uniquely identifies an object and that will be used in the URL, in this case, specifying the Lifejacket object.
The HTTP verb or method used to make the request tells the RESTful server what operation should be performed on the specified object. When you tested the RESTful server in the previous section, the browser sent an HTTP GET request, which the server interprets as an instruction to retrieve the specified object and send it to the client. It is for this reason that the browser displayed a JSON representation of the Lifejacket object.
Table 24-3 shows the most common combination of HTTP methods and URLs and explains what each of them does when sent to a RESTful server.
Table 24-3.
Common HTTP Verbs and Their Effect in a RESTful Web Service
Verb
URL
Description
GET
/products
This combination retrieves all the objects in the products collection.
GET
/products/2
This combination retrieves the object whose id is 2 from the products collection.
POST
/products
This combination is used to add a new object to the products collection. The request body contains a JSON representation of the new object.
PUT
/products/2
This combination is used to replace the object in the products collection whose id is 2. The request body contains a JSON representation of the replacement object.
PATCH
/products/2
This combination is used to update a subset of the properties of the object in the products collection whose id is 2. The request body contains a JSON representation of the properties to update and the new values.
DELETE
/products/2
This combination is used to delete the product whose id is 2 from the products collection.
Caution is required because there can be considerable differences in the way that some RESTful web services work, caused by differences in the frameworks used to create them and the preferences of the development team. It is important to confirm how a web service uses verbs and what is required in the URL and request body to perform operations.
Some common variations include web services that won’t accept any request bodies that contain id values (to ensure they are generated uniquely by the server’s data store) or any web services that don’t support all of the verbs (it is common to ignore PATCH requests and only accept updates using the PUT verb).
Replacing the Static Data Source
The best place to start with HTTP requests is to replace the static data source in the example application with one that retrieves data from the RESTful web service. This will provide a foundation for describing how Angular supports HTTP requests and how they can be integrated into an application.
Creating the New Data Source Service
To create a new data source, I added a file called rest.datasource.ts in the src/app/model folder and added the statements shown in Listing 24-6.
import { Injectable, Inject, InjectionToken } from "@angular/core";
import { HttpClient } from "@angular/common/http";
import { Observable } from "rxjs";
import { Product } from "./product.model";
export const REST_URL = new InjectionToken("rest_url");
@Injectable()
export class RestDataSource {
constructor(private http: HttpClient,
@Inject(REST_URL) private url: string) { }
getData(): Observable<Product[]> {
return this.http.get<Product[]>(this.url);
}
}
Listing 24-6.
The Contents of the rest.datasource.ts File in the src/app/model Folder
This is a simple-looking class, but there are some important features at work, which I described in the sections that follow.
Setting Up the HTTP Request
Angular provides the ability to make asynchronous HTTP requests through the HttpClient class, which is defined in the @angular/common/http JavaScript module and is provided as a service in the HttpClientModule feature module. The data source declared a dependency on the HttpClient class using its constructor, like this:
The other constructor argument is used so that the URL that requests are sent to doesn’t have to be hardwired into the data source. I’ll create a provider using the REST_URL opaque token when I configure the feature module. The HttpClient object received through the constructor is used to make an HTTP GET request in the data source’s getData method, like this:
...
getData(): Observable<Product[]> {
return this.http.get<Product[]>(this.url);
}
...
The HttpClient class defines a set of methods for making HTTP requests, each of which uses a different HTTP verb, as described in Table 24-4.
Table 24-4.
The HttpClient Methods
Name
Description
get(url)
This method sends a GET request to the specified URL.
post(url, body)
This method sends a POST request using the specified object as the body.
put(url, body)
This method sends a PUT request using the specified object as the body.
patch(url, body)
This method sends a PATCH request using the specified object as the body.
delete(url)
This method sends a DELETE request to the specified URL.
head(url)
This method sends a HEAD request, which has the same effect as a GET request except that the server will return only the headers and not the request body.
options(url)
This method sends an OPTIONS request to the specified URL.
request(method, url, options)
This method can be used to send a request with any verb, as described in the “Consolidating HTTP Requests” section.
Tip
The methods in Table 24-4 accept an optional configuration object, as demonstrated in the “Configuring Request Headers” section.
Processing the Response
The methods described in Table 24-4 accept a type parameter, which the HttpClient class uses to parse the response received from the server. The RESTful web server returns JSON data, which has become the de facto standard used by web services, and the HttpClient object will automatically convert the response into an Observable that yields an instance of the type parameter when it completes. This means that if you call the get method, for example, with a Product[] type parameter, then the response from the get method will be an Observable<Product[]> that represents the eventual response from the HTTP request.
...
getData(): Observable<Product[]> {
return this.http.get<Product[]>(this.url);
}
...
Caution
The methods in Table 24-4 prepare an HTTP request, but it isn’t sent to the server until the Observer object’s subscribe method is invoked. Be careful, though, because the request will be sent once per call to the subscribe method, which makes it easy to inadvertently send the same request multiple times.
Configuring the Data Source
The next step is to configure a provider for the new data source and to create a value-based provider to configure it with a URL to which requests will be sent. Listing 24-7 shows the changes to the model.module.ts file.
import { NgModule } from "@angular/core";
// import { StaticDataSource } from "./static.datasource";
import { Model } from "./repository.model";
import { HttpClientModule } from "@angular/common/http";
import { RestDataSource, REST_URL } from "./rest.datasource";
Configuring the Data Source in the model.module.ts File in the src/app/model Folder
The two new providers enable the RestDataSource class as a service and use the REST_URL opaque token to configure the URL for the web service. I removed the provider for the StaticDataSource class, which is no longer required.
Using the REST Data Source
The final step is to update the repository class so that it declares a dependency on the new data source and uses it to get the application data, as shown in Listing 24-8.
import { Injectable } from "@angular/core";
import { Product } from "./product.model";
//import { StaticDataSource } from "./static.datasource";
import { Observable } from "rxjs";
import { RestDataSource } from "./rest.datasource";
@Injectable()
export class Model {
private products: Product[] = new Array<Product>();
let index = this.products.findIndex(p => this.locator(p, id));
if (index > -1) {
this.products.splice(index, 1);
}
}
private generateID(): number {
let candidate = 100;
while (this.getProduct(candidate) != null) {
candidate++;
}
return candidate;
}
}
Listing 24-8.
Using the New Data Source in the repository.model.ts File in the src/app/model Folder
The constructor dependency has changed so that the repository will receive a RestDataSource object when it is created. Within the constructor, the data source’s getData method is called, and the subscribe method is used to receive the data objects that are returned from the server and process them.
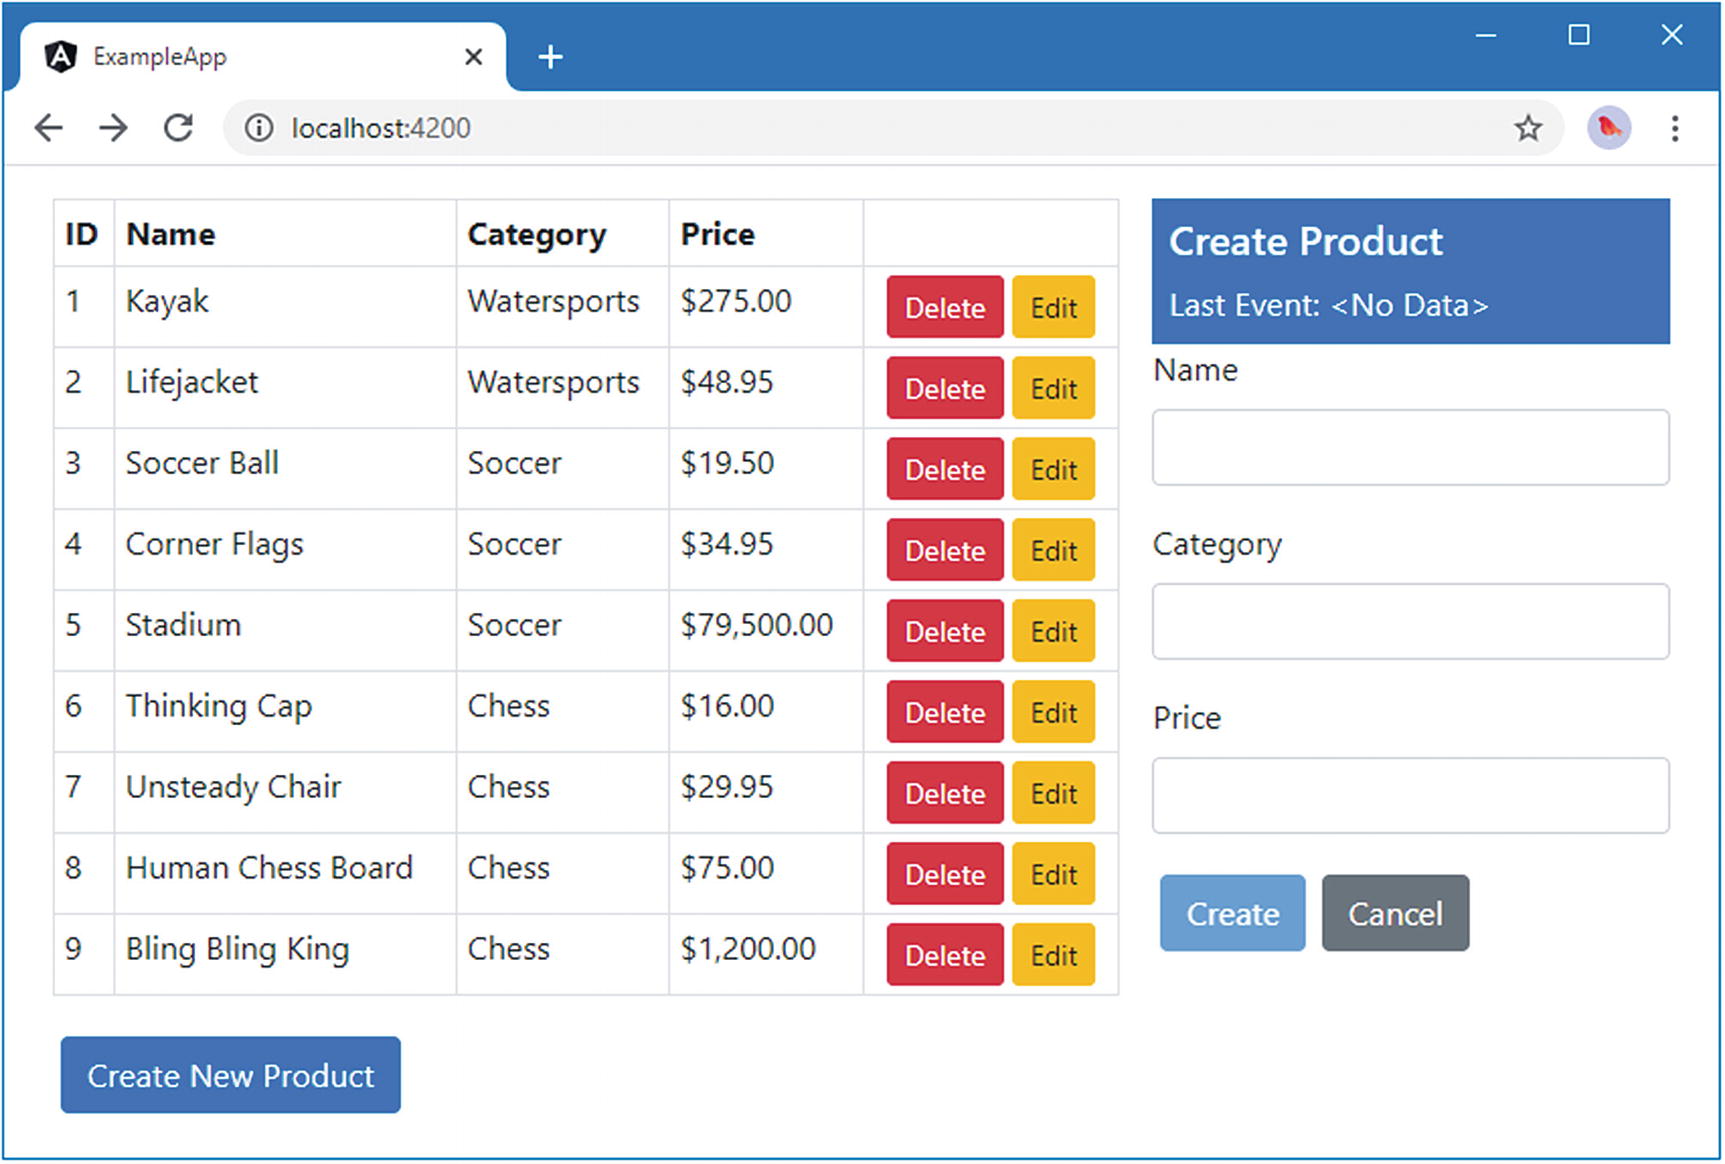
When you save the changes, the browser will reload the application, and the new data source will be used. An asynchronous HTTP request will be sent to the RESTful web service, which will return the larger set of data objects shown in Figure 24-2.
Figure 24-2.
Getting the application data
Saving and Deleting Data
The data source is able to get data from the server, but it also needs to send data the other way, persisting changes that the user makes to objects in the model and storing new objects that are created. Listing 24-9 adds methods to the data source class to send HTTP requests to save or update objects using the Angular HttpClient class.
import { Injectable, Inject, InjectionToken } from "@angular/core";
import { HttpClient } from "@angular/common/http";
import { Observable } from "rxjs";
import { Product } from "./product.model";
export const REST_URL = new InjectionToken("rest_url");
Sending Data in the rest.datasource.ts File in the src/app/model Folder
The saveProduct, updateProduct, and deleteProduct methods follow the same pattern: they call one of the HttpClient class methods and return an Observable<Product> as the result.
When saving a new object, the ID of the object is generated by the server so that it is unique and clients don’t inadvertently use the same ID for different objects. In this situation, the POST method is used, and the request is sent to the /products URL. When updating or deleting an existing object, the ID is already known, and a PUT request is sent to a URL that includes the ID. So, a request to update the object whose ID is 2, for example, is sent to the /products/2 URL. Similarly, to remove that object, a DELETE request would be sent to the same URL.
What these methods have in common is that the server is the authoritative data store, and the response from the server contains the official version of the object that has been saved by the server. It is this object that is returned as the result from these methods, provided through the Observable<Product>.
Listing 24-10 shows the corresponding changes in the repository class that take advantage of the new data source features.
import { Injectable } from "@angular/core";
import { Product } from "./product.model";
import { Observable } from "rxjs";
import { RestDataSource } from "./rest.datasource";
@Injectable()
export class Model {
private products: Product[] = new Array<Product>();
let index = this.products.findIndex(p => this.locator(p, id));
if (index > -1) {
this.products.splice(index, 1);
}
});
}
}
Listing 24-10.
Using the Data Source Features in the repository.model.ts File in the src/app/model Folder
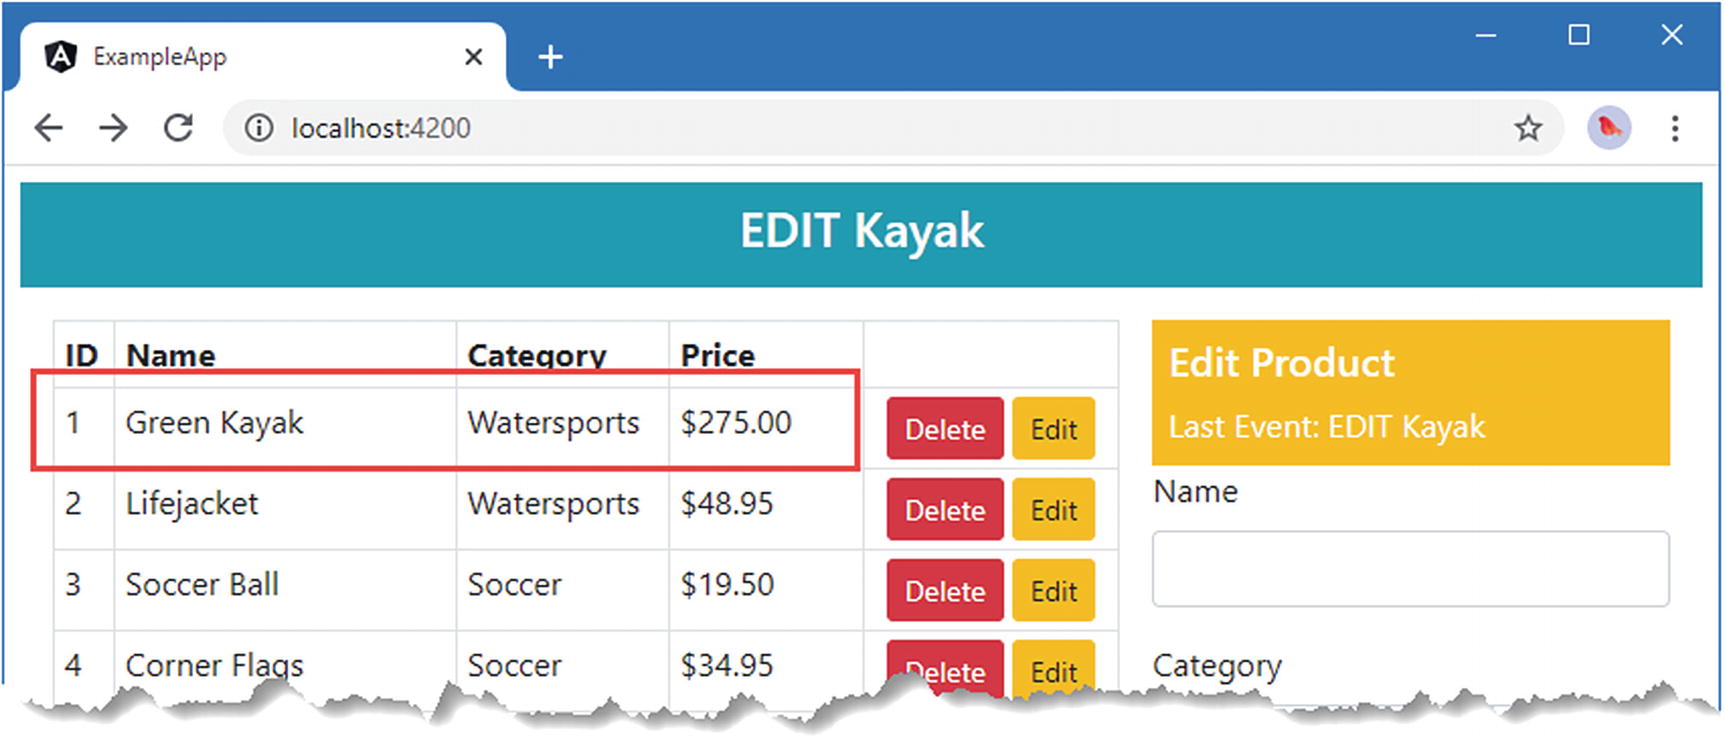
The changes use the data source to send updates to the server and use the results to update the locally stored data so that it is displayed by the rest of the application. To test the changes, click the Edit button for the Kayak product and change its name to Green Kayak. Click the Save button, and the browser will send an HTTP PUT request to the server, which will return a modified object that is added to the repository’s products array and is displayed in the table, as shown in Figure 24-3.
Figure 24-3.
Sending a PUT request to the server
You can check that the server has stored the changes by using the browser to request http://localhost:3500/products/1, which will produce the following representation of the object:
{
"id": 1,
"name": "Green Kayak",
"category": "Watersports",
"price": 275
}
Consolidating HTTP Requests
Each of the methods in the data source class duplicates the same basic pattern of sending an HTTP request using a verb-specific HttpClient method. This means that any change to the way that HTTP requests are made has to be repeated in four different places, ensuring that the requests that use the GET, POST, PUT, and DELETE verbs are all correctly updated and performed consistently.
The HttpClient class defines the request method, which allows the HTTP verb to be specified as an argument. Listing 24-11 uses the request method to consolidate the HTTP requests in the data source class.
import { Injectable, Inject, InjectionToken } from "@angular/core";
import { HttpClient } from "@angular/common/http";
import { Observable } from "rxjs";
import { Product } from "./product.model";
export const REST_URL = new InjectionToken("rest_url");
Consolidating HTTP Requests in the rest.datasource.ts File in the src/app/model Folder
The request method accepts the HTTP verb, the URL for the request, and an optional object that is used to configure the request. The configuration object is used to set the request body using the body property, and the HttpClient will automatically take care of encoding the body object and including a serialized representation of it in the request.
Table 24-5 describes the most useful properties that can be specified to configure an HTTP request made using the request method.
This property returns an HttpHeaders object that allows the request headers to be specified, as described in the “Configuring Request Headers” section.
body
This property is used to set the request body. The object assigned to this property will be serialized as JSON when the request is sent.
withCredentials
When true, this property is used to include authentication cookies when making cross-site requests. This setting must be used only with servers that include the Access-Control-Allow-Credentials header in responses, as part of the Cross-Origin Resource Sharing (CORS) specification. See the “Making Cross-Origin Requests” section for details.
responseType
This property is used to specify the type of the response expected from the server. The default value is json, indicating the JSON data format.
Making Cross-Origin Requests
By default, browsers enforce a security policy that allows JavaScript code to make asynchronous HTTP requests only within the same origin as the document that contains them. This policy is intended to reduce the risk of cross-site scripting (CSS) attacks, where the browser is tricked into executing malicious code. The details of this attack are beyond the scope of this book, but the article available at http://en.wikipedia.org/wiki/Cross-site_scripting provides a good introduction to the topic.
For Angular developers, the same-origin policy can be a problem when using web services because they are typically outside of the origin that contains the application’s JavaScript code. Two URLs are considered to be in the same origin if they have the same protocol, host, and port and have different origins if this is not the case. The URL for the HTML file that contains the example application’s JavaScript code is http://localhost:3000/index.html. Table 24-6 summarizes how similar URLs have the same or different origins, compared with the application’s URL.
As the table shows, the URL for the RESTful web service, http://localhost:3500/products, has a different origin because it uses a different port from the main application.
HTTP requests made using the Angular HttpClient class will automatically use Cross-Origin Resource Sharing to send requests to different origins. With CORS, the browser includes headers in the asynchronous HTTP request that provide the server with the origin of the JavaScript code. The response from the server includes headers that tell the browser whether it is willing to accept the request. The details of CORS are outside the scope of this book, but there is an introduction to the topic at https://en.wikipedia.org/wiki/Cross-origin_resource_sharing, and the CORS specification is available at www.w3.org/TR/cors.
For the Angular developer, CORS is something that is taken care of automatically, just as long as the server that receives asynchronous HTTP requests supports the specification. The json-server package that has been providing the RESTful web service for the examples supports CORS and will accept requests from any origin, which is why the examples have been working. If you want to see CORS in action, use the browser’s F12 developer tools to watch the network requests that are made when you edit or create a product. You may see a request made using the OPTIONS verb, known as the preflight request, which the browser uses to check that it is allowed to make the POST or PUT request to the server. This request and the subsequent request that sends the data to the server will contain an Origin header, and the response will contain one or more Access-Control-Allow headers, through which the server sets out what it is willing to accept from the client.
All of this happens automatically, and the only configuration option is the withCredentials property that was described in Table 24-5. When this property is true, the browser will include authentication cookies, and headers from the origin will be included in the request to the server.
Using JSONP Requests
CORS is available only if the server to which the HTTP requests are sent supports it. For servers that don’t implement CORS, Angular also provides support for JSONP, which allows a more limited form of cross-origin requests.
JSONP works by adding a script element to the Document Object Model that specifies the cross-origin server in its src attribute. The browser sends a GET request to the server, which returns JavaScript code that, when executed, provides the application with the data it requires. JSONP is, essentially, a hack that works around the browser’s same-origin security policy. JSONP can be used only to make GET requests, and it presents greater security risks than CORS. As a consequence, JSONP should be used only when CORS isn’t available.
The Angular support for JSONP is defined in a feature module called HttpClientJsonpModule, which is defined in the @angular/common/http JavaScript module. To enable JSONP, Listing 24-12 adds HttpClientJsonpModule to the set of imports for the model module.
import { NgModule } from "@angular/core";
//import { StaticDataSource } from "./static.datasource";
import { Model } from "./repository.model";
import { HttpClientModule, HttpClientJsonpModule } from "@angular/common/http";
import { RestDataSource, REST_URL } from "./rest.datasource";
Enabling JSONP in the model.module.ts File in the src/app/model Folder
Angular provides support for JSONP through the HttpClient service, which takes care of managing the JSONP HTTP request and processing the response, which can otherwise be a tedious and error-prone process. Listing 24-13 shows the data source using JSONP to request the initial data for the application.
import { Injectable, Inject, InjectionToken } from "@angular/core";
import { HttpClient } from "@angular/common/http";
import { Observable } from "rxjs";
import { Product } from "./product.model";
export const REST_URL = new InjectionToken("rest_url");
Making a JSONP Request in the rest.datasource.ts File in the src/app/model Folder
JSONP can be used only for get requests, which are sent using the HttpClient.jsonp method. When you call this method, you must provide the URL for the request and the name for the callback parameter, which must be set to callback, like this:
When Angular makes the HTTP request, it creates a URL with the name of a dynamically generated function. If you look at the network requests that the browser makes, you will see that the initial request is sent to a URL like this one:
The server JavaScript function matches the name used in the URL and passes it the data received from the request. JSONP is a more limited way to make cross-origin requests, and, unlike CORS, it skirts around the browser’s security policy, but it can be a useful fallback in a pinch.
Configuring Request Headers
If you are using a commercial RESTful web service, you will often have to set a request header to provide an API key so that the server can associate the request with your application for the purposes of access control and billing. You can set this kind of header—or any other header—by configuring the configuration object that is passed to the request method, as shown in Listing 24-14. (This listing also returns to using the request method for all requests, rather than JSONP.)
import { Injectable, Inject, InjectionToken } from "@angular/core";
import { HttpClient, HttpHeaders } from "@angular/common/http";
import { Observable } from "rxjs";
import { Product } from "./product.model";
export const REST_URL = new InjectionToken("rest_url");
Setting a Request Header in the rest.datasource.ts File in the src/app/model Folder
The headers property is set to an HttpHeaders object, which can be created using a map object of properties that correspond to header names and the values that should be used for them. If you use the browser’s F12 developer tools to inspect the asynchronous HTTP requests, you will see that the two headers specified in the listing are sent to the server along with the standard headers that the browser creates, like this:
...
Accept:*/*
Accept-Encoding:gzip, deflate, sdch, br
Accept-Language:en-US,en;q=0.8
access-key:<secret>
application-name:exampleApp
Connection:keep-alive
...
If you have more complex demands for request headers, then you can use the methods defined by the HttpHeaders class, as described in Table 24-7.
Table 24-7.
The HttpHeaders Methods
Name
Description
keys()
Returns all the header names in the collection
get(name)
Returns the first value for the specified header
getAll(name)
Returns all the values for the specified header
has(name)
Returns true if the collection contains the specified header
set(header, value)
Returns a new HttpHeaders object that replaces all existing values for the specified header with a single value
set(header, values)
Returns a new HttpHeaders object that replaces all existing values for the specified header with an array of values
append(name, value)
Appends a value to the list of values for the specified header
delete(name)
Removes the specified header from the collection
HTTP headers can have multiple values, which is why there are methods that append values for headers or replace all the values in the collection. Listing 24-15 creates an empty HttpHeaders object and populates it with headers that have multiple values.
Setting Multiple Header Values in the rest.datasource.ts File in the src/app/model Folder
When the browser sends requests to the server, they will include the following headers:
...
Accept:*/*
Accept-Encoding:gzip, deflate, sdch, br
Accept-Language:en-US,en;q=0.8
access-key:<secret>
application-names:exampleApp,proAngular
Connection:keep-alive
...
Handling Errors
At the moment, there is no error handling in the application, which means that Angular doesn’t know what to do if there is a problem with an HTTP request. To make it easy to generate an error, I have added a button to the product table that will lead to an HTTP request to delete an object that doesn’t exist at the server, as shown in Listing 24-16.
Adding an Error Button in the table.component.html File in the src/app/core Folder
The button element invokes the component’s deleteProduct method with an argument of -1. The component will ask the repository to delete this object, which will lead to an HTTP DELETE request being sent to /products/-1, which does not exist. If you open the browser’s JavaScript console and click the new button, you will see the response from the server displayed, like this:
Improving this situation means detecting this kind of error when one occurs and notifying the user, who won’t typically be looking at the JavaScript console. A real application might also respond to errors by logging them so they can be analyzed later, but I am going to keep things simple and just display an error message.
Generating User-Ready Messages
The first step in handling errors is to convert the HTTP exception into something that can be displayed to the user. The default error message, which is the one written to the JavaScript console, contains too much information to display to the user. Users don’t need to know the URL that the request was sent to; just having a sense of the kind of problem that has occurred will be enough.
The best way to transform error messages is to use the catchError and throwError methods. The catchError method is used with the pipe method to receive any errors that occur within an Observable sequence, and the throwError method is used to create a new Observable that just contains the error. Listing 24-17 applies both methods to the data source.
import { Injectable, Inject, InjectionToken } from "@angular/core";
import { HttpClient, HttpHeaders } from "@angular/common/http";
import { Observable, throwError } from "rxjs";
import { Product } from "./product.model";
import { catchError } from "rxjs/operators";
export const REST_URL = new InjectionToken("rest_url");
Transforming Errors in the rest.datasource.ts File in the src/app/model Folder
The function passed to the catchError method is invoked when there is an error and receives the Response object that describes the outcome. The throwError function creates a new observable that contains just an error object, which in this case is used to generate an error message that contains the HTTP status code and status text from the response.
If you save the changes and then click the Generate HTTP Error button again, the error message will still be written to the browser’s JavaScript console but will have changed to the format produced by the catchError/throwError methods.
EXCEPTION: Network Error: Not Found (404)
Handling the Errors
The errors have been transformed but not handled, which is why they are still being reported as exceptions in the browser’s JavaScript console. There are two ways in which the errors can be handled. The first is to provide an error-handling function to the subscribe method for the Observable objects created by the HttpClient object. This is a useful way to localize the error and provide the repository with the opportunity to retry the operation or try to recover in some other way.
The second approach is to replace the built-in Angular error-handling feature, which responds to any unhandled errors in the application and, by default, writes them to the console. It is this feature that writes out the messages shown in the previous sections.
For the example application, I want to override the default error handler with one that uses the message service. I created a file called errorHandler.ts in the src/app/messages folder and used it to define the class shown in Listing 24-18.
import { ErrorHandler, Injectable, NgZone } from "@angular/core";
import { MessageService } from "./message.service";
import { Message } from "./message.model";
@Injectable()
export class MessageErrorHandler implements ErrorHandler {
let msg = error instanceof Error ? error.message : error.toString();
this.ngZone.run(() => this.messageService
.reportMessage(new Message(msg, true)), 0);
}
}
Listing 24-18.
The Contents of the errorHandler.ts File in the src/app/messages Folder
The ErrorHandler class is defined in the @angular/core module and responds to errors through a handleError method. The class shown in the listing replaces the default implementation of this method with one that uses the MessageService to report an error.
The constructor receives an ngZone object, which is part of the Angular support for asynchronous operations and is an essential part of the change detection feature. In this listing, the ngZone object’s run method is used to report an error message so that the operation will trigger the change detection process and display the error to the user.
To replace the default ErrorHandler, I used a class provider in the message module, as shown in Listing 24-19.
import { NgModule, ErrorHandler } from "@angular/core";
import { BrowserModule } from "@angular/platform-browser";
import { MessageComponent } from "./message.component";
import { MessageService } from "./message.service";
import { MessageErrorHandler } from "./errorHandler";
Configuring an Error Handler in the message.module.ts File in the src/app/messages Folder
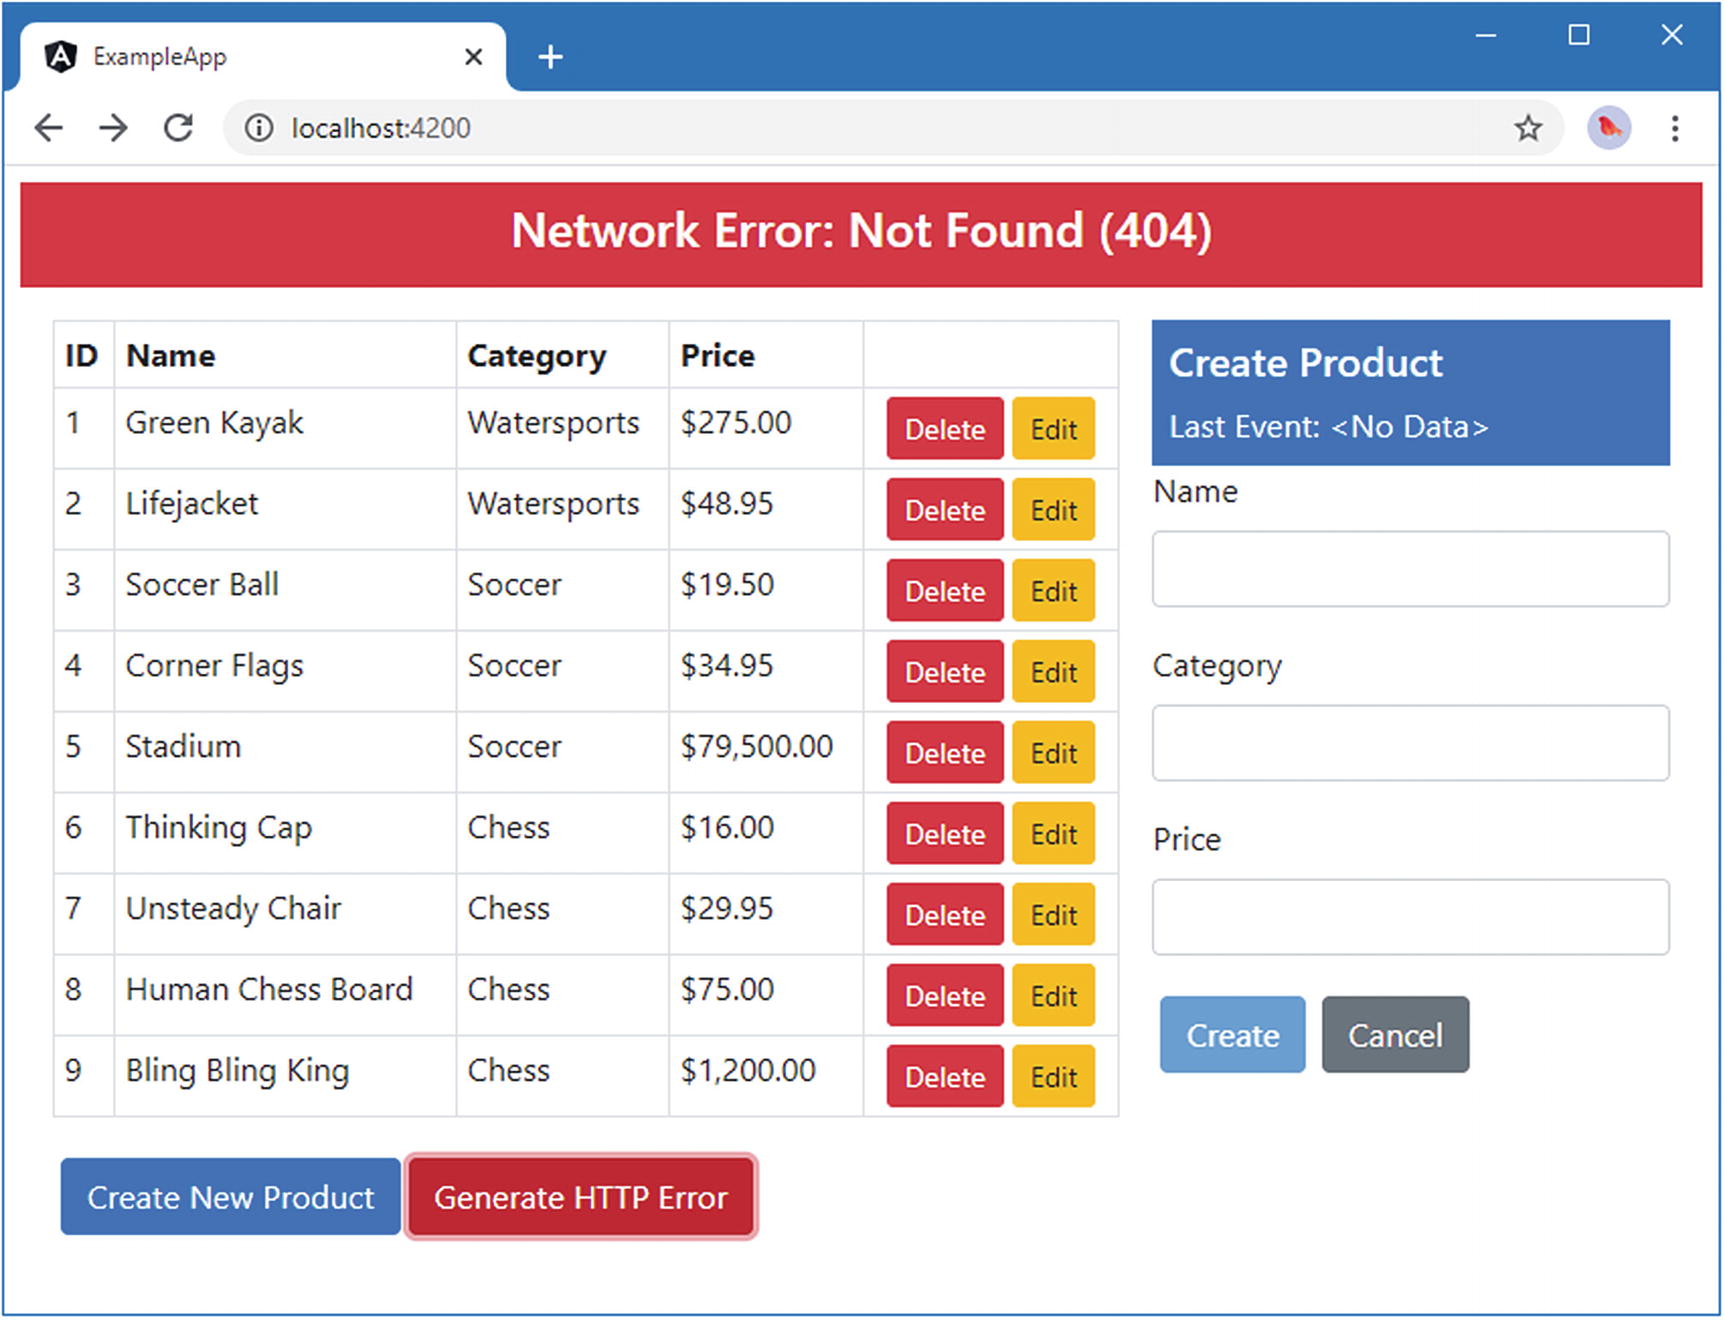
The error handling function uses the MessageService to report an error message to the user. Once these changes have been saved, clicking the Generate HTTP Error button produces an error that the user can see, as shown in Figure 24-4.
Figure 24-4.
Handling an HTTP error
Summary
In this chapter, I explained how to make asynchronous HTTP requests in Angular applications. I introduced RESTful web services and the methods provided by the Angular HttpClient class that can be used to interact with them. I explained how the browser restricts requests to different origins and how Angular supports CORS and JSONP to make requests outside of the application’s origin. In the next chapter, I introduce the URL routing feature, which allows for navigating complex applications.