© Adam Freeman 2020
A. FreemanPro Angular 9https://doi.org/10.1007/978-1-4842-5998-6_26

26. Routing and Navigation: Part 2

Adam Freeman1 
(1)
London, UK
 
In the previous chapter, I introduced the Angular URL routing system and explained how it can be used to control the components that are displayed to the user. The routing system has a lot of features, which I continue to describe in this chapter and in Chapter 27. This emphasis in this chapter is about creating more complex routes, including routes that will match any URL, routes that redirect the browser to other URLs, routes that navigate within a component, and routes that select multiple components. Table 26-1 summarizes the chapter.
Table 26-1.

Chapter Summary

Problem

Solution

Listing

Matching multiple URLs with a single route

Use routing wildcards

1–9

Redirecting one URL to another

Use a redirection route

10

Navigating within a component

Use a relative URL

11

Receiving notifications when the activated URL changes

Use the Observable objects provided by the ActivatedRoute class

12

Styling an element when a specific route is active

Use the routerLinkActive attribute

13–16

Using the routing system to display nested components

Define child routes and use the router-outlet element

17–21

Preparing the Example Project

For this chapter, I will continue using the exampleApp project that was created in Chapter 22 and has been modified in each subsequent chapter. To prepare for this chapter, I have added two methods to the repository class, as shown in Listing 26-1.

Tip

You can download the example project for this chapter—and for all the other chapters in this book—from https://github.com/Apress/pro-angular-9. See Chapter 1 for how to get help if you have problems running the examples.

import { Injectable } from "@angular/core";
import { Product } from "./product.model";
import { Observable } from "rxjs";
import { RestDataSource } from "./rest.datasource";
@Injectable()
export class Model {
    private products: Product[] = new Array<Product>();
    private locator = (p: Product, id: number) => p.id == id;
    constructor(private dataSource: RestDataSource) {
        this.dataSource.getData().subscribe(data => this.products = data);
    }
    getProducts(): Product[] {
        return this.products;
    }
    getProduct(id: number): Product {
        return this.products.find(p => this.locator(p, id));
    }
    getNextProductId(id: number): number {
        let index = this.products.findIndex(p => this.locator(p, id));
        if (index > -1) {
            return this.products[this.products.length > index + 2
                ? index + 1 : 0].id;
        } else {
            return id || 0;
        }
    }
    getPreviousProductid(id: number): number {
        let index = this.products.findIndex(p => this.locator(p, id));
        if (index > -1) {
            return this.products[index > 0
                ? index - 1 : this.products.length - 1].id;
        } else {
            return id || 0;
        }
    }
    saveProduct(product: Product) {
        if (product.id == 0 || product.id == null) {
            this.dataSource.saveProduct(product)
                .subscribe(p => this.products.push(p));
        } else {
            this.dataSource.updateProduct(product).subscribe(p => {
                let index = this.products
                    .findIndex(item => this.locator(item, p.id));
                this.products.splice(index, 1, p);
            });
        }
    }
    deleteProduct(id: number) {
        this.dataSource.deleteProduct(id).subscribe(() => {
            let index = this.products.findIndex(p => this.locator(p, id));
            if (index > -1) {
                this.products.splice(index, 1);
            }
        });
    }
}
Listing 26-1.

Adding Methods in the repository.model.ts File in the src/app/model Folder

The new methods accept an ID value, locate the corresponding product, and then return the IDs of the next and previous objects in the array that the repository uses to collect the data model objects. I will use this feature later in the chapter to allow the user to page through the set of objects in the data model.

To simplify the example, Listing 26-2 removes the statements in the form component that receive the details of the product to edit using optional route parameters. I also changed the access level for the constructor parameters so I can use them directly in the component’s template.
import { Component, Inject } from "@angular/core";
import { NgForm } from "@angular/forms";
import { Product } from "../model/product.model";
import { Model } from "../model/repository.model";
import { ActivatedRoute, Router } from "@angular/router";
@Component({
    selector: "paForm",
    templateUrl: "form.component.html",
    styleUrls: ["form.component.css"]
})
export class FormComponent {
    product: Product = new Product();
    constructor(public model: Model, activeRoute: ActivatedRoute,
        public router: Router) {
        this.editing = activeRoute.snapshot.params["mode"] == "edit";
        let id = activeRoute.snapshot.params["id"];
        if (id != null) {
            Object.assign(this.product, model.getProduct(id) || new Product());
        }
    }
    editing: boolean = false;
    submitForm(form: NgForm) {
        if (form.valid) {
            this.model.saveProduct(this.product);
            this.router.navigateByUrl("/");
        }
    }
    resetForm() {
        this.product = new Product();
    }
}
Listing 26-2.

Removing Optional Parameters in the form.component.ts File in the src/app/core Folder

Listing 26-3 removes the optional parameters from the table component’s template so they are not included in the navigation URLs for the Edit buttons.
<table class="table table-sm table-bordered table-striped">
    <tr>
        <th>ID</th><th>Name</th><th>Category</th><th>Price</th><th></th>
    </tr>
    <tr *ngFor="let item of getProducts()">
        <td>{{item.id}}</td>
        <td>{{item.name}}</td>
        <td>{{item.category}}</td>
        <td>{{item.price | currency:"USD" }}</td>
        <td class="text-center">
            <button class="btn btn-danger btn-sm mr-1"
                    (click)="deleteProduct(item.id)">
                Delete
            </button>
            <button class="btn btn-warning btn-sm"
                [routerLink]="['/form', 'edit', item.id]">
                Edit
            </button>
        </td>
    </tr>
</table>
<button class="btn btn-primary m-1" routerLink="/form/create">
    Create New Product
</button>
<button class="btn btn-danger" (click)="deleteProduct(-1)">
    Generate HTTP Error
</button>
Listing 26-3.

Removing Route Parameters in the table.component.html File in the src/app/core Folder

Adding Components to the Project

I need to add some components to the application to demonstrate some of the features covered in this chapter. These components are simple because I am focusing on the routing system, rather than adding useful features to the application. I created a file called productCount.component.ts in the src/app/core folder and used it to define the component shown in Listing 26-4.

Tip

You can omit the selector attribute from the @Component decorator if a component is going to be displayed only through the routing system. I tend to add it anyway so that I can apply the component using an HTML element as well.

import {
    Component, KeyValueDiffer, KeyValueDiffers, ChangeDetectorRef
} from "@angular/core";
import { Model } from "../model/repository.model";
@Component({
    selector: "paProductCount",
    template: `<div class="bg-info text-white p-2">There are
                  {{count}} products
               </div>`
})
export class ProductCountComponent {
    private differ: KeyValueDiffer<any, any>;
    count: number = 0;
    constructor(private model: Model,
        private keyValueDiffers: KeyValueDiffers,
        private changeDetector: ChangeDetectorRef) { }
    ngOnInit() {
        this.differ = this.keyValueDiffers
            .find(this.model.getProducts())
            .create();
    }
    ngDoCheck() {
        if (this.differ.diff(this.model.getProducts()) != null) {
            this.updateCount();
        }
    }
    private updateCount() {
        this.count = this.model.getProducts().length;
    }
}
Listing 26-4.

The Contents of the productCount.component.ts File in the src/app/core Folder

This component uses an inline template to display the number of products in the data model, which is updated when the data model changes. Next, I added a file called categoryCount.component.ts in the src/app/core folder and defined the component shown in Listing 26-5.
import {
    Component, KeyValueDiffer, KeyValueDiffers, ChangeDetectorRef
} from "@angular/core";
import { Model } from "../model/repository.model";
@Component({
    selector: "paCategoryCount",
    template: `<div class="bg-primary p-2 text-white">
                    There are {{count}} categories
               </div>`
})
export class CategoryCountComponent {
    private differ: KeyValueDiffer<any, any>;
    count: number = 0;
    constructor(private model: Model,
        private keyValueDiffers: KeyValueDiffers,
        private changeDetector: ChangeDetectorRef) { }
    ngOnInit() {
        this.differ = this.keyValueDiffers
            .find(this.model.getProducts())
            .create();
    }
    ngDoCheck() {
        if (this.differ.diff(this.model.getProducts()) != null) {
            this.count = this.model.getProducts()
                .map(p => p.category)
                .filter((category, index, array) => array.indexOf(category) == index)
                .length;
        }
    }
}
Listing 26-5.

The Contents of the categoryCount.component.ts File in the src/app/core Folder

This component uses a differ to track changes in the data model and count the number of unique categories, which is displayed using a simple inline template. For the final component, I added a file called notFound.component.ts in the src/app/core folder and used it to define the component shown in Listing 26-6.
import { Component } from "@angular/core";
@Component({
    selector: "paNotFound",
    template: `<h3 class="bg-danger text-white p-2">Sorry, something went wrong</h3>
               <button class="btn btn-primary" routerLink="/">Start Over</button>`
})
export class NotFoundComponent {}
Listing 26-6

The notFound.component.ts File in the src/app/core Folder

This component displays a static message that will be shown when something goes wrong with the routing system. Listing 26-7 adds the new components to the core module.
import { NgModule } from "@angular/core";
import { BrowserModule } from "@angular/platform-browser";
import { FormsModule } from "@angular/forms";
import { ModelModule } from "../model/model.module";
import { TableComponent } from "./table.component";
import { FormComponent } from "./form.component";
import { Subject } from "rxjs";
import { StatePipe } from "./state.pipe";
import { MessageModule } from "../messages/message.module";
import { MessageService } from "../messages/message.service";
import { Message } from "../messages/message.model";
import { Model } from "../model/repository.model";
import { RouterModule } from "@angular/router";
import { ProductCountComponent } from "./productCount.component";
import { CategoryCountComponent } from "./categoryCount.component";
import { NotFoundComponent } from "./notFound.component";
@NgModule({
    imports: [BrowserModule, FormsModule, ModelModule, MessageModule, RouterModule],
    declarations: [TableComponent, FormComponent, StatePipe,
        ProductCountComponent, CategoryCountComponent, NotFoundComponent],
    exports: [ModelModule, TableComponent, FormComponent]
})
export class CoreModule { }
Listing 26-7.

Declaring Components in the core.module.ts File in the src/app/core Folder

Open a new command prompt, navigate to the exampleApp folder, and run the following command to start the server that provides the RESTful web server:
npm run json
Open a separate command prompt, navigate to the exampleApp folder, and run the following command to start the Angular development tools:
ng serve
Open a new browser window and navigate to http://localhost:4200 to see the content shown in Figure 26-1.
../images/421542_4_En_26_Chapter/421542_4_En_26_Fig1_HTML.jpg
Figure 26-1.

Running the example application

Using Wildcards and Redirections

The routing configuration in an application can quickly become complex and contain redundancies and oddities to cater to the structure of an application. Angular provides two useful tools that can help simplify routes and also deal with problems when they arise, as described in the following sections.

Using Wildcards in Routes

The Angular routing system supports a special path, denoted by two asterisks (the ** characters), that allows routes to match any URL. The basic use of the wildcard path is to deal with navigation that would otherwise create a routing error. Listing 26-8 adds a button to the table component’s template that navigates to a route that hasn’t been defined by the application’s routing configuration.
<table class="table table-sm table-bordered table-striped">
    <tr>
        <th>ID</th><th>Name</th><th>Category</th><th>Price</th><th></th>
    </tr>
    <tr *ngFor="let item of getProducts()">
        <td>{{item.id}}</td>
        <td>{{item.name}}</td>
        <td>{{item.category}}</td>
        <td>{{item.price | currency:"USD" }}</td>
        <td class="text-center">
            <button class="btn btn-danger btn-sm mr-1"
                    (click)="deleteProduct(item.id)">
                Delete
            </button>
            <button class="btn btn-warning btn-sm"
                [routerLink]="['/form', 'edit', item.id]">
                Edit
            </button>
        </td>
    </tr>
</table>
<button class="btn btn-primary m-1" routerLink="/form/create">
    Create New Product
</button>
<button class="btn btn-danger" (click)="deleteProduct(-1)">
    Generate HTTP Error
</button>
<button class="btn btn-danger m-1" routerLink="/does/not/exist">
    Generate Routing Error
</button>
Listing 26-8.

Adding a Button in the table.component.html File in the src/app/core Folder

Clicking the button will ask the application to navigate to the URL /does/not/exist, for which there is no route configured. When a URL doesn’t match a URL, an error is thrown, which is then picked up and processed by the error handling class, which leads to a warning being displayed by the message component, as shown in Figure 26-2.
../images/421542_4_En_26_Chapter/421542_4_En_26_Fig2_HTML.jpg
Figure 26-2.

The default navigation error

This isn’t a useful way to deal with an unknown route because the user won’t know what routes are and may not realize that the application was trying to navigate to the problem URL.

A better approach is to use the wildcard route to handle navigation for URLs that have not been defined and select a component that will present a more useful message to the user, as illustrated in Listing 26-9.
import { Routes, RouterModule } from "@angular/router";
import { TableComponent } from "./core/table.component";
import { FormComponent } from "./core/form.component";
import { NotFoundComponent } from "./core/notFound.component";
const routes: Routes = [
    { path: "form/:mode/:id", component: FormComponent },
    { path: "form/:mode", component: FormComponent },
    { path: "", component: TableComponent },
    { path: "**", component: NotFoundComponent }
]
export const routing = RouterModule.forRoot(routes);
Listing 26-9.

Adding a Wildcard Route in the app.routing.ts File in the src/app Folder
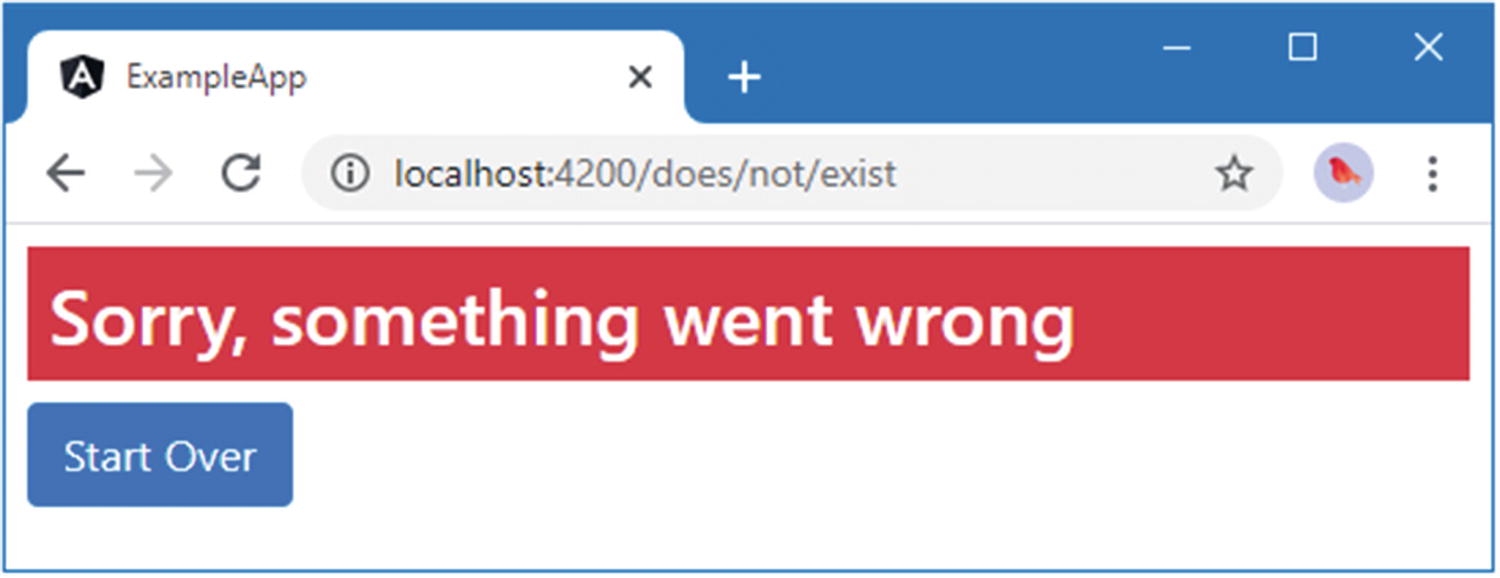
The new route in the listing uses the wildcard to select the NotFoundComponent, which displays the message shown in Figure 26-3 when the Generate Routing Error button is clicked.
../images/421542_4_En_26_Chapter/421542_4_En_26_Fig3_HTML.jpg
Figure 26-3.

Using a wildcard route

Clicking the Start Over button navigates to the / URL, which will select the table component for display.

Using Redirections in Routes

Routes do not have to select components; they can also be used as aliases that redirect the browser to a different URL. Redirections are defined using the redirectTo property in a route, as shown in Listing 26-10.
import { Routes, RouterModule } from "@angular/router";
import { TableComponent } from "./core/table.component";
import { FormComponent } from "./core/form.component";
import { NotFoundComponent } from "./core/notFound.component";
const routes: Routes = [
    { path: "form/:mode/:id", component: FormComponent },
    { path: "form/:mode", component: FormComponent },
    { path: "does", redirectTo: "/form/create", pathMatch: "prefix" },
    { path: "table", component: TableComponent },
    { path: "", redirectTo: "/table", pathMatch: "full" },
    { path: "**", component: NotFoundComponent }
]
export const routing = RouterModule.forRoot(routes);
Listing 26-10.

Using Route Redirection in the app.routing.ts File in the src/app Folder

The redirectTo property is used to specify the URL that the browser will be redirected to. When defining redirections, the pathMatch property must also be specified, using one of the values described in Table 26-2.
Table 26-2.

The pathMatch Values

Name

Description

prefix

This value configures the route so that it matches URLs that start with the specified path, ignoring any subsequent segments.

full

This value configures the route so that it matches only the URL specified by the path property.

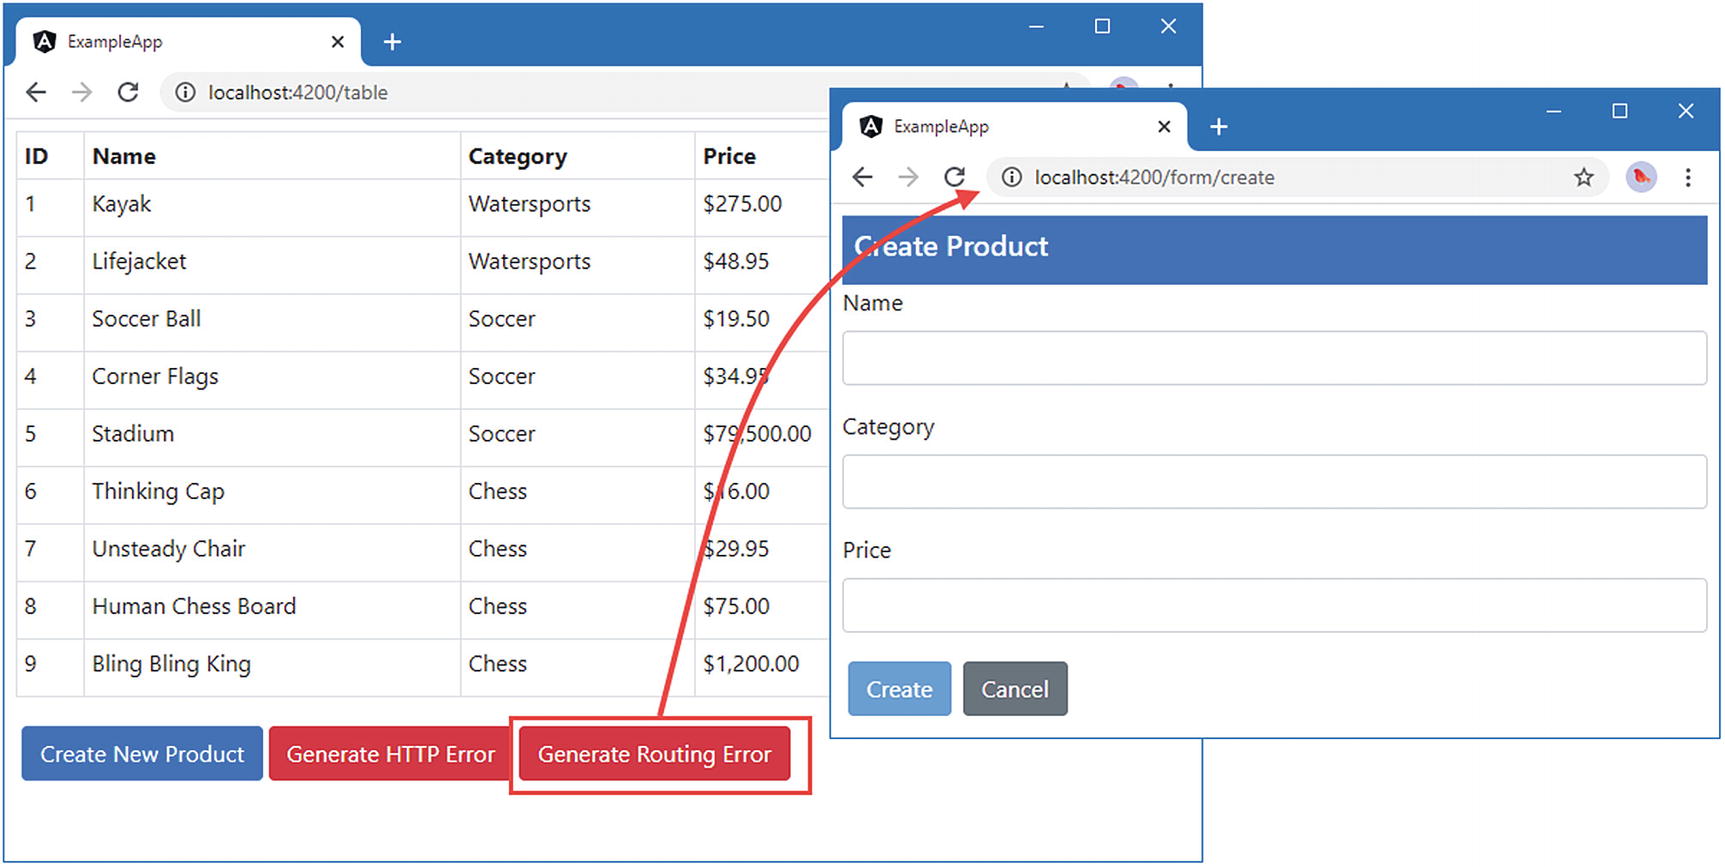
The first route added in Listing 26-10 specifies a pathMatch value of prefix and a path of does, which means it will match any URL whose first segment is does, such as the /does/not/exist URL that is navigated to by the Generate Routing Error button. When the browser navigates to a URL that has this prefix, the routing system will redirect it to the /form/create URL, as shown in Figure 26-4.
../images/421542_4_En_26_Chapter/421542_4_En_26_Fig4_HTML.jpg
Figure 26-4.

Performing a route redirection

The other routes in Listing 26-10 redirect the empty path to the /table URL, which displays the table component. This is a common technique that makes the URL schema more obvious because it matches the default URL (http://localhost:4200/) and redirects it to something more meaningful and memorable to the user (http://localhost:4200/table). In this case, the pathMatch property value is full, although this has no effect since it has been applied to the empty path.

Navigating Within a Component

The examples in the previous chapter navigated between different components so that clicking a button in the table component navigates to the form component and vice versa.

This isn’t the only kind of navigation that’s possible; you can also navigate within a component. To demonstrate, Listing 26-11 adds buttons to the form component that allow the user to edit the previous or next data objects.
<div class="bg-primary text-white p-2" [class.bg-warning]="editing">
    <h5>{{editing  ? "Edit" : "Create"}} Product</h5>
    <!-- Last Event: {{ stateEvents | async | formatState }} -->
</div>
<div *ngIf="editing" class="p-2">
    <button class="btn btn-secondary m-1"
            [routerLink]="['/form', 'edit', model.getPreviousProductid(product.id)]">
        Previous
    </button>
    <button class="btn btn-secondary"
            [routerLink]="['/form', 'edit', model.getNextProductId(product.id)]">
        Next
    </button>
</div>
<form novalidate #form="ngForm" (ngSubmit)="submitForm(form)" (reset)="resetForm()" >
    <div class="form-group">
        <label>Name</label>
        <input class="form-control" name="name"
               [(ngModel)]="product.name" required />
    </div>
    <div class="form-group">
        <label>Category</label>
        <input class="form-control" name="category"
               [(ngModel)]="product.category" required />
    </div>
    <div class="form-group">
        <label>Price</label>
        <input class="form-control" name="price"
               [(ngModel)]="product.price"
               required pattern="^[0-9.]+$" />
    </div>
    <button type="submit" class="btn btn-primary m-1"
            [class.btn-warning]="editing" [disabled]="form.invalid">
        {{editing ? "Save" : "Create"}}
    </button>
    <button type="reset" class="btn btn-secondary m-1" routerLink="/">
            Cancel
    </button>
</form>
Listing 26-11.

Adding Buttons to the form.component.html File in the src/app/core Folder

These buttons have bindings for the routerLink directive with expressions that target the previous and next objects in the data model. This means that if you click the Edit button in the table for the lifejacket, for example, the Next button will navigate to the URL that edits the soccer ball, and the Previous button will navigate to the URL for the kayak.

Responding to Ongoing Routing Changes

Although the URL changes when the Previous and Next buttons are clicked, there is no change in the data displayed to the user. Angular tries to be efficient during navigation, and it knows that the URLs that the Previous and Next buttons navigate to are handled by the same component that is currently displayed to the user. Rather than create a new instance of the component, it simply tells the component that the selected route has changed.

This is a problem because the form component isn’t set up to receive change notifications. Its constructor receives the ActivatedRoute object that Angular uses to provide details of the current route, but only its snapshot property is used. The component’s constructor has long been executed by the time that Angular updates the values in the ActivatedRoute object, which means that it misses the notification. This worked when the configuration of the application meant that a new form component would be created each time the user wanted to create or edit a product, but it is no longer sufficient.

Fortunately, the ActivatedRoute class defines a set of properties allowing interested parties to receive notifications through Reactive Extensions Observable objects. These properties correspond to the ones provided by the ActivatedRouteSnapshot object returned by the snapshot property (described in Chapter 25) but send new events when there are any subsequent changes, as described in Table 26-3.
Table 26-3.

The Observable Properties of the ActivatedRoute Class

Name

Description

url

This property returns an Observable<UrlSegment[]>, which provides the set of URL segments each time the route changes.

params

This property returns an Observable<Params>, which provides the URL parameters each time the route changes.

queryParams

This property returns an Observable<Params>, which provides the URL query parameters each time the route changes.

fragment

This property returns an Observable<string>, which provides the URL fragment each time the route changes.

These properties can be used by components that need to handle navigation changes that don’t result in a different component being displayed to the user, as shown in Listing 26-12.

Tip

If you need to combine different data elements from the route, such as using both segments and parameters, then subscribe to the Observer for one data element and use the snapshot property to get the rest of the data you require.

import { Component, Inject } from "@angular/core";
import { NgForm } from "@angular/forms";
import { Product } from "../model/product.model";
import { Model } from "../model/repository.model";
import { ActivatedRoute, Router } from "@angular/router";
@Component({
    selector: "paForm",
    templateUrl: "form.component.html",
    styleUrls: ["form.component.css"]
})
export class FormComponent {
    product: Product = new Product();
    constructor(public model: Model, activeRoute: ActivatedRoute,
        public  router: Router) {
        activeRoute.params.subscribe(params => {
            this.editing = params["mode"] == "edit";
            let id = params["id"];
            if (id != null) {
                Object.assign(this.product, model.getProduct(id) || new Product());
            }
        })
    }
    editing: boolean = false;
    submitForm(form: NgForm) {
        if (form.valid) {
            this.model.saveProduct(this.product);
            this.router.navigateByUrl("/");
        }
    }
    resetForm() {
        this.product = new Product();
    }
}
Listing 26-12.

Observing Route Changes in the form.component.ts File in the src/app/core Folder

The component subscribes to the Observer<Params> that sends a new Params object to subscribers each time the active route changes. The Observer objects returned by the ActivatedRoute properties send details of the most recent route change when the subscribe method is called, ensuring that the component’s constructor doesn’t miss the initial navigation that led to it being called.

The result is that the component can react to route changes that don’t cause Angular to create a new component, meaning that clicking the Next or Previous button changes the product that has been selected for editing, as shown in Figure 26-5.
../images/421542_4_En_26_Chapter/421542_4_En_26_Fig5_HTML.jpg
Figure 26-5.

Responding to route changes

Tip

The effect of navigation is obvious when the activated route changes the component that is displayed to the user. It may not be so obvious when just the data changes. To help emphasize changes, Angular can apply animations that draw attention to the effects of navigation. See Chapter 28 for details.

Styling Links for Active Routes

A common use for the routing system is to display multiple navigation elements alongside the content that they select. To demonstrate, Listing 26-13 adds a new route to the application that will allow the table component to be targeted with a URL that contains a category filter.
import { Routes, RouterModule } from "@angular/router";
import { TableComponent } from "./core/table.component";
import { FormComponent } from "./core/form.component";
import { NotFoundComponent } from "./core/notFound.component";
const routes: Routes = [
    { path: "form/:mode/:id", component: FormComponent },
    { path: "form/:mode", component: FormComponent },
    { path: "does", redirectTo: "/form/create", pathMatch: "prefix" },
    { path: "table/:category", component: TableComponent },
    { path: "table", component: TableComponent },
    { path: "", redirectTo: "/table", pathMatch: "full" },
    { path: "**", component: NotFoundComponent }
]
export const routing = RouterModule.forRoot(routes);
Listing 26-13.

Defining a Route in the app.routing.ts File in the src/app Folder

Listing 26-14 updates the TableComponent class so that it uses the routing system to get details of the active route and assigns the value of the category route parameter to a category property that can be accessed in the template. The category property is used in the getProducts method to filter the objects in the data model.
import { Component, Inject } from "@angular/core";
import { Product } from "../model/product.model";
import { Model } from "../model/repository.model";
import { ActivatedRoute } from "@angular/router";
@Component({
    selector: "paTable",
    templateUrl: "table.component.html"
})
export class TableComponent {
    category: string = null;
    constructor(public model: Model, activeRoute: ActivatedRoute) {
        activeRoute.params.subscribe(params => {
            this.category = params["category"] || null;
        })
    }
    getProduct(key: number): Product {
        return this.model.getProduct(key);
    }
    getProducts(): Product[] {
        return this.model.getProducts()
            .filter(p => this.category == null || p.category == this.category);
    }
    get categories(): string[] {
        return this.model.getProducts()
            .map(p => p.category)
            .filter((category, index, array) => array.indexOf(category) == index);
    }
    deleteProduct(key: number) {
        this.model.deleteProduct(key);
    }
}
Listing 26-14.

Adding Category Filter Support in the table.component.ts File in the src/app/core Folder

There is also a new categories property that will be used in the template to generate the set of categories for filtering. The final step is to add the HTML elements to the template that will allow the user to apply a filter, as shown in Listing 26-15.
<div class="container-fluid">
    <div class="row">
        <div class="col-auto">
            <button class="btn btn-secondary btn-block"
                    routerLink="/" routerLinkActive="bg-primary">
                All
            </button>
            <button *ngFor="let category of categories"
                    class="btn btn-secondary btn-block px-3"
                    [routerLink]="['/table', category]"
                    routerLinkActive="bg-primary">
                {{category}}
            </button>
        </div>
        <div class="col">
            <table class="table table-sm table-bordered table-striped">
                <tr>
                    <th>ID</th><th>Name</th><th>Category</th><th>Price</th><th></th>
                </tr>
                <tr *ngFor="let item of getProducts()">
                    <td>{{item.id}}</td>
                    <td>{{item.name}}</td>
                    <td>{{item.category}}</td>
                    <td>{{item.price | currency:"USD" }}</td>
                    <td class="text-center">
                        <button class="btn btn-danger btn-sm mr-1"
                                (click)="deleteProduct(item.id)">
                            Delete
                        </button>
                        <button class="btn btn-warning btn-sm"
                            [routerLink]="['/form', 'edit', item.id]">
                            Edit
                        </button>
                    </td>
                </tr>
            </table>
        </div>
    </div>
</div>
<div class="p-2 text-center">
    <button class="btn btn-primary m-1" routerLink="/form/create">
        Create New Product
    </button>
    <button class="btn btn-danger" (click)="deleteProduct(-1)">
        Generate HTTP Error
    </button>
    <button class="btn btn-danger m-1" routerLink="/does/not/exist">
        Generate Routing Error
    </button>
</div>
Listing 26-15.

Adding Filter Elements in the table.component.html File in the src/app/core Folder

The important part of this example is the use of the routerLinkActive attribute, which is used to specify a CSS class that the element will be assigned to when the URL specified by the routerLink attribute matches the active route.

The listing specifies a class called bg-primary, which changes the appearance of the button and makes the selected category more obvious. When combined with the functionality added to the component in Listing 26-14, the result is a set of buttons allowing the user to view products in a single category, as shown in Figure 26-6.
../images/421542_4_En_26_Chapter/421542_4_En_26_Fig6_HTML.jpg
Figure 26-6.

Filtering products

If you click the Soccer button, the application will navigate to the /table/Soccer URL, and the table will display only those products in the Soccer category. The Soccer button will also be highlighted since the routerLinkActive attribute means that Angular will add the button element to the Bootstrap bg-primary class.

Fixing the All Button

The navigation buttons reveal a common problem, which is that the All button is always added to the active class, even when the user has filtered the table to show a specific category.

This happens because the routerLinkActive attribute performs partial matches on the active URL by default. In the case of the example, the / URL will always cause the All button to be activated because it is at the start of all URLs. This problem can be fixed by configuring the routerLinkActive directive, as shown in Listing 26-16.
...
<div class="col-auto">
    <button class="btn btn-secondary btn-block"
        routerLink="/table" routerLinkActive="bg-primary"
        [routerLinkActiveOptions]="{exact: true}">
        All
    </button>
    <button *ngFor="let category of categories"
            class="btn btn-secondary btn-block px-3"
            [routerLink]="['/table', category]"
            routerLinkActive="bg-primary">
        {{category}}
    </button>
</div>
...
Listing 26-16.

Configuring the Directive in the table.component.html File in the src/app/core Folder

The configuration is performed using a binding on the routerLinkActiveOptions attribute, which accepts a literal object. The exact property is the only available configuration setting and is used to control matching the active route URL. Setting this property to true will add the element to the class specified by the routerLinkActive attribute only when there is an exact match with the active route’s URL. With this change, the All button will be highlighted only when all of the products are shown, as illustrated by Figure 26-7.
../images/421542_4_En_26_Chapter/421542_4_En_26_Fig7_HTML.jpg
Figure 26-7.

Fixing the All button problem

Creating Child Routes

Child routes allow components to respond to part of the URL by embedding router-outlet elements in their templates, creating more complex arrangements of content. I am going to use the simple components I created at the start of the chapter to demonstrate how child routes work. These components will be displayed above the product table, and the component that is shown will be specified in the URLs shown in Table 26-4.
Table 26-4.

The URLs and the Components They Will Select

URL

Component

/table/products

The ProductCountComponent will be displayed.

/table/categories

The CategoryCountComponent will be displayed.

/table

Neither component will be displayed.

Listing 26-17 shows the changes to the application’s routing configuration to implement the routing strategy in the table.
import { Routes, RouterModule } from "@angular/router";
import { TableComponent } from "./core/table.component";
import { FormComponent } from "./core/form.component";
import { NotFoundComponent } from "./core/notFound.component";
import { ProductCountComponent } from "./core/productCount.component";
import { CategoryCountComponent } from "./core/categoryCount.component";
const routes: Routes = [
    { path: "form/:mode/:id", component: FormComponent },
    { path: "form/:mode", component: FormComponent },
    { path: "does", redirectTo: "/form/create", pathMatch: "prefix" },
    {
        path: "table",
        component: TableComponent,
        children: [
            { path: "products", component: ProductCountComponent },
            { path: "categories", component: CategoryCountComponent }
        ]
    },
    { path: "table/:category", component: TableComponent },
    { path: "table", component: TableComponent },
    { path: "", redirectTo: "/table", pathMatch: "full" },
    { path: "**", component: NotFoundComponent }
]
export const routing = RouterModule.forRoot(routes);
Listing 26-17.

Configuring Routes in the app.routing.ts File in the src/app Folder

Child routes are defined using the children property, which is set to an array of routes defined in the same way as the top-level routes. When Angular uses the entire URL to match a route that has children, there will be a match only if the URL to which the browser navigates contains segments that match both the top-level segment and the segments specified by one of the child routes.

Tip

Notice that I have added the new route before the one whose path is table/:category. Angular tries to match routes in the order in which they are defined. The table/:category path would match both the /table/products and /table/categories URLs and lead the table component to filter the products for nonexistent categories. By placing the more specific route first, the /table/products and /table/categories URLs will be matched before the table/:category path is considered.

Creating the Child Route Outlet

The components selected by child routes are displayed in a router-outlet element defined in the template of the component selected by the parent route. In the case of the example, this means the child routes will target an element in the table component’s template, as shown in Listing 26-18, which also adds elements that will navigate to the new routes.
<div class="container-fluid">
    <div class="row">
        <div class="col-auto">
            <button class="btn btn-secondary btn-block"
                routerLink="/table" routerLinkActive="bg-primary"
                [routerLinkActiveOptions]="{exact: true}">
                All
            </button>
            <button *ngFor="let category of categories"
                    class="btn btn-secondary btn-block px-3"
                    [routerLink]="['/table', category]"
                    routerLinkActive="bg-primary">
                {{category}}
            </button>
        </div>
        <div class="col">
            <button class="btn btn-info mx-1" routerLink="/table/products">
                Count Products
            </button>
            <button class="btn btn-primary mx-1" routerLink="/table/categories">
                Count Categories
            </button>
            <button class="btn btn-secondary mx-1" routerLink="/table">
                Count Neither
            </button>
            <div class="my-2">
                <router-outlet></router-outlet>
            </div>
            <table class="table table-sm table-bordered table-striped">
                <tr>
                    <th>ID</th><th>Name</th><th>Category</th><th>Price</th><th></th>
                </tr>
                <tr *ngFor="let item of getProducts()">
                    <td>{{item.id}}</td>
                    <td>{{item.name}}</td>
                    <td>{{item.category}}</td>
                    <td>{{item.price | currency:"USD" }}</td>
                    <td class="text-center">
                        <button class="btn btn-danger btn-sm mr-1"
                                (click)="deleteProduct(item.id)">
                            Delete
                        </button>
                        <button class="btn btn-warning btn-sm"
                            [routerLink]="['/form', 'edit', item.id]">
                            Edit
                        </button>
                    </td>
                </tr>
            </table>
        </div>
    </div>
</div>
<div class="p-2 text-center">
    <button class="btn btn-primary m-1" routerLink="/form/create">
        Create New Product
    </button>
    <button class="btn btn-danger" (click)="deleteProduct(-1)">
        Generate HTTP Error
    </button>
    <button class="btn btn-danger m-1" routerLink="/does/not/exist">
        Generate Routing Error
    </button>
</div>
Listing 26-18.

Adding an Outlet in the table.component.html File in the src/app/core Folder
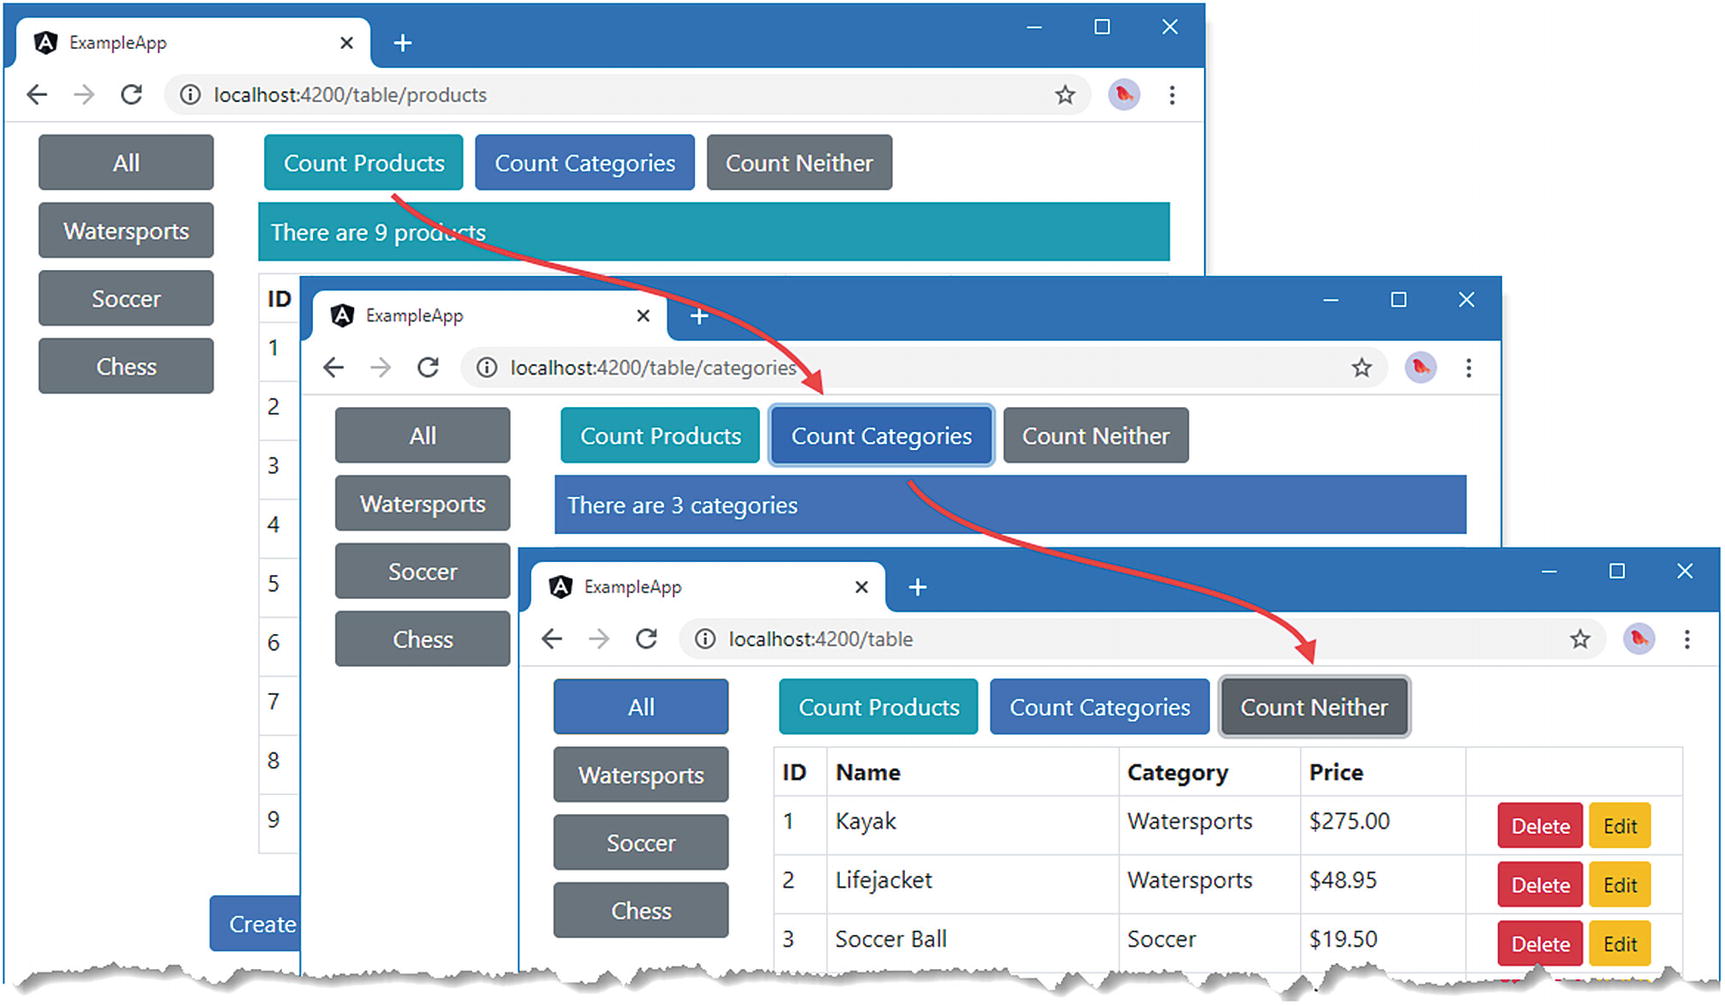
The button elements have routerLink attributes that specify the URLs listed in Table 26-4, and there is also a router-outlet element, which will be used to display the selected component, as shown in Figure 26-8, or no component if the browser navigates to the /table URL.
../images/421542_4_En_26_Chapter/421542_4_En_26_Fig8_HTML.jpg
Figure 26-8.

Using child routes

Accessing Parameters from Child Routes

Child routes can use all the features available to the top-level routes, including defining route parameters and even having their own child routes. Route parameters are worth special attention in child routes because of the way that Angular isolates children from their parents. For this section, I am going to add support for the URLs described in Table 26-5.
Table 26-5.

The New URLs Supported by the Example Application

Name

Description

/table/:category/products

This route will filter the contents of the table and select the ProductCountComponent.

/table/:category/categories

This route will filter the contents of the table and select the CategoryCountComponent.

Listing 26-19 defines the routes that support the URLs shown in the table.
import { Routes, RouterModule } from "@angular/router";
import { TableComponent } from "./core/table.component";
import { FormComponent } from "./core/form.component";
import { NotFoundComponent } from "./core/notFound.component";
import { ProductCountComponent } from "./core/productCount.component";
import { CategoryCountComponent } from "./core/categoryCount.component";
const childRoutes: Routes = [
    { path: "products", component: ProductCountComponent },
    { path: "categories", component: CategoryCountComponent },
    { path: "", component: ProductCountComponent }
];
const routes: Routes = [
    { path: "form/:mode/:id", component: FormComponent },
    { path: "form/:mode", component: FormComponent },
    { path: "does", redirectTo: "/form/create", pathMatch: "prefix" },
    { path: "table", component: TableComponent, children: childRoutes },
    { path: "table/:category", component: TableComponent, children: childRoutes },
    { path: "", redirectTo: "/table", pathMatch: "full" },
    { path: "**", component: NotFoundComponent }
]
export const routing = RouterModule.forRoot(routes);
Listing 26-19.

Adding Routes in the app.routing.ts File in the src/app Folder

The type of the children property is a Routes object, which makes it easy to minimize duplication in the route configuration when you need to apply the same set of child routes in different parts of the URL schema. In the listing, I have defined the child routes in a Routes object called childRoutes and used it as the value for the children property in two different top-level routes.

To make it possible to target these new routes, Listing 26-20 changes the targets of the buttons that appear above the table so they navigate relative to the current URL. I have removed the Count Neither button since the ProductCountComponent will be shown when the empty path child route matches the URL.
...
<div class="col">
    <button class="btn btn-info mx-1" routerLink="products">
        Count Products
    </button>
    <button class="btn btn-primary mx-1" routerLink="categories">
        Count Categories
    </button>
    <button class="btn btn-secondary mx-1" routerLink="/table">
        Count Neither
    </button>
    <div class="my-2">
        <router-outlet></router-outlet>
    </div>
    <table class="table table-sm table-bordered table-striped">
...
Listing 26-20.

Using Relative URLs in the table.component.html File in the src/app/core Folder

When Angular matches routes, the information it provides to the components that are selected through the ActivatedRoute object is segregated so that each component only receives details of the part of the route that selected it.

In the case of the routes added in Listing 26-20, this means the ProductCountComponent and CategoryCountComponent receive an ActivatedRoute object that only describes the child route that selected them, with the single segment of /products or /categories. Equally, the TableComponent component receives an ActivatedRoute object that doesn’t contain the segment that was used to match the child route.

Fortunately, the ActivatedRoute class provides some properties that offer access to the rest of the route, allowing parents and children to access the rest of the routing information, as described in Table 26-6.
Table 26-6.

The ActivatedRoute Properties for Child-Parent Route Information

Name

Description

pathFromRoot

This property returns an array of ActivatedRoute objects representing all the routes used to match the current URL.

parent

This property returns an ActivatedRoute representing the parent of the route that selected the component.

firstChild

This property returns an ActivatedRoute representing the first child route used to match the current URL.

children

This property returns an array of ActivatedRoute objects representing all the child routes used to match the current URL.

Listing 26-21 shows how the ProductCountComponent component can access the wider set of routes used to match the current URL to get a value for the category route parameter and adapt its output when the contents of the table are filtered for a single category.
import {
    Component, KeyValueDiffer, KeyValueDiffers, ChangeDetectorRef
} from "@angular/core";
import { Model } from "../model/repository.model";
import { ActivatedRoute } from "@angular/router";
@Component({
    selector: "paProductCount",
    template: `<div class="bg-info p-2">There are {{count}} products</div>`
})
export class ProductCountComponent {
    private differ: KeyValueDiffer<any, any>;
    count: number = 0;
    private category: string;
    constructor(private model: Model,
            private keyValueDiffers: KeyValueDiffers,
            private changeDetector: ChangeDetectorRef,
            activeRoute: ActivatedRoute) {
        activeRoute.pathFromRoot.forEach(route => route.params.subscribe(params => {
            if (params["category"] != null) {
                this.category = params["category"];
                this.updateCount();
            }
        }))
    }
    ngOnInit() {
        this.differ = this.keyValueDiffers
            .find(this.model.getProducts())
            .create();
    }
    ngDoCheck() {
        if (this.differ.diff(this.model.getProducts()) != null) {
            this.updateCount();
        }
    }
    private updateCount() {
        this.count = this.model.getProducts()
            .filter(p => this.category == null || p.category == this.category)
            .length;
    }
}
Listing 26-21.

Ancestor Routes in the productCount.component.ts File in the src/app/core Folder

The pathFromRoot property is especially useful because it allows a component to inspect all the routes that have been used to match the URL. Angular minimizes the routing updates required to handle navigation, which means that a component that has been selected by a child route won’t receive a change notification through its ActivatedRoute object if only its parent has changed. It is for this reason that I have subscribed to updates from all the ActivatedRoute objects returned by the pathFromRoot property, ensuring that the component will always detect changes in the value of the category route parameter.

To see the result, save the changes, click the Watersports button to filter the contents of the table, and then click the Count Products button, which selects the ProductCountComponent. This number of products reported by the component will correspond to the number of rows in the table, as shown in Figure 26-9.
../images/421542_4_En_26_Chapter/421542_4_En_26_Fig9_HTML.jpg
Figure 26-9.

Accessing the other routes used to match a URL

Summary

In this chapter, I continued to describe the features provided by the Angular URL routing system, going beyond the basic features described in the previous chapter. I explained how to create wildcard and redirection routes, how to create routes that navigate relative to the current URL, and how to create child routes to display nested components. In the next chapter, I finish describing the URL routing system, focusing on the most advanced features.

..................Content has been hidden....................

You can't read the all page of ebook, please click here login for view all page.
Reset
18.218.168.16