Throughout the chapters in the previous part of the book, I added classes and content to the example project to demonstrate different Angular features and then, in Chapter 21, introduced feature modules to add some structure to the project. The result is a project with a lot of redundant and unused functionality, and for this part of the book, I am going to start a new project that takes some of the core features from earlier chapters and provides a clean foundation on which to build in the chapters that follow.
Tip
You can download the example project for this chapter—and for all the other chapters in this book—from https://github.com/Apress/pro-angular-9. See Chapter 1 for how to get help if you have problems running the examples.
Starting the Example Project
To create the project and populate it with tools and placeholder content, open a new command prompt, navigate to a convenient location, and run the command shown in Listing 22-1.
ng new exampleApp --routing false --style css --skip-git --skip-tests
Listing 22-1.
Creating the Example Project
To distinguish the project used in this part of the book from earlier examples, I created a project called exampleApp. The project initialization process will take a while to complete as all the required packages are downloaded.
Adding and Configuring the Bootstrap CSS Package
I continue to use the Bootstrap CSS framework to style the HTML elements in this chapter and the rest of the book. Run the commands in Listing 22-2 to navigate to the exampleApp folder and add the Bootstrap package to the project.
Add the line shown in Listing 22-3 to the angular.json file to include the Bootstrap CSS styles in the bundles that are prepared by the Angular development tools.
Configuring a CSS File in the angular.json File in the exampleApp Folder
Creating the Project Structure
To prepare for the contents of the example application, I added a series of subfolders that will be used to contain the application code and some feature modules, as listed in Table 22-1.
Table 22-1.
The Folders Created for the Example Application
Name
Description
src/app/model
This folder will contain a feature module containing the data model.
src/app/core
This folder will contain a feature module containing components that provide the core features of the application.
src/app/messages
This folder will contain a feature module that is used to display messages and errors to the user.
Creating the Model Module
The first feature module will contain the project’s data model, which is similar to the one used in Part 2, although it won’t contain the form validation logic, which will be handled elsewhere.
Creating the Product Data Type
To define the basic data type around which the application is based, I added a file called product.model.ts to the src/app/model folder and defined the class shown in Listing 22-4.
export class Product {
constructor(public id?: number,
public name?: string,
public category?: string,
public price?: number) {}
}
Listing 22-4.
The Contents of the product.model.ts File in the src/app/model Folder
Creating the Data Source and Repository
To provide the application with some initial data, I created a file called static.datasource.ts in the src/app/model folder and defined the service shown in Listing 22-5. This class will be used as the data source until Chapter 24, where I explain how to use asynchronous HTTP requests to request data from web services.
Tip
I am more relaxed about following the name conventions for Angular files when creating files within a feature module, especially if the purpose of the module is obvious from its name.
import { Injectable } from "@angular/core";
import { Product } from "./product.model";
@Injectable()
export class StaticDataSource {
private data: Product[];
constructor() {
this.data = new Array<Product>(
new Product(1, "Kayak", "Watersports", 275),
new Product(2, "Lifejacket", "Watersports", 48.95),
new Product(3, "Soccer Ball", "Soccer", 19.50),
new Product(4, "Corner Flags", "Soccer", 34.95),
new Product(5, "Thinking Cap", "Chess", 16));
}
getData(): Product[] {
return this.data;
}
}
Listing 22-5.
The Contents of the static.datasource.ts File in the src/app/model Folder
The next step is to define the repository, through which the rest of the application will access the model data. I created a file called repository.model.ts in the src/app/model folder and used it to define the class shown in Listing 22-6.
import { Injectable } from "@angular/core";
import { Product } from "./product.model";
import { StaticDataSource } from "./static.datasource";
let index = this.products.findIndex(p => this.locator(p, id));
if (index > -1) {
this.products.splice(index, 1);
}
}
private generateID(): number {
let candidate = 100;
while (this.getProduct(candidate) != null) {
candidate++;
}
return candidate;
}
}
Listing 22-6.
The Contents of the repository.model.ts File in the src/app/model Folder
Completing the Model Module
To complete the data model, I need to define the module. I created a file called model.module.ts in the src/app/model folder and used it to define the Angular module shown in Listing 22-7.
import { NgModule } from "@angular/core";
import { StaticDataSource } from "./static.datasource";
import { Model } from "./repository.model";
@NgModule({
providers: [Model, StaticDataSource]
})
export class ModelModule { }
Listing 22-7.
The Contents of the model.module.ts File in the src/app/model Folder
Creating the Core Module
The core module will contain the central functionality of the application, built on features that were described in Part 2, that presents the user with a list of the products in the model and the ability to create and edit them.
Creating the Shared State Service
To help the components in this module to collaborate, I am going to add a service that records the current mode, noting whether the user is editing or creating a product. I added a file called sharedState.model.ts to the src/app/core folder and defined the enum and class shown in Listing 22-8.
Tip
I used the model.ts file name, rather than service.ts, because the role of this class will change in a later chapter. Bear with me for the moment, even though I am breaking the naming convention.
export enum MODES {
CREATE, EDIT
}
export class SharedState {
mode: MODES = MODES.EDIT;
id: number;
}
Listing 22-8.
The Contents of the sharedState.model.ts File in the src/app/core Folder
The SharedState class contains two properties that reflect the current mode and the ID of the data model object that is being operated on.
Creating the Table Component
This component will present the user with the table that lists all the products in the application and that will be the main focal point in the application, providing access to other areas of functionality through buttons that allow objects to be created, edited, or deleted. Listing 22-9 shows the contents of the table.component.ts file, which I created in the src/app/core folder.
import { Component } from "@angular/core";
import { Product } from "../model/product.model";
import { Model } from "../model/repository.model";
import { MODES, SharedState } from "./sharedState.model";
The Contents of the table.component.ts File in the src/app/core Folder
This component provides the same basic functionality used in Part 2, with the addition of the editProduct and createProduct methods. These methods update the shared state service when the user wants to edit or create a product.
Creating the Table Component Template
To provide the table component with a template, I added an HTML file called table.component.html to the src/app/core folder and added the markup shown in Listing 22-10.
The Contents of the table.component.html File in the src/app/core Folder
This template uses the ngFor directive to create rows in a table for each product in the data model, including buttons that call the deleteProduct and editProduct methods. There is also a button element outside of the table that calls the component’s createProduct method when it is clicked.
Creating the Form Component
For this project, I am going to create a form component that will manage an HTML form that will allow new products to be created and allow existing products to be modified. To define the component, I added a file called form.component.ts to the src/app/core folder and added the code shown in Listing 22-11.
import { Component } from "@angular/core";
import { NgForm } from "@angular/forms";
import { Product } from "../model/product.model";
import { Model } from "../model/repository.model"
import { MODES, SharedState } from "./sharedState.model";
@Component({
selector: "paForm",
templateUrl: "form.component.html",
styleUrls: ["form.component.css"]
})
export class FormComponent {
product: Product = new Product();
constructor(private model: Model,
private state: SharedState) { }
get editing(): boolean {
return this.state.mode == MODES.EDIT;
}
submitForm(form: NgForm) {
if (form.valid) {
this.model.saveProduct(this.product);
this.product = new Product();
form.reset();
}
}
resetForm() {
this.product = new Product();
}
}
Listing 22-11.
The Contents of the form.component.ts File in the src/app/core Folder
The same component and form will be used to create new products and edit existing ones, so there is some additional functionality compared with the equivalent component from Part 2. The editing property will be used in the view to signal the current setting of the shared state service. The resetForm method is the other new addition and resets the object used to provide data values to the form. The submitForm method hasn’t changed and relies on the data model to determine whether the object passed to the saveProduct method is a new addition to the model or a replacement for an existing object.
Creating the Form Component Template
To provide the component with a template, I added an HTML file called form.component.html to the src/app/core folder and added the markup shown in Listing 22-12.
The Contents of the form.component.html File in the src/app/core Folder
The most important part of this template is the form element, which contains input elements for the name, category, and price properties required to create or edit a product. The header at the top of the template and the submit button for the form change their content and appearance based on the editing mode to distinguish between different operations.
Creating the Form Component Styles
To keep the example simple, I have used the basic form validation without any error messages. Instead, I rely on CSS styles that are applied using Angular validation classes. I added a file called form.component.css to the src/app/core folder and defined the styles shown in Listing 22-13.
The Contents of the form.component.css File in the src/app/core Folder
Completing the Core Module
To define the module that contains the components, I added a file called core.module.ts to the src/app/core folder and created the Angular module shown in Listing 22-14.
import { NgModule } from "@angular/core";
import { BrowserModule } from "@angular/platform-browser";
import { FormsModule } from "@angular/forms";
import { ModelModule } from "../model/model.module";
import { TableComponent } from "./table.component";
import { FormComponent } from "./form.component";
import { SharedState } from "./sharedState.model";
The Contents of the core.module.ts File in the src/app/core Folder
This module imports the core Angular functionality, the Angular form features, and the application’s data model, created earlier in the chapter. It also sets up a provider for the SharedState service.
Creating the Messages Module
The messages module will contain a service that is used to report messages or errors that should be displayed to the user and a component that presents them. This is functionality that will be required throughout the application and doesn’t really belong in either of the other two modules.
Creating the Message Model and Service
To represent messages that should be displayed to the user, I added a file called message.model.ts to the src/app/messages folder and added the code shown in Listing 22-15.
export class Message {
constructor(public text: string,
public error: boolean = false) { }
}
Listing 22-15.
The Contents of the message.model.ts File in the src/app/messages Folder
The Message class defines properties that present the text that will be displayed to the user and whether the message represents an error. Next, I created a file called message.service.ts in the src/app/messages folder and used it to define the service shown in Listing 22-16, which will be used to register messages that should be displayed to the user.
The Contents of the message.service.ts File in the src/app/messages Folder
This service acts as a broker between the parts of the application that generate error messages and those that need to receive them. I’ll improve the way that this service works in Chapter 23 when I introduce features from the Reactive Extensions package.
Creating the Component and Template
Now that I have a source of messages, I can create a component that will display them to the user. I added a file called message.component.ts to the src/app/messages folder and defined the component shown in Listing 22-17.
import { Component } from "@angular/core";
import { MessageService } from "./message.service";
The Contents of the message.component.ts File in the src/app/messages Folder
The component receives a MessageService object as its constructor argument and uses it to register a handler function that will be invoked when a message is received by the service, assigning the most recent message to a property called lastMessage. To provide a template for the component, I created a file called message.component.html in the src/app/messages folder and added the markup shown in Listing 22-18, which displays the message to the user.
<div *ngIf="lastMessage"
class="bg-info text-white p-2 text-center"
[class.bg-danger]="lastMessage.error">
<h4>{{lastMessage.text}}</h4>
</div>
Listing 22-18.
The Contents of the message.component.html File in the src/app/messages Folder
Completing the Message Module
I added a file called message.module.ts in the src/app/messages folder and defined the module shown in Listing 22-19.
import { NgModule } from "@angular/core";
import { BrowserModule } from "@angular/platform-browser";
import { MessageComponent } from "./message.component";
import { MessageService } from "./message.service";
@NgModule({
imports: [BrowserModule],
declarations: [MessageComponent],
exports: [MessageComponent],
providers: [MessageService]
})
export class MessageModule { }
Listing 22-19.
The Contents of the message.module.ts File in the src/app/messages Folder
Completing the Project
To bring all of the different modules together, I made the changes shown in Listing 22-20 to the root module.
import { BrowserModule } from '@angular/platform-browser';
import { NgModule } from '@angular/core';
//import { AppComponent } from './app.component';
import { ModelModule } from "./model/model.module";
import { CoreModule } from "./core/core.module";
import { TableComponent } from "./core/table.component";
import { FormComponent } from "./core/form.component";
import { MessageModule } from "./messages/message.module";
import { MessageComponent } from "./messages/message.component";
Configuring the Application in the app.module.ts File in the src/app Folder
The module imports the feature modules created in this chapter and specifies three bootstrap components, two of which were defined in CoreModule and one from MessageModule. These will display the product table and form and any messages or errors.
The final step is to update the HTML file so that it contains elements that will be matched by the selector properties of the bootstrap components, as shown in Listing 22-21.
Adding Custom Elements in the index.html File in the src Folder
Run the following command in the exampleApp folder to start the Angular development tools and build the project:
ng serve
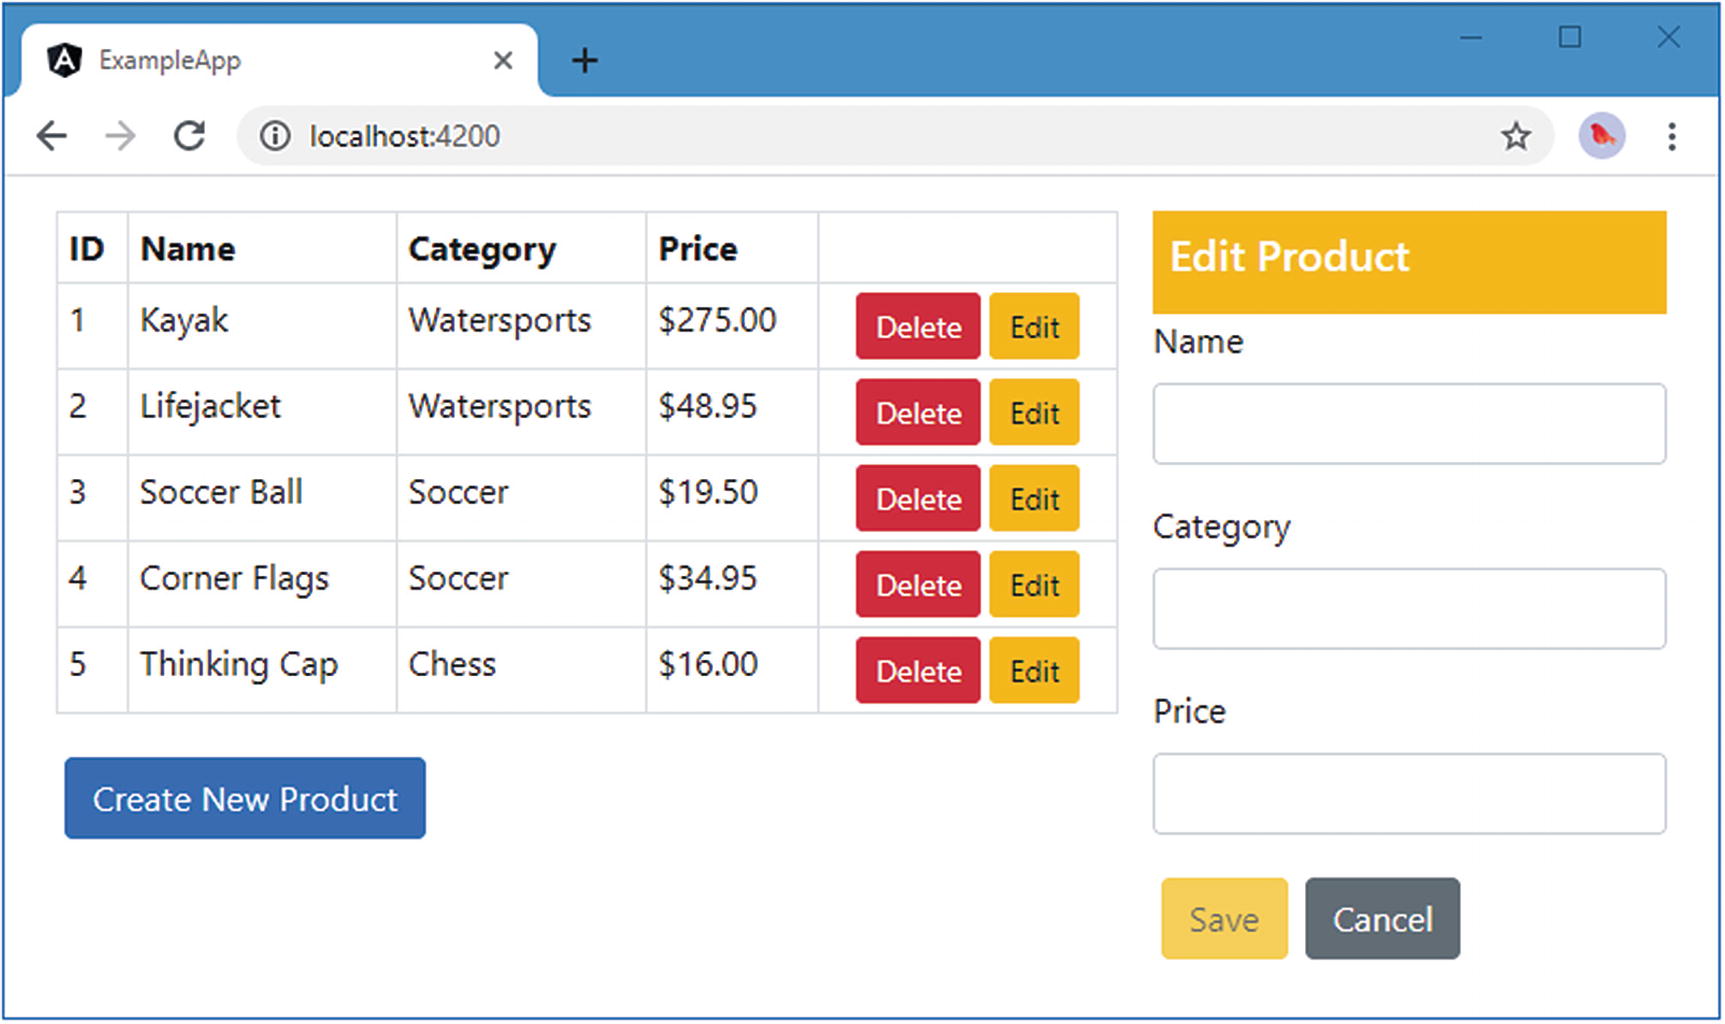
Once the initial build process has completed, open a new browser window and navigate to http://localhost:4200 to see the content shown in Figure 22-1.
Figure 22-1.
Running the example application
Not everything in the example application works yet. You can toggle between the two modes of operation by clicking the Create New Product and Edit buttons, but the editing function doesn’t work. I complete the core functionality and add new features in the chapters that follow.
Summary
In this chapter, I created the example project that I will use in this part of the book. The basic structure is the same as the example used in earlier chapters but without the redundant code and markup that I used to demonstrate earlier features. In the next chapter, I introduce the Reactive Extensions package, which is used to handle updates in Angular applications.