
C H A P T E R 11
Using the Web Storage API
In this chapter, we will explore what you can do with HTML5 Web Storage—sometimes referred to as DOMStorage—an API that makes it easy to retain data across web requests. Before the Web Storage API, remote web servers needed to store any data that persisted by sending it back and forth from client to server. With the advent of the Web Storage API, developers can now store data directly on the client side in the browser for repeated access across requests or to be retrieved long after you completely close the browser, thus reducing network traffic.
We'll first look at how Web Storage differs from cookies and then explore how you can store and retrieve data. Next, we will look at the differences between localStorage and sessionStorage, the attributes and functions that the storage interface provides, and how you can handle Web Storage events. We wrap up with a look at Web SQL Database API and a few practical extras.
Overview of Web Storage
To explain the Web Storage API, it is best to review its predecessor, the intriguingly named cookie. Browser cookies—named after an age-old programming technique for passing small data values between programs—are a built-in way of sending text values back and forth from server to browser. Servers can use the values they put into these cookies to track user information across web pages. Cookie values are then transmitted back and forth every time a user visits a domain. For example, cookies can store a session identifier that allows a web server to know which shopping cart belongs to a user by storing a unique ID in a browser cookie that matches the server's own shopping cart database. Then, as a user moves from page to page, the shopping cart can be updated consistently. Another use for cookies is to store local values into an application so that these values can be used on subsequent page loads.
Cookie values can also be used for operations that are slightly less desirable to users, such as tracking which pages a user visits for the sake of targeted advertising. As such, some users have demanded that browsers include functionality to allow them to block or remove cookies either all of the time or for specific sites.
Love them or hate them, cookies have been supported by browsers since the earliest days of the Netscape browser, back in the mid-1990s. Cookies are also one of the few features that have been consistently supported across browser vendors since the early days of the Web. Cookies allow data to be tracked across multiple requests, as long as that data is carefully coordinated between the server and the browser code. Despite their ubiquity, cookies have some well-known drawbacks:
- Cookies are extremely limited in size. Generally, only about 4KB of data can be set in a cookie, meaning they are unacceptable for large values such as documents or mail.
- Cookies are transmitted back and forth from server to browser on every request scoped to that cookie. Not only does this mean that cookie data is visible on the network, making them a security risk when not encrypted, but also that any data persisted as cookies will be consuming network bandwidth every time a URL is loaded. As such, the relatively small size of cookies makes more sense.
In many cases, the same results could be achieved without involving a network or remote server. This is where the HTML5 Web Storage API comes in. By using this simple API, developers can store values in easily retrievable JavaScript objects that persist across page loads. By using either sessionStorage or localStorage, developers can choose to let those values survive either across page loads in a single window or tab or across browser restarts, respectively. Stored data is not transmitted across the network, and is easily accessed on return visits to a page. Furthermore, larger values can be persisted using the Web Storage API values as high as a few megabytes. This makes Web Storage suitable for document and file data that would quickly blow out the size limit of a cookie.
Browser Support for Web Storage
Web Storage is one of the most widely adopted features of HTML5. In fact, since the arrival of Internet Explorer 8 in 2009 all currently shipping browser versions support Web Storage in some capacity. At the time of this publication, the market share of browsers that do not support storage is dwindling down into single digit percentages.
Web Storage is one of the safest new APIs to use in your web applications today because of its widespread support. As usual, though, it is a good idea to first test if Web Storage is supported before you use it. The subsequent section “Checking for Browser Support” will show you how you can programmatically check if Web Storage is supported.
Using the Web Storage API
The Web Storage API is surprisingly simple to use. We'll start by covering basic storage and retrieval of values and then move on to the differences between sessionStorage and localStorage. Finally, we'll look at the more advanced aspects of the API, such as event notification when values change.
Checking for Browser Support
The storage database for a given domain is accessed directly from the window object. Therefore, determining if a user's browser supports the Web Storage API is as easy as checking for the existence of window.sessionStorage or window.localStorage. Listing 11-1 shows a routine that checks for storage support and displays a message about the browser's support for the Web Storage API. Instead of using this code, you can also use the JavaScript utility library Modernizr, which handles some cases that may result in a false positive.
Listing 11-1. Checking for Web Storage Support
function checkStorageSupport() {


  //sessionStorage

  if (window.sessionStorage) {

    alert('This browser supports sessionStorage'),

  } else {

    alert('This browser does NOT support sessionStorage'),

  }


  //localStorage

  if (window.localStorage) {

    alert('This browser supports localStorage'),

  } else {

    alert('This browser does NOT support localStorage'),

  }

}
Figure 11-1 shows this check for storage support in action.
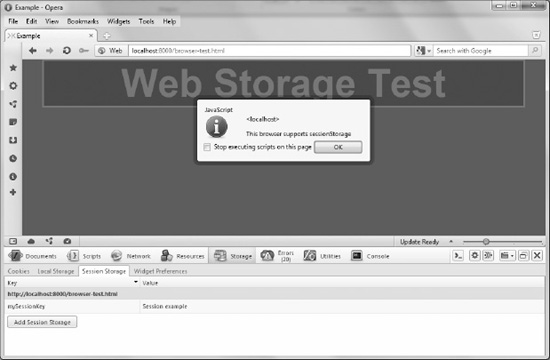
Figure 11-1. Checking for browser support in Opera
Some browsers do not support sessionStorage for files accessed directly from the file system. Make sure you serve up the pages from a web server when you run the examples in this chapter! For example, you can start Python's simple HTTP server in the code/storage directory as follows:
python -m SimpleHTTPServer 9999
After that, you can access the files at http://localhost:9999/. For example, http://localhost:9999/browser-test.html.
However, you are free to use any server or URL location to run the examples.
![]() Note If a user is browsing with his browser set to “private” mode, then localStorage values will not actually persist once the browser is shut down. This is by design, as users of this mode have explicitly chosen to leave no traces behind. Nonetheless, your application should respond gracefully if storage values are not available in a later browsing session.
Note If a user is browsing with his browser set to “private” mode, then localStorage values will not actually persist once the browser is shut down. This is by design, as users of this mode have explicitly chosen to leave no traces behind. Nonetheless, your application should respond gracefully if storage values are not available in a later browsing session.
Setting and Retrieving Values
To begin, we'll focus on the session storage capability as you learn to set and retrieve simple values in a page. Setting a value can easily be done in a single statement, which we'll initially write using the long-hand notation:
sessionStorage.setItem(‘myFirstKey', ‘myFirstValue'),
There are a few important points to notice from this storage access statement:
- We can omit the reference to the
windowfor a shorthand notation, as the storage objects are made available in the default page context. - The function we are calling is
setItem, which takes a key string and a value string. Although some browsers might support passing in nonstring values, the specification only allows strings as values. - This particular call will set into the session storage the string
myFirstValue, which can later be retrieved by the keymyFirstKey.
To retrieve the value, the long-hand notation involves making a call to the getItem function. For example, if we augmented our previous example with the following statement
alert(sessionStorage.getItem(‘myFirstKey'));
The browser raises a JavaScript alert displaying the text myFirstValue. As you can see, setting and retrieving values from the Web Storage API is very straightforward.
However, there is an even simpler way to access the storage objects in your code. You are also able to use expando-properties to set values in storage. Using this approach, the setItem and getItem calls can be avoided entirely by simply setting and retrieving values corresponding to the key-value pair directly on the sessionStorage object. Using this approach, our value set call can be rewritten as follows:
sessionStorage.myFirstKey = ‘myFirstValue';
Or even
Similarly, the value retrieval call can be rewritten as:
alert(sessionStorage.myFirstKey);
We'll use these formats interchangeably in the chapter for the sake of readability.
That's it for the basics. You now have all the knowledge you need to use session storage in your application. However, you might be wondering what's so special about this sessionStorage object. After all, JavaScript allows you to set and get properties on nearly any object. The difference is in the scope. What you may not have realized is that our example set and get calls do not need to occur in the same web page. As long as pages are served from the same origin—the combination of scheme, host, and port—then values set on sessionStorage can be retrieved from other pages using the same keys. This also applies to subsequent loads of the same page. As a developer, you are probably used to the idea that changes made in script will disappear whenever a page is reloaded. That is no longer true for values that are set in the Web Storage API; they will continue to exist across page loads.
Plugging Data Leaks
How long do the values persist? For objects set into sessionStorage, they will persist as long as the browser window (or tab) is not closed. As soon as a user closes the window—or browser, for that matter—the sessionStorage values are cleared out. It is useful to consider a sessionStorage value to be somewhat like a sticky note reminder. Values put into sessionStorage won't last long, and you should not put anything truly valuable into them, as the values are not guaranteed to be around whenever you are looking for them.
Why, then, would you choose to use the session storage area in your web application? Session storage is perfect for short-lived processes that would normally be represented in wizards or dialogs. If you have data to store over the course of a few pages, that you would not be keen to have resurface the next time a user visits your application, feel free to store them in the session storage area. In the past, these types of values might be submitted by forms and cookies and transmitted back and forth on every page load. Using storage eliminates that overhead.
The sessionStorage API has another very specific use that solves a problem that has plagued many web-applications: scoping of values. Take, for example, a shopping application that lets you purchase airline tickets. In such an application, preference data such as the ideal departure date and return date could be sent back and forth from browser to server using cookies. This allows the server to remember previous choices as the user moves through the application, picking seats and a choice of meals.
However, it is very common for users to open multiple windows as they shop for travel deals, comparing flights from different vendors for the same departure time. This causes problems in a cookie system, because if a user switches back and forth between browser windows while comparing prices and availability, they are likely to set cookie values in one window that will be unexpectedly applied to another window served from the same URL on its next operation. This is sometimes referred to as leaking data and is caused by the fact that cookies are shared based on the origin where they are stored. Figure 11-2 shows how this can play out.
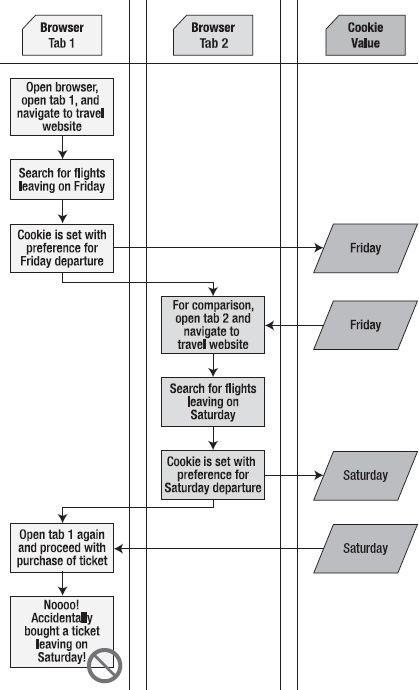
Figure 11-2. Data leakage while using a travel site to compare prices
Using sessionStorage, on the other hand, allows temporary values like a departure date to be saved across pages that access the application but not leak into other windows where the user is also browsing for flights. Therefore, those preferences will be isolated to each window where the corresponding flights are booked.
Local Versus Session Storage
Sometimes, an application needs values that persist beyond the life of a single tab or window or need to be shared across multiple views. In these cases, it is more appropriate to use a different Web Storage implementation: localStorage. The good news is that you already know how to use localStorage. The only programmatic difference between sessionStorage and localStorage is the name by which each is accessed—through the sessionStorage and localStorage objects, respectively. The primary behavioral differences are how long the values persist and how they are shared. Table 11-1 shows the differences between the two types of storage.
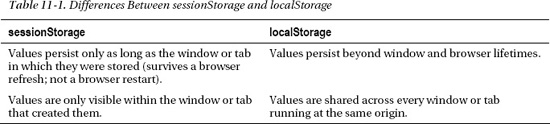
Keep in mind that browsers sometimes redefine the lifespan of a tab or window. For example, some browsers will save and restore the current session when a browser crashes, or when a user shuts down the display with many open tabs. In these cases, the browser may choose to keep the sessionStorage around when the browser restarts or resumes. So, in effect, sessionStorage may live longer than you think!
Other Web Storage API Attributes and Functions
The Web Storage API is one of the simplest in the HTML5 set. We have already looked at both explicit and implicit ways to set and retrieve data from the session and local storage areas. Let's complete our survey of the API by looking at the full set of available attributes and function calls.
The sessionStorage and localStorage objects can be retrieved from the window object of the document in which they are being used. Other than their names and the duration of their values, they are identical in functionality. Both implement the Storage interface, which is shown in Listing 11-2.
Listing 11-2. The Storage Interface
interface Storage {

  readonly attribute unsigned long length;

  getter DOMString key(in unsigned long index);

  getter any getItem(in DOMString key);

  setter creator void setItem(in DOMString key, in any data);

  deleter void removeItem(in DOMString key);

  void clear();

};
Let's look at the attributes and functions here in more detail.
- The
lengthattribute specifies how many key-value pairs are currently stored in the storage object. Remember that storage objects are specific to their origin, so that implies that the items (and length) of the storage object only reflect the items stored for the current origin. - The
key(index)function allows retrieval of a given key. Generally, this is most useful when you wish to iterate across all the keys in a particular storage object. Keys are zero-based, meaning that the first key is at index (0) and the last key is at index (length – 1). Once a key is retrieved, it can be used to fetch its corresponding value. Keys will retain their indices over the life of a given storage object unless a key or one of its predecessors is removed. - As you've already seen,
getItem(key)function is one way to retrieve the value based on a given key. The other is to reference the key as an array index to the storage object. In both cases, the valuenullwill be returned if the key does not exist in storage. - Similarly,
setItem(key, value)function will put a value into storage under the specified key name, or replace an existing value if one already exists under that key name. Note that it is possible to receive an error when setting an item value; if the user has storage turned off for that site, or if the storage is already filled to its maximum amount, aQUOTA_EXCEEDED_ERRerror will be thrown during the attempt. Make sure to handle such an error should your application depend on proper storage behavior.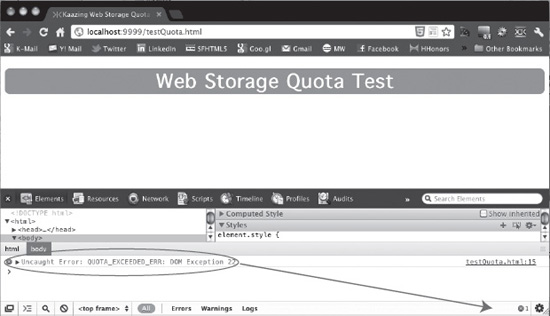
Figure 11-3. Quota Exceeded Error in Chrome
- The
removeItem(key)function does exactly as you might expect. If a value is currently in storage under the specified key, this call will remove it. If no item was stored under that key, no action is taken. Note Unlike some collection and data frameworks, removing an item does not return the old value as a result of the call to remove it. Make sure you've stored any copy you need independent of the removal.
 - Finally, the
clear()function removes all values from the storage list. It is safe to call this on an empty storage object; as such, a call will simply do nothing.
DISK SPACE QUOTA
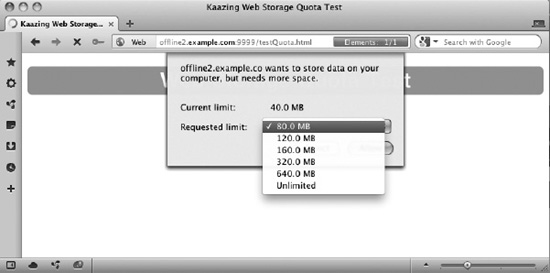
Figure 11-4. On-the-fly Quota increase in Opera
Communicating Web Storage Updates
Sometimes, things get a little more complicated, and storage needs to be accessed by more than one page, browser tab, or worker. Perhaps your application needs to trigger many operations in succession whenever a storage value is changed. For just these cases, the Web Storage API includes an event mechanism to allow notifications of data updates to be communicated to interested listeners. Web Storage events are fired on the window object for every window of the same origin as the storage operation, regardless of whether or not the listening window is doing any storage operations itself.
![]() Note Web Storage events can be used to communicate between windows on the same origin. This will be explored a bit more thoroughly in the “Practical Extras” section.
Note Web Storage events can be used to communicate between windows on the same origin. This will be explored a bit more thoroughly in the “Practical Extras” section.
To register to receive the storage events of a window's origin, simply register an event listener, for example:
window.addEventListener("storage", displayStorageEvent, true);
As you can see, the name storage is used to indicate interest in storage events. Any time a Storage event—either sessionStorage or localStorage—for that origin is raised any registered event listener will receive the storage event as the specified event handler. The storage event itself takes the form shown in Listing 11-3.
Listing 11-3. The StorageEvent Interface
interface StorageEvent : Event {

  readonly attribute DOMString key;

  readonly attribute any oldValue;

  readonly attribute any newValue;

  readonly attribute DOMString url;

  readonly attribute Storage storageArea;

};
The StorageEvent object will be the first object passed to the event handler, and it contains all the information necessary to understand the nature of the storage change.
- The
keyattribute contains the key value that was updated or removed in the storage. - The
oldValuecontains the previous value corresponding to the key before it was updated, and thenewValuecontains the value after the change. If the value was newly added, theoldValuewill be null, and if the value has been removed, thenewValuewill be null. - The
urlwill point to the origin where thestorageevent occurred. - Finally, the
storageAreaprovides a convenient reference to thesessionStorageorlocalStoragewhere the value was changed. This gives the handler an easy way to query the storage for current values or make changes based on other storage changes.
Listing 11-4 shows a simple event handler, which will raise an alert dialog with the contents of any storage event fired on the page's origin.
Listing 11-4. Event Handler that Displays Content of a Storage Event
// display the contents of a storage event

function displayStorageEvent(e) {

  var logged = "key:" + e.key + ", newValue:" + e.newValue + ", oldValue:" +

               e.oldValue +", url:" + e.url + ", storageArea:" + e.storageArea;


  alert(logged);

}


// add a storage event listener for this origin

window.addEventListener("storage", displayStorageEvent, true);
Exploring Web Storage
Since Web Storage is very similar in function to cookies, it is not too surprising that the most advanced browsers are treating them in a very similar manner. Values that are stored into localStorage or sessionStorage can be browsed similar to cookies in the latest browsers, as shown in Figure 11-5.
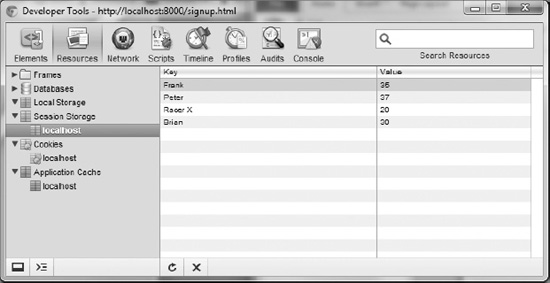
Figure 11-5. Storage values in Google Chrome's Resources Panel
This interface also grants users the ability to remove storage values as desired and easily see what values a given web site is recording while they visit the pages. Not surprisingly, the Safari browser has a similar, unified display for cookies and storage, as it is based on the same underlying WebKit rendering engine as Chrome is. Figure 11-6 shows the Safari Resources panel.
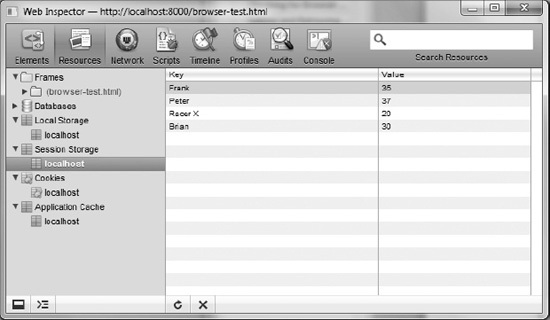
Figure 11-6. Storage values in Safari's Resources panel
Like the other browsers, the Opera Dragonfly storage display allows users to not only browse and delete storage values but also create them as shown in Figure 11-7.
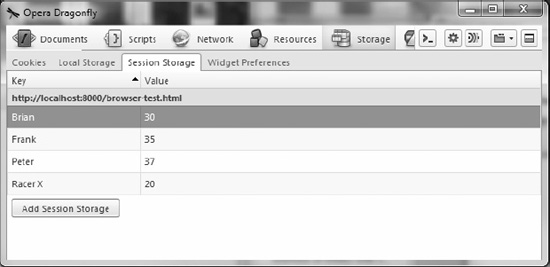
Figure 11-7. Storage values in Opera's Storage panel
As Web Storage becomes more widely implemented by the various browser vendors, expect both the capacity and tooling available to users and developers to expand rapidly.
Building an Application with Web Storage
Now, let's put together what you've learned by integrating storage into a web application. As applications grow more complex, it becomes increasingly important to manage as much data as possible without server interaction. Keeping data local to the client reduces network traffic and increases responsiveness by fetching data from a local machine instead of a remote location.
One common problem developers grapple with is how to manage data as users move from page to page within an application. Traditionally, web applications achieve this by storing data on a server and moving it back and forth while the user navigates pages. Alternatively, the application may attempt to keep the user in a single page and update everything dynamically. However, users are prone to wander, and getting data back into the display quickly when a user returns to your application's page is a great way to enhance the user experience.
In our sample application, we'll show how to store temporary application data locally while the user moves from page to page on a web site and quickly load it from storage on each page. To accomplish this, we'll build on the examples of previous chapters. In Chapter 5, we showed how easy it is to gather a user's current location. Then, in Chapter 7, we demonstrated how to take location data and send it to a remote server so that it can be viewed by any number of interested users. Here, we will go one step further: we will listen for broadcasted location data delivered via a WebSocket and store it in local storage so that it is immediately available as users move from page to page.
Imagine that our running club has live location information from its race participants being broadcast from their mobile devices and shared via a WebSocket server. It would be simple for a web application to display the current position of every racer live and in real time, as the racers upload new position information during the race. And a smart web site would cache those race positions to display them quickly as a user navigated among the pages of the site. That's exactly what we're going to build.
In order to achieve this, we'll need to introduce a demonstration web site that can save and restore our racer data. We've created a three-page example running race site and placed it in our online resources in the folder code/storage, but you can use any site of your choosing for your own demonstration. The key here is merely that you have multiple web pages that are easily traversed by a user. We will insert a bit of dynamic content into those pages to represent a live leader board, or a list of race participants and their current distance from the finish line. Figure 11-8 shows the three pages that make up the race site.

Figure 11-8. The example race website
Each of our web pages will contain a common section to display the leader board data. Each entry in the leader board will show the name of one of our racers and his or her current distance from the finish line. When any of our pages is loaded, it will make a WebSocket connection to a race broadcast server and listen for messages indicating the position of a racer. The racers, in turn, will be sending their current position to the same broadcast server, causing the position data to stream down to the page in real time.
All of this has been covered in previous chapters related to Geolocation and WebSocket. In fact, much of the demonstration code here is shared with the examples from earlier in this book. However, there is one key difference in this example: when the data arrives in the page, we will store it in the session storage area for later retrieval. Then, whenever a user navigates to a new page, the stored data will be retrieved and displayed before making a new WebSocket connection. In this way, the temporary data is transferred from page to page without using any cookies or web server communication.
To keep our data feed small, we'll send our racer location messages across the web in a simple format that is easy to read and parse. This format is a String that uses the semicolon character (;) as a delimiter separating the chunks of data: name, latitude, and longitude. For example, a racer named Racer X who is at latitude 37.20 and longitude –121.53 would be identified with the following string:
;Racer X;37.20;-121.53
![]() Note A common technique is to use the JSON format to send object representations between client and server. We'll show you how to do that in the section “Practical Extras” later in this chapter.
Note A common technique is to use the JSON format to send object representations between client and server. We'll show you how to do that in the section “Practical Extras” later in this chapter.
Now, let's dig into the code itself. Each of our pages will contain identical JavaScript code to connect to the WebSocket server, process and display leader board messages, and save and restore the leader board using sessionStorage. As such, this code would be a prime candidate to include in a JavaScript library in a real application.
First, we'll establish a few utility methods that you've seen before. To calculate the distance of any particular racer from the finish line, we need routines to calculate distance between two geolocation positions as shown in Listing 11-5.
Listing 11-5. Distance Calculation Routine
    // functions for determining the distance between two

    // latitude and longitude positions

    function toRadians(num) {

      return num * Math.PI / 180;

    }


    function distance(latitude1, longitude1, latitude2, longitude2) {

      // R is the radius of the earth in kilometers

      var R = 6371;


      var deltaLatitude = toRadians((latitude2-latitude1));

      var deltaLongitude = toRadians((longitude2-longitude1));

      latitude1 = toRadians(latitude1), latitude2 = toRadians(latitude2);


      var a = Math.sin(deltaLatitude/2) *

              Math.sin(deltaLatitude/2) +

              Math.cos(latitude1) *
              Math.cos(latitude2) *

              Math.sin(deltaLongitude/2) *

              Math.sin(deltaLongitude/2);


      var c = 2 * Math.atan2(Math.sqrt(a),

                             Math.sqrt(1-a));

      var d = R * c;

      return d;

    }


    // latitude and longitude for the finish line in the Lake Tahoe race

    var finishLat = 39.17222;

    var finishLong = -120.13778;
In this familiar set of functions—used earlier in Chapter 5—we calculate the distance between two points with a distance function. The details are not of particular importance, nor are they the most accurate representation of distance along a racetrack, but they'll do for our example.
In the final lines, we establish a latitude and longitude for the finish line location of the race. As you'll see, we will compare these coordinates with incoming racer positions to determine the racers' distance from the finish line, and thus, their ranks in the race.
Now, let's look at a tiny snippet of the HTML markup used to display the page.
        <h2>Live T216 Leaderboard</h2>

        <p id="leaderboardStatus">Leaderboard: Connecting...</p>

        <div id="leaderboard"></div>
Although most of the page HTML is irrelevant to our demonstration, in these few lines, we declare some named elements with the IDs leaderboardStatus and leaderboard. The leaderboardStatus is where we will display the connection information for our WebSocket. And the leaderboard itself is where we will insert div elements to indicate the position information we are receiving from our WebSocket messages, using the utility function shown in Listing 11-6.
Listing 11-6. Position Information Utility Function
    // display the name and distance in the page

    function displayRacerLocation(name, distance) {

        // locate the HTML element for this ID

        // if one doesn't exist, create it

        var incomingRow = document.getElementById(name);

        if (!incomingRow) {

            incomingRow = document.createElement('div'),

            incomingRow.setAttribute('id', name);

            incomingRow.userText = name;


            document.getElementById("leaderboard").appendChild(incomingRow);

        }


        incomingRow.innerHTML = incomingRow.userText + " is " +

                              Math.round(distance*10000)/10000 + " km from the finish line";

    }
This utility is a simple display routine, which takes the racer's name and distance from the finish line. Figure 11-9 shows what the leader board section looks like on the index.html page.

Figure 11-9. The race leader board
The name is used for two purposes; not only is it placed into the status message for that racer but it is also used to reference the unique div element where that racer's status is stored. If a div for our racer already exists, we will find it when we look it up using the standard document.getElementById() routine. If a div does not already exist in the page for that racer, we will create one and insert it into the leaderboard area. Either way, we update the div element corresponding to that racer with the latest distance from the finish line, which will immediately update it in the display of the page. If you have already read Chapter 7, this will be familiar to you from the example application we created there.
Our next function is the message processor that will be called whenever data is returned from the broadcasting race WebSocket server, as shown in Listing 11-7.
Listing 11-7. WebSocket Message Processing Function
    // callback when new position data is retrieved from the websocket

    function dataReturned(locationData) {

        // break the data into ID, latitude, and longitude

        var allData = locationData.split(";");

        var incomingId   = allData[1];

        var incomingLat  = allData[2];

        var incomingLong = allData[3];


        // update the row text with the new values

        var currentDistance = distance(incomingLat, incomingLong, finishLat, finishLong);


        // store the incoming user name and distance in storage

        window.sessionStorage[incomingId] = currentDistance;


        // display the new user data in the page

        displayRacerLocation(incomingId, currentDistance);

    }
This function takes a string in the format described previously, a semicolon-separated message containing the name, latitude, and longitude of a racer. Our first step is to split it into its component parts using the JavaScript split() routine to produce the incomingId, incomingLat, and incomingLong, respectively.
Next, it passes the racer's latitude and longitude, as well as the latitude and longitude of the finish line, to the distance utility method we defined earlier, storing the resulting distance in the currentDistance variable.
Now that we actually have some data worth storing, we can look at the call which exercises Web Storage.
        // store the incoming user name and distance in storage

        window.sessionStorage[incomingId] = currentDistance;
In this line, we use the sessionStorage object on the window to store the current distance of the racer from the finish line as a value under the name and ID of the racer. In other words, we will set a value on the session storage with the key being the racer's name and the value being that racer's distance from the finish. As you will see momentarily, this data will be retrieved from storage as the user navigates from page to page on the web site. At the end of the function, we call the displayLocation() routine we previously defined to make sure that this most recent location update is displayed visually in the current page.
Now, on to our final function in our storage example—the load routine shown in Listing 11-8 that fires whenever visitors access the web page.
Listing 11-8. Initial Page Load Routine
// when the page loads, make a socket connection to the race broadcast server
function loadDemo() {
        // make sure the browser supports sessionStorage

        if (typeof(window.sessionStorage) === "undefined") {

            document.getElementById("leaderboardStatus").innerHTML = "Your browser does

                     not support HTML5 Web Storage";

            return;

        }
        var storage = window.sessionStorage;


        // for each key in the storage database, display a new racer

        // location in the page

        for (var i=0; i < storage.length; i++) {

            var currRacer = storage.key(i);

            displayRacerLocation(currRacer, storage[currRacer]);

        }
// test to make sure that Web Sockets are supported
if (window.WebSocket) {
// the location where our broadcast WebSocket server is located
url = "ws://websockets.org:7999/broadcast";
socket = new WebSocket(url);
socket.onopen = function() {
document.getElementById("leaderboardStatus").innerHTML = "Leaderboard:
Connected!";
}
socket.onmessage = function(e) {
dataReturned(e.data);
}
}
}
This is a longer function than the others, and there is a lot going on. Let's take it step by step. First, as shown in Listing 11-9, we do a basic error check to make sure that the browser viewing the page supports sessionStorage by checking for its presence on the window object. If sessionStorage is not accessible, we simply update the leaderboardStatus area to indicate as much, and then return out of the loading routine. We won't be attempting to work around lack of browser storage in this example.
Listing 11-9. Checking for Browser Support
// make sure the browser supports sessionStorage
if (typeof(window.sessionStorage) === "undefined") {
document.getElementById("leaderboardStatus").innerHTML = "Your browser does
not support HTML5 Web Storage";
return;
}
![]() Note It is possible to rework this demonstration to simply forgo any persistence of data between page navigations and start each page load with a clean leader board if storage is not supported. However, our goal here is to show how storage optimizes the experience for both the user and the network.
Note It is possible to rework this demonstration to simply forgo any persistence of data between page navigations and start each page load with a clean leader board if storage is not supported. However, our goal here is to show how storage optimizes the experience for both the user and the network.
The next thing we do on page load is to use the storage to retrieve any racer distance results that have already been served to this or other pages of our website. Recall that we are running an identical block of script code on every one of our site pages, so that the leader board follows the users as they browse around various locations. As such, the leader board may already have stored values into storage from other pages that will be retrieved and displayed here directly on load as shown in Listing 11-10. The previously saved values will follow the user during navigation, as long as the user does not close the window, tab, or browser, thus clearing out the session storage.
Listing 11-10. Displaying Stored Racer Data
var storage = window.sessionStorage;
// for each key in the storage database, display a new racer
// location in the page
for (var i=0; i < storage.length; i++) {
var currRacer = storage.key(i);
displayRacerLocation(currRacer, storage[currRacer]);
}
This is an important section of code. Here, we query the session for its length—in other words, the number of keys the storage contains. Then, we grab each key using storage.key() and store it into the currRacer variable, later using that variable to reference the key's corresponding value with storage[currRacer]. Together, the key and its value represent a racer and that racer's distance, which were stored on a visit to a previous page.
Once we have a previously stored racer name and distance, we display them using the displayRacerLocation() function. This all happens very quickly on page load, causing the page to instantaneously fill its leader board with previously transmitted values.
![]() Note Our sample application relies on being the only application that stores values into the session storage area. If your application needs to share the storage object with other data, you will need to use a more nuanced key strategy than simply storing the keys at root level. We'll look at another storage strategy in the “Practical Extras” section.
Note Our sample application relies on being the only application that stores values into the session storage area. If your application needs to share the storage object with other data, you will need to use a more nuanced key strategy than simply storing the keys at root level. We'll look at another storage strategy in the “Practical Extras” section.
Our last piece of load behavior is to hook up the page to the racer broadcast server using a simple WebSocket, as shown in Listing 11-11.
Listing 11-11. Connecting to the WebSocket Broadcast Service
// test to make sure that WebSocket is supported
if (window.WebSocket) {
// the location where our broadcast WebSocket server is located
// for the sake of example, we'll just show websockets.org
url = "ws://websockets.org:7999/broadcast";
socket = new WebSocket(url);
socket.onopen = function() {
document.getElementById("leaderboardStatus").innerHTML = "Leaderboard:
Connected!";
}
socket.onmessage = function(e) {
dataReturned(e.data);
}
}
As we did before in our WebSocket chapter, we first check to make sure that the browser supports WebSocket by checking for the existence of the window.WebSocket object. Once we have verified that it exists, we connect to the URL where our WebSocket server is running. This server broadcasts racer location messages of the semicolon-separated format listed previously, and whenever we receive one of those messages via the socket.onmessage callback, we call our previously discussed dataReturned() function to process and display it. We also use the socket.onopen callback to update our leaderboardStatus area with a simple diagnostic message to indicate that the socket opened successfully.
That's it for our load routine. The final block of code we declare in our script block is the registration function, which requests that the loadDemo() function is called whenever page load is complete:
    // add listeners on page load and unload

    window.addEventListener("load", loadDemo, true);
As you have seen many times before, this event listener requests that our loadDemo() function will be called when the window has completed loading.
But how do we get racer data transmitted from the trails to the broadcast WebSocket server and into our pages? Well, we could actually use the tracker example previously declared in the WebSocket chapter by simply pointing its connect URL to the broadcast server listed previously. However, we have also created a very simple racer broadcast source page, shown in Listing 11-12, which serves a similar purpose. This page would theoretically be run on the mobile devices of the race participants. Although it does not include any Web Storage code itself, it is a convenient way to transmit the properly formatted data when run in a browser with both WebSocket and Geolocation support. The file racerBroadcast.html is available from the web site sample area provided for this book.
Listing 11-12. Contents of the File racerBroadcast.html
<!DOCTYPE html>


<html>


<head>

<title>Racer Broadcast</title>

<link rel="stylesheet" href="styles.css">

</head>


<body onload="loadDemo()">


<h1>Racer Broadcast</h1>


Racer name: <input type="text" id="racerName" value="Racer X"/>

<button onclick="startSendingLocation()">Start</button>


<div><strong>Geolocation</strong>: <p id="geoStatus">HTML5 Geolocation not

 started.</p></div>

<div><strong>WebSocket</strong>: <p id="socketStatus">HTML5 Web Sockets are

<strong>not</strong> supported in your browser.</p></div>


<script type="text/javascript">


    // reference to the Web Socket

    var socket;


    var lastLocation;


    function updateSocketStatus(message) {

        document.getElementById("socketStatus").innerHTML = message;

    }


    function updateGeolocationStatus(message) {

        document.getElementById("geoStatus").innerHTML = message;

    }


    function handleLocationError(error) {

        switch(error.code)

        {

        case 0:

          updateGeolocationStatus("There was an error while retrieving your location: " +

                                   error.message);

          break;

        case 1:

          updateGeolocationStatus("The user prevented this page from retrieving a

                                   location.");

          break;
        case 2:

          updateGeolocationStatus("The browser was unable to determine your location: " +

                                   error.message);

          break;

        case 3:

          updateGeolocationStatus("The browser timed out before retrieving the location.");

          break;

        }

    }


    function loadDemo() {

        // test to make sure that Web Sockets are supported

        if (window.WebSocket) {


            // the location where our broadcast WebSocket server is located

            url = "ws://websockets.org:7999/broadcast";

            socket = new WebSocket(url);

            socket.onopen = function() {

                updateSocketStatus("Connected to WebSocket race broadcast server");

            }

        }

    }


    function updateLocation(position) {

        var latitude = position.coords.latitude;

        var longitude = position.coords.longitude;

        var timestamp = position.timestamp;


        updateGeolocationStatus("Location updated at " + timestamp);


        // Schedule a message to send my location via WebSocket

        var toSend =    ";" + document.getElementById("racerName").value

                        + ";" + latitude + ";" + longitude;

        setTimeout("sendMyLocation('" + toSend + "')", 1000);

    }


    function sendMyLocation(newLocation) {

        if (socket) {

            socket.send(newLocation);

            updateSocketStatus("Sent: " + newLocation);

        }

    }


    function startSendingLocation() {

        var geolocation;

        if(navigator.geolocation) {

            geolocation = navigator.geolocation;

            updateGeolocationStatus("HTML5 Geolocation is supported in your browser.");

        }

        else {

            geolocation = google.gears.factory.create('beta.geolocation'),

            updateGeolocationStatus("Geolocation is supported via Google Gears");
        }


        // register for position updates using the Geolocation API

        geolocation.watchPosition(updateLocation,

                                  handleLocationError,

                                  {maximumAge:20000});

    }


</script>

</body>

</html>
We won't spend too much space covering this file in detail, as it is nearly identical to the tracker example in Chapter 7. The primary difference is that this file contains a text field for entering the racer's name:
Racer name: <input type="text" id="racerName" value="Racer X"/>
The racer's name is now sent to the broadcast server as part of the data string:
var toSend =    ";" + document.getElementById("racerName").value

                    + ";" + latitude + ";" + longitude;
To try it out for yourself, open two windows in a browser that supports Web Storage, Geolocation, and WebSocket, such as Google Chrome. In the first, load the running club's index.html page. You will see it connect to the race broadcast site using WebSocket and then await any racer data notifications. In the second window, open the racerBroadcast.html file. After this page, too, has connected to the WebSocket broadcast site, enter a name for your racer, and click the Start button. You'll see that the racer broadcast has transmitted the location of your favorite racer, and it should show up in the leader board in your other browser window. Figure 11-10 shows what this looks like.
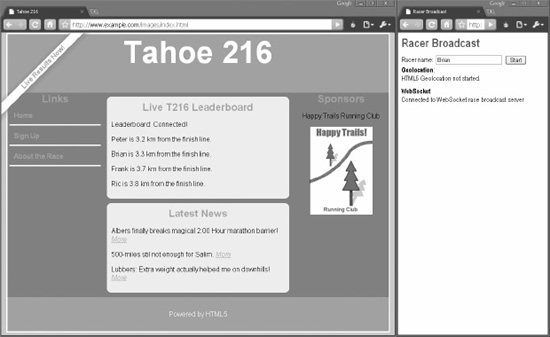
Figure 11-10. Race page and racerBroadcast.html side by side
Now, navigate to other racing club pages using the Signup and About the Race links on the left side of the page. Because all of these pages have been configured to load our script, they will immediately load and populate the leader board with the previous racer data, which was delivered while browsing other pages. Send more racer status notifications (from the broadcast page), and you'll see them propagate through the club site pages as you navigate, as well.
Now that we've finished our code, let's review what we've built. We've created a simple function block, suitable for inclusion in a shared JavaScript library, which connects to a WebSocket broadcast server and listens for racer updates. When an update is received, the script displays the position in the page and stores it using sessionStorage. When the page is loaded, it checks for any previously stored racer position values, thus maintaining the state as the user navigates the site. What are some of the benefits we gain from this approach?
- Reduced network traffic: Race information is stored locally in the browser. Once it arrives, it sticks around for every page load, rather than using cookies or server requests to fetch it again.
- Immediate display of values: The browser pages themselves can be cached rather than loaded from the network, because the dynamic parts of the page—the current leaderboard status—are local data. This data is rapidly displayed without any network load time.
- Transient storage: The race data isn't very useful after the race has completed. Consequently, we store it in session storage area, meaning it is discarded when the window or tab is shut down, and it no longer consumes any space.
A WORD ABOUT BULLETPROOFING
This same technique we demonstrated in this example can be applied to any number of data types: chat, e-mail, and sports scores are other examples that can be cached and displayed from page to page using local or session storage just as we've shown here. If your application sends user-specific data back and forth from browser to server at regular intervals, consider using Web Storage to streamline your flow.
The Future of Browser Database Storage
The key-value Storage API is great for persisting data, but what about indexed storage that can be queried? HTML5 applications will eventually have access to indexed databases as well. The exact details of the database APIs are still solidifying, and there are two primary proposals.
The Web SQL Database
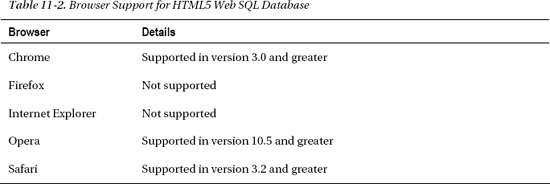
One of the proposals, Web SQL Database, has been implemented in Safari, Chrome, and Opera. Table 11-2 shows the browser support for Web SQL Database.
Web SQL Database allows applications access to SQLite through an asynchronous JavaScript interface. Although it will not be part of the common Web platform nor the eventual recommended database API for HTML5 applications, the SQL API can be useful when targeting a specific platform such as mobile Safari. In any case, this API shows off the power of databases in the browser. Just like the other storage APIs, the browser can limit the amount of storage available to each origin and clear out the data when user data is cleared.
The Fate of Web SQL Database
Because Web SQL Database is already implemented in the wild, we are including a basic example but omiting the complete details of the API. This example demonstrates the basic use of the Web SQL Database API. It opens a database called mydb, creates a racers table if a table by that name does not already exist, and populates the table with a list of predefined names. Figure 11-11 shows this database with racers table in Safari's Web Inspector.

Figure 11-11. Database with racers table in Safari's Web Inspector
To begin, we open a database by name. The window.openDatabase() function returns a Database object through which database interaction takes place. The openDatabase() function takes a name as well as an optional version and description. With an open database, application code can now start transactions. SQL statements are executed in the context of a transaction using the transaction.executeSql() function. This simple example uses executeSql() to create a table, insert racer names into the table, and later query the database to create an HTML table. Figure 11-12 shows the output HTML file with the list of names retrieved from the table.
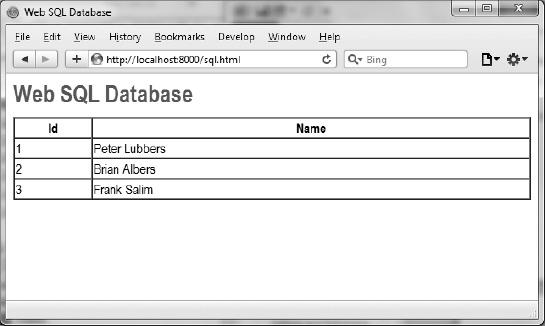
Figure 11-12. sql.html displaying the results of SELECT * FROM racers
Database operations can take some time to complete. Instead of blocking script execution until a result set is available, queries run in the background. When the results are available, a function given as the third argument to executeSQL() is called back with the transaction and the result set as arguments.
Listing 11-13 shows the complete code for the file sql.html; the sample code shown is also located in the code/storage folder.
Listing 11-13. Using the Web SQL Database API
<!DOCTYPE html>

<title>Web SQL Database</title>

<script>


    // open a database by name

    var db = openDatabase('db', '1.0', 'my first database', 2 * 1024 * 1024);


    function log(id, name) {

        var row = document.createElement("tr");

        var idCell = document.createElement("td");

        var nameCell = document.createElement("td");

        idCell.textContent = id;

        nameCell.textContent = name;

        row.appendChild(idCell);

        row.appendChild(nameCell);


        document.getElementById("racers").appendChild(row);
    }


    function doQuery() {

        db.transaction(function (tx) {

                tx.executeSql('SELECT * from racers', [], function(tx, result) {

                    // log SQL result set

                    for (var i=0; i<result.rows.length; i++) {

                        var item = result.rows.item(i);

                        log(item.id, item.name);

                    }

                });

            });

    }


    function initDatabase() {

        var names = ["Peter Lubbers", "Brian Albers", "Frank Salim"];


        db.transaction(function (tx) {

                tx.executeSql('CREATE TABLE IF NOT EXISTS racers (id integer primary key

autoincrement, name)'),


                for (var i=0; i<names.length; i++) {

                    tx.executeSql('INSERT INTO racers (name) VALUES (?)', [names[i]]);

                }


                doQuery();

            });

    }


    initDatabase();


</script>


<h1>Web SQL Database</h1>


<table id="racers" border="1" cellspacing="0" style="width:100%">

    <th>Id</th>

    <th>Name</th>

</table>
The Indexed Database API
A second proposal for browser database storage gained prominence in 2010. The Indexed Database API is supported by Microsoft and Mozilla and is seen as a counter to the Web SQL Database. Where the Web SQL Database looks to bring the established SQL language into browsers, the Indexed Database aims to bring low-level indexed storage capabilities, with the hope that more developer-friendly libraries will be built on top of the indexed core.
While the Web SQL API supports using query languages to issue SQL statements against tables of data, the Indexed DB API issues synchronous or asynchronous function calls directly against a tree-like object storage engine. Unlike Web SQL, the Indexed DB does not work with tables and columns.
The support for the Indexed Database API is growing (see Table 11-3).
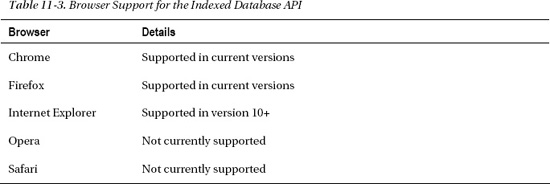
Microsoft and Mozilla have announced that they will not support the Web SQL Database and have thrown their weight behind the Indexed Database instead. Google's Chrome has joined in with support, and as such, it is likely that the Indexed Database is the future of standardized structured storage in the browser. Among their reasons are the fact that SQL is not a true standard and also that the only implementation of Web SQL was the SQLite project. With only one implementation and a loose standard, they could not support WebSQL in the HTML5 specification.
The Indexed Database API eschews query strings in favor of a low-level API that allows values to be stored directly in JavaScript objects. Values stored in the database can be retrieved by key or using indexes, and the API can be accessed in either synchronous or asynchronous manner. Like the WebSQL proposal, indexed databases are scoped by origin so that you can only access the storage created in your own web pages.
Creation or modification of Indexed Database storage is done under the context of transactions, which can be classified as either READ_ONLY, READ_WRITE, or VERSION_CHANGE. While the first two are probably self-explanatory, the VERSION_CHANGE transaction type is used whenever an operation will modify the structure of the database.
Retrieving records from an Indexed Database is done via a cursor object. A cursor object iterates over a range of records in either increasing or decreasing order. At any time a cursor either has a value or does not, due to the fact that it is either in the process of loading or has reached the end of its iteration.
A detailed description of the Indexed Database API is beyond the scope of this book. If you are intending to implement a query engine on top of the built-in API, you should consult the official specification at http://www.w3.org/TR/IndexedDB/. Otherwise, you would be wise to wait for one of the proposed engines layered on top of the standard to be made available to use a more developer-friendly database API. At this point, no third-party libraries have gained prominence or significant backing.
Why Use a Hammer…
Practical Extras
Sometimes, there are techniques that don't fit into our regular examples but nonetheless apply to many types of HTML5 applications. We present to you some short, but common, practical extras here.
JSON Object Storage
Although the specification for Web Storage allows for objects of any type to be stored as key-value pairs, in current implementations, some browsers limit values to be text string data types. There is a practical workaround, however, due to the fact that modern versions of browsers contain built-in support for JavaScript Object Notation (JSON).
JSON is a standard for data-interchange that can represent objects as strings and vice-versa. JSON has been used for over a decade to transmit objects from browser clients to servers over HTTP. Now, we can use it to serialize complex objects in and out of Web Storage in order to persist complex data types. Consider the script block in Listing 11-14.
Listing 11-14. JSON Object Storage
<script>


  var data;


  function loadData() {

    data = JSON.parse(sessionStorage["myStorageKey"])

  }


  function saveData() {

    sessionStorage["myStorageKey"] = JSON.stringify(data);

  }


  window.addEventListener("load", loadData, true);

  window.addEventListener("unload", saveData, true);


</script>
As you can see, the script contains event listeners to register handlers for load and unload events in the browser window. In this case, the handlers call the loadData() and saveData() functions, respectively.
In the loadData() function, the session storage area is queried for the value of a storage key, and that key is passed to the JSON.parse() function. The JSON.parse() routine will take a previously saved string representation of an object and reconstitute it into a copy of the original. This routine is called every time the page loads.
Similarly, the saveData() function takes a data value and calls JSON.stringify() on it to turn it into a string representation of the object. That string is, in turn, stored back into storage. By registering the saveData() function on the unload browser event, we ensure that it is called every time the user navigates away or shuts down the browser or window.
The practical result of these two functions is that any object we wish to track in storage, no matter if it is a complex object type, can be stored and reloaded as users navigate in and out of the application. This allows developers to extend the techniques we have already shown to nontext data.
A Window into Sharing
As alluded to in an earlier section, the ability for Web Storage events to fire in any window browsing the same origin has some powerful implications. It means that storage can be used to send messages from window to window, even if they are not all using the storage object itself. This, in turn implies that we can now share data across windows that have the same origin.
Let's see how this works using some code samples. To listen to cross-window messages, a simple script needs only to register a handler for storage events. Let's assume that a page running at http://www.example.com/storageLog.html contains the code shown in Listing 11-15 (the sample file storageLog.html for this example is also located in the code/storage folder).
Listing 11-15. Cross-Window Communication Using Storage
// display records of new storage events

function displayStorageEvent(e) {

  var incomingRow = document.createElement('div'),

  document.getElementById("container").appendChild(incomingRow);


  var logged = "key:" + e.key + ", newValue:" + e.newValue + ", oldValue:" +

                e.oldValue + ", url:" + e.url + ", storageArea:" + e.storageArea;

                incomingRow.innerHTML = logged;

}


// add listeners on storage events

window.addEventListener("storage", displayStorageEvent, true);
After registering an event listener for the storage event type, this window will receive notification of storage changes in any pages. For example, if a browser window viewing http://www.example.com/browser-test.html that is currently browsing the same origin sets or changes a new storage value, the storageLog.html page will receive a notification. Therefore, to send a message to a receiving window, the sending window need only modify a storage object, and its old and new values will be sent as part of the notification. For example, if a storage value is updated using localStorage.setItem(), then the displayStorageEvent() handler in the storageLog.html page hosted at the same origin will receive an event. By carefully coordinating event names and values, the two pages can now communicate, a feat which has been difficult to accomplish before. Figure 11-13 shows the storageLog.html page in action, simply logging storage events it receives.
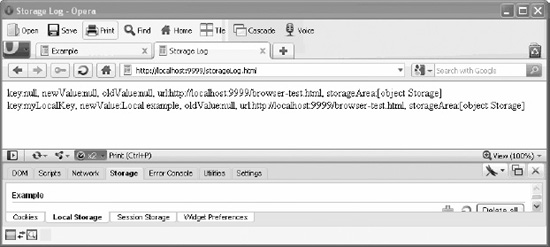
Figure 11-13. The storageLog.html page logging storage eventsSummary
Summary
In this chapter, we showed how Web Storage can be used as an alternative to browser cookies for keeping local copies of data across windows, tabs, and (with localStorage) even across browser restarts. You've seen that data can be appropriately segregated between windows by using sessionStorage, and shared—even across windows—by using storage events. In our full-fledged example, we showed a practical way to use storage to track data from page to page as users navigate a website, which could just as easily be applied to other data types. We even demonstrated how nontext data types can be stored when a page loads or unloads to save and restore the state of a page across visits.
In the next chapter, we'll show you how HTML5 lets you create offline applications.