
C H A P T E R 2
Creating a User Interface in JavaFX
Life is the art of drawing without an eraser.
—John W. Gardner
Chapter 1 gave you a jump start using JavaFX by covering the basics in developing and executing JavaFX programs. Now we cover many of the details about creating a user interface in JavaFX that were glossed over in Chapter 1. First on the agenda is to get you acquainted with the theater metaphor used by JavaFX to express user interfaces and to cover the significance of what we call a node-centric UI.
Introduction to Node-Centric UIs
Creating a user interface in JavaFX is like creating a theater play in that it typically consists of these very simple steps:
- Create a stage on which your program will perform: The realization of your stage will depend on the platform on which it is deployed (e.g., a web page, the desktop, or a tablet).
- Create a scene in which the actors and props (nodes) will visually interact with each other and the audience (the users of your program): Like any good set designer in the theater business, good JavaFX developers endeavor to make their scenes visually appealing. To this end, it is often a good idea to collaborate with a graphic designer on your “theater play.”
- Create nodes in the scene: These nodes are subclasses of the javafx.scene.Node class, which include UI controls, shapes, Text (a type of shape), images, media players, embedded browsers, and custom UI components that you create. Nodes may also be containers for other nodes, often providing cross-platform layout capabilities. A scene has a scene graph that contains a directed graph of nodes. Individual nodes and groups of nodes can be manipulated in many ways (such as moving, scaling, and setting opacity) by changing the values of a very rich set of Node properties.
- Create variables and classes that represent the model for the nodes in the scene: As discussed in Chapter 1, one of the very powerful aspects of JavaFX is binding, which enables the application’s UI to stay in sync easily with the state, or model, of the application.
 Note Most of the examples in this chapter are small programs intended to demonstrate UI concepts. For this reason, the model in many of these examples consists of variables appearing in the main program, rather than being contained by separate Java classes (such as the AudioConfigModel class in Chapter 1).
 - Create event handlers, such as onMousePressed, that allow the user to interact with your program: Often these event handlers manipulate instance variables in the model.
- Create timelines and transitions that animate your scene: For example, you may want the thumbnail images of a list of books to move smoothly across the scene or a page in the UI to fade into view. You may simply want a ping-pong ball to move across the scene, bouncing off walls and paddles, which is demonstrated later in this chapter in the section, “The Zen of Node Collision Detection.”
Let’s get started with a closer look at Step 1, in which we examine the capabilities of the stage.
Setting the Stage
The appearance and functionality of your stage will depend on the platform on which it is deployed. For example, if deployed in a web browser, your stage will be a rectangular area, called an applet, within a web page. The stage for a JavaFX program deployed via Java Web Start will be a window.
Understanding the Stage Class
The Stage class is the top-level container for any JavaFX program that has a graphical UI. It has several properties and methods that allow it, for example, to be positioned, sized, given a title, made invisible, or given some degree of opacity. The two best ways that we know of to learn the capabilities of a class are to study the JavaFX API documentation and to examine (and write) programs that use it. In this section, we ask you to do both, beginning with looking at the API docs.
The JavaFX API docs may be found in the docs/api directory subordinate to where you installed the JavaFX SDK. Also, they are available online at the URL given in the Resources section at the end of this chapter. Open the index.html file in your browser, navigate to the javafx.stage package, and select the Stage class. That page should contain tables of Properties, Constructors, and Methods as shown in the excerpt in Figure 2-1.
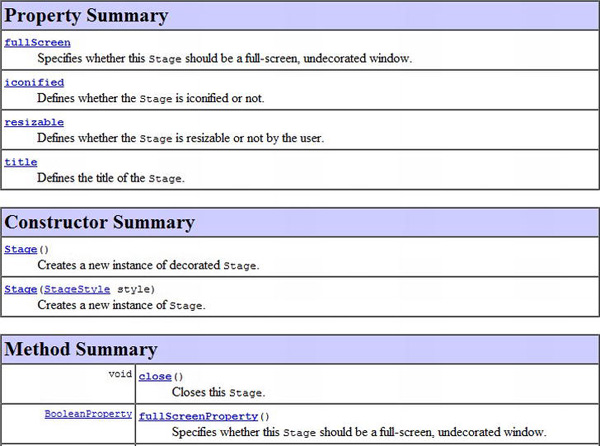
Figure 2-1. A portion of the Stage class documentation in the JavaFX API
Go ahead and explore the documentation for each of the properties and methods in the Stage class, remembering to click the links to reveal more detailed information. When you’re finished, come back and we show you a program that demonstrates many of the properties and methods available in the Stage class.
Using the Stage Class: The StageCoach Example
A screenshot of the unassuming, purposely ill-fitting StageCoach example program is shown in Figure 2-2.

Figure 2-2. A screenshot of the StageCoach example
The StageCoach program was created to coach you through the finer points of using the Stage class and related classes such as StageStyle and Screen. Also, we use this program to show you how to get arguments passed into the program. Before walking through the behavior of the program, go ahead and open the project and execute it by following the instructions for building and executing the Audio-Config project in Chapter 1. The project file is located in the Chapter02 directory subordinate to where you extracted the book’s code download bundle.
EXAMINING THE BEHAVIOR OF THE STAGECOACH PROGRAM
When the program starts, its appearance should be similar to the screenshot in Figure 2-2. To fully examine its behavior, perform the following steps. Note that for instructional purposes, the property and method names on the UI correspond to the properties and methods in the Stage instance.
- Notice that the StageCoach program’s window is initially displayed near the top of the screen, with its horizontal position in the center of the screen. Drag the program’s window and observe that the x and y values near the top of the UI are dynamically updated to reflect its position on the screen.
- Resize the program’s window and observe that the width and height values change to reflect the width and height of the Stage. Note that this size includes the decorations (title bar and borders) of the window.
- Click the program (or cause it to be in focus some other way) and notice that the focused value is true. Cause the window to lose focus, perhaps by clicking somewhere else on the screen, and notice that the focused value becomes false.
- Deselect the resizable check box and then notice that the resizable value becomes false. Then try to resize the window and note that it is not permitted. Select the resizable check box again to make the window resizable.
- Select the fullScreen check box. Notice that the program occupies the full screen and that the window decorations are not visible. Deselect the fullScreen check box to restore the program to its former size.
- Edit the text in the text field beside the title label, noticing that the text in the window’s title bar is changed to reflect the new value.
- Drag the window to partially cover another window, and click the toBack() button. Notice that this places the program behind the other window, therefore causing the z-order to change.
- With a portion of the program’s window behind another window, but with the toFront() button visible, click that button. Notice that the program’s window is placed in front of the other window.
- Click the close() button, noticing that the program exits.
- Invoke the program again, passing in the string “undecorated”. If invoking from NetBeans, use the Project Properties dialog to pass this argument as shown in Figure 2-3. See the Hello Earthrise example in Chapter 1 for instructions on accessing this dialog.
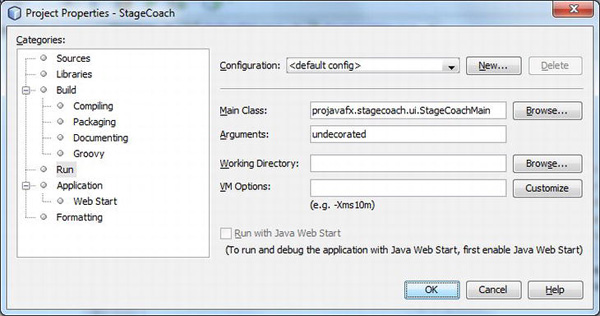
Figure 2-3. Using NetBeans’ Project Properties dialog to pass an argument into the program
- Notice that this time the program appears without any window decorations, but that the white background of the program includes the background of the window. The black outline in the screenshot shown in Figure 2-4 is part of the desktop background.
- Exit the program again by clicking the close() button, and then run the program again, passing in the string “transparent” as the argument. Notice that the program appears in the shape of a rounded rectangle, as shown in Figure 2-5.
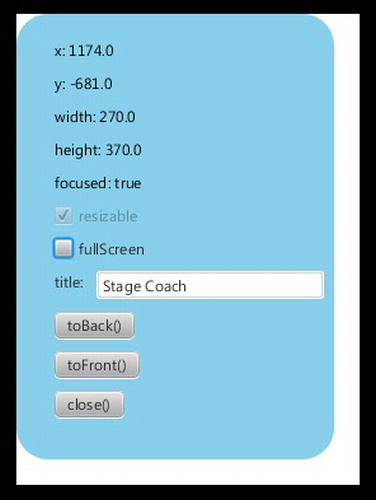
Figure 2-4. The StageCoach program after being invoked with the undecorated argument
Note You may have noticed that the screenshots in Figures 2-4 and 2-5 have yvalues that are negative. This is because the application was positioned on the secondary monitor, logically above the primary monitor, when the screenshots were taken.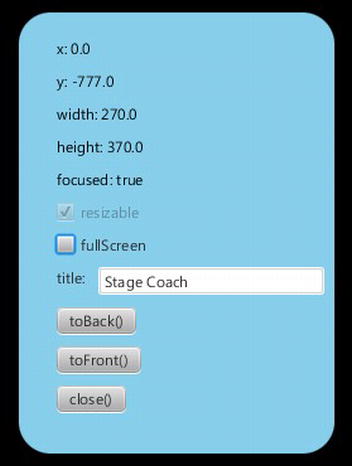
Figure 2-5. The StageCoach program after being invoked with the transparent argument
- Click the application’s UI, drag it around the screen, and click the close() button when finished. Congratulations on sticking with this 13-step exercise! Performing this exercise has prepared you to relate to the code behind it, which we now walk through together.
Understanding the StageCoach Program
Take a look at the code for the StageCoach program in Listing 2-1, and after that we point out new and relevant concepts.
Listing 2-1. StageCoachMain.java
package projavafx.stagecoach.ui;


import java.util.List;

import javafx.application.Application;

import javafx.beans.property.SimpleStringProperty;

import javafx.beans.property.StringProperty;

import javafx.event.EventHandler;

import javafx.geometry.Rectangle2D;

import javafx.geometry.VPos;

import javafx.scene.Group;

import javafx.scene.GroupBuilder;

import javafx.scene.Scene;

import javafx.scene.SceneBuilder;

import javafx.scene.control.ButtonBuilder;

import javafx.scene.control.CheckBox;

import javafx.scene.control.CheckBoxBuilder;

import javafx.scene.control.Label;

import javafx.scene.control.TextField;

import javafx.scene.control.TextFieldBuilder;

import javafx.scene.input.MouseEvent;

import javafx.scene.layout.HBoxBuilder;

import javafx.scene.layout.VBoxBuilder;

import javafx.scene.paint.Color;

import javafx.scene.shape.RectangleBuilder;

import javafx.scene.text.Text;

import javafx.scene.text.TextBuilder;

import javafx.stage.Screen;

import javafx.stage.Stage;

import javafx.stage.StageStyle;

import javafx.stage.WindowEvent;


public class StageCoachMain extends Application {

  StringProperty title = new SimpleStringProperty();


  Text textStageX;

  Text textStageY;

  Text textStageW;

  Text textStageH;

  Text textStageF;

  CheckBox checkBoxResizable;

  CheckBox checkBoxFullScreen;


  double dragAnchorX;

  double dragAnchorY;


  public static void main(String[] args) {

    Application.launch(args);

  }
  @Override

  public void start(Stage stage) {

    StageStyle stageStyle = StageStyle.DECORATED;

    List<String> unnamedParams = getParameters().getUnnamed();

    if (unnamedParams.size() > 0) {

      String stageStyleParam = unnamedParams.get(0);

      if (stageStyleParam.equalsIgnoreCase("transparent")) {

        stageStyle = StageStyle.TRANSPARENT;

      }

      else if (stageStyleParam.equalsIgnoreCase("undecorated")) {

        stageStyle = StageStyle.UNDECORATED;

      }

      else if (stageStyleParam.equalsIgnoreCase("utility")) {

        stageStyle = StageStyle.UTILITY;

      }

    }

    final Stage stageRef = stage;

    Group rootGroup;

    TextField titleTextField;

    Scene scene  = SceneBuilder.create()

      .width(270)

      .height(370)

      .fill(Color.TRANSPARENT)

      .root(

        rootGroup = GroupBuilder.create()

          .children(

            RectangleBuilder.create()

              .width(250)

              .height(350)

              .arcWidth(50)

              .arcHeight(50)

              .fill(Color.SKYBLUE)

              .build(),

            VBoxBuilder.create()

              .layoutX(30)

              .layoutY(20)

              .spacing(10)

              .children(

                textStageX = TextBuilder.create()

                  .textOrigin(VPos.TOP)

                  .build(),

                textStageY = TextBuilder.create()

                  .textOrigin(VPos.TOP)

                  .build(),

                textStageW = TextBuilder.create()

                  .textOrigin(VPos.TOP)

                  .build(),

                textStageH = TextBuilder.create()

                  .textOrigin(VPos.TOP)

                  .build(),
                textStageF = TextBuilder.create()

                  .textOrigin(VPos.TOP)

                  .build(),

                checkBoxResizable = CheckBoxBuilder.create()

                  .text("resizable")

                  .disable(stageStyle == StageStyle.TRANSPARENT ||

                           stageStyle == StageStyle.UNDECORATED)

                  .build(),

                checkBoxFullScreen = CheckBoxBuilder.create()

                  .text("fullScreen")

                  .build(),

                HBoxBuilder.create()

                  .spacing(10)

                  .children(

                    new Label("title:"),

                    titleTextField = TextFieldBuilder.create()

                      .text("Stage Coach")

                      .prefColumnCount(15)

                      .build()

                  )

                  .build(),

                ButtonBuilder.create()

                  .text("toBack()")

                  .onAction(new EventHandler<javafx.event.ActionEvent>() {

                    @Override public void handle(javafx.event.ActionEvent e) {

                      stageRef.toBack();

                    }

                  })

                  .build(),

                ButtonBuilder.create()

                  .text("toFront()")

                  .onAction(new EventHandler<javafx.event.ActionEvent>() {

                    @Override public void handle(javafx.event.ActionEvent e) {

                      stageRef.toFront();

                    }

                  })

                  .build(),

                ButtonBuilder.create()

                  .text("close()")

                  .onAction(new EventHandler<javafx.event.ActionEvent>() {

                    @Override public void handle(javafx.event.ActionEvent e) {

                      stageRef.close();

                    }

                  })

                  .build()

              )

              .build()

          )

          .build()

      )

      .build();
    // When mouse button is pressed, save the initial position of screen

    rootGroup.setOnMousePressed(new EventHandler<MouseEvent>() {

        public void handle(MouseEvent me) {

            dragAnchorX = me.getScreenX() - stageRef.getX();

            dragAnchorY = me.getScreenY() - stageRef.getY();

        }

    });


    // When screen is dragged, translate it accordingly

    rootGroup.setOnMouseDragged(new EventHandler<MouseEvent>() {

        public void handle(MouseEvent me) {

            stageRef.setX(me.getScreenX() - dragAnchorX);

            stageRef.setY(me.getScreenY() - dragAnchorY);

        }

    });


    textStageX.textProperty().bind(new SimpleStringProperty("x: ")

            .concat(stageRef.xProperty().asString()));

    textStageY.textProperty().bind(new SimpleStringProperty("y: ")

            .concat(stageRef.yProperty().asString()));

    textStageW.textProperty().bind(new SimpleStringProperty("width: ")

            .concat(stageRef.widthProperty().asString()));

    textStageH.textProperty().bind(new SimpleStringProperty("height: ")

            .concat(stageRef.heightProperty().asString()));

    textStageF.textProperty().bind(new SimpleStringProperty("focused: ")

            .concat(stageRef.focusedProperty().asString()));

    stage.setResizable(true);

    checkBoxResizable.selectedProperty()

            .bindBidirectional(stage.resizableProperty());

    checkBoxFullScreen.selectedProperty().addListener(new ChangeListener() {

      public void changed(ObservableValue ov, Object oldValue, Object newValue) {

        stageRef.setFullScreen(checkBoxFullScreen.selectedProperty().getValue());

      }

    });

    title.bind(titleTextField.textProperty());


    stage.setScene(scene);

    stage.titleProperty().bind(title);

    stage.initStyle(stageStyle);

    stage.setOnCloseRequest(new EventHandler<WindowEvent>() {

        public void handle(WindowEvent we) {

            System.out.println("Stage is closing");

        }

    });

    stage.show();

    Rectangle2D primScreenBounds = Screen.getPrimary().getVisualBounds();

    stage.setX((primScreenBounds.getWidth() - stage.getWidth()) / 2);

    stage.setY((primScreenBounds.getHeight() - stage.getHeight()) / 4);

  }

}
Obtaining Program Arguments
The first new concept introduced by this program is the ability to read the arguments passed into a JavaFX program. The javafx.application package includes a class named Application that has application lifecycle related methods such as launch(), init(), start(), and stop(). Another method in the Application class is getParameters(), which gives the application access to the arguments passed on the command-line, as well as unnamed parameters and <name,value> pairs specified in a JNLP file. Here’s the relevant code snippet from Listing 2-1 for your convenience:
    StageStyle stageStyle = StageStyle.DECORATED;

    List<String> unnamedParams = getParameters().getUnnamed();

    if (unnamedParams.size() > 0) {

      String stageStyleParam = unnamedParams.get(0);

      if (stageStyleParam.equalsIgnoreCase("transparent")) {

        stageStyle = StageStyle.TRANSPARENT;

      }

      else if (stageStyleParam.equalsIgnoreCase("undecorated")) {

        stageStyle = StageStyle.UNDECORATED;

      }

      else if (stageStyleParam.equalsIgnoreCase("utility")) {

        stageStyle = StageStyle.UTILITY;

      }

    }

    ...code omitted...

    stage.initStyle(stageStyle);
Setting the Style of the Stage
We’re using the getParameters() method described previously to get an argument that tells us whether the stage style of the Stage instance should be its default (StageStyle.DECORATED), StageStyle.UNDECORATED, or StageStyle.TRANSPARENT. You saw the effects of each in the preceding exercise, specifically in Figures 2-2, 2-4, and 2-5.
Controlling Whether a Stage Is Resizable
As shown in the snippet below from Listing 2-1, to make this application’s window initially resizable we’re calling the setResizable() method of the Stage instance. To keep the resizable property of the Stage and the state of the resizable check box synchronized, the check box is bidirectionally bound to the resizable property of the Stage instance.
    stage.setResizable(true);

    checkBoxResizable.selectedProperty()

            .bindBidirectional(stage.resizableProperty());
![]() Tip A property that is bound cannot be explicitly set. In the code preceding the snippet, the resizable property is set with the setResizable() method before the property is bound in the next line.
Tip A property that is bound cannot be explicitly set. In the code preceding the snippet, the resizable property is set with the setResizable() method before the property is bound in the next line.
Making a Stage Full Screen
Making the Stage show in full-screen mode is done by setting the fullScreen property of the Stage instance to true. As shown in the snippet below from Listing 2-1, to keep the fullScreen property of the Stage and the state of the fullScreen check box synchronized, the fullScreen property of the Stage instance is updated whenever the selected property of the checkBox changes.
    checkBoxFullScreen.selectedProperty().addListener(new ChangeListener() {

      public void changed(ObservableValue ov, Object oldValue, Object newValue) {

        stageRef.setFullScreen(checkBoxFullScreen.selectedProperty().getValue());

      }

    });
Working with the Bounds of the Stage
The bounds of the Stage are represented by its x, y, width, and height properties whose values can be changed at will. This is demonstrated in the following snippet from Listing 2-1 where the Stage is placed near the top and centered horizontally on the primary screen after the Stage has been initialized.
    Rectangle2D primScreenBounds = Screen.getPrimary().getVisualBounds();

    stage.setX((primScreenBounds.getWidth() - stage.getWidth()) / 2);

    stage.setY((primScreenBounds.getHeight() - stage.getHeight()) / 4);
We’re using the Screen class of the javafx.stage package to get the dimensions of the primary screen so that the desired position may be calculated.
![]() Note We intentionally made the Stage in Figure 2-2 larger than the Scene contained within to make the following point. The width and height of a Stage include its decorations (title bar and border), which vary on different platforms. It is therefore usually better to control the width and height of the Scene (we show you how in a bit) and let the Stage conform to that size.
Note We intentionally made the Stage in Figure 2-2 larger than the Scene contained within to make the following point. The width and height of a Stage include its decorations (title bar and border), which vary on different platforms. It is therefore usually better to control the width and height of the Scene (we show you how in a bit) and let the Stage conform to that size.
Drawing Rounded Rectangles
As pointed out in Chapter 1, you can put rounded corners on a Rectangle by specifying the arcWidth and arcHeight for the corners. The following snippet from Listing 2-1 draws the sky-blue rounded rectangle that becomes the background for the transparent window example in Figure 2-5.
            RectangleBuilder.create()

              .width(250)

              .height(350)

              .arcWidth(50)

              .arcHeight(50)

              .fill(Color.SKYBLUE)

              .build(),
Dragging the Stage on the Desktop When a Title Bar Isn’t Available
The Stage may be dragged on the desktop using its title bar, but in the case where its StageStyle is UNDECORATED or TRANSPARENT, the title bar isn’t available. To allow dragging in this circumstance, we added the code shown in the following code snippet from Listing 2-1.
    // When mouse button is pressed, save the initial position of screen

    rootGroup.setOnMousePressed(new EventHandler<MouseEvent>() {

        public void handle(MouseEvent me) {

            dragAnchorX = me.getScreenX() - stageRef.getX();

            dragAnchorY = me.getScreenY() - stageRef.getY();

        }

    });


    // When screen is dragged, translate it accordingly

    rootGroup.setOnMouseDragged(new EventHandler<MouseEvent>() {

        public void handle(MouseEvent me) {

            stageRef.setX(me.getScreenX() - dragAnchorX);

            stageRef.setY(me.getScreenY() - dragAnchorY);

        }

    });
Event handlers are covered a little later in the chapter, but as a preview, the handle() method of the anonymous class that is supplied to the onMouseDragged() method is called when the mouse is dragged. As a result, the values of the x and y properties are altered by the number of pixels that the mouse was dragged, which moves the Stage as the mouse is dragged.
Using UI Layout Containers
When developing applications that will be deployed in a cross-platform environment or are internationalized, it is good to use layout containers. One advantage of using layout containers is that when the node sizes change, their visual relationships with each other are predictable. Another advantage is that you don’t have to calculate the location of each node that you place in the UI.
The following snippet from Listing 2-1 shows how the VBox layout class, located in the javafx.scene.layout package, is used to arrange the Text, CheckBox, HBox, and Button nodes in a column. This snippet also shows that layout containers may be nested, as demonstrated by the HBox that arranges the Label and TextField nodes horizontally. Note that several lines of code are omitted from this snippet in order to see the layout nesting clearly:
            VBoxBuilder.create()

              .spacing(10)

              .children(

                textStageX = TextBuilder.create()

                  .build(),

                checkBoxResizable = CheckBoxBuilder.create()

                  .text("resizable")

                  .build(),
                HBoxBuilder.create()

                  .spacing(10)

                  .children(

                    new Label("title:"),

                    titleTextField = TextFieldBuilder.create()

                      .text("Stage Coach")

                      .build()

                  )

                  .build(),

                ButtonBuilder.create()

                  .text("toBack()")

                  .build(),

              )

              .build()
The VBox layout class is similar to the Group class discussed in the Hello Earthrise example in Chapter 1, in that it contains a collection of nodes within it. Unlike the Group class, the VBox class arranges its contained nodes vertically, spacing them apart from each other by the number of pixels specified in the spacing property.
Ascertaining Whether the Stage Is in Focus
To know whether your JavaFX application is the one that currently is in focus (e.g., keys pressed are delivered to the application), simply consult the focused property of the Stage instance. The following snippet from Listing 2-1 demonstrates this.
    textStageF.textProperty().bind(new SimpleStringProperty("focused: ")

            .concat(stageRef.focusedProperty().asString()));
Controlling the Z-Order of the Stage
In the event that you want your JavaFX application to appear on top of other windows or behind other windows onscreen, you can use the toFront() and toBack() methods, respectively. The following snippet from Listing 2-1 shows how this is accomplished.
                ButtonBuilder.create()

                  .text("toFront()")

                  .onAction(new EventHandler<javafx.event.ActionEvent>() {

                    @Override public void handle(javafx.event.ActionEvent e) {

                      stageRef.toFront();

                    }

                  })

                  .build(),

                ButtonBuilder.create()

                  .text("close()")

                  .onAction(new EventHandler<javafx.event.ActionEvent>() {

                    @Override public void handle(javafx.event.ActionEvent e) {

                      stageRef.close();

                    }

                  })

                  .build()
Closing the Stage and Detecting When It Is closed
As shown in the following code snippet from Listing 2-1, you can programmatically close the Stage with its close() method. This is important when the stageStyle is undecorated or transparent, because the close button supplied by the windowing system is not present.
                ButtonBuilder.create()

                  .text("close()")

                  .onAction(new EventHandler<javafx.event.ActionEvent>() {

                    @Override public void handle(javafx.event.ActionEvent e) {

                      stageRef.close();

                    }

                  })

                  .build()
By the way, you can detect when there is an external request to close the Stage by using the onCloseRequest event handler as shown in the following code snippet from Listing 2-1.
    stage.setOnCloseRequest(new EventHandler<WindowEvent>() {

        public void handle(WindowEvent we) {

            System.out.println("Stage is closing");

        }

    });
To see this in action, run the application without any arguments so that it has the appearance of Figure 2-2 shown previously, and then click the close button on the decoration of the window.
![]() Tip The onCloseRequest event handler is only called when there is an external request to close the window. This is why the “Stage is closing” message doesn’t appear in this example when you click the button labeled “close()”.
Tip The onCloseRequest event handler is only called when there is an external request to close the window. This is why the “Stage is closing” message doesn’t appear in this example when you click the button labeled “close()”.
Making a Scene
Continuing on with our theater metaphor for creating JavaFX applications, we now discuss putting a Scene on the Stage. The Scene, as you recall, is the place in which the actors and props (nodes) visually interact with each other and the audience (the users of your program).
Using the Scene Class: The OnTheScene Example
As with the Stage class, we’re going to use a contrived example application whose purpose is to demonstrate and teach the details of the available capabilities in the Scene class. See Figure 2-6 for a screenshot of the OnTheScene program.
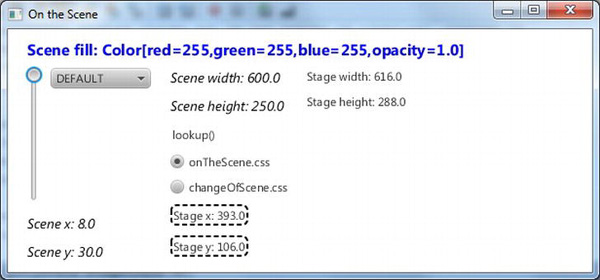
Figure 2-6. The OnTheScene program when first invoked
Go ahead and run the OnTheScene program, putting it through its paces as instructed in the following exercise. We follow up with a walkthrough of the code so that you can associate the behavior with the code behind it.
EXAMINING THE BEHAVIOR OF THE ONTHESCENE PROGRAM
When the OnTheScene program starts, its appearance should be similar to the screenshot in Figure 2-6. To fully examine its behavior, perform the following steps. Note that the property and method names on the UI correspond to the property and methods in the Scene, Stage, and Cursor classes, as well as CSS (Cascading Style Sheets) file names.
- Drag the application around, noticing that although the Stage x and y values are relative to the screen, the Scene’s x and y values are relative to the upper-left corner of the exterior of the Stage (including decorations). Similarly, the width and height of the Scene are the dimensions of the interior of the Stage (which doesn’t include decorations). As noted earlier, it is best to set the Scene width and height explicitly (or let it be set implicitly by assuming the size of the contained nodes), rather than setting the width and height of a decorated Stage.
- Resize the program’s window and observe that the width and height values change to reflect the width and height of the Scene. Also notice that the position of much of the content in the scene changes as you change the height of the window.
- Click the lookup() hyperlink and notice that the string “Scene height: XXX.X” prints in the console, where XXX.X is the Scene’s height.
- Hover the mouse over the choice box dropdown and notice that it becomes slightly larger. Click the choice box and choose a cursor style in the list, noticing that the cursor changes to that style. Be careful with choosing NONE, as the cursor may disappear, and you’ll need to use the keyboard (or psychic powers while moving the mouse) to make it visible.
- Drag the slider on the left, noticing that the fill color of the Scene changes and that the string at the top of the Scene reflects the red-green-blue (RGB) and opacity values of the current fill color.
- Notice the appearance and content of the text on the Scene. Then click the changeOfScene.css button, noticing that the color and font and content characteristics for some of the text on the Scene changes as shown in the screenshot in Figure 2-7.
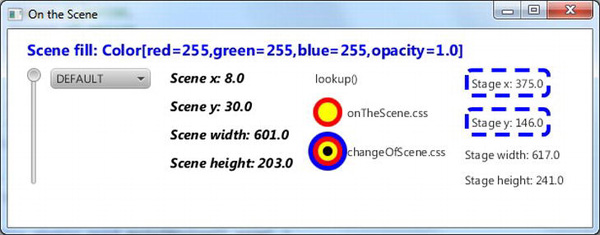
Figure 2-7. The OnTheScene program with the changeOfScene CSS style sheet applied
- Click the OnTheScene.css button, noticing that the color and font characteristics return to their previous state.
Now that you’ve explored this example program that demonstrates features of the Scene, let’s walk through the code!
Understanding the OnTheScene Program
Take a look at the code for the OnTheScene program in Listing 2-2, and after that we point out new and relevant concepts.
Listing 2-2. OnTheSceneMain.fx
package projavafx.onthescene.ui;


import javafx.application.Application;

import javafx.beans.property.DoubleProperty;

import javafx.beans.property.SimpleDoubleProperty;

import javafx.beans.property.SimpleStringProperty;

import javafx.beans.value.ChangeListener;

import javafx.beans.value.ObservableValue;

import javafx.collections.FXCollections;

import javafx.collections.ObservableList;

import javafx.event.EventHandler;

import javafx.geometry.HPos;

import javafx.geometry.Insets;

import javafx.geometry.Orientation;

import javafx.geometry.VPos;

import javafx.scene.Cursor;

import javafx.scene.Scene;

import javafx.scene.SceneBuilder;

import javafx.scene.control.ChoiceBox;

import javafx.scene.control.ChoiceBoxBuilder;

import javafx.scene.control.HyperlinkBuilder;

import javafx.scene.control.Label;

import javafx.scene.control.LabelBuilder;

import javafx.scene.control.RadioButton;

import javafx.scene.control.RadioButtonBuilder;

import javafx.scene.control.Slider;

import javafx.scene.control.SliderBuilder;

import javafx.scene.control.ToggleGroup;

import javafx.scene.layout.FlowPane;

import javafx.scene.layout.FlowPaneBuilder;

import javafx.scene.layout.HBoxBuilder;

import javafx.scene.paint.Color;

import javafx.scene.text.Font;

import javafx.scene.text.FontWeight;

import javafx.scene.text.Text;

import javafx.scene.text.TextBuilder;

import javafx.stage.Stage;


public class OnTheSceneMain extends Application {

  DoubleProperty fillVals = new SimpleDoubleProperty(255.0);


  Scene sceneRef;


  ObservableList cursors = FXCollections.observableArrayList(

      Cursor.DEFAULT,

      Cursor.CROSSHAIR,

      Cursor.WAIT,

      Cursor.TEXT,

      Cursor.HAND,

      Cursor.MOVE,
      Cursor.N_RESIZE,

      Cursor.NE_RESIZE,

      Cursor.E_RESIZE,

      Cursor.SE_RESIZE,

      Cursor.S_RESIZE,

      Cursor.SW_RESIZE,

      Cursor.W_RESIZE,

      Cursor.NW_RESIZE,

      Cursor.NONE

    );


  public static void main(String[] args) {

    Application.launch(args);

  }


  @Override

  public void start(Stage stage) {

    Slider sliderRef;

    ChoiceBox choiceBoxRef;

    Text textSceneX;

    Text textSceneY;

    Text textSceneW;

    Text textSceneH;

    Label labelStageX;

    Label labelStageY;

    Label labelStageW;

    Label labelStageH;


    final ToggleGroup toggleGrp = new ToggleGroup();


    FlowPane sceneRoot = FlowPaneBuilder.create()

      .layoutX(20)

      .layoutY(40)

      .padding(new Insets(0, 20, 40, 0))

      .orientation(Orientation.VERTICAL)

      .vgap(10)

      .hgap(20)

      .columnHalignment(HPos.LEFT)

      .children(

        HBoxBuilder.create()

          .spacing(10)

          .children(

            sliderRef = SliderBuilder.create()

              .min(0)

              .max(255)

              .value(255)

              .orientation(Orientation.VERTICAL)

              .build(),

            choiceBoxRef = ChoiceBoxBuilder.create()

              .items(cursors)

              .build()

          )
          .build(),

        textSceneX = TextBuilder.create()

          .styleClass("emphasized-text")

          .build(),

        textSceneY = TextBuilder.create()

          .styleClass("emphasized-text")

          .build(),

        textSceneW = TextBuilder.create()

          .styleClass("emphasized-text")

          .build(),

        textSceneH = TextBuilder.create()

          .styleClass("emphasized-text")

          .id("sceneHeightText")

          .build(),

        HyperlinkBuilder.create()

          .text("lookup()")

          .onAction(new EventHandler<javafx.event.ActionEvent>() {

            @Override public void handle(javafx.event.ActionEvent e) {

              System.out.println("sceneRef:" + sceneRef);

              Text textRef = (Text)sceneRef.lookup("#sceneHeightText");

              System.out.println(textRef.getText());

            }

          })

          .build(),

        RadioButtonBuilder.create()

          .text("onTheScene.css")

          .toggleGroup(toggleGrp)

          .selected(true)

          .build(),

        RadioButtonBuilder.create()

          .text("changeOfScene.css")

          .toggleGroup(toggleGrp)

          .build(),

        labelStageX = LabelBuilder.create()

          .id("stageX")

          .build(),

        labelStageY = LabelBuilder.create()

          .id("stageY")

          .build(),

        labelStageW = new Label(),

        labelStageH = new Label()

      )

      .build();


    sceneRef = SceneBuilder.create()

      .width(600)

      .height(250)

      .root(sceneRoot)

      .build();
     sceneRef.getStylesheets().addAll(OnTheSceneMain.class

            .getResource("onTheScene.css").toExternalForm());

    stage.setScene(sceneRef);


    choiceBoxRef.getSelectionModel().selectFirst();


    // Setup various property binding

    textSceneX.textProperty().bind(new SimpleStringProperty("Scene x: ")

            .concat(sceneRef.xProperty().asString()));

    textSceneY.textProperty().bind(new SimpleStringProperty("Scene y: ")

            .concat(sceneRef.yProperty().asString()));

    textSceneW.textProperty().bind(new SimpleStringProperty("Scene width: ")

            .concat(sceneRef.widthProperty().asString()));

    textSceneH.textProperty().bind(new SimpleStringProperty("Scene height: ")

            .concat(sceneRef.heightProperty().asString()));

    labelStageX.textProperty().bind(new SimpleStringProperty("Stage x: ")

            .concat(sceneRef.getWindow().xProperty().asString()));

    labelStageY.textProperty().bind(new SimpleStringProperty("Stage y: ")

            .concat(sceneRef.getWindow().yProperty().asString()));

    labelStageW.textProperty().bind(new SimpleStringProperty("Stage width: ")

            .concat(sceneRef.getWindow().widthProperty().asString()));

    labelStageH.textProperty().bind(new SimpleStringProperty("Stage height: ")

            .concat(sceneRef.getWindow().heightProperty().asString()));

    sceneRef.cursorProperty().bind(choiceBoxRef.getSelectionModel()

            .selectedItemProperty());

    fillVals.bind(sliderRef.valueProperty());


    // When fillVals changes, use that value as the RGB to fill the scene

    fillVals.addListener(new ChangeListener() {

      public void changed(ObservableValue ov, Object oldValue, Object newValue) {

        Double fillValue = fillVals.getValue() / 256.0;

        sceneRef.setFill(new Color(fillValue, fillValue, fillValue, 1.0));

      }

    });


    // When the selected radio button changes, set the appropriate stylesheet

    toggleGrp.selectedToggleProperty().addListener(new ChangeListener() {

      public void changed(ObservableValue ov, Object oldValue, Object newValue) {

        String radioButtonText = ((RadioButton)toggleGrp.getSelectedToggle())

                .getText();

        sceneRef.getStylesheets().addAll(OnTheSceneMain.class

                .getResource(radioButtonText).toExternalForm());

      }

    });


    stage.setTitle("On the Scene");

    stage.show();
    // Define an unmanaged node that will display Text

    Text addedTextRef = TextBuilder.create()

      .layoutX(0)

      .layoutY(-30)

      .textOrigin(VPos.TOP)

      .fill(Color.BLUE)

      .font(Font.font("Sans Serif", FontWeight.BOLD, 16))

      .managed(false)

      .build();


    // Bind the text of the added Text node to the fill property of the Scene

    addedTextRef.textProperty().bind(new SimpleStringProperty("Scene fill: ").

            concat(sceneRef.fillProperty()));


    // Add to the Text node to the FlowPane

    ((FlowPane)sceneRef.getRoot()).getChildren().add(addedTextRef);

  }

}
Setting the Cursor for the Scene
The cursor can be set for a given node and/or for the entire scene. To do the latter, set the cursor property of the Scene instance to one of the constant values in the Cursor class, as shown in the following snippet from Listing 2-2.
    sceneRef.cursorProperty().bind(choiceBoxRef.getSelectionModel()

            .selectedItemProperty());
These cursor values can be seen by looking at the javafx.scene.Cursor class in the JavaFX API docs; we’ve created a collection of these constants in Listing 2-2.
Painting the Scene’s Background
The Scene class has a fill property whose type is javafx.scene.paint.Paint. Looking at the JavaFX API will reveal that the known subclasses of Paint are Color, LinearGradient, and RadialGradient. Therefore, a Scene’s background may be filled with solid colors and gradients. If you don’t set the fill property of the Scene, the default color (white) will be used.
![]() Tip One of the Color constants is Color.TRANSPARENT, so you may make the Scene’s background completely transparent if desired. In fact, the reason that the Scene behind the rounded-cornered rectangle in the StageCoach screenshot in Figure 2-5 isn’t white is that its fill property is set to Color.TRANSPARENT. (See Listing 2-1 again.)
Tip One of the Color constants is Color.TRANSPARENT, so you may make the Scene’s background completely transparent if desired. In fact, the reason that the Scene behind the rounded-cornered rectangle in the StageCoach screenshot in Figure 2-5 isn’t white is that its fill property is set to Color.TRANSPARENT. (See Listing 2-1 again.)
To set the fill property in the OnTheScene example, instead of using one of the constants in the Color class (such as Color.BLUE), we’re using an RGB formula to create the color. Take a look at the javafx.scene.paint.Color class in the JavaFX API docs and scroll down past the constants such as ALICEBLUE and WHITESMOKE to see the constructors and methods. We’re using a constructor of the Color class, setting the fill property to it, as shown in the following snippet from Listing 2-2.
sceneRef.setFill(new Color(fillValue, fillValue, fillValue, 1.0));
As you move the Slider, to which the fillVals property is bound, each of the arguments to the Color() constructor are set to a value from 0 to 255, as indicated in the following code snippet from Listing 2-2.
fillVals.bind(sliderRef.valueProperty());
Populating the Scene with Nodes
As covered in Chapter 1, you can populate a Scene with nodes by instantiating them using builder classes. We’ve also discussed that some nodes (such as Group and VBox) can contain other nodes. These capabilities enable you to construct complex scene graphs containing nodes. In the current example, the root property of the Scene contains a Flow layout container, which causes its contents to flow either vertically or horizontally, wrapping as necessary. The Flow container in our example contains an HBox (which contains a Slider and a ChoiceBox) and several other nodes (instances of Text, Hyperlink, and RadioButton classes).
Finding a Scene Node by ID
Each node in a Scene can be assigned an ID in the id property of the node. For example, in the following snippet from Listing 2-2, the id property of a Text node is assigned the String “sceneHeightText”. When the action event handler in the Hyperlink control is called, the lookup() method of the Scene instance is used to obtain a reference to the node whose id is “sceneHeightText”. The event handler then prints the content of the Text node to the console.
![]() Note The Hyperlink control is essentially a button that has the appearance of hyperlink text. It has an action event handler in which you could place code that opens a browser page or any other desired functionality.
Note The Hyperlink control is essentially a button that has the appearance of hyperlink text. It has an action event handler in which you could place code that opens a browser page or any other desired functionality.
        textSceneH = TextBuilder.create()

          .styleClass("emphasized-text")

          .id("sceneHeightText")

          .build(),

        HyperlinkBuilder.create()

          .text("lookup()")

          .onAction(new EventHandler<javafx.event.ActionEvent>() {
            @Override public void handle(javafx.event.ActionEvent e) {

              System.out.println("sceneRef:" + sceneRef);

              Text textRef = (Text)sceneRef.lookup("#sceneHeightText");

              System.out.println(textRef.getText());

            }

          })

          .build(),
A close examination of the action event handler reveals that the lookup() method returns a Node, but the actual type of object returned in this snippet is a Text object. Because we need to access a property of the Text class (text) that isn’t in the Node class, it is necessary to coerce the compiler into trusting that at runtime the object will be an instance of the Text class.
Accessing the Stage from the Scene
To obtain a reference to the Stage instance from the Scene, we use a property in the Scene class named window. The accessor method for this property appears in the following snippet from Listing 2-2 to get the x and y co-ordinates of the Stage on the screen.
    labelStageX.textProperty().bind(new SimpleStringProperty("Stage x: ")

            .concat(sceneRef.getWindow().xProperty().asString()));

    labelStageY.textProperty().bind(new SimpleStringProperty("Stage y: ")

            .concat(sceneRef.getWindow().yProperty().asString()));
Inserting a Node into the Scene’s Content Sequence
Sometimes it is useful to add a node dynamically to the children of a UI container class. The code snippet shown below from Listing 2-2 demonstrates how this may be accomplished by dynamically adding a Text node to the children of the FlowPane instance:
    // Define an unmanaged node that will display Text

    Text addedTextRef = TextBuilder.create()

      .layoutX(0)

      .layoutY(-30)

      .textOrigin(VPos.TOP)

      .fill(Color.BLUE)

      .font(Font.font("Sans Serif", FontWeight.BOLD, 16))

      .managed(false)

      .build();


    // Bind the text of the added Text node to the fill property of the Scene

    addedTextRef.textProperty().bind(new SimpleStringProperty("Scene fill: ").

            concat(sceneRef.fillProperty()));


    // Add to the Text node to the FlowPane

    ((FlowPane)sceneRef.getRoot()).getChildren().add(addedTextRef);
This particular Text node is the one at the top of the Scene shown in Figures 2-6 and 2-7, in which the value of the Scene’s fill property is displayed. Note that in this example the managed property of the addedTextRef instance is set to false, so its position isn’t governed by the FlowPane.
CSS Styling the Nodes in a Scene
A very powerful aspect of JavaFX is the ability to use CSS to style the nodes in a Scene dynamically. You used this capability in Step 6 of the previous exercise when you clicked the changeOfScene.css button to change the appearance of the UI from what you saw in Figure 2-6 to what was shown in Figure 2-7. Also, in Step 7 of the exercise, the appearance of the UI changed back to what was shown in Figure 2-6 when you clicked the onTheScene.css radio button. The relevant code snippet from Listing 2-2 is shown here:
    sceneRef.getStylesheets().addAll(OnTheSceneMain.class

            .getResource("onTheScene.css").toExternalForm());

    ...code omitted...

    // When the selected radio button changes, set the appropriate stylesheet

    toggleGrp.selectedToggleProperty().addListener(new ChangeListener() {

      public void changed(ObservableValue ov, Object oldValue, Object newValue) {

        String radioButtonText = ((RadioButton)toggleGrp.getSelectedToggle())

                .getText();

        sceneRef.getStylesheets().addAll(OnTheSceneMain.class

                .getResource(radioButtonText).toExternalForm());

      }

    });
In this snippet, the stylesheets property of the Scene is initialized to the location of the onTheScene.css file, which in this case is the same directory as the OnTheSceneMain class. Also shown in the snippet is the assignment of the CSS files to the Scene as the appropriate buttons are clicked. Take a look at Listing 2-3 to see the style sheet that corresponds to the screenshot in Figure 2-6.
Some of the CSS selectors in this style sheet represent the nodes whose id property is either “stageX” or “stageY”. There is also a selector in this style sheet that represents nodes whose styleClass property is “emphasized-text”. In addition, there is a selector in this style sheet that maps to the ChoiceBox UI control by substituting the camel-case name of the control to a lowercase hyphenated name (choice-box). The properties in this style sheet begin with “-fx-“, and correspond to the type of node with which they are associated. The values in this style sheet (such as black, italic, and 14pt) are expressed as standard CSS values.
Listing 2-3. onTheScene.css
#stageX, #stageY {

  -fx-padding: 1;

  -fx-border-color: black;

  -fx-border-style: dashed;

  -fx-border-width: 2;

  -fx-border-radius: 5;

}


.emphasized-text {

  -fx-font-size: 14pt;

  -fx-font-weight: normal;

  -fx-font-style: italic;

}
.choice-box:hover {

    -fx-scale-x: 1.1;

    -fx-scale-y: 1.1;

}


.radio-button .radio  {

   -fx-background-color: -fx-shadow-highlight-color, -fx-outer-border,

                         -fx-inner-border, -fx-body-color;

   -fx-background-insets: 0 0 -1 0,  0,  1,  2;

   -fx-background-radius: 1.0em;

   -fx-padding: 0.333333em;

}


.radio-button:focused .radio {

    -fx-background-color: -fx-focus-color, -fx-outer-border,

                          -fx-inner-border, -fx-body-color;

    -fx-background-radius: 1.0em;

    -fx-background-insets: -1.4, 0, 1, 2;

}
Listing 2-4 is the style sheet that corresponds to the screenshot in Figure 2-7. For more information on CSS style sheets, see the Resources section at the end of this chapter.
Listing 2-4. changeOfScene.css
#stageX, #stageY {

  -fx-padding: 3;

  -fx-border-color: blue;

  -fx-stroke-dash-array: 12 2 4 2;

  -fx-border-width: 4;

  -fx-border-radius: 5;

}


.emphasized-text {

  -fx-font-size: 14pt;

  -fx-font-weight: bold;

  -fx-font-style: normal;

}


.radio-button *.radio  {

    -fx-padding: 10;

    -fx-background-color: red, yellow;

    -fx-background-insets: 0, 5;

    -fx-background-radius: 30, 20;

}


.radio-button:focused *.radio {

    -fx-background-color: blue, red, yellow;

    -fx-background-insets: -5, 0, 5;

    -fx-background-radius: 40, 30, 20;

}
Now that you’ve had some experience with using the Stage and Scene classes, several of the Node subclasses, and CSS styling, we show you how to handle events that can occur when your JavaFX program is running.
Handling Input Events
So far we’ve shown you a couple of examples of event handling. For example, we used the onAction event handler to execute code when a button is clicked. We also used the onCloseRequest event handler of the Stage class to execute code when the Stage has been requested externally to close. In this section, we explore more of the event handlers available in JavaFX.
Surveying Mouse and Keyboard Events and Handlers
Most of the events that occur in JavaFX programs are related to the user manipulating input devices such as a mouse and keyboard. To see the available event handlers and their associated event objects, we take yet another look at the JavaFX API documentation. First, navigate to the javafx.scene.Node class and look for the properties that begin with the letters “on”. These properties represent the event handlers common to all nodes in JavaFX. Here is a list of these event handlers in the JavaFX 2.0 API:
- Key event handlers: onKeyPressed, onKeyReleased, onKeyTyped
- Mouse event handlers: onMouseClicked, onMouseDragged, onMouseEntered, onMouseExited, onMouseMoved, onMousePressed, onMouseReleased
- Drag and drop handlers: onDragDetected, onDragDone, onDragDropped, onDragEntered, onDragExited, onDragOver
Each of these is a property that defines a method to be called when particular input events occur. In the case of the key event handlers, as shown in the JavaFX API docs, the method’s parameter is a javafx.scene.input.KeyEvent instance. The method’s parameter for the mouse event handlers is a javafx.scene.input.MouseEvent.
Understanding the KeyEvent Class
Take a look at the JavaFX API docs for the KeyEvent class, and you’ll see that it contains several methods, a commonly used one being getCode(). The getCode() method returns a KeyCode instance representing the key that caused the event when pressed. Looking at the javafx.scene.input.KeyCode class in the JavaFX API docs reveals that a multitude of constants exist that represent keys on an international set of keyboards. Another way to find out what key was pressed is to call the getCharacter() method, which returns a string that represents the unicode character associated with the key pressed.
The KeyEvent class also enables you to see whether the Alt, Ctrl, Meta, and/or Shift keys were down at the time of the event by calling the isAltDown(), isControlDown(), isMetaDown(), or isShiftDown() methods, respectively.
Understanding the MouseEvent Class
Take a look at the MouseEvent class in the JavaFX API docs, and you see that significantly more methods are available than in KeyEvent. Like KeyEvent, MouseEvent has the isAltDown(), isControlDown(), isMetaDown(), and isShiftDown() methods, as well as the source field, which is a reference to the object in which the event originated. In addition, it has several methods that pinpoint various co-ordinate spaces where the mouse event occurred, all expressed in pixels:
- getX() and getY() return the horizontal and vertical position of the mouse event, relative to the origin of the node in which the mouse event occurred.
- getSceneX() and getSceneY() return the horizontal and vertical position of the mouse event, relative to the Scene.
- getScreenX() and getScreenY() return the horizontal and vertical position of the mouse event, relative to the screen.
Here are a few other commonly useful methods:
- isDragDetect() returns true if a drag event is detected.
- getButton(), isPrimaryButtonDown(), isSecondaryButtonDown(), isMiddleButtonDown(), and getClickCount() contain information about what button was clicked, and how many times it was clicked.
A little later in this chapter you get some experience with creating key and mouse event handlers in the ZenPong example program. To continue preparing you for the ZenPong example, we now give you a look at how you can animate the nodes that you put in your scene.
Animating Nodes in the Scene
One of the strengths of JavaFX is the ease with which you can create graphically rich user interfaces. Part of that richness is the ability to animate nodes that live in the Scene. At its core, animating a node involves changing the value of its properties over a period of time. Examples of animating a node include the following.
- Gradually increasing the size of a node when the mouse enters its bounds, and gradually decreasing the size when the mouse exits its bounds. Note that this requires scaling the node, which is referred to as a transform.
- Gradually increasing or decreasing the opacity of a node to provide a fade-in or fade-out effect, respectively.
- Gradually altering values of properties in a node that change its location, causing it to move from one location to another. This is useful, for example, when creating a game such as Pong. A related capability is detecting when a node has collided with another node.
Animating a node involves the use of the Timeline class, located in the javafx.animation package. Depending on the requirements of an animation and personal preference, use one of two general techniques:
- Create an instance of the Timeline class directly and supply key frames that specify values and actions at specific points in time.
- Use the javafx.animation.Transition subclasses to define and associate specific transitions with a node. Examples of transitions include causing a node to move along a defined path over a period of time, and rotating a node over a period of time. Each of these transition classes extends the Timeline class.
We now cover these techniques, showing examples of each, beginning with the first one listed.
Using a Timeline for Animation
Take a look at the javafx.animation package in the JavaFX API docs, and you see three of the classes that are used when directly creating a timeline: Timeline, KeyFrame, and Interpolator. Peruse the docs for these classes, and then come back so we can show you some examples of using them.
![]() Tip Remember to consult the JavaFX API docs for any new packages, classes, properties, and methods that you encounter.
Tip Remember to consult the JavaFX API docs for any new packages, classes, properties, and methods that you encounter.
The Metronome1 Example
We use a simple metronome example to demonstrate how to create a timeline.
As the screenshot in Figure 2-8 shows, the Metronome1 program has a pendulum as well as four buttons that start, pause, resume, and stop the animation. The pendulum in this example is a Line node, and we’re going to animate that node by interpolating its startX property over the period of one second. Go ahead and take this example for a spin by doing the following exercise.
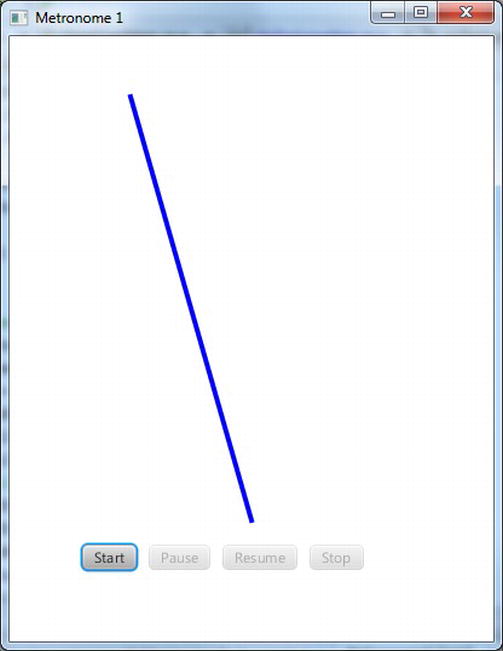
Figure 2-8. The Metronome1 program
Now that you’ve experienced the behavior of the Metronome1 program, we walk through the code behind it.
Understanding the Metronome1 program
Take a look at the code for the Metronome1 program in Listing 2-5, and then we point out relevant concepts.
Listing 2-5. Metronome1Main.java
package projavafx.metronome1.ui;


import javafx.animation.Animation;

import javafx.animation.Interpolator;

import javafx.animation.KeyFrame;

import javafx.animation.KeyValue;

import javafx.animation.Timeline;

import javafx.animation.TimelineBuilder;

import javafx.application.Application;

import javafx.beans.property.DoubleProperty;

import javafx.beans.property.SimpleDoubleProperty;

import javafx.event.EventHandler;

import javafx.scene.GroupBuilder;

import javafx.scene.Scene;

import javafx.scene.SceneBuilder;

import javafx.scene.control.Button;

import javafx.scene.control.ButtonBuilder;

import javafx.scene.layout.HBoxBuilder;

import javafx.scene.paint.Color;

import javafx.scene.shape.Line;

import javafx.scene.shape.LineBuilder;

import javafx.stage.Stage;

import javafx.util.Duration;


public class Metronome1Main extends Application {

  DoubleProperty startXVal = new SimpleDoubleProperty(100.0);
  Button startButton;

  Button pauseButton;

  Button resumeButton;

  Button stopButton;

  Line line;


  Timeline anim = TimelineBuilder.create()

    .autoReverse(true)

    .keyFrames(

      new KeyFrame(

        new Duration(0.0),

        new KeyValue(startXVal, 100.0)

      ),

      new KeyFrame(

        new Duration(1000.0),

        new KeyValue(startXVal, 300.0, Interpolator.LINEAR)

      )

    )

    .cycleCount(Timeline.INDEFINITE)

    .build();


  public static void main(String[] args) {

    Application.launch(args);

  }


  @Override

  public void start(Stage stage) {

    Scene scene  = SceneBuilder.create()

      .width(400)

      .height(500)

      .root(

        GroupBuilder.create()

          .children(

            line = LineBuilder.create()

              .startY(50)

              .endX(200)

              .endY(400)

              .strokeWidth(4)

              .stroke(Color.BLUE)

              .build(),

            HBoxBuilder.create()

              .layoutX(60)

              .layoutY(420)

              .spacing(10)

              .children(

                startButton = ButtonBuilder.create()

                  .text("Start")

                  .onAction(new EventHandler<javafx.event.ActionEvent>() {

                    @Override public void handle(javafx.event.ActionEvent e) {

                      anim.playFromStart();

                    }

                  })
                  .build(),

                pauseButton = ButtonBuilder.create()

                  .text("Pause")

                  .onAction(new EventHandler<javafx.event.ActionEvent>() {

                    @Override public void handle(javafx.event.ActionEvent e) {

                      anim.pause();

                    }

                  })

                  .build(),

                resumeButton = ButtonBuilder.create()

                  .text("Resume")

                  .onAction(new EventHandler<javafx.event.ActionEvent>() {

                    @Override public void handle(javafx.event.ActionEvent e) {

                      anim.play();

                    }

                  })

                  .build(),

                stopButton = ButtonBuilder.create()

                  .text("Stop")

                  .onAction(new EventHandler<javafx.event.ActionEvent>() {

                    @Override public void handle(javafx.event.ActionEvent e) {

                      anim.stop();

                    }

                  })

                  .build()

              )

              .build()

          )

          .build()

      )

      .build();


    line.startXProperty().bind(startXVal);

    startButton.disableProperty().bind(anim.statusProperty()

            .isNotEqualTo(Animation.Status.STOPPED));

    pauseButton.disableProperty().bind(anim.statusProperty()

            .isNotEqualTo(Animation.Status.RUNNING));

    resumeButton.disableProperty().bind(anim.statusProperty()

            .isNotEqualTo(Animation.Status.PAUSED));

    stopButton.disableProperty().bind(anim.statusProperty()

            .isEqualTo(Animation.Status.STOPPED));


    stage.setScene(scene);

    stage.setTitle("Metronome 1");

    stage.show();

  }

}
Understanding the Timeline Class
The main purpose for the Timeline class is to provide the ability to change the values of properties in a gradual fashion over given periods of time. Take a look at the following snippet from Listing 2-5 to see the timeline being created, along with some of its commonly used properties.
  DoubleProperty startXVal = new SimpleDoubleProperty(100.0);


  ...code omitted...


  Timeline anim = TimelineBuilder.create()

    .autoReverse(true)

    .keyFrames(

      new KeyFrame(

        new Duration(0.0),

        new KeyValue(startXVal, 100.0)

      ),

      new KeyFrame(

        new Duration(1000.0),

        new KeyValue(startXVal, 300.0, Interpolator.LINEAR)

      )

    )

    .cycleCount(Timeline.INDEFINITE)

    .build();


  ...code omitted...


    line = LineBuilder.create()

      .startY(50)

      .endX(200)

      .endY(400)

      .strokeWidth(4)

      .stroke(Color.BLUE)

      .build(),


  ...code omitted...


    line.startXProperty().bind(startXVal);
Inserting Key Frames into the Timeline
Our timeline contains a collection of two KeyFrame instances. Using the KeyValue constructor, one of these instances assigns 100 to the startXVal property at the beginning of the timeline, and the other assigns 300 to the startXVal property when the timeline has been running for one second. Because the startX property of the Line is bound to the value of the startXVal property, the net result is that the top of the line moves 200 pixels horizontally over the course of one second.
In the second KeyFrame of the timeline, the KeyValue constructor is passed a third argument that specifies that the interpolation from 100 to 300 will occur in a linear fashion over the one-second duration. Other Interpolation constants include EASEIN, EASEOUT, and EASEBOTH. These cause the interpolation in a KeyFrame to be slower in the beginning, ending, or both, respectively.
Following are the other Timeline properties, inherited from the Animation class, used in this example:
- autoReverse, which we’re initializing to true. This causes the timeline to automatically reverse when it reaches the last KeyFrame. When reversed, the interpolation goes from 300 to 100 over the course of one second.
- cycleCount, which we’re initializing to Timeline.INDEFINITE. This causes the timeline to repeat indefinitely until stopped by the stop() method of the Timeline class.
Speaking of the methods of the Timeline class, now is a good time to show you how to control the timeline and monitor its state.
Controlling and Monitoring the Timeline
As you observed when using the Metronome1 program, clicking the buttons causes the animation to start, pause, resume, and stop. This in turn has an effect on the states of the animation (running, paused, or stopped). Those states are reflected in the buttons in the form of being enabled/disabled. The following snippet from Listing 2-5 shows how to start, pause, resume, and stop the timeline, as well as how to tell whether the timeline is running and/or paused.
                startButton = ButtonBuilder.create()

                  .text("Start")

                  .onAction(new EventHandler<javafx.event.ActionEvent>() {

                    @Override public void handle(javafx.event.ActionEvent e) {

                      anim.playFromStart();

                    }

                  })

                  .build(),

                pauseButton = ButtonBuilder.create()

                  .text("Pause")

                  .onAction(new EventHandler<javafx.event.ActionEvent>() {

                    @Override public void handle(javafx.event.ActionEvent e) {

                      anim.pause();

                    }

                  })

                  .build(),

                resumeButton = ButtonBuilder.create()

                  .text("Resume")

                  .onAction(new EventHandler<javafx.event.ActionEvent>() {

                    @Override public void handle(javafx.event.ActionEvent e) {

                      anim.play();

                    }

                  })
                  .build(),

                stopButton = ButtonBuilder.create()

                  .text("Stop")

                  .onAction(new EventHandler<javafx.event.ActionEvent>() {

                    @Override public void handle(javafx.event.ActionEvent e) {

                      anim.stop();

                    }

                  })

                  .build()


    ...code omitted...


    startButton.disableProperty().bind(anim.statusProperty()

            .isNotEqualTo(Animation.Status.STOPPED));

    pauseButton.disableProperty().bind(anim.statusProperty()

            .isNotEqualTo(Animation.Status.RUNNING));

    resumeButton.disableProperty().bind(anim.statusProperty()

            .isNotEqualTo(Animation.Status.PAUSED));

    stopButton.disableProperty().bind(anim.statusProperty()

            .isEqualTo(Animation.Status.STOPPED));
As shown here in the action event handler of the Start button, the playFromStart() method of the Timeline instance is called, which begins playing the timeline from the beginning. In addition, the disable property of that Button is bound to an expression that evaluates whether the status property of the timeline is not equal to Animation.Status.STOPPED. This causes the button to be disabled when the timeline is not stopped (in which case it must be either running or paused).
When the user clicks the Pause button, the action event handler calls the timeline’s pause() method, which pauses the animation. The disable property of that Button is bound to an expression that evaluates whether the timeline is not running.
The Resume button is only disabled when the timeline is not paused. To resume the timeline from where it was paused, the action event handler calls the play() method of the timeline.
Finally, the Stop button is disabled when the timeline is stopped. To stop the timeline, the action event handler calls the stop() method of the timeline.
Now that you know how to animate nodes by creating a Timeline class and creating KeyFrame instances, it’s time to learn how to use the transition classes to animate nodes.
Using the Transition Classes for Animation
The javafx.transition package contains several classes whose purpose is to provide convenient ways to do commonly used animation tasks. For example, Table 2-1 contains a list of transition classes in that package.

Let’s take a look at a variation on the metronome theme in which we create a metronome using TranslateTransition for the animation.
The MetronomeTransition Example
When using the transition classes, we take a different approach toward animation than when using the Timeline class directly:
- In the timeline-based Metronomel program, we bound a property of a node (specifically, startX) to a property in the model (startXVal), and then used the timeline to interpolate the value of the property in the model.
- When using a transition class, however, we assign values to the properties of the Transition subclass, one of which is a node. The net result is that the node itself is affected, rather than just a bound attribute of the node being affected.
The distinction between these two approaches becomes clear as we walk through the MetronomeTransition example. Figure 2-9 shows a screenshot of this program when it is first invoked.
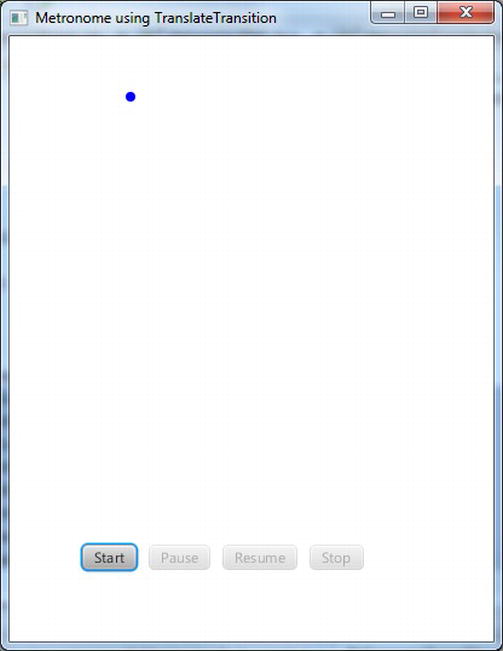
Figure 2-9. The MetronomeTransition program
The first noticeable difference between this example and the previous (Metronome1) example is that instead of one end of a line moving back and forth, we’re going to make a Circle node move back and forth.
The Behavior of the MetronomeTransition Program
Go ahead and run the program, and perform the same steps that you did in the previous “Examining the Behavior of the Metronome1 Program” exercise. Everything should function the same, except for the visual difference pointed out previously.
Understanding the MetronomeTransition Program
Take a look at the code for the MetronomeTransition program in Listing 2-6, and then we point out relevant concepts.
Listing 2-6. MetronomeTransitionMain.fx
package projavafx.metronometransition.ui;


import javafx.animation.Animation;

import javafx.animation.Interpolator;

import javafx.animation.Timeline;

import javafx.animation.TranslateTransition;

import javafx.animation.TranslateTransitionBuilder;

import javafx.application.Application;

import javafx.event.EventHandler;

import javafx.scene.GroupBuilder;

import javafx.scene.Scene;

import javafx.scene.SceneBuilder;

import javafx.scene.control.Button;

import javafx.scene.control.ButtonBuilder;

import javafx.scene.layout.HBoxBuilder;

import javafx.scene.paint.Color;

import javafx.scene.shape.Circle;

import javafx.scene.shape.CircleBuilder;

import javafx.stage.Stage;

import javafx.util.Duration;


public class MetronomeTransitionMain extends Application {

  Button startButton;

  Button pauseButton;

  Button resumeButton;

  Button stopButton;

  Circle circle = CircleBuilder.create()

    .centerX(100)

    .centerY(50)

    .radius(4)

    .fill(Color.BLUE)

    .build();


  TranslateTransition anim = TranslateTransitionBuilder.create()

    .duration(new Duration(1000.0))

    .node(circle)

    .fromX(0)

    .toX(200)

    .interpolator(Interpolator.LINEAR)

    .autoReverse(true)

    .cycleCount(Timeline.INDEFINITE)

    .build();


  public static void main(String[] args) {

    Application.launch(args);

  }
  @Override

  public void start(Stage stage) {

    Scene scene  = SceneBuilder.create()

      .width(400)

      .height(500)

      .root(

        GroupBuilder.create()

          .children(

            circle,

            HBoxBuilder.create()

              .layoutX(60)

              .layoutY(420)

              .spacing(10)

              .children(

                startButton = ButtonBuilder.create()

                  .text("Start")

                  .onAction(new EventHandler<javafx.event.ActionEvent>() {

                    @Override public void handle(javafx.event.ActionEvent e) {

                      anim.playFromStart();

                    }

                  })

                  .build(),

                pauseButton = ButtonBuilder.create()

                  .text("Pause")

                  .onAction(new EventHandler<javafx.event.ActionEvent>() {

                    @Override public void handle(javafx.event.ActionEvent e) {

                      anim.pause();

                    }

                  })

                  .build(),

                resumeButton = ButtonBuilder.create()

                  .text("Resume")

                  .onAction(new EventHandler<javafx.event.ActionEvent>() {

                    @Override public void handle(javafx.event.ActionEvent e) {

                      anim.play();

                    }

                  })

                  .build(),

                stopButton = ButtonBuilder.create()

                  .text("Stop")

                  .onAction(new EventHandler<javafx.event.ActionEvent>() {

                    @Override public void handle(javafx.event.ActionEvent e) {

                      anim.stop();

                    }

                  })

                  .build()

              )

              .build()

          )

          .build()

      )

      .build();
    startButton.disableProperty().bind(anim.statusProperty()

            .isNotEqualTo(Animation.Status.STOPPED));

    pauseButton.disableProperty().bind(anim.statusProperty()

            .isNotEqualTo(Animation.Status.RUNNING));

    resumeButton.disableProperty().bind(anim.statusProperty()

            .isNotEqualTo(Animation.Status.PAUSED));

    stopButton.disableProperty().bind(anim.statusProperty()

            .isEqualTo(Animation.Status.STOPPED));


    stage.setScene(scene);

    stage.setTitle("Metronome using TranslateTransition");

    stage.show();

  }

}
Using the TranslateTransition Class
As shown in the following snippet from Listing 2-6, to create a TranslateTransition we’re supplying values that are reminiscent of the values that we used when creating a timeline in the previous example. For example, we’re setting autoReverse to true and cycleCount to Timeline.INDEFINITE. Also, just as when creating a KeyFrame for a timeline, we’re supplying a duration and an interpolation type here as well.
In addition, we’re supplying some values to properties that are specific to a TranslateTransition, namely fromX and toX. These values are interpolated over the requested duration and assigned to the layoutX property of the node controlled by the transition (in this case, the circle). If we also wanted to cause vertical movement, assigning values to fromY and toY would cause interpolated values between them to be assigned to the layoutY property.
An alternative to supplying toX and toY values is to provide values to the byX and byY properties, which enables you to specify the distance to travel in each direction rather than start and end points. Also, if you don’t supply a value for fromX, the interpolation will begin with the current value of the node’s layoutX property. The same holds true for fromY (if not supplied, the interpolation will begin with the value of layoutY).
  Circle circle = CircleBuilder.create()

    .centerX(100)

    .centerY(50)

    .radius(4)

    .fill(Color.BLUE)

    .build();


  TranslateTransition anim = TranslateTransitionBuilder.create()

    .duration(new Duration(1000.0))

    .node(circle)

    .fromX(0)

    .toX(200)

    .interpolator(Interpolator.LINEAR)

    .autoReverse(true)

    .cycleCount(Timeline.INDEFINITE)

    .build();
Controlling and Monitoring the Transition
The TranslateTransition class, as do all of the classes in Table 2-1 earlier, extends the javafx.animation.Transition class, which in turn extends the Animation class. Because the Timeline class extends the Animation class, as you can see by comparing Listings 2-5 and 2-6, all of the code for the buttons in this example are identical to that in the previous example.
The MetronomePathTransition Example
As shown in Table 2-1 earlier, PathTransition is a transition class that enables you to move a node along a defined geometric path. Figure 2-10 shows a screenshot of a version of the metronome example, named MetronomePathTransition, that demonstrates how to use the PathTransition class.
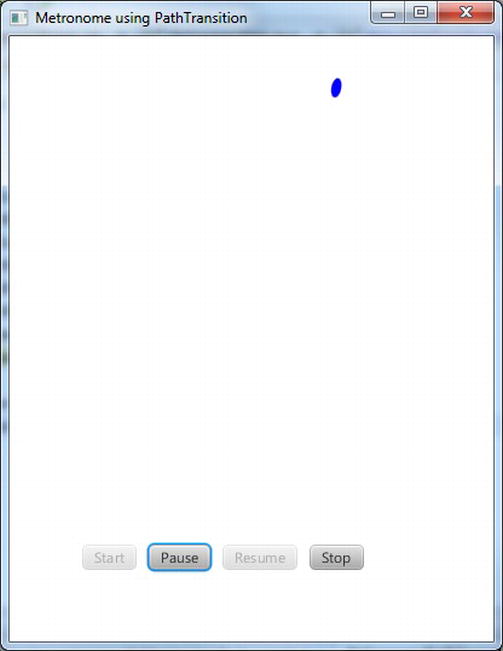
Figure 2-10. The MetronomePathTransition program
The Behavior of the MetronomePathTransition Program
Go ahead and run the program, performing once again the same steps that you did in the “Examining the Behavior of the Metronome1 Program” exercise. Everything should function the same as it did in the MetronomeTransition example, except that the node is an ellipse instead of a circle, and the node moves along the path of an arc.
Understanding the MetronomePathTransition Program
Listing 2-7 contains code snippets from the MetronomePathTransition program that highlight the differences from the preceding (MetronomeTransition) program. Take a look at the code, and we point out relevant concepts.
Listing 2-7. Portions of MetronomePathTransitionMain.java
package projavafx.metronomepathtransition.ui;

...imports omitted...

public class MetronomePathTransitionMain extends Application {

  Button startButton;

  Button pauseButton;

  Button resumeButton;

  Button stopButton;

  Ellipse ellipse = EllipseBuilder.create()

    .centerX(100)

    .centerY(50)

    .radiusX(4)

    .radiusY(8)

    .fill(Color.BLUE)

    .build();


  Path path = PathBuilder.create()

    .elements(

      new MoveTo(100, 50),

      ArcToBuilder.create()

        .x(300)

        .y(50)

        .radiusX(350)

        .radiusY(350)

        .sweepFlag(true)

        .build()

    )

    .build();


  PathTransition anim = PathTransitionBuilder.create()

    .duration(new Duration(1000.0))

    .node(ellipse)

    .path(path)

    .orientation(OrientationType.ORTHOGONAL_TO_TANGENT)

    .interpolator(Interpolator.LINEAR)

    .autoReverse(true)
    .cycleCount(Timeline.INDEFINITE)

    .build();


  public static void main(String[] args) {

    Application.launch(args);

  }


  @Override

  public void start(Stage stage) {

    Scene scene  = SceneBuilder.create()

      .width(400)

      .height(500)

      .root(

        GroupBuilder.create()

          .children(

            ellipse,

            ...HBox and Button instances omitted...

          )

          .build()

      )

      .build();

    ...property bindings omitted...

    stage.setScene(scene);

    stage.setTitle("Metronome using PathTransition");

    stage.show();

  }

}
Using the PathTransition Class
As shown in Listing 2-7, defining a PathTransition includes supplying an instance of type Path to the path property that represents the geometric path that the node is to travel. Here we’re creating a Path instance that defines an arc beginning at 100 pixels on the x axis and 50 pixels on the y axis, ending at 300 pixels on the x axis and 50 pixels on the y axis, with 350 pixel horizontal and vertical radii. This is accomplished by using the PathBuilder to create elements in the Path that contain the MoveTo and ArcTo path elements shown previously. Take a look at the javafx.scene.shapes package in the JavaFX API docs for more information on the PathElement class and its subclasses, which are used for creating a path.
![]() Tip The properties in the ArcTo class are fairly intuitive except for sweepFlag. If sweepFlag is true, the line joining the center of the arc to the arc itself sweeps through increasing angles. Otherwise, it sweeps through decreasing angles.
Tip The properties in the ArcTo class are fairly intuitive except for sweepFlag. If sweepFlag is true, the line joining the center of the arc to the arc itself sweeps through increasing angles. Otherwise, it sweeps through decreasing angles.
Another property of the PathTransition class is orientation, which controls whether the node’s orientation remains unchanged or stays perpendicular to the path’s tangent as it moves along the path. Listing 2-7 uses the OrientationType.ORTHOGONAL_TO_TANGENT constant to accomplish the latter, as the former is the default.
Drawing an Ellipse
As shown in Listing 2-7, drawing an Ellipse is similar to drawing a Circle, the difference being that an additional radius is required (radiusX and radiusY instead of just radius).
Now that you’ve learned how to animate nodes by creating a timeline and by creating transitions, we create a very simple Pong-style game that requires animating a ping-pong ball. In the process, you learn how to detect when the ball has hit a paddle or wall in the game.
The Zen of Node Collision Detection
When animating a node, you sometimes need to know when the node has collided with another node. To demonstrate this capability, our colleague Chris Wright developed a simple version of the Pong-style game that we call ZenPong. Originally we asked him to build the game with only one paddle, which brought the famous Zen koan (philosophical riddle), “What is the sound of one hand clapping,” to mind. Chris had so much fun developing the game that he snuck a second paddle in, but we’re still calling this example ZenPong. Figure 2-11 shows this very simple form of the game when first invoked.
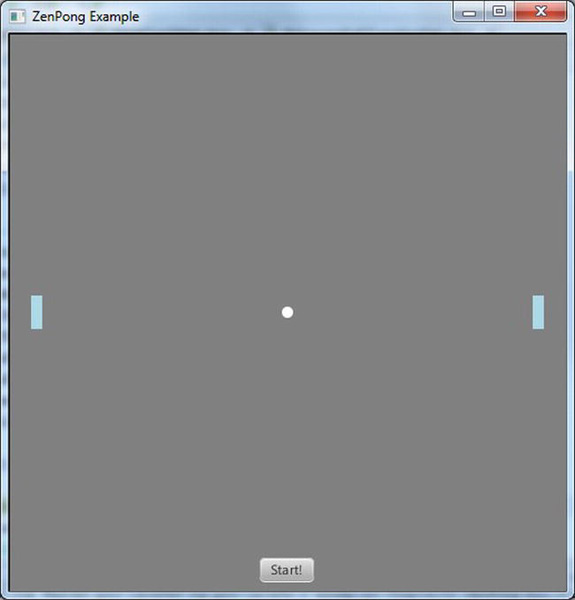
Figure 2-11. The initial state of the ZenPong game
Try out the game by following the instructions in the upcoming exercise, remembering that you control both paddles (unless you can get a colleague to share your keyboard and play).
EXAMINING THE BEHAVIOR OF THE ZENPONG GAME
When the program starts, its appearance should be similar to the screenshot in Figure 2-11. To fully examine its behavior, perform the following steps.
- Before clicking the Start button, drag each of the paddles vertically to other positions. One game cheat is to drag the left paddle up and the right paddle down, which will put them in good positions to respond to the ball after being served.
- Practice using the A key to move the left paddle up, the Z key to move the left paddle down, the L key to move the right paddle up, and the comma (,) key to move the right paddle down.
- Click the Start button to begin playing the game. Notice that the Start button disappears and the ball begins moving at a 45° angle, bouncing off paddles and the top and bottom walls. The screen should look similar to Figure 2-12.
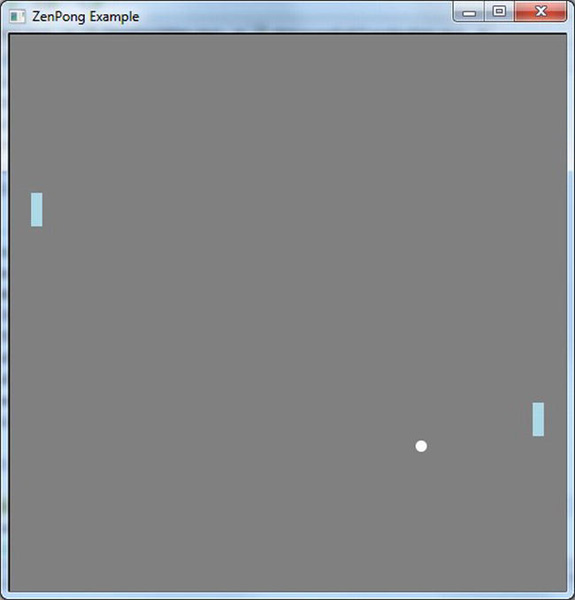
Figure 2-12. The ZenPong game in action
- If the ball hits the left or right wall, one of your hands has lost the game. Notice that the game resets, looking again like the screenshot in Figure 2-11.
Now that you’ve experienced the behavior of the ZenPong program, we walk through the code behind it.
Understanding the ZenPong Program
Examine the code for the ZenPong program in Listing 2-8, and then we highlight some concepts demonstrated within.
Listing 2-8. ZenPongMain.java
package projavafx.zenpong.ui;

...imports omitted...

public class ZenPongMain extends Application {

  /**

   * The center points of the moving ball

   */

  DoubleProperty centerX = new SimpleDoubleProperty();

  DoubleProperty centerY = new SimpleDoubleProperty();


  /**

   * The Y coordinate of the left paddle

   */

  DoubleProperty leftPaddleY = new SimpleDoubleProperty();


  /**

   * The Y coordinate of the right paddle

   */

  DoubleProperty rightPaddleY = new SimpleDoubleProperty();


  /**

   * The drag anchor for left and right paddles

   */

  double leftPaddleDragAnchorY;

  double rightPaddleDragAnchorY;


  /**

   * The initial translateY property for the left and right paddles

   */

  double initLeftPaddleTranslateY;

  double initRightPaddleTranslateY;
  /**

   * The moving ball

   */

  Circle ball;


  /**

   * The Group containing all of the walls, paddles, and ball.  This also allows

   * us to requestFocus for KeyEvents on the Group

   */

  Group pongComponents;


  /**

   * The left and right paddles

   */

  Rectangle leftPaddle;

  Rectangle rightPaddle;


  /**

   * The walls

   */

  Rectangle topWall;

  Rectangle rightWall;

  Rectangle leftWall;

  Rectangle bottomWall;


  Button startButton;


  /**

   * Controls whether the startButton is visible

   */

  BooleanProperty startVisible = new SimpleBooleanProperty(true);


  /**

   * The animation of the ball

   */

  Timeline pongAnimation = TimelineBuilder.create()

    .keyFrames(

      new KeyFrame(

        new Duration(10.0),

        new EventHandler<ActionEvent>() {

          public void handle(javafx.event.ActionEvent t) {

            checkForCollision();

            int horzPixels = movingRight ? 1 : -1;

            int vertPixels = movingDown ? 1 : -1;

            centerX.setValue(centerX.getValue() + horzPixels);

            centerY.setValue(centerY.getValue() + vertPixels);

          }

        }

      )

    )
    .cycleCount(Timeline.INDEFINITE)

    .build();


  /**

   * Controls whether the ball is moving right

   */

  boolean movingRight = true;


  /**

   * Controls whether the ball is moving down

   */

  boolean movingDown = true;


  /**

   * Sets the initial starting positions of the ball and paddles

   */

  void initialize() {

    centerX.setValue(250);

    centerY.setValue(250);
    leftPaddleY.setValue(235);

    rightPaddleY.setValue(235);

    startVisible.set(true);

    pongComponents.requestFocus();

  }


  /**

   * Checks whether or not the ball has collided with either the paddles,

   * topWall, or bottomWall.  If the ball hits the wall behind the paddles,

   * the game is over.

   */

  void checkForCollision() {

    if (ball.intersects(rightWall.getBoundsInLocal()) ||

        ball.intersects(leftWall.getBoundsInLocal())) {

      pongAnimation.stop();

      initialize();

    }

    else if (ball.intersects(bottomWall.getBoundsInLocal()) ||

             ball.intersects(topWall.getBoundsInLocal())) {

      movingDown = !movingDown;

    }

    else if (ball.intersects(leftPaddle.getBoundsInParent()) && !movingRight) {

      movingRight = !movingRight;

    }

    else if (ball.intersects(rightPaddle.getBoundsInParent()) && movingRight) {

      movingRight = !movingRight;

    }

  }
  /**

   * @param args the command line arguments

   */

  public static void main(String[] args) {

    Application.launch(args);

  }


  @Override

  public void start(Stage stage) {

    Scene scene  = SceneBuilder.create()

      .width(500)

      .height(500)

      .fill(

        LinearGradientBuilder.create()

          .startX(0.0)

          .startY(0.0)

          .endX(0.0)

          .endY(1.0)

          .stops(

            new Stop(0.0, Color.BLACK),

            new Stop(0.0, Color.GRAY)

           )

          .build()

      )

      .root(

        pongComponents = GroupBuilder.create()

          .focusTraversable(true)

          .children(

            ball = CircleBuilder.create()

              .radius(5.0)

              .fill(Color.WHITE)

              .build(),

            topWall = RectangleBuilder.create()

              .x(0)

              .y(0)

              .width(500)

              .height(1)

              .build(),

            leftWall = RectangleBuilder.create()

              .x(0)

              .y(0)

              .width(1)

              .height(500)

              .build(),

            rightWall = RectangleBuilder.create()

              .x(500)

              .y(0)

              .width(1)

              .height(500)

              .build(),
            bottomWall = RectangleBuilder.create()

              .x(0)

              .y(500)

              .width(500)

              .height(1)

              .build(),

            leftPaddle = RectangleBuilder.create()

              .x(20)

              .width(10)

              .height(30)

              .fill(Color.LIGHTBLUE)

              .cursor(Cursor.HAND)

              .onMousePressed(new EventHandler<MouseEvent>() {

                public void handle(MouseEvent me) {

                  initLeftPaddleTranslateY =  leftPaddle.getTranslateY();

                  leftPaddleDragAnchorY = me.getSceneY();

                }

              })

              .onMouseDragged(new EventHandler<MouseEvent>() {

                public void handle(MouseEvent me) {

                  double dragY = me.getSceneY() - leftPaddleDragAnchorY;

                  leftPaddleY.setValue(initLeftPaddleTranslateY + dragY);

                }

              })

              .build(),

            rightPaddle = RectangleBuilder.create()

              .x(470)

              .width(10)

              .height(30)

              .fill(Color.LIGHTBLUE)

              .cursor(Cursor.HAND)

              .onMousePressed(new EventHandler<MouseEvent>() {

                public void handle(MouseEvent me) {

                  initRightPaddleTranslateY =  rightPaddle.getTranslateY();

                  rightPaddleDragAnchorY = me.getSceneY();

                }

              })

              .onMouseDragged(new EventHandler<MouseEvent>() {

                public void handle(MouseEvent me) {

                  double dragY = me.getSceneY() - rightPaddleDragAnchorY;

                  rightPaddleY.setValue(initRightPaddleTranslateY + dragY);

                }

              })

              .build(),

            startButton = ButtonBuilder.create()

              .layoutX(225)

              .layoutY(470)

              .text("Start!")

              .onAction(new EventHandler<javafx.event.ActionEvent>() {

                @Override public void handle(javafx.event.ActionEvent e) {

                  startVisible.set(false);

                  pongAnimation.playFromStart();
                  pongComponents.requestFocus();

                }

              })

              .build()

          )

          .onKeyPressed(new EventHandler<KeyEvent>() {

            @Override public void handle(KeyEvent k) {

              if (k.getCode() == KeyCode.SPACE &&

                  pongAnimation.statusProperty()

                      .equals(Animation.Status.STOPPED)) {

                rightPaddleY.setValue(rightPaddleY.getValue() - 6);

              }

              else if (k.getCode() == KeyCode.L &&

                  !rightPaddle.getBoundsInParent().intersects(topWall.getBoundsInLocal())) {

                rightPaddleY.setValue(rightPaddleY.getValue() - 6);

              }

              else if (k.getCode() == KeyCode.COMMA &&

                  !rightPaddle.getBoundsInParent().intersects(bottomWall.getBoundsInLocal())) {

                rightPaddleY.setValue(rightPaddleY.getValue() + 6);

              }

              else if (k.getCode() == KeyCode.A &&

                  !leftPaddle.getBoundsInParent().intersects(topWall.getBoundsInLocal())) {

                leftPaddleY.setValue(leftPaddleY.getValue() - 6);

              }

              else if (k.getCode() == KeyCode.Z &&

                  !leftPaddle.getBoundsInParent().intersects(bottomWall.getBoundsInLocal())) {

                leftPaddleY.setValue(leftPaddleY.getValue() + 6);

              }

            }

          })

          .build()

      )

      .build();


    ball.centerXProperty().bind(centerX);

    ball.centerYProperty().bind(centerY);

    leftPaddle.translateYProperty().bind(leftPaddleY);

    rightPaddle.translateYProperty().bind(rightPaddleY);

    startButton.visibleProperty().bind(startVisible);


    stage.setScene(scene);

    initialize();

    stage.setTitle("ZenPong Example");

    stage.show();

  }

}
Using the KeyFrame Action Event Handler
We’re using a different technique in the timeline than demonstrated in the Metronome1 program earlier in the chapter (see Figure 2-8 and Listing 2-5). Instead of interpolating two values over a period of time, we’re using the action event handler of the KeyFrame instance in our timeline. Take a look at the following snippet from Listing 2-8 to see this technique in use.
  Timeline pongAnimation = TimelineBuilder.create()

    .keyFrames(

      new KeyFrame(

        new Duration(10.0),

        new EventHandler<ActionEvent>() {

          public void handle(javafx.event.ActionEvent t) {

            checkForCollision();

            int horzPixels = movingRight ? 1 : -1;

            int vertPixels = movingDown ? 1 : -1;

            centerX.setValue(centerX.getValue() + horzPixels);

            centerY.setValue(centerY.getValue() + vertPixels);

          }

        }

      )

    )

    .cycleCount(Timeline.INDEFINITE)

    .build();
As shown in the snippet, we use only one KeyFrame, and it has a very short time (10 milliseconds). When a KeyFrame has an action event handler, the code in that handler is executed when the time for that KeyFrame is reached. Because the cycleCount of this timeline is indefinite, the action event handler will be executed every 10 milliseconds. The code in this event handler does two things:
Calls a method named checkForCollision() which is defined in this program, whose purpose is to see whether the ball has collided with either paddle or any of the walls
Updates the properties in the model to which the position of the ball is bound, taking into account the direction in which the ball is already moving
Using the Node intersects() Method to Detect Collisions
Take a look inside the checkForCollision() method in the following snippet from Listing 2-8 to see how we check for collisions by detecting when two nodes intersect (share any of the same pixels).
  void checkForCollision() {

    if (ball.intersects(rightWall.getBoundsInLocal()) ||

        ball.intersects(leftWall.getBoundsInLocal())) {

      pongAnimation.stop();

      initialize();

    }

    else if (ball.intersects(bottomWall.getBoundsInLocal()) ||

             ball.intersects(topWall.getBoundsInLocal())) {

      movingDown = !movingDown;

    }
    else if (ball.intersects(leftPaddle.getBoundsInParent()) && !movingRight) {

      movingRight = !movingRight;

    }

    else if (ball.intersects(rightPaddle.getBoundsInParent()) && movingRight) {

      movingRight = !movingRight;

    }

  }
The intersects() method of the Node class shown here takes an argument of type Bounds, located in the javafx.geometry package. It represents the rectangular bounds of a node, for example, the leftPaddle node shown in the preceding code snippet. Notice that to get the position of the left paddle in the Group that contains it, we’re using the boundsInParent property that the leftPaddle (a Rectangle) inherited from the Node class.
The net results of the intersect method invocations in the preceding snippet are as follows.
- If the ball intersects with the bounds of the rightWall or leftWall, the pongAnimation Timeline is stopped and the game is initialized for the next play. Note that the rightWall and left Wall nodes are one-pixel-wide rectangles on the left and right sides of the Scene. Take a peek at Listing 2-8 to see where these are defined.
- If the ball intersects with the bounds of the bottomWall or topWall, the vertical direction of the ball will be changed by negating the program’s Boolean movingDown variable.
- If the ball intersects with the bounds of the leftPaddle or rightPaddle, the horizontal direction of the ball will be changed by negating the program’s Boolean movingRight variable.
![]() Tip For more information on boundsInParent and its related properties, layoutBounds and boundsInLocal, see the “Bounding Rectangles” discussion at the beginning of the javafx.scene.Node class in the JavaFX API docs. For example, it is a common practice to find out the width or height of a node by using the expression myNode.getLayoutBounds().getWidth() or myNode.getLayoutBounds().getHeight().
Tip For more information on boundsInParent and its related properties, layoutBounds and boundsInLocal, see the “Bounding Rectangles” discussion at the beginning of the javafx.scene.Node class in the JavaFX API docs. For example, it is a common practice to find out the width or height of a node by using the expression myNode.getLayoutBounds().getWidth() or myNode.getLayoutBounds().getHeight().
Dragging a Node
As you experienced previously, the paddles of the ZenPong application may be dragged with the mouse. The following snippet from Listing 2-8 shows how this capability is implemented in ZenPong.
  DoubleProperty rightPaddleY = new SimpleDoubleProperty();

  ...code omitted...

  double rightPaddleDragStartY;

  double rightPaddleDragAnchorY;

  ...code omitted...

  void initialize() {

    centerX.setValue(250);

    centerY.setValue(250);
    leftPaddleY.setValue(235);

    rightPaddleY.setValue(235);

    startVisible.set(true);

    pongComponents.requestFocus();

  }

  ...code omitted...

  rightPaddle = RectangleBuilder.create()

    .x(470)

    .width(10)

    .height(30)

    .fill(Color.LIGHTBLUE)

    .cursor(Cursor.HAND)

    .onMousePressed(new EventHandler<MouseEvent>() {

      public void handle(MouseEvent me) {

        initRightPaddleTranslateY =  rightPaddle.getTranslateY();

        rightPaddleDragAnchorY = me.getSceneY();

      }

    })

    .onMouseDragged(new EventHandler<MouseEvent>() {

      public void handle(MouseEvent me) {

        double dragY = me.getSceneY() - rightPaddleDragAnchorY;

        rightPaddleY.setValue(initRightPaddleTranslateY + dragY);

      }

    })

    .build(),
Note that in this ZenPong example, we’re dragging the paddles only vertically, not horizontally Therefore, the code snippet only deals with dragging on the y axis.
Giving Keyboard Input Focus to a Node
In order for a node to receive key events, it has to have keyboard focus. This is accomplished in the ZenPong example by doing these two things, as shown in the snippet below from Listing 2-8:
- Assigning true to the focusTraversable property of the Group node. This allows the node to accept keyboard focus.
- Calling the requestFocus() method of the Group node (referred to by the pongComponents variable). This requests that the node obtain focus.
![]() Tip You cannot directly set the value of the focused property of a Stage. Consulting the API docs also reveals that neither can you set the value of the focused property of a Node (e.g., the Group that we’re discussing now). However, as discussed in the second bullet point above, you can call requestFocus() on the node, which if granted (and focusTraversable is true) sets the focused property to true. By the way, Stage doesn’t have a requestFocus() method, but it does have a toFront() method, which should give it keyboard focus.
Tip You cannot directly set the value of the focused property of a Stage. Consulting the API docs also reveals that neither can you set the value of the focused property of a Node (e.g., the Group that we’re discussing now). However, as discussed in the second bullet point above, you can call requestFocus() on the node, which if granted (and focusTraversable is true) sets the focused property to true. By the way, Stage doesn’t have a requestFocus() method, but it does have a toFront() method, which should give it keyboard focus.
...code omitted...
pongComponents = GroupBuilder.create()
.focusTraversable(true)
...code omitted...
pongComponents.requestFocus();
...code omitted...
.onKeyPressed(new EventHandler<KeyEvent>() {
@Override public void handle(KeyEvent k) {
if (k.getCode() == KeyCode.SPACE &&
pongAnimation.statusProperty()
.equals(Animation.Status.STOPPED)) {
rightPaddleY.setValue(rightPaddleY.getValue() - 6);
}
else if (k.getCode() == KeyCode.L &&
!rightPaddle.getBoundsInParent().intersects(topWall.getBoundsInLocal())) {
rightPaddleY.setValue(rightPaddleY.getValue() - 6);
}
else if (k.getCode() == KeyCode.COMMA &&
!rightPaddle.getBoundsInParent().intersects(bottomWall
.getBoundsInLocal())) {
rightPaddleY.setValue(rightPaddleY.getValue() + 6);
}
else if (k.getCode() == KeyCode.A &&
!leftPaddle.getBoundsInParent().intersects(topWall.getBoundsInLocal())) {
leftPaddleY.setValue(leftPaddleY.getValue() - 6);
}
else if (k.getCode() == KeyCode.Z &&
!leftPaddle.getBoundsInParent().intersects(bottomWall.getBoundsInLocal())) {
leftPaddleY.setValue(leftPaddleY.getValue() + 6);
}
}
})
Now that the node has focus, when the user interacts with the keyboard, the appropriate event handlers will be invoked. In this example, we’re interested in whenever certain keys are pressed, as discussed next.
Using the onKeyPressed Event Handler
When the user presses a key, the handle() method of the anonymous class supplied to the onKeyPressed method is invoked, passing a KeyEvent instance that contains information about the event. This handle method, shown in the preceding snippet from Listing 2-8, compares the getCode() method of the KeyEvent instance to the KeyCode constants that represent the arrow keys to ascertain which key was pressed.
Summary
Congratulations, you have learned a lot in this chapter about creating UIs in JavaFX, including the following.
- Creating a user interface in JavaFX, which we loosely based on the metaphor of creating a theater play and typically consists of creating a stage, a scene, nodes, a model, and event handlers, and animating some of the nodes
- The details about using most of the properties and methods of the Stage class, including how to create a Stage that is transparent with no window decorations
- How to use the HBox and VBox layout containers to organize nodes horizontally and vertically, respectively
- The details about using many of the properties and methods of the Scene class
- How to create and apply CSS styles to nodes in your program by associating one or more style sheets with the Scene
- How to handle keyboard and mouse input events
- How to animate nodes in the scene, both with the Timeline class and the transition classes
- How to detect when nodes in the scene have collided
Now that you have learned more about JavaFX user interface development, it is time to move on to Chapter 3 to take a deeper dive into the areas of Properties and Binding.
Resources
For some additional information on creating JavaFX user interfaces, you can consult the following resources.
- JavaFX 2.0 SDK documentation online:
http://download.oracle.com/javafx/2.0/api/index.html - JavaFX 2.0 CSS Reference Guide:
http://download.oracle.com/javafx/2.0/api/javafx/scene/doc-files/cssref.html - The w3schools.com CSS Tutorial:
http://www.w3schools.com/css