
C H A P T E R 8
Using the Media Classes
We keep moving forward, opening new doors, and doing new things, because we’re curious and curiosity keeps leading us down new paths.
—Walt Disney
In the previous chapters you have learned how to create applications using the JavaFX library. Now we make good use of that knowledge while creating applications that explore the audio and video capabilities of the JavaFX platform.
The Foundation
The media classes in JavaFX are based on an open source multimedia framework named GStreamer.1 This is a big change from the media library in previous versions of JavaFX where the native media capabilities of the various supported platforms were used directly. In comparison, the new GStreamer-based library provides better stability and more consistency across platforms. The downside is that, at least in JavaFX 2.0, the new library is slightly more limited in some of its capabilities and in its support for media containers and codecs. For example, there is no support for streaming media and only video encoded with the VP6 format is currently supported. As compensation there are a few new features as well, which we cover in the following sections.
It should be noted that the limitations mentioned above are not limitations of GStreamer itself. We remain optimistic that these features will appear in future releases. In the meantime, the changeover to the GStreamer library provides a solid foundation for the media capabilities of JavaFX 2.0 and beyond.
Supported Media Formats
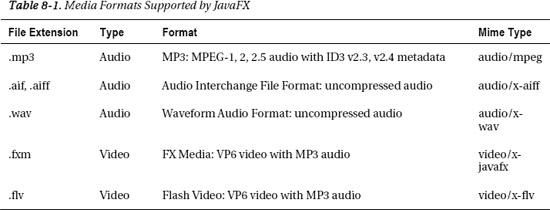
Table 8-1 shows the file formats that are supported by the JavaFX media classes. Three audio formats and two identical video formats are supported. The three audio formats supported in JavaFX (MP3, WAV, and AIFF) are very common and are all well supported by most audio tools on the market. You should have no trouble obtaining your source audio files in, or converting them to, one of the formats supported by JavaFX.
__________
FXM is the “native” JavaFX video format. It consists of VP6 encoded video and MP3 audio, a combination that is also used in Flash Video (FLV) files. An FLV container can host several different options for video and audio encoding other than VP6 and MP3. Therefore, it is not correct to say that JavaFX can play any FLV file. However, the VP6/MP3 combination is very common and so it is fair to say that JavaFX should be able to play most FLV files that can be found on the Internet. FLV video is widely supported by tools from Adobe and others so you should have no trouble converting or authoring video in this format.
![]() Note As this book goes to press, Oracle has announced that support for AAC audio and H.264 video will be added to JavaFX 2.1.
Note As this book goes to press, Oracle has announced that support for AAC audio and H.264 video will be added to JavaFX 2.1.
Working with Audio Clips
In previous versions of JavaFX, there was no way to play low latency audio. This much-needed feature is now available in version 2.0 using the new AudioClip class. Audio clips are not suitable for large or lengthy sounds because the audio data associated with these sounds are decompressed and stored completely in memory. If you need to play a song or other lengthy audio file, you should use a Media object instead, which is discussed in the next section.
An AudioClip is ideal for playing short sounds in response to user actions in a game or other rich-media application. An AudioClip instance is constructed by passing a URI string as the only parameter to the constructor. This URI can point to a resource on the Internet, the local file system, or within the jar file by using the http:, file:, and jar: schemes, respectively. Once constructed, you can adjust several properties that affect the playback of the clip such as the volume, playback rate, panning, and balance. Calling its play method will begin playback of an AudioClip. You may call the play method repeatedly to begin multiple overlapping playbacks of a given clip.
There are actually three overloaded versions of the play method in the AudioClip class. Calling the method with no arguments will use the current properties of the AudioClip instance for the playback. There is also a variant of the play method that takes a volume argument, which allows you to override the volume of the clip for that playback only. The final variant of the play method allows you to specify the volume, balance, rate, pan, and priority of that playback. Specifying these parameters as arguments of the play methods does not cause them to be saved permanently; they are a one-time-only override of the AudioClip’s instance data. There is also a stop method that stops all playback of the AudioClip.
Listing 8-1 illustrates the simple steps required to create and play an AudioClip. This source code is part of the BasicAudioClip example project in the Chapter08 directory of the book’s source code.
Listing 8-1. Playing an Audio Clip
public class BasicAudioClip extends Application {


    public static void main(String[] args) {

        launch(args);

    }


    @Override

    public void start(Stage primaryStage) {

        final URL resource = getClass().getResource("resources/beep.wav");

        final AudioClip clip = new AudioClip(resource.toString());


        final Button button = new Button("Bing Zzzzt!");

        button.setOnAction(new EventHandler<ActionEvent>() {

            @Override

            public void handle(ActionEvent event) {

                clip.play(1.0);

            }

        });


        final StackPane stackPane = new StackPane();

        stackPane.setPadding(new Insets(10));

        stackPane.getChildren().add(button);


        final Scene scene = new Scene(stackPane, 200, 200);

        final URL stylesheet = getClass().getResource("media.css");

        scene.getStylesheets().add(stylesheet.toString());


        primaryStage.setTitle("Basic AudioClip Example");

        primaryStage.setScene(scene);

        primaryStage.show();

    }

}
The prerequisite to creating an AudioClip is to create the URI string for the resource to be loaded. In Listing 8-1, we use the getResource method to return the URI for an audio file embedded in the jar file. The URI is converted to a String and then passed to the AudioClip constructor. As previously mentioned, the AudioClip constructor loads the entire sound into memory, decoding it if necessary. If your sound effect files are small you can store them in an uncompressed format such as the .wav file we use in this example to avoid the overhead of decoding them. Once a sound file grows larger than 100 kB or so, you should consider storing it as a compressed MP3 file instead because the smaller size of the file can more than make up for the overhead of decoding the sound. This is especially true if you are loading your sound files from a server on the Internet. You should also keep in mind that the AudioClip constructor will block the current thread until the sound is completely loaded. For this reason, you should consider loading your sound effects on a background thread if you are loading a lot of files or if the files are large. See the section titled Using the JavaFX Concurrency Framework in Chapter 6 for details on using JavaFX’s concurrency classes.
Once the AudioClip is constructed, you simply need to call one of its play methods to start a playback. The sound in Listing 8-1 is played in response to a button click by calling the play method and passing it a volume parameter of 1.0, which causes the sound to be played at maximum volume. The Button is then added to a StackPane so that it will automatically remain centered in the Scene. Finally, the Scene is added to the Stage and shown to the user. Note that the media.css style sheet is applied to the scene. This style sheet is used by all of the sample applications in this chapter. The style sheet is shown in Listing 8-2.
Listing 8-2. The First Version of the Style Sheet Used by the Applications in This Chapter
.root {

  -fx-base: #606060;

  -fx-background-color: radial-gradient(center 50% 50%, radius 60%,

                                        #666a6b, #2b2f32);

  -fx-background-image: url("resources/cross.png");

  -fx-background-position: left top;

}


.button {

  -fx-text-fill: #E0E0E0;

  -fx-font-size: 20pt;

  -fx-pref-width: 300px;

}


.label {

  -fx-text-fill: #E0E0E0;

}


#clipLabel {

  -fx-font-size: 24pt;

}


.hyperlink {

  -fx-text-fill: #808080;

}
Figure 8-1 shows how this simple AudioClip example should look when it is running. A new playback of the AudioClip is started each time the button is clicked. If you’re very quick, you might get two or three playing at a time.
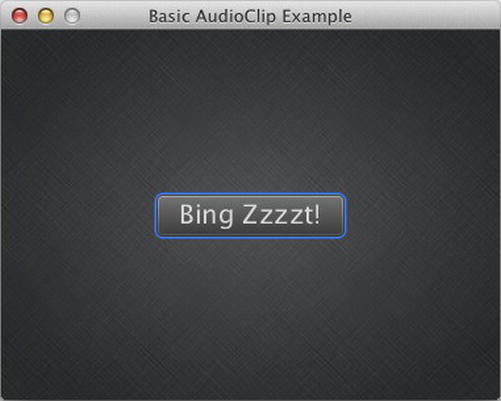
Figure 8-1. The BasicAudioClip application
Controlling the Playback Parameters of an AudioClip
We now build on the preceding example to show how AudioClip allows a sound effect to be played at differing volumes and rates. We also show how the balance of an audio clip can be adjusted to control the volume of the left and right channels. This can be useful when you want to achieve a bit of 2D spatialization in your sound effects. The application we end up with is shown in Figure 8-2.
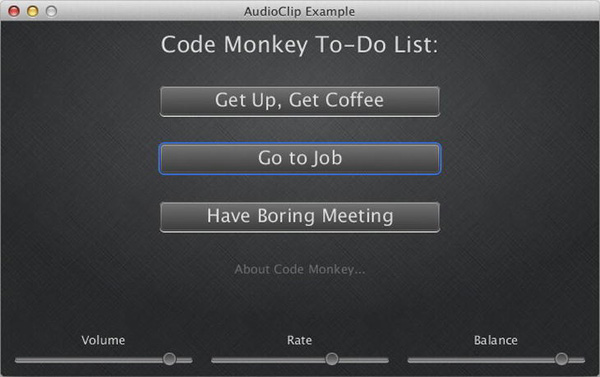
Figure 8-2. The CodeMonkeyToDo application
We start by examining the Application class and look at how the sounds are loaded. Listing 8-3 shows the application with the scene construction code removed. This allows you to see more easily that we are loading MP3 files from the jar file using the getResource method again. In this case, our sound effects are in a different location relative to our application class. Therefore we use a path such as “resources/coffee.mp3” to locate them. These clips are a little longer, so the decision was made to use MP3 files to keep the size of the jar file to a minimum at the expense of a little extra decoding time during startup.
The audio clips are all loaded in the constructor of the CodeMonkeyToDo class. Loading them in the constructor guarantees that they are loaded at the very start of the program before the start method is called. Alternatively, we could have overridden the init method of the Application class and loaded our clips there. Notice that the three AudioClips and the three Slider controls are declared as fields in the Application class. This allows convenient access later when the AudioClip is played using the current values from the Slider controls shown in Figure 8-2.
Listing 8-3. The Application Class of the CodeMonkeyToDo Example Program
public class CodeMonkeyToDo extends Application {


  private final AudioClip coffeeClip;

  private final AudioClip jobClip;

  private final AudioClip meetingClip;


  private Slider volumeSlider;

  private Slider rateSlider;

  private Slider balanceSlider;


  public static void main(String[] args) {

    CodeMonkeyToDo.launch(args);

  }


  public CodeMonkeyToDo() {

    coffeeClip = new AudioClip(getClipResourceString("resources/coffee.mp3"));

    jobClip = new AudioClip(getClipResourceString("resources/job.mp3"));

    meetingClip =

        new AudioClip(getClipResourceString("resources/meeting.mp3"));

  }


  // Scene construction code removed for now…


  private String getClipResourceString(String clipName) {

    return getClass().getResource(clipName).toString();

  }

}
Constructing the Scene
We now take a brief look at the scene construction code for the application shown in Figure 8-2. The application is organized as a vertical column of buttons that play the audio clips with a row of controls at the bottom of the window. We use a GridPane as the top-level layout container for the application. You can see the GridPane created in the application’s start method, which is shown in Listing 8-4. Once the GridPane is created and configured, it is passed as an argument to the createControls and createClipList methods. The createClipList method is responsible for creating the vertical column of buttons and is shown and discussed later in this section. The createControls method creates Labels and the corresponding Slider controls that allow the user to set the volume, rate, and balance of the next clip to be played. The Sliders and their Labels are then added to the GridPane before the method returns. After the grid has been populated with its controls, it is used as the root node of a new Scene. The Scene is then styled with our media.css style sheet and added to the primaryStage, which is then shown to the user.
Listing 8-4. Constructing the Scene and the Volume, Balance, and Rate Controls
  @Override

  public void start(Stage primaryStage) {

    final GridPane grid = new GridPane();

    grid.setPadding(new Insets(10));

    grid.setHgap(10);

    grid.setVgap(5);


    createControls(grid);

    createClipList(grid);  // Shown later…


    final Scene scene = new Scene(grid, 640, 380);

    scene.getStylesheets()

        .add(getClass().getResource("media.css").toString());


    primaryStage.setTitle("AudioClip Example");

    primaryStage.setScene(scene);

    primaryStage.show();

  }


  private void createControls(GridPane grid) {

    final Label volumeLabel = new Label("Volume");

    final Label rateLabel = new Label("Rate");

    final Label balanceLabel = new Label("Balance");


    GridPane.setHalignment(volumeLabel, HPos.CENTER);

    GridPane.setHalignment(rateLabel, HPos.CENTER);

    GridPane.setHalignment(balanceLabel, HPos.CENTER);


    volumeSlider = new Slider(0.0, 1.0, 1.0);

    rateSlider = new Slider(0.25, 2.5, 1.0);

    balanceSlider = new Slider(-1.0, 1.0, 0.0);


    GridPane.setHgrow(volumeSlider, Priority.ALWAYS);

    GridPane.setHgrow(rateSlider, Priority.ALWAYS);

    GridPane.setHgrow(balanceSlider, Priority.ALWAYS);
    grid.add(volumeLabel, 0, 2);

    grid.add(volumeSlider, 0, 3);

    grid.add(rateLabel, 1, 2);

    grid.add(rateSlider, 1, 3);

    grid.add(balanceLabel, 2, 2);

    grid.add(balanceSlider, 2, 3);

  }
Listing 8-5 shows the createClipList method. This method creates a VBox to hold a Label, the three Buttons that play the AudioClips, and a Hyperlink that triggers the display of the Code Monkey web page at jonathancoulton.com in a separate window. The VBox is then added to the GridPane such that it spans all remaining columns in the first row. The VBox is always centered horizontally in the grid and grows in both the horizontal and vertical directions, taking up whatever extra space is available in the layout.
Listing 8-5. Constructing the Buttons That Play the AudioClips
  private void createClipList(GridPane grid) {

    final VBox vbox = new VBox(30);

    vbox.setAlignment(Pos.TOP_CENTER);


    final Label clipLabel = new Label("Code Monkey To-Do List:");

    clipLabel.setId("clipLabel");


    final Button getUpButton = new Button("Get Up, Get Coffee");

    getUpButton.setPrefWidth(300);

    getUpButton.setOnAction(createPlayHandler(coffeeClip));


    final Button goToJobButton = new Button("Go to Job");

    goToJobButton.setPrefWidth(300);

    goToJobButton.setOnAction(createPlayHandler(jobClip));


    final Button meetingButton = new Button("Have Boring Meeting");

    meetingButton.setPrefWidth(300);

    meetingButton.setOnAction(createPlayHandler(meetingClip));


    final Hyperlink link = new Hyperlink("About Code Monkey...");

    link.setOnAction(new EventHandler<ActionEvent>() {

      @Override

      public void handle(ActionEvent event) {

        WebView wv = new WebView();

        wv.getEngine().load("http://www.jonathancoulton.com/2006/04/14/" +

                            "thing-a-week-29-code-monkey/");


        Scene scene = new Scene(wv, 720, 480);


        Stage stage = new Stage();

        stage.setTitle("Code Monkey");

        stage.setScene(scene);

        stage.show();

      }

    });
    vbox.getChildren().addAll(clipLabel, getUpButton, goToJobButton,

                              meetingButton, link);


    GridPane.setHalignment(vbox, HPos.CENTER);

    GridPane.setHgrow(vbox, Priority.ALWAYS);

    GridPane.setVgrow(vbox, Priority.ALWAYS);

    grid.add(vbox, 0, 0, GridPane.REMAINING, 1);

  }


  private EventHandler<ActionEvent> createPlayHandler(final AudioClip clip) {

    return new EventHandler<ActionEvent>() {

      @Override

      public void handle(ActionEvent event) {

        clip.play(volumeSlider.getValue(), balanceSlider.getValue(),

                  rateSlider.getValue(), 0, 0);

      }

    };

  }
As each Button is created, a new EventHandler is also created that plays the appropriate AudioClip for that Button. The play method in the EventHandler uses the current values of the volume, rate, and balance sliders as its arguments. The last two arguments of the play method are set to zero, but these can be used to specify the pan and priority of the AudioClip when it is played. We discuss these two properties in the next section.
AudioClip Wrap-Up
There are two properties of an AudioClip that we have not shown in the preceding examples: pan and priority. The pan property allows you to move the center of your clip. Setting it to –1.0 moves the clip completely to the left channel, and setting it to 1.0 moves it completely to the right. The default setting of 0.0 leaves the clip as it was originally. Unlike the balance property, which merely adjusts the relative volumes of the left and right channels, the pan property actually remixes the two channels. This allows you to introduce some or all of the left channel into the right channel and vice versa. It really only makes sense to use the pan property on actual stereo sound effects whose right and left channels differ. Setting the pan on a mono sound has the exact same outcome as adjusting the balance, and balance is much less computationally expensive. You can set or retrieve a clip’s current pan setting using the setPan and getPan methods and the property is exposed by the panProperty method.
You can optionally assign a priority to your AudioClips. This is an IntegerProperty that specifies the relative priority of your sound effects. The higher the number, the more importance you are assigning to that AudioClip. If you exceed the limit of AudioClip playbacks that the system can handle, the priorities are used to determine which clips are stopped. The number of clips that can be played is not specified precisely, nor can it be queried in the current version of JavaFX. Therefore, if you play a lot of AudioClips at once, as might be the case for a game, you should consider assigning priorities to your sound effects.
AudioClips are very useful for playing short, low-latency sound effects. If you need to play songs or background music instead, the JavaFX media classes are a better choice.
Working with Media
The JavaFX media classes make it very easy to work with audio and video files by simply treating them as two different types of media. Therefore, the basic playback of an audio or video file can be accomplished using only a few lines of (nearly identical) code. On the other hand, there is also some depth to the API that allows you to go beyond simple playback to enhance the experience for your users. In the remainder of this chapter, we start with simple audio playback and then show you how to tap into the power of this API and take your media-based applications to the next level.
The JavaFX media classes are located in the javafx.scene.media package. There are three main classes named Media, MediaPlayer, and MediaView as well as a number of supporting classes. The Media class encapsulates the audio or video resource to be played. The string representation of the URI identifying this resource is passed to the Media constructor as its only argument. The Media object exposes properties that describe the media’s width and height (when dealing with video), its duration, and two properties related to error handling. Once constructed, a Media object can be passed to the constructor of a MediaPlayer instance, which provides a set of methods for controlling the playback of the audio or video resource. And finally, a MediaPlayer can be passed to the constructor of a MediaView node in order for the video to be displayed in the scene graph. The relationship among these three classes is illustrated in Figure 8-3.2
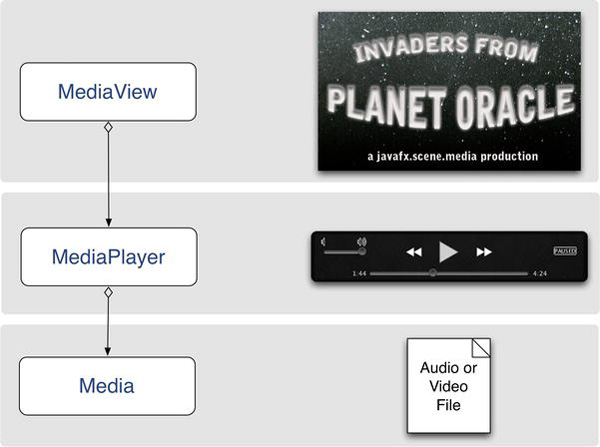
Figure 8-3. The JavaFX 2.0 media classes
__________
2 Naturally the invaders are initially greeted with fear and distrust. In a surprise plot twist, they turn out to be a competent and helpful group of people.
It bears repeating that of these three classes, only MediaView is-a Node and therefore capable of being inserted into the scene graph. This means we have taken a slight liberty in showing a set of visual controls associated with the MediaPlayer class in Figure 8-3. In reality you will have to create your own buttons and sliders, wired to MediaPlayer methods, to allow the user to control the playback of the media in your application. We have plenty of opportunity to show you how to do this in the examples that follow in this chapter. Let’s begin our in-depth look at these media classes by creating an application that plays audio files.
Playing Audio
Playing audio files involves only the Media and MediaPlayer classes. There is no video to deal with, thus no MediaView is needed. Listing 8-6 shows the minimum amount of code needed to play audio with JavaFX.
Listing 8-6. A Very Simple Application That Plays an Audio File
public class AudioPlayer1 extends Application {


    public static void main(String[] args) {

        launch(args);

    }


    @Override

    public void start(Stage primaryStage) {

        URL resource = getClass().getResource("resources/keeper.mp3");

        Media media = new Media(resource.toString());

        MediaPlayer mediaPlayer = new MediaPlayer(media);

        mediaPlayer.play();


        primaryStage.setTitle("Audio Player 1");

        primaryStage.setWidth(200);

        primaryStage.setHeight(200);

        primaryStage.show();

    }

}
This simplistic application starts by finding the URL of an audio file resource that is packaged within its jar file. The String form of the resource URL is passed as the source parameter to the Media constructor. The Media class can also load resources from the Internet or from the local filesystem just like an AudioClip. Once the Media object is constructed, it is used to construct a new MediaPlayer and the MediaPlayer’s play method is called to begin playback. This application has no actual scene to display so the width and height of the Stage are set to 200 so that the resulting window will be visible. If your audio needs are no more complicated than loading a sound file and starting it playing, your job is now finished. However, the code in Listing 8-6 is not exactly production quality yet.
![]() Note Once a MediaPlayer is created, its Media object cannot be changed. If you wish to change the song or video that is currently playing, you must create a new MediaPlayer for the new Media object. Multiple MediaPlayers can share one Media object.
Note Once a MediaPlayer is created, its Media object cannot be changed. If you wish to change the song or video that is currently playing, you must create a new MediaPlayer for the new Media object. Multiple MediaPlayers can share one Media object.
Error Handling
The Media class has two properties, error and onError, that help you deal with any errors that occur during playback. You can manually check for errors by calling the getError method, which will return a MediaException object. This method will return a nonnull value from the underlying errorProperty if an error has occurred. You can listen for errors by attaching an InvalidationListener or ChangeListener to the errorProperty of the Media class. As a convenience, you can simply pass a Runnable to the setOnError method in order to achieve the same result. The Runnable’s run method will be called if an error occurs. It is safe to update the scene graph from the run method inasmuch as it is called on the JavaFX application thread.
Media instances are rarely used on their own. Normally they will be passed to a MediaPlayer as a constructor argument. The MediaPlayer class replicates the error and onError properties of Media, and all Media errors are forwarded to the error property and the onError callback of the enclosing MediaPlayer instance. Therefore, you only need to use the MediaPlayer error properties to catch errors from both the MediaPlayer and its underlying Media object all in one place.
Exceptions, including MediaExceptions, can also occur during the construction of a Media or MediaPlayer instance. Obviously these exceptions will not be available in the object’s error property because the object does not exist yet. If you want to be thorough in your error handling, you should also enclose your constructors in try-catch blocks in addition to setting MediaPlayer’s onError handler. This error-handling technique is demonstrated in Listing 8-7.
Listing 8-7. Error Handling with the Media Classes
try {

  final URL resource = getClass().getResource("resources/keeper.mp3");

  final Media media = new Media(resource.toString());


  final MediaPlayer mediaPlayer = new MediaPlayer(media);

  mediaPlayer.setOnError(new Runnable() {

    @Override

    public void run() {

      // Handle Media and MediaPlayer errors during playback...

      final String errorMessage = media.getError().getMessage();

    }

  });


  mediaPlayer.play();


} catch (RuntimeException re) {

  // Handle Media and MediaPlayer construction errors...

}
Displaying Metadata
Most media file formats have the ability to embed metadata, data that describe the song or video. MP3 files, for instance, have ID3 tags that can be used to identify the artist, album, track number, and even the year that the song was released. Many MP3 files also have embedded images of the artist, the album cover, or a logo (in the case of podcasts and such). The JavaFX Media class reads these metadata and presents them to the developer in the form of an ObservableMap of key-value pairs. The keys are Strings that identify the metadata and the values are Objects, most likely a String or an Image.
Although there is no guarantee as to which metadata are present in any given media file, there are a few fields that are very common: artist, title, album, and year. In addition, if any image is embedded in a file’s metadata, the Media class will give you access to it using the “image” key. Listing 8-8 shows you how to add the ability to receive metadata notifications when a new Media object is created.
In the listing we are loading an episode of the Java Posse podcast from an Internet URL. Immediately after the Media instance is created, we get a reference to its metadata map by calling the getMetadata method. We then attach a MapChangeListener to the metadata map that makes a check to see if a new key-value pair was added to the map. If so, the new key and value are passed to the handleMetadata helper method, which checks to see if it is a piece of metadata that we are interested in handling. This is the code that is shown in bold in Listing 8-8.
Listing 8-8. Listening for Metadata from the Media Class
private Label artist;

private Label album;

private Label title;

private Label year;

private ImageView albumCover;


private void createMedia() {

  try {

    media = new Media("http://traffic.libsyn.com/dickwall/JavaPosse373.mp3");

    media.getMetadata().addListener(new MapChangeListener<String, Object>() {

      @Override

      public void onChanged(Change<? extends String, ? extends Object> ch) {

        if (ch.wasAdded()) {

          handleMetadata(ch.getKey(), ch.getValueAdded());

        }

      }

    });


    mediaPlayer = new MediaPlayer(media);

    mediaPlayer.setOnError(new Runnable() {

      @Override

      public void run() {

        final String errorMessage = media.getError().getMessage();

        // Handle errors during playback

        System.out.println("MediaPlayer Error: " + errorMessage);

      }

    });


    mediaPlayer.play();
  } catch (RuntimeException re) {

    // Handle construction errors

    System.out.println("Caught Exception: " + re.getMessage());

  }

}


private void handleMetadata(String key, Object value) {

  if (key.equals("album")) {

    album.setText(value.toString());

  } else if (key.equals("artist")) {

    artist.setText(value.toString());

  } if (key.equals("title")) {

    title.setText(value.toString());

  } if (key.equals("year")) {

    year.setText(value.toString());

  } if (key.equals("image")) {

    albumCover.setImage((Image)value);

  }

}
If the handleMetadata method determines that the new metadata are of interest to the program, it sets the metadata’s value as either the string of a Label control or the Image of an ImageView node. Listing 8-9 shows the rest of this application’s code wherein these controls are created and placed into a GridPane for display to the user. There have also been some minor additions to the media.css style sheet to set the size of the fonts used in the Labels. You can view these changes in the source files for the AudioPlayer2 example application in the book’s example code.
Listing 8-9. Displaying the Metadata Information in the Scene Graph
public class AudioPlayer2 extends Application {

  private Media media;

  private MediaPlayer mediaPlayer;


  private Label artist;

  private Label album;

  private Label title;

  private Label year;

  private ImageView albumCover;


  public static void main(String[] args) {

    launch(args);

  }


  @Override

  public void start(Stage primaryStage) {

    createControls();

    createMedia();


    final Scene scene = new Scene(createGridPane(), 800, 400);

    final URL stylesheet = getClass().getResource("media.css");

    scene.getStylesheets().add(stylesheet.toString());
    primaryStage.setScene(scene);

    primaryStage.setTitle("Audio Player 2");

    primaryStage.show();

  }


  private GridPane createGridPane() {

    final GridPane gp = new GridPane();

    gp.setPadding(new Insets(10));

    gp.setHgap(20);

    gp.add(albumCover, 0, 0, 1, GridPane.REMAINING);

    gp.add(title, 1, 0);

    gp.add(artist, 1, 1);

    gp.add(album, 1, 2);

    gp.add(year, 1, 3);


    final ColumnConstraints c0 = new ColumnConstraints();

    final ColumnConstraints c1 = new ColumnConstraints();

    c1.setHgrow(Priority.ALWAYS);

    gp.getColumnConstraints().addAll(c0, c1);


    final RowConstraints r0 = new RowConstraints();

    r0.setValignment(VPos.TOP);

    gp.getRowConstraints().addAll(r0, r0, r0, r0);


    return gp;

  }


  private void createControls() {

    artist = new Label();

    artist.setId("artist");

    album = new Label();

    album.setId("album");

    title = new Label();

    title.setId("title");

    year = new Label();

    year.setId("year");


    final Reflection reflection = new Reflection();

    reflection.setFraction(0.2);


    final URL url = getClass().getResource("resources/defaultAlbum.png");

    final Image image = new Image(url.toString());


    albumCover = new ImageView(image);

    albumCover.setFitWidth(240);

    albumCover.setPreserveRatio(true);

    albumCover.setSmooth(true);

    albumCover.setEffect(reflection);

  }
  private void createMedia() {

    // As previously shown...

  }


  private void handleMetadata(String key, Object value) {

    // As previously shown...

  }

}
The AudioPlayer2 application with the Java Posse podcast’s metadata on display is shown in Figure 8-4. You can see from the code in Listing 8-9 and the image in Figure 8-4 that we have also added a subtle reflection to the image that was read from the metadata. Although we don’t want to abuse these types of effects, it is really nice that JavaFX allows us to create them so easily.
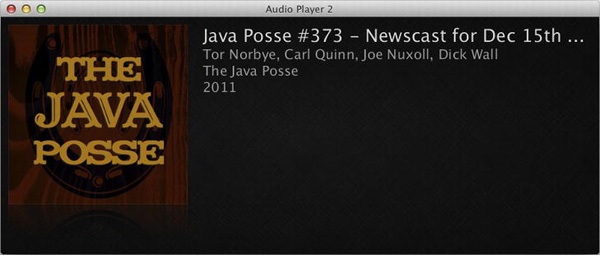
Figure 8-4. Displaying media metadata in the second version of the audio player
Loading Media
Loading media files from a predetermined jar resource or Internet URL is limiting if this audio player is going to grow into a reasonably useful application. We support two ways of selecting content. First, we allow the user to select files from the local filesystem using the JavaFX FileChooser. We also support dragging and dropping a file or URL onto the audio player. Another issue that requires attention is scaling the application’s source code. It is growing too large to be contained in a single file and a single class. It is time to inflict a bit of architecture upon our sample application.
We begin by isolating the code that deals with the Media, its associated metadata, and its MediaPlayer into a separate class named SongModel. This class will expose a set of JavaFX properties (refer back to Chapter 3, Properties and Bindings, if you need a refresher) that represent the metadata of the current media and one that exposes the MediaPlayer instance. It also defines a method for setting a media URL, which will trigger the creation of new Media and MediaPlayer instances. This class is shown in Listing 8-10.
Listing 8-10. The SongModel Class
public final class SongModel {

  private static final String DEFAULT_IMG_URL =

      SongModel.class.getResource("resources/defaultAlbum.png").toString();

  private static final Image DEFAULT_ALBUM_COVER =

      new Image(DEFAULT_IMG_URL);


  private final StringProperty album =

      new SimpleStringProperty(this, "album");

  private final StringProperty artist =

      new SimpleStringProperty(this,"artist");

  private final StringProperty title =

      new SimpleStringProperty(this, "title");

  private final StringProperty year =

      new SimpleStringProperty(this, "year");


  private final ObjectProperty<Image> albumCover =

      new SimpleObjectProperty<Image>(this, "albumCover");


  private final ReadOnlyObjectWrapper<MediaPlayer> mediaPlayer =

      new ReadOnlyObjectWrapper<MediaPlayer>(this, "mediaPlayer");


  public SongModel() {

    resetProperties();

  }


  public void setURL(String url) {

    if (mediaPlayer.get() != null) {

      mediaPlayer.get().stop();

    }


    initializeMedia(url);

  }


  public String getAlbum() { return album.get(); }

  public void setAlbum(String value) { album.set(value); }

  public StringProperty albumProperty() { return album; }


  // The three methods above are repeated for the artist, title,

  // year, and albumCover properties...


  public MediaPlayer getMediaPlayer() { return mediaPlayer.get(); }

  public ReadOnlyObjectProperty<MediaPlayer> mediaPlayerProperty() {

    return mediaPlayer.getReadOnlyProperty();

  }
  private void resetProperties() {

    setArtist("");

    setAlbum("");

    setTitle("");

    setYear("");


    setAlbumCover(DEFAULT_ALBUM_COVER);

  }


private void initializeMedia(String url) {

    resetProperties();


    try {

      final Media media = new Media(url);

      media.getMetadata().addListener(new MapChangeListener<String,Object>() {

        @Override

        public void onChanged(Change<? extends String, ? extends Object> ch) {

          if (ch.wasAdded()) {

            handleMetadata(ch.getKey(), ch.getValueAdded());

          }

        }

      });


      mediaPlayer.setValue(new MediaPlayer(media));

      mediaPlayer.get().setOnError(new Runnable() {

        @Override

        public void run() {

          String errorMessage = mediaPlayer.get().getError().getMessage();

          // Handle errors during playback

          System.out.println("MediaPlayer Error: " + errorMessage);

        }

      });

    } catch (RuntimeException re) {

      // Handle construction errors

      System.out.println("Caught Exception: " + re.getMessage());

    }

  }


  private void handleMetadata(String key, Object value) {

    if (key.equals("album")) {

      setAlbum(value.toString());

    } else if (key.equals("artist")) {

      setArtist(value.toString());

    } if (key.equals("title")) {

      setTitle(value.toString());

    } if (key.equals("year")) {

      setYear(value.toString());

    } if (key.equals("image")) {

      setAlbumCover((Image)value);

    }

  }

}
The MediaPlayer property is exposed as a ReadOnlyObjectProperty inasmuch as we don’t want users of the class to be able to set the MediaPlayer instance to a new value. Now that we have a nicely encapsulated class for our media, we turn our attention to separating our user interface code into more manageable chunks, or views. A new AbstractView base class is created to eliminate duplication by holding some code that is common to all of our views. This small class is shown in Listing 8-11.
Listing 8-11. The AbstractView Base Class
public abstract class AbstractView {

  protected final SongModel songModel;

  protected final Node viewNode;


  public AbstractView(SongModel songModel) {

    this.songModel = songModel;

    this.viewNode = initView();

  }


  public Node getViewNode() {

    return viewNode;

  }


  protected abstract Node initView();

}
This class ensures that all of the views have access to the application’s SongModel instance. It also provides a pattern for easily writing new views. Each new view only has to provide a concrete implementation of the initView method. This method returns a top-level Node that is the root node of a scene graph for that view.
With those two pieces of infrastructure in place, we can proceed to create some actual views. The obvious place to start is to move the GridPane, Labels, and ImageView that display the metadata in AudioPlayer2 into a new view class named MetadataView. The source code for this class is not presented here because it is virtually the same user interface code that was shown in the createGridPane and createControls methods of Listing 8-9. If you are curious, the view can be found in the source code of the AudioPlayer3 project.
We now return to the original goal of letting the user select a media resource to play by means of a FileChooser dialog box or by dragging and dropping a file or URL onto the application. A new view is created to hold controls for our audio player. Its first component is a button that shows the FileChooser when clicked. The button’s event handler will get the file chosen by the user and pass the file’s URL to the SongModel. This view, called PlayerControlsView, is shown in Listing 8-12.
Listing 8-12. The PlayerControlsView Class
class PlayerControlsView extends AbstractView {


  public PlayerControlsView(SongModel songModel) {

    super(songModel);

  }


  @Override

  protected Node initView() {

    final HBox hbox = new HBox();
    hbox.setPadding(new Insets(10));


    final Button openButton = new Button();

    openButton.setId("openButton");

    openButton.setOnAction(new OpenHandler());

    openButton.setPrefWidth(32);

    openButton.setPrefHeight(32);


    hbox.getChildren().addAll(openButton);

    return hbox;

  }


  private class OpenHandler implements EventHandler<ActionEvent> {

    @Override

    public void handle(ActionEvent event) {

      FileChooser fc = new FileChooser();

      fc.setTitle("Pick a Sound File");

      File song = fc.showOpenDialog(viewNode.getScene().getWindow());

      if (song != null) {

        songModel.setURL(song.toURI().toString());

        songModel.getMediaPlayer().play();

      }

    }

  }

}
The code fragment shown below sets the openButton’s icon from the CSS style sheet.
#openButton {

  -fx-graphic: url("resources/music_note.png");

}
The next step is to add the drag and drop support. The drag event handlers are added to the Scene because we want to support the dropping of a file or URL anywhere on the application. Listing 8-13 shows the initSceneDragAndDrop method that creates these event handlers.
Listing 8-13. The DragEvent Handlers for the Scene
private void initSceneDragAndDrop(Scene scene) {

    scene.setOnDragOver(new EventHandler<DragEvent>() {

      @Override

      public void handle(DragEvent event) {

        Dragboard db = event.getDragboard();

        if (db.hasFiles() || db.hasUrl()) {

          event.acceptTransferModes(TransferMode.ANY);

        }

        event.consume();

      }

    });
    scene.setOnDragDropped(new EventHandler<DragEvent>() {

      @Override

      public void handle(DragEvent event) {

        Dragboard db = event.getDragboard();

        String url = null;


        if (db.hasFiles()) {

          url = db.getFiles().get(0).toURI().toString();

        } else if (db.hasUrl()) {

          url = db.getUrl();

        }


        if (url != null) {

          songModel.setURL(url);

          songModel.getMediaPlayer().play();

        }


        event.setDropCompleted(url != null);

        event.consume();

      }

    });

  }
The handler for the DRAG_OVER event checks to make sure that this drag contains either files or a URL. If so, it calls DragEvent’s acceptTransferModes method to set which types of TransferModes are supported. In this case we indicate that any type of transfer is supported. Other options are COPY, LINK, and MOVE. Because we are interested only in the string form of the file’s URL or in an actual URL string, we can accept any type of transfer. It is important to call the acceptTransferModes method in your DRAG_OVER handler because on many platforms that will affect the visual feedback the user receives as she moves her drag cursor over your window.
The DRAG_DROPPED handler gets the URL of the first file in the list of dropped files or the URL itself if that is what is being dragged. Just as with the file chooser code, it then passes this URL to the SongModel and begins playback of the song. The final step in the drag operation is to call the setDropCompleted method of the DragEvent to inform it that the drop was successfully completed.
Listing 8-14 shows the new Application class that creates the views and initializes the drag and drop handling. The SongModel instance is created in the constructor of the AudioPlayer3 class and gets passed to the application’s views later in the start method. The code that creates and initializes the Scene, loads the style sheets, and initializes the Stage is mostly unchanged from AudioPlayer2, with the minor addition of calling the initSceneDragAndDrop method that was shown in Listing 8-13. Another difference is that we are now using a BorderPane layout node to keep our metadata view on top of the controls view.
Listing 8-14. The AudioPlayer3 Application Class
public class AudioPlayer3 extends Application {

  private final SongModel songModel;


  private MetadataView metaDataView;

  private PlayerControlsView playerControlsView;
  public static void main(String[] args) {

    launch(args);

  }


  public AudioPlayer3() {

    songModel = new SongModel();

  }


  @Override

  public void start(Stage primaryStage) {

    songModel.setURL("http://traffic.libsyn.com/dickwall/JavaPosse373.mp3");

    metaDataView = new MetadataView(songModel);

    playerControlsView = new PlayerControlsView(songModel);


    final BorderPane root = new BorderPane();

    root.setCenter(metaDataView.getViewNode());

    root.setBottom(playerControlsView.getViewNode());


    final Scene scene = new Scene(root, 800, 400);

    initSceneDragAndDrop(scene);


    final URL stylesheet = getClass().getResource("media.css");

    scene.getStylesheets().add(stylesheet.toString());


    primaryStage.setScene(scene);

    primaryStage.setTitle("Audio Player 3");

    primaryStage.show();

    songModel.getPlayer().play();

  }


  private void initSceneDragAndDrop(Scene scene) {

    // Shown in Listing 8.13.

  }

}
We now have a good beginning to an audio player application, but it’s pretty annoying when you can’t control the playback of the songs. It’s time to remedy that.
Controlling Playback
There are three main methods in the MediaPlayer class that are used to control the playback of Media objects: play, pause, and stop. None of these methods takes any parameters, but they do affect the MediaPlayer’s status and currentTime properties. The play method is used to begin the playback of the media. As the media are played, MediaPlayer’s currentTime property is continuously updated to indicate the progress of the playback. Because currentTime is of type Duration, it can give you the position of the playback in milliseconds, seconds, minutes, or hours. The pause method will cause the playback to pause and a subsequent call to play will restart the playback from where it was paused. Calling the stop method stops playback and resets the currentTime variable to the start of the Media.
When a MediaPlayer object is first created, its status property is initialized to MediaPlayer.Status.UNKNOWN. Once the Media resource begins loading and there are no other errors, the status will change to MediaPlayer.Status.READY. Calling the play method causes the status variable to change to MediaPlayer.Status.PLAYING. Calling stop or pause will reset the status to MediaPlayer.Status.STOPPED or MediaPlayer.Status.PAUSED, respectively. Other possible values for status include MediaPlayer.Status.HALTED and MediaPlayer.Status.STALLED. The halted state means that a critical unrecoverable error has occurred. Once entered, the MediaPlayer will never exit the halted state. The stalled status will occur when a media stream runs out of data during playback and must wait until more data become available. You can call the play method on the MediaPlayer at any time, even when its status is UNKNOWN. In that case, playback will begin as soon as the MediaPlayer is in the READY state.
Laying Out the Player Controls
It is time to revisit the PlayerControlsView that we created in Listing 8-12. In addition to the openButton we currently have, we add the ability to control playback, volume, and playback position as well as display the media’s current time, total duration, and the status of the MediaPlayer. That is a lot to display in one layout, so we use JavaFX’s most flexible layout node, the GridPane, to keep track of it all. The GridPane layout that we end up with is shown in Figure 8-5.
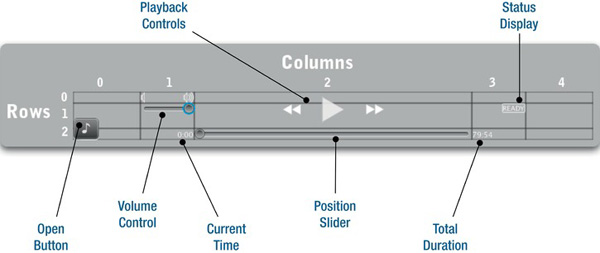
Figure 8-5. The GridPane layout of the media player controls
Some controls in Figure 8-5, such as the playback controls and the open button, span multiple rows. Others use special alignment constraints. Listing 8-15 shows the new initView method of the PlayerControlsView that creates this layout.
Listing 8-15. The GridPane Layout for the Player Controls
@Override

protected Node initView() {

  final Button openButton = createOpenButton();

  controlPanel = createControlPanel();

  volumeSlider = createSlider("volumeSlider");

  statusLabel = createLabel("Buffering", "statusDisplay");

  positionSlider = createSlider("positionSlider");
  totalDurationLabel = createLabel("00:00", "mediaText");

  currentTimeLabel = createLabel("00:00", "mediaText");


  final ImageView volLow = new ImageView();

  volLow.setId("volumeLow");


  final ImageView volHigh = new ImageView();

  volHigh.setId("volumeHigh");


  final GridPane gp = new GridPane();

  gp.setHgap(1);

  gp.setVgap(1);

  gp.setPadding(new Insets(10));


  final ColumnConstraints buttonCol = new ColumnConstraints(100);

  final ColumnConstraints spacerCol = new ColumnConstraints(40, 80, 80);

  final ColumnConstraints middleCol = new ColumnConstraints();

  middleCol.setHgrow(Priority.ALWAYS);


  gp.getColumnConstraints().addAll(buttonCol, spacerCol, middleCol,

                                   spacerCol, buttonCol);


  GridPane.setValignment(openButton, VPos.BOTTOM);

  GridPane.setHalignment(volHigh, HPos.RIGHT);

  GridPane.setValignment(volumeSlider, VPos.TOP);

  GridPane.setHalignment(statusLabel, HPos.RIGHT);

  GridPane.setValignment(statusLabel, VPos.TOP);

  GridPane.setHalignment(currentTimeLabel, HPos.RIGHT);


  gp.add(openButton, 0, 0, 1, 3);

  gp.add(volLow, 1, 0);

  gp.add(volHigh, 1, 0);

  gp.add(volumeSlider, 1, 1);

  gp.add(controlPanel, 2, 0, 1, 2);

  gp.add(statusLabel, 3, 1);

  gp.add(currentTimeLabel, 1, 2);

  gp.add(positionSlider, 2, 2);

  gp.add(totalDurationLabel, 3, 2);


  return gp;

}


private Slider createSlider(String id) {

  final Slider slider = new Slider(0.0, 1.0, 0.1);

  slider.setId(id);

  slider.setValue(0);

  return slider;

}
private Label createLabel(String text, String styleClass) {

  final Label label = new Label(text);

  label.getStyleClass().add(styleClass);

  return label;

}
The method starts by creating the controls and ImageViews that will be placed in the layout. We have already seen the code that creates the openButton in Listing 8-12. The createControlPanel method is presented later in this section. The next step is to create the GridPane and its ColumnConstraints. Three different column constraints are created. The first, buttonCol, is for the open button and has a fixed width of 100 pixels. The buttons are smaller than 100 pixels, so the width of this column creates a nice buffer between the buttons and the actual player controls. The second column constraint is the spacerCol and can vary in width from a minimum of 40 pixels to a maximum of 80 pixels, with a preferred width that is also 80 pixels. This constraint is used for the columns that mainly contain the volume slider and the status display. And finally we have the middleCol constraint. The column having this constraint is allowed to grow to fill the remaining space left over from the other columns. It will contain the position slider and the playback controls.
The constraints are added in the following order: buttonCol, spacerCol, middleCol, spacerCol, and buttonCol. We added the last buttonCol constraint even though we don’t have any controls to put in that last column. This keeps the layout symmetrical and keeps the player controls centered in the window.
Several of the controls also have special alignments that are set using the setHalignment and setValignment methods to control their horizontal and vertical alignment. For example, the openButton is aligned to the bottom of the three cells that it spans. As previously mentioned, this is to create “white space” between the button and the actual player controls. Another example is the volHigh ImageView. It is aligned to the right of its cell. The reason is that we add the volLow and volHigh images to the same GridPane cell. Because volLow is left-aligned (the default) and volHigh is right-aligned, they don’t overlap and automatically maintain their proper positions above the volume slider even when the layout is resized.
The final step, of course, is actually to add the controls to the GridPane. We used GridPane’s add methods in Listing 8-15. There are two different variants of the method. The first allows you to specify the Node to be added along with its column index and its row index. The second version of the add method additionally allows you to specify the number of columns and rows that the Node should span. This latter version is used for the player controls (the controlPanel Node and the openButton) to allow them to span multiple rows.
With its ability to specify row and column sizing constraints, custom alignments, and even display multiple nodes per cell, the GridPane is by far the most powerful and flexible layout in your JavaFX toolkit. It really pays to become familiar with all of its abilities.
Creating Playback Controls
Now that you have a basic knowledge of controlling playback with a MediaPlayer and our layout is now in place, let’s consider the implementation of a play/pause button. This simple control will show a play icon if the MediaPlayer is not currently in the PLAYING state. If the MediaPlayer is PLAYING, the button will show a pause icon. If pressed while the MediaPlayer is in the PLAYING state, the button’s event handler will call the MediaPlayer’s pause method. Otherwise, the MediaPlayer’s play method will be called. The code that loads the play and pause icons, creates the button, and attaches the event handler that implements this logic is shown in Listing 8-16.
Listing 8-16. The Logic Behind the Play/Pause Button
private Button createPlayPauseButton() {

  URL url = getClass().getResource("resources/pause.png");

  pauseImg = new Image(url.toString());


  url = getClass().getResource("resources/play.png");

  playImg = new Image(url.toString());


  playPauseIcon = new ImageView(playImg);


  final Button playPauseButton = new Button(null, playPauseIcon);

  playPauseButton.setId("playPauseButton");

  playPauseButton.setOnAction(new EventHandler<ActionEvent>() {

    @Override

    public void handle(ActionEvent arg0) {

      final MediaPlayer mediaPlayer = songModel.getMediaPlayer();

      if (mediaPlayer.getStatus() == MediaPlayer.Status.PLAYING) {

        mediaPlayer.pause();

      } else {

        mediaPlayer.play();

      }

    }

  });

  return playPauseButton;

}
The first step in creating the playPauseButton is to load the two images that will serve as the button’s icons. The playPauseIcon, an ImageView, is then initialized with the play Image. This ImageView serves as the playPauseButton’s graphic node. The two Images and the ImageView are private members of the PlayerControlsView class because we need to access them later to set the button’s icon according to the state of the media player.
The playPauseButton is also given an ID that is used by the application’s style sheet to apply additional styles to the button. These styles make the button’s background completely transparent unless the mouse is currently hovering over it. In that case, a translucent background is applied to give the user some visual feedback that the button is live. These styles are shown in the code fragment below.
#playPauseButton {

  -fx-background-color: transparent;

}

#playPauseButton:hover {

  -fx-background-color: rgb(255, 255, 255, 0.1);

}
To switch the icon of the playPauseButton based on the state of the MediaPlayer, we need to listen to the MediaPlayer’s status property. Unfortunately, the status property is not updated on the JavaFX application thread, so we cannot bind the button’s icon directly to the property. Doing so would violate JavaFX’s threading rules and could lead to “undefined behavior.”
![]() Caution The
Caution The status and currentTime properties are updated by the MediaPlayer and, as of JavaFX version 2.0.2, these updates do not occur on the JavaFX application thread. Therefore, you cannot bind to these properties or use them in binding expressions that affect live scene graph nodes. Doing so will result in strange bugs or exceptions because this violates the threading conventions of JavaFX.
The solution is to attach a listener to the property and use the Platform.runLater method to trigger updates on the application thread. This code is shown in Listing 8-17.
Listing 8-17. Listening to Status Property Changes to Update the Scene Graph
private class StatusListener implements InvalidationListener {

  @Override

  public void invalidated(Observable observable) {

    Platform.runLater(new Runnable() {

      @Override public void run() {

        updateStatus(songModel.getMediaPlayer().getStatus());

      }

    });

  }

}


private void updateStatus(Status newStatus) {

  if (newStatus == Status.UNKNOWN || newStatus == null) {

    controlPanel.setDisable(true);

    positionSlider.setDisable(true);

    statusLabel.setText("Buffering");

  } else {

    controlPanel.setDisable(false);

    positionSlider.setDisable(false);

    statusLabel.setText(newStatus.toString());


    if (newStatus == Status.PLAYING) {

      playPauseIcon.setImage(pauseImg);

    } else {

      playPauseIcon.setImage(playImg);

    }

  }

}
The StatusListener inner class is an InvalidationListener that, once added to a MediaPlayer’s status property, will be notified whenever the status property changes. Its job is to call out to the private updateStatus method of its enclosing class on the JavaFX application thread. This makes it safe to update live scene graph nodes from within the updateStatus method. One of those updates is to set the image of the playPauseIcon (an ImageView node) as shown by the code that is highlighted within the updateStatus method.
We also update the text of the statusLabel that is used as the status display (refer back to Figure 8-5) as well as enable or disable the playback controls and the position slider any time the status changes. If the MediaPlayer’s status is UNKNOWN or null, the player is not ready to begin playback and we indicate this status by displaying the “Buffering” string and disabling the playback controls. Any other MediaPlayer status will result in its name being displayed and the playback controls being enabled.
The status display is shown as a text string with a border around it. This is accomplished simply by using a Label control with some extra styling, which is shown in the following code.
.statusDisplay {

  -fx-border-color: white;

  -fx-border-radius: 2;

  -fx-border-width: 1;

  -fx-text-fill: white;

  -fx-font-size: 10pt;

}
The final piece of the playback puzzle is to stop the playback once the media end. MediaPlayer does not stop playback automatically when the end of the media is reached (technically, when the stopTime is reached; more on that in the Seeking section). You can stop playback explicitly by setting the MediaPlayer’s onEndOfMedia callback property to a Runnable that invokes the stop method on the MediaPlayer.
songModel.getMediaPlayer().setOnEndOfMedia(new Runnable() {

  @Override

  public void run() {

    songModel.getMediaPlayer().stop();

  }

});
Calling MediaPlayer’s stop method will set the status to STOPPED and reset the playback position to the start of the media by setting currentTime to 0.
![]() Note It may seem a little odd that all of the
Note It may seem a little odd that all of the MediaPlayer callback properties such as onEndOfMediaProperty, onError, and onReadyProperty are Runnables rather than EventHandlers as is done in the rest of the JavaFX API. The JavaFX team at Oracle has indicated that this was merely an oversight and that it will likely be changed in a future version.
As a final note on playback, MediaPlayer also contains a property named autoPlay. This Boolean property will cause playback to start as soon as possible if it is set to true. Occasionally it is a little too aggressive and we have found that playback will sometimes pause or even restart after a second or two when using this feature with audio files. Therefore we recommend that the play method be used in normal circumstances and that autoPlay only be used in situations where potential glitches in playback are not a serious concern and you just want to “fire and forget” the playback.
Seeking
The read-only property named currentTime always contains the MediaPlayer’s current playback position. This property is of type Duration and can be set only by using the seek method. You can use the seek method to move the playback position to any time between the current startTime and stopTime. MediaPlayer’s startTime and stopTime properties are initialized to 0 and totalDuration, respectively, where the totalDuration property, also read-only, specifies the total length of the media. The seek method has no effect if the MediaPlayer is currently in the STOPPED state.
Three controls in the audio player application make use of the seek functionality of the MediaPlayer. Perhaps the most obvious are the “seek to beginning” and “seek to end” buttons that are located on each side of the playPauseButton. These buttons show icons that consist of double triangles pointing to the left (seek to beginning) and right (seek to end). Listing 8-18 shows the createControlPanel method from the PlayerControlsView class in which these buttons are created.
Listing 8-18. Creating the Panel Containing the Play/Pause Button and the Seek Buttons
private Node createControlPanel() {

  final HBox hbox = new HBox();

  hbox.setAlignment(Pos.CENTER);

  hbox.setFillHeight(false);


  final Button playPauseButton = createPlayPauseButton();


  final Button seekStartButton = new Button();

  seekStartButton.setId("seekStartButton");

  seekStartButton.setOnAction(new EventHandler<ActionEvent>() {

    @Override

    public void handle(ActionEvent event) {

      seekAndUpdatePosition(Duration.ZERO);

    }

  });


  final Button seekEndButton = new Button();

  seekEndButton.setId("seekEndButton");

  seekEndButton.setOnAction(new EventHandler<ActionEvent>() {

    @Override

    public void handle(ActionEvent event) {

      final MediaPlayer mediaPlayer = songModel.getMediaPlayer();

      final Duration totalDuration = mediaPlayer.getTotalDuration();

      final Duration oneSecond = Duration.seconds(1);

      seekAndUpdatePosition(totalDuration.subtract(oneSecond));

    }

  });


  hbox.getChildren().addAll(seekStartButton, playPauseButton, seekEndButton);

  return hbox;

}


private void seekAndUpdatePosition(Duration duration) {

  final MediaPlayer mediaPlayer = songModel.getMediaPlayer();


  if (mediaPlayer.getStatus() == Status.STOPPED) {

    mediaPlayer.pause();

  }
  mediaPlayer.seek(duration);


  if (mediaPlayer.getStatus() != Status.PLAYING) {

      updatePositionSlider(duration);

  }

}
Recall that Listing 8-16 showed the code for the createPlayPauseButton method. Listing 8-18 shows the creation of the rest of the playback control panel, namely the seekStartButton and the seekEndButton. These two buttons specify a seek time as the argument to the seekAndUpdatePosition helper method. For the seekStartButton, the seek time is Duration.ZERO, which will always seek to the start of the media. The seekEndButton actually seeks to one second prior to the end of the media, which is specified by the MediaPlayer’s totalDuration property. There is no reason that you cannot seek all the way to the totalDuration value. We arbitrarily decided to seek to one second prior to the end in order to let the user hear the very end of the song rather than just silence.
The assignment of the buttons’ icons can be handled easily by the application’s style sheet because these icons are static. The buttons also share some of the styling of the play/pause button as shown here.
#seekStartButton {

  -fx-graphic: url("resources/prev.png");

}


#seekEndButton {

  -fx-graphic: url("resources/next.png");

}


#playPauseButton, #seekEndButton, #seekStartButton {

  -fx-background-color: transparent;

}


#playPauseButton:hover, #seekEndButton:hover, #seekStartButton:hover {

  -fx-background-color: rgb(255, 255, 255, 0.1);

}
The logic that controls the actual seek operation is encapsulated in the seekAndUpdatePosition method. Remember that the seek method has no effect if the player is in the STOPPED state. If that is the case, we need to call the pause method before the seek method is called or the seek will not work. Also note that after seek is called, we manually update the position slider if the MediaPlayer is not playing. This is necessary because the MediaPlayer’s currentTime property is not updated automatically by the call to seek. If the MediaPlayer is playing, this is not noticeable because playback will immediately continue from the new seek position, causing the currentTime to be quickly updated as well. On the other hand, if the MediaPlayer is not playing then the currentTime will not be updated, causing the position slider (which listens to and displays currentTime updates) to become out of sync with the new playback position. This is noticeable the next time the play button is pressed; the position slider will suddenly skip ahead or back to the position of the last seek.
This discussion has led nicely to the third control in the audio player that makes use of the seek function: the aforementioned position slider. The position slider does double duty; it displays the currentTime value but can also be dragged to a new position resulting in a call to the seek method. As you can probably guess, there are some subtleties to account for when getting this to work properly. Listing 8-19 shows the code required to implement the first part of this functionality: displaying the currentTime value on the position slider.
Listing 8-19. Displaying the Value of currentTime on the Position Slider
private class CurrentTimeListener implements InvalidationListener {

  @Override

  public void invalidated(Observable observable) {

    Platform.runLater(new Runnable() {

      @Override

      public void run() {

        final MediaPlayer mediaPlayer = songModel.getMediaPlayer();

        final Duration currentTime = mediaPlayer.getCurrentTime();

        currentTimeLabel.setText(formatDuration(currentTime));

        updatePositionSlider(currentTime);

      }

    });

  }

}


private void updatePositionSlider(Duration currentTime) {

  if (positionSlider.isValueChanging())

    return;


  final MediaPlayer mediaPlayer = songModel.getMediaPlayer();

  final Duration total = mediaPlayer.getTotalDuration();


  if (total == null || currentTime == null) {

    positionSlider.setValue(0);

  } else {

    positionSlider.setValue(currentTime.toMillis() / total.toMillis());

  }

}
Like the status property, MediaPlayer’s currentTime property is updated on a different thread than the main JavaFX application thread. Therefore we cannot bind to it directly and must instead attach an InvalidationListener that utilizes Platform.runLater in order to perform updates to live scene graph nodes such as the position slider. Listing 8-19 above shows the implementation of the CurrentTimeListener inner class that accomplishes this for us. The Runnable’s run method is called on the JavaFX application thread. Inside the run method we get the currentTime from the MediaPlayer and pass it as a parameter to the updatePositionSlider method. The updatePositionSlider method, also shown in Listing 8-19, first checks to see if the positionSlider’s value is currently changing and, if so, returns without doing anything. We do this to make sure we don’t change the slider’s position while the user is currently dragging it. Doing so would make the slider’s thumb bar flicker back and forth between the drag position and the position indicated by the currentTime value. Needless to say, this is an unwanted effect that we are careful to avoid. If the user is not currently changing the position slider’s value, we are free to update it based on the value of currentTime and totalDuration. The position slider is created with minimum and maximum values of 0.0 and 1.0. The currentTime value is therefore divided by the media’s totalDuration to calculate the correct value for the slider. If either totalDuration or currentValue is null, the slider is simply positioned at 0.
You probably noticed that the CurrentTimeListener also formats the value of currentTime and displays it as the text of the currentTimeLabel. If you refer back to Figure 8-5 you can see that the position slider is bracketed by two Label controls. On the left is a label that displays the currentTime value, and the totalDuration is displayed by a label to the right of the slider. The label displaying the totalDuration is set by a listener that is attached to MediaPlayer’s totalDuration property much like the CurrentTimeListener shown above. Whenever the value of totalDuration changes, the listener calls the formatDuration method to create a String to use as the label’s text. The formatDuration method used to format both of these values is shown in Listing 8-20.
Listing 8-20. The formatDuration Method
private String formatDuration(Duration duration) {

    double millis = duration.toMillis();

    int seconds = (int) (millis / 1000) % 60;

    int minutes = (int) (millis / (1000 * 60));

    return String.format("%02d:%02d", minutes, seconds);

  }
The formatDuration method takes a Duration as a parameter and returns a String with the format mm:ss where mm is minutes and ss is seconds. The minutes and seconds values will be zero-padded if they are only one digit long.
The second part of the position slider’s job is to allow the user to set the playback position by dragging the slider back and forth. This is accomplished by listening for changes to the Slider’s valueChangingProperty as shown in Listing 8-21.
Listing 8-21. Listening to Position Slider Changes and Seeking
@Override

protected Node initView() {

  // Controls are created as was shown in Listing 8-15.


  positionSlider = createSlider("positionSlider");

  positionSlider.valueChangingProperty().addListener(new PositionListener());


  // Lay out the GridPane as was shown in Listing 8-15.

}


private class PositionListener implements ChangeListener<Boolean> {

  @Override

  public void changed(ObservableValue<? extends Boolean> observable,

                      Boolean oldValue, Boolean newValue) {

    if (oldValue && !newValue) {

      double pos = positionSlider.getValue();

      final MediaPlayer mediaPlayer = songModel.getMediaPlayer();

      final Duration seekTo = mediaPlayer.getTotalDuration().multiply(pos);

      seekAndUpdatePosition(seekTo);

    }

  }

}
PositionListener is a ChangeListener that waits for an old value of true (the value was changing) and a new value of false (the value is not changing anymore). When those conditions exist, we know the user has finished dragging the slider and it is time to seek the new position. The new position is calculated by multiplying the slider’s new value, which you recall can range from 0.0 to 1.0, by the MediaPlayer’s totalDuration to give the new Duration we pass to the seek method. This value is passed to the same seekAndUpdatePosition helper method that was shown in Listing 8-18, which handles the details of the call to the seek method.
Controlling Volume
The MediaPlayer class has two properties that control the volume of the audio playback. The volume property has a range that goes from 0.0 (mute) to 1.0 (maximum volume). This volume setting does not affect the master volume of the computer on which the audio is playing; it controls only the volume used by the MediaPlayer. The default value for the volume property is 1.0. There is also a Boolean property named mute. When this variable is set to true, the volume of the playback will be muted. Although playback continues, no sound will be heard. This is effectively equivalent to setting the volume property to 0.0, but muting playback allows you to cut out the sound and easily restore it later to its previous level without needing to read and reset the volume value.
The volume control in the audio player application is a Slider whose value can range from 0.0 to 1.0. Simply establishing a bidirectional binding between the Slider’s value property and the MediaPlayer’s volume property will allow the user to control the volume of the playback.
volumeSlider.valueProperty().bindBidirectional(mediaPlayer.volumeProperty());
That concludes our look at the player controls in our sample application. We have not shown the code that listens to changes in the mediaPlayer property itself in order to add and remove listeners cleanly. If you are interested in viewing the full source of the PlayerControlsView, it can be found in the AudioPlayer3 project in the book’s Chapter 8 example code. Figure 8-6 shows what the audio player looks like at this point.
MediaPlayer also exposes a balance property, which controls the left-to-right balance of the audio. The range of the variable is from −1.0 (playing from the left speakers only) to 1.0 (playing from the right speakers only). If the audio that is playing has only one track (mono), that track will be played on both speakers and the balance control will act as a volume control allowing you to adjust how loud the left or right speaker is playing. If the audio has two tracks (stereo), the left track is played on the left speaker and the right track is played on the right speaker. In this case the balance control will allow you to fade back and forth between the left and right audio tracks. The default value of the balance variable is 0.0. The audio player application does not provide any controls to adjust the balance; we have mentioned it here only for completeness.
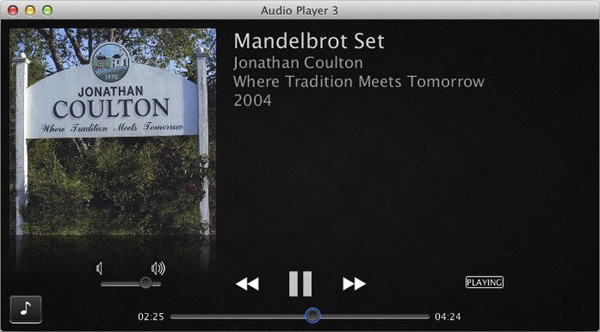
Figure 8-6. The audio player’s playback controls. “Just take a point called z in the complex plane. . . .”
Repetition
Another MediaPlayer feature not used by the audio player sample application, but that certainly bears mentioning, is the ability to repeat the playback of your media. You can set the playback to repeat itself a certain number of times or to repeat forever. This behavior is controlled by the cycleCount property. The number of playback cycles that have been completed is available in the currentCount property. When the end of the media is reached, currentCount is incremented and, if it is less than cycleCount, playback will begin again automatically. The onRepeat callback function is called whenever playback is repeated. The usual call to onEndOfMedia will not be made until after the final repetition. Setting cycleCount to the value MediaPlayer.INDEFINITE will cause the playback to loop indefinitely.
The startTime and stopTime properties in the MediaPlayer class can affect where the media start and stop playing. As their names indicate, both of these properties are Duration types. The startTime property is initialized to 0 milliseconds whereas stopTime is initialized to the value of totalDuration. If a stopTime is set, playback will stop or repeat when that time is reached. On a related note, the cycleDuration property is a read-only property that gives you the current difference between the startTime and stopTime.
The ability to set the playback to repeat would be a handy feature for the audio player to have. It is not currently implemented in the sample application, but adding it would be a good exercise for the enthusiastic reader.
Audio Equalization
Two very cool new features of the JavaFX media API are the abilities to create an audio equalizer and to view the live spectrum of the audio as it’s being played. The equalizer allows you to boost or attenuate the audio at certain frequencies. This change is then visible if you are visualizing the audio’s frequency spectrum; the two features work together to give you or your users ultimate control of the playback experience.
Each MediaPlayer creates an AudioEqualizer instance that you can access using the getAudioEqualizer method. The AudioEqualizer class has an enabled property that you can use to enable or disable the equalizer. It also exposes an ObservableList of EqualizerBand instances. Each EqualizerBand has bandwidth, centerFrequency, and gain properties. The bandwidth and centerFrequency properties let you define the range of frequencies that are affected by the band, and the gain property boosts or attenuates those frequencies. All three of those properties are mutable. When you get a reference to the MediaPlayer’s equalizer, it will already have a number of EqualizerBands defined. You can modify the settings of those bands, or remove some or all of them and replace them with your own bands.
Listing 8-22 shows the start of the EqualizerView class. This new view is used to display an audio equalizer and a live spectrum. It is added in the AudioPlayer4 example project in the book’s source code.
Listing 8-22. The EqualizerView Class
public class EqualizerView extends AbstractView {

  private static final double START_FREQ = 250.0;

  private static final int BAND_COUNT = 7;
  public EqualizerView(SongModel songModel) {

    super(songModel);

    createEQInterface();

  }


  @Override

  protected Node initView() {

    final GridPane gp = new GridPane();

    gp.setPadding(new Insets(10));

    gp.setHgap(20);


    RowConstraints middle = new RowConstraints();

    RowConstraints outside = new RowConstraints();

    outside.setVgrow(Priority.ALWAYS);


    gp.getRowConstraints().addAll(outside, middle, outside);

    return gp;

  }


  private void createEQInterface() {

    final GridPane gp = (GridPane) getViewNode();

    final MediaPlayer mp = songModel.getMediaPlayer();


    createEQBands(gp, mp);

  }


  // To be continued...

}
Here we have the first portion of our new view. As with all of our custom AbstractView classes, we need to override the initView method so that we can create and return the view’s “root” node. The equalizer view eventually shows the live audio spectrum above the equalizer controls. The GridPane is once again the natural choice for displaying content that consists of several rows of nodes. The top row contains our spectrum display, the middle row contains a set of labels identifying the center frequency of each EqualizerBand, and the bottom row consists of a row of sliders to adjust the gain of each EqualizerBand. We therefore create two row constraints to control the sizing behavior of these rows. Finally, the new GridPane instance is returned so that it can become the view’s root node.
Because initView is called from the superclass constructor, it is called before the rest of EqualizerView’s constructor runs. Therefore, by the time that createEQInterface is called in the constructor, initView will already have completed. This is why we can call the getViewNode method in createEQInterface to retrieve the GridPane that was just created in initView. The createEQInterface method also retrieves the current MediaPlayer instance from songModel and passes them both to the createEQBands method, which creates the EqualizerBand instances and the Slider controls that are used to manipulate the gain of each band. This method is shown in Listing 8-23.
Listing 8-23. Creating Equalizer Bands
private void createEQBands(GridPane gp, MediaPlayer mp) {

  final ObservableList<EqualizerBand> bands =

          mp.getAudioEqualizer().getBands();
  bands.clear();


  double min = EqualizerBand.MIN_GAIN;

  double max = EqualizerBand.MAX_GAIN;

  double mid = (max - min) / 2;

  double freq = START_FREQ;


  // Create the equalizer bands with the gains preset to

  // a nice cosine wave pattern.

  for (int j = 0; j < BAND_COUNT; j++) {

    // Use j and BAND_COUNT to calculate a value between 0 and 2*pi

    double theta = (double)j / (double)(BAND_COUNT-1) * (2*Math.PI);


    // The cos function calculates a scale value between 0 and 0.4

    double scale = 0.4 * (1 + Math.cos(theta));


    // Set the gain to be a value between the midpoint and 0.9*max.

    double gain = min + mid + (mid * scale);


    bands.add(new EqualizerBand(freq, freq/2, gain));

    freq *= 2;

  }


  for (int i = 0; i < bands.size(); ++i) {

    EqualizerBand eb = bands.get(i);

    Slider s = createEQSlider(eb, min, max);


    final Label l = new Label(formatFrequency(eb.getCenterFrequency()));

    l.getStyleClass().addAll("mediaText", "eqLabel");


    GridPane.setHalignment(l, HPos.CENTER);

    GridPane.setHalignment(s, HPos.CENTER);

    GridPane.setHgrow(s, Priority.ALWAYS);


    gp.add(l, i, 1);

    gp.add(s, i, 2);

  }

}


private Slider createEQSlider(EqualizerBand eb, double min, double max) {

  final Slider s = new Slider(min, max, eb.getGain());

  s.getStyleClass().add("eqSlider");

  s.setOrientation(Orientation.VERTICAL);

  s.valueProperty().bindBidirectional(eb.gainProperty());

  s.setPrefWidth(44);

  return s;

}
private String formatFrequency(double centerFrequency) {

  if (centerFrequency < 1000) {

    return String.format("%.0f Hz", centerFrequency);

  } else {

    return String.format("%.1f kHz", centerFrequency / 1000);

  }

}
The createEQBands method begins by getting the list of EqualizerBands from the AudioEqualizer associated with the current MediaPlayer. The list is then cleared to make way for the bands that we want to create. The minimum and maximum gains for an EqualizerBand on the current platform are accessible through the EqualizerBand.MIN_GAIN and EqualizerBand.MAX_GAIN constants. These constants should always be used in calculations involving the range of valid gain values. We use them to define the min, max, and mid (the midpoint of the gain range) variables. A for loop then creates the number of EqualizerBands defined by the BAND_COUNT constant, setting their gain values in a nice cosine wave pattern. This pattern emphasizes the bass and high-range frequencies, which makes a nice set of default values.
Afterward, a second for loop iterates through the list of EqualizerBand instances we just created and creates a corresponding Slider control and frequency Label for each one. Each Slider is created by the createEQSlider method. The new Slider’s value property is bidirectionally bound to the EqualizerBand’s gain property inside this method. This is the crucial part that gives the user control of the band’s gain. Note that each Slider is also given a style class of eqSlider. We use this class later to add some nice styling to our equalizer display.
The final step in the createEQBands method is to set the alignment and grow constraints of the Slider and Label and add them to the GridPane layout node. The Sliders are set to grow horizontally so that the GridPane will expand to fill the width of the window. Of course, the same result could have been achieved by setting the Labels to grow, but then we would also have had to reset the Label’s maximum size because all Labels, by default, have their maximum size set equal to their preferred size. The Labels and Sliders populate rows one and two in the GridPane, leaving row zero for the spectrum display.
MediaPlayer has four properties that deal with the frequency spectrum of the current audio track: audioSpectrumListener, audioSpectrumInterval, audioSpectrumNumBands, and audioSpectrumThreshold. The audioSpectrumListener property is an instance of the AudioSpectrumListener interface. You use MediaPlayer’s setAudioSepctrumListener method to attach the listener, which then enables the computation of spectrum data and sends periodic updates to the listener’s spectrumDataUpdate method. Calling setAudioSpectrumListener again with a null value turns off audio spectrum calculations and updates.
The audioSpectrumInterval property lets you control the interval at which updates are sent to the AudioSpectrumListener. The value is specified in seconds, and its default value is 0.1 seconds, which means that by default your listener will receive 10 spectrum updates per second. The number of spectrum bands that will be reported to the listener is controlled by the audioSpectrumNumBands property. And the audioSpectrumThreshold property defines the minimum value that will be reported for a given spectral band. This value has a unit of decibels and must be less than zero.
Listing 8-24 highlights the additions that need to be made to the createEQInterface method to create the controls that display the audio frequency spectrum.
Listing 8-24. Creating the Frequency Spectrum Display
private void createEQInterface() {

  final GridPane gp = (GridPane) getViewNode();

  final MediaPlayer mp = songModel.getMediaPlayer();


  createEQBands(gp, mp);

  createSpectrumBars(gp, mp);

  spectrumListener = new SpectrumListener(START_FREQ, mp, spectrumBars);

}


private void createSpectrumBars(GridPane gp, MediaPlayer mp) {

  spectrumBars = new SpectrumBar[BAND_COUNT];


  for (int i = 0; i < spectrumBars.length; i++) {

    spectrumBars[i] = new SpectrumBar(100, 20);

    spectrumBars[i].setMaxWidth(44);

    GridPane.setHalignment(spectrumBars[i], HPos.CENTER);

    gp.add(spectrumBars[i], i, 0);

  }

}
The createSpectrumBars method creates a new array of SpectrumBar controls, one for each equalizer band that was previously created. SpectrumBar is a custom control class that extends VBox to arrange a series of Rectangle nodes in a vertical stack. The constructor parameters determine the maximum value of the bar, 100 in this case, and the number of Rectangle nodes in the stack, which we have set to 20. The control has a setValue method that determines how many of the bars are lit. For example, if we set a value of 50 (out of a maximum of 100), half of the bars, 10 in this case, will be lit. The maximum width of each SpectrumBar is set to 44 to match the width of the equalizer sliders. Each bar is then added to the GridPane layout in row zero where they are each centered horizontally within their GridPane cell. Several examples of the control are shown in Figure 8-7. We do not list the code for SpectrumBar because creating a custom control is not the focus of this chapter. If you would like to view the source code for this control, it is in SpectrumBar.java in the AudioPlayer4 example project.
Figure 8-7. A row of six SpectrumBar controls
Listing 8-24 also shows a new line in the createEQInterface method that instantiates a new instance of the SpectrumListener class. This class is an implementation of the AudioSpectrumListener interface. Its job is to listen for spectrum data updates, calculate the magnitude of the frequencies that lie within each of the equalizer bands we have defined, and update the corresponding SpectrumBar with this calculated value. Listing 8-25 shows the class and its initialization code.
Listing 8-25. The SpectrumListener Class
class SpectrumListener implements AudioSpectrumListener {

  private final SpectrumBar[] bars;

  private double minValue;

  private double[] norms;

  private int[] spectrumBucketCounts;


  SpectrumListener(double startFreq, MediaPlayer mp, SpectrumBar[] bars) {

    this.bars = bars;

    this.minValue = mp.getAudioSpectrumThreshold();

    this.norms = createNormArray();


    int bandCount = mp.getAudioSpectrumNumBands();

    this.spectrumBucketCounts = createBucketCounts(startFreq, bandCount);

  }


  public void spectrumDataUpdate(double timestamp, double duration,

                                 float[] magnitudes, float[] phases) {

    // Shown in Listing 8-26.

  }


  private double[] createNormArray() {

    double[] normArray = new double[bars.length];

    double currentNorm = 0.05;

    for (int i = 0; i < normArray.length; i++) {

      normArray[i] = 1 + currentNorm;

      currentNorm *= 2;

    }

    return normArray;

  }


  private int[] createBucketCounts(double startFreq, int bandCount) {

    int[] bucketCounts = new int[bars.length];


    double bandwidth = 22050.0 / bandCount;

    double centerFreq = bandwidth / 2;

    double currentSpectrumFreq = centerFreq;

    double currentEQFreq = startFreq / 2;

    double currentCutoff = 0;

    int currentBucketIndex = -1;
    for (int i = 0; i < bandCount; i++) {

      if (currentSpectrumFreq > currentCutoff) {

        currentEQFreq *= 2;

        currentCutoff = currentEQFreq + currentEQFreq / 2;

        ++currentBucketIndex;

        if (currentBucketIndex == bucketCounts.length) {

          break;

        }

      }


      ++bucketCounts[currentBucketIndex];

      currentSpectrumFreq += bandwidth;

    }


    return bucketCounts;

  }

}
The SpectrumListener constructor takes three parameters. The first is the center frequency of the first equalizer band. The second is the MediaPlayer instance to which this listener will be attached. The third is the array of SpectrumBar controls that the listener will update. This array is saved in the class’s instance data for later use. The MediaPlayer instance is used to gain access to the data needed by the listener during initialization. This includes the value of the audioSpectrumNumBands property as well as the value of audioSpectrumThreshold. The listener’s calculations would be slightly off if either of these two values were changed after the SpectrumListener constructor was called. We know that AudioPlayer4 does not do this, but if you have to deal with that situation, you would need to either bind or attach listeners to those properties to be notified of the changes.
The constructor then initializes a normalization array named normArray. This is an array of double values used to normalize the magnitude values that are later computed for each equalizer band’s frequency range. The normalization factor attempts to compensate for the fact that the bandwidth doubles in each successive equalizer band, but we still want to display all of them on the same scale in our SpectrumBar controls.
The final piece of initialization code called from our constructor is the createBucketCounts method. This method’s job is to figure out how many spectrum bands fall within each of our equalizer bands. It creates “buckets” into which we can later sum the magnitudes of each of the spectrum bands, thus easily figuring out to which equalizer band they correspond. The bucket counts are stored in an int array that is the same length as the SpectrumBar array, that is, one bucket for each SpectrumBar.
To begin the bucket calculation, we assume that the spectrum data will cover frequencies of up to 22.05 kHz, which is a good assumption for music. Spoken audio (voices only) will typically cover a much smaller range of frequencies, but the spectrum data provided by the media engine will cover all 22.05 kHz. We divide this maximum frequency by the number of audio spectrum bands to yield the bandwidth of each band. Half of the bandwidth gives us the center frequency of the first band. We then proceed to set the initial values of the variables used inside the for loop. These are set such that the first time through the loop, the value of currentSpectrumFreq (which was initialized to the center frequency of the first spectrum band) is greater than the currentCutoff frequency (which was initialized to zero) thus triggering a recalculation of our loop variables. We do this so that we don’t have to treat the first iteration of the loop differently than the following iterations.
After the first iteration, the loop variables are all set up as expected and the count of the first bucket is incremented. The loop then proceeds to check the center frequency of each spectrum band. If it is greater than the cutoff frequency of the current equalizer band, the bucket index is incremented and the bucket corresponding to the next equalizer frequency begins to be incremented. When finished, we have an array that tells us how many spectrum bands are contained in each equalizer band.
This bucket array allows us to sum the magnitudes of each spectrum band quickly and assign them to the correct equalizer band during the listener’s spectrumDataUpdate method. This optimization is a good idea because the spectrumDataUpdate takes place 10 times per second. The code for the listener’s spectrumDataUpdate method is shown in Listing 8-26.
Listing 8-26. SpectrumListener’s spectrumDataUpdate Method
@Override

public void spectrumDataUpdate(double timestamp, double duration,

                               float[] magnitudes, float[] phases) {

  int index = 0;

  int bucketIndex = 0;

  int currentBucketCount = 0;

  double sum = 0.0;


  while (index < magnitudes.length) {

    sum += magnitudes[index] - minValue;

    ++currentBucketCount;


    if (currentBucketCount >= spectrumBucketCounts[bucketIndex]) {

      bars[bucketIndex].setValue(sum / norms[bucketIndex]);

      currentBucketCount = 0;

      sum = 0.0;

      ++bucketIndex;

    }


    ++index;

  }

}
The spectrumDataUpdate method takes four parameters. The timestamp parameter gives the time of the update in seconds. The duration is the number of seconds for which the spectrum was computed. The duration should normally be approximately equal to the value of MediaPlayer’s audioSpectrumInterval property. The magnitudes array will hold the floating-point values corresponding to the magnitude of each spectrum band. The array length will always equal the value of MediaPlayer’s audioSpectrumNumBands property. The value is in decibels and will be between audioSpectrumThreshold and zero. It is always less than zero. Similarly, the phases array contains the phase offset of each spectrum band. These arrays should be treated as read-only by the listener because the MediaPlayer may reuse them between updates.
For our purposes, we are only trying to give the user a general idea of the spectrum content in each of the equalizer bands. Therefore we need to be concerned only with the magnitudes array. We iterate through the array and use the bucket counts to sum the magnitudes of the bands that correspond to each equalizer band. When we reach the count for each bucket, the current sum is divided by the normalization factor and then passed as the value to the corresponding SpectrumBar. Then the values are reset and the sum for the next band is calculated.
We now have the ability to create a custom set of EqualizerBands and to display the magnitude of the frequencies in each band as calculated from the audio signal that is currently being played. This gives a pretty nice equalizer interface for the users of the application. We do need to ensure that we reinitialize our equalizer interface whenever a new MediaPlayer is created (a new song is loaded). A listener attached to SongModel’s mediaPlayer property handles this and is shown in Listing 8-27.
Listing 8-27. EqualizerView’s MediaPlayer Listener
private class MediaPlayerListener implements ChangeListener<MediaPlayer> {

  @Override

  public void changed(ObservableValue<? extends MediaPlayer> observable,

                      MediaPlayer oldValue, MediaPlayer newValue) {

    if (oldValue != null) {

      oldValue.setAudioSpectrumListener(null);

      clearGridPane();

    }


    createEQInterface();

  }


  private void clearGridPane() {

    for (Node node : ((GridPane)getViewNode()).getChildren()) {

      GridPane.clearConstraints(node);

    }

    ((GridPane)getViewNode()).getChildren().clear();

  }

}
This inner class resides in EqualizerView. If the oldValue is not null, we set its spectrum listener to null to turn off the spectrum calculations. Then we clear the GridPane and recreate the equalizer interface. This is necessary because each MediaPlayer has its own AudioEqualizer instance that cannot be initialized or set from the outside. It would also be wasteful to have the MediaPlayer compute the audio spectrum when it is not visible, such as when the metadata view is being shown. We can attach another listener to our GridPane’s scene property to ensure that this does not happen. Listing 8-28 shows the final version of the EqualizerView constructor with this addition highlighted.
Listing 8-28. The EqualizerView Constructor with the Scene Listener Declared
public EqualizerView(SongModel songModel) {

  super(songModel);


  songModel.mediaPlayerProperty().addListener(new MediaPlayerListener());

  createEQInterface();


  getViewNode().sceneProperty().addListener(new ChangeListener<Scene>() {

    @Override

    public void changed(ObservableValue<? extends Scene> observable,

                        Scene oldValue, Scene newValue) {

      final MediaPlayer mp = EqualizerView.this.songModel.getMediaPlayer();

      if (newValue != null) {

        mp.setAudioSpectrumListener(spectrumListener);

      } else {
        mp.setAudioSpectrumListener(null);

      }

    }

  });

}
Whenever EqualizerView’s GridPane is not part of the scene (whenever newValue is null), we make sure to set MediaPlayer’s audioSpectrumListener to null in order to disable the spectrum calculations, which begs the question of how and when to add the equalizer view to the application. We created an EQ button and added it to the far right side of the player controls view. Whenever this button is clicked, the metadata and controls views are hidden and the equalizer view is shown. We have also added a “Back” button to the equalizer view that returns the application to the metadata and controls views. To facilitate the changing of views, a new listener field has been added to the AbstractView class. It lets us specify one event handler per view that can be used to indicate that the “next” view should be shown. The new version of the AbstractView class is shown in Listing 8-29.
Listing 8-29. Adding the setNextHandler Method to AbstractView
public abstract class AbstractView {

  protected final SongModel songModel;

  protected final Node viewNode;


  public AbstractView(SongModel songModel) {

    this.songModel = songModel;

    this.viewNode = initView();

  }


  // other methods removed...


  public void setNextHandler(EventHandler<ActionEvent> nextHandler) {

  }

}
As you can see, the setNextHandler does nothing by default, so existing views are free to ignore it. Any view that needs to support this new functionality can override the method and pass along the nextHandler argument to whichever control is the source of the next action. In our case, this is the “EQ” button in the player controls view and the “Back” button in the equalizer view. Naturally, the AudioPlayer4 application class also needs to be modified to create the event handlers that are capable of switching between the two “pages” of our final application. We do not detail those changes here, but you can consult the AudioPlayer4 example code if you are curious.
The final version of the audio player application is shown in Figure 8-8. The top image shows the “page” containing the metadata and controls views, and the bottom image shows the final version of the equalizer view.
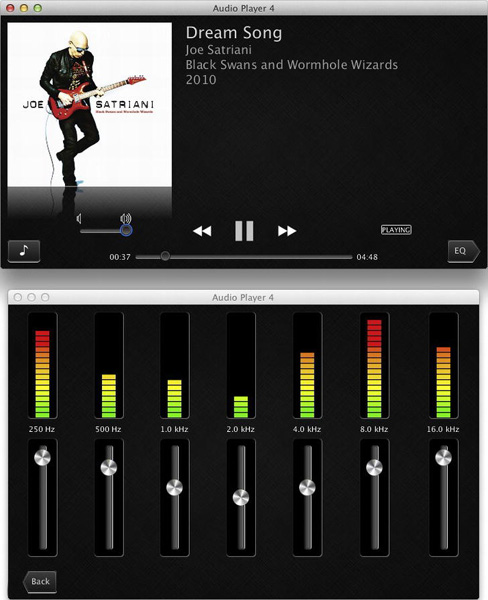
Figure 8-8. The final version of AudioPlayer 4 with the metadata/controls view (top) and equalizer view (bottom)
The bottom image of Figure 8-8 shows the special styling that was applied to the Slider and SpectrumBar controls of the EqualizerView. You may also have noticed that the Back and EQ buttons are shaped like arrows. This was also done via the application’s style sheet. Those styles are shown in Listing 8-30.
Listing 8-30. Styling the Equalizer and Buttons
#eqButton {

  -fx-shape: "M 1,0 L 10,0 13,5 10,10 1,10 Q 0 10 0 9 L 0,1 Q 0 0 1 0";

  -fx-font-size: 12pt;

  -fx-alignment: center-left;

}


#backButton {

  -fx-shape: "M 3,0 L 12,0 Q 13,0 13,1 L 13,9 Q 13,10 12,10 L 3,10 1,5";

  -fx-font-size: 12pt;

  -fx-alignment: center-right;

}


.eqSlider {

  -fx-background-radius: 5;

  -fx-background-color: #222, #888, black;

  -fx-background-insets: 0, 1 0 0 1, 1;

  -fx-padding: 2 10;

}


.eqSlider .thumb {

  -fx-background-image: url("resources/thumb.png");

  -fx-padding: 12;

}


.eqSlider:vertical .track{

  -fx-padding: 5;

}


.spectrumBar {

  -fx-background-radius: 5;

  -fx-background-color: #222, #888, black;

  -fx-background-insets: 0, 1 0 0 1, 1;

  -fx-padding: 2 10;

}
MediaPlayer Wrap-Up
Playing media files over the Internet happens automatically with the JavaFX media API. All you have to do is point a Media object to an HTTP resource and attach it to a MediaPlayer with autoPlay set to true. If, however, you are interested in monitoring the progress of the download buffer, you can use the bufferProgressTime property in the MediaPlayer class. When data are loaded from a stream or from disk, the amount of time those data will take to play is calculated and this time is regularly updated as the value of bufferProgressTime. By binding to this property, you can receive these updates and effectively monitor the media’s buffer.
The final two MediaPlayer properties we discuss are the rate and currentRate properties. Calling setRate allows you to control the rate of the playback. Passing a parameter of 1.0 will cause playback to proceed at the normal rate. A parameter of 2.0 would cause your media to be played at twice the normal rate. You can pass any value between 0.0 and 8.0. The currentRate property always reflects the actual rate of playback, regardless of the value of the rate property. For example, if playback is currently stalled, currentRate will be 0.0 even though rate may be set to 4.0.
Playing Video
From an API standpoint, playing video instead of audio is as simple as wrapping a MediaPlayer with a MediaView and adding the MediaView to the scene graph. Listing 8-31 shows how this is done. You simply point a Media object at a valid source (a Flash movie in this case) and wrap it with an auto-playing MediaPlayer, which, in turn, is wrapped with a MediaView. The final step is to add the MediaView to the scene and set the size of the scene to match the size of the movie.
Listing 8-31. A Minimalist but Functional Movie Player
public class VideoPlayer1 extends Application {


  public static void main(String[] args) {

    launch(args);

  }


  @Override

  public void start(Stage primaryStage) {

    String workingDir = System.getProperty("user.dir");

    File f = new File(workingDir, "../media/omgrobots.flv");


    Media m = new Media(f.toURI().toString());

    MediaPlayer mp = new MediaPlayer(m);

    MediaView mv = new MediaView(mp);


    StackPane root = new StackPane();

    root.getChildren().add(mv);


    primaryStage.setScene(new Scene(root, 960, 540));

    primaryStage.setTitle("Video Player 1");

    primaryStage.show();


    mp.play();

  }

}
This example loads the video file from the filesystem. Loading video from the Internet using an http URL will work just as well, but it is not advisable to package movies of any significant size inside your jar file because that will drastically increase the size of the download (assuming you are deploying to the browser or with webstart). Once we have our file URL, everything becomes familiar. You use the URL to create the Media object and wrap that Media object in a MediaPlayer. The only new step is to construct a MediaView node using the MediaPlayer as the constructor argument and add it to the root of our scene graph, a StackPane in this case. We create a Scene that is sized to fit the dimensions of our movie, then pass it to the stage and show it. The final step is to start the movie playing with the same familiar call to MediaPlayer’s play method. Figure 8-9 shows this simple movie player in action.
Figure 8-9. Playing a robot movie in JavaFX
Everything you’ve learned up to this point about playing audio with Media and MediaPlayer also applies to playing video with MediaView. There are only a few extra concepts that you need to know.
Controlling the Size of a MediaView
MediaView is just another node in the scene graph, therefore it is possible to scale its content using the usual transforms or the scaleX and scaleY properties of the Node class. There are more convenient ways to get the job done when dealing with MediaViews, however. The properties fitWidth and fitHeight can be used to make the MediaView stretch or shrink to the desired size. Using only one of them at a time will make the MediaView scale only in that dimension while the size in the other dimension remains unchanged.
If you want to maintain the movie’s original aspect ratio as you scale it to fit your application, you can set the preserveRatio property to true. If you specify a fit size in one dimension along with setting preserveRatio to true, the other dimension will be automatically scaled to match the movie’s original aspect ratio as it’s being fit along your specified dimension. For example, let’s say our movie’s size is originally 640 352 pixels, which gives an aspect ratio of 640 ÷ 352, or approximately 1.82. If you specify a fitWidth of 400 and enable preserveRatio, the final height of the movie will be changed from 352 pixels to 400 ÷ 1.82 = 220 pixels. Note that the aspect ratio is preserved because 400 ÷ 220 is also 1.82.
You can also choose to scale in both dimensions by specifying both a fitWidth and a fitHeight value along with enabling preserveRatio. In this case the best fit for the movie will be calculated and the other dimension will be scaled to preserve the original aspect ratio. For example, if the fit area and the movie are both wider than they are tall (the common case), the movie will be scaled to fit horizontally and the height will be determined by using the aspect ratio to calculate the height needed to match the new width.
One last property that is worth knowing about in relation to resizing a movie is the smooth property. This is a Boolean property that controls the quality of the resulting image after the scale. If smooth is true, the scaling algorithm will produce a higher-quality image at the cost of some extra computation time. If false, the scaling will be done faster but the result will not look as good. This lets the developer make a time versus quality trade-off. When making a movie smaller, there is not a large difference in quality between the smooth and nonsmooth options. Although the difference in quality while upscaling is noticeable, it still may be acceptable for some applications. Therefore, if you need to generate and show thumbnails of movies, this can be a worthwhile option to consider. By default, smooth is usually set to true but this can depend on the platform on which you are running.
Listing 8-32 shows a full-screen movie player that uses the fitWidth, fitHeight, and preserveRatio to scale a movie to play using the entire screen. This is accomplished by using the Stage’s fullScreen property to ensure that only the movie can be seen on the screen. Pressing the Escape key will restore the application to its normal window.
Listing 8-32. A Full-Screen Movie Player
public class FullScreenVideoPlayer extends Application {


  public static void main(String[] args) {

    launch(args);

  }


  @Override

  public void start(Stage primaryStage) {

    String workingDir = System.getProperty("user.dir");

    final File f = new File(workingDir, "../media/omgrobots.flv");


    final Media m = new Media(f.toURI().toString());

    final MediaPlayer mp = new MediaPlayer(m);

    final MediaView mv = new MediaView(mp);


    final DoubleProperty width = mv.fitWidthProperty();

    final DoubleProperty height = mv.fitHeightProperty();


    width.bind(Bindings.selectDouble(mv.sceneProperty(), "width"));

    height.bind(Bindings.selectDouble(mv.sceneProperty(), "height"));


    mv.setPreserveRatio(true);


    StackPane root = new StackPane();

    root.getChildren().add(mv);


    final Scene scene = new Scene(root, 960, 540);

    scene.setFill(Color.BLACK);


    primaryStage.setScene(scene);

    primaryStage.setTitle("Full Screen Video Player");

    primaryStage.setFullScreen(true);

    primaryStage.show();
    mp.play();

  }

}
The highlighted code in Listing 8-32 shows that MediaView’s fitWidth and fitHeight properties are bound to the width and height properties of the MediaView’s Scene object. Bindings.selectDouble is used to make sure fitWidth and fitHeight are updated when the MediaView is added to the active scene graph. For the movie to scale properly, the preserveRatio property must be set to true.
MediaView and Effects
All of the normal effects that can be applied to a Node can also be applied to a MediaView. Some care must be taken to ensure that the effects are not so expensive as to interfere with the smooth playback of the movie. With that caveat in place, we go over some of the effects that are commonly in use with media player applications. Reflections (see javafx.scene.effect.Reflection) are a popular effect, specifically in demos that are meant to show off a platform’s graphical horsepower. A reflection can make the movie look as if it is sitting on a shiny surface. The effect is very compelling because the reflection is updated in real-time to match the movie. JavaFX’s ColorAdjust effect can be used to alter the colors in the movie for a fun and visually interesting effect. If you’re in a more artsy kind of mood, the SepiaTone effect may be just the thing. And of course there is the old reliable DropShadow effect to make the movie look as if it is floating over the background. We encourage you to use the example programs and experiment with the different effects in the javafx.scene.effect package. It is a fun and interesting way to learn about them.
Using Markers
The JavaFX 2.0 media API also includes support for media markers. These markers can be used to trigger events during media playback. Every Media object contains an ObservableMap whose keys are Strings and whose values are Durations. During playback, these markers trigger MediaMarkerEvents at the Duration specified by the marker. These events can be caught by passing an EventHandler to the MediaPlayer’s setOnMarker method. Listing 8-33 contains the code for the VideoPlayer2 application that sets and then displays the text of these markers during video playback. Although we show them here during video playback, the marker functionality is available during audio playback as well.
Listing 8-33. Displaying Media Markers in a Movie
public class VideoPlayer2 extends Application {


  public static void main(String[] args) {

    launch(args);

  }


  @Override

  public void start(Stage primaryStage) {

    final Label markerText = new Label();

    StackPane.setAlignment(markerText, Pos.TOP_CENTER);


    String workingDir = System.getProperty("user.dir");

    final File f = new File(workingDir, "../media/omgrobots.flv");
    final Media m = new Media(f.toURI().toString());


    final ObservableMap<String, Duration> markers = m.getMarkers();

    markers.put("Robot Finds Wall", Duration.millis(3100));

    markers.put("Then Finds the Green Line", Duration.millis(5600));

    markers.put("Robot Grabs Sled", Duration.millis(8000));

    markers.put("And Heads for Home", Duration.millis(11500));


    final MediaPlayer mp = new MediaPlayer(m);

    mp.setOnMarker(new EventHandler<MediaMarkerEvent>() {

      @Override

      public void handle(final MediaMarkerEvent event) {

        Platform.runLater(new Runnable() {

          @Override public void run() {

            markerText.setText(event.getMarker().getKey());

          }

        });

      }

    });


    final MediaView mv = new MediaView(mp);


    final StackPane root = new StackPane();

    root.getChildren().addAll(mv, markerText);

    root.setOnMouseClicked(new EventHandler<MouseEvent>() {

      @Override

      public void handle(MouseEvent event) {

        mp.seek(Duration.ZERO);

        markerText.setText("");

      }

    });


    final Scene scene = new Scene(root, 960, 540);

    final URL stylesheet = getClass().getResource("media.css");

    scene.getStylesheets().add(stylesheet.toString());


    primaryStage.setScene(scene);

    primaryStage.setTitle("Video Player 1");

    primaryStage.show();


    mp.play();

  }

}
A Label is used to display the text of each marker centered at the top of the screen by setting its alignment to be Pos.TOP_CENTER. Then, after creating the Media object, four markers are inserted into the ObservableMap starting with the message “Robot Finds Wall” at 3.1 seconds and ending with “And Heads for Home” at 11.5 seconds. Once the MediaPlayer is instantiated, a new MediaMarkerEvent handler is created and passed to the setOnMarker method. This event will occur on the JavaFX media thread, so we must use Platform.runLater to set the text of the markerText label on the JavaFX application thread. One other change we’ve made to this version of the video player is to add an onMouseClicked handler, which seeks back to the beginning of the media and clears the markerText label. This lets you simply click on the window to restart playback. The running application displaying the “And Heads for Home” marker text is shown in Figure 8-10. The styling of the messageLabel text is included in the media.css style sheet that is loaded by the Scene after it is created.
Figure 8-10. Displaying markers during movie playback
One Player, Multiple Views
Each MediaView supports the concept of a viewport. This is a Rectangle2D that defines which part of the movie to view. Multiple MediaViews can share the same MediaPlayer, and through the use of viewports, they can all be displaying different views of the same media. Because they all share the same player, all views will be showing the same frame of video at the same time. The viewport will become your view of the player’s content. If you specify a fitWidth or fitHeight, any transforms or effects, they will be applied to the viewport just as they would have been applied to the view as a whole. The code in Listing 8-34 shows how to define multiple MediaViews and viewports for a single MediaPlayer.
The listing starts by defining a Label to hold a “secret” message, which is initially set invisible. After the Media object is created, two markers are defined that will tell us when it is time to split and join the two viewports that we create. Next, two MediaViews are created and each is given one half of the video to view. The arguments to the Rectangle2D constructor specify, in order, the minimum x coordinate, the minimum y coordinate, the width, and the height of the viewport’s rectangle. Therefore, you can see that the first MediaView will contain a viewport into the left side of the movie and the second MediaView will view the right side of the movie. A StackPane is created to hold the message behind the two MediaViews; the message is added as the first child. When the “split” marker is triggered, the two viewports will slide apart revealing our message. The “join” marker will trigger the two viewports to slide back together, hiding the message once again.
Listing 8-34. Defining Viewports for MediaViews
public class VideoPlayer3 extends Application {

  public static void main(String[] args) {

    launch(args);

  }


  @Override

  public void start(Stage primaryStage) {

    final Label message = new Label("I u2764 Robots");

    message.setVisible(false);


    String workingDir = System.getProperty("user.dir");

    final File f = new File(workingDir, "../media/omgrobots.flv");


    final Media m = new Media(f.toURI().toString());

    m.getMarkers().put("Split", Duration.millis(3000));

    m.getMarkers().put("Join", Duration.millis(9000));


    final MediaPlayer mp = new MediaPlayer(m);


    final MediaView mv1 = new MediaView(mp);

    mv1.setViewport(new Rectangle2D(0, 0, 960 / 2, 540));

    StackPane.setAlignment(mv1, Pos.CENTER_LEFT);


    final MediaView mv2 = new MediaView(mp);

    mv2.setViewport(new Rectangle2D(960 / 2, 0, 960 / 2, 540));

    StackPane.setAlignment(mv2, Pos.CENTER_RIGHT);


    StackPane root = new StackPane();

    root.getChildren().addAll(message, mv1, mv2);

    root.setOnMouseClicked(new EventHandler<MouseEvent>() {

      @Override public void handle(MouseEvent event) {

        mp.seek(Duration.ZERO);

        message.setVisible(false);

      }

    });


    final Scene scene = new Scene(root, 960, 540);

    final URL stylesheet = getClass().getResource("media.css");

    scene.getStylesheets().add(stylesheet.toString());


    primaryStage.setScene(scene);

    primaryStage.setTitle("Video Player 3");

    primaryStage.show();


    mp.setOnMarker(new EventHandler<MediaMarkerEvent>() {

      @Override public void handle(final MediaMarkerEvent event) {
        Platform.runLater(new Runnable() {

          @Override public void run() {

            if (event.getMarker().getKey().equals("Split")) {

              message.setVisible(true);

              buildSplitTransition(mv1, mv2).play();

            } else {

              buildJoinTransition(mv1, mv2).play();

            }

          }


        });

      }

    });

    mp.play();

  }

}
The last step in showing our hidden message is to set a handler for the MediaMarkerEvents that lets us know when it is time to split the two viewports and when it is time to rejoin them. As in the last example, the Platform.runLater method is required because we manipulate the visibility of the message Label as well as apply translations to the two MediaView nodes. The methods that build and return the two transitions are shown in Listing 8-35.
Listing 8-35. Building the Split and Join Transitions
private ParallelTransition buildJoinTransition(Node one, Node two) {

  return ParallelTransitionBuilder.create().children(

            TranslateTransitionBuilder.create().

              duration(Duration.millis(1000)).

              node(one).

              byX(200).build(),

            TranslateTransitionBuilder.create().

              duration(Duration.millis(1000)).

              node(two).

              byX(-200).build()).

          build();

}


private ParallelTransition buildSplitTransition(Node one, Node two) {

  return ParallelTransitionBuilder.create().children(

            TranslateTransitionBuilder.create().

              duration(Duration.millis(1000)).

              node(one).

              byX(-200).build(),

            TranslateTransitionBuilder.create().

              duration(Duration.millis(1000)).

              node(two).

              byX(200).build()).

          build();

}
This example demonstrates that there are many uses for media markers other than simply displaying captions. They can be used to trigger all kinds of events in your applications. A screen shot of the running application with our hidden message revealed is shown in Figure 8-11.
Figure 8-11. The MediaViews slide apart to reveal the hidden message.
Converting AudioPlayer into a VideoPlayer
Based on what you have learned so far, you may think that converting the AudioPlayer application to play video is a straightforward task, and you would be right. The first step is simply to rename the SongModel class to the more appropriate MediaModel. No code changes are required. Although movies do not typically contain metadata, it does not hurt to leave in the code that looks for them. Rather than display metadata, we create a new view that displays the MediaView instead. This VideoView class is shown in Listing 8-36.
Listing 8-36. A View That Displays the MediaView Node
public class VideoView extends AbstractView {


  public VideoView(MediaModel mediaModel) {

    super(mediaModel);

  }


  @Override

  protected Node initView() {
    MediaView mv = new MediaView();

    mv.mediaPlayerProperty().bind(mediaModel.mediaPlayerProperty());

    return mv;

  }

}
This simple class uses its initView method to create a MediaView and bind the MediaView’s mediaPlayerProperty to the mediaPlayerProperty we created in our MediaModel (formerly SongModel) class.
The next step is to replace the MetadataView with this new VideoView. Listing 8-37 shows the modified code from the VideoPlayer4 class (formerly AudioPlayer4). Instead of creating the MetadataView, we now create the VideoView, passing it the mediaModel instance. The VideoView’s view node is then retrieved and set as the center node of the BorderPane in place of the MetadataView’s view node. That is literally all there is to it!
Listing 8-37. Creating the VideoView and Adding It to the Application’s First Page
private Parent createPageOne() {

  videoView = new VideoView(mediaModel);

  playerControlsView = new PlayerControlsView(mediaModel);

  playerControlsView.setNextHandler(new EventHandler<ActionEvent>() {

    @Override

    public void handle(ActionEvent arg0) {

      rootNode.getChildren().setAll(page2);

    }

  });


  final BorderPane bp = new BorderPane();

  bp.setCenter(videoView.getViewNode());

  bp.setBottom(playerControlsView.getViewNode());


  return bp;

}
One final finishing touch is to change the music note icon on the open button to something more appropriate. We therefore created a filmstrip icon and replaced the name of the image file used by the button in the application’s style sheet.
#openButton {

  -fx-graphic: url("resources/filmstrip.png");

}
The final result of our conversion is shown in Figure 8-12 playing a promotional video from Oracle’s web site. All of the controls work exactly the same as they did in the version that played audio files, right down to the equalizer. You just have to love JavaFX, don’t you?
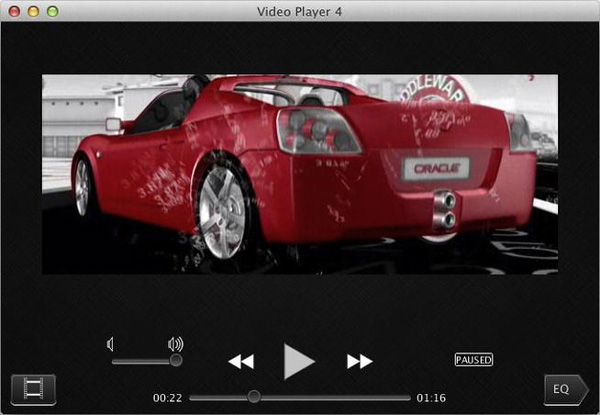
Figure 8-12. The converted video player in action
Summary
In this chapter, you learned about a very important aspect of the JavaFX platform: the media classes. We showed you how to accomplish the following.
- Use the
AudioClipclass to play low-latency sound effects. - Load the various media types supported by JavaFX into a
Mediaobject. - Use the
MediaPlayerclass to play audio files from .jar files, from disk, and by loading them over the Internet. - Build a simple media player that contains a graphical user interface that can be used to control playback of the audio files.
- Take advantage of the MediaPlayer’s equalizer and audio frequency spectrum capabilities.
- Play video files using the
MediaViewclass. - Use media markers to trigger events during media playback.
- Split your video playback into multiple viewports.