
C H A P T E R 6
Collections and Concurrency
When you know a thing, to hold that you know it; and when you do not know a thing, to allow that you do not know it;—this is knowledge.
—Confucius
After the fast-paced exploration of JavaFX layouts in Chapter 4 and JavaFX UI controls in Chapter 5, we refocus our attention on some of the lower-level facilities of JavaFX in this chapter.
Recall that in Chapter 3, “Properties and Bindings,” you learned about the Observable interface and one of its subinterfaces ObservableValue. In this chapter, we examine the other two subinterfaces of Observable—ObservableList and ObservableMap—rounding out the story of the Observable family of interfaces and classes.
We then cover concurrency in JavaFX. We explain the JavaFX threading model, pointing out the most important threads present in a JavaFX application. We look at the rules that you must follow to ensure your JavaFX application is responsive to user inputs and not locked up by event handlers that take too long to execute. We also show you how the javafx.concurrent framework can be used to offload long-running routines to background threads.
We conclude this chapter with two examples that show how a JavaFX scene graph can be embedded into a Swing application using JFXPanel, and how it can be embedded into an SWT application using FXCanvas, paying attention to how to make the JavaFX event thread play nicely with the Swing event dispatching thread.
Understanding Observable Collections
As we saw in Chapter 3, the Observable interface has three direct subinterfaces in JavaFX 2.0—the ObservableValue interface, the ObservableList interface, and the ObservableMap interface. We learned that the ObservableValue interface plays a central role in the JavaFX 2.0 Properties and Bindings framework.
The ObservableList and ObservableMap interfaces reside in the javafx.collections package, and are referred to as the JavaFX 2.0 observable collections. In addition to extending the Observable interface, ObservableList also extends the java.util.List interface, and ObservableMap extends the java.util.Map interface, making both genuine collections in the eyes of the Java collections framework. And you can call all the Java collections framework methods you are familiar with on objects of the JavaFX observable collection interfaces and expect exactly the same results. What the JavaFX observable collections provide in addition to the stock Java collections framework are notifications to registered listeners. Because they are Observables, you can register InvalidationListeners with the JavaFX observable collections objects and be notified when the content of the observable collections becomes invalid.
Each of the JavaFX observable collections interfaces supports a change event that conveys more detailed information of the change. We examine the JavaFX observable collections and the change events that they support in the following sections.
Understanding ObservableList
Figure 6-1 is an UML diagram showing the ObservableList and supporting interfaces.
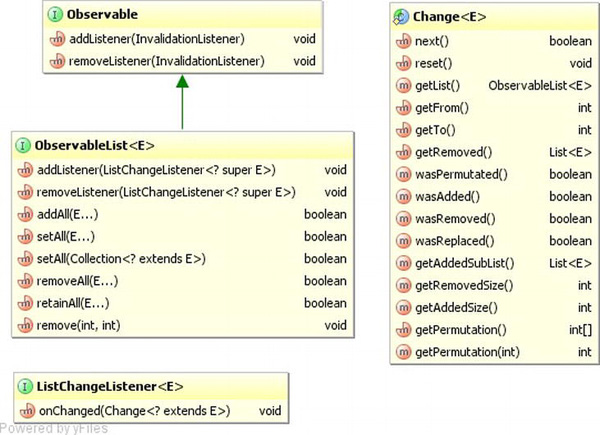
Figure 6-1. Key interfaces that support the JavaFX observable list
To prevent clutter, we omitted the java.util.List interface from the diagram in Figure 6-1. The java.util.List interface is the other super interface of ObservableList. The following two methods on the ObservableList interface allow you to register and unregister ListChangeListeners:
addListener(ListChangeListener<? super E> listener)removeListener(ListChangeListener<? super E> listener)
The following, additional, six methods on ObservableList make working with the interface easier:
addAll(E... elements)setAll(E... elements)setAll(Collection<? extends E> col)removeAll(E... elements)retainAll(E... elements)remove(int from, int to)
The ListChangeListener interface has only one method: onChange(ListChangeListener.Change<? extends E> change). This method is called back when the content of the ObservableList is manipulated. Notice that this method’s parameter type is the nested class Change that is declared in the ListChangeListener interface. We show you how to use the ListChangeListener.Change class in the next subsection. For now, we look at a simple example illustrating the firing of invalidation and list change events when an ObservableList is manipulated.
Listing 6-1. ObservableListExample.java
import javafx.beans.InvalidationListener;

import javafx.beans.Observable;

import javafx.collections.FXCollections;

import javafx.collections.ListChangeListener;

import javafx.collections.ObservableList;


import java.util.Arrays;

import java.util.Iterator;

import java.util.List;


public class ObservableListExample {

    public static void main(String[] args) {

        ObservableList<String> strings = FXCollections.observableArrayList();


        strings.addListener(new InvalidationListener() {

            @Override

            public void invalidated(Observable observable) {

                System.out.println("	list invalidated");

            }

        });


        strings.addListener(new ListChangeListener<String>() {

            @Override

            public void onChanged(Change<? extends String> change) {

                System.out.println("	strings = " + change.getList());

            }

        });


        System.out.println("Calling add("First"): ");

        strings.add("First");


        System.out.println("Calling add(0, "Zeroth"): ");

        strings.add(0, "Zeroth");


        System.out.println("Calling addAll("Second", "Third"): ");

        strings.addAll("Second", "Third");


        System.out.println("Calling set(1, "New First"): ");

        strings.set(1, "New First");


        final List<String> list = Arrays.asList
        ("Second_1", "Second_2");

        System.out.println("Calling addAll(3, list): ");

        strings.addAll(3, list);


        System.out.println("Calling remove(2, 4): ");

        strings.remove(2, 4);


        final Iterator<String> iterator = strings.iterator();

        while (iterator.hasNext()) {

            final String next = iterator.next();

            if (next.contains("t")) {

                System.out.println("Calling remove() on iterator: ");

                iterator.remove();

            }

        }


        System.out.println("Calling removeAll("Third", "Fourth"): ");

        strings.removeAll("Third", "Fourth");

    }

}
Unlike the Java collections framework, where the public API contains both the interfaces, such as List and Map, and concrete implementations of the interfaces that you can instantiate, such as ArrayList and HashMap, the JavaFX observable collections framework provides only the interfaces ObservableList and ObservableMap, but not concrete implementation classes. To obtain an object of a JavaFX observable collections interface, you use the utility class FXCollections. In Listing 6-1, we obtain an ObservableList<String> object by calling a factory method on FXCollections:
ObservableList<String> strings = FXCollections.observableArrayList();
We then hooked an InvalidationListener and a ListChangeListener to the observable list. The invalidation listener simply prints out a message every time it’s called. The list change listener prints out the content of the observable list. The rest of the program simply manipulates the content of the observable list in various ways: by calling methods on the java.util.List interface, by calling some of the new convenience methods added to ObservableList, and by calling the remove() method on an Iterator obtained from the observable list.
When we run the program in Listing 6-1, the following output is printed to the console:
Calling add("First"):


        list invalidated


        strings = [First]


Calling add(0, "Zeroth"):


        list invalidated


        strings = [Zeroth, First]


Calling addAll("Second", "Third"):


        list invalidated


        strings = [Zeroth, First, Second, Third]


Calling set(1, "New First"):


        list invalidated


        strings = [Zeroth, New First, Second, Third]


Calling addAll(3, list):


        list invalidated


        strings = [Zeroth, New First, Second, Second_1, Second_2, Third]


Calling remove(2, 4):


        list invalidated


        strings = [Zeroth, New First, Second_2, Third]


Calling remove() on iterator:


        list invalidated


        strings = [New First, Second_2, Third]


Calling remove() on iterator:


        list invalidated


        strings = [Second_2, Third]


Calling removeAll("Third", "Fourth"):


        list invalidated


        strings = [Second_2]
Indeed, every call that we made in the code to change the content of the observable list triggered a callback on both the invalidation listener and the list change listener.
![]() Note Although it is not specified in the Javadocs, for observable lists obtained by calling
Note Although it is not specified in the Javadocs, for observable lists obtained by calling FXCollections.observableArrayList() a invalidation event is fired exactly when a list change event is fired. Any invalidation listener you add is wrapped and added as a list change listener. You can verify this by stepping through the code in a debugger.
If an instance of an invalidation listener or a list change listener has already been added as a listener to an observable list, all subsequent addListener() calls with that instance as an argument are ignored. Of course, you can add as many distinct invalidation listeners and list change listeners as you like to an observable list.
Handling Change Events in ListChangeListener
In this section, we take a closer look at the ListChangeListener.Change class and discuss how the onChange() callback method should handle the list change event.
As we saw in the preceding section, for an ObservableList obtained by calling FXCollections.observableArrayList(),each mutator call—that is, each call to a single method that changes the content of the observable list—generates a list change event delivered to each registered observers. The event object, an instance of a class that implements the ListChangeListener.Change interface, can be thought of as representing one or more discrete changes, each of which is of one of four kinds: elements added, elements removed, elements replaced, or elements permuted. The ListChangeListener.Change class provides the following methods that allow you to get at this detailed information about the change:
boolean next()void reset()boolean wasAdded()boolean wasRemoved()boolean wasReplaced()boolean wasPermutted()int getFrom()int getTo()int getAddedSize()List<E> getAddedSublist()int getRemovedSize()List<E> getRemoved()int getPermutation(int i)ObservableList<E> getList()
The next() and reset() methods control a cursor that iterates through all the discrete changes in the event object. On entry to the onChange() method of ListChangeListener, the cursor is positioned before the first discrete change. You must call the next() method to move the cursor to the first discrete change. Succeeding calls to the next() method will move the cursor to the remaining discrete changes. If the next discrete change is reached, the return value will be true. If the cursor is already on the last discrete change, the return value will be false. Once the cursor is positioned on a valid discrete change, the methods wasAdded(), wasRemoved(), wasReplaced(), and wasPermutted()can be called to determine the kind of change the discrete change represents.
![]() Caution The
Caution The wasAdded(), wasRemoved(), wasReplaced(), and wasPermutted() methods are not orthogonal. A discrete change is a replacement only if it is both an addition and a removal. So the proper order for testing the kind of a discrete change is to first determine whether it is a permutation or a replacement and then to determine whether it is an addition or a removal.
Once you have determined the kind of discrete change, you can call the other methods to get more information about it. For addition, the getFrom() method returns the index in the observable list where new elements were added; the getTo() method returns the index of element that is one past the end of the added elements; the getAddedSize() method returns the number of elements that were added; and the getAddedSublist() method returns a List<E> that contains the added elements. For removal, the getFrom() and getTo() methods both return the index in the observable list where elements were removed; the getRemovedSize() method returns the number of elements that were removed; and the getRemoved() method returns a List<E> that contains the removed elements. For replacement, both the methods that are relevant for addition and the methods that are relevant for removal should be examined, because a replacement can be seen as a removal followed by an addition at the same index. For permutation, the getPermutation(int i) method returns the index of an element in the observable list after the permutation whose index in the observable list before the permutation was i. In all situations, The getList() method always returns the underlying observable list.
In the following example, we perform various list manipulations after attaching a ListChangeListener to an ObservableList. The implementation of ListChangeListener, called MyListener includes a pretty printer for the ListChangeListener.Change object, and prints out the list change event object when an event is fired.
Listing 6-2. ListChangeEventExample.java
import javafx.collections.FXCollections;

import javafx.collections.ListChangeListener;

import javafx.collections.ObservableList;


public class ListChangeEventExample {

    public static void main(String[] args) {

        ObservableList<String> strings = FXCollections.observableArrayList ();

        strings.addListener(new MyListener());


        System.out.println("Calling addAll("Zero", "One", "Two", "Three"): ");

        strings.addAll("Zero", "One", "Two", "Three");


        System.out.println("Calling FXCollections.sort(strings): ");

        FXCollections.sort(strings);


        System.out.println("Calling set(1, "Three_1"): ");

        strings.set(1, "Three_1");


        System.out.println("Calling setAll("One_1", "Three_1", "Two_1", "Zero_1"): ");

        strings.setAll("One_1", "Three_1", "Two_1", "Zero_1");


        System.out.println("Calling removeAll("One_1", "Two_1", "Zero_1"): ");

        strings.removeAll("One_1", "Two_1", "Zero_1");

    }


    private static class MyListener implements ListChangeListener<String> {

        @Override

        public void onChanged(Change<? extends String> change) {

            System.out.println("	list = " + change.getList());

            System.out.println(prettyPrint(change));

        }


        private String prettyPrint(Change<? extends String> change) {

            StringBuilder sb = new StringBuilder("	Change event data:
");

            int i = 0;

            while (change.next()) {

                sb.append("		cursor = ")

                    .append(i++)

                    .append("
");


                final String kind =

                    change.wasPermutated() ? "permutted" :

                        change.wasReplaced() ? "replaced" :

                            change.wasRemoved() ? "removed" :

                                change.wasAdded() ? "added" : "none";


                sb.append("		Kind of change: ")

                    .append(kind)

                    .append("
");


                sb.append("		Affected range: [")

                    .append(change.getFrom())

                    .append(", ")

                    .append(change.getTo())

                    .append("]
");


                if (kind.equals("added") || kind.equals("replaced")) {

                    sb.append("		Added size: ")

                        .append(change.getAddedSize())

                        .append("
");

                    sb.append("		Added sublist: ")

                        .append(change.getAddedSubList())

                        .append("
");

                }


                if (kind.equals("removed") || kind.equals("replaced")) {

                    sb.append("		Removed size: ")

                        .append(change.getRemovedSize())

                        .append("
");

                    sb.append("		Removed: ")

                        .append(change.getRemoved())

                        .append("
");

                }


                if (kind.equals("permutted")) {

                    StringBuilder permutationStringBuilder = new StringBuilder("[");

                    for (int k = change.getFrom(); k < change.getTo(); k++) {

                        permutationStringBuilder.append(k)

                            .append("->")

                            .append(change.getPermutation(k));

                        if (k < change.getTo() - 1) {

                            permutationStringBuilder.append(", ");

                        }

                    }

                    permutationStringBuilder.append("]");

                    String permutation = permutationStringBuilder.toString();

                    sb.append("		Permutation: ").append(permutation).append("
");

                }

            }


            return sb.toString();

        }

    }

}
In the preceding example, we triggered the four kinds of discrete changes in an observable list. Since no methods on an ObservableList will trigger a permutation event, therefore we used the sort() utility method from the FXCollections class to effect a permutation. We have more to say about FXCollections in a later section. We triggered the replace event twice, once with set(), and once with setAll(). The nice thing about setAll() is that it effectively does a clear() and an addAll() in one operation and generates only one change event.
When we run the program in Listing 6-2, the following output is printed to the console:
Calling addAll("Zero", "One", "Two", "Three"):


        list = [Zero, One, Two, Three]


        Change event data:


                cursor = 0


                Kind of change: added


                Affected range: [0, 4]


                Added size: 4


                Added sublist: [Zero, One, Two, Three]


Calling FXCollections.sort(strings):


        list = [One, Three, Two, Zero]


        Change event data:


                cursor = 0


                Kind of change: permutted


                Affected range: [0, 4]


                Permutation: [0->3, 1->0, 2->2, 3->1]


Calling set(1, "Three_1"):


        list = [One, Three_1, Two, Zero]


        Change event data:


                cursor = 0


                Kind of change: replaced


                Affected range: [1, 2]


                Added size: 1


                Added sublist: [Three_1]


                Removed size: 1


                Removed: [Three]


Calling setAll("One_1", "Three_1", "Two_1", "Zero_1"):


        list = [One_1, Three_1, Two_1, Zero_1]


        Change event data:


                cursor = 0


                Kind of change: replaced


                Affected range: [0, 4]


                Added size: 4


                Added sublist: [One_1, Three_1, Two_1, Zero_1]


                Removed size: 4


                Removed: [One, Three_1, Two, Zero]


Calling removeAll("One_1", "Two_1", "Zero_1"):


        list = [Three_1]


        Change event data:


                cursor = 0


                Kind of change: removed


                Affected range: [0, 0]


                Removed size: 1


                Removed: [One_1]


                cursor = 1


                Kind of change: removed


                Affected range: [1, 1]


                Removed size: 2


                Removed: [Two_1, Zero_1]
In all but the removeAll() call, the list change event object contains only one discrete change. The reason that the removeAll() call generates a list change event that contains two discrete changes is that the three elements that we wish to remove fall in two disjoint ranges in the list.
In the majority of use cases where we care about list change events, you don’t necessarily need to distinguish the kinds of discrete changes. Sometimes you simply want to do something to all added and removed elements. In such a case your ListChangeListener method can be as simple as the following.
        @Override

        public void onChanged(Change<? extends Foo> change) {

            while (change.next()) {

                for (Foo foo : change.getAddedSubList()) {

                    // starting up

                }

                for (Foo foo : change.getRemoved()) {

                    // cleaning up

                }

            }

        }
Understanding ObservableMap
Although ObservableMap appears equivalent to ObservableList in the JavaFX observable collections framework hierarchy, it is actually not as sophisticated as ObservableList. Figure 6-2 is an UML diagram showing the ObservableMap and supporting interfaces.
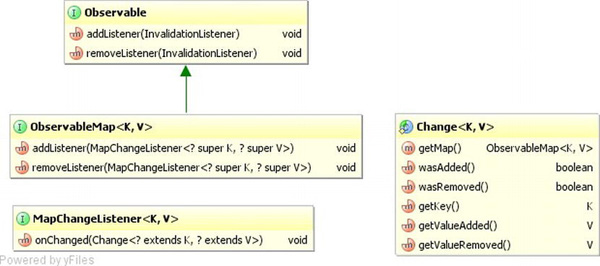
Figure 6-2. Key interfaces that support the JavaFX observable map
To prevent clutter, we omitted the java.util.Map interface from the diagram. The java.util.Map interface is the other super interface of ObservableMap. The following methods on the ObservableMap interface allow you to register and unregister MapChangeListeners:
addListener(MapChangeListener<? super K, ? super V> listener)addListener(MapChangeListener<? super K, ? super V> listener)
There are no additional convenience methods on ObservableMap.
The MapChangeListener interface has only one method: onChange(MapChangeListener.Change<? extends K, ? extends V> change). This method is called back when the content of the ObservableMap is manipulated. Notice that this method’s parameter type is the nested class Change that is declared in the MapChangeListener interface. Unlike the ListChangeListener.Change class, the MapChangeListener.Change class is geared towards reporting the change of a single key in a map. If a method call on ObservableMap affects multiple keys, as many map change events as the number of affected keys will be fired.
The MapChangeListener.Change class provides the following methods for you to inspect the changes made to a key.
boolean wasAdded()returnstrueif a new value was added for the key.boolean wasRemoved()returnstrueif an old value was removed from the key.K getKey()returns the affected key.V getValueAdded()returns the value that was added for the key.V getValueRemoved()returns the value that was removed for the key. (Note that aput()call with an existing key will cause the old value to be removed.)ObservableMap<K, V> getMap()
In the following example, we perform various map manipulations after attaching a MapChangeListener to an ObservableMap. The implementation of MapChangeListener, called MyListener includes a pretty printer for the MapChangeListener. Change object, and prints out the map change event object when an event is fired.
Listing 6-3. MapChangeEventExample.java
import javafx.collections.FXCollections;

import javafx.collections.MapChangeListener;

import javafx.collections.ObservableMap;


import java.util.HashMap;

import java.util.Iterator;

import java.util.Map;


public class MapChangeEventExample {

    public static void main(String[] args) {

        ObservableMap<String, Integer> map = FXCollections.observableHashMap();

        map.addListener(new MyListener());


        System.out.println("Calling put("First", 1): ");

        map.put("First", 1);


        System.out.println("Calling put("First", 100): ");

        map.put("First", 100);


        Map<String, Integer> anotherMap = new HashMap<>();

        anotherMap.put("Second", 2);

        anotherMap.put("Third", 3);

        System.out.println("Calling putAll(anotherMap): ");

        map.putAll(anotherMap);


        final Iterator <Map.Entry<String, Integer>> entryIterator = map.entrySet().iterator();

        while (entryIterator.hasNext()) {

            final Map.Entry<String, Integer> next = entryIterator.next();

            if (next.getKey().equals("Second")) {

                System.out.println("Calling remove on entryIterator: ");

                entryIterator.remove();

            }

        }


        final Iterator<Integer> valueIterator = map.values().iterator();

        while (valueIterator.hasNext()) {

            final Integer next = valueIterator.next();

            if (next == 3) {

                System.out.println("Calling remove on valueIterator: ");

                valueIterator.remove();

            }

        }

    }


    private static class MyListener implements MapChangeListener<String, Integer> {

        @Override

        public void onChanged(Change<? extends String, ? extends Integer> change) {

            System.out.println("	map = " + change.getMap());

            System.out.println(prettyPrint(change));

        }


        private String prettyPrint(Change<? extends String, ? extends Integer> change) {

            StringBuilder sb = new StringBuilder("	Change event data:
");

            sb.append("		Was added: ").append(change.wasAdded()).append("
");

            sb.append("		Was removed: ").append(change.wasRemoved()).append("
");

            sb.append("		Key: ").append(change.getKey()).append("
");

            sb.append("		Value added: ").append(change.getValueAdded()).append("
");

            sb.append("		Value removed: ").append(change.getValueRemoved()).append("
");

            return sb.toString();

        }

    }

}
When we run the program in Listing 6-3, the following output is printed to the console:
Calling put("First", 1):


        map = {First=1}


        Change event data:


                Was added: true


                Was removed: false


                Key: First


                Value added: 1


                Value removed: null


Calling put("First", 100):


        map = {First=100}


        Change event data:


                Was added: true


                Was removed: true


                Key: First


                Value added: 100


                Value removed: 1


Calling putAll(anotherMap):


        map = {Third=3, First=100}


        Change event data:


                Was added: true


                Was removed: false


                Key: Third


                Value added: 3


                Value removed: null


        map = {Third=3, Second=2, First=100}


        Change event data:


                Was added: true


                Was removed: false


                Key: Second


                Value added: 2


                Value removed: null


Calling remove on entryIterator:


        map = {Third=3, First=100}


        Change event data:


                Was added: false


                Was removed: true


                Key: Second


                Value added: null


                Value removed: 2


Calling remove on valueIterator:


        map = {First=100}


        Change event data:


                Was added: false


                Was removed: true


                Key: Third


                Value added: null


                Value removed: 3
In the preceding example, notice that the putAll() call generated two map change events because the other map contains two keys.
Using Factory and Utility Methods from FXCollections
The FXCollections class plays a similar role in the JavaFX observable collections framework that the java.util.Collections class plays in the Java collections framework. The FXCollections class contains ten factory methods for ObservableList:
ObservableList<E> observableList(List<E> list)ObservableList<E> observableArrayList()ObservableList<E> observableArrayList(E... items)ObservableList<E> observableArrayList(Collection<? extends E> col)ObservableList<E> concat(ObservableList<E>... lists)ObservableList<E> unmodifiableObservableList(ObservableList<E> list)ObservableList<E> checkedObservableList(ObservableList<E> list, Class<E> type)ObservableList<E> synchronizedObservableList(ObservableList<E> list)ObservableList<E> emptyObservableList()ObservableList<E> singletonObservableList(E e)
It contains three factory methods for ObservableMap:
ObservableMap<K, V> observableMap(Map<K, V> map)ObservableMap<K, V> unmodifiableObservableMap(ObservableMap<K, V> map)ObservableMap<K, V> observableHashMap()
And it contains nine utility methods that are parallels of methods with the same name in java.util.Collections. They all act on ObservableList objects. And they differ from their java.util.Collections counterpart in that when they act on an ObservableList, care is taken to generate only one list change events whereas their java.util.Collections counterpart would have generated more than one list change event.
void copy(ObservableList<? super T> dest, java.util.List<? extends T> src)void fill(ObservableList<? super T> list, T obj)boolean replaceAll(ObservableList<T> list, T oldVal, T newVal)void reverse(ObservableList list)void rotate(ObservableList list, int distance)void shuffle(ObservableList<?> list)void shuffle(ObservableList list, java.util.Random rnd)void sort(ObservableList<T> list)void sort(ObservableList<T> list, java.util.Comparator<? super T> c)
We illustrate the effects of these utility methods in Listing 6-4.
Listing 6-4. FXCollectionsExample.java
import javafx.collections.FXCollections;

import javafx.collections.ListChangeListener;

import javafx.collections.ObservableList;


import java.util.Arrays;

import java.util.Comparator;

import java.util.Random;


public class FXCollectionsExample {

    public static void main(String[] args) {

        ObservableList<String> strings = FXCollections.observableArrayList();

        strings.addListener(new MyListener());


        System.out.println("Calling addAll("Zero", "One", "Two", "Three"): ");

        strings.addAll("Zero", "One", "Two", "Three");


        System.out.println("Calling copy: ");

        FXCollections.copy(strings, Arrays.asList("Four", "Five"));


        System.out.println("Calling replaceAll: ");

        FXCollections.replaceAll(strings, "Two", "Two_1");


        System.out.println("Calling reverse: ");

        FXCollections.reverse(strings);


        System.out.println("Calling rotate(strings, 2: ");

        FXCollections.rotate(strings, 2);


        System.out.println("Calling shuffle(strings): ");

        FXCollections.shuffle(strings);


        System.out.println("Calling shuffle(strings, new Random(0L)): ");

        FXCollections.shuffle(strings, new Random(0L));


        System.out.println("Calling sort(strings): ");

        FXCollections.sort(strings);


        System.out.println("Calling sort(strings, c) with custom comparator: ");

        FXCollections.sort(strings, new Comparator<String>() {

            @Override

            public int compare(String lhs, String rhs) {

                // Reverse the order

                return rhs.compareTo(lhs);

            }

        });


        System.out.println("Calling fill(strings, "Ten"): ");

        FXCollections.fill(strings, "Ten");

    }


    // We omitted the nested class MyListener, which is the same as in Listing 6-2

}
When we run the program in Listing 6-4, the following output is printed to the console:
Calling addAll("Zero", "One", "Two", "Three"):


        list = [Zero, One, Two, Three]


        Change event data:


                cursor = 0


                Kind of change: added


                Affected range: [0, 4]


                Added size: 4


                Added sublist: [Zero, One, Two, Three]


Calling copy:


        list = [Four, Five, Two, Three]


        Change event data:


                cursor = 0


                Kind of change: replaced


                Affected range: [0, 4]


                Added size: 4


                Added sublist: [Four, Five, Two, Three]


                Removed size: 4


                Removed: [Zero, One, Two, Three]


Calling replaceAll:


        list = [Four, Five, Two_1, Three]


        Change event data:


                cursor = 0


                Kind of change: replaced


                Affected range: [0, 4]


                Added size: 4


                Added sublist: [Four, Five, Two_1, Three]


                Removed size: 4


                Removed: [Four, Five, Two, Three]


Calling reverse:


        list = [Three, Two_1, Five, Four]


        Change event data:


                cursor = 0


                Kind of change: replaced


                Affected range: [0, 4]


                Added size: 4


                Added sublist: [Three, Two_1, Five, Four]


                Removed size: 4


                Removed: [Four, Five, Two_1, Three]


Calling rotate(strings, 2:


        list = [Five, Four, Three, Two_1]


        Change event data:


                cursor = 0


                Kind of change: replaced


                Affected range: [0, 4]


                Added size: 4


                Added sublist: [Five, Four, Three, Two_1]


                Removed size: 4


                Removed: [Three, Two_1, Five, Four]


Calling shuffle(strings):


        list = [Five, Three, Two_1, Four]


        Change event data:


                cursor = 0


                Kind of change: replaced


                Affected range: [0, 4]


                Added size: 4


                Added sublist: [Five, Three, Two_1, Four]


                Removed size: 4


                Removed: [Five, Four, Three, Two_1]


Calling shuffle(strings, new Random(0L)):


        list = [Four, Five, Three, Two_1]


        Change event data:


                cursor = 0


                Kind of change: replaced


                Affected range: [0, 4]


                Added size: 4


                Added sublist: [Four, Five, Three, Two_1]


                Removed size: 4


                Removed: [Five, Three, Two_1, Four]


Calling sort(strings):


        list = [Five, Four, Three, Two_1]


        Change event data:


                cursor = 0


                Kind of change: permutted


                Affected range: [0, 4]


                Permutation: [0->1, 1->0, 2->2, 3->3]


Calling sort(strings, c) with custom comparator:


        list = [Two_1, Three, Four, Five]


        Change event data:


                cursor = 0


                Kind of change: permutted


                Affected range: [0, 4]


                Permutation: [0->3, 1->2, 2->1, 3->0]


Calling fill(strings, "Ten"):


        list = [Ten, Ten, Ten, Ten]


        Change event data:


                cursor = 0


                Kind of change: replaced


                Affected range: [0, 4]


                Added size: 4


                Added sublist: [Ten, Ten, Ten, Ten]


                Removed size: 4


                Removed: [Two_1, Three, Four, Five]
Notice that each invocation of a utility method in FXCollections generated exactly one list change event.
Using the JavaFX Concurrency Framework
It is common knowledge nowadays that almost all GUI platforms use a single-threaded event dispatching model. JavaFX is no exception, and indeed all user interface events in JavaFX are processed in the JavaFX Application Thread. However, with multicore desktop machines becoming common in recent years (e.g., I'm writing this chapter on my three-year-old quad-core PC), it is natural for the designers of JavaFX to take advantage of the full power of the hardware by leveraging the excellent concurrency support of the Java programming language.
In this section, we examine important threads that are present in all JavaFX applications. We explain the role they play in the overall scheme of JavaFX applications. We then turn our attention to the JavaFX Application Thread, explaining why executing long-running code in the JavaFX Application Thread makes your application appear to hang. Finally, we look at the javafx.concurrent framework and show you how to use it to execute long-running code in a worker thread off the JavaFX Application Thread and communicate the result back to the JavaFX Application Thread to update the GUI states.
![]() Note If you are familiar with Swing programming, the JavaFX Application Thread is similar to Swing's Event Dispatcher Thread (EDT), usually with the name “AWT-EventQueue-0.”
Note If you are familiar with Swing programming, the JavaFX Application Thread is similar to Swing's Event Dispatcher Thread (EDT), usually with the name “AWT-EventQueue-0.”
Identifying the Threads in a JavaFX Application
The program in Listing 6-5 creates a simple JavaFX GUI with a ListView, a TextArea and a Button, and populates the ListView with the names of all live threads of the application. When you select an item from the ListView, that thread's stack trace is displayed in the TextArea. The original list of threads and stack traces is populated as the application is starting up. And you can update the list of threads and stack traces by clicking the Update button.
Listing 6-5. JavaFXThreadsExample.java
import javafx.application.Application;

import javafx.beans.value.ChangeListener;

import javafx.beans.value.ObservableValue;

import javafx.collections.FXCollections;

import javafx.collections.ObservableList;

import javafx.event.ActionEvent;

import javafx.event.EventHandler;

import javafx.geometry.Insets;

import javafx.scene.Scene;

import javafx.scene.SceneBuilder;

import javafx.scene.control.Button;

import javafx.scene.control.ListView;

import javafx.scene.control.TextArea;

import javafx.scene.layout.VBoxBuilder;

import javafx.stage.Stage;


import java.util.Map;


public class JavaFXThreadsExample extends Application

        implements EventHandler<ActionEvent>, ChangeListener<Number> {


    private Model model;

    private View view;


    public static void main(String[] args) {

        Application.launch(args);

    }


    public JavaFXThreadsExample() {

        model = new Model();

    }


    @Override

    public void start(Stage stage) throws Exception {

        view = new View(model);

        hookupEvents();

        stage.setTitle("JavaFX Threads Information");

        stage.setScene(view.scene);

        stage.show();

    }


    private void hookupEvents() {

        view.updateButton.setOnAction(this);

        view.threadNames.getSelectionModel().selectedIndexProperty().addListener(this);

    }


    @Override

    public void changed(ObservableValue<? extends Number> observableValue,

                        Number oldValue, Number newValue) {

        int index = (Integer) newValue;

        if (index >= 0) {

            view.stackTrace.setText(model.stackTraces.get(index));

        }

    }


    @Override

    public void handle(ActionEvent actionEvent) {

        model.update();

    }


    public static class Model {

        public ObservableList<String> threadNames;

        public ObservableList<String> stackTraces;


        public Model() {

            threadNames = FXCollections.observableArrayList();

            stackTraces = FXCollections.observableArrayList();

            update();

        }


        public void update() {

            threadNames.clear();

            stackTraces.clear();

            final Map<Thread, StackTraceElement[]> map = Thread.getAllStackTraces();

            for (Map.Entry<Thread, StackTraceElement[]> entry : map.entrySet()) {

                threadNames.add(""" + entry.getKey().getName() + """);

                stackTraces.add(formatStackTrace(entry.getValue()));

            }

        }


        private String formatStackTrace(StackTraceElement[] value) {

            StringBuilder sb = new StringBuilder("StackTrace:
");

            for (StackTraceElement stackTraceElement : value) {

                sb.append("    at ").append(stackTraceElement.toString()).append("
");

            }

            return sb.toString();

        }

    }


    private static class View {

        public ListView<String> threadNames;

        public TextArea stackTrace;

        public Button updateButton;

        public Scene scene;


        private View(Model model) {

            threadNames = new ListView<>(model.threadNames);

            stackTrace = new TextArea();

            updateButton = new Button("Update");

            scene = SceneBuilder.create()

                .width(440)

                .height(640)

                .root(VBoxBuilder.create()

                    .spacing(10)

                    .padding(new Insets(10, 10, 10, 10))

                    .children(threadNames, stackTrace, updateButton)

                    .build())

                .build();

        }

    }

}
This is a pretty minimal JavaFX GUI application. Before letting you run this program, we point out several features of the program.
First of all, make a mental note of the main() method:
    public static void main(String[] args) {

        Application.launch(args);

    }
You have seen this method several times already. This stylized main() method always appears in a class that extends the javafx.application.Application class. There is an overloaded version of the Application.launch() method that takes a Class object as the first parameter that can be called from other classes:
launch(Class<? Extends Application> appClass, String[] args)
Therefore you can move the main() method to another class:
public class Main {

    public static void main(String[] args) {

        Application.launch(JavaFXThreadsExample.class, args);

    }

}
to achieve the same result.
Next, notice that the nested class Model builds up its data model, which consists of a list of all live threads and the stack traces of each thread, in its update() method:
        public void update() {

            threadNames.clear();

            stackTraces.clear();

            final Map<Thread, StackTraceElement[]> map = Thread.getAllStackTraces();

            for (Map.Entry<Thread, StackTraceElement[]> entry : map.entrySet()) {

                threadNames.add(""" + entry.getKey().getName() + """);

                stackTraces.add(formatStackTrace(entry.getValue()));

            }

        }
This method is called once in the constructor of Model, which is called from the constructor of the JavaFXThreadsExample, and once from the event handler of the Update button.
When we run the program in Listing 6-5, the GUI in Figure 6-3 is displayed on the screen. You can explore the threads in this JavaFX program by clicking on each thread name in the list and see the stack trace for that thread in the text area. Here are some interesting observations:
- The “
main” thread's call stack includes a call tocom.sun.javafx.application.LauncherImpl.launchApplication(). - The “
JavaFX-Launcher” thread's call stack includes a call to the constructorJavaFXThreadsExample.<init>. - The “
JavaFX Application Thread” thread's call stack includes the native methodcom.sun.glass.ui.win.WinApplication._runLoop(). - The “
QuantumRenderer-0” thread's call stack includes the methodcom.sun.javafx.tk.quantum.QuantumRenderer$ObservedRunnable.run().
Now when you click the Update button and examine the call stack for the “JavaFX Application Thread” thread, you will discover that the event handler of the Update button is executed on the JavaFX Application Thread.
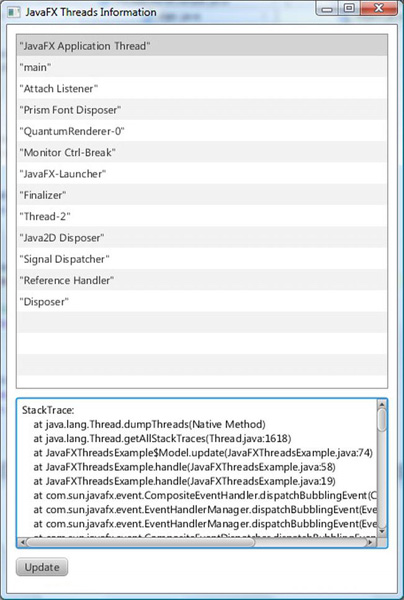
Figure 6-3. The JavaFXThreadsExample program
This little experiment reveals some of the architectural elements of the JavaFX runtime system. Although parts of this information include implementation details represented by, appropriately, classes in the com.sun hierarchy—therefore not to be used in code of normal JavaFX applications—it is nevertheless beneficial to have some knowledge of how the internals work.
![]() Caution In the discussion that follows, we mention Java classes in packages whose names begin with
Caution In the discussion that follows, we mention Java classes in packages whose names begin with com.sun. These classes are implementation details of the JavaFX runtime system and are not meant to be used in normal JavaFX applications. And they may change in future releases of JavaFX.
The javafx.application.Application class provides life-cycle support for JavaFX applications. In addition to the two static launch() methods we mentioned earlier in this section, it provides the following life-cycle methods.
public void init() throws Exceptionpublic abstract void start(Stage stage) throws Exceptionpublic void stop() throws Exception
The constructor and the init() method are called in the “JavaFX-Launcher” thread. The start() and stop() methods are called in the “JavaFX Application Thread” thread. The JavaFX application thread is part of the Glass Windowing Toolkit in the com.sun.glass package hierarchy. JavaFX events are processed on the JavaFX Application Thread. All live scene manipulation must be performed in the JavaFX Application Thread. Nodes that are not attached to a live scene may be created and manipulated in other threads until they are attached to a live scene.
![]() Note The role the Glass Windowing Toolkit plays in a JavaFX application is similar to that of the AWT in Swing applications. It provides drawing surfaces and input events from the native platform. Unlike in AWT, where the EDT is different from the native platform's UI thread and communication has to occur between them, the JavaFX application thread in the Glass Windowing Toolkit uses the native platform's UI thread directly.
Note The role the Glass Windowing Toolkit plays in a JavaFX application is similar to that of the AWT in Swing applications. It provides drawing surfaces and input events from the native platform. Unlike in AWT, where the EDT is different from the native platform's UI thread and communication has to occur between them, the JavaFX application thread in the Glass Windowing Toolkit uses the native platform's UI thread directly.
The owner of the “QuantumRenderer-0” thread is the Quantum Toolkit that lives in the com.sun.javafx.tk.quantum package hierarchy. This thread is responsible for rendering the JavaFX scene graph using the Prism Graphics Engine in the com.sun.prism package hierarchy. Prism will use a fully accelerated rendering path if the graphics hardware is supported by JavaFX and will fall back to the Java2D rendering path if the graphics hardware is not supported by JavaFX. The Quantum Toolkit is also responsible for coordinating the activities of the event thread and the rendering thread. It does the coordination using pulse events.
![]() Note A pulse event is an event that is put on the queue for the JavaFX application thread. When it is processed, it synchronizes the state of the elements of the scene graph down the rendering layer. Pulse events are scheduled if the states of the scene graph change, either through running animation or by modifying the scene graph directly. Pulse events are throttled at 60 frames per second.
Note A pulse event is an event that is put on the queue for the JavaFX application thread. When it is processed, it synchronizes the state of the elements of the scene graph down the rendering layer. Pulse events are scheduled if the states of the scene graph change, either through running animation or by modifying the scene graph directly. Pulse events are throttled at 60 frames per second.
Had the JavaFXThreadsExample program included media-playing, another thread named “JFXMedia Player EventQueueThread” would have shown up on the list. This thread is responsible for synchronizing the latest frame through the scene graph by using the JavaFX application thread.
Fixing Unresponsive UIs
Event handlers execute on the JavaFX application thread, thus an event handler takes too long to finish its work, the whole UI will become unresponsive because any subsequent user action will simply queue up and won't be handled until the long-running event handler is done.
We illustrate this in Listing 6-6.
Listing 6-6. UnresponsiveUIExample.java
import javafx.application.Application;

import javafx.beans.property.ObjectProperty;

import javafx.beans.property.SimpleObjectProperty;

import javafx.event.ActionEvent;

import javafx.event.EventHandler;

import javafx.geometry.Insets;

import javafx.geometry.Pos;

import javafx.scene.Scene;

import javafx.scene.SceneBuilder;

import javafx.scene.control.Button;

import javafx.scene.layout.BorderPaneBuilder;

import javafx.scene.layout.HBox;

import javafx.scene.layout.HBoxBuilder;

import javafx.scene.paint.Color;

import javafx.scene.paint.Paint;

import javafx.scene.shape.Rectangle;

import javafx.scene.shape.RectangleBuilder;

import javafx.stage.Stage;


public class UnresponsiveUIExample extends Application {

    private Model model;

    private View view;


    public static void main(String[] args) {

        Application.launch(args);

    }


    public UnresponsiveUIExample() {

        model = new Model();

    }


    @Override

    public void start(Stage stage) throws Exception {

        view = new View(model);

        hookupEvents();


        stage.setTitle("Unresponsive UI Example");

        stage.setScene(view.scene);

        stage.show();

    }


    private void hookupEvents() {

        view.changeFillButton.setOnAction(new EventHandler<ActionEvent>() {

            @Override

            public void handle(ActionEvent actionEvent) {

                final Paint fillPaint = model.getFillPaint();

                if (fillPaint.equals(Color.LIGHTGRAY)) {

                    model.setFillPaint(Color.GRAY);

                } else {

                    model.setFillPaint(Color.LIGHTGRAY);

                }

                // Bad code, this will cause the UI to be unresponsive

                try {

                    Thread.sleep(Long.MAX_VALUE);

                } catch (InterruptedException e) {

                    // TODO properly handle interruption

                }

            }

        });


        view.changeStrokeButton.setOnAction(new EventHandler<ActionEvent>() {

            @Override

            public void handle(ActionEvent actionEvent) {

                final Paint strokePaint = model.getStrokePaint();

                if (strokePaint.equals(Color.DARKGRAY)) {

                    model.setStrokePaint(Color.BLACK);

                } else {

                    model.setStrokePaint(Color.DARKGRAY);

                }

            }

        });

    }


    private static class Model {

        private ObjectProperty<Paint> fillPaint = new SimpleObjectProperty<>();

        private ObjectProperty<Paint> strokePaint = new SimpleObjectProperty<>();


        private Model() {

            fillPaint.set(Color.LIGHTGRAY);

            strokePaint.set(Color.DARKGRAY);

        }


        final public Paint getFillPaint() {

            return fillPaint.get();

        }


        final public void setFillPaint(Paint value) {

            this.fillPaint.set(value);

        }


        final public Paint getStrokePaint() {

            return strokePaint.get();

        }


        final public void setStrokePaint(Paint value) {

            this.strokePaint.set(value);

        }


        final public ObjectProperty<Paint> fillPaintProperty() {

            return fillPaint;

        }


        final public ObjectProperty<Paint> strokePaintProperty() {

            return strokePaint;

        }

    }


    private static class View {

        public Rectangle rectangle;

        public Button changeFillButton;

        public Button changeStrokeButton;

        public HBox buttonHBox;

        public Scene scene;


        private View(Model model) {

            rectangle = RectangleBuilder.create()

                .width(200)

                .height(200)

                .strokeWidth(10)

                .build();

            rectangle.fillProperty().bind(model.fillPaintProperty());

            rectangle.strokeProperty().bind(model.strokePaintProperty());


            changeFillButton = new Button("Change Fill");

            changeStrokeButton = new Button("Change Stroke");


            buttonHBox = HBoxBuilder.create()

                .padding(new Insets(10, 10, 10, 10))

                .spacing(10)

                .alignment(Pos.CENTER)

                .children(changeFillButton, changeStrokeButton)

                .build();


            scene = SceneBuilder.create()

                .root(BorderPaneBuilder.create()

                    .padding(new Insets(10, 10, 10, 10))

                    .center(rectangle)

                    .bottom(buttonHBox)

                    .build())

                .build();

        }

    }

}
This class stands up a simple UI with a rectangle with a pronounced Color.DARKGRAY stroke and a Color.LIGHTGRAY fill in the center of a BorderPane, and two buttons at the bottom labeled “Change Fill” and “Change Stroke.” The “Change Fill” button is supposed to toggle the fill of the rectangle between Color.LIGHTGRAY and Color.GRAY. The “Change Stroke” button is supposed to toggle the stroke of the rectangle between Color.DARKGRAY and Color.BLACK. When we run the program in Listing 6-6, the GUI in Figure 6-4 is displayed on the screen.

Figure 6-4. The UnresponsiveUIExample program
However, this program has a bug in the event handler of the “Change Fill” button:
            @Override

            public void handle(ActionEvent actionEvent) {

                final Paint fillPaint = model.getFillPaint();

                if (fillPaint.equals(Color.LIGHTGRAY)) {

                    model.setFillPaint(Color.GRAY);


                } else {

                    model.setFillPaint(Color.LIGHTGRAY);

                }

                // Bad code, this will cause the UI to be unresponsive

                try {

                    Thread.sleep(Long.MAX_VALUE);

                } catch (InterruptedException e) {

                    // TODO properly handle interruption

                }

            }
The Thread.sleep(Long.MAX_VALUE) simulates code that takes a long time to execute. In real-life applications, this might be a database call, a web service call, or a piece of complicated code. As a result, if you click the “Change Fill” button, the color change is not seen in the rectangle. What is worse, the whole UI appears to be locked up: the “Change Fill” and “Change Stroke” buttons stop working; the close window button that is provided by the operating system will not have the desired effect. The operating system might also mark the program as “Not Responding,” and the only way to stop the program is to use the operating system's forced kill functionality.
To fix problems like this, we need to offload long-running code to worker threads and communicate the result of the long computation back to the JavaFX application thread in order to update the states of the UI so that the user can see the result. Depending on when you learned your Java, your answer to the first question of offloading code to worker threads may be different. If you are a long-time Java programmer your instinctive reaction might be to instantiate a Runnable, wrap it in a Thread and call start() on it. If you started with Java after Java 5 and learned the java.util.concurrent hierarchy of classes, your reaction might be to stand up a java.util.concurrent.ExecutorService and submit java.util.concurrent.FutureTasks to it. JavaFX includes a worker threading framework based on the latter approach in the javafx.concurrent package.
We examine the interfaces and classes in this framework in the next few sections, but before we do that we use the Runnable and Thread approach to offload computation to a worker thread. Our intention here is to highlight the answer to the second question of how to cause code to be run on the JavaFX application thread from a worker thread. The complete corrected program can be found in ResponsiveUIExample.java. Here is the new code for the event handler of the “Change Fill” button:
            @Override

            public void handle(ActionEvent actionEvent) {

                final Paint fillPaint = model.getFillPaint();

                if (fillPaint.equals(Color.LIGHTGRAY)) {

                    model.setFillPaint(Color.GRAY);

                } else {

                    model.setFillPaint(Color.LIGHTGRAY);

                }

                Runnable task = new Runnable() {

                    @Override

                    public void run() {

                        try {

                            Thread.sleep(3000);

                            Platform.runLater(new Runnable() {

                                @Override

                                public void run() {

                                    final Rectangle rect = view.rectangle;


                                    double newArcSize =

                                        rect.getArcHeight() < 20 ? 30 : 0;

                                    rect.setArcWidth(newArcSize);

                                    rect.setArcHeight(newArcSize);

                                }

                            });

                        } catch (InterruptedException e) {

                            // TODO properly handle interruption

                        }

                    }

                };

                new Thread(task).start();

            }
We have replaced the long sleep with code that executes in a worker thread. After sleeping for three seconds, the worker thread calls the runLater() method of the javafx.application.Platform class, passing it another Runnable that toggles the rounded corners of the rectangle. Because the long-running computation is done in a worker thread, the event handler is not blocking the JavaFX application thread. The change of fill is now reflected immediately in the UI. Because the Platform.runLater() call causes the Runnable to be executed on the JavaFX application thread, the change to the rounded corners is reflected in the UI after three seconds. The reason we have to execute the Runnable on the JavaFX application thread is that it modifies the state of a live scene.
The Platform class includes the following helpful utility methods.
public static boolean isFxApplicationThread()returnstrueif it is executed on the JavaFX application thread andfalseotherwise.- public static boolean isSupported(ConditionalFeature) tests whether the execution environment supports a
ConditionalFeature. TestableConditionalFeaturesincludeEFFECT,INPUT_METHOD,SCENE3D, andSHAPE_CLIP. - public static void exit(), if called after the application's
start()method has been called, causes the application'sstop()method to be executed on the JavaFX application thread before the JavaFX application thread and other JavaFX platform threads are taken down. If the application'sstart()method has not been called yet, the application'sstop()method may not be called.
![]() Note If you are familiar with Swing programming, you should see the similarity between JavaFX's
Note If you are familiar with Swing programming, you should see the similarity between JavaFX's Platform.runLater() and Swing's EventQueue.invokerLater(), or SwingUtilities.invokeLater().
Now that we have solved our problem with Runnable and Thread and Platform.runLater(), it is time to see how we can use JavaFX's built-in worker threading framework to solve the problem in a more flexible and elegant way.
Understanding the javafx.concurrent Framework
The JavaFX worker threading framework in the javafx.concurrent package combines the versatility and flexibility of the Java concurrency framework introduced in Java 5 with the convenience of the JavaFX properties and bindings framework to produce an easy-to-use tool-set that is aware of the JavaFX application threading rules and also very easy to use. It consists of one interface, Worker, and two abstract base classes, Task<V> and Service<V>, that implement the interface.
Understanding the Worker Interface
The Worker interface specifies a JavaFX bean with nine read-only properties, one method named cancel(), and a state model and state transition rules. A Worker represents a unit of work that runs in one or more background threads yet has some of its internal states safely observable to the JavaFX application thread. The nine read only properties are as follows.
titleis aStringproperty that represents the title of the task.- message is a
Stringproperty that represents a more detailed message as the task progresses. - running is a
booleanproperty that is true only when theWorkeris in theWorker.State.SCHEDULEDorWorker.State.RUNNINGstate. - state is an
Objectproperty that represents theWorker.Stateof the task. - totalWork is a
doubleproperty that represents the total amount of work of the task. Its value is–1.0when the total amount of work is not known. - workDone is a
doubleproperty that represents the amount of work that has been done so far in the task. Its value is–1.0or a number between0andtotalWork. - progress is a
doubleproperty that represents the percentage of the total work that has been done so far in the task. Its value is–1.0or the ratio betweenworkDoneandtotalWork. - value is an
Objectproperty that represents the output of the task. Its value is non-null only when the task has finished successfully, that is, has reached theWorker.State.SUCCEEDEDstate. - exception is an
Objectproperty that represents aThrowablethat the implementation of the task has thrown to the JavaFX worker threading framework. Its value is non-null only when the task is in theWorker.State.FAILEDstate.
The preceding properties are meant to be accessed from the JavaFX application thread. It is safe to bind scene graph properties to them because the invalidation events and change events of these properties are fired on the JavaFX application thread. It is helpful to think of the properties through an imaginary task progress message box that you see in many GUI applications. They usually have a title, a progress bar indicating the percentage of the work that has been done, and a message telling the user how many items it has processed already and how many more to go. All of these properties are set by the JavaFX worker threading framework itself or by the actual implementation of the task.
The running, state, value, and exception properties are controlled by the framework and no user intervention is needed for them to be observed in the JavaFX application thread. When the framework wants to change these properties, it does the heavy lifting of making sure that the change is done on the JavaFX application thread. The title, message, totalWork, workDone and progress properties are updatable by the implementation code of the task by calling framework-provided protected methods that do the heavy lifting of making sure that the change is done on the JavaFX application thread.
Worker.State is a nested enum that defines the following six states of a Worker:
READY (initial state)SCHEDULED (transitional state)RUNNING (transitional state)SUCCEEDED (terminal state)CANCELLED (terminal state)FAILED (terminal state)
The cancel() method will transition the Worker to the CANCELLED state if it is not already in the SUCCEEDED or FAILED state.
Now that you are familiar with the properties and states of the Worker interface, you can proceed to learn the two abstract classes in the JavaFX worker threading framework that implements this interface, Task<V> and Service<V>.
Understanding the Task<V> Abstract Class
The Task<V> abstract class is an implementation of the Worker interface that is meant to be used for one-shot tasks. Once its state progresses to SUCCEEDED or FAILED or CANCELLED, it will stay in the terminal state forever. The Task<V> abstract class extends the FutureTask<V> class, and as a consequence supports the Runnable, Future<V>, and RunnableFuture<V> interfaces as well as the Worker interface. The Future<V>, RunnableFuture<V>, and FutureTask<V> interfaces and class are part of the java.util.concurrent package. Because of this heritage, a Task<V> object can be used in various ways that befit its parent class. However, for typical JavaFX usage, it is enough to use just the methods in the Task<V> class itself, a list of which can be found in the Javadoc for the class. Here is a listing of these methods, excluding the read-only properties that were discussed in the preceding section:
protected abstract V call() throws Exceptionpublic final boolean cancel()public boolean cancel(boolean myInterruptIfRunning)protected void updateTitle(String title)protected void updateMessage(String message)protected void updateProgress(long workDone, long totalWork)
Extensions of Task<V> must override the protected abstract call() method to perform the actual work. The implementation of the call() method may call the protected methods updateTitle(), updateMessage(), and updateProgress() to publish its internal state to the JavaFX application thread. The implementation has total control of what the title and message of the task should be. For the updateProgress() call, the workDone and totalWork must either both be –1, indicating indeterminate progress, or satisfy the relations workDone >= 0 and workDone <= totalWork, resulting in a progress value of between 0.0 and 1.0 (0% to 100%).
![]() Caution The
Caution The updateProgress() API will throw an exception if workDone > totalWork, or if one of them is <–1. However, it allows you to pass in (0, 0) resulting in a progress of NaN.
The two cancel() methods can be called from any thread, and will move the task to the CANCELLED state if it is not already in the SUCCEEDED or FAILED state. If either cancel() method is called before the task is run, it will move to the CANCELLED state and will never be run. The two cancel() methods differ only if the task is in the RUNNING state, and only in their treatment of the running thread. If cancel(true) is called, the thread will receive an interrupt. For this interrupt to have the desired effect of causing the task to finish processing quickly, the implementation of the call() method has to be coded in a way that will detect the interrupt and skip any further processing. The no-argument cancel() method simply forwards to cancel(true).
Listing 6-7 illustrates the creation of a Task, starting it, and observing the properties of the task from a simple GUI that displays all nine of the properties.
Listing 6-7. WorkerAndTaskExample.java
import javafx.application.Application;

import javafx.beans.binding.Bindings;

import javafx.beans.binding.StringBinding;

import javafx.beans.property.ReadOnlyObjectProperty;

import javafx.concurrent.Task;

import javafx.concurrent.Worker;

import javafx.event.ActionEvent;

import javafx.event.EventHandler;

import javafx.geometry.HPos;

import javafx.geometry.Insets;

import javafx.geometry.Pos;

import javafx.scene.Scene;

import javafx.scene.SceneBuilder;

import javafx.scene.control.Button;

import javafx.scene.control.Label;

import javafx.scene.control.ProgressBar;

import javafx.scene.control.ProgressBarBuilder;

import javafx.scene.layout.BorderPaneBuilder;

import javafx.scene.layout.ColumnConstraintsBuilder;

import javafx.scene.layout.GridPane;

import javafx.scene.layout.GridPaneBuilder;

import javafx.scene.layout.HBox;

import javafx.scene.layout.HBoxBuilder;

import javafx.stage.Stage;


import java.util.concurrent.atomic.AtomicBoolean;


public class WorkerAndTaskExample extends Application {

    private Model model;

    private View view;


    public static void main(String[] args) {

        Application.launch(args);

    }


    public WorkerAndTaskExample() {

        model = new Model();

    }


    @Override

    public void start(Stage stage) throws Exception {

        view = new View(model);

        hookupEvents();

        stage.setTitle("Worker and Task Example");

        stage.setScene(view.scene);

        stage.show();

    }


    private void hookupEvents() {

        view.startButton.setOnAction(new EventHandler<ActionEvent>() {

            @Override

            public void handle(ActionEvent actionEvent) {

                new Thread((Runnable) model.worker).start();

            }

        });

        view.cancelButton.setOnAction(new EventHandler<ActionEvent>() {

            @Override

            public void handle(ActionEvent actionEvent) {

                model.worker.cancel();

            }

        });

        view.exceptionButton.setOnAction(new EventHandler<ActionEvent>() {

            @Override

            public void handle(ActionEvent actionEvent) {

                model.shouldThrow.getAndSet(true);

            }

        });

    }


    private static class Model {

        public Worker<String> worker;

        public AtomicBoolean shouldThrow = new AtomicBoolean(false);


        private Model() {

            worker = new Task<String>() {

                @Override

                protected String call() throws Exception {

                    updateTitle("Example Task");

                    updateMessage("Starting...");

                    final int total = 250;

                    updateProgress(0, total);

                    for (int i = 1; i <= total; i++) {

                        try {

                            Thread.sleep(20);

                        } catch (InterruptedException e) {

                            return "Cancelled at " + System.currentTimeMillis();

                        }

                        if (shouldThrow.get()) {

                            throw new RuntimeException("Exception thrown at " +

 System.currentTimeMillis());

                        }

                        updateTitle("Example Task (" + i + ")");

                        updateMessage("Processed " + i + " of " + total + " items.");

                        updateProgress(i, total);

                    }

                    return "Completed at " + System.currentTimeMillis();

                }

            };

        }

    }


    private static class View {

        public ProgressBar progressBar;


        public Label title;

        public Label message;

        public Label running;

        public Label state;

        public Label totalWork;

        public Label workDone;

        public Label progress;

        public Label value;

        public Label exception;


        public Button startButton;

        public Button cancelButton;

        public Button exceptionButton;


        public Scene scene;


        private View(final Model model) {

            progressBar = ProgressBarBuilder.create()

                .minWidth(250)

                .build();


            title = new Label();

            message = new Label();

            running = new Label();

            state = new Label();

            totalWork = new Label();

            workDone = new Label();

            progress = new Label();

            value = new Label();

            exception = new Label();


            startButton = new Button("Start");

            cancelButton = new Button("Cancel");

            exceptionButton = new Button("Exception");


            final ReadOnlyObjectProperty<Worker.State> stateProperty =

                model.worker.stateProperty();


            progressBar.progressProperty().bind(model.worker.progressProperty());


            title.textProperty().bind(

                model.worker.titleProperty());

            message.textProperty().bind(

                model.worker.messageProperty());

            running.textProperty().bind(

                Bindings.format("%s", model.worker.runningProperty()));

            state.textProperty().bind(

                Bindings.format("%s", stateProperty));

            totalWork.textProperty().bind(

                model.worker.totalWorkProperty().asString());

            workDone.textProperty().bind(

                model.worker.workDoneProperty().asString());

            progress.textProperty().bind(

                Bindings.format("%5.2f%%", model.worker.progressProperty().multiply(100)));

            value.textProperty().bind(

                model.worker.valueProperty());

            exception.textProperty().bind(new StringBinding() {

                {

                    super.bind(model.worker.exceptionProperty());

                }


                @Override

                protected String computeValue() {

                    final Throwable exception = model.worker.getException();

                    if (exception == null) return "";

                    return exception.getMessage();

                }

            });


            startButton.disableProperty().bind(

                stateProperty.isNotEqualTo(Worker.State.READY));

            cancelButton.disableProperty().bind(

                stateProperty.isNotEqualTo(Worker.State.RUNNING));

            exceptionButton.disableProperty().bind(

                stateProperty.isNotEqualTo(Worker.State.RUNNING));


            final HBox topPane = HBoxBuilder.create()

                .padding(new Insets(10, 10, 10, 10))

                .spacing(10)

                .alignment(Pos.CENTER)

                .children(progressBar)

                .build();


            final GridPane centerPane = GridPaneBuilder.create()

                .hgap(10)

                .vgap(10)

                .padding(new Insets(10, 10, 10, 10))

                .columnConstraints(

                    ColumnConstraintsBuilder.create()

                        .halignment(HPos.RIGHT)

                        .minWidth(65)

                        .build(),

                    ColumnConstraintsBuilder.create()

                        .halignment(HPos.LEFT)

                        .minWidth(200)

                        .build()

                )

                .build();

            centerPane.add(new Label("Title:"), 0, 0);

            centerPane.add(new Label("Message:"), 0, 1);

            centerPane.add(new Label("Running:"), 0, 2);

            centerPane.add(new Label("State:"), 0, 3);

            centerPane.add(new Label("Total Work:"), 0, 4);

            centerPane.add(new Label("Work Done:"), 0, 5);

            centerPane.add(new Label("Progress:"), 0, 6);

            centerPane.add(new Label("Value:"), 0, 7);

            centerPane.add(new Label("Exception:"), 0, 8);


            centerPane.add(title, 1, 0);

            centerPane.add(message, 1, 1);

            centerPane.add(running, 1, 2);

            centerPane.add(state, 1, 3);

            centerPane.add(totalWork, 1, 4);

            centerPane.add(workDone, 1, 5);

            centerPane.add(progress, 1, 6);

            centerPane.add(value, 1, 7);

            centerPane.add(exception, 1, 8);


            final HBox buttonPane = HBoxBuilder.create()

                .padding(new Insets(10, 10, 10, 10))

                .spacing(10)

                .alignment(Pos.CENTER)

                .children(startButton, cancelButton, exceptionButton)

                .build();


            scene = SceneBuilder.create()

                .root(BorderPaneBuilder.create()

                    .top(topPane)

                    .center(centerPane)

                    .bottom(buttonPane)

                    .build())

                .build();

        }

    }

}
The Model nested class for this program holds a worker field of type Worker, and a shouldThrow field of type AtomicBoolean. The worker field is initialized to an instance of an anonymous subclass of Task<String> that implements its call() method by simulating the processing of 250 items at a 20-milliseconds-per-item pace. It updates the properties of the task at the beginning of the call and in each iteration of the loop. If an interrupt to the thread is received while the method is in progress, it gets out of the loop and returns quickly. The shouldThrow field is controlled by the View to communicate to the task that it should throw an exception.
The View nested class of this program creates a simple UI that has a ProgressBar at the top, a set of Labels at the center that display the various properties of the worker, and three buttons at the bottom. The contents of the Labels are bound to the various properties of the worker. The disable properties of the buttons are also bound to the state property of the worker so that only the relevant buttons are enabled at any time. For example, the Start button is enabled when the program starts but becomes disabled after it is pressed and the task execution begins. Similarly, the Cancel and Exception buttons are enabled only if the task is running.
When we run the program in Listing 6-7, the GUI in Figure 6-5 is displayed on the screen.
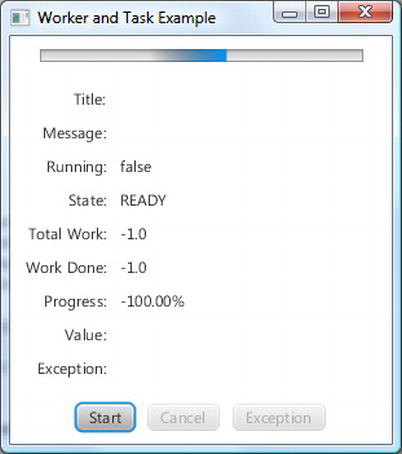
Figure 6-5. The WorkerAndTaskExample program after starting up
Notice that the progress bar is in an indeterminate state. The values of Title, Message, Value, and Exception are empty. The value of Running is false. The value of State is READY, and the values of Total Work, Work Done, and Progress are all -1. The Start button is enabled whereas the Cancel and Exception buttons are disabled.
After the Start button is clicked, the task starts to execute and the GUI automatically reflects the values of the properties as the task progresses. Figure 6-6 is a screenshot of the application at this stage. Notice that the progress bar is in a determinate state and reflects the progress of the task. The values of Title and Message reflects what is set to these properties in the implementation of the call() method in the task. The value of Running is true. The value of State is RUNNING, and the values of Total Work, Work Done, and Progress reflect the current state of the executing task: 156 of 250 items done. The Value and the Exception fields are empty because neither a value nor an Exception is available from the task. The Start button is disabled now. The Cancel and Exception buttons are enabled, indicating that we may attempt to cancel the task or force an exception to be thrown from the task at this moment.
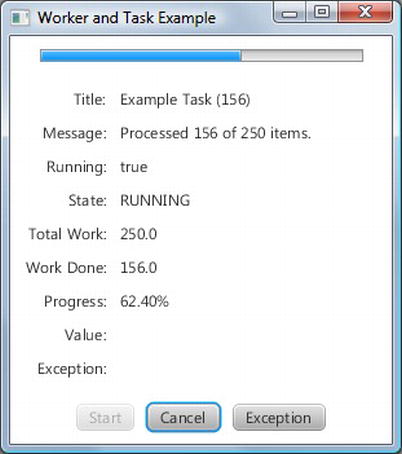
Figure 6-6. The WorkerAndTaskExample program while a task is in progress
When the task finishes normally, we arrive at the screenshot in Figure 6-7. Notice that the progress bar is at 100%. The Title, Message, Total Work, Work Done and Progress fields all have values that reflect the fact that the task has finished processing all 250 items. The Running is false. The State is SUCCEEDED. And the Value field now contains the return value from the call() method.
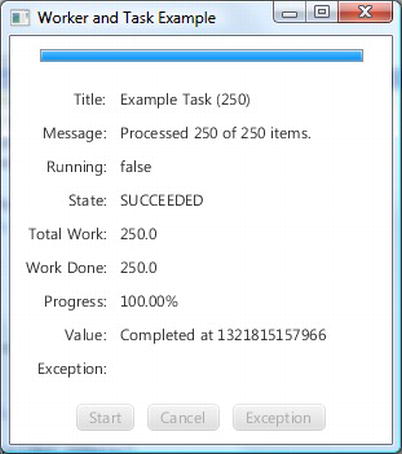
Figure 6-7. The WorkerAndTaskExample program after the task succeeded
If, instead of letting the task finish normally, we click the Cancel button, the task will finish immediately and the screenshot in Figure 6-8 results. Notice that the Status field has the value CANCELLED now. The Value field contains the string we returned from the call() method when the thread was interrupted. When we catch the InterruptedException in the call() method, we have two choices of exiting from the method body. In the program in Listing 6-7, we chose to return from the method. That's why we see a Value string. We could also have chosen to exit from the method body by throwing a RuntimeException. Had we made that choice, the screenshot would have an empty Value field but with an non-empty Exception field. The state of the worker would have been CANCELLED either way.
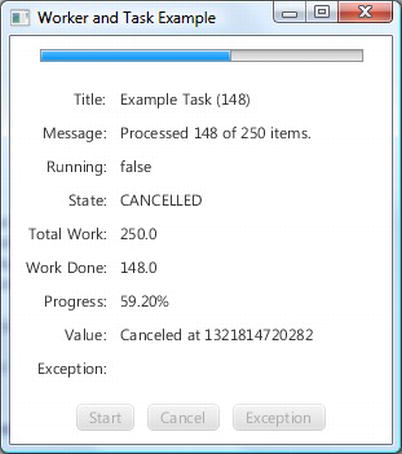
Figure 6-8. The WorkerAndTaskExample program after the task has been cancelled
The final screenshot, Figure 6-9, shows what happens when the Exception button is clicked when the task is executing. We simulate an exception in the task by setting an AtomicBoolean flag from the JavaFX application, which the task then picks up in the worker thread and throws the exception. Notice that the status field has the value FAILED now. The Value field is empty because the task did not complete successfully. The Exception field is filled with the message of the RuntimeException that we threw.

Figure 6-9. The WorkerAndTaskExample program after the task threw an exception
![]() Note The
Note The Task<V> class defines one-shot tasks that are executed once and never run again. You have to restart the WorkerAndTaskExample program after each run of the task.
Understanding the Service<V> Abstract Class
The Service<V> abstract class is an implementation of the Worker interface that is meant to be reused. It extends Worker's state model by allowing its state to be reset to Worker.State.READY. Although the Service<V> abstract class does not extend any other class or implement any interface other than Worker, it does include a field of type Task<V> and another one of type java.util.concurrent.Executor. In addition to the nine read only properties of the Worker interface, Service<V> has an additional read write property of type Executor called executor. Here is a listing of the rest of the methods of Service<V>:
protected abstract Task createTask()public void start()public void reset()public void restart()public final boolean cancel()
Extensions of Service<V> must override the protected abstract createTask() method to generate a freshly created Task. The start() method can only be called when the Service<V> object is in the Worker.State.READY state. It calls createTask() to obtain a freshly minted Task, and asks the executor property for an Executor. If the executor property is not set, it creates its own Executor. It binds the Service<V> object's nine Worker properties to that of the Task's. It then transitions the Task to the Worker.State.SCHEDULED state, and executes the Task on the Executor. The reset() method can only be called when the Service<V>'s state is not Worker.State.SCHEDULED or Worker.State.RUNNING. It simply unbinds the nine Service<V> properties from that of the underlying Task and resets their values to fresh start-up values: Worker.State.READY for the state property, and null or “” or false or –1 for the other properties. The restart() method simply cancels the currently executing Task, if any, and then does a reset() followed by a start(). The cancel() method will cancel the currently executing Task, if any; otherwise it will transition the Service<V> to the Worker.State.CANCELLED state.
Listing 6-8 illustrates using an instance of an anonymous subclass of the Service<V> abstract class to execute Tasks repeatedly in its own Executor.
Listing 6-8. ServiceExample.java
import javafx.application.Application;

import javafx.beans.binding.Bindings;

import javafx.beans.binding.IntegerBinding;

import javafx.beans.binding.StringBinding;

import javafx.beans.property.IntegerProperty;

import javafx.beans.property.ReadOnlyObjectProperty;

import javafx.beans.property.SimpleIntegerProperty;

import javafx.concurrent.Service;

import javafx.concurrent.Task;

import javafx.concurrent.Worker;

import javafx.event.ActionEvent;

import javafx.event.EventHandler;

import javafx.geometry.HPos;

import javafx.geometry.Insets;

import javafx.geometry.Pos;

import javafx.scene.Scene;

import javafx.scene.SceneBuilder;

import javafx.scene.control.Button;

import javafx.scene.control.Label;

import javafx.scene.control.ProgressBar;

import javafx.scene.control.ProgressBarBuilder;

import javafx.scene.control.TextField;

import javafx.scene.control.TextFieldBuilder;

import javafx.scene.layout.BorderPaneBuilder;

import javafx.scene.layout.ColumnConstraintsBuilder;

import javafx.scene.layout.GridPane;

import javafx.scene.layout.GridPaneBuilder;

import javafx.scene.layout.HBox;

import javafx.scene.layout.HBoxBuilder;

import javafx.stage.Stage;


import java.util.concurrent.atomic.AtomicBoolean;


public class ServiceExample extends Application {

    private Model model;

    private View view;


    public static void main(String[] args) {

        Application.launch(args);

    }


    public ServiceExample() {

        model = new Model();

    }


    @Override

    public void start(Stage stage) throws Exception {

        view = new View(model);

        hookupEvents();

        stage.setTitle("Service Example");

        stage.setScene(view.scene);

        stage.show();

    }


    private void hookupEvents() {

        view.startButton.setOnAction(new EventHandler<ActionEvent>() {

            @Override

            public void handle(ActionEvent actionEvent) {

                model.shouldThrow.getAndSet(false);

                ((Service) model.worker).restart();

            }

        });

        view.cancelButton.setOnAction(new EventHandler<ActionEvent>() {

            @Override

            public void handle(ActionEvent actionEvent) {

                model.worker.cancel();

            }

        });

        view.exceptionButton.setOnAction(new EventHandler<ActionEvent>() {

            @Override

            public void handle(ActionEvent actionEvent) {

                model.shouldThrow.getAndSet(true);

            }

        });

    }


    private static class Model {

        public Worker<String> worker;

        public AtomicBoolean shouldThrow = new AtomicBoolean(false);

        public IntegerProperty numberOfItems = new SimpleIntegerProperty(250);


        private Model() {

            worker = new Service<String>() {

                @Override

                protected Task createTask() {

                    return new Task<String>() {

                        @Override

                        protected String call() throws Exception {

                            updateTitle("Example Service");

                            updateMessage("Starting...");

                            final int total = numberOfItems.get();

                            updateProgress(0, total);

                            for (int i = 1; i <= total; i++) {

                                try {

                                    Thread.sleep(20);

                                } catch (InterruptedException e) {

                                    return "Canceled at " + System.currentTimeMillis();

                                }

                                if (shouldThrow.get()) {

                                    throw new RuntimeException("Exception thrown at " +

 System.currentTimeMillis());

                                }

                                updateTitle("Example Service (" + i + ")");

                                updateMessage("Processed " + i + " of " + total + " items.");

                                updateProgress(i, total);

                            }

                            return "Completed at " + System.currentTimeMillis();

                        }

                    };

                }

            };

        }

    }


    private static class View {

        public ProgressBar progressBar;


        public Label title;

        public Label message;

        public Label running;

        public Label state;

        public Label totalWork;

        public Label workDone;

        public Label progress;

        public Label value;

        public Label exception;


        public TextField numberOfItems;

        public Button startButton;

        public Button cancelButton;

        public Button exceptionButton;


        public Scene scene;


        private View(final Model model) {

            progressBar = ProgressBarBuilder.create()

                .minWidth(250)

                .build();


            title = new Label();

            message = new Label();

            running = new Label();

            state = new Label();

            totalWork = new Label();

            workDone = new Label();

            progress = new Label();

            value = new Label();

            exception = new Label();


            numberOfItems = TextFieldBuilder.create()

                .maxWidth(40)

                .build();

            startButton = new Button("Start");

            cancelButton = new Button("Cancel");

            exceptionButton = new Button("Exception");


            final ReadOnlyObjectProperty<Worker.State> stateProperty =

                model.worker.stateProperty();


            progressBar.progressProperty().bind(model.worker.progressProperty());


            title.textProperty().bind(

                model.worker.titleProperty());

            message.textProperty().bind(

                model.worker.messageProperty());

            running.textProperty().bind(

                Bindings.format("%s", model.worker.runningProperty()));

            state.textProperty().bind(

                Bindings.format("%s", stateProperty));

            totalWork.textProperty().bind(

                model.worker.totalWorkProperty().asString());

            workDone.textProperty().bind(

                model.worker.workDoneProperty().asString());

            progress.textProperty().bind(

                Bindings.format("%5.2f%%", model.worker.progressProperty().multiply(100)));

            value.textProperty().bind(

                model.worker.valueProperty());

            exception.textProperty().bind(new StringBinding() {

                {

                    super.bind(model.worker.exceptionProperty());

                }


                @Override

                protected String computeValue() {

                    final Throwable exception = model.worker.getException();

                    if (exception == null) return "";

                    return exception.getMessage();

                }

            });


            model.numberOfItems.bind(new IntegerBinding() {

                {

                    super.bind(numberOfItems.textProperty());

                }


                @Override

                protected int computeValue() {

                    final String text = numberOfItems.getText();

                    int n = 250;

                    try {

                        n = Integer.parseInt(text);

                    } catch (NumberFormatException e) {

                    }

                    return n;

                }

            });


            startButton.disableProperty().bind(

                stateProperty.isEqualTo(Worker.State.RUNNING));

            cancelButton.disableProperty().bind(

                stateProperty.isNotEqualTo(Worker.State.RUNNING));

            exceptionButton.disableProperty().bind(

                stateProperty.isNotEqualTo(Worker.State.RUNNING));


            final HBox topPane = HBoxBuilder.create()

                .padding(new Insets(10, 10, 10, 10))

                .spacing(10)

                .alignment(Pos.CENTER)

                .children(progressBar)

                .build();


            final GridPane centerPane = GridPaneBuilder.create()

                .hgap(10)

                .vgap(10)

                .padding(new Insets(10, 10, 10, 10))

                .columnConstraints(

                    ColumnConstraintsBuilder.create()

                        .halignment(HPos.RIGHT)

                        .minWidth(65)

                        .build(),

                    ColumnConstraintsBuilder.create()

                        .halignment(HPos.LEFT)

                        .minWidth(200)

                        .build()

                )

                .build();

            centerPane.add(new Label("Title:"), 0, 0);

            centerPane.add(new Label("Message:"), 0, 1);

            centerPane.add(new Label("Running:"), 0, 2);

            centerPane.add(new Label("State:"), 0, 3);

            centerPane.add(new Label("Total Work:"), 0, 4);

            centerPane.add(new Label("Work Done:"), 0, 5);

            centerPane.add(new Label("Progress:"), 0, 6);

            centerPane.add(new Label("Value:"), 0, 7);

            centerPane.add(new Label("Exception:"), 0, 8);


            centerPane.add(title, 1, 0);

            centerPane.add(message, 1, 1);

            centerPane.add(running, 1, 2);

            centerPane.add(state, 1, 3);

            centerPane.add(totalWork, 1, 4);

            centerPane.add(workDone, 1, 5);

            centerPane.add(progress, 1, 6);

            centerPane.add(value, 1, 7);

            centerPane.add(exception, 1, 8);


            final HBox buttonPane = HBoxBuilder.create()

                .padding(new Insets(10, 10, 10, 10))

                .spacing(10)

                .alignment(Pos.CENTER)

                .children(new Label("Process"), numberOfItems, new Label("items"),

                    startButton, cancelButton, exceptionButton)

                .build();


            scene = SceneBuilder.create()

                .root(BorderPaneBuilder.create()

                    .top(topPane)

                    .center(centerPane)


                    .bottom(buttonPane)

                    .build())

                .build();

        }

    }

}
The preceding program is derived from the WorkerAndTaskExample class that we studied in the previous section. The Model nested class for this program holds a worker field of type Worker, a shouldThrow field of type AtomicBoolean, and a numberOfItems field of type IntegerProperty. The worker field is initialized to an instance of an anonymous subclass of Service<String> that implements its createTask() method to return a Task<String> whose call() method is implemented almost exactly like the Task<String> implementation in the last section, except that instead of always processing 250 items, it picks up the number of items to process from the numberOfItems property from the Model class.
The View nested class of this program creates a UI that is almost identical to that in the previous section but with some additional controls in the button panel. One of the controls added to the button panel is a TextField named numberOfItems. The model's numberOfItems IntegerProperty is bound to an IntegerBinding created with the textProperty() of the view's numberOfItems field. This effectively controls the number of items each newly created Task will process. The Start button is disabled only if the service is in the Worker.State.RUNNING state. Therefore you can click on the Start button after a task has finished.
The action handler of the Start button now resets the shouldThrow flag to false and calls restart() of the service.
The screenshots in Figures 6-10 to 6-14 are taken with the ServiceExample program under situations similar to those for the screenshots in Figures 6-5 to 6-9 for the WorkerAndTaskExample program.
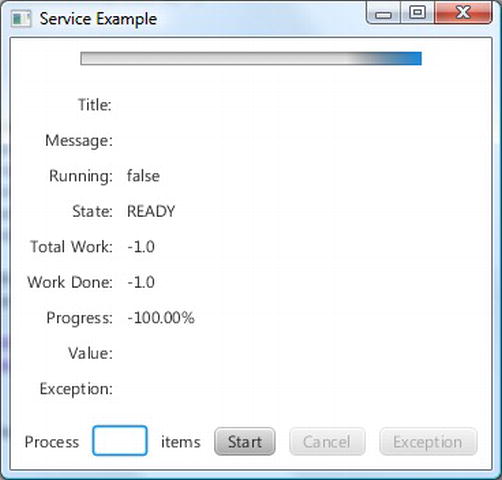
Figure 6-10. The ServiceExample program after starting up
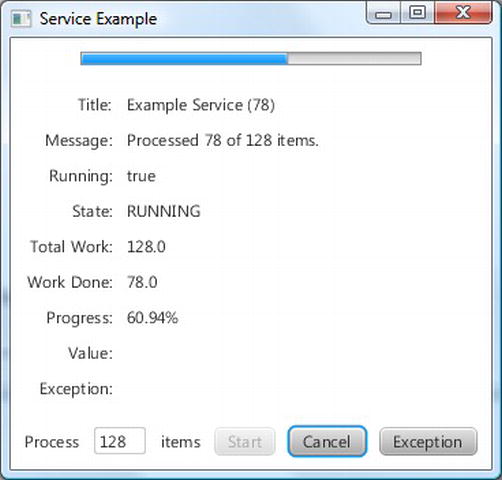
Figure 6-11. The ServiceExample program while a task is in progress
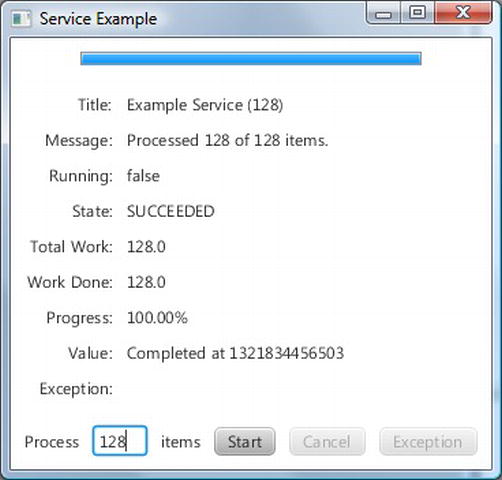
Figure 6-12. The ServiceExample program after the task succeeded
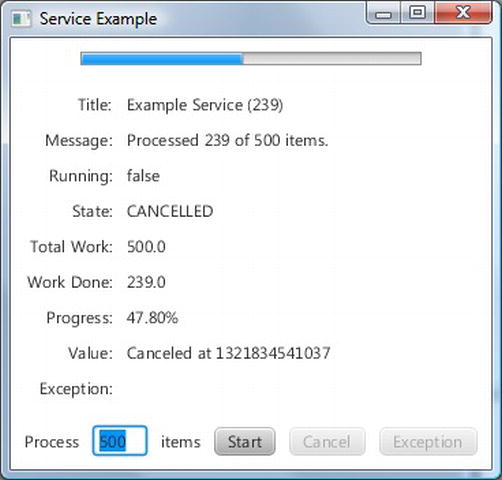
Figure 6-13. The ServiceExample program after the task has been cancelled
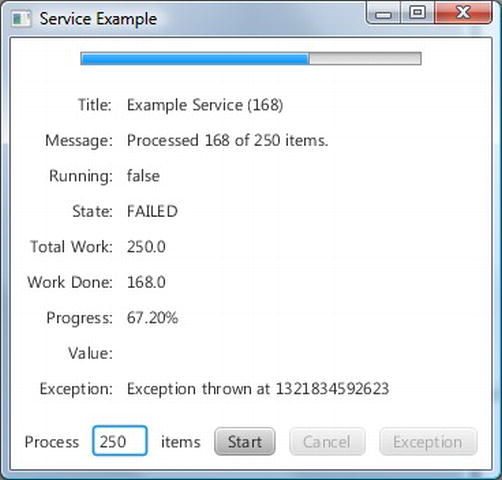
Figure 6-14. The ServiceExample program after the task threw an exception
As you can see from the preceding screenshots, the number that is entered into the text field does indeed influence the number of items processed in each run of the service, as is evidenced by the messages reflected in the UI in the screenshots.
![]() Caution Because the task that is started with the JavaFX worker threading framework executes in background threads, it is very important not to access any live scenes in the task code.
Caution Because the task that is started with the JavaFX worker threading framework executes in background threads, it is very important not to access any live scenes in the task code.
Embedding JavaFX Scenes in Swing and SWT Applications
Having examined the threading paradigm of the JavaFX runtime and ways to execute code from the JavaFX application thread, we now look at how to make use of JavaFX scenes in Swing and SWT applications. JavaFX 2.0 supports embedding a JavaFX scene into a Swing application through the javafx.embed.swing package of classes. This is a pretty small package that includes two public classes: JFXPanel, and JFXPanelBuilder. The JFXPanel class extends javax.swing.JComponent, and as such can be placed in a Swing program just as any other Swing component. JFXPanel can also host a JavaFX scene, and as such can add a JavaFX scene to a Swing program.
However, this Swing program with a JavaFX scene embedded in it needs both the Swing runtime to make its Swing portion function correctly, and the JavaFX runtime to make the JavaFX portion function correctly. Therefore it has both the Swing Event Dispatching Thread (EDT) and the JavaFX Application Thread. The JFXPanel class does a two-way translation of all the user events between Swing and JavaFX.
Just as JavaFX has the rule that requires all access to live scenes to be done in the JavaFX Application Thread, Swing has the rule that requires all access to Swing GUIs to be done in the EDT. You still need to jump the thread if you want to alter a Swing component from a JavaFX event handler or vice versa. The proper way to execute a piece of code on the JavaFX Application Thread, as we saw earlier, is to use Platform.runLater(). The proper way to execute a piece of code on the Swing EDT is to use EventQueue.invokeLater().
In the rest of this section, we will convert a pure Swing program into a Swing and JavaFX hybrid program, and a pure SWT program into a SWT and JavaFX hybrid program. We start off with the Swing program in Listing 6-9, which is very similar to the ResponsiveUIExample program.
Listing 6-9. NoJavaFXSceneInSwingExample.java
import javax.swing.*;

import java.awt.*;

import java.awt.event.ActionEvent;

import java.awt.event.ActionListener;


public class NoJavaFXSceneInSwingExample {

    public static void main(final String[] args) {

        EventQueue.invokeLater(new Runnable() {

            @Override

            public void run() {

                swingMain(args);

            }

        });

    }

    private static void swingMain(String[] args) {

        Model model = new Model();

        View view = new View(model);

        Controller controller = new Controller(model, view);

        controller.mainLoop();

    }


    private static class Model {

        public Color fillColor = Color.LIGHT_GRAY;

        public Color strokeColor = Color.DARK_GRAY;

    }


    private static class View {

        public JFrame frame;

        public JComponent canvas;

        public JButton changeFillButton;

        public JButton changeStrokeButton;


        private View(final Model model) {

            frame = new JFrame("No JavaFX in Swing Example");

            canvas = new JComponent() {

                @Override

                public void paint(Graphics g) {

                    g.setColor(model.strokeColor);

                    g.fillRect(0, 0, 200, 200);

                    g.setColor(model.fillColor);

                    g.fillRect(10, 10, 180, 180);

                }


                @Override

                public Dimension getPreferredSize() {

                    return new Dimension(200, 200);

                }

            };

            FlowLayout canvasPanelLayout = new FlowLayout(FlowLayout.CENTER, 10, 10);

            JPanel canvasPanel = new JPanel(canvasPanelLayout);

            canvasPanel.add(canvas);


            changeFillButton = new JButton("Change Fill");

            changeStrokeButton = new JButton("Change Stroke");

            FlowLayout buttonPanelLayout = new FlowLayout(FlowLayout.CENTER, 10, 10);

            JPanel buttonPanel = new JPanel(buttonPanelLayout);

            buttonPanel.add(changeFillButton);

            buttonPanel.add(changeStrokeButton);


            frame.add(canvasPanel, BorderLayout.CENTER);

            frame.add(buttonPanel, BorderLayout.SOUTH);

            frame.setDefaultCloseOperation(JFrame.EXIT_ON_CLOSE);

            frame.setLocationByPlatform(true);

            frame.pack();

        }

    }

    private static class Controller {

        private View view;


        private Controller(final Model model, final View view) {

            this.view = view;

            this.view.changeFillButton.addActionListener(new ActionListener() {

                @Override

                public void actionPerformed(ActionEvent e) {

                    if (model.fillColor.equals(Color.LIGHT_GRAY)) {

                        model.fillColor = Color.GRAY;

                    } else {

                        model.fillColor = Color.LIGHT_GRAY;

                    }

                    view.canvas.repaint();

                }

            });

            this.view.changeStrokeButton.addActionListener(new ActionListener() {

                @Override

                public void actionPerformed(ActionEvent e) {

                    if (model.strokeColor.equals(Color.DARK_GRAY)) {

                        model.strokeColor = Color.BLACK;

                    } else {

                        model.strokeColor = Color.DARK_GRAY;

                    }

                    view.canvas.repaint();

                }

            });

        }


        public void mainLoop() {

            view.frame.setVisible(true);

        }

    }

}
When the program in Listing 6-9 is run, the UI in Figure 6-15 is displayed. It is a JFrame holding three Swing components, a JComponent with overridden paint()and getPreferredSize()methods that makes it look like the rectangle we saw in the earlier program, and two JButtons that will change the fill and the stroke of the rectangle.
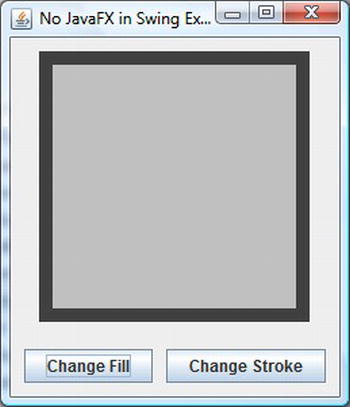
Figure 6-15. The NoJavaFXSceneInSwingExample program
Inasmuch as the custom-painted JComponent in NoJavaFXSceneInSwingExample is hard to maintain over the long run, we replace it with the JavaFX Rectangle. This is done by replacing the Swing code with the equivalent JFXPanel code. Here is the Swing code:
            canvas = new JComponent() {

                @Override

                public void paint(Graphics g) {

                    g.setColor(model.strokeColor);

                    g.fillRect(0, 0, 200, 200);

                    g.setColor(model.fillColor);

                    g.fillRect(10, 10, 180, 180);

                }


                @Override

                public Dimension getPreferredSize() {

                    return new Dimension(200, 200);

                }

            };
And here is the JFXPanel code:
            canvas = new JFXPanel();

            canvas.setPreferredSize(new Dimension(210, 210));

            Platform.runLater(new Runnable() {

                @Override

                public void run() {

                    final Rectangle rectangle = RectangleBuilder.create()

                        .width(200)

                        .height(200)

                        .strokeWidth(10)

                        .build();

                    rectangle.fillProperty().bind(model.fillProperty());

                    rectangle.strokeProperty().bind(model.strokeProperty());

                    canvas.setScene(SceneBuilder.create()

                        .root(VBoxBuilder.create()

                            .children(rectangle)

                            .build())

                        .build());

                }

            });
The JFXPanel constructor bootstraps the JavaFX runtime system. We set the preferred size to the JFXPanel in order for it to be laid out correctly in Swing containers. We then constructed the scene graph on the JavaFX application thread and bound it to the model, which we changed into a JavaFX bean. Another set of changes that need to be made are in the ActionListeners of the two JButtons. Modifying the model triggers a change to the JavaFX rectangle, therefore the following code needs to be run on the JavaFX application thread:
            this.view.changeFillButton.addActionListener(new ActionListener() {

                @Override

                public void actionPerformed(ActionEvent e) {

                    Platform.runLater(new Runnable() {

                        @Override

                        public void run() {

                            final javafx.scene.paint.Paint fillPaint = model.getFill();

                            if (fillPaint.equals(Color.LIGHTGRAY)) {

                                model.setFill(Color.GRAY);

                            } else {

                                model.setFill(Color.LIGHTGRAY);

                            }

                        }

                    });

                }

            });
The completed Swing JavaFX hybrid program is shown in Listing 6-10.
Listing 6-10. JavaFXSceneInSwingExample.java
import javafx.application.Platform;

import javafx.beans.property.ObjectProperty;

import javafx.beans.property.SimpleObjectProperty;

import javafx.embed.swing.JFXPanel;

import javafx.scene.SceneBuilder;

import javafx.scene.layout.VBoxBuilder;

import javafx.scene.paint.Color;

import javafx.scene.paint.Paint;

import javafx.scene.shape.Rectangle;

import javafx.scene.shape.RectangleBuilder;


import javax.swing.*;

import java.awt.*;

import java.awt.event.ActionEvent;

import java.awt.event.ActionListener;


public class JavaFXSceneInSwingExample {

    public static void main(final String[] args) {

        EventQueue.invokeLater(new Runnable() {

            @Override

            public void run() {

                swingMain(args);

            }

        });

    }


    private static void swingMain(String[] args) {

        Model model = new Model();

        View view = new View(model);

        Controller controller = new Controller(model, view);

        controller.mainLoop();

    }


    private static class Model {

        private ObjectProperty<Color> fill = new SimpleObjectProperty<>(Color.LIGHTGRAY);

        private ObjectProperty<Color> stroke = new SimpleObjectProperty<>(Color.DARKGRAY);


        public final Color getFill() {

            return fill.get();

        }


        public final void setFill(Color value) {

            this.fill.set(value);

        }


        public final Color getStroke() {

            return stroke.get();

        }


        public final void setStroke(Color value) {

            this.stroke.set(value);

        }


        public final ObjectProperty<Color> fillProperty() {

            return fill;

        }


        public final ObjectProperty<Color> strokeProperty() {

            return stroke;

        }


    }


    private static class View {

        public JFrame frame;

        public JFXPanel canvas;

        public JButton changeFillButton;

        public JButton changeStrokeButton;


        private View(final Model model) {

            frame = new JFrame("JavaFX in Swing Example");

            canvas = new JFXPanel();

            canvas.setPreferredSize(new Dimension(210, 210));

            Platform.runLater(new Runnable() {

                @Override

                public void run() {

                    final Rectangle rectangle = RectangleBuilder.create()

                        .width(200)

                        .height(200)

                        .strokeWidth(10)

                        .build();

                    rectangle.fillProperty().bind(model.fillProperty());

                    rectangle.strokeProperty().bind(model.strokeProperty());

                    canvas.setScene(SceneBuilder.create()

                        .root(VBoxBuilder.create()

                            .children(rectangle)

                            .build())

                        .build());

                }

            });

            FlowLayout canvasPanelLayout = new FlowLayout(FlowLayout.CENTER, 10, 10);

            JPanel canvasPanel = new JPanel(canvasPanelLayout);

            canvasPanel.add(canvas);


            changeFillButton = new JButton("Change Fill");

            changeStrokeButton = new JButton("Change Stroke");

            FlowLayout buttonPanelLayout = new FlowLayout(FlowLayout.CENTER, 10, 10);

            JPanel buttonPanel = new JPanel(buttonPanelLayout);

            buttonPanel.add(changeFillButton);

            buttonPanel.add(changeStrokeButton);


            frame.add(canvasPanel, BorderLayout.CENTER);

            frame.add(buttonPanel, BorderLayout.SOUTH);

            frame.setDefaultCloseOperation(JFrame.EXIT_ON_CLOSE);

            frame.setLocationByPlatform(true);

            frame.pack();

        }

    }


    private static class Controller {

        private View view;


        private Controller(final Model model, final View view) {

            this.view = view;

            this.view.changeFillButton.addActionListener(new ActionListener() {

                @Override

                public void actionPerformed(ActionEvent e) {

                    Platform.runLater(new Runnable() {

                        @Override

                        public void run() {

                            final Paint fillPaint = model.getFill();

                            if (fillPaint.equals(Color.LIGHTGRAY)) {

                                model.setFill(Color.GRAY);

                            } else {

                                model.setFill(Color.LIGHTGRAY);

                            }

                        }

                    });

                }

            });

            this.view.changeStrokeButton.addActionListener(new ActionListener() {

                @Override

                public void actionPerformed(ActionEvent e) {

                    Platform.runLater(new Runnable() {

                        @Override

                        public void run() {

                            final Paint strokePaint = model.getStroke();

                            if (strokePaint.equals(Color.DARKGRAY)) {

                                model.setStroke(Color.BLACK);

                            } else {

                                model.setStroke(Color.DARKGRAY);

                            }


                        }

                    });

                }

            });

        }


        public void mainLoop() {

            view.frame.setVisible(true);

        }

    }

}
When the program in Listing 6-10 is run, the GUI in Figure 9-16 is displayed. You can't tell from the screenshot, but the rectangle in the center of the JFrame is a JavaFX rectangle.
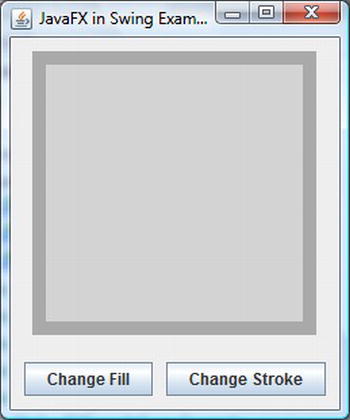
Figure 6-16. The JavaFXSceneInSwingExample program
JavaFX 2.0.2 introduced the capability of embedding JavaFX scene into an SWT application through the javafx.embed.swt package of classes. It contains one public class FXCanvas. The FXCanvas class extends org.eclipse.swt.widgets.Canvas, and can be placed in an SWT program just like any other SWT widget. FXCanvas can also host a JavaFX scene, and can add a JavaFX scene to an SWT program.
Since both SWT and JavaFX uses the native platform's UI thread as their own event dispatching thread, the SWT UI thread (where a Display object is instantiated and where the main loop is started and where all other UI widgets must be created and accessed) and the JavaFX application thread are one and the same. Therefore there is no need to use Platform.runLater() or its SWT equivalent display.asyncExec() in your SWT and JavaFX event handlers.
The SWT program in Listing 6-11 is an SWT port of the Swing program in Listing 6-9.
![]() Note You need to add the jar file that contains the SWT classes to your classpath in order to compile the programs in Listings 6-11 and 6-12. On my development machine the SWT jar is located in %ECLIPSE_HOME%pluginsorg.eclipse.swt.win32.win32.x86_64_3.7.1.v3738a.jar, where %ECLIPSE_HOME% is my Eclipse (Indigo) installation directory.
Note You need to add the jar file that contains the SWT classes to your classpath in order to compile the programs in Listings 6-11 and 6-12. On my development machine the SWT jar is located in %ECLIPSE_HOME%pluginsorg.eclipse.swt.win32.win32.x86_64_3.7.1.v3738a.jar, where %ECLIPSE_HOME% is my Eclipse (Indigo) installation directory.
Listing 6-11. NoJavaFXSceneInSWTExample.java
import org.eclipse.swt.SWT;

import org.eclipse.swt.events.MouseEvent;

import org.eclipse.swt.events.MouseMoveListener;

import org.eclipse.swt.events.MouseTrackAdapter;

import org.eclipse.swt.events.PaintEvent;

import org.eclipse.swt.events.PaintListener;

import org.eclipse.swt.events.SelectionAdapter;

import org.eclipse.swt.events.SelectionEvent;

import org.eclipse.swt.graphics.Color;

import org.eclipse.swt.graphics.GC;

import org.eclipse.swt.graphics.RGB;

import org.eclipse.swt.layout.RowData;

import org.eclipse.swt.layout.RowLayout;

import org.eclipse.swt.widgets.Button;

import org.eclipse.swt.widgets.Canvas;

import org.eclipse.swt.widgets.Composite;

import org.eclipse.swt.widgets.Display;

import org.eclipse.swt.widgets.Label;

import org.eclipse.swt.widgets.Shell;


public class NoJavaFXSceneInSWTExample {

    public static void main(final String[] args) {

        Model model = new Model();

        View view = new View(model);

        Controller controller = new Controller(model, view);

        controller.mainLoop();

    }


    private static class Model {

        public static final RGB LIGHT_GRAY = new RGB(0xd3, 0xd3, 0xd3);

        public static final RGB GRAY = new RGB(0x80, 0x80, 0x80);

        public static final RGB DARK_GRAY = new RGB(0xa9, 0xa9, 0xa9);

        public static final RGB BLACK = new RGB(0x0, 0x0, 0x0);

        public RGB fillColor = LIGHT_GRAY;

        public RGB strokeColor = DARK_GRAY;

    }


    private static class View {

        public Display display;

        public Shell frame;

        public Canvas canvas;

        public Button changeFillButton;

        public Button changeStrokeButton;

        public Label mouseLocation;

        public boolean mouseInCanvas;


        private View(final Model model) {

            this.display = new Display();

            frame = new Shell(display);

            frame.setText("No JavaFX in SWT Example");

            RowLayout frameLayout = new RowLayout(SWT.VERTICAL);

            frameLayout.spacing = 10;

            frameLayout.center = true;

            frame.setLayout(frameLayout);


            Composite canvasPanel = new Composite(frame, SWT.NONE);

            RowLayout canvasPanelLayout = new RowLayout(SWT.VERTICAL);

            canvasPanelLayout.spacing = 10;

            canvasPanel.setLayout(canvasPanelLayout);


            canvas = new Canvas(canvasPanel, SWT.NONE);

            canvas.setLayoutData(new RowData(200, 200));

            canvas.addPaintListener(new PaintListener() {

                @Override

                public void paintControl(PaintEvent paintEvent) {

                    final GC gc = paintEvent.gc;

                    final Color strokeColor = new Color(display, model.strokeColor);

                    gc.setBackground(strokeColor);

                    gc.fillRectangle(0, 0, 200, 200);

                    final Color fillColor = new Color(display, model.fillColor);

                    gc.setBackground(fillColor);

                    gc.fillRectangle(10, 10, 180, 180);

                    strokeColor.dispose();

                    fillColor.dispose();

                }

            });


            Composite buttonPanel = new Composite(frame, SWT.NONE);

            RowLayout buttonPanelLayout = new RowLayout(SWT.HORIZONTAL);

            buttonPanelLayout.spacing = 10;

            buttonPanelLayout.center = true;

            buttonPanel.setLayout(buttonPanelLayout);


            changeFillButton = new Button(buttonPanel, SWT.NONE);

            changeFillButton.setText("Change Fill");

            changeStrokeButton = new Button(buttonPanel, SWT.NONE);

            changeStrokeButton.setText("Change Stroke");

            mouseLocation = new Label(buttonPanel, SWT.NONE);

            mouseLocation.setLayoutData(new RowData(50, 15));


            frame.pack();

        }

    }


    private static class Controller {

        private View view;


        private Controller(final Model model, final View view) {

            this.view = view;

            view.changeFillButton.addSelectionListener(new SelectionAdapter() {

                @Override

                public void widgetSelected(SelectionEvent e) {

                    if (model.fillColor.equals(model.LIGHT_GRAY)) {

                        model.fillColor = model.GRAY;


                    } else {

                        model.fillColor = model.LIGHT_GRAY;

                    }

                    view.canvas.redraw();

                }

            });

            view.changeStrokeButton.addSelectionListener(new SelectionAdapter() {

                @Override

                public void widgetSelected(SelectionEvent e) {

                    if (model.strokeColor.equals(model.DARK_GRAY)) {

                        model.strokeColor = model.BLACK;

                    } else {

                        model.strokeColor = model.DARK_GRAY;

                    }

                    view.canvas.redraw();

                }

            });

            view.canvas.addMouseMoveListener(new MouseMoveListener() {

                @Override

                public void mouseMove(MouseEvent mouseEvent) {

                    if (view.mouseInCanvas) {

                        view.mouseLocation.setText("(" + mouseEvent.x + ", " + mouseEvent.y + ")");

                    }

                }

            });

            this.view.canvas.addMouseTrackListener(new MouseTrackAdapter() {

                @Override

                public void mouseEnter(MouseEvent e) {

                    view.mouseInCanvas = true;

                }


                @Override

                public void mouseExit(MouseEvent e) {

                    view.mouseInCanvas = false;

                    view.mouseLocation.setText("");

                }

            });


        }


        public void mainLoop() {

            view.frame.open();

            while (!view.frame.isDisposed()) {

                if (!view.display.readAndDispatch()) {

                    view.display.sleep();

                }

            }

            view.display.dispose();

        }

    }

}
When the program in Listing 6-11 is run, the UI in Figure 6-17 is displayed. It is a SWT Shell holding four SWT widgets, a Canvas with a PaintListener that makes it look like the rectangle we saw earlier, two Buttons that will change the fill and the stroke of the rectangle, and a Label widget that will show the location of the mouse pointer when the mouse is inside the rectangle.
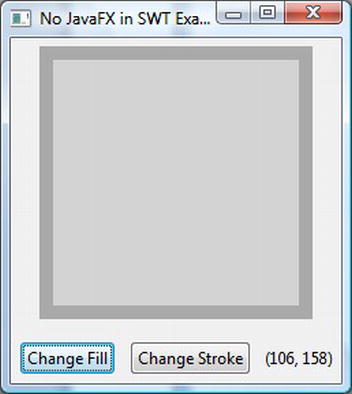
Figure 6-17. The NoJavaFXSceneInSWTExample program
As we did with the Swing example, we replace the custom painted Canvas widget in the program NoJavaFXSceneInSWTExample with a JavaFX Rectangle. This is done by replacing the SWT code with the equivalent FXCanvas code. Here is the SWT code:
            canvas = new Canvas(canvasPanel, SWT.NONE);

            canvas.setLayoutData(new RowData(200, 200));

            canvas.addPaintListener(new PaintListener() {

                @Override

                public void paintControl(PaintEvent paintEvent) {

                    final GC gc = paintEvent.gc;

                    final Color strokeColor = new Color(display, model.strokeColor);

                    gc.setBackground(strokeColor);

                    gc.fillRectangle(0, 0, 200, 200);

                    final Color fillColor = new Color(display, model.fillColor);

                    gc.setBackground(fillColor);

                    gc.fillRectangle(10, 10, 180, 180);

                    strokeColor.dispose();

                    fillColor.dispose();

                }

            });
And here is the FXCanvas code:
            canvas = new FXCanvas(canvasPanel, SWT.NONE);

            canvas.setScene(SceneBuilder.create()

                .width(210)

                .height(210)

                .root(VBoxBuilder.create()

                    .children(rectangle = RectangleBuilder.create()

                        .width(200)

                        .height(200)

                        .strokeWidth(10)

                        .build())

                    .build())

                .build());

            rectangle.fillProperty().bind(model.fillProperty());

            rectangle.strokeProperty().bind(model.strokeProperty());
We also changed the model into a JavaFX bean. The event listeners are changed in a natural way. The complete SWT JavaFX hybrid program is shown in Listing 6-12.
Listing 6-12. JavaFXSceneInSWTExample.java
import javafx.beans.property.ObjectProperty;

import javafx.beans.property.SimpleObjectProperty;

import javafx.embed.swt.FXCanvas;

import javafx.event.EventHandler;

import javafx.scene.SceneBuilder;

import javafx.scene.input.MouseEvent;

import javafx.scene.layout.VBoxBuilder;

import javafx.scene.paint.Color;

import javafx.scene.paint.Paint;

import javafx.scene.shape.Rectangle;

import javafx.scene.shape.RectangleBuilder;

import org.eclipse.swt.SWT;

import org.eclipse.swt.events.SelectionAdapter;

import org.eclipse.swt.events.SelectionEvent;

import org.eclipse.swt.layout.RowData;

import org.eclipse.swt.layout.RowLayout;

import org.eclipse.swt.widgets.Button;

import org.eclipse.swt.widgets.Composite;

import org.eclipse.swt.widgets.Display;

import org.eclipse.swt.widgets.Label;

import org.eclipse.swt.widgets.Shell;


public class JavaFXSceneInSWTExample {

    public static void main(final String[] args) {

        Model model = new Model();

        View view = new View(model);

        Controller controller = new Controller(model, view);

        controller.mainLoop();

    }


    private static class Model {

        private ObjectProperty<Color> fill = new SimpleObjectProperty<>(Color.LIGHTGRAY);

        private ObjectProperty<Color> stroke = new SimpleObjectProperty<>(Color.DARKGRAY);


        public Color getFill() {

            return fill.get();

        }


        public void setFill(Color value) {

            this.fill.set(value);

        }


        public Color getStroke() {

            return stroke.get();

        }


        public void setStroke(Color value) {

            this.stroke.set(value);

        }


        public ObjectProperty<Color> fillProperty() {

            return fill;

        }


        public ObjectProperty<Color> strokeProperty() {

            return stroke;

        }

    }


    private static class View {

        public Display display;

        public Shell frame;

        public FXCanvas canvas;

        public Button changeFillButton;

        public Button changeStrokeButton;

        public Label mouseLocation;

        public boolean mouseInCanvas;

        public Rectangle rectangle;


        private View(final Model model) {

            this.display = new Display();

            frame = new Shell(display);

            frame.setText("JavaFX in SWT Example");

            RowLayout frameLayout = new RowLayout(SWT.VERTICAL);

            frameLayout.spacing = 10;

            frameLayout.center = true;

            frame.setLayout(frameLayout);


            Composite canvasPanel = new Composite(frame, SWT.NONE);

            RowLayout canvasPanelLayout = new RowLayout(SWT.VERTICAL);

            canvasPanelLayout.spacing = 10;

            canvasPanel.setLayout(canvasPanelLayout);

            canvas = new FXCanvas(canvasPanel, SWT.NONE);

            canvas.setScene(SceneBuilder.create()

                .width(210)

                .height(210)

                .root(VBoxBuilder.create()

                    .children(rectangle = RectangleBuilder.create()

                        .width(200)

                        .height(200)

                        .strokeWidth(10)

                        .build())

                    .build())

                .build());

            rectangle.fillProperty().bind(model.fillProperty());

            rectangle.strokeProperty().bind(model.strokeProperty());


            Composite buttonPanel = new Composite(frame, SWT.NONE);

            RowLayout buttonPanelLayout = new RowLayout(SWT.HORIZONTAL);

            buttonPanelLayout.spacing = 10;

            buttonPanelLayout.center = true;

            buttonPanel.setLayout(buttonPanelLayout);


            changeFillButton = new Button(buttonPanel, SWT.NONE);

            changeFillButton.setText("Change Fill");

            changeStrokeButton = new Button(buttonPanel, SWT.NONE);

            changeStrokeButton.setText("Change Stroke");

            mouseLocation = new Label(buttonPanel, SWT.NONE);

            mouseLocation.setLayoutData(new RowData(50, 15));


            frame.pack();

        }

    }


    private static class Controller {

        private View view;


        private Controller(final Model model, final View view) {

            this.view = view;

            view.changeFillButton.addSelectionListener(new SelectionAdapter() {

                @Override

                public void widgetSelected(SelectionEvent e) {

                    final Paint fillPaint = model.getFill();

                    if (fillPaint.equals(Color.LIGHTGRAY)) {

                        model.setFill(Color.GRAY);

                    } else {

                        model.setFill(Color.LIGHTGRAY);

                    }

                }

            });

            view.changeStrokeButton.addSelectionListener(new SelectionAdapter() {

                @Override

                public void widgetSelected(SelectionEvent e) {

                    final Paint strokePaint = model.getStroke();

                    if (strokePaint.equals(Color.DARKGRAY)) {

                        model.setStroke(Color.BLACK);

                    } else {

                        model.setStroke(Color.DARKGRAY);

                    }

                }

            });

            view.rectangle.setOnMouseEntered(new EventHandler<MouseEvent>() {

                @Override

                public void handle(MouseEvent mouseEvent) {

                    view.mouseInCanvas = true;

                }

            });

            view.rectangle.setOnMouseExited(new EventHandler<MouseEvent>() {

                @Override

                public void handle(final MouseEvent mouseEvent) {

                    view.mouseInCanvas = false;

                    view.mouseLocation.setText("");

                }

            });

            view.rectangle.setOnMouseMoved(new EventHandler<MouseEvent>() {

                @Override

                public void handle(final MouseEvent mouseEvent) {

                    if (view.mouseInCanvas) {

                        view.mouseLocation.setText("(" + (int) mouseEvent.getSceneX() + ", " + (int) mouseEvent.getSceneY() + ")");

                    }

                }

            });

        }


        public void mainLoop() {

            view.frame.open();

            while (!view.frame.isDisposed()) {

                if (!view.display.readAndDispatch()) view.display.sleep();

            }

            view.display.dispose();

        }

    }

}
When the program in Listing 6-12 is run, the GUI in Figure 6-18 is displayed. The rectangle in the center of the SWT Shell is a JavaFX rectangle.
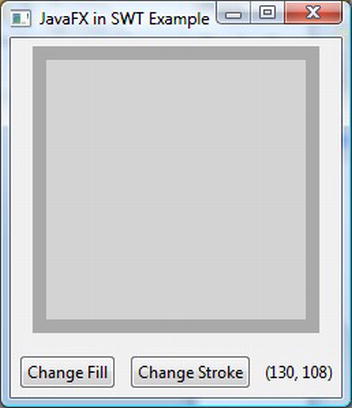
Figure 6-18. The JavaFXSceneInSWTExample program
Summary
In this chapter, we looked at JavaFX observable collections, the JavaFX worker threading framework, and embedding JavaFX scene in Swing and SWT applications to help you understand the following principles and techniques.
- JavaFX 2.0 supports two observable collection classes:
ObservableListandObservableMap. ObservableListfiresChangeevents throughListChangeListener.ListChangeListener.Changemay contain one or more discrete changes.ObservableMapfiresChangeevents throughMapChangeListener.MapChangeListener.Changerepresents the change of only one key.- The
FXCollectionsclass contains factory methods to create observable collections, and utility methods to work on them. - The main event processing thread in JavaFX applications is the JavaFX application thread. All access to live scenes must be done through the JavaFX application thread.
- Other important threads such as the prism rendering thread and the media event thread collaborate with the JavaFX application thread to make graphics rendering and media playback possible.
- Long-running computations on the JavaFX application thread make JavaFX GUIs unresponsive. They should be farmed out to background, or worker, threads.
- The
Workerinterface defines nine properties that can be observed on the JavaFX application thread. It also defines acancel()method. Task<V>defines a one-time task for offloading work to background, or worker, threads and communicates the results or exceptions to the JavaFX application thread.Service<V>defines a reusable mechanism for creating and running background tasks.- The
JFXPanelclass is aJComponentthat can put a JavaFX scene into a Swing application. - In a Swing JavaFX hybrid program, use
Platform.runLater()in Swing event listeners to access the JavaFX scene, and useEventQueue.invokeLater(), orSwingUtilities.invokeLater()in JavaFX event handlers to access Swing widgets. - The
FXCanvasclass is an SWT widget that can put a JavaFX scene into a SWT application. - In an SWT JavaFX hybrid program, the SWT UI thread and the JavaFX application thread is one and the same.
Resources
Here are some useful resources for understanding this chapter's material:
- The JavaFX architecture page on the JavaFX tutorials site:
http://docs.oracle.com/javafx/2.0/architecture/jfxpub-architecture.htm - The original JavaFX worker threading framework write up on FX Experience:
http://fxexperience.com/2011/07/worker-threading-in-javafx-2-0/ - The original JavaFX and SWT interoperability write up on FX Experience:
http://fxexperience.com/2011/12/swt-interop/ - The JavaOne 2011 site has links to all presentation slides, including many about JavaFX:
http://www.oracle.com/javaone/index.html