
C H A P T E R 1
Getting a Jump Start in JavaFX
Don't ask what the world needs. Ask what makes you come alive, and go do it. Because what the world needs is people who have come alive.
—Howard Thurman
At the annual JavaOne conference in May 2007, Sun Microsystems announced a new product family named JavaFX. Its stated purpose includes enabling the development and deployment of content-rich applications on consumer devices such as cell phones, televisions, in-dash car systems, and browsers. Josh Marinacci, a software engineer at Sun, made the following statement very appropriately in a recent Java Posse interview: “JavaFX is sort of a code word for reinventing client Java and fixing the sins of the past.” Josh was referring to the fact that Java Swing and Java 2D have lots of capability, but are also very complex. JavaFX allows us to simply and elegantly express user interfaces (UIs) with a declarative programming style. It also leverages the full power of Java, because you can instantiate and use the millions of Java classes that exist today. Add features such as binding the UI to properties in a model and change listeners that reduce the need for setter methods, and you have a combination that will help restore Java to the client side of the RIA equation.
In this chapter, we give you a jump start in developing JavaFX applications. After bringing you up to date on the brief history of JavaFX, we show you how to get the JavaFX software development kit (SDK). We also explore some great JavaFX resources and walk you through the process of compiling and running JavaFX applications. In the process you'll learn a lot about the JavaFX API as we walk through application code together. First, however, we point out a related technology that is enabling the rise of rich-client Java.
JavaFX Can't Bring Rich-Client Java Back by Itself
When Java was first introduced in 1995, the hope was that the Java Runtime Environment (JRE) would become the common client platform on which the UI portion of client–server applications could be deployed. Although the JRE became ubiquitous on the server side of the equation, factors such as the browser wars of the late 1990s delayed the prospect of achieving a consistent JRE on client machines. The result has been that web browser technologies such as HTML and JavaScript have stepped in to fill the gap, which we feel has proven suboptimal at best. The software development industry and the users we serve need to have the JRE on all client machines so that we can break free from browser technologies and enable graphically rich, fast-performing applications. Fortunately, the technology known as Java SE 6 Update 10 is solving that problem.
![]() Note What has come to be known as Java SE 6 Update 10 has actually had several names. It started life as the Consumer JRE, and then Java SE 6 Update N. Then it became known as Java SE 6 Update 10. As of this writing, Java SE 7 has been released, but we just refer to this technology as Java SE 6 Update 10.
Note What has come to be known as Java SE 6 Update 10 has actually had several names. It started life as the Consumer JRE, and then Java SE 6 Update N. Then it became known as Java SE 6 Update 10. As of this writing, Java SE 7 has been released, but we just refer to this technology as Java SE 6 Update 10.
Java SE 6 Update 10 consists of several technologies that improve the user experience related to installing the JRE, and to deploying and running rich-client Java (and JavaFX) programs:
- Java Kernel Online Installer—The JRE is now divided into small bundles. If the user's machine doesn't have the JRE installed when a Java program is invoked, the online installer will ascertain which of the bundles are needed to run the program. Those bundles will be installed first and the program will begin executing as soon as this takes place.
- Java Auto-Updater: This provides a faster and more reliable process for updating the JRE by using a patch-in-place mechanism.
- Java Quick Starter: After a cold boot of the system, portions of the JRE are prefetched into memory. This enables a Java program to start more quickly.
- Pack200 Format: Pack200 is a highly compressed format that enables Java libraries and resources, for example, to download more quickly than traditional JAR files.
- Java Deployment Toolkit: This includes a simple JavaScript interface with which to deploy Java applets and applications. The JavaScript library is located at a well-known URL, and is engineered to make the right deployment decisions based on the detected JRE environment on the user's machine.
- Next Generation Java Plug-In: This Java plug-in is much more reliable and versatile than its predecessor. For example, you now have the ability to specify large heap sizes, and per-applet command-line arguments. Also, it has built-in Java Network Launching Protocol (JNLP) support as well as improved Java/JavaScript communications.
- Hardware Acceleration Support: In a media-rich environment, it is crucial to take advantage of the graphics capabilities on the underlying hardware. For example, Java SE 6 Update 10 currently has a hardware accelerated graphics pipeline based on the Microsoft Direct3D API. This is a predecessor to the new Prism pipeline that JavaFX uses.
The net result is that we are now at a point in software development history when two technologies (JavaFX and Java SE 6 Update 10) are working together to restore rich client Java. We feel that sanity is in the process of being restored to Internet software development, and we want you to join us in this RIA revolution. But first, a brief history lesson about JavaFX.
A Brief History of JavaFX
JavaFX started life as the brainchild of Chris Oliver when he worked for a company named SeeBeyond. They had the need for richer user interfaces, so Chris created a language that he dubbed F3 (Form Follows Function) for that purpose. In the article, “Mind-Bendingly Cool Innovation” (cited in the Resources section at the end of this chapter) Chris is quoted as follows. “When it comes to integrating people into business processes, you need graphical user interfaces for them to interact with, so there was a use case for graphics in the enterprise application space, and there was an interest at SeeBeyond in having richer user interfaces.”
SeeBeyond was acquired by Sun, who subsequently changed the name of F3 to JavaFX, and announced it at JavaOne 2007. Chris joined Sun during the acquisition and continued to lead the development of JavaFX.
The first version of JavaFX Script was an interpreted language, and was considered a prototype of the compiled JavaFX Script language that was to come later. Interpreted JavaFX Script was very robust, and there were two JavaFX books published in the latter part of 2007 based on that version. One was written in Japanese, and the other was written in English and published by Apress (JavaFX Script: Dynamic Java Scripting for Rich Internet/Client-Side Applications, Apress, 2007).
While developers were experimenting with JavaFX and providing feedback for improvement, the JavaFX Script compiler team at Sun was busy creating a compiled version of the language. This included a new set of runtime API libraries. The JavaFX Script compiler project reached a tipping point in early December 2007, which was commemorated in a blog post entitled “Congratulations to the JavaFX Script Compiler Team—The Elephant Is Through the Door.” That phrase came from the JavaFX Script compiler project leader Tom Ball in a blog post, which contained the following excerpt.
An elephant analogy came to me when I was recently grilled about exactly when the JavaFX Script compiler team will deliver our first milestone release. “I can't give you an accurate date,” I said. “It's like pushing an elephant through a door; until a critical mass makes it past the threshold you just don't know when you'll be finished. Once you pass that threshold, though, the rest happens quickly and in a manner that can be more accurately predicted.”
A screenshot of the silly, compiled JavaFX application written by one of the authors, Jim Weaver, for that post is shown in Figure 1-1, demonstrating that the project had in fact reached the critical mass to which Tom Ball referred.

Figure 1-1. Screenshot for the “Elephant Is Through the Door” program
Much progress continued to be made on JavaFX in 2008:
- The NetBeans JavaFX plug-in became available for the compiled version in March 2008.
- Many of the JavaFX runtime libraries (mostly focusing on the UI aspects of JavaFX) were rewritten by a team that included some very talented developers from the Java Swing team.
- In July 2008, the JavaFX Preview SDK was released, and at JavaOne 2008 Sun announced that the JavaFX 1.0 SDK would be released in fall 2008.
- On December 4, 2008, the JavaFX 1.0 SDK was released. This event increased the adoption rate of JavaFX by developers and IT managers because it represented a stable codebase.
- In April 2009, Oracle and Sun announced that Oracle would be acquiring Sun. The JavaFX 1.2 SDK was released at JavaOne 2009.
- In January 2010, Oracle completed its acquisition of Sun. JavaFX 1.3 SDK was released in April 2010, with JavaFX 1.3.1 being the last of the 1.3 releases.
At JavaOne 2010, JavaFX 2.0 was announced. The JavaFX 2.0 roadmap was published by Oracle on the Web page noted in the Resources section below, and includes items such as the following.
- Deprecate the JavaFX Script language in favor of using Java and the JavaFX 2.0 API. This brings JavaFX into the mainstream by making it available to any language (such as Java, Groovy, and JRuby) that runs on the JVM.
- Make the compelling features of JavaFX Script, including binding to expressions, available in the JavaFX 2.0 API.
- Offer an increasingly rich set of UI components, building on the components already available in JavaFX 1.3.
- Provide a Web component for embedding HTML and JavaScript content into JavaFX applications.
- Enable JavaFX interoperability with Swing.
- Rewrite the media stack from the ground up.
JavaFX 2.0 was released at JavaOne 2011, and has enjoyed a greatly increased adoption rate due to the innovative features articulated previously. Now that you've had the obligatory history lesson in JavaFX, let's get one step closer to writing code by showing you where some examples, tools, and other resources are.
Going to the Source: Oracle's JavaFX Web Site
Oracle's JavaFX.com site is a great resource for seeing example JavaFX programs, downloading the JavaFX SDK and tools, taking tutorials on JavaFX, and linking to other resources. See Figure 1-2 for a screenshot of this web site.

Figure 1-2. Oracle's official JavaFX web site
In addition, blogs maintained by JavaFX engineers and developers are great resources for up-to-the-minute technical information on JavaFX. For example, Oracle JavaFX Engineers Richard Bair, Jasper Potts, and Jonathan Giles keep the developer community apprised of the latest JavaFX innovations at http://fxexperience.com. In addition, the Resources section at the end of this chapter contains the URLs of the blogs that the authors of this book use to engage the JavaFX developer community.
Take a few minutes to explore these sites. Next we point out some more valuable resources that are helpful.
Accessing the JavaFX SDK API
A useful resource available from the JavaFX sites is the SDK API JavaDoc documentation, shown in Figure 1-3.
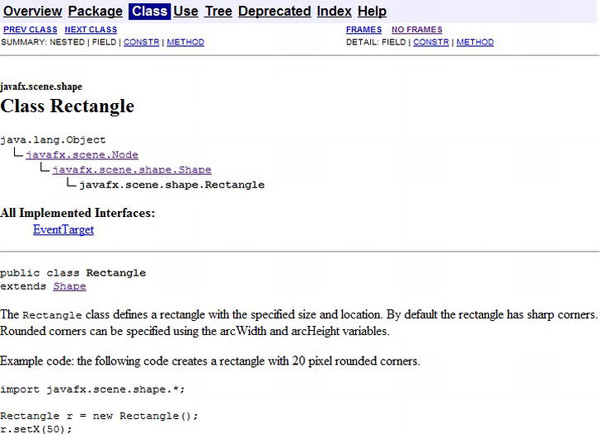
Figure 1-3. JavaFX SDK API Javadoc
The API documentation in Figure 1-3, for example, shows how to use the Rectangle class, located in the javafx.scene.shape package. Scrolling down this web page shows the properties, constructors, methods, and other helpful information about the Rectangle class. By the way, this API documentation is available in the JavaFX SDK that you'll download shortly, but we wanted you to know how to find it online as well.
Now that you've explored Oracle's JavaFX web site and available resources, it's time to obtain the JavaFX SDK and related tools so that you can begin developing JavaFX programs.
Obtaining the JavaFX SDK
You can get the JavaFX SDK from Oracles's JavaFX web site mentioned earlier. Currently you have the choice of downloading the JavaFX SDK, the JavaFX Runtime, and the JavaFX Plugin for NetBeans IDE. To develop JavaFX applications you'll need the JavaFX SDK. In addition, we recommend that you download the JavaFX Plugin for NetBeans IDE as it contains modules that will help you develop and package JavaFX 2.0 applications. The instructions for the examples in this first chapter assume that you have the NetBeans Plugin installed.
Go ahead and download the JavaFX SDK, and the JavaFX Plugin for NetBeans, following the installation instructions. In addition, so that you can compile and run the JavaFX application from the command-line, the JAR file that contains the JavaFX runtime must be on the classpath. The name of this file is jfxrt.jar, and it is located in the rt/lib directory subordinate to the directory in which the JavaFX SDK is installed.
Other Available Tools
There are other tools available for developing JavaFX applications. For example, there is a JavaFX plug-in being developed by Tom Schindl for the Eclipse IDE, but at the time of this writing it isn't as mature as the NetBeans plugin. The URL for the Eclipse plugin is listed in the Resources section.
Now that you have the tools installed, we show you how to create a simple JavaFX program, and then we walk through it in detail. The first program that we've chosen for you is called “Hello Earthrise,” which demonstrates more features than the typical beginning “Hello World” program.
Developing Your First JavaFX Program: “Hello Earthrise”
On Christmas Eve in 1968 the crew of Apollo 8 entered lunar orbit for the first time in history. They were the first humans to witness an “Earthrise,” taking the magnificent picture shown in Figure 1-4. This image is dynamically loaded from this book's web site when the program starts, so you'll need to be connected to the Internet to view it.
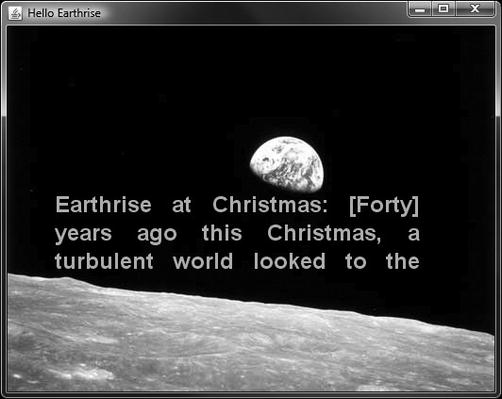
Figure 1-4. The Hello Earthrise program
In addition to demonstrating how to dynamically load images over the Internet, this example shows you how to use animation in JavaFX. Now it's time for you to compile and run the program. We show you two ways to do this: from the command-line, and using NetBeans with the JavaFX plug-in.
Compiling and Running from the Command-Line
We usually use an IDE to build and run JavaFX programs, but to take all of the mystery out of the process we use the command-line tools first.
![]() Note For this exercise, as with most others in the book, you need the source code. If you prefer not to type the source code into a text editor, you can obtain the source code for all of the examples in this book from the code download site. See the Resources section at the end of this chapter for the location of this site.
Note For this exercise, as with most others in the book, you need the source code. If you prefer not to type the source code into a text editor, you can obtain the source code for all of the examples in this book from the code download site. See the Resources section at the end of this chapter for the location of this site.
Assuming that you've downloaded and extracted the source code for this book into a directory, follow the directions in this exercise, performing all of the steps as instructed. We dissect the source code after the exercise.
COMPILING AND RUNNING THE HELLO EARTHRISE PROGRAM FROM THE COMMAND
Congratulations on completing your first exercise as you explore JavaFX!
Understanding the Hello Earthrise Program
Now that you've run the application, let's walk through the program listing together. The code for the Hello Earthrise application is shown in Listing 1-1.
Listing 1-1. The HelloEarthRiseMain.java Program
/*

*  HelloEarthRiseMain.java - A JavaFX "Hello World" style example

 *

 *  Developed 2011 by James L. Weaver jim.weaver [at] javafxpert.com

 *  as a JavaFX SDK 2.0 example for the Pro JavaFX book.

 */

package projavafx.helloearthrise.ui;


import javafx.animation.Interpolator;

import javafx.animation.Timeline;

import javafx.animation.TranslateTransition;

import javafx.application.Application;

import javafx.builders.GroupBuilder;

import javafx.builders.ImageViewBuilder;

import javafx.builders.RectangleBuilder;

import javafx.builders.SceneBuilder;

import javafx.builders.TextBuilder;

import javafx.builders.TranslateTransitionBuilder;

import javafx.geometry.VPos;

import javafx.scene.Scene;

import javafx.scene.image.Image;

import javafx.scene.paint.Color;

import javafx.scene.text.Font;

import javafx.scene.text.FontWeight;

import javafx.scene.text.Text;

import javafx.scene.text.TextAlignment;

import javafx.stage.Stage;

import javafx.util.Duration;


/**

 *  Main class for the "Hello World" style example

 */

public class HelloEarthRiseMain extends Application {


  /**

   * @param args the command-line arguments

   */

  public static void main(String[] args) {

    Application.launch(args);

  }


  @Override

  public void start(Stage stage) {


    String message =

      "Earthrise at Christmas: " +

      "[Forty] years ago this Christmas, a turbulent world " +

      "looked to the heavens for a unique view of our home "  +

      "planet. This photo of Earthrise over the lunar horizon " +

      "was taken by the Apollo 8 crew in December 1968, showing " +

      "Earth for the first time as it appears from deep space. " +

      "Astronauts Frank Borman, Jim Lovell and William Anders " +

      "had become the first humans to leave Earth orbit, " +

      "entering lunar orbit on Christmas Eve. In a historic live " +

      "broadcast that night, the crew took turns reading from " +

      "the Book of Genesis, closing with a holiday wish from " +

      "Commander Borman: "We close with good night, good luck, " +

      "a Merry Christmas, and God bless all of you -- all of " +

      "you on the good Earth."";


    // Reference to the Text

    Text textRef = TextBuilder.create()

      .layoutY(100)

      .textOrigin(VPos.TOP)

      .textAlignment(TextAlignment.JUSTIFY)

      .wrappingWidth(400)

      .text(message)

      .fill(Color.rgb(187, 195, 107))

      .font(Font.font("SansSerif", FontWeight.BOLD, 24))

      .build();


    // Provides the animated scrolling behavior for the text

    TranslateTransition transTransition = TranslateTransitionBuilder.create()

      .duration(new Duration(75000))

      .node(textRef)

      .toY(-820)

      .interpolator(Interpolator.LINEAR)

      .cycleCount(Timeline.INDEFINITE)

      .build();


    Scene scene  = SceneBuilder.create()

      .width(516)

      .height(387)

      .root(

        GroupBuilder.create()

          .children(

            ImageViewBuilder.create()

              .image(new Image("http://projavafx.com/images/earthrise.jpg"))

              .build(),

            GroupBuilder.create()

              .layoutX(50)

              .layoutY(180)

              .children(

                textRef

              )

              .clip(

                RectangleBuilder.create()

                  .width(430)

                  .height(85)

                  .build()

              )

              .build()

          )

          .build()

      )

      .build();


    stage.setScene(scene);

    stage.setTitle("Hello Earthrise");

    stage.show();


    // Start the text animation

    transTransition.play();

  }

}
Now that you've seen the code, let's take a look at its constructs and concepts in detail.
Declarative Code That Defines the User Interface
One of the most exciting features of JavaFX is its ability to express a graphical user interface (GUI) using simple, consistent, and powerful builder classes.
![]() Note As we show a little later, JavaFX supports data binding, which is characterized by binding the value of a property (such as the height of a rectangle) to an expression. Data binding is a major enabler of using declarative code.
Note As we show a little later, JavaFX supports data binding, which is characterized by binding the value of a property (such as the height of a rectangle) to an expression. Data binding is a major enabler of using declarative code.
In this example, some of the program is declarative in that it contains a large expression. This expression begins by defining a Scene object with the SceneBuilder class. Nested within that are properties of the Scene object, such as its width and height. A Scene also has a property named root that holds the graphical elements that are displayed in the Scene, in this case a Group instance that contains an ImageView instance (which displays an image) and a Group instance. Nested within the latter Group is a Text instance (which is a graphical element, usually called a graphical node, or simply node).
The build() method of builder classes creates an instance (also known as an object) of the Java class it is responsible for building.
Using the Stage Class
A Stage contains the user interface of a JavaFX app, whether it is deployed on the desktop, within a browser, or on other devices. On the desktop, for example, a Stage has its own top-level window, which typically includes a border and title bar. In the browser the Stage doesn't have a window, but is rendered as an applet within a rectangular area of the browser.
The Stage class has a set of properties and methods. Some of these properties and methods, as shown in the following code snippet from the listing, are as follows.
- A scene that contains the graphical nodes in the user interface
- A title that appears in the title bar of the window (when deployed on the desktop)
- The visibility of the Stage
    stage.setScene(scene);

    stage.setTitle("Hello Earthrise");

    stage.show();
Using the Scene Class
As mentioned previously, a Scene holds the graphical elements that are displayed on the Stage. Every element in a Scene is a graphical node, which is any class that extends the javafx.scene.Node. Take another look at the declarative code that creates the Scene in our example program:
    Scene scene  = SceneBuilder.create()

      .width(516)

      .height(387)

      .root(

        GroupBuilder.create()

          .children(

            ImageViewBuilder.create()

              .image(new Image("http://projavafx.com/images/earthrise.jpg"))

              .build(),

            GroupBuilder.create()

              .layoutX(50)

              .layoutY(180)

              .children(

                textRef

              )

              .clip(

                RectangleBuilder.create()

                  .width(430)

                  .height(85)

                  .build()

              )

              .build()

          )

          .build()

      )

      .build();
Notice that the root property of the Scene contains an instance of the Group class, created by the build() method of the GroupBuilder class. The root property may contain any subclass of javafx.scene.Node, and typically contains a subclass that is capable of holding its own set of Node instances. Take a look at the JavaFX API documentation that we showed you how to access in the “Accessing the JavaFX SDK API” section earlier and check out the Node class to see the properties and methods available to any graphical node. Also, take a look at the ImageView class in the javafx.scene.image package and the Group class in the javafx.scene package. In both cases, they inherit from the Node class.
![]() Tip We can't emphasize enough the importance of having the JavaFX API documentation handy while reading this book. As classes, variables, and functions are mentioned, it's often a good idea to look at the documentation to get more information. In addition, this habit helps you become more familiar with what is available to you in the API.
Tip We can't emphasize enough the importance of having the JavaFX API documentation handy while reading this book. As classes, variables, and functions are mentioned, it's often a good idea to look at the documentation to get more information. In addition, this habit helps you become more familiar with what is available to you in the API.
Displaying Images
As shown in the following code, displaying an image entails using an ImageView instance in conjunction with an Image instance.
            ImageViewBuilder.create()

              .image(new Image("http://projavafx.com/images/earthrise.jpg"))

              .build(),
The Image instance identifies the image resource and loads it from the URL assigned to its URL variable. Both of these classes are located in the javafx.scene.image package.
Working with Graphical Nodes as a Group
One powerful graphical feature of JavaFX is the ability to create scene graphs, which consist of a tree of graphical nodes. You can then assign values to properties of a Group located in the hierarchy, and the nodes contained in the Group will be affected. In our current example from Listing 1-1, we're using a Group to contain a Text node and to clip a specific rectangular region within the Group so that the text doesn't appear on the moon or the Earth as it animates upward. Here's the relevant code snippet:
            GroupBuilder.create()

              .layoutX(50)

              .layoutY(180)

              .children(

                textRef

              )

              .clip(

                RectangleBuilder.create()

                  .width(430)

                  .height(85)

                  .build()

              )

              .build()
Notice that the Group is located 50 pixels to the right and 180 pixels down, from where it would have been located by default. This is due to the values assigned to the layoutX and layoutY variables of the Group instance. Because this Group is contained directly by the Scene, its upper-left corner's location is 50 pixels to the right and 180 pixels down from the upper-left corner of the Scene. Take a look at Figure 1-5 to see this example illustrated as you read the rest of the explanation.
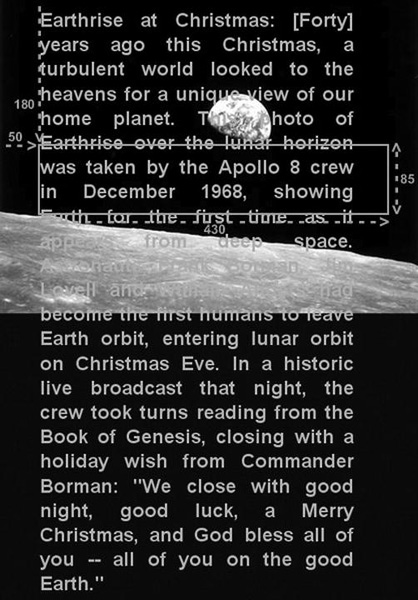
Figure 1-5. The Scene, Group, Text, and clip illustrated
A Group instance contains instances of Node subclasses by assigning a collection of them to itself via the children() method. In the previous code snippet, the Group contains a Text instance that has a value assigned to its layoutY property. Because this Text is contained by a Group, it assumes the two-dimensional space (also called the co-ordinate space) of the Group, with the origin of the Text node (0,0) coincident with the top-left corner of the Group. Assigning a value of 100 to the layoutY property causes the Text to be located 100 pixels down from the top of the Group, which is just below the bottom of the clip region, thus causing it to be out of view until the animation begins. Because a value isn't assigned to the layoutX variable, its value is 0 (the default).
The layoutX and layoutY properties of the Group just described are examples of our earlier statement that nodes contained in a Group will be affected by values assigned to properties of the Group. Another example is setting the opacity property of a Group instance to 0.5, which causes all of the nodes contained in that Group to become translucent. If the JavaFX API documentation is handy, look at the properties available in the javafx.scene.Group class. Then look at the properties available in the javafx.scene.Node class properties, which is where you'll find the layoutX, layoutY, and opacity variables that are inherited by the Group class.
Drawing Text
In the previous snippet, notice that several variables are available in the Text class. This particular example is a little more complicated than the normal use of the Text class. Let's first look at a typical case, shown in the following snippet, in which you simply want to draw a string of text characters somewhere in the scene.
            TextBuilder.create()

              .layoutX(65)

              .layoutY(12)

              .textOrigin(VPos.TOP)

              .fill(Color.WHITE)

              .text("Audio Configuration")

              .font(Font.font("SansSerif", FontWeight.BOLD, 20))

              .build(),
This snippet, borrowed from the Audio Configuration example in Figure 1-7 and Listing 1-3 later in this chapter, draws the graphical Text string “Audio Configuration” in a bold Sans Serif font. The font size is 20, and the color of the text is white.
Referring again to the JavaFX API documentation, notice that the VPos enum (in the javafx.geometry package) has fields that serve as constants, for example, BASELINE, BOTTOM, and TOP. These control the origin of the text with respect to vertical locations on the displayed Text:
- The TOP origin, as we're using it in the previous code snippet, places the top of the text (including ascenders) at the layoutY position, relative to the co-ordinate space in which the Text is located.
- The BOTTOM origin would place the bottom of the text, including descenders (located in a lowercase “g”, for example) at the layoutY position.
- The BASELINE origin would place the baseline of the text (excluding descenders) at the layoutY position. This is the default value for the textOrigin property of a Text instance.
While you're looking at the javafx.scene.text package in the API documentation, take a look at the font function of the Font class, which is used in the previous snippet to define the font family, weight, and size of the Text.
Turning back again to the Hello Earthrise example in Listing 1-1, we're using some additional properties of the Text class that enable it to flow from one line to the next:
- The wrappingWidth property enables you to specify at what number of pixels the text will wrap.
- The textAlignment property enables you to control how the text will be justified. In our example, TextAlignment.JUSTIFY aligns the text on both the left and right sides, expanding the space between words to achieve that.
The text that we're displaying is sufficiently long to wrap and be drawn on the Earth, so we need to define a rectangular region outside of which that text can't be seen.
Clipping Graphical Areas
To define a clipping area, we assign a Node subclass to the clip property that defines the clipping shape, in this case a Rectangle that is 430 pixels wide and 85 pixels high. In addition to keeping the Text from covering the moon, when the Text scrolls up as a result of animation the clipping area keeps the Text from covering the earth.
Animating the Text to Make It Scroll Up
When the HelloEarthriseMain program is invoked, the Text begins scrolling up slowly. To achieve this animation, we're using the TranslateTransition class located in the javafx.animation package, as shown in the following snippet from Listing 1-1.
  TranslateTransition  transTransition = TranslateTransitionBuilder.create()

    .duration(new Duration(75000))

    .node(textRef)

    .toY(-820)

    .interpolator(Interpolator.LINEAR)

    .cycleCount(Timeline.INDEFINITE)

    .build();

    ...code omitted...

    // Start the text animation

    transTransition.play();
The javafx.animation package contains convenience classes for animating nodes. This TranslateTransition instance (created by the TranslateTransitionBuilder class) translates the Text node referenced by the textRef variable from its original Y position of 100 pixels to a Y position of −820 pixels, over a duration of 75 seconds. The Interpolator.LINEAR constant is assigned to the interpolator property, which causes the animation to proceed in a linear fashion. A look at the API docs for the Interpolator class in the javafx.animation package reveals that there are other forms of interpolation available, one of which is EASE_OUT, which slows down the animation toward the end of the specified duration.
![]() Note Interpolation in this context is the process of calculating the value at any point in time, given a beginning value, an ending value, and a duration.
Note Interpolation in this context is the process of calculating the value at any point in time, given a beginning value, an ending value, and a duration.
The last line in the previous snippet begins executing the play method of the TranslateTransition instance created earlier in the program. This makes the Text begin scrolling upward. Because of the value assigned to the cycleCount variable, this transition will repeat indefinitely.
Now that you've compiled and run this example using the command-line tools and we've walked through the code together, it is time to begin using the NetBeans IDE with the JavaFX plug-in to make the development and deployment process faster and easier.
Building and Running the Program with NetBeans
Assuming that you've downloaded and extracted the source code for this book into a directory, follow the directions in this exercise to build and run the Hello Earthrise program in NetBeans with the JavaFX plug-in. If you haven't yet downloaded the JavaFX SDK and the JavaFX plug-in for NetBeans, please do so from Oracle's JavaFX site listed in the Resources section at the end of this chapter.
BUILDING AND RUNNING HELLO EARTHRISE WITH NETBEANS
To build and run the Hello Earthrise program, perform the following steps.
- Start up NetBeans containing the JavaFX 2.0 plug-in.
- Choose File
 New Project from the menu bar. The first window of the New Project Wizard will appear:
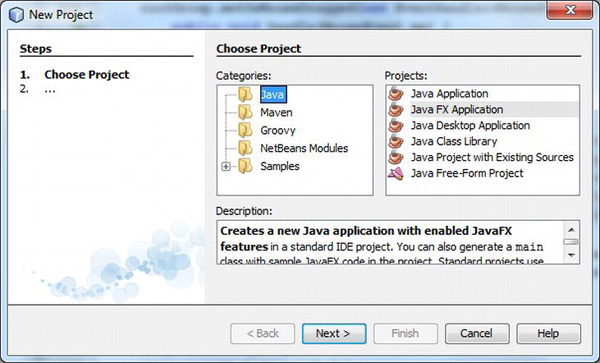
- Choose Java in the Categories pane and JavaFX Application in the Projects pane, and click the Next button. The next page in the New Project Wizard should appear:

- On this screen, type the project name (we used HelloEarthRise) and click the Browse button.
- On the Select Project Location screen, navigate to the directory in which you'd like to create this project (we used C:MyJavaFX), and click the Open button.
- Select the Create Main Class check box, and change the supplied package/class name to: projavafx.helloearthrise.ui.HelloEarthRiseMain
- Select the Set as Main Project check box.
- Click the Finish button. The HelloEarthrise project with a default main class created by the JavaFX Plugin for NetBeans should now be created. If you'd like to run this default program, right-click on the HelloEarthRise project in the Projects pane and select Run Project from the context menu.
- Enter the code from Listing 1-1 above into the HelloEarthRiseMain.java code window. You can type it in, or cut and paste it from the HelloEarthRiseMain.java file located in the Chapter01/HelloEarthRise/src/projavafx/helloearthrise/ui directory of this book's source code download.
- Right-click on the HelloEarthrise project in the Projects pane and select Run Project from the context menu.
The HelloEarthRise program should begin executing, as you saw in Figure 1-4 earlier in the chapter.
At this point, you've built and run the “Hello Earthrise” program application, both from the command-line and using NetBeans. Before leaving this example, we show you another way to achieve the scrolling Text node. There is a class in the javafx.scene.control package named ScrollPane whose purpose is to provide a scrollable view of a node that is typically larger than the view. In addition, the user can drag the node being viewed within the scrollable area. Figure 1-6 shows the Hello Earthrise program after being modified to use the ScrollPane control.

Figure 1-6. Using the ScrollPane control to provide a scrollable view of the Text node
Notice that the move cursor is visible, signifying that the user can drag the node around the clipped area. Note that the screenshot in Figure 1-6 is of the program running on Windows, and the move cursor has a different appearance on other platforms. Listing 1-2 contains the code for this example, named HelloScrollPaneMain.java.
Listing 1-2. The HelloScrollPaneMain.java Program
...code omitted...

    Text  textRef = TextBuilder.create()

      .layoutY(100)

      .textOrigin(VPos.TOP)

      .textAlignment(TextAlignment.JUSTIFY)

      .wrappingWidth(400)

      .text(message)

      .fill(Color.rgb(187, 195, 107))

      .font(Font.font("SansSerif", FontWeight.BOLD, 24))

      .build();


    TranslateTransition  transTransition = TranslateTransitionBuilder.create()

      .duration(new Duration(75000))

      .node(textRef)

      .toY(-820)

      .interpolator(Interpolator.LINEAR)

      .cycleCount(Timeline.INDEFINITE)

      .build();


    Scene scene  = SceneBuilder.create()

      .width(516)

      .height(387)

      .root(

        GroupBuilder.create()

          .children(

            ImageViewBuilder.create()

              .image(new Image("http://projavafx.com/images/earthrise.jpg"))

              .build(),

            ScrollPaneBuilder.create()

              .layoutX(50)

              .layoutY(180)

              .prefWidth(440)

              .prefHeight(85)

              .hbarPolicy(ScrollBarPolicy.NEVER)

              .vbarPolicy(ScrollBarPolicy.NEVER)

              .pannable(true)

              .content(textRef)

              .style("-fx-background-color: transparent;")

              .build()

          )

          .build()

      )

      .build();

...code omitted...
Now that you've learned some of the basics of JavaFX application development, let's examine another JavaFX example application to help you learn more JavaFX Script concepts and constructs.
Developing Your Second JavaFX Program: “More Cowbell!”
If you're familiar with the Saturday Night Live television show, you may have seen the More Cowbell sketch, in which Christopher Walken's character keeps asking for “more cowbell” during a Blue Oyster Cult recording session. The following JavaFX example program covers some of the simple but powerful concepts of JavaFX in the context of an imaginary application that lets you select a music genre and control the volume. Of course, “Cowbell Metal,” shortened to “Cowbell,” is one of the available genres. Figure 1-7 shows a screenshot of this application, which has a sort of retro iPhone application look.
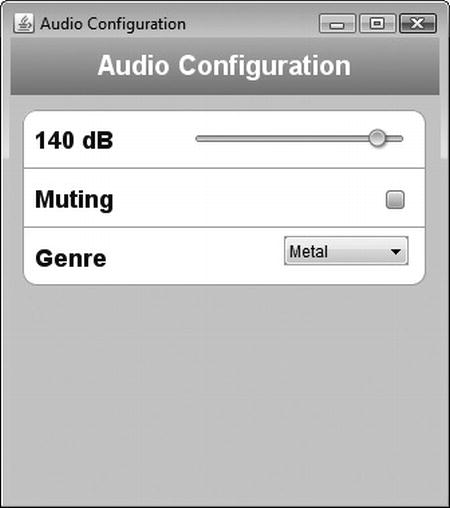
Figure 1-7. The Audio Configuration “More Cowbell” program
Building and Running the Audio Configuration Program
Earlier in the chapter, we showed you how to create a new JavaFX project in NetBeans, and how to add a folder that contains source code files to the project.
For this example (and the rest of the examples in the book), we take advantage of the fact that the code download bundle for the book contains both NetBeans and Eclipse project files for each example. Follow the instructions in this exercise to build and run the Audio Configuration application.
BUILDING AND RUNNING THE AUDIO CONFIGURATION PROGRAM USING NETBEANS
To build and execute this program using NetBeans, perform the following steps.
- From the File menu, select the Open Project menu item. In the Open Project dialog box, navigate to the Chapter01 directory where you extracted the book's code download bundle, as shown here:
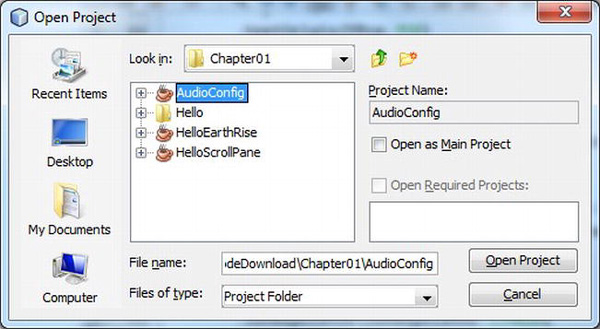
- Select the AudioConfig project in the pane on the left, and click the Open Project button.
- Run the project as discussed previously.
The application should appear as shown in Figure 1-7.
The Behavior of the Audio Configuration Program
When you run the application, notice that adjusting the volume slider changes the associated decibel (dB) level displayed. Also, selecting the Muting check box disables the slider, and selecting various genres changes the volume slider. This behavior is enabled by concepts that are shown in the code that follows, such as
- Binding to a class that contains a model
- Using change listeners
- Creating observable lists
Understanding the Audio Configuration Program
The Audio Configuration program contains two source code files, shown in Listing 1-3 and Listing 1-4 (which appear in the section “The Model Class for the Audio Configuration Example” in just a moment):
- The AudioConfigMain.java file in Listing 1-3 contains the main class, and expresses the UI in a manner that you are familiar with from the Hello Earthrise example in Listing 1-1.
- The AudioConfigModel.java file in Listing 1-4 contains a model for this program, which holds the state of the application, to which the UI is bound.
Take a look at the AudioConfigMain.java source code in Listing 1-3, after which we examine it together, focusing on concepts not covered in the previous example.
Listing 1-3. The AudioConfigMain.java Program
package projavafx.audioconfig.ui;


import javafx.application.Application;

import javafx.builders.CheckBoxBuilder;

import javafx.builders.ChoiceBoxBuilder;

import javafx.builders.GroupBuilder;

import javafx.builders.LineBuilder;

import javafx.builders.LinearGradientBuilder;

import javafx.builders.RectangleBuilder;

import javafx.builders.SceneBuilder;

import javafx.builders.SliderBuilder;

import javafx.builders.TextBuilder;

import javafx.geometry.VPos;

import javafx.scene.Scene;

import javafx.scene.control.CheckBox;

import javafx.scene.control.ChoiceBox;

import javafx.scene.control.Slider;

import javafx.scene.paint.Color;

import javafx.scene.paint.Stop;

import javafx.scene.text.Font;

import javafx.scene.text.FontWeight;

import javafx.scene.text.Text;

import javafx.stage.Stage;

import projavafx.audioconfig.model.AudioConfigModel;


public class AudioConfigMain extends Application {


  // A reference to the model

  AudioConfigModel acModel = new AudioConfigModel();


  Text textDb;

  Slider slider;

  CheckBox mutingCheckBox;

  ChoiceBox genreChoiceBox;


  public static void main(String[] args) {

    Application.launch(args);

  }


  @Override

  public void start(Stage stage) {

    Scene scene = SceneBuilder.create()

      .width(320)

      .height(343)

      .root(

        GroupBuilder.create()

          .children(

            RectangleBuilder.create()

              .width(320)

              .height(45)

              .fill(

                LinearGradientBuilder.create()

                  .endX(0.0)

                  .endY(1.0)

                  .stops(

                    new Stop(0, Color.web("0xAEBBCC")),

                    new Stop(1, Color.web("0x6D84A3"))

                  )

                  .build()

              )

              .build(),

            TextBuilder.create()

              .layoutX(65)

              .layoutY(12)

              .textOrigin(VPos.TOP)

              .fill(Color.WHITE)

              .text("Audio Configuration")

              .font(Font.font("SansSerif", FontWeight.BOLD, 20))

              .build(),

            RectangleBuilder.create()

              .x(0)

              .y(43)

              .width(320)

              .height(300)

              .fill(Color.rgb(199, 206, 213))

              .build(),

            RectangleBuilder.create()

              .x(9)

              .y(54)

              .width(300)

              .height(130)

              .arcWidth(20)

              .arcHeight(20)

              .fill(Color.WHITE)

              .stroke(Color.color(0.66, 0.67, 0.69))

              .build(),

            textDb = TextBuilder.create()

              .layoutX(18)

              .layoutY(69)

              .textOrigin(VPos.TOP)

              .fill(Color.web("#131021"))

              .font(Font.font("SansSerif", FontWeight.BOLD, 18))

              .build(),

            slider = SliderBuilder.create()

              .layoutX(135)

              .layoutY(69)

              .prefWidth(162)

              .min(acModel.minDecibels)

              .max(acModel.maxDecibels)

              .build(),

            LineBuilder.create()

              .startX(9)

              .startY(97)

              .endX(309)

              .endY(97)

              .stroke(Color.color(0.66, 0.67, 0.69))

              .build(),

            TextBuilder.create()

              .layoutX(18)

              .layoutY(113)

              .textOrigin(VPos.TOP)

              .fill(Color.web("#131021"))

              .text("Muting")

              .font(Font.font("SanSerif", FontWeight.BOLD, 18))

              .build(),

            mutingCheckBox = CheckBoxBuilder.create()

              .layoutX(280)

              .layoutY(113)

              .build(),

            LineBuilder.create()

              .startX(9)

              .startY(141)

              .endX(309)

              .endY(141)

              .stroke(Color.color(0.66, 0.67, 0.69))

              .build(),

            TextBuilder.create()

              .layoutX(18)

              .layoutY(154)

              .textOrigin(VPos.TOP)

              .fill(Color.web("#131021"))

              .text("Genre")

              .font(Font.font("SanSerif", FontWeight.BOLD, 18))

              .build(),

            genreChoiceBox = ChoiceBoxBuilder.create()

              .layoutX(204)

              .layoutY(154)

              .prefWidth(93)

              .items(acModel.genres)

              .build()

          )

          .build()

      )

      .build();


    textDb.textProperty().bind(acModel.selectedDBs.asString().concat(" dB"));

    slider.valueProperty().bindBidirectional(acModel.selectedDBs);

    slider.disableProperty().bind(acModel.muting);

    mutingCheckBox.selectedProperty().bindBidirectional(acModel.muting);

    acModel.genreSelectionModel = genreChoiceBox.getSelectionModel();

    acModel.addListenerToGenreSelectionModel();

    acModel.genreSelectionModel.selectFirst();


    stage.setScene(scene);

    stage.setTitle("Audio Configuration");

    stage.show();

  }

}
Now that you've seen the main class in this application, let's walk through the new concepts.
Creating an Instance of the Model, and the Magic of Binding
One of the powerful aspects of JavaFX is binding, which enables the application's UI to easily stay in sync with the state, or model, of the application. The model for a JavaFX application is typically held in one or more classes, in this case the AudioConfigModel class. Look at the following snippet, taken from Listing 1-3, in which we create an instance of this model class.
AudioConfigModel acModel = new AudioConfigModel();
There are several graphical node instances in the scene of this UI (recall that a scene consists of a sequence of nodes). Skipping past several of them, we come to the graphical nodes shown in the following snippet that have a property bound to the selectedDBs property in the model.
            textDb = TextBuilder.create()

              .layoutX(18)

              .layoutY(69)

              .textOrigin(VPos.TOP)

              .fill(Color.web("#131021"))

              .font(Font.font("SansSerif", FontWeight.BOLD, 18))

              .build(),

            slider = SliderBuilder.create()

              .layoutX(135)

              .layoutY(69)

              .prefWidth(162)

              .min(acModel.minDecibels)

              .max(acModel.maxDecibels)

              .build(),

    ...code omitted...

    textDb.textProperty().bind(acModel.selectedDBs.asString().concat(" dB"));

    slider.valueProperty().bindBidirectional(acModel.selectedDBs);
As shown in this snippet, the text property of the Text object is bound to an expression. The bind function contains an expression (that includes the selectedDBs property), which is evaluated and becomes the value of the text property. Look at Figure 1-7 (or check the running application) to see the content value of the Text node displayed to the left of the slider.
Notice also in the snippet that the value property of the Slider node is bound to the selectedDBs property in the model as well, but that it uses the bindBidirectional() method. This causes the bind to be bidirectional, so in this case when the slider is moved, the selectedDBs property in the model changes. Conversely, when the selectedDBs property changes (as a result of changing the genre), the slider moves.
Go ahead and move the slider to demonstrate the effects of the bind expressions in the snippet. The number of decibels displayed at the left of the slider should change as the slider is adjusted.
There are other bound properties in Listing 1-3 that we point out when we walk through the model class. Before leaving the UI, we point out some color-related concepts in this example.
Colors and Gradients
The following snippet from Listing 1-3 contains an example of defining a color gradient pattern, as well as defining colors.
            RectangleBuilder.create()

              .width(320)

              .height(45)

              .fill(

                LinearGradientBuilder.create()

                  .endX(0.0)

                  .endY(1.0)

                  .stops(

                    new Stop(0, Color.web("0xAEBBCC")),

                    new Stop(1, Color.web("0x6D84A3"))

                  )

                  .build()

              )

              .build(),
If the JavaFX API docs are handy, first take a look at the javafx.scene.shape.Rectangle class and notice that it inherits a property named fill that is of type javafx.scene.paint.Paint. Looking at the JavaFX API docs for the Paint class, you'll see that the Color, LinearGradient, and RadialGradient classes are subclasses of Paint. This means that the fill of any shape can be assigned a color or a gradient.
To create a LinearGradient, as shown in the snippet, you need to define at least two stops, which define the location and color at that location. In this example the offset value of the first stop is 0.0, and the offset value of the second stop is 1.0. These are the values at both extremes of the unit square, the result being that the gradient will span the entire node (in this case a Rectangle). The direction of the LinearGradient is controlled by its startX, startY, endX, and endY values. In this case, the direction is only vertical because the startY value is 0.0 and the endY value is 1.0, whereas the startX and endX values are both 0.0.
Note that in the Hello Earthrise example in Listing 1-1, the constant named Color.WHITE was used to represent the color white. In the previous snippet, the web function of the Color class is used to define a color from a hexadecimal value.
The Model Class for the Audio Configuration Example
Take a look at the source code for the AudioConfigModel class in Listing 1-4.
Listing 1-4. The Source Code for AudioConfigModel.java
package projavafx.audioconfig.model;


import javafx.beans.property.BooleanProperty;

import javafx.beans.property.IntegerProperty;

import javafx.beans.property.SimpleBooleanProperty;

import javafx.beans.property.SimpleIntegerProperty;

import javafx.beans.value.ChangeListener;

import javafx.beans.value.ObservableValue;

import javafx.collections.FXCollections;

import javafx.collections.ObservableList;

import javafx.scene.control.SingleSelectionModel;


/**

 * The model class that the AudioConfigMain class uses

 */

public class AudioConfigModel {

  /**

   * The minimum audio volume in decibels

   */

  public double minDecibels = 0.0;


  /**

   * The maximum audio volume in decibels

   */

  public double maxDecibels = 160.0;


  /**

   * The selected audio volume in decibels

   */

  public IntegerProperty selectedDBs = new SimpleIntegerProperty(0);


  /**

   * Indicates whether audio is muted

   */

  public BooleanProperty muting = new SimpleBooleanProperty(false);


  /**

   * List of some musical genres

   */

  public ObservableList genres = FXCollections.observableArrayList(

    "Chamber",

    "Country",

    "Cowbell",

    "Metal",

    "Polka",

    "Rock"

  );


  /**

   * A reference to the selection model used by the Slider

   */

  public SingleSelectionModel genreSelectionModel;


  /**

   * Adds a change listener to the selection model of the ChoiceBox, and contains

   * code that executes when the selection in the ChoiceBox changes.

   */

  public void addListenerToGenreSelectionModel() {

    genreSelectionModel.selectedIndexProperty().addListener(new ChangeListener() {

      public void changed(ObservableValue ov, Object oldValue, Object newValue) {

        int selectedIndex = genreSelectionModel.selectedIndexProperty().getValue();

        switch(selectedIndex) {

          case 0: selectedDBs.setValue(80);

            break;

          case 1: selectedDBs.setValue(100);

            break;

          case 2: selectedDBs.setValue(150);

            break;

          case 3: selectedDBs.setValue(140);

            break;

          case 4: selectedDBs.setValue(120);

            break;

          case 5: selectedDBs.setValue(130);

        }

      }

    });

  }

}
Defining Change Listeners in the Model class
Change listeners are a construct that helps enable declarative programming. For example, the change listener shown in this snippet executes whenever the selected index property of the selection model associated with the ChoiceBox changes:
    genreSelectionModel.selectedIndexProperty().addListener(new ChangeListener() {

      public void changed(ObservableValue ov, Object oldValue, Object newValue) {

        int selectedIndex = genreSelectionModel.selectedIndexProperty().getValue();

        switch(selectedIndex) {

          case 0: selectedDBs.setValue(80);

            break;

          case 1: selectedDBs.setValue(100);

            break;

          case 2: selectedDBs.setValue(150);

            break;

          case 3: selectedDBs.setValue(140);

            break;

          case 4: selectedDBs.setValue(120);

            break;

          case 5: selectedDBs.setValue(130);

        }

      }

    });
What causes selectedIndexProperty of the genreSelectionModel to change, though? To see the answer to this, we have to revisit some code in Listing 1-3. In the following code snippet, the items method of the ChoiceBoxBuilder is used to populate the ChoiceBox with items that each contain a genre.
            genreChoiceBox = ChoiceBoxBuilder.create()

              .layoutX(204)

              .layoutY(154)

              .prefWidth(93)

              .items(acModel.genres)

              .build()
This snippet from the model code in Listing 1-4 contains the collection to which the ComboBox items are bound:
  /**

   * List of some musical genres

   */

  public ObservableList genres = FXCollections.observableArrayList(

    "Chamber",

    "Country",

    "Cowbell",

    "Metal",

    "Polka",

    "Rock"

  );
When the user chooses a different item in the ChoiceBox, the change listener is invoked. Looking again at the code in the change listener, you'll see that the value of the selectedDBs property changes, which as you may recall, is bidirectionally bound to the slider. This is why the slider moves when you select a genre in the combo box. Go ahead and test this out by running the Audio Config program.
![]() Note Associating the items property of the ChoiceBox with an ObservableList causes the items in the ChoiceBox to be automatically updated when the elements in the underlying collection are modified.
Note Associating the items property of the ChoiceBox with an ObservableList causes the items in the ChoiceBox to be automatically updated when the elements in the underlying collection are modified.
Surveying JavaFX Features
We close this chapter by surveying many of the features of JavaFX, some of which are a review for you. We do this by describing several of the more commonly used packages and classes in the JavaFX SDK API.
The javafx.stage package contains:
- The Stage class, which is the top level of the UI containment hierarchy for any JavaFX application, regardless of where it is deployed (such as the desktop, a browser, or a cell phone).
- The Screen class, which represents the displays on the machine in which a JavaFX program is running. This enables you to get information about the screens, such as size and resolution.
The javafx.scene package contains some classes that you'll use often:
- The Scene class is the second level of the UI containment hierarchy for JavaFX applications. It includes all of the UI elements contained in the application. These elements are called graphical nodes, or simply nodes.
- The Node class is the base class of all of the graphical nodes in JavaFX, UI elements such as text, images, media, shapes, and controls (such as text boxes and buttons) are all subclasses of Node. Take a moment to look at the variables and functions in the Node class to appreciate the capabilities provided to all of its subclasses, including bounds calculation and mouse and keyboard event handling.
- The Group class is a subclass of the Node class whose purpose includes grouping nodes together into a single co-ordinate space and allowing transforms (such as rotate) to be applied to the whole group. Also, attributes of the group that are changed (such as opacity) apply to all of the nodes contained within the group.
Several packages begin with javafx.scene that contain subclasses of Node of various types. For example:
- The javafx.scene.image package contains the Image and ImageView classes, which enable images to be displayed in the Scene. The ImageView class is a subclass of Node.
- The javafx.scene.shape package contains several classes for drawing shapes such as Circle, Rectangle, Line, Polygon, and Arc. The base class of the shapes, named Shape, contains an attribute named fill that enables you to specify a color or gradient with which to fill the shape.
- The javafx.scene.text package contains the Text class for drawing text in the scene. The Font class enables you to specify the font name and size of the text.
- The javafx.scene.media package has classes that enable you to play media. The MediaView class is a subclass of Node that displays the media.
- The javafx.scene.chart package has classes that help you easily create area, bar, bubble, line, pie, and scatter charts. The corresponding UI classes in this package are AreaChart, BarChart, BubbleChart, LineChart, PieChart, and ScatterChart.
Here are some other packages in the JavaFX 1.2 API.
- The javafx.scene.control package contains several UI controls, each one having the ability to be skinned and styled via CSS.
- The javafx.scene.transform package enables you to transform nodes (scale, rotate, translate, shear, and affine).
- The javafx.scene.input package contains classes such as MouseEvent and KeyEvent that provide information about these events from within an event handler function such as the Node class's onMouseClicked event.
- The javafx.scene.layout package contains several layout containers, including HBox, VBox, BorderPane, FlowPane, StackPane, and TilePane.
- The javafx.scene.effect and javafx.scene.effect.light packages contain easy-to-use effects such as Reflection, Glow, Shadow, BoxBlur, and Lighting.
- The javafx.scene.web package contains classes for easily embedding a web browser in your JavaFX applications.
- The javafx.animation package contains time-based interpolations typically used for animation, and convenience classes for common transitions, respectively.
- The javafx.beans, javafx.beans.binding, javafx.beans.property, and javafx.beans.value packages contain classes that implement properties and binding.
- The javafx.fxml package contains classes that implement a very powerful facility known as FXML,a markup language for expressing JavaFX user interfaces in XML.
- The javafx.builder package contains builder classes such as the ones demonstrated in earlier in this chapter.
- The javafx.util package contains utility classes such as the Duration class used in the HelloEarthRise example earlier in this chapter.
Take a look at the JavaFX API docs again in light of the information to get a deeper sense of how you can use its capabilities.
Summary
Congratulations, you learned a lot about JavaFX in this chapter, including:
- JavaFX is rich-client Java, and is needed by the software development industry.
- Java SE 6 Update 10 is a technology by Sun that solves the deployment problems that have prevented the Java Runtime Environment (JRE) from being ubiquitous on client machines. Java SE 6 Update 10 also addresses the ease and speed of deploying Java/JavaFX applications.
- Some of the high points of the history of JavaFX.
- Where to find JavaFX resources, including the JavaFX SDK, the JavaFX plug-in for NetBeans, and the API documentation.
- How to compile and run a JavaFX program from the command-line.
- How to declaratively express a user interface in JavaFX, using builder classes.
- How to build and run a JavaFX program using NetBeans.
- How to use several of the classes in the JavaFX API.
- How to create a class in JavaFX and use it as a model contains the state of a JavaFX application.
- How to use property binding to keep the UI easily in sync with the model.
We also looked at many of the available API packages and classes, and you learned how you can leverage their capabilities. Now that you have a jump start in JavaFX, you can begin examining the details of JavaFX in Chapter 2.
Resources
For some background information on JavaFX, you can consult the following resources.
- This book's code examples: The Source Code/Download section at the Apress web site (
www.apress.com). - Java Posse #163: Newscast for February 8, 2008: This is a podcast of a Java Posse interview with Josh Marinacci and Richard Bair on the subject of JavaFX. The URL is
www.javaposse.com/index.php?post_id=305735. - “Mind-Bendingly Cool Innovation”: This article contains an interview with Chris Oliver, the founder of JavaFX The URL is
http://research.sun.com/minds/2008-1202/. - “Congratulations to the JavaFX Script Compiler Team—The Elephant Is Through the Door”: A blog post by one of this book's authors, Jim Weaver, that congratulated the JavaFX compiler team for reaching a tipping point in the project. The URL is
http://learnjavafx.typepad.com/weblog/2007/12/congratulations.html. - “Development and Deployment of Java Web Apps (Applets and Java Web Start Applications) for JavaSE 6u10”: This set of web pages from Sun discusses the features of Java SE 6 Update 10 and how to use them. The URL is
http://java.sun.eom/javase/6/docs/technotes/guides/jweb/index.html. - Oracles's JavaFX.com site: The home page for JavaFX where you can download the JavaFX SDK and other resource for JavaFX. The URL is
http://www.javafx.com. - FX Experience: A blog maintained by Oracle JavaFX Engineers Richard Bair, Jasper Potts, and Jonathan Giles. The URL is
http://fxexperience.com. - Jim Weaver's JavaFX Blog: A blog, started in October 2007, whose stated purpose is to help the reader become a “JavaFXpert.” The URL is
http://javafxpert.com. - Weiqi Gao's Observation: A blog in which Weiqi Gao shares his experience in software development. The URL is
http://www.weiqigao.com/blog. - Dean Iverson's Pleasing Software Blog: A blog in which Dean Iverson shares his innovations in JavaFX and GroovyFX. The URL is
http://pleasingsoftware.blogspot.com. - Steve on Java: A blog in which Stephen Chin keeps the world updated on his tireless exploits in the areas of JavaFX, Java, and Agile development. The URL is
http://steveonjava.com. - JavaFX Eclipse Plugin: Eclipse tooling for JavaFX 2.0, being developed by Tom Shindl. The URL for the announcement is
http://tomsondev.bestsolution.at/2011/06/24/introducing-efxclipse/. - JavaFX 2.0 Roadmap: The roadmap and associated milestones published by Oracle for JavaFX 2.0.