
![]()
Building Games with Canvas API
One of the web browser’s most exciting new capabilities in recent years has been the adoption of the <canvas> tag in HTML5 and its associated JavaScript API. Alone in an HTML document, it does nothing. However, combine it with the power of JavaScript and you have a blank drawing surface in your page to which you can add shapes, images and text to your heart’s content. The contents of a canvas element are represented by pixel data on a flat drawing surface rather than individual DOM elements in a document, so if you draw over an existing shape with another, there’s no record in the document that the original shape ever existed. By repeatedly clearing and redrawing on the same canvas over a period of time with small variations, we can give the impression of animation and movement within the element. By connecting up this animation to a controller on a touchscreen, mouse or keyboard, we allow the user the ability to manipulate what happens on screen. Combine this with some behavioral logic and we can use the <canvas> element to build games that run in the browser. In this chapter, we’ll look at the basic drawing operations in the Canvas JavaScript API before delving into detail on how to build games using it, including building a working version of the classic arcade game, Frogger.
Basic Drawing Operations in Canvas
All drawing on a canvas surface occurs through JavaScript alone, and all canvases are blank by default. Before drawing, we need to get a reference to the two-dimensional drawing context of the canvas element, which returns a reference to the surface we wish to draw on—future development of the canvas specification is possible by creating additional contexts for different needs, such as three-dimensional graphics which are now possible in canvas through the WebGL specification (http://webgl.org). Getting the drawing context reference is as simple as executing the getContext() method of the canvas DOM element, and from there a number of methods can be executed to draw shapes and add text onto the canvas, as shown in Listing 11-1.
Listing 11-1. Basic drawing operations in Canvas
// Create a new <canvas> element
var canvas = document.createElement("canvas"),

    // Get a reference to the drawing context of the canvas
    context = canvas.getContext("2d");

// Set the dimensions of the canvas
canvas.width = 200;
canvas.height = 200;

// By default, a canvas is drawn empty, however if we needed to empty its contents after
// drawing to it, we could execute this function
function emptyCanvas() {

    // Erase the contents of the canvas from the top-left of the canvas to the position at
    // 200px x 200px from the top-left corner
    context.clearRect(0, 0, 200, 200);
}

// With the drawing context established, we can now execute any of the drawing commands we
// would like on our blank canvas. For example, if we want to draw a circle in the top-left
// corner of our canvas, we could execute the following function
function drawCircle() {

    // First, we tell the drawing context that we're creating a path—essentially a line
    // between one point and another that could take any course between the two points

    context.beginPath();

    // The context's arc() method tells the path to take an arc shape. The method’s first
    // two parameters indicate its starting position of the arc in pixels along the x- and
    // y-axes, respecitvely. The third parameter indicates the size of the arc, in pixels,
    // and the final two parameters indicate the arc's start and end angle, in radians,
    // respsecitvely. To draw a circle, the start angle will always be 0, and the end angle
    // will always be twice the value of PI, which indicates a full 360 degrees in radians.
    context.arc(100, 100, 100, 0, 2 * Math.PI);

    // By default, this line's path would be invisible, however the stroke() method ensures
    // that a visible line is drawn along the path making its outline visible. We could also
    // have used the fill() method to fill the circle with a fixed color.
    context.stroke();
}

// Drawing a straight line works in a similar way to drawing a circle in that we must define
// our line before calling the stroke() method to actually apply the graphical "ink" to the
// canvas
function drawLine() {

    // Move the drawing context location to position 50px (from the left edge of the canvas) x 40px
    // (from the top edge of the canvas)
    context.moveTo(50, 40);

    // Mark out a staright line from the context's current position to position 150px x 160px,
    // without actually drawing a line onto the canvas
    context.lineTo(150, 160);

    // Apply the "ink" to the canvas to fill in the marked-out line
    context.stroke();
}

// Define a function to draw a red square onto the canvas using the drawing context's
// fillRect() method, setting the draw color to use first before performing the action
function drawSquare() {

    // Set the fill style of the next draw operation. #FF000 is the hex value representing red.
    context.fillStyle = "#FF0000";

    // Draw a 100px red square starting at position 20px x 20px
    context.fillRect(20, 20, 100, 100);
}

// We could even add text onto our canvas using the fillText() and strokeText() drawing
// context methods as shown in this function
function writeText() {

    // First set the font style to use for the text to draw onto the canvas
    context.font = "30px Arial";

    // Write some text onto the canvas at position 0px x 0px
    context.fillStyle = "#000";
    context.fillText("Filled Text", 0, 30);

    // Write some outlined text onto the canvas beneath the existing text at position 0px x 40px
    context.strokeText("Outlined Text", 0, 70);
}

// Execute the defined drawing functions, adding their shapes and text to the canvas
emptyCanvas();
drawCircle();
drawLine();
drawSquare();
writeText();

// Add the new <canvas> DOM element to the end of the current HTML page once loaded
window.addEventListener("load", function() {
    document.body.appendChild(canvas);
}, false);
Executing the code in Listing 11-1 within the context of a web page results in the image shown in Figure 11-1 being added to the page within a <canvas> element.
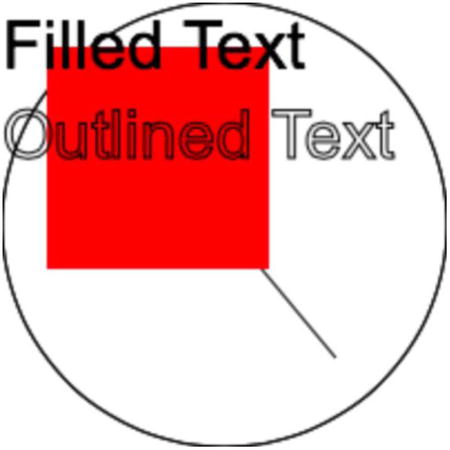
Figure 11-1. Basic drawing operations in Canvas
For a more detailed overview of the drawing methods available in the Canvas API, check out the “Canvas Tutorial” hosted on Mozilla’s Developer Network via http://bit.ly/canvas_tutorial.
High-Definition Canvas Elements
Recent advances in screen technology for mobile and desktop devices have brought the advent of high-definition graphics to such devices, sometimes called retina graphics as the individual pixel boundaries should be indistinguishable to the retina within the naked eye. By default, canvas elements do not appear to create higher-definition graphics for such screen types and standard canvas-based graphics typically look pixelated or blurred on these screens. Fortunately there are techniques to help us work around this to create high-resolution canvas elements.
To ensure that your canvas is only rendering the correct number of pixels for the device screen it is displayed upon, we can take advantage of the devicePixelRatio property on the browser’s window object. The value stored in this property indicates the resolution factor over the standard display resolution the current screen supports, for example, 1 for a standard screen, and 2 for a retina display. We use this value to scale up the width and height of our <canvas> element if appropriate for the screen type, using CSS as before to scale it down to the correct size again for display. The dimensions and sizes of all drawing operations must also be scaled by this factor as appropriate, therefore, to render in the correct size on the device. Paul Lewis has written some thorough documentation on how to achieve this on the HTML5 Rocks blog via http://bit.ly/hidpi_canvas, which is worth reading thoroughly, however if you are confident the graphics you are drawing are not particularly intensive operations to perform, you could simply create your canvas at double the size you intend to display it at, rendering everything assuming this larger size (i.e., without using a scale factor), then simply use CSS to set the width and height of the canvas element back to the desired display size within the HTML page. This results in higher resolution graphics being visible on the canvas by simply rendering more pixels in the smaller space. If your end user does not have a high-definition screen, we are rendering extra pixels which aren’t displayed, which is why this technique should only be used for less-intensive graphics operations so as not to affect browser performance.
One common use of the Canvas API is for building games that run in the browser, once only the domain of proprietary code written for Adobe’s Flash player. Because the API is supported on a wide range of devices, both desktop and mobile, games written using the Canvas API can also be played on the move from within the browser.
Many games consist of similar procedures and structures, including:
- The presence of a game board, or world, which defines the constraints of action within the game
- Drawing and animating the player the user controls, and any enemies or obstacles present on the game board and keeping track of the position of each on the game board
- Controlling the player’s movement over the game board using input mechanisms such as keypresses, clicks, taps, movement, and other relevant input devices
- Keeping an updated score, high score, and keeping track of the number of lives the player has remaining and/or how much time the player has remaining to complete the level
- Detecting when one or more players or obstacles collide with each other on the game board as well as the handling of the player losing a life or completing the level or game
Let’s look in some detail now at how to code each of these structures in a way that can work together to form a working game using the Canvas API.
Most games involve the movement of images on a screen—the player’s character is rarely a simple shape such as a circle or square, it can be easiest to design game graphics as images for use within the game. The involves needing to draw images from files straight onto a canvas, which can be done using the drawImage() method of the canvas’ drawing context, passing it a reference to an <img> element and the position on the canvas to draw the image, as shown in Listing 11-2.
Listing 11-2. Drawing an image onto a canvas
// Create a new <canvas> element to draw the image to
var canvas = document.createElement("canvas"),

    // Get the drawing context of the <canvas> element
    context = canvas.getContext("2d"),

    // Create a new <img> element to reference the image to draw onto the <canvas>
    img = document.createElement("img");

// Assign a function to execute once the assigned image has loaded—the image will not begin to
// load until its "src" attribute has been set
img.addEventListener("load", function() {

    // Draw the image onto the <canvas> element at position 0px x 0px—the top-left corner of
    // the element
    context.drawImage(img, 0, 0);
}, false);

// Assign the "src" attribute of the <img> element to point to the location of the image we wish
// to display within the <canvas> element. The image will then load and the event handler
// assigned previously will be executed
img.src = "filename.png";

 // Append the new <canvas> element to the end of the current HTML page once loaded
window.addEventListener("load", function() {
    document.body.appendChild(canvas);
}, false);
Avoiding Multiple Image Files by Using Sprite Map Images
A common technique for avoiding loading multiple small image files that are used together on a web page is to combine those images together into a sprite map, a larger image containing each individual image within it. This helps improve performance by reducing the number of HTTP requests generated that the browser and server need to fulfill. In a standard webpage, the individual images can then be extracted from the larger image for display by using the CSS background-position property in conjunction with the width and height properties. In the case of displaying images on a canvas, a variation of the parameters used in the drawImage() method allow us to extract a smaller portion of an image from a larger sprite map image file, as shown in Listing 11-3.
Listing 11-3. Drawing an individual image from a sprite map onto a canvas
var canvas = document.createElement("canvas"),
    context = canvas.getContext("2d"),
    img = document.createElement("img");

img.addEventListener("load", function() {
    var individualImagePositionTop = 200,
        individualImagePositionLeft = 150,
        individualImageWidth = 300,
        individualImageHeight = 40,
        displayPositionTop = 100,
        displayPositionLeft = 100,
        displayWidth = 150,
        displayHeight = 40;

    // Draw the individual image located at position 200px x 150px and with dimensions 300px x
    // 40px onto the <canvas> element at position 100px x 100px, rendering at half the size of
    // the original, at 150px x 40px
    context.drawImage(img, individualImagePositionTop, individualImagePositionLeft, individualImageWidth, individualImageHeight, displayPositionTop, displayPositionLeft, displayWidth, displayHeight);
}, false);

img.src = "sprite-map.png";

window.addEventListener("load", function() {
    document.body.appendChild(canvas);
}, false);
Animation is a fundamental aspect of any game and for the Canvas API to be a good platform for building games on, it needs to support the ability to update the position and appearance of pixels drawn within it. Because the contents of a canvas are represented as nothing other than pixels in a fixed space, we’ve no way of locating an individual image, shape, or other part of the canvas and updating that without affecting the rest of the contents of the canvas. To create the illusion of animation, we therefore need to re-render the contents of the canvas frequently enough for the human eye not to detect the changes as anything other than smooth animation. We draw each constituent part of the canvas then clear the canvas and redraw it after a fixed time, with elements moved to new positions if necessary. By redrawing several times per second, we create the illusion of animation.
Listing 11-4 shows a simple animation of a circle moving across a <canvas> element, created by redrawing the canvas once every 50 milliseconds with the circle’s new position updated each time.
Listing 11-4. Simple animation in Canvas
var canvas = document.createElement("canvas"),
    context = canvas.getContext("2d"),

    // Define the position, size and properties of the circle to be drawn onto the canvas
    leftPosition = 0,
    topPosition = 100,
    radius = 100,
    startDegree = 0,
    endDegree = 2 * Math.PI; // = 360 degrees in radians

// Define a function to be executed periodically to update the position of the circle and redraw
// it in its new position
function animate() {

    // Update the position on the screen where the circle should be drawn
    leftPosition++;

    // Empty the contents of the canvas
    context.clearRect(0, 0, canvas.width, canvas.height);

    // Draw the circle onto the canvas at the new position
    context.beginPath();
    context.arc(leftPosition, topPosition, radius, startDegree, endDegree);
    context.stroke();
}

// Execute the animate() function once every 50 milliseconds, redrawing the circle in its
// updated position each time
setInterval(animate, 50);

// Add the <canvas> element to the current page once loaded
window.addEventListener("load", function() {
    document.body.appendChild(canvas);
}, false);
All games react to some form of input from the device they’re being played on—they’d be pretty boring otherwise. Most often, this involves controlling a main character, attempting to use some form of dexterity to ensure that character reaches a certain goal, avoiding enemies and obstacles on the way. On desktop computers, pressing specific keys on the keyboard or by moving or clicking the mouse typically controls the character’s position. On mobile devices, character control is possible by tapping on the touch-sensitive screen, or by rotating or moving the device in a certain way. Because canvas-based games can be played on both types of device, you should ensure that any game you create could be controlled by input types present on any type of device.
Listing 11-5 shows how to capture specific keypresses or taps on a screen in order to control a player in a canvas-based game.
Listing 11-5. Capturing inputs to control a character in a game
var canvas = document.createElement("canvas");

// Define a function call to move the player’s character in the <canvas>
function move(direction) {
    // Insert code here to update the position of the character on the canvas
}

// When the player presses the arrow keys on the keyboard, move the player's
// character in the appropriate direction
window.addEventListener("keydown", function(event) {

    // Define the key codes for the arrow keys
    var LEFT_ARROW = 37,
        UP_ARROW = 38,
        RIGHT_ARROW = 39,
        DOWN_ARROW = 40;

    // Execute the move() function, passing along the correct direction based on the
    // arrow key pressed. Ignore any other key presses.
    if (event.keyCode === LEFT_ARROW) {
        move("left");
    } else if (event.keyCode === RIGHT_ARROW) {
        move("right");
    } else if (event.keyCode === UP_ARROW) {
        move("up");
    } else if (event.keyCode === DOWN_ARROW) {
        move("down");
    }
}, false);

// When the player taps in certain places on the <cavnas> on their touch-sensitive
// screen, move the player's character in the appropriate direction according to where the
// screen has been tapped
canvas.addEventListener("touchstart", function(event) {

    // Get a reference to the position of the touch on the screen in pixels from the
    // top-left position of the <canvas>
    var touchLeft = event.targetTouches[0].clientX,
        touchTop = event.targetTouches[0].clientY;

    // Execute the move() function, passing along the correct direction based on the
    // position tapped on the <canvas> element
    if (touchLeft < (canvas.width / 8)) {
        move("left");
    } else if (touchLeft > (3 * canvas.width / 8)) {
        move("right");
    } else if (touchTop < (canvas.height / 8)) {
        move("up");
    } else if (touchTop > (3 * canvas.height / 8)) {
        move("down");
    }
}, false);

// Add the <canvas> element to the current HTML page once loaded
window.addEventListener("load", function() {
    document.body.appendChild(canvas);
}, false);
So far we’ve seen how to draw, animate, and control the graphical elements of a game on a <canvas> element, the next thing to handle is what happens when the player’s character comes into contact with an obstacle or enemy—in game development parlance, this is known as a collision. In a number of games, the player’s character would sustain some damage or potentially lose a life when it collides with an enemy character. Because the <canvas> element contains only pixel data, we have no way of distinguishing between one character and another simply by using JavaScript to scan the visual content of the element. What we need to do in our game is to maintain the position of our main character and all obstacles and enemies, as we would have to do anyway to calculate their next movement in their animation sequence. We can get the position of each element and compare them using a function to determine whether the bounds surrounding the player’s character intersects with the bounds surrounding an obstacle or enemy character. The code in Listing 11-6 shows an example function that could be used to determine if a collision has occurred between the player and another element within the <canvas>.
Listing 11-6. Simple collision detection
// Define a function to establish if the bounds of the player’s character intersects with those
// of an obstacle or enemy, causing a collision
function intersects(characterLeft, characterWidth, characterTop, characterHeight, obstacleLeft, obstacleWidth, obstacleTop, obstacleHeight) {

    // Define Boolean variables to indicate whether a collision occurs on the y-axis and whether
    // it occurs on the x-axis
    var doesIntersectVertically = false,
        doesIntersectHorizontally = false,

        // Establish the bounds of the character and obstacle based on the supplied parameters
        characterRight = characterLeft + characterWidth,
        characterBottom = characterTop + characterHeight,
        obstacleRight = obstacleLeft + obstacleWidth,
        obstacleBottom = obstacleTop + obstacleHeight;

    // A collision occurs on the y-axis if the top position of the character sits between the
    // top and bottom positions of the obstacle or if the bottom position of the character sits
    // between the same positions of the obstacle
    if ((characterTop > obstacleTop && characterTop < obstacleBottom) ||
        (characterBottom > obstacleTop && characterTop < obstacleBottom)) {
        doesIntersectVertically = true;
    }

    // A collision occurs on the x-axis if the left position of the character sits between the
    // left and right positions of the obstacle or if the right position of the character sits
    // between the same positions of the obstacle
    if ((characterLeft > obstacleLeft && characterLeft < obstacleRight) ||
        (characterRight > obstacleLeft && characterLeft < obstacleRight)) {
        doesIntersectHorizontally = true;
    }

    // A collision occurs if the character intersects the obstacle on both the x- and y-axes.
    return doesIntersectVertically && doesIntersectHorizontally;
}
The game loop is a function that is called repeatedly according to a fixed duration and is, in essence, the core of the game—it updates the position of any characters within the game board, checks for collisions, and renders the characters within the <canvas> element in their updated positions. Although the player’s input may occur at any time to attempt to update the character’s position on screen, it is only when the next call of the game loop function takes place that the character is drawn in its new position based on that input.
One technique for ensuring that the game loop runs on a specific interval to keep animation smooth at a fixed frame rate is to use the browser’s setInterval() function, as shown in Listing 11-7.
Listing 11-7. Running a game loop at a fixed frame rate using the setInterval( ) function
// Define a function to act as the game loop
function gameLoop() {
    // Update character positions, check for collisions and draw characters in new positions
}

// Execute the gameLoop() function once every 50 milliseconds, resulting in a frame rate of 20
// frames per second (=1000/50)
setInterval(gameLoop, 50);
The trouble with using the setInterval() function to run the game loop is that if the browser does not complete executing the game loop function’s code in time before it gets initiated again, a backlog of code gathers and causes the browser to appear to lock up, or cause stuttering in any animation—not good. Fortunately, browser manufacturers have worked on a way around this particular issue so that, instead of you demanding your code to run regardless of its effect on the browser, the browser can tell you when it is available and able to process more commands. This is surfaced through a call to the requestAnimationFrame() method on the window object, to which a function is passed and is executed at the next available opportunity by the browser. By combining the use of this method with a timer to ensure commands are executed according to a fixed frame rate, we give more control to the browser, allowing for smoother animations as shown in Listing 11-8. Due to some cross-browser differences in naming until the spec is settled upon, we need a simple polyfill to ensure cross-browser operation, as shown at the start of Listing 11-8, which shows an example game loop.
Listing 11-8. Running a game loop using requestAnimationFrame
// Create a simple cross-browser polyfill for modern browsers' requestAnimationFrame()
// method to enable smooth, power-efficient animations. Credit to Paul Irish via
// http://bit.ly/req_anim_frame
window.requestAnimationFrame = (function(){
    return window.requestAnimationFrame || window.webkitRequestAnimationFrame ||
window.mozRequestAnimationFrame || function (callback){
        window.setTimeout(callback, 1000 / 60);
    };
})();

// Store a reference to the last time the game loop began in a local variable—initialize it
// to the current time
var lastTimeGameLoopRan = (new Date()).getTime(),

    // Define the refresh rate we desire for our game loop to re-render our canvas within.
    // A 20 millisecond refresh rate gives a frame rate of 50 frames per second (=1000 / 20)
    refreshRate = 20;

// Define a function to act as the game loop
function gameLoop() {

    // Get the current time and infer from there the difference between it and the last time
    // the game loop ran
    var currentTime = (new Date()).getTime(),
        timeDifference = currentTime - lastTimeGameLoopRan;

    // Execute this function again when the next animation frame is ready for use by
    // the browser - keeps the game loop looping but within the confines of the browser's
    // performance and constraints, which is ultimately best for the player
    window.requestAnimationFrame(gameLoop);

    // the time difference between the current execution of the gameLoop() function and
    // its previous execution is greater than or equal to the defined refresh rate, then
    // run the typical game loop operations
    if (timeDifference >=refreshRate) {

        // Update character positions, check for collisions and draw characters in
        // new positions

        // Update the last time the game loop ran so its next execution will occur at the
        // correct time
        lastTimeGameLoopRan = currentTime;
    }
}

// Start the first run of the game loop
gameLoop();
Layering Canvases for Better Performance
Each draw operation to a <canvas> element takes a certain amount of time to execute. Multiply this numerous times if you have a complex game with lots of characters and you start to realize that every drawing operation counts in terms of performance, therefore any opportunity to avoid redrawing static parts of the game should be avoided where possible. For some games with static backgrounds, for example, it makes more sense to create two <canvas> elements, one to draw the background onto, and the other for all the regularly updating character movement and animation. CSS can then be used to position the two elements above each other, with the element containing all the movement positioned above the element containing the background, which need only be drawn once and never updated.
Building a “Frogger” Game in Canvas
Let’s use the Canvas API to put what we’ve learned into practice. We’re going to build a simple game based on the 1981 arcade classic, Frogger (http://bit.ly/frogger_game), showing how best to draw and animate characters, handle input from game controllers, handle collision detection between two or more characters in the game and how to regulate frame rates to keep performance optimal for the player.
The purpose of the game, if you’re not familiar, is to guide a frog across the screen from bottom to top, first by leading the character across a busy road without hitting any traffic, and then over a river using floating logs and the backs of occasionally-surfacing turtles while avoiding dangers lurking in the water, before finally delivering our hero character to one of five goal stations at the top of the screen, at which point a new frog is created at the bottom of the screen again. Once the character has entered each goal station once, the game is won. As the one controlling the game, the user must ensure that the frog does not get hit by a vehicle, get transported off the side of the screen, touch the water, including stand on top of a turtle when it dives underwater, and that the character reaches one of the goal stations within the allotted time. If an accident befalls the character, one of its five lives are lost until none remain and the game is deemed over.
A typical level in Frogger looks like that shown in Figure 11-2.

Figure 11-2. Frogger—the arcade classic
Let’s start by creating the basic HTML page to house our game, as shown in Listing 11-9. We fix the width of the viewport for mobile devices using a specially formatted <meta> tag in the <head>. We also require a custom font, named “Arcade Classic” and available for download for free from http://bit.ly/arcade_font, to display the scores and other text within the canvas, so we also load this in here. We then create two <canvas> elements, one to house the background and one the animating foreground, and define the CSS to layer the two canvases above each other, ensuring that they display at half the size of the actual canvas dimensions so as to support high-definition displays.
Listing 11-9. HTML page to host a Frogger game in Canvas
<!DOCTYPE html>
<html>
<head>
    <title>Frogger In Canvas</title>
    <meta charset="utf-8">
    <meta name="viewport" content="width=480, initial-scale=1.0">
    <style>
    @font-face {
        font-family: "Arcade Classic";
        src: url("arcadeclassic.eot");
        src: url("arcadeclassic.eot?#iefix") format("embedded-opentype"),
             url("arcadeclassic.woff") format("woff"),
             url("arcadeclassic.ttf") format("truetype"),
             url("arcadeclassic.svg#arcadeclassic") format("svg");
        font-weight: normal;
        font-style: normal;
    }

    .canvas {
        position: absolute;
        top: 0;
        left: 0;
        border: 2px solid #000;
        width: 480px;
        height: 640px;
    }
    </style>
</head>
<body>
    <canvas id="background-canvas" class="canvas" width="960" height="1280"></canvas>
    <canvas id="canvas" class="canvas" width="960" height="1280"></canvas>

    <!-- Load in scripts here once defined -->
</body>
</html>
With our HTML in place, we start on the JavaScript. Listing 11-10 shows how we might start off our game code by creating a namespace to house our code and defining some key properties and methods for use throughout the rest of the code, including the observer design pattern methods which we will use to communicate between code modules throughout our game code.
Listing 11-10. Defining a namespace and key properties and methods for use throughout our game
// Define a namespace to contain the code for our game within a single global variable
var Frogger = (function() {

    // Locate the main <canvas> element on the page
    var canvas = document.getElementById("canvas"),

        // Get a reference to the <canvas> element's 2-D drawing surface context
        drawingSurface = canvas.getContext("2d"),

        // Locate the background <canvas> element on the page
        backgroundCanvas = document.getElementById("background-canvas"),

        // Get a reference to the background <canvas> element's 2-D drawing surface context
        backgroundDrawingSurface = backgroundCanvas.getContext("2d"),

        // Get a reference to the <canvas> element's width and height, in pixels
        drawingSurfaceWidth = canvas.width,
        drawingSurfaceHeight = canvas.height;

    return {

        // Expose the <canvas> element, its 2-D drawing surface context, its width and
        // its height for use in other code modules
        canvas: canvas,
        drawingSurface: drawingSurface,
        drawingSurfaceWidth: drawingSurfaceWidth,
        drawingSurfaceHeight: drawingSurfaceHeight,

        // Expose the background <canvas> element's 2-D drawing surface context
        backgroundDrawingSurface: backgroundDrawingSurface,

        // Define an object containing references to directions the characters in our game can
        // move in. We define it here globally for use across our whole code base
        direction: {
            UP: "up",
            DOWN: "down",
            LEFT: "left",
            RIGHT: "right"
        },

        // Define the observer design pattern methods subscribe() and publish() to allow
        // application-wide communication without the need for tightly-coupled modules. See
        // Chapter 7 for more information on this design pattern.
        observer: (function() {
            var events = {};

            return {
                subscribe: function(eventName, callback) {

                    if (!events.hasOwnProperty(eventName)) {
                        events[eventName] = [];
                    }

                    events[eventName].push(callback);
                },

                publish: function(eventName) {
                    var data = Array.prototype.slice.call(arguments, 1),
                        index = 0,
                        length = 0;

                    if (events.hasOwnProperty(eventName)) {
                        length = events[eventName].length;

                        for (; index < length; index++) {
                            events[eventName][index].apply(this, data);
                        }
                    }
                }
            };
        }()),

        // Define a method to determine whether two obstacles on the game board intersect
        // each other on the horizontal axis. By passing in two objects, each with a 'left'
        // and 'right' property indicating the left-most and right-most position of each
        // obstacle in pixels on the game board, we establish whether the two intersect
        // each other - if they do, and they are both on the same row as each other on the
        // game board, this can be considered a collision between these two obstacles
        intersects: function(position1, position2) {
            var doesIntersect = false;

            if ((position1.left > position2.left && position1.left < position2.right) ||
                (position1.right > position2.left && position1.left < position2.right)) {
                doesIntersect = true;
            }

            return doesIntersect;
        }
    };
}());
Each code listing that follows needs to be referenced in order within <script> tags from the HTML page in Listing 11-9 to see the finished result.
Now let’s create our core game logic, including the game state, the game loop, score handling, and establishing the player’s remaining lives and time remaining to complete the level, as shown in Listing 11-11.
Listing 11-11. The core game logic for Frogger
// Create a simple cross-browser polyfill for modern browsers' requestAnimationFrame()
// method to enable smooth, power-efficient animations. Credit to Paul Irish via
// http://bit.ly/req_anim_frame
window.requestAnimationFrame = (function(){
    return window.requestAnimationFrame || window.webkitRequestAnimationFrame || window.mozRequestAnimationFrame || function (callback){
        window.setTimeout(callback, 1000 / 60);
    };
})();

// Define the game logic module which keeps track of the game state, the players's score,
// the number of lives remaining, handles collisions between the player's character and
// other obstacles and ensures the game graphics are drawn onto the <canvas> at the
// right moment. This module contains the brains behind the game play and instructs other
// code modules to do the heavy lifting through the use of the observer design pattern.
(function(Frogger) {

    // Define a variable to hold the current player's score
    var _score = 0,

        // Define and initialize a variable to hold the high score achieved in the game
        _highScore = 1000,

        // Define the number of lives the player has remaining before the game is over
        _lives = 5,

        // Define the number of milliseconds the player has to get their character to
        // the goal (60 seconds). If they take too long, they will lose a life
        _timeTotal = 60000,

        // Define a variable to store the current time remaining for the player to reach
        // the goal
        _timeRemaining = _timeTotal,

        // Define the refresh rate of the graphics on the <canvas> element (one draw every
        // 33 1/3 milliseconds = 30 frames per second). Attempting to redraw too frequently
        // can cause the browser to slow down so choose this value carefully to maintain a
        // good balance between fluid animation and smooth playability
        _refreshRate = 33.333,

        // Define a variable to store the number of times the player's character has
        // reached the goal
        _timesAtGoal = 0,

        // Define a variable to indicate the number of times the player's character needs
        // to reach the goal for the game to be won
        _maxTimesAtGoal = 5,

        // Define a Boolean variable to indicate whether the player's movement is currently
        // frozen in place
        _isPlayerFrozen = false,

        // Define a variable to store the last time the game loop ran - this helps keep
        // the animation running smoothly at the defined refresh rate
        _lastTimeGameLoopRan = (new Date()).getTime();

    // Define a function to be called to count down the time remaining for the player to
    // reach the goal without forfeiting a life
    function countDown() {
        if (_timeRemaining > 0) {

            // This function will be called as frequently as the _refreshRate variable
            // dictates so we reduce the number of milliseconds remaining by the
            // _refreshRate value for accurate timing
            _timeRemaining -= _refreshRate;

            // Publish the fact that the remaining time has changed, passing along the
            // new time remaining as a percentage - which will help when we come to display
            // the remaining time on the game board itself
            Frogger.observer.publish("time-remaining-change", _timeRemaining / _timeTotal);
        } else {

            // If the remaining time reaches zero, we take one of the player's remaining
            // lives
            loseLife();
        }
    }

    // Define a function to be called when all the player's lives have gone and the game
    // is declared over
    function gameOver() {

        // Pause the player's movements as they are no longer in the game
        freezePlayer();

        // Inform other code modules in this application that the game is over
        Frogger.observer.publish("game-over");
    }

    // Define a function to be called when the player has reached the goal
    function gameWon() {

        // Inform other code modules that the game has been won
        Frogger.observer.publish("game-won");
    }

    // Define a function to be called when the player loses a life
    function loseLife() {

        // Decrease the number of lives the player has remaining
        _lives--;

        // Pause the player's movements
        freezePlayer();

        // Inform other code modules that the player has lost a life
        Frogger.observer.publish("player-lost-life");

        if (_lives === 0) {

            // Declare the game to be over if the player has no lives remaining
            gameOver();
        } else {

            // If there are lives remaining, wait 2000 milliseconds (2 seconds) before
            // resetting the player's character and other obstacles to their initial
            // positions on the game board
            setTimeout(reset, 2000);
        }
    }

    // Define a function to be called when the player's character is required to be frozen
    // in place, such as when the game is over or when the player has lost a life
    function freezePlayer() {

        // Set the local variable to indicate the frozen state
        _isPlayerFrozen = true;

        // Inform other code modules - including that which controls the player's
        // character - that the player is now be frozen
        Frogger.observer.publish("player-freeze");
    }

    // Define a function to be called when the player's character is free to move after
    // being previously frozen in place
    function unfreezePlayer() {

        // Set the local variable to indicate the new state
        _isPlayerFrozen = false;

        // Inform other code modules that the player's character is now free to move around
        // the game board
        Frogger.observer.publish("player-unfreeze");
    }

    // Define a function to increase the player's score by a specific amount and update
    // the high score accordingly
    function increaseScore(increaseBy) {

        // Increase the score by the supplied amount (or by 0 if no value is provided)
        _score += increaseBy || 0;

        // Inform other code modules that the player's score has changed, passing along
        // the new score
        Frogger.observer.publish("score-change", _score);

        // If the player's new score beats the current high score then update the high
        // score to reflect the player's new score and inform other code modules of a
        // change to the high score, passing along the new high score value
        if (_score > _highScore) {
            _highScore = _score;
            Frogger.observer.publish("high-score-change", _highScore);
        }
    }

    // Define a function to execute once the player reaches the designated goal
    function playerAtGoal() {

        // When the player reaches the goal, increase their score by 1000 points
        increaseScore(1000);

        // Increment the value indicating the total number of times the player's character
        // has reached the goal
        _timesAtGoal++;

        // Freeze the player's character movement temporarily to acknowledge they have
        // reached the goal
        freezePlayer();

        if (_timesAtGoal < _maxTimesAtGoal) {

            // The player must enter the goal a total of 5 times, as indicated by the
            // _maxTimesAtGoal value. If the player has not reached the goal this many
            // times yet, then reset the player's character position and obstacles on the
            // game board after a delay of 2000 milliseconds (2 seconds)
            setTimeout(reset, 2000);
        } else {

            // If the player has reached the goal 5 times, the game has been won!
            gameWon();
        }
    }

    // Define a function to execute when the player moves their character on the game
    // board, increasing their score by 20 points when they do
    function playerMoved() {
        increaseScore(20);
    }

    // Define a function to be called when the game board needs to be reset, such as when
    // the player loses a life
    function reset() {

        // Reset the variable storing the current time remaining to its initial value
        _timeRemaining = _timeTotal;

        // Release the player's character if it has been frozen in place
        unfreezePlayer();

        // Inform other code modules to reset themselves to their initial conditions
        Frogger.observer.publish("reset");
    }

    // The game loop executes on an interval at a rate dictated by value of the
    // _refreshRate variable (once every 50 milliseconds), in which the game board is
    // redrawn with the character and obstacles drawn at their relevant positions on
    // the board and any collisions between the player's character and any obstacles
    // are detected
    function gameLoop() {

        // Calculate how many milliseconds have passed since the last time the game loop
        // was called
        var currentTime = (new Date()).getTime(),
            timeDifference = currentTime - _lastTimeGameLoopRan;

        // Execute this function again when the next animation frame is ready for use by
        // the browser - keeps the game loop looping
        window.requestAnimationFrame(gameLoop);

        // If the number of milliseconds passed exceeds the defined refresh rate, draw
        // the obstacles in the updated position on the game board and check for collisions
        if (timeDifference >= _refreshRate) {

            // Clear the <canvas> element's drawing surface - erases everything on the
            // game board so we can redraw the player's character and obstacles in their
            // new positions
            Frogger.drawingSurface.clearRect(0, 0, Frogger.drawingSurfaceWidth, Frogger.
            drawingSurfaceHeight);

            if (!_isPlayerFrozen) {

                // As long as the player's character is not frozen in place, ensure the
                // timer is counting down, putting pressure on the player to reach the
                // goal in time
                countDown();

                // Inform other code modules to check the player has not collided with an
                // obstacle on the game board
                Frogger.observer.publish("check-collisions");
            }

            // Now on our empty canvas we draw our game board and the obstacles upon it in
            // their respective positions
            Frogger.observer.publish("render-base-layer");

            // After the game board and obstacles, we draw the player's character so that
            // it is always on top of anything else on the <canvas> drawing surface
            Frogger.observer.publish("render-character");

            // Store the current time for later comparisons to keep the frame rate smooth
            _lastTimeGameLoopRan = currentTime;
        }
    }

    // Define a function to kick-start the application and run the game loop, which renders
    // each frame of the game graphics and checks for collisions between the player's
    // character and any obstacles on the game board
    function start() {

        // Inform other code modules of the initial state of the game's high score
        Frogger.observer.publish("high-score-change", _highScore);

        // Start the game loop running
        gameLoop();
    }

    // Execute the start() function to kick off the game loop once the "game-load" event
    // is fired. We'll trigger this event after we've configured the rest of our code
    // modules for the game
    Frogger.observer.subscribe("game-load", start);

    // Execute the playerAtGoal() function when another code module informs us that the
    // player has reached the goal
    Frogger.observer.subscribe("player-at-goal", playerAtGoal);

    // Execute the playerMoved() function when we have been informed that the player has
    // moved their character
    Frogger.observer.subscribe("player-moved", playerMoved);

    // Execute the loseLife() function when we are informed by another code base that the
    // player's character has collided with an obstacle on the game board
    Frogger.observer.subscribe("collision", loseLife);

// Pass the global Frogger variable into the module so it can be accessed locally,
// improving performance and making its dependency clear
}(Frogger));
Now let’s create some reusable base code for creating images and animations of our main character as well as the obstacles on the game board from a large sprite image, which is shown in Figure 11-3. You should be able to see where the boundaries of each individual image lie within the larger sprite.
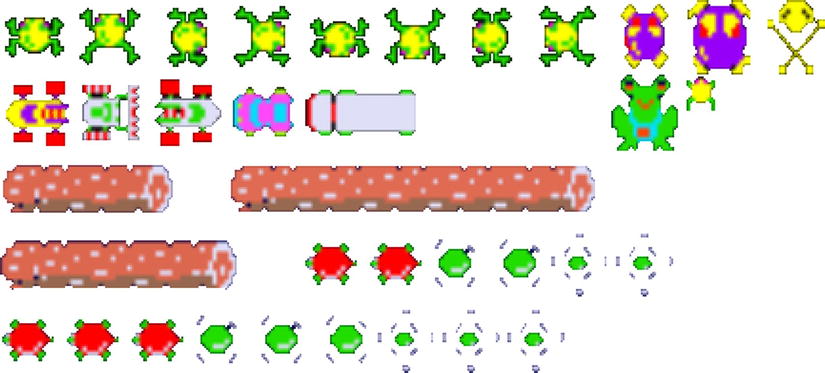
Figure 11-3. The sprite map containing all the images required to support our game in a single file
You may download this sprite image for use with the code listings in this chapter via http://bit.ly/frogger_image. The code to allow us to create individual images and animations from this sprite image is shown in Listing 11-12.
Listing 11-12. Base code for creating images and animations from a sprite image
// Define a "class" for creating images to place on the game board. All the individual
// images are stored together in a single large image file called a Sprite Map. By knowing
// the position within this sprite file of the image to display, together with its width
// and height, we can pull out the individual images for display. By only loading in a
// single image file we improve the loading performance of the game
Frogger.ImageSprite = function(startPositionLeft, startPositionTop) {

    // Each instance stores its starting position on the game board so it can later be
    // reset to its initial position if necessary
    this.startLeft = startPositionLeft || 0;
    this.startTop = startPositionTop || 0;

    // Initialize an object property to later store any animations for this image
    this.animations = {};

    // Set this image to its initial state for display
    this.reset();
};

// Define a "class" for assigning animations to an ImageSprite instance to allow any image
// on the game board to appear to animate. An animation is a sequence of images which will
// be displayed in order over a fixed time period to give the impression of movement
Frogger.Animation = function(options) {
    options = options || {};

    // Store the rate to move between the images in the animation sequence, in milliseconds
    // - defaults to a rate of 150 milliseconds
    this.rate = options.rate || 150;

    // Store a Boolean value to indicate whether this animation is to loop or play once
    this.loop = options.loop || false;

    // Store the supplied position in pixels from the left-hand side of the spite map image
    // where the first image in this animation sequence is located
    this.spriteLeft = options.spriteLeft || 0;

    // Store the animation sequence which indicates a multiple of the image with as an
    // offset from the spriteLeft value. A sequence value of [0, 1, 2] would indicate there
    // are three images in this animation sequence located at the position stored in the
    // spriteLeft property, that position + the width of the sprite image, and that
    // position + double the width of the sprite image, respectively. It is therefore
    // expected that an animation sequence of images are stored horizontally beside each
    // other in order within the sprite map image file
    this.sequence = options.sequence || [];
};

// Define and initialize properties and methods to be inherited by each instance of the
// Frogger.Animation "class"
Frogger.Animation.prototype = {

    // Define a value to indicate the current frame shown from the animation sequence.
    // As the sequence property is an Array, this is effectively an index within that Array
    frame: 0,

    // Define a property to indicate whether the animation is currently playing - that is
    // that the frame index of the animation sequence is being actively incremented at the
    // rate supplied at initiation time
    playing: false,

    // Define a property to store a timer indicator to start and stop the incrementing of
    // the frame index on demand
    timer: null,

    // Define a function to start playing the animation - essentially incrementing the
    // frame index on a timer at the rate supplied upon instantiation
    play: function() {
        var that = this;

        // If the animation is not currently playing, then reset it to its initial state
        if (!this.playing) {
            this.reset();
            this.playing = true;
        }

        // Increment the current frame index of the animation on a timer at a rate given
        // by the supplied value upon instantiation, storing a reference to the timer in
        // the timer property so that it can be stopped at a later time
        this.timer = setInterval(function() {
            that.incrementFrame();
        }, this.rate);
    },

    // Define a function to rewind the current frame index of the animation sequence back
    // to the start
    reset: function() {
        this.frame = 0;
    },

    // Define a function to increment the current frame index of the animation sequence
    incrementFrame: function() {

        // Only increment the current frame if the animation should be playing
        if (this.playing) {

            // Increment the current frame index of the animation sequence
            this.frame++;

            // If we have reached the end of the animation sequence, stop the animation if
            // it was not intended to loop, otherwise reset the current frame index of the
            // animation back to the start
            if (this.frame === this.sequence.length - 1) {
                if (!this.loop) {
                    this.stop();
                } else {
                    this.reset();
                }
            }
        }
    },

    // Define a function to return the value stored in the animation sequence at the
    // current frame index. This value will be used later on to correctly identify which
    // individual image from the large sprite map to display within the <canvas> element
    getSequenceValue: function() {
        return this.sequence[this.frame];
    },

    // Define a function to return the number of pixels from the left-hand edge of the
    // sprite map of the first frame of this animation. This is used in conjunction with
    // the current value of the animation sequence and the image width to decide which
    // image to display within the <canvas> element
    getSpriteLeft: function() {
        return this.spriteLeft;
    },

    // Define a function to stop the timer from incrementing the current frame index, and
    // hence stop the animation from playing
    stop: function() {

        // Terminate the timer
        clearInterval(this.timer);

        // Indicate that the animation is no longer playing
        this.playing = false;
    }
};

// Define and initialize properties and methods to be inherited by each instance of the
// Frogger.ImageSprite "class" to enable individual images from a larger sprite map to be
// drawn onto the <canvas> element
Frogger.ImageSprite.prototype = {

    // Define properties to store the current position in pixels of the image on the
    // game board from the top and left-hand edges
    top: 0,
    left: 0,

    // Define properties to store the initial position in pixels of the images on the game
    // board from the top and left-hand edges so that the image can be returned to its
    // initial position at a later stage if needed
    startLeft: 0,
    startTop: 0,

    // Define a property containing a reference to a new <img> tag holding the single
    // large sprite map image. Because this is an object, it will be shared across all
    // instances of the Frogger.ImageSprite "class", saving on memory usage
    sprite: (function() {
        var img = document.createElement("img");
        img.src = "spritemap.png";
        return img;
    }()),

    // Define properties to define the default width and height, in pixels, of an
    // individual image within the large sprite map image file
    width: 80,
    height: 80,

    // Define properties denoting the location of the top and left positions, in pixels,
    // of the individual image within the large sprite map image. Together with the width
    // and height properties, we are able to pull out an individual image from the sprite
    // map to display within the <canvas> element
    spriteTop: 0,
    spriteLeft: 0,

    // Declare no animations by default
    animations: null,

    // Define a property indicating the name of the currently playing animation, if any
    currentAnimation: "",

    // Define a property to indicate whether the individual image represented by this
    // object instance is currently hidden from display
    isHidden: false,

    // Define a function to reset this image back to its initial position and to reset any
    // associated animation of that image
    reset: function() {

        // Reset the top and left position of the image on the game board back to its
        // initial position defined upon instantiation
        this.left = this.startLeft;
        this.top = this.startTop;

        // Reset any associated animations to their initial state
        this.resetAnimation();

        // Declare this image no longer to be hidden
        this.isHidden = false;
    },

    // Define a function to associate one or more animation with this image - data is
    // passed in as an object literal with each key representing the name of the animation
    registerAnimation: function(animations) {
        var key,
            animation;

        // Loop through the supplied object literal data indicating the animations to
        // register
        for (key in animations) {
            animation = animations[key];

            // Create instances of the Frogger.Animation "class" for each item in the
            // supplied data object. Each item's data is passed to the "class" upon
            // instantiation to define its animation sequence, animation rate, and other
            // initial properties
            this.animations[key] = new Frogger.Animation(animation);
        }
    },

    // Define a function to reset any currently playing animation back to its initial state
    resetAnimation: function() {
        if (this.animations[this.currentAnimation]) {

            // If an animation is currently playing, then call its reset() method to
            // restore it to its initial state
            this.animations[this.currentAnimation].reset();
        }

        // Once reset, there should be no currently playing animation
        this.currentAnimation = "";
    },

    // Define a function to play a specific animation sequence by name. The name must
    // correspond with one provided to the registerAnimation() method previously
    playAnimation: function(name) {

        // Set the current animation to the provided name
        this.currentAnimation = name;

        if (this.animations[this.currentAnimation]) {

            // If an animation is found by the supplied name, then call its play() method
            // to begin incrementing its current frame index using its internal timer
            this.animations[this.currentAnimation].play();
        }
    },

    // Define a function to draw the individual image onto the <canvas> element at the
    // supplied left and top positions, in pixels. If an animation is currently playing,
    // ensure the correct image is displayed based on that animation's current sequence
    // value
    renderAt: function(left, top) {

        // Locate the animation that is currently playing, if any
        var animation = this.animations[this.currentAnimation],

            // If an animation is playing, get its current sequence value based on its
            // internal frame index. If no animation is playing, assume a sequence value
            // of 0. This value will be multiplied by the width of the individual image
            // within the sprite map to identify the exact image to show based on the
            // animation's current frame index
            sequenceValue = animation ? animation.getSequenceValue() : 0,


            // If an animation is playing, get the location of the animation's initial
            // frame as an offset in pixels from the left-hand edge of the sprite map image.
            // We make an assumption that the top offset of the animation images is the
            // same as the main image itself represented in this object instance - meaning
            // that all frames of the animation should be positioned together with the main
            // non-animating image on the same row of the sprite map image
            animationSpriteLeft = animation ? animation.getSpriteLeft() : 0,

            // Calculate the offset in pixels from the left-hand edge of the sprite map
            // image where the individual image to display is to be found, based on whether
            // an animation is currently playing or not. If no animation is playing, the
            // offset will be the same as that stored in the spriteLeft property of this
            // object instance
            spriteLeft = this.spriteLeft + animationSpriteLeft + (this.width * sequenceValue);

        // If the image is not currently to be considered hidden, then extract the individual
        // image from the sprite map and draw it onto the <canvas> drawing surface at the
        // top and left positions, in pixels, as provided to this method, when called
        if (!this.isHidden) {
            Frogger.drawingSurface.drawImage(this.sprite, spriteLeft, this.spriteTop, this.width,
            this.height, left, top, this.width, this.height);
        }
    },


    // Define a function to set the stored left and top offset positions, in pixels,
    // indicating where on the game board the image should be displayed. These values are
    // then used in the renderAt() method to draw the image at this position
    moveTo: function(left, top) {
        this.left = left || 0;

        // Since most images are moved left and right in this game, rather than up and down,
        // we let the top offset value be optional
        if (typeof top !== "undefined") {
            this.top = top || 0;
        }
    },

    // Define a function return the width of the individual image we are extracting from
    // the large sprite map image
    getWidth: function() {
        return this.width;
    },

    // Define a function to return the left and right positions, in pixels, of the image
    // which we can use later to perform collision detection with other obstacles on the
    // game board
    getPosition: function() {
        return {
            left: this.left,

            // The right position is derived as the left position plus the width of the
            // individual image
            right: this.left + this.width
        };
    },

    // Define a function to hide this image from the game board by effectively stopping
    // the drawing of the image to the <canvas> within the renderAt() method
    hide: function() {
        this.isHidden = true;
    }
};
Now let’s create a code module to define the limits and parameters of the game board, including the bounds within which the character is allowed to move, as shown in Listing 11-13. The game board itself is essentially a grid within which obstacles are fixed to a certain vertical grid position and move only horizontally—the player’s character is the one exception to this rule as this is able to jump up and down the game board, moving one grid position at a time.
Listing 11-13. Coding the game board parameters
// Define a code module to define the parameters of the game board itself, the number of
// rows and columns within the grid, along with their relative positions in pixels, and
// the bounds within which the player's character may move
(function(Frogger) {

    // Define the width and height of each square on the game board grid, in pixels. The
    // game board is divided into rows with different obstacles on each, and columns within
    // which the player's character can move
    var _grid = {
            width: 80,
            height: 80
        },

        // Define the number of rows on the game board. The top two rows contain the score,
        // the next two contain the home base the player is attempting to reach. There then
        // follow five rows of water-based obstacles before reaching a 'safe' row where the
        // player's character may take refuge without obstacles. There then follow five rows
        // of road-based obstacles before another 'safe' row, which is where the player's
        // character starts its game from. The final row holds the remaining time and number
        // of lives remaining. There are 17 rows, therefore, though since we start counting
        // rows at position 0, the total number of rows is said to be 16 using the grid
        // square defined previously
        _numRows = 16,

        // Define the number of columns on the game board, from left to right, based on the
        // game board grid defined previously. The total number of columns is 12 but since
        // we count position 0 as a column, we represent the number as 11 instead
        _numColumns = 11,

        // Define the limits of movement of the player's character on the game board in
        // pixels, returning the left-, right-, top- and bottom-most positions the
        // character can be placed. This is to ensure the player is not able to move
        // their character onto the parts of the game board that show the score, the time
        // remaining, etc.
        _characterBounds = {
            left: 0,
            right: _numColumns * _grid.width,
            top: 2 * _grid.height,
            bottom: (_numRows - 2) * _grid.height
        },

        // Define an array containing the pixel positions of each of the 17 rows as
        // measured from the left-most edge of the game board - each is essentially a
        // multiple of the grid width. This allows easy access to pixel positions by
        // row number.
        _rows = (function() {
            var output = [],
                index = 0,
                length = _numRows;

            for (; index < length; index++) {
                output.push(index * _grid.width);
            }

            return output;
        }()),

        // Define an array containing the pixel positions of each of the 12 columns as
        // measured from the top-most edge of the game board - each is essentially a
        // multiple of the grid height. This allows easy access to pixel positions by
        // column number.
        _columns = (function() {
            var output = [],
                index = 0,
                length = _numColumns;

            for (; index < length; index++) {
                output.push(index * _grid.height);
            }

            return output;
        }());

    // Listen for the "game-load" event, which will be fired once all our code modules
    // are configured
    Frogger.observer.subscribe("game-load", function() {

        // Publish the "game-board-initialize" event, passing along relevant information
        // about the game board for other code modules to use to ensure they draw their
        // images to the correct place on the board, and allow the character to only
        // move between certain limits as defined in this code module
        Frogger.observer.publish("game-board-initialize", {

            // Pass across the number of rows and columns the board consists of
            numRows: _numRows,
            numColumns: _numColumns,

            // Pass across arrays representing the pixel positions of each of the rows
            // and columns on the board to simplify the drawing of images onto the <canvas>
            // element in the correct place
            rows: _rows,
            columns: _columns,

            // Pass across the width and height of each grid square on the game board
            grid: {
                width: _grid.width,
                height: _grid.height
            },

            // Pass across the object containing the left, right, top and bottom positions
            // in pixels which the player's character is allowed to move within on the
            // game board
            characterBounds: _characterBounds
        });
    });
}(Frogger));
Listing 11-14 shows how we might add current and high scores as well as other text to the <canvas> element using the custom Arcade Classic font. By storing all of the code together in a module that handles the rendering of text and game status messages, such as “Game Over” and “You Win!” to the game board, we know exactly where to look if a problem occurs with text rendering to the canvas.
Listing 11-14. Adding text to the game board, including score and messages such as “Game Over”
// Define a code module to add text-based visuals to the game board, e.g. the score, high
// score, and any informative text for the player about the game state, such as "Game Over"
// or "You Win!"
(function(Frogger) {

    // Define the text size and font name to use for the text. You can find the Arcade
    // Classic font for download for free online at http://bit.ly/arcade_font
    var _font = "67px Arcade Classic",

        // Define variables to store the current game state locally in this module
        _score = 0,
        _highScore = 0,
        _gameWon = false,
        _gameOver = false,

        // Define a variable to store the initialized data from the game board module
        // defined previously - this will be populated later with data from that module
        _gameBoard = {};

    // Define a function to render the player's score and high score to the <canvas> element
    function renderScore() {

        // Select the font face and size
        Frogger.drawingSurface.font = _font;

        // Right-align text at the position we define to draw the text at
        Frogger.drawingSurface.textAlign = "end";

        // Write the text "1-UP", right-aligned to the 4th column position and ending half
        // a row down from the top of the game board in white (hex color value #FFF)
        Frogger.drawingSurface.fillStyle = "#FFF";
        Frogger.drawingSurface.fillText("1-UP", _gameBoard.columns[3], _gameBoard.grid.height / 2);

        // Write out the current score in red (hex color value #F00) right-aligned beneath
        // the "1-UP" text previously drawn to the <canvas>
        Frogger.drawingSurface.fillStyle = "#F00";
        Frogger.drawingSurface.fillText(_score, _gameBoard.columns[3], _gameBoard.grid.height);

        // Write the text "HI-SCORE", right-aligned to the 8th column position and ending
        // half a row down from the top of the game board in white (hex color value #FFF)
        Frogger.drawingSurface.fillStyle = "#FFF";
        Frogger.drawingSurface.fillText("HI-SCORE", _gameBoard.columns[8],
        _gameBoard.grid.height / 2);

        // Write out the current high score in red (hex color value #F00) right-aligned
        // beneath the "HI-SCORE" text previously drawn to the <canvas>
        Frogger.drawingSurface.fillStyle = "#F00";
        Frogger.drawingSurface.fillText(_highScore, _gameBoard.columns[8], _gameBoard.grid.height);
    }

    // Define a function to render the text "GAME OVER" to the <canvas>. This will only be
    // called when the game is over
    function renderGameOver() {

        // Use the Arcade Classic font as previously defined, and write the text centered
        // around the given drawing position in white
        Frogger.drawingSurface.font = _font;
        Frogger.drawingSurface.textAlign = "center";
        Frogger.drawingSurface.fillStyle = "#FFF";

        // Write the text center aligned within the <canvas> and at the 9th row position
        // from the top of the game board
        Frogger.drawingSurface.fillText("GAME OVER", Frogger.drawingSurfaceWidth / 2,
        _gameBoard.rows[9]);
    }

    // Define a function to render the text "YOU WIN!" to the <canvas> which will be called
    // when the player has won the game by reaching the home base position five times
    function renderGameWon() {

        // Use the Arcade Classic font as previously defined, and write the text centered
        // around the given drawing position in yellow (hex value #FF0)
        Frogger.drawingSurface.font = _font;
        Frogger.drawingSurface.textAlign = "center";
        Frogger.drawingSurface.fillStyle = "#FF0";

        // Write the text center aligned within the <canvas> and at the 9th row position
        // from the top of the game board
        Frogger.drawingSurface.fillText("YOU WIN!", Frogger.drawingSurfaceWidth / 2,
        _gameBoard.rows[9]);
    }

    // Define a function to render the "TIME" label in the bottom-right corner of the
    // game board
    function renderTimeLabel() {

        // Use the Arcade Classic font as previously defined, and write the text centered
        // around the given drawing position in yellow (hex value #FF0)
        Frogger.drawingSurface.font = _font;
        Frogger.drawingSurface.textAlign = "end";
        Frogger.drawingSurface.fillStyle = "#FF0";

        // Write the text right aligned within the <canvas> and in the bottom right corner
        // of the game board
        Frogger.drawingSurface.fillText("TIME", Frogger.drawingSurfaceWidth, Frogger.
       drawingSurfaceHeight);
    }

    // Define a function to render the text-based visuals to the game board as appropriate
    // depending on the current game state - we'll connect this up later to be called
    // once on every cycle of the game loop
    function render() {
        renderScore();
        renderTimeLabel();

        // Only render the "GAME OVER" text if the game is actually over
        if (_gameOver) {
            renderGameOver();
        }

        // Only render the "YOU WIN!" text if the players has won the game
        if (_gameWon) {
            renderGameWon();
        }
    }

    // When the game logic publishes a message declaring that the player has won the game,
    // set the local variable to indicate this also so that the "YOU WIN!" text will be
    // drawn onto the <canvas> during any following execution of the game loop
    Frogger.observer.subscribe("game-won", function() {
        _gameWon = true;
    });

    // When the game logic module publishes a message indicating that the game has been
    // lost, set the local variable to reflect this fact so that the "GAME OVER" text gets
    // written to the <canvas> element on the next cycle around the game loop
    Frogger.observer.subscribe("game-over", function() {
        _gameOver = true;
    });

    // Reset the local variables indicating the game state if the game logic has forced
    // a game state reset to occur
    Frogger.observer.subscribe("reset", function() {
        _gameOver = false;
        _gameWon = false;
    });

    // Update the local score variable when the player's score changes throughout the
    // course of the game. The updated score will then be written onto the <canvas> on
    // the next cycle of the game loop
    Frogger.observer.subscribe("score-change", function(newScore) {
        _score = newScore;
    });

    // Update the local high score variable when the game's high score changes throughout
    // the course of the game. The updated high score will then be drawn to the <canvas>
    // on the next cycle of the game loop
    Frogger.observer.subscribe("high-score-change", function(newHighScore) {
        _highScore = newHighScore;
    });

    // Subscribe to the "game-board-initialize" event fired by the previous code module,
    // storing the game board properties and settings in a local variable
    Frogger.observer.subscribe("game-board-initialize", function(gameBoard) {
        _gameBoard = gameBoard;

        // Start listening to the "render-base-layer" event, fired from within the game
        // loop, and execute the render() function when it occurs, drawing the text onto
        // the game board in the appropriate position for each cycle of the game loop
        Frogger.observer.subscribe("render-base-layer", render);
    });
}(Frogger));
It’s time we added our background image to the background canvas, and this is what we’ll do in Listing 11-15, as well as rendering the number of player lives remaining and the time remaining for the player’s character to reach the goal. Because the background is static, we will only draw it once at the start of the game and won’t need to touch or amend it again after that. The image we’ll use for the game board is shown in Figure 11-4, and can be downloaded for use with the code listings in this chapter via http://bit.ly/frogger_gameboard.
Listing 11-15. Draw the game background, the number of lives remaining, and the time remaining
// Define a code module to draw the game board background image to the background <canvas>
// element. We will draw the image once only since it is static and will not change - all
// graphical elements that could change are drawn to the main <canvas> element instead.
(function(Frogger) {

    // To draw an image file onto the <canvas> we need to create a new <img> element to
    // contain the image first
    var _background = document.createElement("img");

    // Once the image has loaded, draw the image onto the background <canvas> element's
    // drawing surface, starting at the top-left corner and covering the full width and
    // height of the drawing surface
    _background.addEventListener("load", function() {
        Frogger.backgroundDrawingSurface.drawImage(_background, 0, 0, Frogger.drawingSurfaceWidth,
        Frogger.drawingSurfaceHeight);
    }, false);

    // Setting the "src" attribute of the <img> causes the file to load immediately, which
    // is why it was essential to configure our "load" event handler first. We load the
    // file named "gameboard.gif" which contains the background of the game board. This
    // will only be drawn once since we are not within the game loop at this point. By
    // splitting the background out into a separate element, we avoid needing to redraw
    // the background each time the game loop executes since it is static.
    _background.src = "gameboard.gif";
}(Frogger));

// Define a code module to show the number of lives the player has remaining, and how much
// time remains before automatically losing a life, within the <canvas> element
(function(Frogger) {

    // Define an array, to be populated later, which will represent the number of lives the
    // player has remaining
    var _lives = [],

        // Define a variable indicating the time remaining on the countdown before the
        // player automatically loses a life, represented as a percentage, starting at
        // 100% and counting down to 0
        _timeRemainingAsPercentage = 100,

        // Define a variable for storing the game board properties and settings
        _gameBoard;

    // Define a subclass of Frogger.ImageSprite to represent the individual image found
    // at position 720px from the left and 80px from the top of the sprite map image which
    // is 40px wide by 40px tall and depicts a small frog to be used to denote a remaining
    // life
    function Life(left, top) {

        // The left and top parameters indicate the starting position of this instance of
        // the Life "class". We pass those parameters directly onto the parent
        // Frogger.ImageSprite() constructor function
        Frogger.ImageSprite.call(this, left, top);
    }

    // Inherit properties and methods from the Frogger.ImageSprite "class"
    Life.prototype = new Frogger.ImageSprite();
    Life.prototype.constructor = Life;

    // Set the dimensions and location of the remaining life image from within the larger
    // sprite map image file
    Life.prototype.spriteLeft = 720;
    Life.prototype.spriteTop = 80;
    Life.prototype.width = 40;
    Life.prototype.height = 40;

    // Define a function to be executed when the game board has initialized, passing along
    // the properties and settings from the game board code module
    function initialize(gameBoard) {

        // Define a variable representing the position from the top of the game board
        // to display the remaining lives
        var lifePositionTop;

        // Store the game board properties and settings in a local variable within this
        // code module
        _gameBoard = gameBoard;

        // Set the lifePositionTop variable to the appropriate position in the bottom-left
        // corner of the game board
        lifePositionTop = (_gameBoard.numRows - 1) * _gameBoard.grid.height;

        // Define five lives for the player by populating the _lives array with five
        // instances of the Life "class", each one initialized with its starting position
        // from left to right along the bottom-left corner of the game board
        _lives = [

            // Each life is displayed at the same position from the top of the game board
            // and each spaced horizontally according to the width of the individual
            // image so they sit right beside each other
            new Life(0, lifePositionTop),
            new Life(1 * Life.prototype.width, lifePositionTop),
            new Life(2 * Life.prototype.width, lifePositionTop),
            new Life(3 * Life.prototype.width, lifePositionTop),
            new Life(4 * Life.prototype.width, lifePositionTop)
        ];

        // Listen for the "render-base-layer" event fired from within the game loop and
        // execute the render() function, defined further down, when it is called
        Frogger.observer.subscribe("render-base-layer", render);
    }

    // Define a function to render the number of lives remaining on the game board
    function renderLives() {
        var index = 0,
            length = _lives.length,
            life;

        // Loop through the number of remaining lives stored in the _lives array, and
        // call the renderAt() method of each of the Life "class" instances contained
        // within, drawing the life on the game board at the appropriate position
        for (; index < length; index++) {
            life = _lives[index];

            life.renderAt(life.left, life.top);
        }
    }

    // Define a function to render the time remaining as a green rectangular bar along the
    // bottom edge of the game board
    function renderTimeRemaining() {

        // Define the width of the rectangle. When full, this will be the width of 10
        // columns on the game board. As the time remaining decreases, the width will
        // decrease accordingly
        var rectangleWidth = _timeRemainingAsPercentage * _gameBoard.rows[10],

            // Define the height of the rectangle, which will always be half of one grid
            // square on the game board
            rectangleHeight = _gameBoard.grid.height / 2,

            // Define the left-hand edge, in pixels, where the rectangle should be drawn
            // from on the <canvas>. Since the countdown should appear to be decreasing
            // from the left to the right, this will be the inverse of the time remaining
            // percentage, multiplied by the full width of the rectangle
            rectangleLeft = (1 - _timeRemainingAsPercentage) * _gameBoard.rows[10],

            // Define the top edge, in pixels, where the rectangle should be drawn from
            // on the <canvas> element. This will be the bottom edge of the game board so
            // we need to subtract the desired height of the rectangle from the height
            // of the game board itself
            rectangleTop = Frogger.drawingSurfaceHeight - rectangleHeight;

        // Set the drawing context to draw in green (hex color #0F0)
        Frogger.drawingSurface.fillStyle = "#0F0";

        // Draw the rectangle on the game board at the given positions
        Frogger.drawingSurface.fillRect(rectangleLeft, rectangleTop, rectangleWidth,
        rectangleHeight);
    }

    // Define a function to draw the remaining lives and time remaining on the game board,
    // executed when the "render-base-layer" event is fired from within the game loop
    function render() {
        renderLives();
        renderTimeRemaining();
    }

    // When the game logic module informs us that the player has lost a life, we remove
    // the last entry from the _lives array, which removes the right-most life image from
    // the bottom-left corner of the canvas, indicating the correct number of lives
    // remaining
    Frogger.observer.subscribe("player-lost-life", function() {
        _lives.pop();
    });

    // When the game logic module informs us that the time remaining for the player to
    // reach the goal has changed, we store the new value returned as a percentage
    Frogger.observer.subscribe("time-remaining-change", function(newTimeRemainingPercentage) {
        _timeRemainingAsPercentage = newTimeRemainingPercentage;
    });

    // When the game board initializes its properties and settings, execute the
    // initialize() function
    Frogger.observer.subscribe("game-board-initialize", initialize);
}(Frogger));
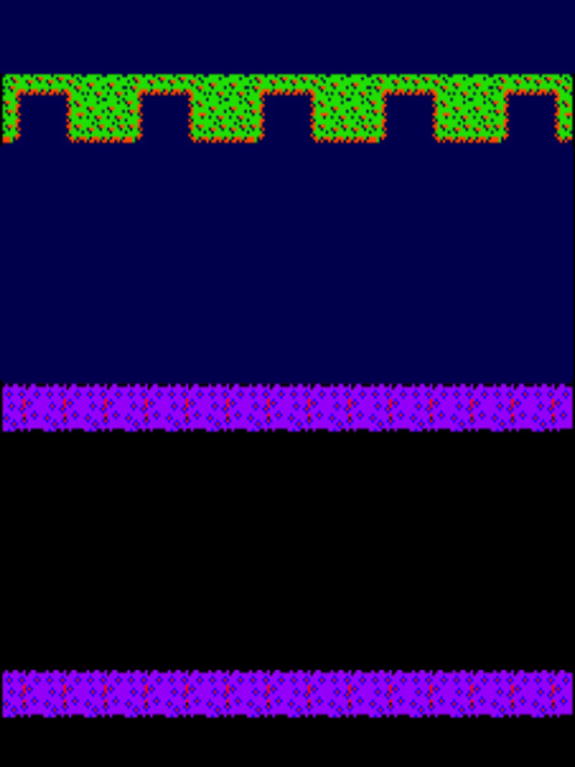
Figure 11-4. The game board background image, containing all the static elements in one image file
With the background visible and our base code in place to extract individual images from the sprite map, it’s time to define the obstacles for our game board, including vehicles, logs, turtles, and the goals the player is trying to reach, along with the images and animations to display for each. This is shown together in Listing 11-16.
Listing 11-16. Creating images and animations for obstacles and goals on the game board
// Define a namespace to store the individual obstacles and images to place on the game
// board as "classes" representing the individual images from the sprite map for each
Frogger.Image = (function(Frogger) {

    // Define a race car obstacle whose starting position on the x-axis can be set when
    // instantiated
    function RaceCar(left) {
        Frogger.ImageSprite.call(this, left);
    }

    // The race car is defined as the image found in the sprite map at position 0px x 80px
    // respectively from the left and top edges of the sprite map image file
    RaceCar.prototype = new Frogger.ImageSprite();
    RaceCar.prototype.constructor = RaceCar;
    RaceCar.prototype.spriteLeft = 0;
    RaceCar.prototype.spriteTop = 80;

    // Define a bulldozer obstacle
    function Bulldozer(left) {
        Frogger.ImageSprite.call(this, left);
    }

    // The bulldozer is the image found at position 80px x 80px within the sprite map
    Bulldozer.prototype = new Frogger.ImageSprite();
    Bulldozer.prototype.constructor = Bulldozer;
    Bulldozer.prototype.spriteLeft = 80;
    Bulldozer.prototype.spriteTop = 80;

    // Define a turbo race car obstacle
    function TurboRaceCar(left) {
        Frogger.ImageSprite.call(this, left);
    }

    // The turbo race car is the image found at position 160px x 80px within the sprite map
    TurboRaceCar.prototype = new Frogger.ImageSprite();
    TurboRaceCar.prototype.constructor = TurboRaceCar;
    TurboRaceCar.prototype.spriteLeft = 160;
    TurboRaceCar.prototype.spriteTop = 80;

    // Define a road car obstacle
    function RoadCar(left) {
        Frogger.ImageSprite.call(this, left);
    }

    // The road car is the image found at position 240px x 80px within the sprite map
    RoadCar.prototype = new Frogger.ImageSprite();
    RoadCar.prototype.constructor = RoadCar;
    RoadCar.prototype.spriteLeft = 240;
    RoadCar.prototype.spriteTop = 80;

    // Define a truck obstacle
    function Truck(left) {
        Frogger.ImageSprite.call(this, left);
    }

    // The truck is the image found at position 320px x 80px within the sprite map, with a
    // width of 122px as opposed to the standard 80px width of the other individual images
    Truck.prototype = new Frogger.ImageSprite();
    Truck.prototype.constructor = Truck;
    Truck.prototype.spriteLeft = 320;
    Truck.prototype.spriteTop = 80;
    Truck.prototype.width = 122;

    // Define a short log obstacle
    function ShortLog(left) {
        Frogger.ImageSprite.call(this, left);
    }

    // The short log is the image found at position 0px x 160px within the sprite map, with
    // a width of 190px
    ShortLog.prototype = new Frogger.ImageSprite();
    ShortLog.prototype.constructor = ShortLog;
    ShortLog.prototype.spriteLeft = 0;
    ShortLog.prototype.spriteTop = 160;
    ShortLog.prototype.width = 190;

    // Define a medium log obstacle
    function MediumLog(left) {
        Frogger.ImageSprite.call(this, left);
    }

    // The medium log is the image found at position 0px x 240px within the sprite map,
    // with a width of 254px
    MediumLog.prototype = new Frogger.ImageSprite();
    MediumLog.prototype.constructor = MediumLog;
    MediumLog.prototype.spriteLeft = 0;
    MediumLog.prototype.spriteTop = 240;
    MediumLog.prototype.width = 254;

    // Define a long log obstacle
    function LongLog(left) {
        Frogger.ImageSprite.call(this, left);
    }

    // The long log is the image found at position 240px x 160px within the sprite map,
    // with a width of 392px
    LongLog.prototype = new Frogger.ImageSprite();
    LongLog.prototype.constructor = LongLog;
    LongLog.prototype.spriteLeft = 240;
    LongLog.prototype.spriteTop = 160;
    LongLog.prototype.width = 392;

    // Define a turtle obstacle. There are two types of turtle obstacle on the game board,
    // one representing a group of two turtles and one representing a group of three
    // turtles. Both types of turtle obstacle have some shared behavior which is defined
    // in this "class" which acts as a base for both obstacles to inherit from.
    function Turtle(left) {
        Frogger.ImageSprite.call(this, left);
    }

    Turtle.prototype = new Frogger.ImageSprite();
    Turtle.prototype.constructor = Turtle;

    // The turtles will animate and appear to dip underwater on occasion. We need to
    // know when the turtle is underwater so that if the player's character is positioned
    // above the turtle at that point, they will lose a life. This will be handled by the
    // collision detection code later, but for now we just need to create a method to
    // tell us when the turtle in underwater
    Turtle.prototype.isUnderwater = function() {
        var isUnderwater = false,

            // Get a reference to the current animation of the turtle diving underwater
            // and resurfacing
            animation = this.animations[this.currentAnimation];

        // The turtle is deemed to be underwater when it is showing the furthestmost image
        // from the sprite map in the animation sequence. This is represented by the
        // largest number in the animation frame sequence which we can get using the
        // Math.max() method in JavaScript. If the current animation sequence value matches
        // this furthestmost image in the sprite map, the turtle is underwater.
        if (animation.getSequenceValue() === Math.max.apply(Math, animation.sequence)) {
            isUnderwater = true;
        }

        return isUnderwater;
    };

    // Define an obstacle representing a group of two turtles together
    function TwoTurtles(left) {
        Turtle.call(this, left);
    }

    // Inherit from the Turtle base "class" defined previously
    TwoTurtles.prototype = new Turtle();
    TwoTurtles.prototype.constructor = TwoTurtles;

    // The group of two turtles is the image found at position 320px x 240px within the
    // sprite map, with a width of 130px
    TwoTurtles.prototype.spriteLeft = 320;
    TwoTurtles.prototype.spriteTop = 240;
    TwoTurtles.prototype.width = 130;

    // Override the reset() method to define and auto-play the animation of the turtle
    // diving and surfacing
    TwoTurtles.prototype.reset = function() {
        Turtle.prototype.reset.call(this);

        // Register the dive and surface animation which plays each frame in the sequence
        // at a frame rate of 200 milliseconds, and loops once it reaches the end of the
        // sequence. The numbers in the sequence represent the multiples of offset of the
        // width of the individual image to grab the animating image from - essentially
        // switching between a number of side-by-side images from the sprite map file to
        // give the illusion of movement
        this.registerAnimation({
            "diveAndSurface": {
                sequence: [0, 1, 2, 3, 3, 2, 1, 0, 0, 0, 0, 0, 0, 0, 0, 0, 0, 0, 0, 0],
                loop: true,
                rate: 200
            }
        });

        // Play the animation straight away
        this.playAnimation("diveAndSurface");
    };

    // Define an obstacle representing a group of three turtles together
    function ThreeTurtles(left) {
        Turtle.call(this, left);
    }

    // Inherit from the Turtle base "class" defined previously
    ThreeTurtles.prototype = new Turtle();
    ThreeTurtles.prototype.constructor = ThreeTurtles;

    // The group of three turtles is the image found at position 0px x 320px within the
    // sprite map, with a width of 200px
    ThreeTurtles.prototype.spriteLeft = 0;
    ThreeTurtles.prototype.spriteTop = 320;
    ThreeTurtles.prototype.width = 200;

    // Register the dive and surface animation as before, but animating over a greater
    // number of frames and at a slower animation rate than with the group of two turtles
    ThreeTurtles.prototype.reset = function() {
        Turtle.prototype.reset.call(this);

        this.registerAnimation({
            "diveAndSurface": {
                sequence: [0, 1, 2, 3, 3, 3, 2, 1, 0, 0, 0, 0, 0, 0, 0, 0, 0, 0, 0, 0, 0],
                loop: true,
                rate: 300
            }
        });

        this.playAnimation("diveAndSurface");
    };

    // Define a "class" representing the frog image displayed when the player's character
    // reaches the goal
    function GoalFrog(left) {
        Frogger.ImageSprite.call(this, left);
    }

    // The goal frog is the image found at position 640px x 80px within the sprite map
    GoalFrog.prototype = new Frogger.ImageSprite();
    GoalFrog.prototype.constructor = GoalFrog;
    GoalFrog.prototype.spriteLeft = 640;
    GoalFrog.prototype.spriteTop = 80;

    // Override the moveTo() method so that this image cannot be moved from its place
    // on the game board once it has been placed down
    GoalFrog.prototype.moveTo = function() {};

    // Define a "class" representing the goal the player will be aiming to meet with at
    // the far end of the game board from their start position
    function Goal(left) {
        Frogger.ImageSprite.call(this, left);
    }

    // Since the goal is drawn onto the game board as part of the background <canvas>
    // we do not need to draw it again here, so we specify the image position as being
    // a transparent block from the sprite map image so effectively nothing is actually
    // drawn to the canvas. We can still take advantage of the other features of the
    // ImageSprite "class", however, to simplify collision checking later on, which
    // will tell us when the player's character has reached a goal
    Goal.prototype = new Frogger.ImageSprite();
    Goal.prototype.constructor = Goal;
    Goal.prototype.spriteLeft = 800;
    Goal.prototype.spriteTop = 320;

    // Override the moveTo() method so that the goal cannot be moved from its place
    // on the game board once it has been placed down
    Goal.prototype.moveTo = function() {};

    // Add a custom property to this "class" to denote whether the goal instance has been
    // met by the player's character
    Goal.prototype.isMet = false;

    // Expose the "classes" defined in this module to the wider code base within the
    // Frogger.Image namespace
    return {
        RaceCar: RaceCar,
        Bulldozer: Bulldozer,
        RoadCar: RoadCar,
        TurboRaceCar: TurboRaceCar,
        Truck: Truck,
        ShortLog: ShortLog,
        MediumLog: MediumLog,
        LongLog: LongLog,
        TwoTurtles: TwoTurtles,
        ThreeTurtles: ThreeTurtles,
        GoalFrog: GoalFrog,
        Goal: Goal
    };
}(Frogger));
With the obstacles defined, it’s time to define the code, images, and animations to represent the player’s character and its froglike movement around the game board, which is shown in Listing 11-17.
Listing 11-17. The player’s character
// Define a code module to represent the player's character on the game board and to
// handle its movement and behavior according to the current game state
Frogger.Character = (function(Frogger) {

    // Define a variable to store the image representing the player's character
    var _character,

        // Define a variable to store the game board properties and settings
        _gameBoard = {},

        // Define a variable to denote the starting row of the player's character on the
        // game board
        _startRow = 14,

        // Define a variable to denote the starting columns of the player's character on
        // the game board - essentially centered
        _startColumn = 6,

        // Define a variable to store the current row the player's character has reached
        _currentRow = _startRow,

        // Define a Boolean variable to indicate whether the player's character is
        // currently frozen in place, as happens temporarily when the player loses a life
        // or reaches the goal
        _isFrozen = false;

    // Define a "class" to represent the player's frog character, inheriting from the
    // Frogger.ImageSprite "class". The left and top values passed in on instantiation
    // reflect the starting position in pixels of the player's character from the top-left
    // hand corner of the game board
    function Character(left, top) {
        Frogger.ImageSprite.call(this, left, top);

        // Register five animations to play when the player loses a life or when the
        // character is moved in any of four different directions - up, down, left or right
        this.registerAnimation({

            // When the player loses a life, switch between the three images found starting
            // at 640px from the left of the sprite map image at a rate of 350 milliseconds,
            // stopping on the last image
            "lose-life": {
                spriteLeft: 640,
                sequence: [0, 1, 2],
                rate: 350
            },

            // When the player's character moves up a row on the game board, switch between
            // the two images found starting at the left-hand edge of the sprite map
            "move-up": {
                spriteLeft: 0,
                sequence: [1, 0]
            },

            // When the player's character moves right on the game board, switch between
            // the two images found starting at 160px from left-hand edge of the sprite map
            "move-right": {
                spriteLeft: 160,
                sequence: [1, 0]
            },

            // When the player's character moves down on the game board, switch between
            // the two images found starting at 320px from left-hand edge of the sprite map
            "move-down": {
                spriteLeft: 320,
                sequence: [1, 0]
            },

            // When the player's character moves left on the game board, switch between
            // the two images found starting at 480px from left-hand edge of the sprite map
            "move-left": {
                spriteLeft: 480,
                sequence: [1, 0]
            }
        });
    }

    // Inherit from the Frogger.ImageSprite "class"
    Character.prototype = new Frogger.ImageSprite();
    Character.prototype.constructor = Character;

    // Define the individual images for the player's character sprite as being found at
    // position 0px x 0px within the sprite map image file
    Character.prototype.spriteLeft = 0;
    Character.prototype.spriteTop = 0;

    // Define a method to move the character up one row on the game board
    Character.prototype.moveUp = function() {

        // Move the top position of the character up by the height of one grid square
        // on the game board
        this.top -= _gameBoard.grid.height;

        // Ensure the character does not move outside of the bounds restricting its
        // movement around the game board - we don't want it appearing on top of the
        // score at the top of the screen
        if (this.top < _gameBoard.characterBounds.top) {
            this.top = _gameBoard.characterBounds.top;
        }

        // Play the animation named "move-up", making it look like the character is moving
        this.playAnimation("move-up");

        // Keep track of the current row the character sits upon
        _currentRow--;
    };

    // Define a method to move the character down one row on the game board
    Character.prototype.moveDown = function() {

        // Move the top position of the character down by the height of one grid square
        // on the game board
        this.top += _gameBoard.grid.height;

        // Ensure the character does not move outside of the bounds restricting its
        // movement around the game board - we don't want it appearing on top of the
        // countdown timer at the base of the screen
        if (this.top > _gameBoard.characterBounds.bottom) {
            this.top = _gameBoard.characterBounds.bottom;
        }

        // Play the animation named "move-down", making it look like the character is moving
        this.playAnimation("move-down");

        // Keep track of the current row the character sits upon
        _currentRow++;
    };

    // Define a method to move the character one column to the left on the game board
    Character.prototype.moveLeft = function() {

        // Move the position of the character on the game board left by the width of one
        // grid square on the game board
        this.left -= _gameBoard.grid.width;

        // Ensure the character does not move outside of the bounds restricting its
        // movement around the game board - we don't want it disappearing off the side
        if (this.left < _gameBoard.characterBounds.left) {
            this.left = _gameBoard.characterBounds.left;
        }

        // Play the animation named "move-left", making it look like the character is moving
        this.playAnimation("move-left");
    };

    // Define a method to move the character one column to the right on the game board
    Character.prototype.moveRight = function() {

        // Move the position of the character on the game board right by the width of one
        // grid square on the game board
        this.left += _gameBoard.grid.width;

        // Ensure the character does not move outside of the bounds restricting its
        // movement around the game board - we don't want it disappearing off the side
        if (this.left > _gameBoard.characterBounds.right) {
            this.left = _gameBoard.characterBounds.right;
        }

        // Play the animation named "move-right", making it look like the character is moving
        this.playAnimation("move-right");
    };

    // Define a function which returns the current position of the player's character in
    // pixels from the top of the game board
    function getTop() {

        // Look up the top position in pixels from the game board properties by the current
        // row the character is sitting upon
        return _gameBoard.rows[_currentRow];
    }

    // Define a function which hides the player's character from display
    function hide() {

        // Call the hide() method on the instance of the Character "class" that will
        // represent the player's character
        _character.hide();
    }

    // Define a function which moves the player's character in one of four possible
    // directions - up, down, left, or right
    function move(characterDirection) {

        // Only move the player's character if it is not deemed to be frozen in place
        if (!_isFrozen) {

            // Call the appropriate method on the Character instance based on the
            // direction the character is to move in
            if (characterDirection === Frogger.direction.LEFT) {
                _character.moveLeft();
            } else if (characterDirection === Frogger.direction.RIGHT) {
                _character.moveRight();
            } else if (characterDirection === Frogger.direction.UP) {
                _character.moveUp();
            } else if (characterDirection === Frogger.direction.DOWN) {
                _character.moveDown();
            }

            // Publish an event to the rest of the code modules, indicating that the
            // player's position has been moved by the player
            Frogger.observer.publish("player-moved");
        }
    }

    // Define a function to render the player's character on screen
    function render() {

        // Call the Character instance's renderAt() method, passing along its current
        // left and top position
        _character.renderAt(_character.left, _character.top);
    }

    // Define a function, to be executed when the player loses a life, which plays the
    // appropriate animation
    function loseLife() {
        _character.playAnimation("lose-life");
    }

    // Define a function to move the player's character to the given position in pixels
    // from the left-hand edge of the game board - this will be used when the character
    // is sitting on a moving object to keep the character aligned with that object
    function setPosition(left) {

        // Ensure the character does not move outside of its defined bounds on the game
        // board
        if (left > _gameBoard.characterBounds.right) {
            left = _gameBoard.characterBounds.right;
        } else if (left < _gameBoard.characterBounds.left) {
            left = _gameBoard.characterBounds.left;
        }

        // Move the character's position from the left-hand edge of the game board to match
        // the given position
        _character.moveTo(left);
    }

    // Define a function to reset the player's character's position on the game board
    function reset() {
        _character.reset();

        // Reset the local variable indicating the current row the character sits upon
        _currentRow = _startRow;
    }

    // Define a function to return the current position of the character on the game board
    function getPosition() {
        return _character.getPosition();
    }

    // Define a function to set the local _isFrozen variable to true, indicating that the
    // player's character's position on the game board should be frozen in place
    function freeze() {
        _isFrozen = true;
    }

    // Define a function to set the local _isFrozen variable to false, indicating that the
    // player's character is free to move around the game board
    function unfreeze() {
        _isFrozen = false;
    }

    // Define a function to be executed when the game board has initialized, passing along
    // the properties and settings from the game board code module
    function initialize(gameBoard) {
        _gameBoard = gameBoard;

        // Initialize an instance of the Character "class" to represent the player's
        // character, setting its start position on the game board
        _character = new Character(_gameBoard.columns[_startColumn], _gameBoard.rows[_startRow]);

        // Ensure the local render() function is executed when the "render-character"
        // event is fired from within the game loop to draw the player's character on
        // the screen
        Frogger.observer.subscribe("render-character", render);
    }

    // When the game logic module informs us that the player has lost a life, execute the
    // loseLife() function to play the appropriate animation
    Frogger.observer.subscribe("player-lost-life", loseLife);

    // When the game logic informs us the player's position needs to be reset, execute the
    // reset() function
    Frogger.observer.subscribe("reset", reset);

    // When the player has reached the goal, hide the player from the screen temporarily
    Frogger.observer.subscribe("player-at-goal", hide);

    // When the game logic tells us the player's character must stay in place on the
    // game board, we set the appropriate local variable to reflect this
    Frogger.observer.subscribe("player-freeze", freeze);

    // When the game logic tells us the player's character is free to move around the
    // game board again, we set the appropriate local variable to reflect this
    Frogger.observer.subscribe("player-unfreeze", unfreeze);

    // When the game board module initializes its properties and settings, execute the
    // initialize() function
    Frogger.observer.subscribe("game-board-initialize", initialize);

    // When the player presses the arrow keys on the keyboard, move the player's
    // character in the appropriate direction on the game board
    window.addEventListener("keydown", function(event) {

        // Define the key codes for the arrow keys
        var LEFT_ARROW = 37,
            UP_ARROW = 38,
            RIGHT_ARROW = 39,
            DOWN_ARROW = 40;

        // Execute the move() function, passing along the correct direction based on the
        // arrow key pressed. Ignore any other key presses
        if (event.keyCode === LEFT_ARROW) {
            move(Frogger.direction.LEFT);
        } else if (event.keyCode === RIGHT_ARROW) {
            move(Frogger.direction.RIGHT);
        } else if (event.keyCode === UP_ARROW) {
            move(Frogger.direction.UP);
        } else if (event.keyCode === DOWN_ARROW) {
            move(Frogger.direction.DOWN);
        }
    }, false);

    // When the player taps in certain places on the game board on their touch-sensitive
    // screen, move the player's character in the appropriate direction on the game board
    // according to where the screen has been tapped. This is useful since users with
    // touch screens are typically on mobile devices that do not have access to
    // physical keyboards to press the arrow keys to move the character.
    Frogger.canvas.addEventListener("touchstart", function(event) {

        // Get a reference to the position of the touch on the screen in pixels from the
        // top-left position of the touched element, in this case the game board
        var touchLeft = event.targetTouches[0].clientX,
            touchTop = event.targetTouches[0].clientY;

        // Execute the move() function, passing along the correct direction based on the
        // position tapped on the game board
        if (touchLeft < (Frogger.drawingSurfaceWidth / 8)) {
            move(Frogger.direction.LEFT);
        } else if (touchLeft > (3 * Frogger.drawingSurfaceWidth / 8)) {
            move(Frogger.direction.RIGHT);
        } else if (touchTop < (Frogger.drawingSurfaceHeight / 8)) {
            move(Frogger.direction.UP);
        } else if (touchTop > (3 * Frogger.drawingSurfaceHeight / 8)) {
            move(Frogger.direction.DOWN);
        }
    }, false);

    // Expose the local getTop(), getPosition() and setPosition() methods so they are
    // available to other code modules
    return {
        getTop: getTop,
        getPosition: getPosition,
        setPosition: setPosition
    };
}(Frogger));
A look at the game board in Figure 11-2 reveals that all similar obstacles are contained together on the same row on the game board, all similar vehicles together, all turtles together, all logs together, and all goals together. We can therefore define the behavior of a “row” on the game board, as shown in Listing 11-18, which will contain references to the obstacle objects in that raw, along with the speed and direction of motion, which all obstacles on that row will follow.
Listing 11-18. Create a “row” for obstacles that can move together in a certain direction at the same speed
// Define a code module to define the types of obstacle rows that exist on the game board,
// representing a road-type row which will house vehicles, a water row containing log
// obstacles, a water row containing turtle obstacles, and a goal row containing the
// locations the player's character aims to reach to win the game
Frogger.Row = (function() {

    // Define a base row "class" containing the shared code required for each different
    // type of specialist row on the game board
    function Row(options) {
        options = options || {};

        // Define the direction of obstacles moving on this row, defaults to moving left
        this.direction = options.direction || Frogger.direction.LEFT;

        // Define the set of obstacles to place on this row and move
        this.obstacles = options.obstacles || [];

        // Define the top position, in pixels, of where this row sits on the game board
        this.top = options.top || 0;

        // Define the speed with which obstacles on this row move in the given direction
        // as a factor of the render rate set in game loop
        this.speed = options.speed || 1;
    }

    Row.prototype = {

        // Define a method to render each of the obstacles in the correct place on the
        // current row
        render: function() {
            var index = 0,
                length = this.obstacles.length,
                left,
                obstaclesItem;

            // Loop through each of the obstacles within this row
            for (; index < length; index++) {
                obstaclesItem = this.obstacles[index];

                // Update the left position, in pixels, of this obstacle based on its
                // current position along with the direction and speed of movement
                left = obstaclesItem.getPosition().left + ((this.direction === Frogger.direction.
                RIGHT ? 1 : -1) * this.speed);

                // Adjust the left position such that if the obstacle falls off one edge of
                // the game board, it then appears to return from the other edge
                if (left < -obstaclesItem.getWidth()) {
                    left = Frogger.drawingSurfaceWidth;
                } else if (left >=Frogger.drawingSurfaceWidth) {
                    left = -obstaclesItem.getWidth();
                }

                // Move the obstacle and draw it on the game board in the updated position
                obstaclesItem.moveTo(left);
                obstaclesItem.renderAt(left, this.top);
            }
        },

        // Define a method to return the top position, in pixels, of this row
        getTop: function() {
            return this.top;
        },

        // Define a method to detect whether the player's character is currently colliding
        // with an obstacle on this row
        isCollision: function(characterPosition) {
            var index = 0,
                length = this.obstacles.length,
                obstaclesItem,
                isCollision = false;

            // Loop through each of the obstacles on this row
            for (; index < length; index++) {
                obstaclesItem = this.obstacles[index];

                // If the player's character touches the current obstacle, a collision
                // has taken place and we return this fact to the calling code
                if (Frogger.intersects(obstaclesItem.getPosition(), characterPosition)) {
                    isCollision = true;
                }
            }

            return isCollision;
        },

        // Define a method to reset the obstacles on this row to their default state and
        // position on the game board
        reset: function() {
            var index = 0,
                length = this.obstacles.length;

            // Loop through each of the obstacles within this row, and call their reset()
            // methods in turn
            for (; index < length; index++) {
                this.obstacles[index].reset();
            }
        }
    };

    // Define a new "class" representing a road-type row, containing vehicle obstacles which
    // inherits from our base Row "class"
    function Road(options) {
        Row.call(this, options);
    }

    Road.prototype = new Row();
    Road.prototype.constructor = Road;

    // Define a new "class" representing a row containing logs floating on water which
    // inherits from our base Row "class"
    function Log(options) {
        Row.call(this, options);
    }

    Log.prototype = new Row();
    Log.prototype.constructor = Log;

    // Override the isCollision() method, reversing its behavior. If the player's character
    // touches a log it is safe, however it should be considered a collision if it touches
    // the water beneath rather than the obstacle itself
    Log.prototype.isCollision = function(characterPosition) {

        // Return the opposite Boolean state returned by a normal call to the isCollision()
        // method
        return !Row.prototype.isCollision.call(this, characterPosition);
    };

    // Override the render() method so that when the player's character lands on a log,
    // it gets transported along the water with the log
    Log.prototype.render = function() {

        // If the player's character is on this row, update its position based on the
        // direction and speed of motion of the log the player has landed on
        if (Frogger.Character.getTop() === this.getTop()) {
            Frogger.Character.setPosition(Frogger.Character.getPosition().left +
            ((this.direction === Frogger.direction.RIGHT ? 1 : -1) * this.speed));
        }

        // Call the inherited render() method to draw the log in its new position
        Row.prototype.render.call(this);

    };

    // Define a new "class" representing a row containing turtles swimming in the water
    // which inherits from our Log "class" as it shares similarities
    function Turtle(options) {
        Log.call(this, options);
    }

    Turtle.prototype = new Log();
    Turtle.prototype.constructor = Turtle;

    // Override the isCollision() method such that it behaves like the same method on
    // the Log "class" apart from when the turtle obstacle has dipped underwater, in which
    // case there will always be a collision if the player's character is on this row
    Turtle.prototype.isCollision = function(characterPosition) {
        var isCollision = Log.prototype.isCollision.call(this, characterPosition);
        return this.obstacles[0].isUnderwater() || isCollision;
    };

    // Define a new "class" representing the goal row the player's character is aiming for
    // in order to win the game, which inherits from our base Row "class"
    function Goal(options) {

        // The goals placed within this row never move so we always force the speed
        // property to be 0
        options.speed = 0;

        Row.call(this, options);
    }

    Goal.prototype = new Row();
    Goal.prototype.constructor = Goal;

    // Override the isCollision() method to detect if the player's character has reached
    // one of the available goals stored in this row
    Goal.prototype.isCollision = function(characterPosition) {
        var index = 0,
            length = this.obstacles.length,
            obstaclesItem,
            isCollision = true;

        // Loop through the goals in this row to find out if the player has reached one
        // of them
        for (; index < length; index++) {
            obstaclesItem = this.obstacles[index];

            // If this goal has not been reached before and the player's character is
            // positioned above the goal, fire the "player-at-goal" event so the game logic
            // module registers that the goal has been reached
            if (!obstaclesItem.isMet && Frogger.intersects(obstaclesItem.getPosition(),
            characterPosition)) {
                this.obstacles[index].isMet = true;
                Frogger.observer.publish("player-at-goal");
                isCollision = false;

                // Add the image of the goal-reached frog to the row within the goal
                // reached so the user can see that they have reached this goal before
                this.obstacles.push(new Frogger.Image.GoalFrog(obstaclesItem.getPosition().left));
            }
        }

        return isCollision;
    };

    // Return the "classes" defined in this code module for use in the rest of our code
    return {
        Road: Road,
        Log: Log,
        Turtle: Turtle,
        Goal: Goal
    };
}(Frogger));
With our base “row” and obstacle types defined, it’s time to create the actual instances of rows and obstacles and place them on the game board, which we do in Listing 11-19.
Listing 11-19. Defining rows and obstacles, and placing them on the game board
// Define a code module to add rows containing obstacles to the game board for the player
// to avoid or make contact with in order to progress from the bottom to the top of the
// game board in order to win the game by reaching each of the five goals without losing
// all their lives or the allocated time running out
(function(Frogger) {

    // Define variables to store the populated rows on the game board, and the properties
    // and settings of the game board itself
    var _rows = [],
        _gameBoard = {};

    // Define a function to be called when the game board has initialized onto which we
    // place our rows and obstacles
    function initialize(gameBoard) {
        _gameBoard = gameBoard;

        // Add elevent rows of obstacles to the game board
        _rows = [

            // Add a goal row to the 3rd row on the game board (the rows start from index
            // 0), containing five goals positioned in the respective places according to
            // the designation on the game board background image
            new Frogger.Row.Goal({
                top: _gameBoard.rows[2],
                obstacles: [new Frogger.Image.Goal(33, 111), new Frogger.Image.Goal(237, 315), new
                Frogger.Image.Goal(441, 519), new Frogger.Image.Goal(645, 723), new Frogger.Image.
                Goal(849, 927)]
            }),

            // Add a row of medium-length logs to the 4th row on the game board, moving
            // right at a rate of 5 pixels per each time the game loop is called to
            // render this row within the <canvas>
            new Frogger.Row.Log({
                top: _gameBoard.rows[3],
                direction: Frogger.direction.RIGHT,
                speed: 5,

                // Add three medium-sized log obstacles to the game board, spaced out evenly
                obstacles: [new Frogger.Image.MediumLog(_gameBoard.columns[1]), new Frogger.Image.
               MediumLog(_gameBoard.columns[6]), new Frogger.Image.MediumLog(_gameBoard.
               columns[10])]
            }),

            // Add a row of turtles, grouped in twos, on the 5th row of the game board,
            // moving left (the default direction) at a rate of 6 pixels on each turn of the
            // game loop
            new Frogger.Row.Turtle({
                top: _gameBoard.rows[4],
                speed: 6,

                // Add four obstacles spaced out across the width of the game board
                obstacles: [new Frogger.Image.TwoTurtles(_gameBoard.columns[0]), new Frogger.Image.
                TwoTurtles(_gameBoard.columns[3]), new Frogger.Image.TwoTurtles(_gameBoard.
                columns[6]), new Frogger.Image.TwoTurtles(_gameBoard.columns[9])]
            }),

            // Add a row of long-length logs to the 6th row on the game board, moving right
            // at a rate of 7 pixels on each turn of the game loop
            new Frogger.Row.Log({
                top: _gameBoard.rows[5],
                direction: Frogger.direction.RIGHT,
                speed: 7,

                // Add two long-length log obstacles to this row
                obstacles: [new Frogger.Image.LongLog(_gameBoard.columns[1]), new Frogger.Image.
                LongLog(_gameBoard.columns[10])]
            }),

            // Add a row of short-length logs to the 7th row of the game board, moving right
            // at a rate of 3 pixels each time the game loop is called
            new Frogger.Row.Log({
                top: _gameBoard.rows[6],
                direction: Frogger.direction.RIGHT,
                speed: 3,

                // Add three short-length logs to this row
                obstacles: [new Frogger.Image.ShortLog(_gameBoard.columns[1]), new Frogger.Image.
                ShortLog(_gameBoard.columns[6]), new Frogger.Image.ShortLog(_gameBoard.columns[10])]
            }),

            // Add a row of turtles, grouped in threes, on the 8th row of the game board,
            // moving left at a rate of 5 pixels each time the game loop is called
            new Frogger.Row.Turtle({
                top: _gameBoard.rows[7],
                speed: 5,
                obstacles: [new Frogger.Image.ThreeTurtles(_gameBoard.columns[0]), new Frogger.
                Image.ThreeTurtles(_gameBoard.columns[3]), new Frogger.Image.ThreeTurtles
                (_gameBoard.columns[7]), new Frogger.Image.ThreeTurtles(_gameBoard.columns[10])]
            }),

            // Add a set of truck-style vehicle obstacles to the 10th row of the game
            // board (the 9th row is considered a "safe" row that contains no obstacles)
            new Frogger.Row.Road({
                top: _gameBoard.rows[9],
                speed: 3,
                obstacles: [new Frogger.Image.Truck(_gameBoard.columns[1]), new Frogger.Image.
                Truck(_gameBoard.columns[7])]
            }),

            // Add a set of turbo race car obstacles to the 11th row of the game board,
            // moving right at a fast rate
            new Frogger.Row.Road({
                top: _gameBoard.rows[10],
                direction: Frogger.direction.RIGHT,
                speed: 12,
                obstacles: [new Frogger.Image.TurboRaceCar(_gameBoard.columns[1]), new Frogger.
                Image.TurboRaceCar(_gameBoard.columns[7])]
            }),

            // Add a set of simple road car obstacles to the 12th row of the game board
            new Frogger.Row.Road({
                top: _gameBoard.rows[11],
                speed: 4,
                obstacles: [new Frogger.Image.RoadCar(_gameBoard.columns[1]), new Frogger.Image.
                RoadCar(_gameBoard.columns[7])]
            }),

            // Add a set of bulldozer-style obstacles to the 13th row of the game board
            new Frogger.Row.Road({
                top: _gameBoard.rows[12],
                direction: Frogger.direction.RIGHT,
                speed: 3,
                obstacles: [new Frogger.Image.Bulldozer(_gameBoard.columns[1]), new Frogger.Image.
                Bulldozer(_gameBoard.columns[7])]
            }),

            // Add a set of race car obstacles to the 14th row of the game board, which is
            // one row above where the player's character's starting position is
            new Frogger.Row.Road({
                top: _gameBoard.rows[13],
                speed: 4,
                obstacles: [new Frogger.Image.RaceCar(_gameBoard.columns[2]), new Frogger.Image.
                RaceCar(_gameBoard.columns[6])]
            })
        ];

        // With the rows and obstacles initialized, connect the local render() function to
        // the "render-base-layer" event fired from within the game loop to draw those
        // obstacles onto the game board
        Frogger.observer.subscribe("render-base-layer", render);
    }

    // Define a function to render each of the defined rows of obstacles onto the game board
    function render() {
        var row,
            index = 0,
            length = _rows.length;

        // Loop through each row calling its render() method, which in turn calls the
        // render() method of each of the obstacles stored within it
        for (; index < length; index++) {
            row = _rows[index];
            row.render();
        }
    }

    // Define a function to detect whether a collision has occured between the player's
    // character and the obstacles within each row
    function isCollision() {
        var collided = false,
            row,
            index = 0,
            length = _rows.length;

        // Loop through each row calling its isCollision() method, which determines
        // whether the obstacles on that row come into contact with the player's
        // character on the game board
        for (; index < length; index++) {
            row = _rows[index];

            if (Frogger.Character.getTop() === row.getTop()) {
                collided = row.isCollision(Frogger.Character.getPosition());
                if (collided) {
                    break;
                }
            }
        }

        // If a collision has occured, trigger the "collision" event which the game logic
        // module uses to cause the player to lose a life
        if (collided) {
            Frogger.observer.publish("collision");
        }

        return collided;
    }

    // Define a function to reset each of the rows to reset to their initial state
    function reset() {
        var row;

        // Loop through each row calling its reset() method, which in turn calls the
        // reset() method of each of the obstacles within that row
        for (var index = 0, length = _rows.length; index < length; index++) {
            row = _rows[index];
            row.reset();
        }
    }

    // When the game logic wishes the game board to reset, call the local reset() function
    Frogger.observer.subscribe("reset", reset);

    // When the game loop wishes to check for collisions, call the local isCollision()
    // function, which will fire a "collision" event if a collision occurs
    Frogger.observer.subscribe("check-collisions", isCollision);

    // When the game board has initialized its properties and settings, call the local
    // initialize() function to place the rows and obstacles onto the game board
    Frogger.observer.subscribe("game-board-initialize", initialize);
}(Frogger));
All of the pieces of our game are now in place and we can simply start the game by triggering the game-load event, which starts the game loop running, drawing everything to the screen and checking for collisions between the player’s character and the obstacles, as shown in Listing 11-20. Use the arrow keys on your keyboard, or tap on your touchscreen, to move the player character up, down, left, or right within the game board to reach the goals at the top of the screen and to win the game.
Listing 11-20. Starting the game
// Now the code modules have been registered, kick off the game logic and start the game
Frogger.observer.publish("game-load");
I have uploaded the completed code for this game, together with the fonts and images required to support it, to my GitHub account here for you to view in place: https://github.com/denodell/frogger. You can run the game directly from GitHub via the URL http://denodell.github.io/frogger.
I hope that by following the code for creating this game, you will have the inspiration and knowledge to build your own using some of the same techniques garnered here, including spriting, the game loop, and collision detection. For further reading on the wide area of game development with the Canvas API, I suggest you look at the following online resources:
- “The Complete Guide To Building HTML5 Games with Canvas and SVG” by David Rousset at SitePoint, via http://bit.ly/complete_games
- “HTML5 Game Development” via http://bit.ly/html5_game_dev
- “Canvas Demos” via http://www.canvasdemos.com
Summary
In this chapter, we’ve covered the basics of drawing shapes, text, and images onto the HTML5 <canvas> element through JavaScript. We’ve seen a series of techniques and steps that constitute the bulk of code in game development and we’ve seen how to build a real, working game using these techniques.
In the next chapter, we’ll look at another native JavaScript API that we can use to build a video chat client connecting two remote users together, all within the browser.