
The performance opens with a boot loader that sets the groundwork for the board to be able to load the kernel. Just like an opening, the boot loader paves the way for the kernel, going as far to load it from a remote server into memory so it can be executed. After it's in memory, the boot loader hands execution to the kernel and exits. The kernel then has its own bootstrapping process (which duplicates what the boot loader did in some cases) that readies the hardware, loads drivers, and starts its processes to manage the system. When it's in a running state, the kernel hands off control to an init program. The kernel and init then share the stage until you shut down the system; when the system restarts, the performance begins again.
This chapter walks through the process of a board running Linux from power-up to the first program being executed. Understanding this process is essential to understanding how to optimize the time necessary to start Linux. For example, a consumer device like a cell phone can't take as long as desktop system to become available to make a call; likewise, a high-availability network device will have reduced uptime if it can't route packets for three minutes while it's booting.
A boot loader isn't unique to Linux or embedded systems. It's a program first run by a computer so that a more sophisticated program can be loaded next. In a Linux system, two boot loaders usually run before the Linux kernel starts running.
The program that the boot loader runs can be anything, but it's usually an operating system that then starts additional programs so the system can be used by a user. The interesting question is, how does the processor know to run the boot loader? At power-up, the processor goes to a certain memory address (put there by the processor designer), reads the content of that address, and performs a jump to the address stored at that location. This address is hard-coded into the processor so the chip maker doesn't have to change the silicon design for each customer or when the boot loader changes. This little bit of code is referred to as the first-stage boot loader.
The code that runs next is what is commonly viewed as the boot loader in a Linux system. This may be a program like U-Boot, RedBoot, or something else (don't worry, they get detailed treatment later in the chapter) smart enough to then load the operating system. After Linux has been loaded into memory, the boot loader is no longer needed and is discarded; any evidence of the code in RAM is overwritten by the operating system. Any device configuration done by the boot loader—for example, setting the speed of the serial port or an IP address assigned to the network adapter—is also lost. Linux reinitializes these devices during its startup process.
Boot loaders can be configured either to automatically run a sequence of commands or to wait for user input via a serial connection or console. Because embedded systems traditionally lack monitors and keyboards, you interact with the boot loader over a serial connection using a terminal emulator like minicom. The serial port is the favored way of presenting a user interface because the programming necessary to interact with a universal asynchronous receiver/transmitter (UART) that manages a serial port is an order of magnitude simpler than code to use a USB device or start a remote console over the network. The boot loader's user interface looks a little like a terminal shell in Linux, but it lacks the bells and whistles you normally find, like auto-completion and line editing.[18]
Boot loaders also act as an interface to the flash devices on the board. Flash memory (named so because the reprogramming process was reminiscent of a flash camera to the designer) is a type of Electrically Erasable Programmable Read-Only Memory (EEPROM) where individual areas (called blocks or erase blocks) can be erased and written; before the invention of flash memory, EEPROMs could only be erased and rewritten in their entirety. With no moving parts and low power consumption, flash memory is an excellent storage medium for embedded devices. Flash support in the boot loader gives you the ability to manage the flash memory by creating segments, which are named areas of the flash memory, and to write data, such as a root file system or kernel image, into those areas.
Boot loaders have been getting increasingly sophisticated over the years. Early boot loaders only accepted one-letter commands and positional parameters and were very unforgiving. Incorrect input resulted in an unrecoverable error, and the board had to be power-cycled (or the reset button pressed, if it had one) to return to the boot loader. Help was non-existent or so minimal that it was equivalent to non-existent. The board usually included a manual explaining how to use the boot loader, or a live person showed up and helped with the boot process, depending on the value of the account.
Note
The boot loader for a PC running Linux is either GRand Unified Boot loader (GRUB) or Linux Loader (LILO). Running Windows? The boot loader for that system is NTLDR; it works as a second-stage boot loader, and the Phoenix BIOS is the first-stage boot loader.
Boot loaders on a desktop system run in two steps: a first- and a second-stage boot loader. The firststage boot loader does just enough to get the second-stage boot loader running. On a desktop system, the boot sequence reads one sector of data into memory and begins executing that code. The first-stage boot loader contains a driver so that it can access a file system on a fixed drive or possibly download the kernel from a remote source, like a TFTP server or an NFS share. On a PowerPC or ARM system, the first-stage boot loader is the code the chip runs after power-up instead of code that is loaded from the hardware.
After the boot loader does its job of getting Linux into memory, the Linux boot-up process starts. Sometimes the kernel is compressed, and the first code decompresses the kernel and jumps to an address that's the kernel's entry point. This code runs and performs processor-level configuration, such as configuring the memory management unit (MMU—the part of the processor that handles virtual memory addressing) and enabling the processor's cache. The code also populates a data structure that you can view by doing the following after the system is up and running:
$ cat /proc/cpuinfo
Next, the kernel runs its board-level configuration. Some boards have peripherals like PCI controllers or flash-management hardware that must be initialized so they can be accessed later during the kernel startup process. When it's ready, the code jumps into the processor-independent startup code. Linux is now in control of the system; the software starts the kernel's threads and process management, parses the command line, and runs the main kernel process. The kernel first runs what you indicated on the command line (via the init parameter) and then attempts to execute /sbin/init, /etc/init, /bin/init, and, finally, /bin/sh.
When the kernel starts the main user process, that process must continue running, because when the process stops the kernel panics and stops as well. A kernel panic is the worst sort of kernel error, because this sort of problem results in the system coming to halt. The following illustration describes the booting process from power-on until the first program runs.
Figure 7-1 shows the boot process in detail. The following reviews the previous discussion and explains what happens each step of the way:
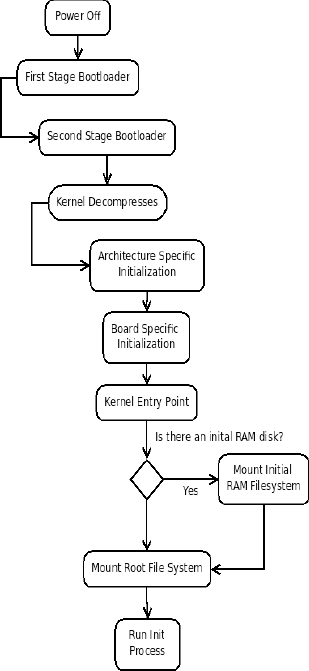
The first-stage boot loader is the code in the processor that reads a location in memory and may put a message on the console or screen.
The second-stage boot loader is responsible for loading what the system will run. In this case, that is Linux, but it could be any program.
If the kernel is compressed, it's now uncompressed into memory. A jump instruction follows the decompression step that places the instruction at the next executable instruction.
Processor and board initialization runs. This low-level code performs hardware initialization. The code then reaches the kernel's entry point, and processor-independent code runs to get the kernel ready to run the init process.
The kernel entry point is the code that's in the architecture-independent part of the kernel tree. This code is located in the
start_kernelfunction in theinit/main.cfile in the kernel source tree.The system mounts the initial RAM disk, sees if it contains an
/initprogram, and if so, runs it. If this program doesn't exist or isn't found, the boot process moves to the next step.One of the parameters passed to the kernel is the device containing the root file system and the file system type. The kernel attempts to mount this file system and panics if it isn't found or isn't mountable.
The program that the kernel first attempts to run is the value of the kernel parameter
init. In lieu of this parameter, the system looks for aninitexecutable by attempting to run/sbin/init,/etc/init,/bin/init, and finally/bin.sh.
In Linux, a bright line exists between the kernel's execution context and that of the programs being run. The kernel's context is called kernel-land or kernel space and encompasses all the device interaction, threads, interrupt handlers, data structures, and memory. When a program is executed, the kernel creates a virtual memory address, configures resource descriptors (like those for files, timers, and semaphores), loads the program into memory, and configures the processor's registers to start execution. All of this activity occurs in userland. These two execution contexts can communicate under controlled circumstances but are otherwise separate and distinct.
Although the kernel and userland are separate and distinct, they're very much related. When the kernel boots, it initializes (and registers) devices that can be used later in the startup process or when the system is up and running. For example, when a board boots that has a USB host controller, the driver for that device initializes in the kernel; in userland, programs can run that interrogate the devices attached to the USB bus and load corresponding drivers.
Understanding the hand-off from the kernel to the first userland process helps when you're debugging startup problems and trying to reduce startup time. From a diagnostic perspective, knowing that the kernel started successfully means booting problems have been automatically narrowed to something in the root file system or initial RAM disk. From a performance perspective, knowing that a configuration step can be done in the kernel or userland (such as assigning an IP address to a network adapter) means certain activities can be deferred until later and scheduled such that system appears to boot faster, or when you can more readily control the configuration process.
Many boot loaders are available for Linux, all of which are open source. The boot loader included with the board is the best choice to use for shipping the board, because it's proven to work; getting another boot loader working is a combination engineering and research project that can be difficult to schedule. The maker of the board has likely paid for the development of a working boot loader so that engineers can easily use the board for development. Because the boot loader is open source, the source code should be included or available for customization.
Boot loaders have matured over the past few years to have the functionality of a minimal operating system: they can run video devices, serial ports, flash memory, USB devices, and even IP networking over Ethernet. Boot loaders have also become less agnostic and have additional features built in for supporting Linux—for example, U-Boot has the ability to uncompress the kernel rather than have the kernel decompress itself.
Getting the source code for a boot loader and building it works much like any other open source project. The part that's very different is getting the code on the board so that it can be run. In some cases, the boot loader supplied by the board can access the flash memory to write the new code; in other cases, you must place the code on the board with a Joint Task Action Group (JTAG) device. JTAG is a communication mechanism, akin to serial or parallel. The software that runs in a JTAG debugger can usually program flash memory on the board. Some vendors, like Atmel, have flash programming tools that use USB instead of JTAG.
The following sections contain detailed information about the boot loaders found on most systems.
This boot loader is built on the hardware abstraction layer of the eCos embedded operating system. The result is a very robust boot loader with a wide range of architecture and device support. As you can guess from the name, this software is part of the Red Hat family of projects.
You can obtain the sources for RedBoot from sourceware like so:
$ mkdir ˜/redboot
$ cd ˜/redboot
$ wget --passive-ftp ftp://ecos.sourceware.org/pub/ecos/ecos-install.tcl
$ cd ecos-install.tcl
The file downloaded is a script that downloads the rest of the RedBoot's code. This script is written in Tcl (it was first TCL, for Tool Command Language, but now it's frequently referred to as "tickle"). The code first prompts for a download mirror; select one close to your current location. Next, the software prompts for the installation directory; you can accept the default.
The next question asks what prebuilt tools to install. The RedBoot loader is picky about the configuration of the compiler used to build it. The cross-compiler created earlier works fine under most conditions; however, the best practice is to download the toolchain offered by the installation program:
Available prebuilt GNU tools:
[1]     arm-eabi
[2]     arm-elf (old)
[3]     i386-elf
[4]     m68k-elf
[5]     mipsisa32-elf
[6]     powerpc-eabi
[7]     sh-elf
[q]     Finish selecting GNU tools
The menu lets you select several tool chains. Each architecture has one toolchain (except ARM; in that case, choose the first), After the installation process finishes, you rebuild by running ecosconfig to configure the source tree and then make to run a build. For example, to do this for an ARM Integrator board, you need the following commnds:
$ cd <redboot installation directory> $ source ./ecosenv.sh $ ecosconfig new integrator redboot $ ecosconfig import ˜/ecos/ecos-3.0/packages/hal/arm/integrator/v3_0/misc/redboot_ROMRAM.ecm $ ecosconfig tree $ make
The first two lines configure environment variables for eCos based on the installation script. The next line creates a skeleton project for the ARM Integrator board, and the next two lines import a configuration file for that board and create the source tree for the build. The build product is in the install/bin directory. The correct values for the parameters passed into ecosconfig for the configuration steps are contained in the http://ecos.sourceware.org/docs-latest/redboot/installationand-testing.html file. This example builds two binaries: one to be loaded into RAM and executed and the other suitable to be written into flash.
After it's built, you can write the new boot loader into flash using RedBoot. This is platform specific. The basis process involves uploading the image on the board into RAM and then writing the data to flash. An example of the commands to perform these steps follows; again, the exact instructions vary for each board. You issue these commands d on the board using the existing redboot program:
redboot> fis init -f
redboot> load -r -b <address> redboot_ROM.bin
redboot> cksum
redboot> fiscreate redboot
When the board is reset, the new version of RedBoot is running.
The general process for using RedBoot is to load the kernel into memory and run it. A kernel comes from either flash storage or from a TFTP server. To load a kernel from flash, use these commands:
redboot> fis load -b 0x1000000 kernel
This command loads the data from the kernel flash partition named kernel and loads the data starting at address 0x100000. A flash partition is a logical division of the flash memory space that's been assigned a name.
From TFTP, use these commands:
redboot> ip_address -l <ip address> -h <address of tftp server>
redboot> load <kernel_image_file>
The first command configures the first adapter on the board to have the IP address <ip address> (remember to use an acceptable address for your network or hardware configuration; duplicate IP addresses summon an IT staff member who won't be impressed) and looks to address <address of tftp server> when performing a TFTP download. The TFTP server IP address should be the one of the host configured earlier in the book. After it's loaded into memory, you can run the kernel by doing the following:
exec -b 0x100000 -l 0x80000 -c "init=runme root=/dev/mtdblock2"
This command runs the kernel loaded into memory at 0x0100000 that's 0x80000 bytes long with the parameters sent to the kernel following the -c parameter. The kernel is now off and running.
RedBoot has support for mounting, reading, and writing Journaling Flash File System (JFFS) partitions, a handy feature because reading these file systems usually requires starting Linux. However, because RedBoot is built on a very small embedded operating system, eCos, this feature isn't surprising. In addition to being able to perform operations like listing directory contents and reading files, you can also create files. You do so by loading the file into memory and then writing it out into a flash partition. For example:
redboot> fs mount -d /dev/flash1 -t jffs2 /rfs
redboot> fis cd /opt
redboot> load <file> -b 0x80000000
redboot> fis write -b 0x80000000 -l <length> <file name>
<file> is a file loaded from the TFTP server. After it loads into memory, RedBoot returns the length of the file and uses that length in the next command when writing the data from the RAM into the flash file system using the fis write command.
Note
TFTP stands for Trivial File Transfer Protocol. TFTP is used by boot loaders because it's a very simple protocol that runs over User Datagram Protocol (UDP), the least demanding of the IP protocols. TFTP also doesn't perform authentication or other security checks, further reducing its complexity. TFTP is related to FTP in name only; FTP is a considerably more sophisticated protocol that uses Transmission Control Protocol (TCP) sockets, a much more resource intensive protocol, to transport data. Because TFTP is relatively easy to implement (even I wrote a TFTP server!) and doesn't require a full IP stack, it was adopted as the way to send files over the network to boot loaders, which need to use something simple. Now that boot loaders and the boards they run on have become more sophisticated, using a complete IP stack would be reasonable, but technological inertia may keep TFTP around for a while.
YAMON is the boot loader used on MIPS development boards and is created and maintained by MIPS. Because YAMON is specific to MIPS development boards, it's rarely rebuilt. The best thing to do is download the required binary from http://www.mips.com/products/system-software/yamon/. On this page is a link for the sources; to download them, you must register.[19] YAMON is different in that it primarily uses S-records (frequently called SRECs) as its input format. An S-record file contains lines starting with the letter S (for "Start"), a number indicating the type of line, and the payload followed by a checksum. All the data in an SREC file is ASCII characters, making this format very easy to examine in a text editor.
To download and run a kernel, do the following:
YAMON> load tftp://<tftp server ip address>/<file>
YAMON> go
<tftp server ip address> is the IP address of a host running TFTP, and <file> is the SREC to download. Notice that the there's no load address in this command; that information is encoded into the SREC file.
U-Boot (which means "the submarine" in German) is a popular boot loader for ARM and PowerPC boards. This tools is maintained primarily by DENX Software is part of this company's embedded Linux suite of products. This company contracts with hardware manufacturers to keep U-Boot up to date for their hardware, which means U-Boot is frequently the first boot loader ready for a large number of boards.
The sources are available via Git or using the FTP site. To download with Git, do the following:
$ cd ˜
$ git clone git://git.denx.de/uboot.git u-boot
If you want to use a specific release of the software, download via FTP and unpack the compressed tar file. Substitute the version number for <version> in the commands:
$ wget ftp://ftp.denx.de/pub/u-boot/u-boot-<version>.tar.bz2
$ tar xjf u-boot-<version>.tar.bz2
After you download the sources, the building software works using the configure/build model. The project has configurations stored in theinclude/configs directory; to use the configuration, strip off the path, remove the training .h, and append _config to the remaining text. The include/configs directory contains this file:
MPC8260ADS
To configure a U-Boot build for this board, do the following:
$ make MPC8260ADS_config
The software works a little while and shows a confirmation message indicating that the project was configured. If you're working with several boards, be sure to clear the environment between configurations by doing the following to empty the build directory of any leftovers that could cause errors:
$ make distclean
U-Boot works like other boot loaders in that you load a kernel into memory and then run that image. The image loaded into memory can be stored on a server running TFTP or on a flash partition. You configure IP information in U-Boot by setting environment variables to configure the board's and TFTP server's address. To set the board's IP address to 10.0.0.2 and the address of the TFTP server to 10.0.0.1, use the following commands:
=> setenv ipaddr 10.0.0.2
=> setenv serverip 10.0.0.1
The device is now configured so that it can communicate over the Ethernet adapter. To download a file from a TFTP server, use the tftpboot command
=> tftpboot 0x80000000 kernel
This loads the kernel into memory at the specified address and starts the booting process. The bootargs environment variable controls what kernel command-line parameters are sent during bootup. Setting bootargs works like setting the board's IP address:
=> setenv bootargs root=/dev/mtd1 rootfstype=jffs2 init=theapp
To save the values of the environment variables, use the saveenv command. It writes the values of the current set of environment variables to flash so they're present the next time U-Boot runs on the board.
You're probably familiar with LILO as a boot loader for desktops and x86 systems; in the early days of Linux, this was the only boot loader. LILO has been surpassed in popularity by GRUB, which has more features, but the minimalistic nature of LILO is what makes it ideal for embedded systems.
Recall from the first part of the chapter that LILO is a second-stage boot loader for an x86 system. It's loaded from the Master Boot Record (MBR) of the first bootable device the BIOS locates.
LILO gets its marching orders from the lilo.conf file. The contents of this file are written to the device's MBR by LILO as part of the configuration process. In this file, you can specify several different boot-up configurations, setting one as the default. You can also set parameters for all configurations; LILO calls these global parameters. The structure of lilo.conf is such that the global options precede the image section, where you tell LILO what kernel to load. A typical lilo.conf file for an embedded system looks like the following:
boot=/dev/hda
root=/dev/hda1
read-only
default=theapp
# kernel image to boot
image=/boot/zImage
label=theapp
This tells the software to load the kernel located in the /boot directory for the root device (in this case, dev/hda1). default= isn't necessary, because the file contains just one configuration; but being explicit is a good habit, because if this file is changed, LILO will prompt you for an image label—and that could be problematic if the device doesn't have traditional input like a mouse or keyboard.
GRUB is the boot loader commonly used in desktop systems, having supplanted LILO in the past few years. GRUB performs the same job as LILO: after the first-stage boot loader has run, GRUB finds a kernel, puts it into memory, and lets the system start.
GRUB divides booting into three stages: 1, 1.5, and 2. The stage 1 boot loader fits into the MBR of the device; its job is to mount the devices necessary to run the stage 2 GRUB boot loader, which reads a configuration file and presents a user interface. The 1.5 boot loader is necessary when the code required to find the stage 2 boot loader doesn't fit into the 512 bytes of the MBR.
GRUB is controlled by the /boot/grub/menu.lst file stored on the boot partition configured when you install GRUB This file is divided into one section (at the start of the file) with global options and a second section containing a list of kernels to boot. A typical menu.lst file for an embedded system looks like the following:
title          Linux

root           (hd0,1)

kernel /zImage root=/dev/hda2 ro
The root parameter indicates that the / should be mapped to the device hd0's first partition. The next line tells the system to get the kernel at /zImage. Because there's only one entry, grub doesn't display a menu. This root parameter doesn't have an effect on the root file system that the kernel eventually mounts; it's the root file system for the boot loader itself.
The root device format is different than Linux, which can result in confusion. In GRUB, a device has the following format:
(device[bios number][,partition])
Device can be one of the following values: hd for fixed disks, fd for floppy disks, or nd for network drives. The number that follows is the identifier assigned by the computer's BIOS. You can find this in the BIOS setup for the computer; the assigned numbers start at 0 and work upward. The partition is the logical division of the drive. To find the partitions on a drive, use the sfdisk command:
$ sudo /sbin/sfdisk -l
GRUB allows you to load the kernel from a TFTP server. To do this, you need to configure the IP parameters and use (nd) instead of (hd0,1) as the root device. For example:
ifconfig -address=10.0.0.1 -server=10.0.0.2
kernel (nd)/bzImage
This results in GRUB configuring the adapter to have an IP address of 10.0.0.1 and use the default netmask (255.0.0.0) and contact 10.0.0.2 to download the kernel file bzImage via TFTP to boot the system.
Flash memory resembles other types of memory in that it's one large array of bytes. The starting address is at 0 and the ending address is one less than the total number of bytes on the device. In order to make this pool of memory more manageable, the concept of flash partitions was added a few years back; these are analogous to partitions on disk drives. With flash partitions, a small amount of flash is reserved and populated with a start address, length, and name. You can refer to the starting address using a name rather than a hex number; and when partitions change in size or location, code that refers to the names of partitions doesn't need to change.
The kernel also uses the partition table to manage the flash memory. In Linux, the device used to access flash is /dev/mtdN, where N is the ordinal of the flash partition, starting at 0. The first flash partition is 0, and the number increases for each entry subsequent partition. Memory technology device (MTD) is the generic term for EEPROM storage devices in Linux.
Flash memory comes in two flavors: NOR and NAND. Although the MTD software interface presents a uniform interface to these flavors, they're very different. The differences between NAND and NOR from a functional perspective are that because NAND memory can't be read and written in a random manner, each block within a NAND device (where a block is a subdivision of the device's memory) must be accessed sequentially. On a NAND device, the driver can't write to byte 5 on block 100 without first writing to bytes 0 through 4. NOR memory also has a different tolerance for errors: the device can have some number of bad blocks that the driver software must be able to work around, as opposed to NOR memory, which is designed to have no bad areas.
Note
You can't use NAND memory to execute in place because it isn't random access like RAM memory. Execute in place works by mapping a flash memory address into what would otherwise be RAM memory, because NAND doesn't permit random access to individual bytes the way NOR memory does.
When booting, the kernel needs to know what device contains the root file system. If the kernel uses a flash-based root file system, one of these partitions contains the root file system; looking at the flash partition table tells you the location of the root file system so the proper device name can be sent to the kernel.
Getting the kernel loaded into memory isn't even half the fun of starting a Linux system. The boot loader's job is to get the operating system from storage (flash, TFTP) into a place where it can be executed (RAM) and then go away. Most of the time, the kernel is stored as compressed data. To uncompress the data, the kernel build process tacks a decompression code on the front of the kernel image, so the first output visible to you is like this:
Uncompressing
Linux..........................................................................
done,
This isn't really the kernel running; it's the decompression program for the kernel. These dots are quickly followed by
booting the kernel.
That output means the kernel has finished going through the processor and board-specific initialization code and is now in the kernel_start or main entry point for the kernel. It's important to know what happens in this area, even though you'll probably never touch this code.
After decompression, the next code that runs is in the head.S used to build the kernel. For example, if you use a PowerPC 32-bit processor, you find this code at
arch/powerpc/kernel/head_32.S
The processor family is the one selected during the configuration of the kernel. If you're building an ARM-based system, the entry-point file later links to a file containing the processor-specific initialization:
arch/arm/kernel/head.S
Both of these files do the same thing; they perform processor-specific configuration:
Initialize the MMU.
If the processor is multicore, get the second processor ready to run.
Get the kernel command line from the boot loader (before it's overwritten), and copy the command line into memory where it can be safely passed to the kernel's entry point.
Configure hooks for hardware debuggers.
Flush the processor's cache.
Looking in the directory for the architecture reveals many more files than those mentioned. The kernel type you choose during the configuration step specifies what additional files are linked into the final initialization object code. No matter what initialization code happens to run, all initialization programs end by jumping to start_kernel.
The kernel's entry point is located in init/main.c in the routine start_kernel. The architecturespecific code jumps to this address after the hardware setup is complete.
The sure way you know you've arrived at this step is when the following appears:
Linux version 2.6.17 ([email protected]) (gcc version 4.2.1)
The code here starts the interrupt handlers, process scheduler, virtual memory management system, and power management; it also scans the PCI bus for peripherals, enables networking, and performs other housekeeping tasks. While this activity is occurring, the device drivers print out information that documents the current state of the system:
CPU: ARM926EJ-Sid(wb) [41069265] revision 5 (ARMv5TEJ)
Machine: ARM-IntegratorCP
Memory policy: ECC disabled, Data cache writeback
CPU0: D VIVT write-through cache
CPU0: I cache: 4096 bytes, associativity 4, 32 byte lines, 32 sets
CPU0: D cache: 65536 bytes, associativity 4, 32 byte lines, 512 sets
Built 1 zonelists
Kernel command line: console=ttyAMA0 mem=128M ip=192.168.20.100:::::eth0:off
The kernel command-line printing is an important milestone: if the kernel has made it this far, then the scheduler (the part of the kernel that decides what software should be running) has started and is ready to handle threads started by the kernel itself as well as the initial user process. The output from the kernel startup process is available from the command line by using the dmesg command immediately after the kernel boots. dmesg prints out the contents of the kernel's temporary buffer, which is overwritten with newer data as the system runs. For example, on a desktop machine, try
$ dmesg | less
That command sends the results of dmesg to the less program, which lets you control the file's scrolling.
Hardware initialization continues, ending with the configuration of the network adapter:
eth0: link up
Sending DHCP requests ...... timed out!
IP-Config: Reopening network devices...
eth0: link up
Sending DHCP requests ., OK
IP-Config: Got DHCP answer from 10.0.2.2, my address is 10.0.2.15
IP-Config: Complete:
      device=eth0, addr=10.0.2.15, mask=255.255.255.0, gw=10.0.2.2,
     host=10.0.2.15, domain=, nis-domain=(none),
     bootserver=10.0.2.2, rootserver=10.0.2.2, rootpath=
These messages show an adapter that attempts to get an address via Dynamic Host Configuration Protocol (DHCP) and succeeds on the second attempt. DHCP is a protocol in which the board sends out a packet to the entire network requesting an address and waits for a reply. Because the board doesn't know if it will get a reply, it makes several attempts before giving up.
The kernel initialization of the hardware interface is necessary for kernels that will attempt to mount a root file system over the network using NFS or PXE, both of which were covered earlier in the book. If the kernel doesn't need to mount a remote file system as root, it doesn't need to configure the network adapter at this point, because this may happen later in the boot process; doing so results in the system getting to userland slightly faster, and you have more control over the assignment of the IP address if the operation is deferred until a userland scripting language can be used.
As devices initialize, the practice is to use a certain data structure, a kobject, to track its existence. Kobjects aren't objects in the Yourdon and Coad[20] sense of the word; they're data structures used throughout the kernel that are exposed through the sysfs file system mounted at /sys. If your desktop is running a 2.6 kernel and doesn't have a file system mounted at /sys, do the following to make this file system available:
# mkdir /sys
# mount -t sysfs none /sys
$ cd /sys
One of the purposes of kobjects when they were introduced was creating a uniform, dependable way for a process in userland to see the device drivers loaded by the kernel. Their use has been expanded over the years to include keeping track of more types of kernel-level data. The notion of kobjects makes it very easy for devices to register and be queried from userland in order to create the device nodes files in the /dev directory, and that is why kobjects are important in the boot-up process.
Note
Device nodes are an interesting concept if you're new to embedded Linux. Linux has a Unix heritage, in that a file establishes the semantics for how things communicate. A hardware device like a USB drive, mouse, or serial port uses a file for communication as well; however, these aren't real files but rather placeholders in the file system (device node files) that look like files. They serve as proxies for communicating with device drivers in the kernel. By writing or reading these things that look like files, the device driver calls functions that handle getting data from userland (the result of a write) or sending data to userland (the result of a read).
The typical desktop machine has a Linux distribution designed to work on some computer, but not necessarily your computer. During the boot-up process, the kernel probes the hardware and attempts to load drivers for that hardware. When those drivers load, they create a kobject in their tracking data structures that is registered by the kernel. The kobject is a data structure exposed in the sysfs file system. In user space, another process runs, called udevd, which inspects the sysfs file system to create the necessary entries in /dev for the device drivers that have been loaded. This is how the /dev file system gets populated with all those device nodes without your direct intervention. This process ensures that the /dev directory has device nodes for all the drivers—and that means the hardware is accessible to the system for use.
Most embedded systems have a fixed set of devices that doesn't change; the overhead of the sysfs file system and udevd is wasteful, because the set of device nodes necessary could be created once and stored on the root file system. This is worth mentioning at this point because it's important to understand what happens during the startup process. When the book discusses reducing boot time and root file system size, udev and the /dev and /sys directories are low-hanging fruit.
After the hardware has initialized, the kernel searches for something to run. The first thing the kernel does is unpack the initial RAM files system, initramfs. Every kernel has one of these file systems, stored as a compressed cpio archive. If you didn't tell the kernel to create one, there's a very small, empty archive.
The purpose of initramfs is to have a failsafe way to load device drivers early in the boot process. Depending on the hardware, for example, the device driver for the device boots the system may not be known when the kernel is compiled and thus must be loaded so the kernel can use the device to continue the booting process. The kernel loads the initrd file system by using a file system that's a layer on top of the disk cache, with the small modification that changes are never written to the disk. How the initrd works is a clever hack. With very little overhead, the Linux system has a RAM disk that supports all the functionality of a disk-based file system.
After the initramfs is in memory, the kernel attempts to run /linuxrc. There is no way to specify another file—it's that or nothing. If this file exists, the kernel runs it and waits for it to finish before continuing the boot process. It's common practice for embedded systems to use initrd as the primary file system on the board, and this is perfectly acceptable. The BusyBox project built in the last chapter created a /linuxrc file in the root or installation for this purpose. If no /initrd file exists, or when it returns, the kernel continues its regular booting process.
After not finding an initrd, the kernel mounts the root file system. The kernel knows what to use because of the root and rootfstype kernel parameters. For example:
root=/dev/mtd0 rootfstype=jffs2
This line instructs the kernel to mount the file system at /dev/mtd0 and says that the file system type should be jffs2. But if no file system has been mounted at /, how can the kernel use a file /dev/mtd0 to mount the root file system? There seems to be a circular dependency. The answer is that during the startup process, the kernel maintains its own in-memory file system for the /dev file system that's disposed of when you mounts the real root file system.
If the device specified by root doesn't exist and isn't created in the temporary /dev file system created by the kernel, you must use the initial RAM disk root file system to load the appropriate driver and ensure that the proper entries exist in the /dev directory of the initramfs file system.
After the root file system has been mounted, the kernel needs to execute the userland init program. The kernel first uses what was specified as the init= parameter on the kernel command line. If you didn't provide an init argument, the kernel attempts to run the following commands, stopping at the first one that works:
/sbin/init
/etc/init
/bin/init
/bin/sh
If none of the above can run, the following error appears on the console:
No init found. Try passing init= option to kernel.
And the system stops.
Systems using Network File System (NFS) root file systems have an additional twist in the booting process. Because NFS file systems require a working network stack, one adapter must have an IP address. You set the IP address with the IP kernel parameter, which has the following format:
ip=host-ip:server-ip:gw-ip:netmask:hostname:device:auto-configureA typical line looks like the following when you specify an IP address
ip=10.0.0.1:10.0.0.2:10.0.0100:255.0.0.0:theboard:eth0:off
or like this when you use DHCP to obtain IP information:
ip=:::::eth0:dhcp
Table 7-1 breaks this down and explains each parameter.
Table 7.1. Parameters to the IP Kernel Argument
Argument | Notes |
|---|---|
Host IP | The IP address to assign to the board. This isn't required. In its absence, the kernel doesn't assign an IP address but still attempts to initialize the adapter. |
Server IP | The IP address of the host with the NFS file system that will be mounted as root. Optional, because a server IP address can be supplied in the |
Gateway IP | The network's gateway IP address. Optional. When absent, the kernel doesn't attempt to route packets that aren't on the local network. |
Netmask | Indicates what parts of an address are network and which identify a machine. In the example, the first 8 bits identify the network, and the remaining can be used to identify a machine. When not supplied, the kernel attempts to calculate a netmask based on the IP address. If the network address fits into the class A, B, or C range, it picks the right netmask automatically. |
Hostname | The text name given to the host. A synonym for the IP address. Optional. |
Device | The device name that is autoconfigured. No |
Autoconfigure | When off, the kernel doesn't attempt to use BOOTP or DHCP to get IP address information. This doesn't turn off the adapter. Optional. Default is BOOTP, which can result in the other parameters being overwritten with data from a BOOTP or DHCP server.[a] |
[a] Get into the habit of putting something here. Many hours have been wasted trying to figure out why the IP address parameters aren't working either because they're being overwritten by a DHCP server that was forgotten about or because the kernel was run on a customer's network that was serving DCHP addresses while the development network wasn't. Not that any of this has happened to me. | |
After the system has an IP address, the next step is telling the kernel the IP address of the NFS server and what export to mount for the root file system. That information appears in the nfsroot kernel parameter, which follows this format:
nfsroot=nfs-server-ip-address:export-name,optionsA typical NFS root parameter looks like the following:
nfsroot=10.0.0.2:/opt/boardrfs
Table 7-2 explains each parameter in detail.
Table 7.2. NFS Root Parameters
Argument | Notes |
|---|---|
NFS server IP address | The IP address of the server that's exporting the NFS information. Optional. If the server is specified in the IP parameter, it's used by default. It's permissible for this to be different than the IP supplied in the IP parameter. |
Export name | The directory on the NFS server to mount as the root file system. Required. |
NFS options | Any option to control the NFS connection. The default parameters are sufficient; however, a table follows that describes GRUB's different values. |
For the record, Table 7-3 lists the NFS options. When you're booting a board, the default NFS parameters are usually adequate. For a production system, you're likely to change the rsize and wsize parameters, because most devices perform better with higher numbers However, in some situations on a production, an NFS server is used as a data-sharing tool, and in that case, the parameters that control caching are of utmost importance.
Table 7.3. NFS Mount Options
Parameter | Default | Notes |
|---|---|---|
| Returned by the port map daemon | Default value is usually 2049. To find out what the value is on your system, look in the |
|
| The number of bytes in a read packet. |
|
| The number of bytes in a write packet. Setting this higher means the network generates fewer handshaking packets, thereby increasing the effective bandwidth. |
|
| The number of seconds the server should wait before it considers the server as not responding. |
|
| The number of times the client should retry a transmission before considering the connection inoperable. |
|
| The minimum amount of time the server can cache file-attribute information. |
|
| The maximum amount of time the server can cache file-attribute information. A lower number decreases performance in exchange for more current data. |
|
| The minimum time directory attributes can be cached. |
|
| The maximum time directory attributes can be cached. |
|
| If a communications timeout occurs, using the soft timeouts results in the system producing a message for the system log and retrying indefinitely. Hard timeouts result in the program receiving an error. You should use hard timeouts in production systems so that errors can be properly handled. |
|
| Mount the file system with POSIX semantics. This is important if the client mounting the server needs to query properties like the maximum name length. |
|
| Stands for "close to open," meaning that when one NFS client closes a file, the next user opening the file sees all the changes from the prior close. This is important for NFS servers that have a large number of clients changing a few files. |
|
| Indicates whether the system uses access control lists instead of UIDs/GIDs to grant file access. |
|
| Some very old NFS servers don't support locking. The default is the acceptable value, but dropping locking results in a slight performance gain. |
|
| What NFS protocol to use. The other valid value is 2. |
|
| What networking transport to use. UDP is lighter weight and faster, but it doesn't have the packet-delivery guarantees of TCP. Use UDP only if you really know what you're doing. |
|
| Set ( |
| Set to |
At this point, the system kernel is up and running, the root file system is mounted, and the system has found something to run. On most desktop systems, that something to run is usually init, but it could be any program. To find out, do the following:
$ ps aux | head −5
USER       PID %CPU %MEM    VSZ   RSS TTY      STAT START   TIME COMMAND
root         1  0.0  0.0   3056   128 ?        Ss   Apr19    0:01 /sbin/init
root         2  0.0  0.0      0     0 ?        S<   Apr19    0:00 [kthreadd]
root         3  0.0  0.0      0     0 ?        S<   Apr19    0:00 [migration/0]
root         4  0.0  0.0      0     0 ?        S<   Apr19    0:00 [ksoftirqd/0]
The process with the PID of 1 is the init process, in this case /sbin/init. On a desktop system, this file is either SysV init or Upstart (from Ubuntu, the binary name is called init, but it's nothing like the SysV init). For an embedded system, both of these solutions are overkill.
SysV init, the most common init, works by running certain programs based on a runlevel. A runlevel is an integer that represents what tasks the system should be running. The level part of runlevel may cause you to think that runlevels are scalar; however, this number is just an identifier. Thus runlevel 1 isn't "less than" runlevel 4. Systems with a graphical environment typically start in runlevel 5. Table 7-4 lists the conventions for assigning programs that should be run for a given runlevel
Table 7.4. Run Level Descriptions
Runlevel | Mode |
|---|---|
0 | System shutdown. |
1 | Single-user mode. The system doesn't start the network adapter or services. Uses a text console for login. |
2 | Not used. |
3 | Multiuser mode. The system starts the networking services. Log in through a text console. |
4 | Not used. |
5 | Multiuser mode with X Window login. |
6 | System reboot. |
The parameters controlling how init works are stored in /sbin/init. The format for this file is cryptic; it's composed of lines in this format (see Table 7-5).
id:runlevel:action:processTable 7.5. Runlevel Parametersn
Field | Explanation |
|---|---|
| Some identifier for the row. This can be any value that contains letters and numbers, but it can't be longer than 4 characters. |
| The runlevel at which this command should be run. Because runlevels are one character long, there's no delimiter for multiple runlevels. Some actions ignore this field. |
| What action should be taken for this line. |
| The program to execute. Depending on the action, this can be empty. |
There are many potential actions for each line. Most are unused, but it's helpful to know what's available. The order of Table 7-6 is the order in which init executes the actions.
Table 7.6. Runlevel Actions
Action | Explanation | Uses ProcessField | Uses Runlevel Field |
|---|---|---|---|
| Specifies the default run level. | No | Yes |
| Runs during system startup. | Yes | No |
| Runs during system startup. | Yes | No |
| Like | Yes | No |
| Runs the process and restarts the process when it stops running. | Yes | Yes |
| Runs the process and waits until it completes to run the next process. | Yes | Yes |
| Runs the process once during the runlevel. | Yes | Yes |
| Executes a process when you press the Ctrl+Alt+Del key combination, triggering a | Yes | No |
| Triggered by a UPS device when the commercial power is interrupted. | Yes | Yes |
| Like | Yes | No |
| Means commercial power has been restored. Waits until this command finishes before running the next command. | Yes | No |
| Means the UPS has exhausted battery backup and the system must be shut down. | Yes | No |
The sysinit file can be very difficult to parse. Table 7-7 breaks down a sample inittab file and explains each part in detail.
Table 7.7. Example inittab lines
inittab line | What It Does |
|---|---|
id:2:initdefault: | Instructs |
si::sysinit:/etc/init.d/rcS | This tells |
l0:0:wait:/etc/init.d/rc 0 l1:1:wait:/etc/init.d/rc 1 l2:2:wait:/etc/init.d/rc 2 l3:3:wait:/etc/init.d/rc 3 l4:4:wait:/etc/init.d/rc 4 l5:5:wait:/etc/init.d/rc 5 l6:6:wait:/etc/init.d/rc 6 | This block of commands tells |
ca::ctrlaltdel:/sbin/shutdown -t1 -h now | The system runs the |
1:23:respawn:/sbin/getty tty1 VC linux 2:23:respawn:/sbin/getty tty2 VC linux 3:23:resawn:/sbin/getty tty3 VC linux | The |
This /etc/sysinit results in the following commands being run in the following order:
/etc/init.d/rcS
/etc/init.d/rc 2
/sbin/getty tty3 VC linux
Init continues to execute the last command any time it stops. The init command doesn't indiscriminately reexecute this command. If the command fails quickly a few times, init waits a few seconds before attempting to run it again.
Note
You should configure at least one command for the system's starting runlevel as respawn. Otherwise, the kernel will panic and the system will stop running the when the command exits.
When the kernel hands control to the init program, some things should happen to make the system usable. None of these steps are required; however, if they aren't done, commands that expect to be running on a regular embedded system will find that random problems occur. The following is a list of the housekeeping chores you should perform:
Mount the proc file system. This file system isn't required, but so many programs read it that it needs to be configured.
Ensure that
/tmpexists and is read-write. The/tmpdirectory is a requirement: programs attempt to write to this directory, and not having it will result in errors that are very difficult to find.Set the system
$PATHto the location of the binaries on the system.Run any daemons (background tasks like web servers or disk-sharing tools) necessary for the application.
The second command that runs in the startup sequence, /etc/init.d/rc 2, runs a script that's responsible for running a series of other scripts in the directory /etc/init.d/rcN.d, where N is the runlevel. This folder contains a series of symlinks that follow this format:
K|S##commandThe K or S character means "Kill" or "Start"; ## is a number that's used to sort the entries, and command is an identifier (usually the name of the command to be run). Start means this command should be executed when entering the runlevel. The Kill command is run when leaving the runlevel. The command portion is informational, because the number controls how commands are executed.
The target of the symlink (that target is what the symlink points to) in the /etc/init.d/rcN.d directory is a file in the /etc/init.d directory. This level of indirection minimizes the amount of duplicated code: if you want to start the HTTP server in several runlevels, the commands to start this service reside in /etc/init.d/http server, and several symlinks reside in the /etc/init.d/rcN.d directories of the runlevels where the commands should run.
This set of scripts is perfect for a server or other enterprise-type system. It has terrific flexibility, and the different levels let you configure with a fine degree of control. This system isn't efficient with respect to time or storage space and isn't the best for a system where both are at a premium. The next two sections cover alternatives that are more appropriate for embedded systems.
BusyBox's init implementation is a common replacement for the SysV init. The BusyBox init program works much like the original, with the following exceptions
There are no runlevels: The only runlevel supported is 0. If a runlevel is supplied, it's ignored.
Only the following actions are supported:
sysinit,respawn,becausekfirst,wait,once,restart,ctrlaltdel, andshutdown. The actionaskfirstprovides a prompt asking that a key be pressed before running the command; it then works likerespawnwith respect to restarting the task.The first field isn't an identifier: This field is used to indicate what TTY device to use when running the program. This value is appended to
/dev/when supplied, so the following lines run login processes on ttyS0 and ttyS1:ttyS0::respawn:/sbin/getty -L ttyS0 9600 vt100 ttyS1::respawn:/sbin/getty -L ttyS1 9600 vt100
If no
/etc/inittabfile is found, BusyBox uses this as a default:::sysinit:/etc/init.d/rcS ::askfirst:/bin/sh ::ctrlaltdel:/sbin/reboot ::shutdown:/sbin/swapoff -a ::shutdown:/bin/umount -a -r ::restart:/sbin/init
The default init file is usually good enough to quickly get a system running. A production system needs to define something different.
The program run for init can be anything that the system can execute: a binary, shell script, Perl script—the only requirement is that it can be run. Like any other init process, when this program stops, the kernel panics and halts. That means the program must be coded so that it works something like the respawn command in init. The typical strategy for implementing this sort of protection is to spawn the program such that the system runs in a separate process and restarts when it fails.
The code for this sort of program follows this pattern:
#include <sys/wait.h>
#include <stdlib.h>
#include <unistd.h>
#include <stdio.h>

#define THE_APPLICATION "somebinary"

int main(int argc, char **argv)
{
    pid_t app, appstatus;
    int status;

    while (1) {
      app = fork();
      if (app == −1) {
        perror("could not fork, application not run");
        exit(EXIT_FAILURE); /* this is a panic */
      }

      if (app == 0) {
        execl(THE_APPLICATION, "");
        sleep(3);
      }
      else {
        appstatus = waitpid(app, &status, 0);
        printf("process exited with %d status, restarting
", status);
      }
   }
}
The code is very simple in that when the program fails, the controlling program prints out a message, and the loop restarts. This code is basic enough that the opportunity for bugs is low; the simplicity means the resulting binary is small as well. The execution time for this approach is very low, because this init program doesn't need to open and parse a file in order to run the application.
The next section of the book covers getting a development environment together to build an application. You pair the cross-compiler with other tools for debugging and development that embedded engineers use to be productive. Linux is very flexible, and you can code a project in any number of languages— maybe to two or three. In years past, C was the only language considered for embedded development, but now choices abound.
[18] Early boot loaders even lacked support for backspace. Being a terrible typist, I found that composing the lines in a text editor and then pasting them into the terminal emulator was the best way to proceed. Now that backspace is well supported, that's something I don't have to do anymore, but old habits die hard.
[19] Consider using http://mailinator.com for registration so you're not bugged with spam.
[20] The book Object-Oriented Design by Peter Coad and Edward Yourdon (Prentice Hall, 1991) remains one of the most lucid explanations of how to approach object-oriented system design.