
Embedded Linux development when you're creating applications is much less about kernel development and more about kernel configuration. Because hardware vendors have a vested interest in making sure Linux is ready for their hardware the day it ships, the days of a developer on an embedded project porting a kernel for a board has become a thing of the past. A typical embedded developer needs to know how the kernel project works but doesn't spend time doing in-depth kernel hacking like in the days of yore.
This chapter explains the kernel project layout and how to build the kernel for your board. If you're changing the kernel and want to make your changes part of the Linux project, a section explains the kernel development process, how to make a patch, and the steps necessary to get your changes accepted into the mainline kernel build. If you receive a patch, a section reviews how to apply it to your current kernel code.
The kernel project is complex, but the complexity is tempered with good organization and a well-defined process for building and development. Compared to other open-source project, the kernel is very well engineered for cross-building; you should have very few problems getting the kernel to build for your target platform. As hardware companies have made it their business over the years to fully support Linux, they have been aggressive in making sure their changes make become part of the mainline Linux kernel available from http://www.kernel.org and making sure engineers choosing Linux for their operating system can be confident that building a functional Linux kernel for an embedded board will be as simple as building one for a desktop system.
The Linux kernel is a large-scale C and Assembler project that's held together with GNU Make and GCC. Some additional scripts control the way the project builds, and some additional helper programs are contained in the scripts
directory and aren't part of the code that goes into the final kernel image.
The kernel has hundreds of active developers. To keep things in order, the project has established its own "a place for everything and everything in its place" policy that's important to understand. Table 11-1 describes the project's directory structure, starting from where the kernel was unpacked or fetched from Git.
Table 11.1. Kernel Directory Layout
Contents | |
|---|---|
The top level directory. | Contains some very basic information about the project. Most notable are the |
| Contains a directory dedicated to each architecture that Linux supports. The Linux kernel has very little architecture-specific code; most of what's here focuses on boot-time, power management, and the like. Any assembler code for a given architecture is found in this directory. Under each architecture, the organization varies a little, but each contains folders for architecture subtypes and board-specific code. |
| Contains core code for managing block devices. The driver code resides elsewhere; this is the API the kernel presents to block devices. |
| Contains the cryptographic API for the kernel. |
| Contains kernel documentation. This is a key part of the kernel: the documentation is well written and well-organized. Use the |
| Contains directories for each major type of driver: USB, keyboard, display, and network drivers, to name a few. |
| Provides the API For devices that have firmware loaded into memory as part of the device driver load. |
| Contains the general code for handling file systems in Linux and a directory for each supported file system. |
| Contains header files used throughout the kernel project. The kernel sets the search path this directory when building the kernel. |
| Contains the code that's run as part of the kernel's initialization. The entry point for the kernel (after the assembler parts of the code are executed) is in this directory. |
| Contains the API for interprocess communications. This directory contains the code for the semaphores and pipes. |
| Contains infrastructure code for the kernel. The scheduler code resides in this directory, as does the timer and process-management code. |
| Contains helper code that's shared across all other parts of the kernel. |
Contains the memory-management code for handling virtual memory and paging. | |
| Contains the TCP stack and networking infrastructure code. The kernel supports much more than TCP in terms of networking, and each networking technology has a directory with some of the shared code in the top level |
| Contains sample code for a few of the newer kernel constructs like kobjects and tracepoints. |
| Contains the kernel configuration and build code. None of the code in this directory is included in the kernel when it's compiled—it's there to make the compilation process happen. |
| Contains Security Enhanced Linux (SELinux) and smack, an alternate access control system. The top-level directory contains some code shared by both of these modules. |
| Contains the drivers and codecs for audio. |
| Contains the stub initramfs file system when one isn't included in the kernel during the build process. |
| Contains the kernel-level virtualization code for the kernel. This isn't code for QEMU virtualization; it's the drivers for the kernel-level x86 virtualization used in server devices. |
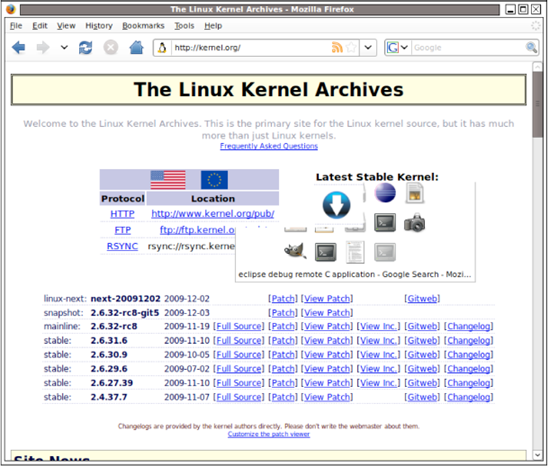
You can find the current releases of the kernel at http://kernel.org (see Figure 11-1). This site is the canonical location of the Linux kernel sources and the hub of activity for the kernel project. Present on the site is every Linux distribution released along with links to the various mailing lists you can use to follow and participate in the project.
There are three ways for you to get the kernel sources. Each is described in a brief section following the summary:
Download a compressed tar file: This is the traditional (as much as this term can be applied to open source distributed software development) method of getting the kernel sources. This archive contains a snapshot of the sources during the development cycle. When the kernel is released, a tar file is created with the sources constituting that release. If you want or need to get a certain version of the kernel (say, 2.6.31.2), this is the easiest method.
Use Git to clone the repository: Git is a distributed source code control system used by developers (and by developers of other projects; Git is a general-purpose tool) for the kernel project. If you start from a Git repository, it's much easier to retrieve updates to the kernel release and incorporate them into your kernel tree.
Supplied by your vendor: You board vendor may supply you with some kernel sources. These could be supplied to you in any number of ways; this chapter assumes that sources supplied in this manner also include enough support that you can get them unpacked and in a place where they can be used for a build.
This is the easiest way to get the sources. Just click the link, and wait for the download to complete; the waiting is the hardest part. After the download completes, you can unarchive the file by doing the following:
tar xzf linux-2.6.30.1.tar.gz
The kernel version you download will likely be something different, but the format will be the same. A directory is created named after the tar file, sans the .tar.gz suffix.
The Git source code control system is explained in greater detail in chapter 13, so this section just covers the mechanics of getting the Linux sources. When working with Git, you don't check out the sources, as with other source code control systems; you create a copy, or clone, of a repository. For the Linux kernel, you use the following command:
$ git clone git://git.kernel.org/pub/scm/linux/kernel/git/stable/linux-2.6.31.y.git
You'll likely use a different version of the kernel, so the 2.6.31 in this link will be the version of the kernel that you want to download. Your company may have a firewall that blocks the URL git://; if this is the case, replace git: with http:, and the data will be downloaded over port 80.
Building the kernel is frequently viewed as a difficult proposition. There's also the view that building the kernel is risky because the newly build kernel won't work properly even if it does compile. These assumptions are simply false. Building a kernel from source is easy, and the risks of the software not working are minimal—the kernel is tested by thousands of software engineers on a daily basis. Because the project is complex, building the kernel requires a few steps not necessary for other project. The basic steps are as follows:
Configuration: During the configuration step, you set the parameters and options that control how the kernel is built. There are several different ways of configuring the kernel, but it doesn't matter which one you select because all of them perform the same underlying activities. Configuration is frequently aided by default configuration settings supplied with the kernel for most boards and processors; for many boards, you can use this default configuration as is to build a kernel that will boot on the board.
Building the kernel: After it's configured, the kernel can be compiled and linked. This process works much like any other project using GNU Make as the build tool. The result of the kernel build is a binary that can be put on the board and booted as well as file suitable for debugging.
Building the modules: The Linux kernel supports linking code into the image at runtime, similar to the way a program uses a shared library. Kernel modules support hardware components that may not be present when the kernel is started, so having the code in memory is a waste of resources. The code that can be linked into the kernel, in a process called loading, is called a module; these modules can be built separately from the kernel. Modules can be loaded and unloaded on demand.
The Linux kernel build process involves first priming the kernel source tree so that it's in the right state to be compiled; this process is called configuration or configuring the kernel. The kernel configuration process grew out of environment variables that were set in the shell, which were then used by the make file to compile certain code or change the compilation method. As the complexity of the kernel project grew, the configuration process advanced similarly and gained a text-based menu interface that is essentially unchanged in the current distribution of Linux.
To start the kernel configuration process using the text-based menu-oriented configuration program (other methods are discussed later), do the following from the command prompt while in the kernel's top-level directory:
$ make menuconfig ARCH=<your architecture>
If the kernel has never been configured before (or has been cleaned—more on that later), the programs used to configure the kernel and display the text-based menu are compiled, after which the screen shown in Figure 11-2 appears on your console.

The value for ARCH is one of the entries in the kernel's arch directory and is always in lowercase. To see a list of the supported processor architectures, do the following from the top of kernel's source tree:
$ ls arch
alpha  blackfin  h8300    m32r       mips     powerpc  sparc xtensa
arm    cris      ia64     m68k       mn10300  s390     um
avr32  frv       Kconfig  m68knommu  parisc   sh       x86
If you're uncertain what to pick for the architecture, run uname -m on the target machine. If you're still uncertain, get in touch with the technical support department or FAE for the board. The most popular targets for embedded (in alphabetical order) are arm, mips, powerpc, sh, and x86.
Many people prefer to use GUI tools that can work with a mouse, as opposed to the text-oriented configuration program. For the kernel, there are two different graphical kernel configuration systems: one that uses the QT graphics library and the other that uses GTK libraries. Table 11-2 describes the configuration programs, the packages you need to install in order to build them, and why you would want to use one over another. GTK and QT use different GUI widget sets, where a widget is a check box or button. Because many systems don't have the proper libraries in place for compiling applications using either of these widget sets, the table also says what extra packages you need to install in order for the configuration build to work.
Table 11.2. Kernel Configuration Programs
Method How | Required Packages | Why Use |
|---|---|---|
Console | Ncurses | Fewest requirements. You'll have the least problem getting this method to work on a large variety of computers. Fast and easy to use when you get the hang of it. |
QT Based | qt3-apps-dev | Runs and loads quickly. Friendlier for keyboard users. Excellent search feature. |
GTK | libgtk2.0-dev libglade2-dev libglib2.0-dev | Friendlier for mouse users. Incremental search feature. |
No matter what configuration program you use, the program does the same thing, so feel free to experiment with each and pick the one you prefer. Many kernel developers have a preference for the console-based menu configuration tool, so if you're working with a kernel developer, learning and using this tool is a good idea.
The options selected by the kernel configuration program are stored in a .config file. Because this file starts with a . it doesn't appear when you list a directory's contents in Linux and use the default parameters for ls (hint: use the -a argument to ls to see files starting with a dot); that confuses users who look for the file containing their configuration information. After you run the configuration program, take a peek at the contents of the file using the head command or by opening the file in an editor:
$ head −50 .config
#
# Automatically generated make config: don't edit
# Linux kernel version: 2.6.29.4
# Tue  Jun 2 23:08:27 2009
#
CONFIG_MIPS=y

#
# Machine selection
#
# CONFIG_MACH_ALCHEMY is not set
# CONFIG_BASLER_EXCITE is not set
# CONFIG_BCM47XX is not set
# CONFIG_MIPS_COBALT is not set
# CONFIG_MACH_DECSTATION is not set
Notice that some of the comment lines show variables that aren't set to a value. This is a vestige of when this file set environment variables; having the line commented out was a trick to show that the variable wasn't being set while keeping a record of the variables that weren't being set. The configuration system now relies on the pattern
# CONFIG_VARIABLE_NAME is not setto determine if a variable is not set, even though this line appears to be a comment. Don't change lines that follow this pattern, because doing so will confuse the kernel configuration program.
The kernel configuration process works when the kernel configuration program reads a kernel configuration specification file, called the kconfig file. This file resides in the arch directory, as specified with the ARCH=<your architecture> parameter when you run menuconfig. The kconfig file for the architecture contains the settings specific to the architecture and then includes configuration files for the rest of the kernel. For example, the MIPS kconfig file contains the following:
config MIPS
        bool
        default y
        select HAVE_IDE
        select HAVE_OPROFILE
        select HAVE_ARCH_KGDB
        # Horrible source of confusion. Die, die, die ...
        select EMBEDDED
        select RTC_LIB

mainmenu "Linux/MIPS Kernel Configuration"

menu "Machine selection"

(many, many lines clipped)

source "net/Kconfig"
source "drivers/Kconfig"
source "fs/Kconfig" source "arch/mips/Kconfig.debug" source "security/Kconfig" source "crypto/Kconfig" source "lib/Kconfig"
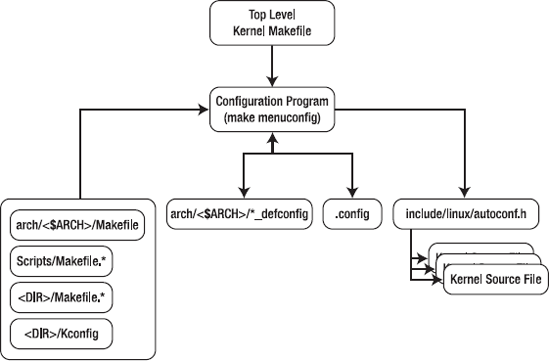
The kernel configuration program reads in the .config file for the kernel, applies the settings to the kconfig that was just read into the system, and renders the menu. After you select options, the changes are written back out to the .config file. Early in the build process, the file include/linux/autoconf.h is generated: it contains all the settings in the .config file as C preprocessor macros. The autoconf.h file is included in all the files in the Linux kernel; that is how the options you select in the configuration program are made available to the kernel. To see the process in terms of actions and configuration files, have a look at Figure 11-3.
The settings for the current configuration session are kept in the .config file in the top level of the kernel sources. Default configuration files (called defconfig files) for boards are stored under their respective arch directories. To get a listing of the defconfig files for a given architecture, do the following from the top-level kernel directory:
$ make ARCH=<your architecture> helpSome generic help for building the kernel appears, followed by a listing of the defconfig files for <your architecture>. In this case, the value was mips:
pnx8335-stb225_defconfig - Build for pnx8335-stb225
  pnx8550-jbs_defconfig    - Build for pnx8550-jbs
  pnx8550-stb810_defconfig - Build for pnx8550-stb810
  rb532_defconfig          - Build for rb532
These defconfig files are nothing more than .config files that has been copied to a different directory and renamed. The kernel build system expects these files to be in the configs directory under the selected architecture; when the make target matches a file in the defconfig directory, it copies the file to .config.
If you're not interested in running make to see the default configurations available, or if you want more information than make provides (such as a date, or if you'd like to sort the list), you can locate these files with the find utility:
$ find arch/<your architecture> -name "*_defconfig"
Using mips for the architecture, the following appears:
(clipped)
arch/mips/configs/msp71xx_defconfig
arch/mips/configs/ip32_defconfig
arch/mips/configs/ip27_defconfig
arch/mips/configs/jazz_defconfig
arch/mips/configs/yosemite_defconfig
(clipped)
To use one of these files to configure the kernel, use it as a target for make. For example, to configure the kernel to build for the yosemite board, you issue the following command from the top level of the kernel directory:
$ make ARCH=mips yosemite_defconfig
#
# configuration written to .config
#
The kernel will be ready to compile, targeting this processor. Because a defconfig file is just a renamed and relocated .config file, you can also store the .config file used in your project in the configs directory.
Note
Most board and processor vendors create defconfig files for their boards. The documentation included with the board tells you the correct defconfig file. If you didn't get this information, browse the configs directory for your board to find a match. Having a defconfig file isn't a requirement for building the kernel, but it does make the process less error prone because the creator of the default configuration file has tested that the settings therein are correct.
Because the .config file is a plain-text file with an uncomplicated format, editing it directly is a temptation and is sometimes the fastest way to change a value that's buried in the configuration's menu system. There is nothing wrong with editing this file by hand, and doing so is common among developers who know exactly what change they want to make. As an example, developers frequently change the value of CONFIG_CMDLINE, the kernel command line; opening the file in an editor and changing the line is much faster than using the existing kernel configuration tools.
After you make a change to the .config file, the best practice is to use the oldconfig target to test the selected options against the current configuration settings. For example,
$ make ARCH=arm oldconfig
results in the current .config file being processed. Any problems are reported on the command line. For example, some changes to the file result in other dependent options no longer being valid.
Another practical use for oldconfig is when you use the contents of a kernel's /proc/config.gz file. Recall from Chapter 4 that when examining a board, you can get a copy of the configuration used to build the kernel from the kernel itself. If you want to build the kernel with that file, the steps are e as follows:
Get the file. On the board is a file
/proc/config.gzthat is a compressed version of the.configfile used to build the kernel. Uncompress it into a regular file by doing the following command on the target:$ gunzip -c /proc/config.gz /tmp/kernel.config
This decompresses the file
/proc/config.gzand makes a copy in/tmp/kernel.config.Copy to the kernel's source tree. Copy the file from the board using the method you've already established. This could mean using SCP, FTP, or a USB thumb drive. Copy the file to the root of the kernel source tree, naming it
.config.Use
make oldconfig. This step loads the existing configuration options, checks them against the current.configfile, and reports any problems:$ make ARCH=<
your arch> oldconfig
After the kernel is configured, it's ready to be built. The output, or target, of a kernel build is a binary suitable for the boot loader on the target board, because the boot loader is the program responsible for getting the kernel code in memory and ready to be executed. The build also produces some of the tools used to build the kernel itself; unlike other projects, the build does the right thing when compiling programs for the host (such as those supporting programs) and object code for the target, such as the kernel and modules.
Many different targets are available for building a kernel, and the right one depends on the boot loader for the board. The differences between the targets in terms of the overall Linux build is quite small, because the build targets determine what happens in the last few steps of the build to format the object code so that it can be used with the boot loader on the board. Table 11-3 outlines the targets available and their applicability.
Table 11.3. Kernel Build Image Types
Description | |
|---|---|
| Compressed kernel image. This contains a bit of code in the header that decompresses the rest of the kernel. |
| Big Z image. Although similar in name to the bz2 compression tools, this just means the size of the image is greater than one sector for an x86-based system. |
| Image suitable for the U-Boot boot loader. It contains some additional information in the header so that the boot loader can put this file in the right place in memory along with some checksum information. This is the most common format for an embedded system. |
| S-record image. S-records are files that use an encoding scheme so that binary data is represented as printable ASCII characters. This is the least common format for an embedded system. |
| Kernel image packaged in the specified format. This is generally used for kernel developers who need to pass their work to another group. |
| XIP image. This is for an "eXecute In Place" kernel that will be run directly out of flash memory without being copied into memory first. |
In addition to picking the appropriate target, you also need to tell the make file what compiler to use. The kernel's make file cross-compiles well, and the make file uses the host system's compiler when building tools for building the kernel and the cross-compiler when building code. The general case command line looks something like this:
$ make ARCH=<arch> CROSS_COMPILER=<cross compiler prefix> <target>
To build a kernel for a PowerPC board using a U-Boot boot loader, use the following command:
$ make uImage ARCH=powerpc CROSS_COMPILER=powerpc-405-linux-gnuabi-
This command line specifies the cross-compiler; it begins with powerpc-405-linux-gnuabi-. The value for CROSS_COMPILER can include a fully qualified directory path if you don't want to put the cross-compiler on the path. Some users who build several different kernels regularly opt for the fully qualified name route; however, putting the cross-compiler on the path is just as effective.
If you skipped ahead to this section and didn't configure the kernel, the following message appears:
***
*** You have not yet configured your kernel!
*** (missing kernel .config file)
***
*** Please run some configurator (e.g. "make oldconfig" or
*** "make menuconfig" or "make xconfig").
***
After the compilation process finishes, the following appears, to show what was produced (this output will vary slight depending on your kernel):
SYMLINK include/asm -> include/asm-powerpc
  CALL    scripts/checksyscalls.sh
  CHK     include/linux/compile.h
  CALL    arch/powerpc/kernel/systbl_chk.sh
  CC      arch/powerpc/kernel/prom_init.o
  CALL    arch/powerpc/kernel/prom_init_check.sh
  WRAP    arch/powerpc/boot/uImage
Image Name:   Linux-2.6.29.4
Created:      Wed Jun 10 23:19:58 2009
Image Type:   PowerPC Linux Kernel Image (gzip compressed)
Data Size:    1467720 Bytes = 1433.32 kB = 1.40 MB
Load Address: 0x00000000
Entry Point:  0x00000000
The output of the kernel build is located under the arch/<ARCH>/boot directory. The actual location varies, so double-check what the output of the build says. In this example, the line
WRAP arch/powerpc/boot/uImage
shows that the output of the build is arch/powerpc/boot/uImage. If you're new to the kernel, this process is a bit mysterious, because no message says "Your Kernel is Here!" The rule of thumb is to look for the line that has a file name the same as the target under the arch/<ARCH>/boot directory. In this case, the uImage file produced by the build is ready for download to a target board.
Note
The vmlinux file residing in the root of the kernel tree isn't the file used to boot the board. You need to use the file in the arch/<target arch>/boot directory to boot the board. Some users mistakenly think this is the file used to boot the board, but this file is the image of the kernel after it's decompressed into memory on the target.
A kernel module is code that is linked into the kernel while the kernel is running. When you're building the kernel, you can either link drivers directly into the kernel or build them as modules that can be loaded into the kernel at some other time. Most embedded systems don't use kernel modules because the hardware on the board is fixed and doesn't change over the life of the system. That is, the kernel that is built for an embedded system is for that system and no other. Compare this to your desktop system, where the kernel is intended to run on an arbitrary x86 host and must adapt by loading modules. Your desktop system probably has dozens of kernel modules loaded. On your host machine, do the following to see a list of the installed modules:
$ lsmod
Module                        Size  Used by
usbhid                     42336  0
nls_iso8859_1              12032  0
nls_cp437                  13696  0
vfat                       18816  0
fat                        58272  1 vfat
mmc_block                  17668  0
aes_i586                   15744  0
aes_generic                35880  1 aes_i586
ftdi_sio                   56968  0
i915                       65540  2
Remember, a general-purpose Linux distribution doesn't know what devices will be on the machine, so the kernel has a minimal set of drivers statically linked and then uses modules, which are dynamically linked, to get the remaining drivers. This minimal set of drivers is enough to drive a display and mount a few file systems likely to be available on most hardware platforms.
The work involved in looking at the current hardware configuration and loading the drivers also takes time during the boot process. Many embedded devices don't have much time before they're up and running, so the time overhead alone may disqualify the use of kernel modules.
For devices that do use kernel modules, building the modules is a straightforward task. The prior section showed how to build a kernel for a PowerPC 405-based board; using that same kernel directory, you build the modules with the following command:
$ make modules ARCH=powerpc CROSS_COMPILE=powerpc-405-linux-gnu-
  (clipped)
  CC [M]  drivers/of/of_i2c.o
  CC [M]  drivers/video/fbmem.o
  CC [M]  drivers/video/fbmon.o
  CC [M]  drivers/video/fbcmap.o
  (clipped)
The output shows that the process is busy building modules (by way of the [M]). The output of a kernel module build is some number of files ending in .ko that are scattered across the kernel's source tree.
After they're compiled, the modules can be gathered into one location via an installation target in the kernel's make file. Installing the modules for an embedded system means gathering the .ko files in the kernel source tree and putting them in a directory. That directory's contents are then moved to the target device. You do this by using the modules_install target as follows:
$ make modules_install ARCH=powerpc INSTALL_MOD_PATH=/path/to/rfs
Replace the directory /path/to/rfs with the directory containing the RFS for the target board. The installation process copies the files into the directory /path/to/rfs/lib/modules/<kernel version>. If space is a concern, you can remove the kernel modules that won't be used on the target device before this directory is included in the board's root file system.
Kernel modules aren't atomic, which means a kernel module may need another in order to work correctly. This data is stored in the modules.dep file under the $INSTALL_MOD_PATH/lib/modules/<kernel version> directory. A typical entry looks like the following:
kernel/drivers/mtd/mtdblock.ko: kernel/drivers/mtd/mtd_blkdevs.ko
This line says that the mkdblock.ko module depends on the mtd_blkdevs.ko module. Looking at the mtd_blkdevs.ko file shows that no further dependencies exist. Dependency information is close in format to what you find in a make file, so it's easy for a human to read. This information tells you that you need both of these files on the target system if you want to use the features offered by the mtdblock.ko module. This is very helpful when you're removing kernel modules that aren't necessary in order to conserve space.
It's important to note that only the kernel module file (.ko) is necessary to load a module. The additional files, like modules.deps, are a convenience. All you need to load a module on a system is the insmod program, which loads the module into the kernel, and the module itself. However, if your system will be loading arbitrary modules or storage space isn't a concern, you can include all the module files in the target's file system.
Cleaning a kernel build is much like cleaning a regular project: it involves removing the output from prior builds. In the case of Linux, there are several different types of "clean," listed here in order of increasing cleanliness:
clean: Removes all the object files but keeps.config. Use this configuration option when you're testing whether the kernel rebuilds after you change to the configuration.mrproper:[29] Does everything thatcleandoes and deletes.configand some of the architecture-related files and symlinks created as part of the configuration and build process. Use this when you want to restore the kernel source tree to the approximate state it was in before it was configured.distclean: Does everything thatcleanandmrproperdo, plus deletes what appear to be editor backup, patch, and other files. Usedistcleanbefore you create or apply a patch file, because this target leaves the source tree in the most pristine state possible.
The kernel, like other open source projects, is open to contributions from its users. In addition, the kernel is a highly distributed project, in a geographical sense, with users from all over the world contributing on a regular basis. These contributions are made when a developer makes changes to the code and submits a patch with those changes so they can be included in the mainline kernel project. This presents the following questions:
How do you create a patch?
To whom do you send the patch?
What happens after you submit a patch?
This section covers these three questions. Most users don't submit kernel patches, just like most Wikipedia readers don't change content; but knowing how the process works is still valuable and helps make sense out of applying patches, as also covered in this section.
The kernel project uses a rolling integration process. This means software checked into project should work and build without error. For a project as big as Linux, this is more that can be done by one person. So, for each major subsystem in the kernel, there is a maintainer who is responsible for reviewing patches. The subsystem maintainers have to ensure that subsystems work, meet the kernel code standards, and build correctly. You can find the canonical list of maintainers in the MAINTAINERS file in the root of the Linux kernel. The maintainers keep a queue of patches at the ready, until Linus Torvalds, the top-level maintainer, sends an e-mail to the maintainers requesting changes, opening what is referred to as the merge window.
The maintainers send their queued changes to Linus, who merges them with the source from the prior release. This process continues for several weeks until the merge window is considered closed. After it's closed, the only changes that are accepted are those that fix defects in the newly accepted code or other major defects. These versions of the Linux kernel are called rc<serial number>, where serial number starts at one and increments upward for every release. A new bug-fix release happens about once a week.
When Linus finds that the code is stable enough—with "stable" meaning that the regression tests are passing and the maintainers working on the kernel agree—Linus issues a new kernel release, and the cycle starts again.
Contributions, big and small, are welcome. Many developers who make small changes to the kernel don't bother contributing their changes, because they view them as not important. If you've made a change that fixes a problem, makes the kernel more stable, or adds a new feature, it will be welcomed by the open source community.
You submit code to maintainers in the form of a patch. Patches show the differences between two files; in order for patches to work, both you and the recipient of the patch need to agree on the basis for the patch. In Linux, patches are made against the latest stable version of the Linux kernel.
To submit a patch, follow these steps:
Fetch a copy of the kernel sources. Getting the Linux sources was described earlier in the chapter; the same instructions apply for this use case.
Unpack that kernel next to your kernel code. For example, say your Linux source tree is stored at
˜/my-linux. You want to unpack the newly downloaded kernel so thatmy-linuxand it share the same parent directory. The Linux kernel is constructed so that if you do the following, things will be correctly positioned for the next step:$ cd your-kernel-tree/.. $ tar xjf kernel-sources
Use
diffto create a patch. Before you create a patch, the kernel must be in clean state, because the patch process finds all the differences between the two source trees. Thedistcleantarget does exactly that, removing output file and even editor backup files. Because your code and the kernel's source tree are in the same directory, creating a patch is easy:$ cd ˜/your-kernel-tree $ make ARCH=your-arch distclean $ cd .. $ diff -Naurp
your-kernel-tree kernel-sources> patch.fileThis command produces a unified diff containing all the changes between the
your-kernel-treeandkernel-sources.Check the patch. In order to make the life of the person who will be reviewing your patch easier, the kernel has a script that scans a patch file and returns common errors. This is likely the first thing the maintainer will check; they will reject your patch if this program returns errors:
$ ./kernel-sources/checkpatch.pl
Find the maintainer, and send e-mail. Look in the
MAINTAINERSfile for an entry that matches the part of the kernel where you made the change. Say the changes have to do with the Atmel board; you'll find an entry that looks like the followingP: Andrew Victor M: [email protected] L: [email protected] (subscribers-only) W: http://maxim.org.za/at91_26.html= S: Maintained
This means the maintainer is Andrew Victor (P), and you can send your patch to the address in field
M. Include your patch in the e-mail as text, not as an attachment.Maintainers prefer plain-text e-mail. Many e-mail program use HTML to mark up pages with fonts, indents, pictures, and the like. All this layout information is a distraction to a user who is likely using a text-only e-mail reader in a terminal window where HTML mail messages appear to be a series of attachments.
Watch for follow-ups. Your patch is likely to be returned to be improved on further. The maintainer may have questions, the code may have formatting problems not discovered by
checkpatch.pl, it may not work on their machine, and so on. If the maintainer lets you know there's a problem, fix it, test it, and resend the patch.
Will your patch get rejected? Nobody likes rejection. The answer is, "Maybe." Patches are rejected when the maintainer gets several patches that solve the same problem and must select one. Patches are also rejected because they don't solve the problem in a way that the maintainer believes is the best way for the project or when the solution causes regressions or other problems. A maintainer will tell you why your patch wasn't accepted and frequently offer you advice on how to improve it.
Note
This example doesn't use Git, the source code control system used for the kernel project. When you're creating a few small patches, using diff if the quickest and easiest way to create the diff text that the maintainer uses to create the patch.
Applying a patch means using a program that takes a patch file and makes changes to your source tree as instructed by the patch. The patch file, as explained in the prior section, is nothing more than a diff between your source tree and the prior latest stable version of the kernel. You apply a patch using the patch program like so:
$ cd your-kernel
$ patch -p1 < /path/to/patch.file
-p1 means to ignore the first directory of a patch file. Recall that when the patch was created, it was made by comparing two directories. By dropping the first directory in the patch specification, you're running it relative to your current directory. For example, if the patch was made to the main/init.c program, the patch would contain instructions that some-directory/main/init.c required a change. When you run patch from the root of the kernel source tree, you're currently in the same directory as some-directory; removing that one directory from the specification instructs patch to update the file main/init.c.
Patch doesn't perform atomic updates, in that if there are three changes in three different files, it makes as many changes as possible; patches that don't apply result in error messages, and files that can't be changed are left in their present condition. When you're applying a patch, you can test if it will be successfully applied by doing the following:
$patch -p1 --dry-run < /path/to/patch.file
When you're applying several patch files, the order can be important, because a patch that's making a change in a file may depend on a prior patch being run. When you receive a group of patches, it's critical that you also receive information about the ordering. Many times, patches can be applied in any order, but this isn't always the case; determining the correct order through examination (or experimentation) is impractical.
The next chapter covers real time. Real time, as you'll read doesn't mean fast, it means predictable. Linux systems are referred to as soft-real time system, i.e. systems that can tolerate a certain amount of unpredictable behavior and still be useful. Real time programming is as much a programming practice as it as a technology. The best real time operating system can be mis-used so that it doesn't behave in a predictable manner, no matter what safeguards the designers of the operating system took. Remember, nothing is foolproof because fools possess extra-ordinary cleverness. The chapter also covers some programming techniques that will increase the predictability of the program to further take advantage of the soft real-time capabilities offered by Linux.