
In previous chapters, you learned the basics of the provisioning process followed by a step-by-step illustration of Identity Management provisioning. This builds the foundation of the Fusion Applications identity layer, which is mandatory in order to begin using the provisioning process of the Fusion Applications components. From this chapter onward, you will see a step-by-step installation of the Fusion Applications components with an example topology and a specific selection of products. By the end of the Fusion Applications provisioning-related chapters, you should feel confident about preparing a complete on-premise or private cloud-based Fusion Applications environment.
It’s best to not skip any of the steps mentioned during the provisioning process, since doing so may result in failure at the final provisioning step. Fusion Applications provisioning is a time-consuming process and may not be complete in one day, so be patient and make sure that experts from the respective teams are available to prepare systems, network, storage, and so on, and to troubleshoot any issues during provisioning.
Current Status of Provisioning
Let’s look at the nodes that are already provisioned and the components that we are going to provision now. Table 8-1 shows the technical components installed and configured on each of the four nodes during the installation. You may notice the components already configured in last chapter for IDMHOST and IDMDBHOST. In this and upcoming chapters, we will configure FAHOST and FADBHOST.
Table 8-1. Provisioning Status of Components
Host | Components | Component Name | Provisioning Status |
|---|---|---|---|
IDMHOST | IDM Oracle HTTP Server instance Oracle Internet Directory instance Oracle Virtual Directory instance IDM WebLogic Domain IDM Administration Server Oracle Access Manager Oracle Identity Manager Oracle Directory Service Manager Oracle Identity Federation IDM SOA Server | ohs1 oid1 ovd1 IDMDomain AdminServer wls_oam1 wls_oim1 wls_ods1 wls_oif1 wls_soa1 | Complete |
IDMDBHOST | IDM Oracle Database | idmdb | Complete |
FAHOST | FA Oracle HTTP Server instance Oracle Fusion Common (Setup) Domain BI WebLogic Domain All selected Product families WebLogic Domains Standalone components like IIR (for CRM) | ohs1 CommonDomain BIDomain <HCMDomain FinancialDomain CRMDomain etc.> | Pending |
FADBHOST | FA Oracle Database | fusiondb | Pending |
Figure 8-1 shows the already provisioned and yet to be provisioned nodes in our selected topology. In this chapter, we will focus on installing and configuring components on FADBHOST (the Fusion Applications Database Host).

Figure 8-1. Fusion Applications envrionment topology selected for this installation
In order to create an Identity Management database, you need to perform the following tasks in the given order. We will discuss each of these in detail in the following sections.
Install the Oracle Fusion provisioning framework on a database node.
This step is required to install the Wizard that allows us to create a single-node, blank Oracle 11g Transaction database for Fusion Applications. This same wizard can also be used for other tasks, such as creating a provisioning response file for Fusion Applications, updating an existing response file, or provisioning a Fusion Applications environment using an existing response file. But on the database node the sole purpose of this framework is to install a blank transactional database for Fusion Applications. The Fusion Applications provisioning framework must be installed regardless of whether you are using the wizard to create the database or using a manual installation of single-node or Oracle RAC database since the provisioning framework contains a blank template for the Fusion Applications database. You will see this in detail in the next section.
Install the Oracle 11g database for Fusion Applications.
Once the provisioning framework is installed, we will use the wizard, which is included in the framework, to create a blank single-node Fusion Applications Transaction database automatically using the included template. The wizard also takes care of installing any required technology patches and updates. You can also create a single node or Oracle RAC database manually but you must make sure to install all the required patches, including the patch set update to bring the database to the supported version for the specific release of Fusion Applications.
Run the Repository Creation Utility (RCU) for Fusion Applications.
Similar to Identity Management RCU, Fusion Applications RCU also creates empty tablespaces for Fusion Middleware and Fusion Applications schemas followed by creation of the required database schemas. At the end it seeds the default data from the dump files along with RCU using Oracle Data Pump. It also creates the resource plan for controlling the database CPU usage based on queries triggered from different functional groups defined for Fusion Applications.
We will now look at each of these tasks one by one in the following sections. During the course of these sections, we will create a Transaction database for Fusion Applications for demonstration purposes.
Install Fusion Applications Provisioning Framework
Fusion Applications provisioning framework contains the GUI wizard and command-line utilities. The provisioning framework helps us create a new Fusion Applications Transaction database, create or update a Fusion Applications provisioning response file, and provision a Fusion Applications environment using an existing response file. Since on the database node we are going to use this wizard to create a single-node, blank Fusion Applications Transaction database for small demo systems, we will need to first install the provisioning framework followed by the database creation.
Note that you will need to install the same provisioning framework on database node as well as on Fusion Applications nodes. If you are using the single-tier topology and hosting the database and application on the same physical host, you need not install the provisioning framework multiple times as the same framework can be used for the database as well as for applications provisioning.
The Fusion Applications provisioning framework installer is available in the installer repository, under the directory named faprov. Recall that you saw the Fusion Applications installer repository directory structure in Figure 3-7 of Chapter 3. We grouped this directory separately in that diagram since this is the only directory required for provisioning framework installation on a database as well as on any application nodes.
Let’s start the installation of Fusion Applications provisioning framework from the <REPOSITORY_LOCATION>/installers/faprov/Disk1 directory. For example:
[fusion@idmhost ∼]$ cd /stage/installers/faprov/Disk1/
[fusion@idmhost Disk1]$ ./runInstaller
...
Please specify JRE/JDK location ( Ex. /home/jre ), <location>/bin/java should exist : /stage/jdk6
Note
Make sure not to use an ampersand (&) to start the installer since this will prompt for a Java directory if the JAVA_HOME is not set. Enter <REPOSITORY_LOCATION>/jdk6 to set the JAVA_HOME temporarily to the staging JDK directory.
If this is the first Oracle software on this machine using this user, it will prompt for the inventory directory location as you have seen this screen during Identity Management provisioning. But since this is different host, you may see the screen here as well.
If you know that it is not the first Oracle product being installed on this host and you already have an inventory on this host, make sure that the /etc/oraInst.loc file has read permission for the fusion installation user. Once you click OK, the installer will prompt you to run the root script named <Inventory_location>/createCentralInvetory.sh as the root user. If you have root access, open a new terminal window and run the script as the root user. This script will point to the previous directory location as the central inventory for the host in the /etc/oraInst.loc file, which is used by all Oracle Software installations.
[root@fadbhost ∼]# /home/fusion/oraInventory/createCentralInventory.sh
Setting the inventory to /home/fusion/oraInventory
Setting the group name to dba
Creating the Oracle inventory pointer file (/etc/oraInst.loc)
Changing permissions of /home/fusion/oraInventory to 770.
Changing groupname of /home/fusion/oraInventory to dba.
The execution of the script is complete
Once the script executes successfully, click OK to proceed. Now you will see the informal Welcome screen, which provides details about the purpose of this installer. No action is necessary on this screen. Click Next to continue to the prerequisite checks, as shown in Figure 8-2.
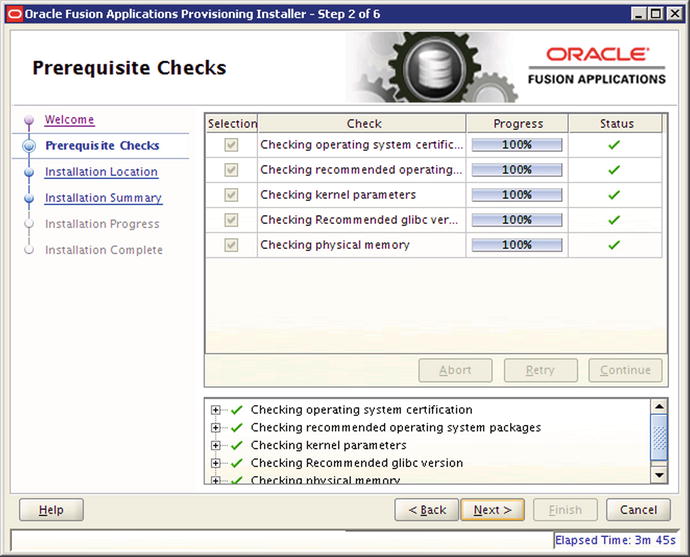
Figure 8-2. Prerequisite Checks status screen
This step checks the following required operating system prerequisites for the Oracle Fusion Applications Provisioning Framework installation.
Operating System Certification: Makes sure that you have the supported operating system and it is not the lowest version supported as per Oracle Certification matrix for future support sustainability and to avoid OS upgrade in near future.
Operating System Packages: Checks for the recommended packages/RPMs for the selected operating system.
Kernel Parameters: Checks all required kernel parameters and their minimum values. Please note that for some kernel parameters the wizard will only check the values for the current session, so make sure that you have also added the values in the relevant system files permanently.
Recommended glibc Version: Although the mandatory packages would have already taken care of this, it specifically checks for the glibc version as well.
Physical Memory: Checks the total amount of installed memory on the host.
Once the prerequisite check is completed, click Next to proceed to the Installation Location screen, as shown in Figure 8-3.
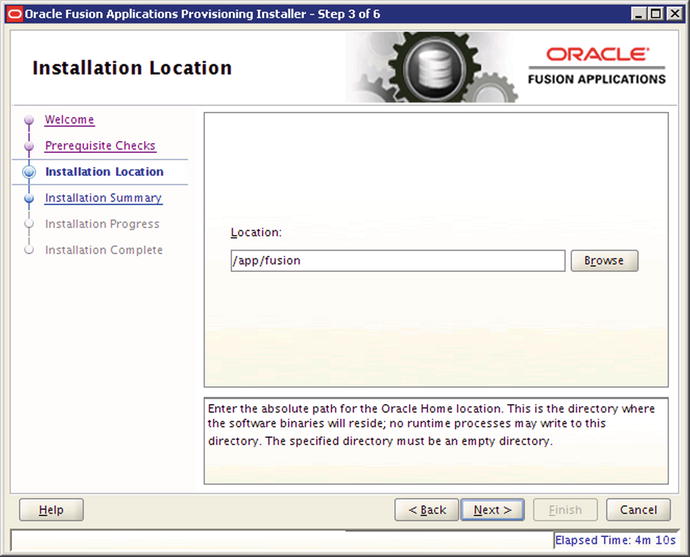
Figure 8-3. Installation Location screen
The Installation Location screen prompts you for the location where the provisioning framework needs to be installed. A directory named provisioning will be created under this location at the end of the installation. We will enter /app/fusion for the location of the provisioning installer.
Meanwhile, create the root directory for the installation directories as follows.
[root@fadbhost ∼]# mkdir /app
[root@fadbhost ∼]# chown fusion:dba /app
Note that if the directory is not already created or if the installation user (fusion in our case) does not have the required permissions to write in the parent directory, you may see error similar to one in Figure 8-4.

Figure 8-4. Installation error example
Once the base directory is created, click Next to proceed to the pre-installation summary shown in Figure 8-5.

Figure 8-5. Pre-installation summary screen
Review the pre-installation summary and save the responses if required for documentation purposes. Click Install to install the provisioning framework. Note that the Back button is enabled so you cannot go back from next screen onward. If you want to change any values after this point, you must cancel the wizard and clean up the directory before proceeding with the installation.
The screen shown in Figure 8-6 shows the installation progress and errors encountered, if any.

Figure 8-6. Fusion Applications provisioning framework Installation Progress screen
The Installation Progress screen shows the progress of the install in percentage and the location of install log file for reviewing. The status message box displays the current status of the installation as well as any errors. This should be a quick installation. Once the installation is finished, click Next to continue to the Installation Complete screen, as shown in Figure 8-7.

Figure 8-7. Provisioning framework Installation Complete screen
The Installation Complete screen shows the location of the installation where the provisioning framework has been installed with the directory named provisioning. Review the summary and save it if required for project documentation purposes. Click Finish to close the wizard and complete the installation of the Oracle Fusion Applications provisioning framework.
Preparing Fusion Applications Database
Now we have Fusion Applications provisioning wizard installed so we can go ahead and create the Fusion Applications Transaction database using the wizard. If you want a production-scale or high-available RAC database, you must install the database manually. Even if you are installing the database manually, you must use the template provided under the provisioning framework templates directory. Figure 8-8 shows the location and names of the available templates for creating a starter Fusion Applications Transaction database. These template files contain the database structure and features and not seeded data files, so these generic templates can be used across any platforms.

Figure 8-8. Fusion Applications Database templates location
Let’s look at the available options for creating an Applications Transaction database.
1. Use Fusion Applications Provisioning Framework to create a database.
This option creates a blank, single node, small-scale database that suites most demo installations. This is the best advisable option for most single-node databases since it creates the required version of database after applying all mandatory patches and PSU automatically and sets the required database parameters. We will use this option in our example.
2. Install production-scale single-node database manually.
If you want to create a production-scale database with advanced options selection, then you can install an Oracle 11g, Release 2 database (11.2.0.3 for Fusion Applications 11g Release 8 or earlier and 11.2.0.4 onward for Fusion Applications 11g, Release 9 and above). You must use the database template provided along with Fusion Applications provisioning framework. For example, you can use the template named empty_database_11.2.large.dbt for creating a production-scale database. Make sure to copy the template to the installer templates directory before starting the installation. Once the database installation is done, it will be still at base release and you must upgrade to the required database release. Apply the PSU for your selected platform in order to upgrade the database. Once the database is upgraded, make sure to apply all mandatory patches required for your platform based on the Fusion Applications release notes.
3. Install Oracle RAC (Real Application Clusters) database manually.
Similar to option 2, for Oracle RAC database you must use the template to create a blank starter database with production-scale memory parameters followed by applying PSU and other mandatory patches. Make sure to check the required database parameters for the current release and set the values accordingly in order to run the production application on this database.
Tip
If you are not planning to create a RAC database at this stage, we suggest you use the provisioning wizard and then tune the required parameters later. This will save you a lot of time since all the patches and PSU are applied automatically.
Install JDK
Since Fusion middleware is based on Java, all the installers included in the media require JDK to be installed on the host machine. Although we have seen in previous step of Installing Fusion Applications provisioning wizard that we can also use the JDK directory included in the installation repository, we must have a permanent Java home location on the host. Since the JDK version included with current release of Fusion Applications is JDK 6, we will install it there.
Although we can get the JDK installer from the Oracle web site as well, in this case we only need to unzip the JDK ZIP file to any desired location. The compressed JDK 6 file (jdk6.zip) is included at <REPOSITORY_LOCATION>/installers/jdk. In this example, we will unzip it to our provisioning installer root directory /app/fusion, but you can select any location.
[fusion@fadbhost ∼]$ cd /app/fusion/
[fusion@fadbhost fusion]$ unzip /stage/installers/jdk/jdk6.zip
This will create a directory named jdk6 at the selected location. In this example, it will be /app/fusion/jdk6. We will specify this directory as Java home in any further installations on this host. Most of the installers can detect the Java home if it is created in the Oracle Base directory.
Installing Fusion Applications Transaction Database
Since we are going with option 1 of the database installation options mentioned previously, we will invoke the Fusion Applications provisioning wizard in order to install the Oracle Database. To install the Applications Transactional database, we need to run Oracle Fusion Applications provisioning wizard from <framework_location>/provisioning/bin.
<framework_location> refers to the location where we installed the Fusion Applications provisioning framework in previous step; for example, /app/fusion.
[fusion@fadbhost ∼]$ cd /app/fusion/provisioning/bin/
[fusion@fadbhost bin]$ export JAVA_HOME=/app/fusion/jdk6
[fusion@fadbhost bin]$ ./provisioningWizard.sh &
The Welcome screen is an informal screen that suggests you check the following two prerequisites.
The Fusion Applications installation repository (installation stage directory) has been created. We have already done this as part of the earlier steps.
The installation repository has been populated with the Oracle database installer and required patches. This is also taken care of since we have extracted all required ZIP files into the installation repository, which also includes the database related directories. This is required because the database-creation option will internally invoke the installer from the database directory of the installation repository.
Once you have confirmed that the required prerequisite steps are complete, click Next to proceed to the wizard option selection screen shown in Figure 8-9.
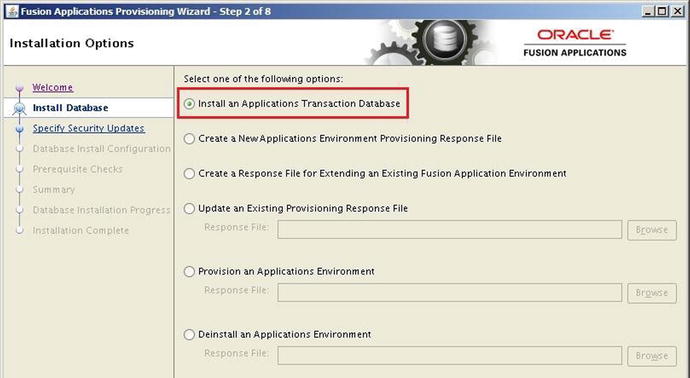
Figure 8-9. Wizard option selection screen
The provisioning option selection screen provides six provisioning-related options.
1. Install an Applications Transaction database.
2. Create a New Applications Environment provisioning response file.
3. Create a response file for extending an existing Fusion Applications environment (available on Fusion Applications 11.1.9 onward).
4. Update an existing Provisioning response file.
5. Provision an Applications environment.
6. Uninstall an Applications environment.
Out of these, only the first option is related to the database, while the other five options are specific to Applications provisioning. We will discuss about the remaining options in next chapter. This option will initiate a short questionnaire for database installation details only. Since most of the database parameters are preselected in the template, they will not be prompted during this wizard.
Select Install an Applications Transactional Database and click Next to proceed to the Security Updates screen. We have already seen this screen where you can optionally enter your email address or Oracle Support credentials to receive updates related to the selected product. Enter the email address or leave the field empty and click Next to proceed to the Database Install Configuration screen, as shown in Figure 8-10.

Figure 8-10. Fusion Applications Database Install Configuration screen
Note that the screen shown in Figure 8-10 is the only screen with database installation related questionnaire unlike a typical database installation. So except for the following details, everything else remains as per the seeded template and is not modifiable at this stage. This screen prompts for the following values to be entered.
Database Listener Port: The default value is 1521 and we can change it to any preferred value. We had changed the listener port to 1531 for the Identity Management database. In this example, we will keep it to 1521 in order to easily distinguish the databases in provisioning screens. Remember the value specified and enter the same value in the provisioning response file in the next steps.
Installer’s Directory Location: Enter the location of the Fusion Applications installation repository here. Note that this is not the location of the database installation subdirectory, but the main installation staging directory. The installer will look for a subdirectory named installers in the specified directory. If the installers directory is not found in this location then an error will be displayed on the screen. In this case the directory is /stage.
Oracle Base: Specify the directory that you want to create as the Oracle Software Base. The subsequent database directories including Oracle home will be created under this directory. You can specify any location that’s writable for the installation user. In this case, we have specified /app/database as the Oracle Base.
Software Location: Specify the software location that will be same as the Oracle home directory. Once you have specified the Oracle Base value, this field will be automatically populated as <ORACLE_BASE>/product/11.2.0/dbhome_1. For example, /app/database/product/11.2.0/dbhome_1.
Database File Location: Specify the location for the database files or data files. This location will default to <ORACLE_BASE>/oradata, but you can change it to any desired location on the same or different disk or storage location. In this case, it defaults to /app/database/oradata and is populated automatically so we will leave it unchanged.
OSDBA group: This value defaults to dba for Unix platforms. In general, you need not change this value and should leave it untouched.
Global Database Name: Specify the name of the database in <database_name>.<domainname> or <database_name> format, which will also be the default SERVICE_NAME of this new database. For example, fusiondb or fusiondb.paramlabs.com. Select any name of your choice or one based on your organization’s database naming policy. Make sure to provide the same name in any subsequent provisioning-related screens. We have selected fusiondb here.
Password: Specify the password for all administrator users, including SYS, SYSTEM, SYSMAN, and so on. Make sure to select a complex password here. You can change these passwords after the database has been provisioned. This password will be required to be entered in Fusion Applications Provisioning response file creation as well.
Once all the required values are entered, click Next to proceed with the prerequisite checks, as shown in Figure 8-11.

Figure 8-11. Database installation prerequisite checks status
This screen will run all the required prerequisites, including hardware, operating system, and network, as well as determine the existence of inventory, inventory pointer files, and listener processes. The status of all the prerequisite checks, including any error or warning messages, will be displayed on the same screen between the BUILD_STARTED and BUILD_COMPLETE messages along with the warning or error symbol.
Caution
If the screen remains blank and you do not see any messages on the screen but instead see a success, error, or warning mark at the top, do not proceed. This means that the installer is not able to forward the standard output content to the screen. This is a Java-specific issue and is caused when the host’s entry in the /etc/hosts file is in the <IP Address> <hostname> <hostname.domainname> format instead of <IP Address> <hostname.domaname> <hostname>. Fix the host file entry and restart the installation.
The Retry button is deactivated by default. If there are any errors in the prerequisites check, the Retry button will be activated. In case of warnings, the Retry button will not be activated but if you want to fix the warnings also then you can always click Back to run it again. In case of errors, you can fix the issues in a separate window and then click on the Retry button to rerun the prerequisite checks. Although warnings will not prevent you from continuing the installation, it is always advisable to make sure that there are no errors or warnings in this screen.
Tip
You might see some warnings related to memory if you are using less than 26 GB of memory for this host. If you are doing a demo installation and planning to reduce the SGA/PGA values afterward, you can ignore the warning for now.
Once the prerequisites check is successful, click Next to proceed to the pre-installation summary screen, as shown in Figure 8-12.

Figure 8-12. Database pre-installation summary
Since this is the last screen before you start the database installation, make sure you check the summary details, including the installation path, global database name, listener port, and so on. If you want to modify any details then use the Back button to go back to previous screens. The Back button will be disabled after this screen. Save the pre-installation summary if required and then click Install to begin the database software installation along with the database instance creation.
Once database installation portion completes (at approximately 20% of the overall progress), the provisioning wizard will prompt you to execute the root configuration scripts as shown in Figure 8-13.

Figure 8-13. Root scripts execution prompt
This script will add the required entry in /etc/oratab and other configuration files. Open a new terminal window and run the script <ORACLE_HOME>/root.sh as the root user. The following is example output of the script execution.
[root@fadbhost ]# /app/database/product/11.2.0/dbhome_1/root.sh
Check /app/database/product/11.2.0/dbhome_1/install/root_fadbhost.paramlabs.com_2013-11-01_16-43-36.log for the output of root script
[root@fadbhost ]# more
/app/database/product/11.2.0/dbhome_1/install/root_fadbhost.paramlabs.com_201 3-11-0 1_1 6-43-3 6.log
Performing root user operation for Oracle 11g
The following environment variables are set as:
ORACLE_OWNER= fusion
ORACLE_HOME= /app/database/product/11.2.0/dbhome_1
Creating /etc/oratab file...
Entries will be added to the /etc/oratab file as needed by
Database Configuration Assistant when a database is created
Finished running generic part of root script.
Now product-specific root actions will be performed.
Finished product-specific root actions.
Click OK
Once the script is executed, click OK to continue with the next phases of the overall database installation, as shown in Figure 8-14.

Figure 8-14. Database installation and configuration progress
The Database Installation Progress screen shows the following phases for this task.
Install: During this phase the database software gets installed with the base release only. The database or instance is not yet created and the database patches or PSU are not applied yet.
Preconfigure : During the Preconfigure phase the Tech Patch Utility (TPU) and Oracle Configuration Manager (OCM, which is used to upload configuration details to Oracle Support) are configured. All the patches and PSU located in <REPOSITORY_LOCATION>/installers/database/psu and <REPOSITORY_LOCATION>/installers/database/patch are applied to the database home as well. At this moment the database is not created so a database metadata upgrade is not required at this stage.
Configure: During this phase the database instance, service, and listener are created and configured. It creates the database using a seeded template and sets the necessary parameters. The network configuration files are also created at this stage.
PostConfigure: At this stage any necessary post patch steps and post-configuration steps are performed. The database is technically installed and ready at this stage.
Startup: Although the required services are already started by now, this stage makes sure that any components that are not yet started should be started now.
Validation: This phase performs the database validation for completeness of the installation and runs the validation SQL for checking connectivity and integrity of the database.
After collapsing the status tree, the screen will look like the one shown in Figure 8-15. Its shows a short summary of your overall progress. You may see tick mark (√), an error sign(x), a warning sign (!), or a clock icon (for an ongoing phase), depending on the status of the activity. Once installation until validation is complete, click Next to proceed to the installation summary, as shown in Figure 8-16.

Figure 8-15. Successful completion of each phase

Figure 8-16. Fusion Applications Transaction database post-installation summary
In the summary screen you can see the URL of the configured Fusion Applications Database Enterprise Manager. Make a note of this URL or save the summary for documentation purposes. Click Close to complete the installation and close the wizard.
Validate the Database Installation
Whether you have installed the Fusion Applications database manually or used the provisioning wizard, it is necessary to make sure that the database is installed correctly and with correct component version. Depending on the release of Fusion Applications the minimum required version of the database will be different. For example, if you installed the Applications Transaction database for Fusion Applications 11g, Release 8 (11.1.8) then you should have the database version as 11.2.0.3. For Fusion Applications 11g Release 9, the required database version is 11.2.0.4.
Execute the following SQLs to validate the database and components version after installation.
SQL> column PRODUCT format A40
SQL> column VERSION format A15
SQL> column STATUS format A20
SQL> select * from PRODUCT_COMPONENT_VERSION;
PRODUCT VERSION STATUS
---------------------------------------- --------------- --------------------
NLSRTL 11.2.0.4.0 Production
Oracle Database 11g Enterprise Edition 11.2.0.4.0 64bit Production
PL/SQL 11.2.0.4.0 Production
TNS for Linux: 11.2.0.4.0 Production
SQL> column COMP_NAME format A40
SQL> select COMP_NAME, VERSION, STATUS from dba_registry;
COMP_NAME VERSION STATUS
---------------------------------------- --------------- --------------------
Oracle Enterprise Search 11.2.0.4.0 VALID
Oracle Enterprise Manager 11.2.0.4.0 VALID
Spatial 11.2.0.4.0 VALID
Oracle Multimedia 11.2.0.4.0 VALID
Oracle XML Database 11.2.0.4.0 VALID
Oracle Text 11.2.0.4.0 VALID
Oracle Expression Filter 11.2.0.4.0 VALID
Oracle Rules Manager 11.2.0.4.0 VALID
Oracle Workspace Manager 11.2.0.4.0 VALID
Oracle Database Catalog Views 11.2.0.4.0 VALID
Oracle Database Packages and Types 11.2.0.4.0 VALID
JServer JAVA Virtual Machine 11.2.0.4.0 VALID
Oracle XDK 11.2.0.4.0 VALID
Oracle Database Java Packages 11.2.0.4.0 VALID
14 rows selected.
In addition to this, if you have installed the database manually, make sure to have following options enabled in your database.
Oracle Partitioning
Oracle Data Mining
Adjust the Memory Size of the Database
By default the Fusion Applications Transaction database created through the provisioning framework will have 9 GB SGA and 4 GB PGA set for a non-production database. For a production database, the memory should be changed to 18 GB SGA and 8 GB PGA. If you are only doing a proof-of-concept (POC) installation, you can even reduce the SGA and PGA to a lesser value (not recommended by Oracle) to reduce the memory usage on the host. Make sure you adjust the tmpfs and swap sizes according to the memory allotted to the Oracle instance on Linux OS.
Let’s first set the ORACLE_HOME, PATH, and ORACLE_SID variables in order to connect to the database. Make sure you add these lines in the user profile so that you need not set it every time you want to connect to or manage the database.
[fusion@fadbhost ]$ ORACLE_HOME=/app/database/product/11.2.0/dbhome_1; export ORACLE_HOME
[fusion@fadbhost ]$ PATH=$PATH:$ORACLE_HOME/bin; export PATH
[fusion@fadbhost ]$ ORACLE_SID=fusiondb; export ORACLE_SID
[fusion@fadbhost bin]$ sqlplus / as sysdba
SQL> show parameter pga
NAME TYPE VALUE
------------ ---- ----------
pga_aggregate_target big integer 4G
SQL> show parameter sga
NAME TYPE VALUE
------------ ---- ----------
lock_sga boolean FALSE
pre_page_sga boolean FALSE
sga_max_size big integer 9G
sga_target big integer 9G
SQL> create pfile from spfile;
File Created.
SQL> shut immediate;
Now modify the SGA and PGA values in the initfusiondb.ora file as per the requirements. Once it is done, recreate SPFILE using this PFILE and then start up the database.
[fusion@fadbhost dbs]$ sqlplus / as sysdba
SQL> create spfile from pfile;
File created.
SQL> startup
Non-Default Parameters for the Fusion Applications Database
If you created the Fusion Applications transaction database using the Provisioning wizard, you need not look at this section since all these parameters are set for you automatically as part of the database template. If you have created the Fusion Applications database (single node or Oracle RAC) manually, you must set the following parameters in order to tune the database parameters for use with Fusion Applications Environment.
Table 8-2 shows the list of parameters with non-default values. Since many of these parameters cannot be modified while the database is running, you may need to set all these values in SPFILE and restart the database.
Table 8-2. Summary Table of Fusion Applications-Related Schemas after RCU
Parameter Name | Default Value | Fusion Applications Specific Value |
|---|---|---|
_ACTIVE_SESSION_LEGACY_BEHAVIOR | FALSE | TRUE |
_b_tree_bitmap_plans | TRUE | FALSE |
_fix_control | 5483301:ON,6708183:OFF | 5483301:OFF,6708183:ON |
audit_trail | DB | NONE |
db_securefile | PERMITTED | ALWAYS |
nls_sort | Varies | BINARY |
open_cursors | 50 | 500 |
pga_aggregate_target | 0 | 4GB (Development) 8GB (Production) |
session_cached_cursors | 50 | 500 |
sga_target | 0 | 9GB (Development) 18GB (Production) |
plsql_code_type | INTERPRETED | NATIVE |
processes | 100 | 5000 |
Change the default values for these parameters before provisioning the Fusion Applications environment. The following example shows you how to change the value for the open_cursors parameter from the current value of 50 to the recommended value of 500. Do the same for all the other parameters as well.
SQL> show parameter open_cursors
NAME TYPE VALUE
------------ ------- -------
open_cursors integer 50
SQL> alter system set open_cursors=500 scope=both sid='*';
System altered.
SQL> show parameter open_cursors
NAME TYPE VALUE
------------ ------- -------
open_cursors integer 500
Running Fusion Applications Repository Creation Utility
After the blank database has been installed, you must create the repository for Fusion Applications components in this database. The RCU performs the following actions on the database.
1. Create empty tablespaces for the Fusion Applications components and schemas.
2. Create required schema owners and populate the required database objects, including tables, views, and so on. Fusion Applications RCU includes both Fusion middleware components as well as Fusion Applications Runtime schema owners.
3. Import the seed data for BI and Fusion Applications schemas using the Oracle Data pump export files included in the RCU.
Fusion Applications installer comes with RCU included in the media. Note that Fusion Applications RCU is available only for Windows and Linux platforms with 64-bit architecture. So if you are hosting your database on Windows 64-bit or Linux x86-64 then you can run the RCU from the database host. But if you have selected a non-Windows and a non-Linux host, you need a remote Windows or Linux machine that can connect to this database from where you can run the RCU and seed the data into the Fusion Applications database. Make sure you have consistent connectivity to the Fusion Applications database from the remote host throughout the RCU process. You may need to open the database port in a firewall if you are running the remote machine from a different network VLAN.
Figure 8-17 shows the two options available to run the RCU—one for Windows/Linux hosts and the later for database hosts with other operating systems. As you can see in the first option, you simply need to unzip the RCU from installation repository to the database host and run it locally. With the second option, we have introduced another host to run the RCU remotely.

Figure 8-17. RCU host and DB host for Windows/Linux versus other operating systems
As you can see, there are two RCU ZIP files available along with Fusion Applications installation repository, under the folder names windows and linux. Since we have selected 64-bit Oracle Linux host for database, we will go ahead with Linux RCU here.
For Linux, the RCU is located at <REPOSITORY_LOCATION>/installers/apps_rcu/linux with the rcuHome_fusionapps_linux.zip filename. We need to unzip this directory in any local location on database server or the remote machine from where we are going to run the RCU. Let’s create a directory on the database server’s local disk. For example, /app/fusion/provisioning/apps_rcu.
[fusion@fadbhost dbs]$ mkdir /app/fusion/provisioning/apps_rcu
The reason we have created the apps_rcu directory under the existing provisioning directory is just to keep the installation-related directories in one location. We will call this location APPS_RCU_HOME.
Now we will extract the compressed RCU file to this location. This will create the Repository Creation Utilities as well as the dump files that the utilities will import to the database. Let’s unzip the file <REPOSITORY_LOCATION>/installers/apps_rcu/linux/rcuHome_fusionapps_linux.zip to APPS_RCU_HOME directory. All dependent components that the Fusion Applications RCU requires are included in this ZIP file.
[fusion@fadbhost dbs]$ cd /app/fusion/provisioning/apps_rcu
[fusion@fadbhost apps_rcu]$ unzip /stage/installers/apps_rcu/linux/rcuHome_fusionapps_linux.zip
Create a temporary directory on the database server. We will extract the data pump export dump files in this directory. Note that regardless of whether you are running RCU from a database host or remote machine, this directory must be created on a database host only since data pump always reads from and writes to the database host itself. Make a note of the location as we will need to enter this location in the next screen when we are required to specify a value for FUSIONAPPS_DBINSTALL_DP_DIR.
[fusion@fadbhost apps_rcu]$ mkdir /app/fusion/provisioning/apps_rcu/dp_dir
The required data pump dump files are located in the newly created RCU directory under location APPS_RCU_HOME/rcu/integration/fusionapps/export_fusionapps_dbinstall.zip. We will extract the contents of this ZIP file to the temporary directory we just created (FUSIONAPPS_DBINSTALL_DP_DIR).
[fusion@fadbhost apps_rcu]$ cd /app/fusion/provisioning/apps_rcu/dp_dir
[fusion@fadbhost dp_dir]$ unzip /app/fusion/provisioning/apps_rcu/rcu/integration/fusionapps/export_fusionapps_dbinstall.zip
Archive: /app/fusion/provisioning/apps_rcu/rcu/integration/fusionapps/export_fusionapps_dbinstall.zip
inflating: fusionapps_dbinstall_latest_06.dmp
inflating: fusionapps_dbinstall_latest_02.dmp
inflating: fusionapps_dbinstall_latest_07.dmp
inflating: fusionapps_dbinstall_latest_04.dmp
inflating: fusionapps_dbinstall_latest_03.dmp
inflating: fusionapps_dbinstall_latest_01.dmp
inflating: fusionapps_dbinstall_latest_05.dmp
inflating: fusionapps_dbinstall_latest_08.dmp
There is another export dump file named otbi.dmp at APPS_RCU_HOME/rcu/integration/biapps/schema location. In order to keep all the export dump files in one location, we will copy this file to the temporary data pump dump directory called FUSIONAPPS_DBINSTALL_DP_DIR.
[fusion@fadbhost ]$ cd /app/fusion/provisioning/apps_rcu/dp_dir
[fusion@fadbhost dp_dir]$ cp -p /app/fusion/provisioning/apps_rcu/rcu/integration/biapps/schema/otbi.dmp .
Now since we have all the required data pump export dump files available locally, we can launch the Repository Creation Utility, which is located at the APPS_RCU_HOME/bin directory with a script name of rcu.
[fusion@fadbhost dp_dir]$ cd /app/fusion/provisioning/apps_rcu/bin
[fusion@fadbhost bin]$ ./rcu
The Welcome screen is informative only and provides information on the purpose of this utility. No action is necessary on this screen. Click Next to see repository creation options, as shown in Figure 8-18.

Figure 8-18. Currently available options in Fusion Applications RCU
As of the current release, Fusion Applications RCU provides only a Create option for the repository, unlike Identity Management RCU, which provides both Create and Drop options. This option allows us to create necessary database tablespaces, schemas, and objects, and then to seed default data in them.
Make sure that the database for which this RCU is being run does not have any of the existing components installed. You must run this RCU against a newly created blank Fusion Applications Transaction database only. Click Next to proceed to the DB Connection Details screen shown in Figure 8-19.

Figure 8-19. Fusion Applications Transaction Database Connection Details screen
This screen prompts for connection details for the database in which the repository needs to be created. The following information is required to be entered.
Database Type: We must select Oracle Database here. Although RCU for some non-Applications components supports non-Oracle databases, our required components support Oracle Database only.
Host Name: For a single-node database, enter the name of the host where we have installed the blank Fusion Applications database. In the case of a RAC database prior to 11gR2, we need to enter the names of the VIP or one of the node names. For 11gR2 and newer databases, enter the SCAN hostname. As this RCU is for Fusion Applications database, only 11gR2 onward is supported. In this case, it is a single-node database so we will enter fadbhost.paramlabs.com.
Port: The default value for port is 1521. If you are using non-default port for the Fusion Applications database then enter the value which you have configured. In this case we have selected default port 1521.
Service Name: In the case of a RAC database, enter the service name, while in the case of a single-node database, enter the SID value here. In this case, it is fusiondb.
Username: Enter a username with SYSDBA privilege. We will enter SYS here.
Password: Enter the password for the selected user.
Role: We must select the SYSDBA role here for the SYS user.
Enter the appropriate details of the Fusion Apps database created in the previous step. Click Next to proceed to the prerequisites check, as shown in Figure 8-20.

Figure 8-20. RCU Prerequisites check status
You will now see a pop-up dialog box that shows the status of various prerequisites checks that will run against the database using the connection parameters specified in previous screen. If there were any errors in the previous screen while providing database connection details, you may see failure in validation here. Any errors in these checks will abort the prerequisites check and show the error details in the messages panel of main screen. Once the prerequisite check completes successfully, click OK to proceed to the Components Selection screen, as shown in Figure 8-21.

Figure 8-21. Repository components selection screen
Now you will see Fusion Applications RCU components selection screen. You will notice that unlike Identity Management RCU, we do not have a prefix selection option here. This is because, similar to Oracle E-Business Suite, Fusion Applications also has specific schema names for each of the components and this cannot be changed due to the architecture of most ERP products. You may see the names of each schema being created on the screen and all the names are grayed out to protect them from being changed. Also for Fusion Applications Provisioning, it is mandatory to select all the components included in the RCU regardless of the number of products you are planning to provision. You can collapse the tree nodes, as shown in Figure 8-22, to make sure that all the components are selected.

Figure 8-22. Summary view of selected components
Figure 8-22 shows a summary view of all selected components for your reference. You can see that the RCU includes both the Fusion Applications and Fusion middleware-related components that are required to be loaded in this database. Make sure that all components are selected and click Next to continue with the RCU.
Now the wizard will check the prerequisites for each of the components selected, in this case for all components since everything is selected. Any error will abort the prerequisite checks and you will be asked to fix the error before rerunning the prerequisites checks. Figure 8-23 shows you one possible error in the prerequisites check for Fusion Applications RCU.

Figure 8-23. Example failure condition in prerequisites check
As you can see, you do not see any error messages but only a checkmark in front of the component’s name. The message at the bottom suggests that an error has occurred. Once you click OK, you will be taken back to the previous screen. Now here you will see the actual error in the Messages panel at the bottom. Now in this particular example we are seeing following error, as shown in Figure 8-24.

Figure 8-24. Prerequisites check error message
RCU-6107:DB Init Param Prerequisite failure for: pga_aggregate_target
Current Value is 0. It should be greater than or equal to 4294967296.
RCU-6107:DB Init Param Prerequisite failure for: sga_target
Current Value is 0. It should be greater than or equal to 9663676416.
This specific error appears only if you had reduced SGA/PGA/memory size after the database installation to reduce the amount of memory required on a demo or proof-of-concept host. Or if you manually set the MEMORY_TARGET value instead of the SGA and PGA target values.
We have two ways to fix this issue.
Option 1: Fix the SGA and PGA target values in the database to the suggested values as shown in Table 8-2. This is the only recommended option for production installations.
Option 2: This is recommended only for demo installations, where you have don’t have the recommended memory allocated to the database. You can temporarily bypass this prerequisite check by manually modifying the RCU prerequisites XML file where the minimum expected values for SGA and PGA are specified. The file is located at APPS_RCU_HOME/rcu/integration/fusionapps/fusionapps.xml.
Make a backup of the existing file before modifying anything.
You can see following sections in this file that relate to the SGA and PGA size.
<DBPrerequisite COMPARE_OPERATOR="GE" DATA_TYPE="NUMBER" PREREQ_TYPE="InitParameter">
<ValidIf DBTYPE="ORACLE"/>
<PrereqIdentifier> sga_target </PrereqIdentifier>
<PrereqValue> 9663676416 </PrereqValue>
</DBPrerequisite>
...
<DBPrerequisite COMPARE_OPERATOR="GE" DATA_TYPE="NUMBER" PREREQ_TYPE="InitParameter">
<ValidIf DBTYPE="ORACLE"/>
<PrereqIdentifier> pga_aggregate_target </PrereqIdentifier>
<PrereqValue> 4294967296 </PrereqValue>
</DBPrerequisite>
Change the values to match with your existing setup. If you used MEMORY_TARGET and kept SGA/PGA values to 0 then you can set these minimum values to 0 as well to avoid prerequisites check error. Once again we want to remind you that this is not recommended option and should be used only if you have no other option to increase the memory size on the database.
Due to a bug in the current version of RCU, you may need to click Back twice and click Next in order to see the prerequisite checks with new values.
You may see each component prerequisites check status and timing information on the screen, as shown in Figure 8-25. Once the prerequisites check is successful, click OK to proceed to the Schema Passwords screen, as shown in Figure 8-26.

Figure 8-25. Successful prerequisites check

Figure 8-26. Specify passwords for schemas to be created
The Schema Passwords screen prompts for selecting the password for each repository schema to be created. It provides three options for password selection. The passwords must contain at least eight characters with a combination of alphanumeric characters and/or special characters.
Same password for all schemas: This option assigns the same password to all the main and auxiliary schemas.
Use main schema passwords for Auxiliary schemas: As you can see in the previous screen, the RCU creates main schemas based on the initially selected components and also creates corresponding auxiliary schemas for certain components. This option allows us to select passwords for main schemas and the related auxiliary schemas will be assigned same password as the main schema. The main schemas textbox remains enabled in this option,
Specify different passwords for all schemas: This option enables all password textboxes and you can assign individual password for each schema as long as it confirms to the password complexity requirement.
For this example, I have selected the first option of selecting the same password for all schemas. Enter and confirm the password. Click Next to proceed to the Custom Variables screen, as shown in Figure 8-27.

Figure 8-27. Fusion Applications RCU Custom Variables screen
Before you enter the values in next screen, you may need to create certain directories which you will need to provide during the RCU and later. Open a new terminal window and create the following directories for custom environment variables.
[fusion@fadbhost ∼]$ mkdir /app/database/applcp
[fusion@fadbhost ∼]$ mkdir /app/database/appllog
[fusion@fadbhost ∼]$ mkdir /app/database/obieebkp
The Custom Variables screen requires you to input the following values. You need to click on the Value cell and paste or type in the required values. Note that due to the data grid size limitation, the text field may not show the complete value entered, but you can resize the wizard window to extend the cell width. You can also use the F2 function key to change the values in the field.
Fusion Applications Custom Variables
Directory on database machine where the FA install dumps are located: Specify the directory where you have extracted the main data pump export dump files earlier. Note that even if you are running the RCU from a remote machine, the data pump directory must be created on database server only. In this case we extracted them at /app/fusion/provisioning/apps_rcu/dp_dir. Specify the same value here.
Directory for the APPLCP_FILE_DIR directory object: The first directory that we created for the APPLCP_FILE_DIR variable. For example, /app/database/applcp.
Directory for APPLLOG_DIR directory object: The second directory that we created for the APPLLOG_DIR variable. For example, /app/database/appllog.
Directory for OBIEE backup directory object: The third directory that we created for the OBIEE backup custom variable. For example, /app/database/obieebkp.
Secure Enterprise Search
Do you have Advanced Compression Option (ACO) License? (Y/N): Default value is N (No). You can select the value appropriately. We will not change this at the moment.
Do you have Oracle Partitioning option License? (Y/N) : Default value is N (No). You can select the appropriate value. We will leave this unchanged at the moment.
Master and Work Repository
Master repository ID (001) : The default value is 501. Leave this unchanged.
Supervisor password: Set up the password for the ODI supervisor here. Make a note of this password since you will need to enter it during Applications Provisioning response file creation.
Confirm supervisor password: Enter the same password as above.
Work repository type: Select the work repository type. The available options are (D) Development and (E) Execution. The default value is D and we will keep it the same.
Work Repository ID (001): The default value is 501. Leave this unchanged.
Work Repository Name (WORKREP): The default value is FUSIONAPPS_WREP. Leave this value unchanged.
Work Repository Password (Default None): Enter the same password as the ODI Supervisor here.
Confirm Work Repository Password: Confirm the same password as above.
Oracle Transactional BI
Directory on the database server where OTBI import/export files are stored: We have extracted Business Intelligence Transactional BI export files in the same location as the main export data pump directory. You can specify a different directory as well but we suggest you keep the same data pump directory to avoid any confusion. We will enter /app/fusion/provisioning/apps_rcu/dp_dir again here.
Activity Graph and Analytics
Install Analytics with Partitioning (Y/N): Default value is N (NO). We will leave this unchanged.
Once all these values are entered and verified, click Next to continue to the Map Tablespaces screen, as shown in Figure 8-28.

Figure 8-28. Map default and temporary tablespaces for schemas being provisioned
Now you will see the screen for mapping tablespaces for each component schema owner. This screen mainly shows four columns.
Component : This column lists the RCU components selected under the Select Components screen you saw earlier.
Schema Owner: This column lists the default schema owner for the specific component.
Default Tablespace: This column lists the default tablespace for the specific schema’s objects. Note that the schema objects could also be stored in different tablespaces as well but the default one is specified here.
Temp Tablespace: This column lists the default temporary tablespace for the given schema.
When you click the default or temporary tablespace name, you will see a list of the values to be selected. You could even select existing tablespaces. Any new tablespaces that are to be created will be prefixed with an asterisk (*) sign.
On the same screen you will see two more buttons—Additional Tablespaces and Manage Tablespaces. When you click Additional Tablespaces button, you will see the pop-up screen shown in Figure 8-29.

Figure 8-29. Specify Additional Tablespaces screen
The Specify Additional Tablespaces screen will show the additional tablespaces to be created for the selected components in addition to their existing default tablespaces. These tablespaces are required to store a specific type of additional objects for the selected components. None of these tablespaces exist in a blank Transactional database, hence all these tablespaces will be created in the further screens. In this screen, you can also select from a list of values but it’s better to leave these unchanged unless you have a specific reason to change the tablespace.
Table 8-3 shows each of the tablespaces created for Fusion Applications and the contents of the objects created in each. Note that not all of these tablespaces will have objects created during the RCU. We will look at this after the completion of RCU.
Table 8-3. Summary of Fusion Applications Related Schemas After RCU
Tablespace Name | Tablespace Contents |
|---|---|
FUSION_DYN_TS | FUSION_DYNAMIC tables to store dynamically generated PL/SQL |
FUSION_IAS_ORASDPM_AQ | ORASDPM advanced queues JMS data and indices |
FUSION_TS_AQ | Cross-pillar communication advanced queues |
FUSION_TS_ARCHIVE | Tables and objects that are no longer used by Fusion Applications |
FUSION_TS_DQ | Data quality |
FUSION_TS_INTERFACE | Temporary/interface data and indices |
FUSION_TS_MEDIA | Multimedia objects such as text, video, and graphics |
FUSION_TS_NOLOGGING | Materialized views and other temporary/scratch pad objects |
FUSION_TS_QUEUES | Advanced queues |
FUSION_TS_SEED | Seed/referenced data and indexes |
FUSION_TS_SUMMARY | Summary management objects |
FUSION_TS_TOOLS | Fusion middleware tables, indices, and data |
FUSION_TS_TX_IDX | Indices for Fusion transactional data |
SEARCH_INDEX | Tablespaces for statistics tables |
BIACMTS | Oracle BI ACM tables |
SEARCH_DATA | Secure Enterprise search-related tables |
SEARCH_INDEX | Indices for SES related tables |
IAS_IAU | Audit services data |
Now let’s look at the screen that pops up when we click the Manage Tablespaces button. This screen allows you to manage the tablespaces selected in the earlier two screens. We have seen two types of tablespaces—Default and Additional. For default tablespaces, we cannot change any values on the screen including tablespace name, type, block size or storage type, number of datafiles, or the name or size of datafiles, as shown in Figure 8-30.

Figure 8-30. Manage Tablespaces: Default Tablespace
When you select an additional tablespace, you will be allowed to change all configuration values of the tablespace, including adding or removing a new tablespace that can be selected for any component. Figure 8-31 shows an example of the Manage Tablespaces screen.

Figure 8-31. Manage Tablespaces: Additional Tablespace
Once you have reviewed the tablespaces and all related screens, click Next to continue creating the tablespaces. Note that the schemas will not be created now since the tablespaces are the prerequisites to create database schemas. The wizard will now prompt you for confirmation in order to create all new tablespaces, as shown in Figure 8-32.

Figure 8-32. Tablespaces creation confirmation prompt
This will create the new tablespaces while leaving the existing tablespaces untouched, even if their specification is not as per the default specification required by the RCU. Once you click OK, the tablespace creation will begin as shown in Figure 8-33.

Figure 8-33. Tablespaces creation progress
This pop-up screen will show you overall progress of all tablespaces instead of the individual ones. You can connect to the database or OS in different window to monitor the progress of the tablespaces creation if required. Once the tablespaces are created, click OK to proceed with the pre-repository creation summary, as shown in Figure 8-34.

Figure 8-34. Pre-Repository Creation Summary screen
The Pre-Repository Creation Summary screen lists the components selected, the schema owner, and the default, temporary, and additional tablespaces created for all the components in a consolidated view. If you want to change the tablespace mapping for any of the component schemas, you can click the Back button to go to the previous screen. Note that mapping existing tablespaces will not invoke the tablespace creation again if you select from the existing tablespaces only. Review the details and click Create to start creating the database schemas and related objects.
Now the RCU will start creating repository schemas and objects and then will load the seed data. The screen will display the progress of each component along with the timing information, as shown in Figure 8-35. This might take long time depending on the machine configuration. Note that this screen will close automatically and move to the next screen once the repository has been created.

Figure 8-35. Fusion Applications repository creation progress
You might wonder what exactly happens behind the scenes when the repository is being created. We have two important directories involved at this point. First, the data pump directory where we have extracted the export dump files and second, the directory named <APPS_RCU_HOME>/rcu/integration. This directory contains subdirectories for each of the components being loaded. The subdirectory for each component has a set of XML files along with SQL files that run on the database to create schema objects and load the data. If you remember, we extracted the dump file from this location only.
During repository creation, each of these SQLs runs and the logs are created at <APPS_RCU_HOME>/rcu/log/logdir.<timestamp>. You will see a different log file for each of the components. In case of any errors or for troubleshooting long-running tasks, you can review the log file for specific components in this directory.
During the repository creation, for Oracle BI and Fusion Applications components, it will invoke the data pump import jobs as well. The import log files will be created in the same location as the temporary data pump directory where you extracted the export dump files. You can also monitor the progress and any errors in these log files. The filename will be of the import_<timestamp>.log format. You can also check the name of the running jobs from the DBA_DATAPUMP_JOBS table in case you want to monitor the progress of the job by attaching to running data pump import job.
Once the repository is created, the screen will move to the final post-RCU summary screen, as shown in Figure 8-36.

Figure 8-36. Post-RCU summary screen
The final summary screen shows the status of each repository component created along with the log file name and the timing information for each component. The screen will also display the name of overall RCU log file and the location of component logs, where you can find the log files mentioned in the grid. It also displays the overall execution time needed to create the repository. The time can vary depending on the configuration of database and host. Review the summary and click Close to finish the Fusion Applications RCU.
Fusion Applications Schemas and Tablespaces
Once the RCU is complete, we can log in to the Fusion Applications database and check the newly created schemas, tablespaces, and so on. Figure 8-37 classifies the tablespaces created by the RCU in two categories. The first group contains the default tablespaces for one or more schemas. The second group of tablespaces contains additional objects from one or more of the schemas. As you can see, some of the tablespaces do not have any objects at the end of the RCU, but once the specific business objects are created in the future, these tablespaces will contain relevant objects.

Figure 8-37. Default and additional tablespaces at the schema level
Table 8-4 shows the summary information of all the new schemas and tablespaces created after RCU completion. You should be able to see these schemas in your database in order to validate the RCU. You can use this table as a reference to locate the relevant schemas in the future.
Table 8-4. Summary of Fusion Applications Related Schemas after RCU
Component | Schema | Default Tablespace | Temporary Tablespace |
|---|---|---|---|
Fusion Applications | FUSION FUSION_ODI_STAGE FUSION_AQ FUSION_SETUP FUSION_BI FUSION_APM FUSION_DQ FUSION_RUNTIME FUSION_DYNAMIC | FUSION_TS_TX_DATA FUSION_TS_TOOLS FUSION_TS_AQ FUSION_TS_TX_DATA FUSION_TS_TX_DATA FUSION_TS_TX_DATA FUSION_TS_DQ FUSION_TS_TX_DATA FUSION_DYN_TS | FUSION_TEMP FUSION_TEMP FUSION_TEMP FUSION_TEMP FUSION_TEMP FUSION_TEMP FUSION_TEMP FUSION_TEMP FUSION_TEMP |
Enterprise Scheduler Service | FUSION_ORA_ESS | FUSION_TS_TOOLS | FUSION_TEMP |
Audit Services | FUSION_IAU FUSION_IAU_APPEND FUSION_IAU_VIEWER | IAS_IAU IAS_IAU IAS_IAU | IAS_TEMP IAS_TEMP IAS_TEMP |
Metadata Services | CRM_FUSION_MDS_SOA FIN_FUSION_MDS_SOA HCM_FUSION_MDS_SOA OIC_FUSION_MDS_SOA PRC_FUSION_MDS_SOA PRJ_FUSION_MDS_SOA SCM_FUSION_MDS_SOA SETUP_FUSION_MDS_SOA FUSION_MDS FUSION_MDS_ESS FUSION_MDS_SPACES | FUSION_TS_TOOLS FUSION_TS_TOOLS FUSION_TS_TOOLS FUSION_TS_TOOLS FUSION_TS_TOOLS FUSION_TS_TOOLS FUSION_TS_TOOLS FUSION_TS_TOOLS FUSION_TS_TOOLS FUSION_TS_TOOLS FUSION_TS_TOOLS | FUSION_TEMP FUSION_TEMP FUSION_TEMP FUSION_TEMP FUSION_TEMP FUSION_TEMP FUSION_TEMP FUSION_TEMP FUSION_TEMP FUSION_TEMP FUSION_TEMP |
Secure Enterprise Search | SEARCHSYS | SEARCH_DATA | SEARCH_TEMP |
WebCenter Content | FUSION_OCSERVER11G FUSION_IPM | FUSION_TS_TOOLS FUSION_TS_TOOLS | FUSION_TEMP FUSION_TEMP |
Oracle Data Integrator | FUSION_ODI | FUSION_TS_TOOLS | FUSION_TEMP |
Oracle Business Intelligence (BI) | FUSION_BIPLATFORM | FUSION_TS_TOOLS | FUSION_TEMP |
Oracle Business Intelligence Applications (OBIA) | FUSION_OTBI | FUSION_TS_TOOLS | FUSION_TEMP |
WebLogic Communication Services | FUSION_ORASDPLS FUSION_ORASDPXDMS FUSION_ORASDPSDS | FUSION_TS_TOOLS FUSION_TS_TOOLS FUSION_TS_TOOLS | FUSION_TEMP FUSION_TEMP FUSION_TEMP |
SOA User Messaging Service | FUSION_ORASDPM | FUSION_TS_TOOLS | FUSION_TEMP |
SOA Infrastructure | CRM_FUSION_SOAINFRA FIN_FUSION_SOAINFRA HCM_FUSION_SOAINFRA OIC_FUSION_SOAINFRA PRC_FUSION_SOAINFRA PRJ_FUSION_SOAINFRA SCM_FUSION_SOAINFRA SETUP_FUSION_SOAINFRA | FUSION_TS_TOOLS FUSION_TS_TOOLS FUSION_TS_TOOLS FUSION_TS_TOOLS FUSION_TS_TOOLS FUSION_TS_TOOLS FUSION_TS_TOOLS FUSION_TS_TOOLS | FUSION_TEMP FUSION_TEMP FUSION_TEMP FUSION_TEMP FUSION_TEMP FUSION_TEMP FUSION_TEMP FUSION_TEMP |
WebCenter Portal | FUSION_WEBCENTER FUSION_PORTLET FUSION_ACTIVITIES FUSION_DISCUSSIONS FUSION_DISCUSSIONS_CRAWLER | FUSION_TS_TOOLS FUSION_TS_TOOLS FUSION_TS_TOOLS FUSION_TS_TOOLS FUSION_TS_TOOLS | FUSION_TEMP FUSION_TEMP FUSION_TEMP FUSION_TEMP FUSION_TEMP |
Oracle Social Network | FUSION_SOCIAL FUSION_SOCIAL_VIEWS FUSION_SOCIAL_CEF | FUSION_TS_TOOLS FUSION_TS_TOOLS FUSION_TS_TOOLS | FUSION_TEMP FUSION_TEMP FUSION_TEMP |
This concludes the Fusion Applications Transaction database creation. We will now proceed to the Fusion Applications Environment provisioning steps in the next chapter.
Summary
This chapter explored the process of creating a Fusion Applications Transaction database. We have seen how to install Fusion Applications provisioning framework on a database node, followed creating a blank starter database. You learned about the steps to create the database manually and what other post-installation steps are required to bring the database to the supported level. In the latter part of this chapter, you learned the steps needed to run the Repository Creation Utility (RCU) for the Fusion Applications database.
At the end of the chapter, you saw the tablespace and schema-level view of the Fusion Applications Transaction database after the repository was created. The next two chapters focus on preparing a Fusion Applications environment using the already provisioned Identity Management nodes and Fusion Applications database as the base infrastructure.