
Finally we have reached the most important step of the Fusion Applications installation, which is the installation of a Fusion Applications environment using the response file we created in an earlier chapter. From the point of view of the number of steps involved, this process seems fairly straightforward since you only need to initiate the Provisioning wizard in order to perform the provisioning process. However, behind the scenes Fusion Applications provisioning is a complex process with a large number of tasks involving database, middleware, and operating system related activities. If so far your setup is flawless, the provisioning process may be completely transparent and you can simply navigate through the wizard. But in many cases, it requires multiple rounds of troubleshooting at various stages of provisioning, especially if you are installing it for the first time.
As mentioned earlier, patience is a virtue while provisioning a Fusion Applications environment as it is quite a lengthy process and prone to errors due to the high resource consumption and a large number of processes running in parallel. Eight out of 10 people who give up on the on-premise installation of Fusion Applications installation do so at this stage. My aim here is to alter the mindset about on-premise Fusion Applications installation. Let me assure you, if you understand the orchestration mechanism of the provisioning process along with the control files, flags, and log files involved, you can troubleshoot any issues encountered during the provisioning process or at least find a root cause and work with Oracle support to find a way forward.
Current Status of the Provisioning Process
Let’s look at what have we completed so far and see where we stand in the overall provisioning process. In other words, let’s look at what you should have accomplished by now in order to reach this stage. Refer to Figure 3-5 of Chapter 3, where we discussed the overall process of Fusion Applications provisioning with the help of dependency diagram. Here, you’ll look at that same diagram with respect to the current status of provisioning with the list of completed and pending tasks.
Figure 10-1 is the depiction of this earlier diagram with classification of completed and pending tasks. As you can see, all the listed tasks except the last one (Provision Fusion Applications environment) are complete. In other words all the listed tasks except this one must be complete before you can proceed to this task. The diagram may lead you to believe that since we have only one task left out of nearly one and half a dozen of them, the installation is about to finish, but technically this is the start of actual installation. All we did so far was prepare to begin the actual applications installation process. At the same time, this task involves running through the wizard.

Figure 10-1. Fusion Applications provisioning prerequisite steps
You might wonder why you need to wait for all these tasks to completed before you can proceed to the installation in parallel. The answer lies in the dependency diagram. As per Figure 10-1, there are three dependencies or prerequisites for the Provision Fusion Applications Environment task.
Identity Management provisioning must be complete: All the required tasks in Figure 10-1 up to the post-IDM provisioning configuration must be complete. This requires all tasks on IDMDBHOST and IDMHOST to be completed prior to this.
Fusion Applications transaction database must be ready: This also means that the Fusion Applications RCU must have been run on the Applications transaction database. So all steps on FADBHOST must be completed.
Fusion Applications Provisioning response file must be created: In order to create the provisioning response file we must have Fusion Applications provisioning framework installed on FAHOST. So partial activities on FAHOST must also be complete.
Fusion Applications Provisioning Phases
We saw the phases for the Identity Management provisioning process that were introduced in Fusion Applications 11g, Release 7 onward. For Fusion Applications provisioning, we have similar phases right from the initial release. However the tasks performed in each phase are quite different in Fusion Applications provisioning compared to IDM provisioning due to the architectural complexity involved.
The concept of provisioning phases is to perform a similar set of actions for every product domain on every node involved in the provisioning topology, make a backup at the end of the phase, and then move on to the next phase. If there’s a failure during any phase, it allows you to fix the underlying cause and then do a proper cleanup of the failed phase, restore from the backup, and restart the phase. All of these actions are seamlessly controlled by the installation orchestration process driven by Apache ANT utility using XML build files. We will look at the build files in a later section.
Let’s first look at the phases of Fusion Applications provisioning followed by the flow of provisioning process. Fusion Applications provisioning involves following phases to be run on every application and web tier hosts in selected topology.
Tip
Fusion applications installation phases are actually ANT build targets. The PROVISIONÇING framework calls the ANT utility with the orchestration.xml build file by specifying the target to be run. For example, to run the configure phase, the ANT utility is executed with the target name as configured, so the tasks are included in target name="configure" from the orchestration.xml build file.
1. Preverify: Prerequisite checks (preverify) phase runs various validation tests to check if the environment meets the installation prerequisites. It checks if installation location is writable, the available physical memory, disk space, swap space, ports availability, JDK version, and kernel parameters, to name a few. It also validates a connection to the FA and IDM databases. It also validates the Identity Management managed servers and URLs reachability. This phase also creates a provisioning plan file from the response file.
2. Install : Installation (install) phase installs Fusion Middleware and Fusion Application components in respective home directories. Once installation of each component is done, it applies the tech patches from the patches directories which are bundled with the installation media and extracted to the respective product directory in the installation repository
3. Preconfigure: The Preconfigure phase mainly performs the Identity Management related activities including creation of administrator groups, seeding bootstrap of AppID, and so on. We will discuss more about this when we look at the preconfigure phase later in this section. This phase also performs ESS ADF configuration by updating the connections.xml file with the Fusion Applications database MDS schema details (FUSION_MDS_ESS) so that ADF uses this as the metadata services repository.
4. Configure: The Configure phase performs a lot of important activities with respect to Fusion Applications installation. It creates WebLogic domains for all required product families, including CommonDomain and other domains required for the products selected for installation on the selected host. Once the domains are created, it creates WebLogic clusters and managed servers as part of the clusters. It also configures the data sources for each domain and wires the middleware components. It also deploys the application products to the respective managed servers. The Configure phase also registers node managers on servers and enrolls the product domains with the node manager. This phase also creates Oracle HTTP Server Virtual Host configuration files for each domain.
5. Configure-secondary: The Configure Secondary phase performs the same configure actions on primary and/or secondary servers if available. The phase runs for each product family, checks whether split domain is enabled for the specific domain and if primary/secondary host is available for the domain, and then performs the configure actions on that domain. Otherwise, it skips the pack/unpack or any other actions. This phase also registers the managed servers with node manager.
6. Postconfigure: The Post-Configure (Postconfigure) phase performs tasks that require the components while they are online. It seeds policies and grants and assigns administrator and functional setup privileges to the super user. This phase configures and deploys Oracle SOA composites and performs post-deployment security configurations. For each domain, it sets the value of FusionAppsFrontendHostUrl.
7. Startup: The Startup phase essentially brings up all domains administration servers and managed servers including middleware and Application managed servers for the host where the phase is running. Although technically these servers are supposed to be running from the Postconfigure phase, it does a clean restart of all the required servers. The Startup phase also performs GUID reconciliation to make sure the seeded policies and grants are reconciled between the Oracle Fusion data security and policy store.
8. Validate: This phase does a variety of checks to validate the installation. These checks include application URLs reachability, validation of data source, and many more.
Now since you know the phases of Fusion Applications provisioning and which tasks run during each phase, let’s look at the provisioning process flow. Figure 10-2 shows the flow of Fusion Applications provisioning with respect to the phases involved.

Figure 10-2. Phases of the Fusion Applications provisioning process
As you can see, the phases run in sequential manner and a new phase cannot start until the previous phase has completed on each of the hosts involved in the selected topology. After successful completion of each phase, the provisioning framework backs up the instance directory. If the local configuration is enabled then that is also backed up. Since the preverify (prerequisites check), startup, and validation phases do not make any changes to configuration, there is no backup taken during these phases.
Note
The Provisioning wizard must be started on a primordial host only followed by running the same phase on primary and secondary hosts using the command-line interface.
If any phase encounters an error for any reason, then we must do a cleanup of the existing phase and restore of the previous phase’s backup files using the Provisioning wizard or the command-line tools. We will look at this in detail in later sections. Since there are no previous backup available during installation phase, if install phase fails then the cleanup and restore activity will delete the existing directories. It does not need to restore any backup files before restarting the install phase. Similarly for startup phase failure, it may only need to clean up any process that failed to start and restart the phase instead of restoring since there is no configuration change involved in this phase. For Preverify and Validation phase, it only needs to restart the same phase again after fixing the underlying issue without doing any actual cleanup tasks. The cleanup target will run as part of the process but without making any changes.
Note
Until Oracle Fusion Applications 11g, Release 3 (11.1.3), the Cleanup and Restore feature had limited capabilities wherein it required complete cleanup and restore of the phase on all nodes. From Fusion Applications Release 11.1.3 onward, we have a granular Cleanup and Restore feature available wherein the cleanup or restore actions are performed only on the hosts where the phase failed and also only on the product domains that failed. This has greatly enhanced the Fusion Applications installation experience and success rate.
Important Input Files Used During Provisioning
As we discussed in Chapter 3, the whole process of Fusion applications provisioning is based on Apache ANT based orchestration. We have also understood the role played by ANT automation build files in any automated deployment process. This is replacement of traditional make commands and provides extended functionality by allowing us to define custom tasks and then calling these tasks from various build files.
The following are the important input files used by the provisioning framework in addition to the provisioning scripts, which you already saw while creating the response file earlier. Note that although you need not understand the ANT program or the build file structure in order to provision an Oracle Fusion Applications environment, it helps immensely in troubleshooting Fusion Applications installation issues.
Provisioning Tasks Class Libraries
The Apache ANT utility allows the developer to run OS commands, Java programs, and other types of codes, each of which is contained in an element called task defined in the build files. A developer can create custom task definitions using Java classes and bundle the class libraries in .jar (Java Archive) files. Oracle Fusion Applications provisioning related tasks are also bundled in various task definition libraries and available under the <FRAMEWORK_LOCATION>/provisioning/lib path. FRAMEWORK_LOCATION is where we have installed the provisioning framework (/app/fusion). Figure 10-3 lists some of the class libraries in this location that include the actual tasks definitions for the provisioning process. These class libraries contain the tasks which are the actual activity to be performed. These tasks can be directly called from build files, which we will discuss next. The same location also can contain third-party extensions in the form of .jar files, which also can be referenced by ANT build files.

Figure 10-3. Provisioning task definition libraries
Provisioning Build Files
Provisioning build files are located in the <FRAMEWORK_LOCATION>/provisioning/provisioning-build directory. These are ANT build automation files or build files written in the XML format. These files contain the logical flow of the provisioning process in the form of various tasks. These tasks can be defined in the build file or can make direct calls to the java program units contained in the custom tasks definition libraries. The following are important elements of an ANT build file.
Project: A logical grouping of related tasks and targets. Each build file will have a distinct project name which will contain a number of targets within it. Project contains a number of targets and only the target which is specified while referencing the build file is executed. Each project has a default target and if no target is specified during the build process, the default target is executed.
Targets: A container of tasks to be performed similar to traditional make utility targets in order to achieve a specific build objective. A target may depend on one or more other targets. So in order to execute one target, the dependency targets are executed from left to right by following any further dependencies. If a dependent target is has already run then it will not run again during this dependency check.
Tasks: The actual code or program unit that is required to be executed. There are many built-in tasks and a developer can write his own task definition as well. Each task can have multiple attributes which are specified in attribute and values pairs. The values could be any string or a reference to a predefined property value. We will look at properties next. Let’s take a short example of project, target and tasks to understand how they relate to each other. Note that a good understanding of how ANT works will always help you in troubleshooting and finding the root cause easily. This example is based on Apache ANT open source manual. Here we are executing the built-in ANT tasks javac and mkdir.
<project name="AntExample" default="compile">
<property name="srcdir" location="src"/>
<property name="destdir" location="dest"/>
<target name="compile">
<mkdir dir="${dest}"/>
<javac srcdir="${srcdir}" destdir="${destdir}"/>
</target>
</project>
Taskdefs : Used to add a new task definition in the current project. These task definitions may include a reference to a Java class that must exist in any of the included .jar files in the ANT library directory (../lib). In Fusion Applications provisioning framework the custom task definitions are created in a build file named common-taskdefs-build.xml. This file is referenced by common-build.xml file and in turn by the provisioning entry point orchestration.xml build file so these tasks remain available to all provisioning targets. For example:
<taskdef name="createDomain" classname="oracle.apps.fnd.provisioning.ant.taskdefs.CreateDomainTask" classpath="${provisioning.classpath}"/>
Properties : The key-value pairs defined either using the <property> task or predefined outside ANT using some input files or one of many possible task. Key acts as a variable which can be used at runtime by ANT by expanding ${key} to a value which is either predefined or generated at runtime. One example of a build file that sets various properties during Fusion Applications Provisioning is common-propertyops-build.xml. For example:
<property name="tstamp.format" value="MM/dd/yyyy hh:mm:ss aa z" />
<property name="time.total" value="Total time: " />
During provisioning process some properties are also loaded from provisioning plan file. We will look at this in next section. Figure 10-4 shows some of build files contained at <FRAMEWORK_LOCATION>/provisioning/provisioning-build. Although all these files are located in same directory and used in the same fashion as any other build files, we have grouped these files into four categories to help you understand them better.

Figure 10-4. Provisioning build files
Provisioning phases and orchestration-related build files: This category includes the build files containing common actions related to each Provisioning Phase in common-<phase>-build.xml format. This category also includes the main installation build file orchestration-build.xml which is the entry point of any Fusion Applications Provisioning. Any phase will begin with orchestration build which internally calls all other build targets and tasks.
Fusion Applications products-related build files: This category includes all the build files related to a particular product family of Fusion Applications suite. There may be one or more build files for each product family which reference each other from main product build file which is in <product>-build.xml format. We will show an example in coming section for one product family and how the tasks calls are being referenced via multiple build files till the particular task definition.
Fusion middleware products-related build files: Similar to Fusion Applications Products Build Files, there are individual build files for each Fusion Middleware Product in the same directory. The format is again <product>-build.xml for example soa-build.xml, webcenter-build.xml and so on. These build files are referenced every time a middleware component related build action is called in any phase.
Common tasks-related build files: This category includes all the build files which are not related to specific phase or product but contain generic task definitions, targets and properties which are common to most phases and products. In the following build files example we will show you how common tasks are referenced from product or phase related build files.
Provisioning Plan File
This file can be considered as input file as well as output file since it is first created as an output file at the beginning of Preverify stage and then used as input file for all phases. The location of this file is <APPLICATIONS_BASE>/provisioning/plan directory which is also created in the Preverify phase just before creation of provisioning plan file. This file should not be confused with the provisioning response file although many people sometimes use the word provisioning plan interchangeably with the response file. Response file is created from the specific responses you entered during the wizard while provisioning plan file is created internally by the provisioning framework during the Preverify phase after validating the response file and then creating a properties file named provisioning.plan. This file contains values of your provisioning environment specific variables which are used by the provisioning build files in alphabetically sorted order.
Note
In earlier versions of Oracle Fusion Applications, the provisioning plan was created first and then supplied to the installation orchestration process. In recent releases, the provisioning plan is generated as part of the Preverify phase. The Preverify phase calls the runCLI.sh (or runCLI.bat) script located at <FRAMEWORK_LOCATION>/provisioning/bin by passing the provisioning response file (provisioning.rsp) as input and specifying the provisioning plan file (provisioning.plan) as the output file to be created.
Then following target included in the common-propertyops-build.xml build file loads the properties from provisioning plan during every provisioning phase and the key values are referred by the build files at runtime.
<taskdef name=" loadplan "
classname=" oracle.apps.fnd.provisioning.ant.taskdefs.LoadPlanTask "
classpathref="bootstrap.provisioning.classpath"/>
...
<target name="common-load-properties" unless="load.properties.done"
depends="private-bootstrap-tasks, private-generate-plan-from-response-file">
...
<loadplan plan="${provisioning.plan}"
override="${plan.override}"
invptrloc="${invptr.location}"
ignoresysprereqs="${preverify.ignore}"/>
...
</target>
You will see following entries in each phase log files related to loading of properties from provisioning plan. Once these properties are loaded, the build files can refer the values using ${key} reference which will be expanded at runtime by ANT to a corresponding value.
...
[echo] Plan file: /app/oracle/provisioning/plan/provisioning.plan
[loadplan] Loading /app/oracle/provisioning/plan/provisioning.plan
[loadplan] Loaded /app/oracle/provisioning/plan/provisioning.plan
The contents of the provisioning.plan file is in <key>=<value> format. Let’s look at some examples of these properties set in the provisioning plan file.
Database-Related Property Examples
database.fusion.dbhost.host.name=fadbhost.paramlabs.com
database.fusion.dbhost.port=1521
database.fusion.enterprise.servicename=fusiondb
IDM Setup-Related Property Examples
provisioning.setup.load-idm-properties.load-idm.load.idm.properties=true
provisioning.setup.load-idm-properties.load-idm.validated.and.processed=true
provisioning.setup.load-idm-properties.load-idm.inputfile.location=/app/fusion/idmsetup.properties
Locations-Related Property Examples
provisioning.setup.common.core.default.home.top=/app/oracle
provisioning.setup.common.core.phaseguards.dir=/app/oracle/provisioning/phaseguards
provisioning.setup.install-location.locations.default.home.instance=/app/oracle/instance
Example of a Provisioning Task Execution Using ANT Build Files
Let’s look at an example task execution during the orchestration process shown in Figure 10-5. We have taken an example of createDomain which is used to create a product family domain in the Configure phase before any managed server cluster can be created.

Figure 10-5. Example task execution across multiple build files
As you can see we have taken example of createDomain task. This task is called during the Configure phase for each product family and creates the respective application domain. Here we will look at HCM WebLogic domain creation task. Let’s look at the steps involved in this ANT call.
1. The entry point for Fusion Applications provisioning is always the build file named orchestration.xml, as you can see in Figure 10-5. We can see the target named configure in this file. configure target internally calls private-invoke-parallel with value of wrappertarget parameter as private-invoke-hcm and value of target parameter as configure.
2. The private-invoke-parallel in turn runs the target name ${wrapppertarget}, the value of which resolves to private-invoke-hcm.
3. The private-invoke-hcm target then runs another target named {$target}, which resolves to configure. But since the antfile value specified is hcm-build.xml, it looks for this target in this file.
4. hcm-build.xml file imports another build file named base-product-family.xml which contains the target named configure.
5. configure internally calls private-configure target which in turn runs common-apps-create-domain via multiple internal calls not shown here.
6. The target common-apps-create-domain is found in another imported file named common-configure-build.xml. This target runs the configure target within the domain-build.xml build file.
7. The configure target in domain-build.xml runs a private-configure target which in turn runs common-create-product-family-domain target.
8. The common-create-product-family target is found in the imported file common-configure-build.xml. This target runs the Task named createDomain, which refers to the oracle.apps.fnd.provisioning.ant.taskdefs.CreateDomainTask class, which may contain the actual code for the task.
9. The Apache ANT utility looks up for this class and finds the ../lib/oracle-provisioning-anttasks.jar file.
This concludes the example workflow of a sample task execution in Fusion Applications provisioning.
Important Output Files Created During Provisioning
After going through the input files used during provisioning process, let’s now look at some of the important output files other than those contained in the installation directory. A good understanding of these files will help you immensely through the provisioning process especially when you need to troubleshoot the issues and monitor the provisioning progress. The following are the main types of output files created.
Phaseguard Files
Phaseguards are created for each host and for every provisioning phase in the <phase>-<hostname>-<status>.grd format. These are blank files acting as flag files for the provisioning framework to detect the current status of the phase. Each phase may have one of the status from STARTED, COMPLETED, ENDED, FAILED, or ABORTSIGNLED.
The directory phaseguards also contains a sub-directory named pf (Product Family) which contains individual status of each product family in every phase. These files are in <phase>-<hostname>-<product family>-<status>.grd format. Product family phaseguards can have STARTED, COMPLETED, or FAILED status. Whenever a phase is restarted after failure, these product family phaseguard files are read and only those which failed earlier are restarted.
Caution
Since the phaseguard files enable the provisioning framework to monitor and control the provisioning phases to the provisioning framework, these files must not be touched during the provisioning process even though if you are stuck with a particular phase of provisioning since it can lead to incomplete installation or failure in further steps. There is an exception to this which we will see at the end of provisioning process after the Validate phase.
Provisioning Lock Files
Provisioning lock files are also as sensitive as phaseguards and should not be touched manually. Provisioning framework controls the asynchronous flow of certain tasks which should not run at the same time by allowing each product build to obtain a lock in form of these flag files so that other tasks may not run the same tasks at that time and need to wait till the lock is released. There is a specific timeout specified for each of such tasks on how long they need to wait before aborting the task and sending failure signal. Provisioning lock files have extension .lck and are blank files acting as a placeholder or flag file only. Only in case of manual cleanup these files can be deleted if you are fully aware of the root cause or if advised by Oracle Support.
Instance and Local Configuration Backup Files
Upon completion of each provisioning phase related tasks, the provisioning framework creates a backup of the instance directory and local configuration directory (if exists). These files are named instance.tar and placed under respective <APPLICATIONS_BASE>/provisioning/restart/backup_<phase> directory for each completed phase. Depending on the number of phases successfully completed, you will see a number of directories in this location. These backup files are used to do a full or partial restore of instance directory in case of failure during Fusion Applications installation.
Figure 10-6 shows the three types of output files along with their location. Note that this diagram shows the status after a successful completion of provisioning so you do not see any FAILED or ABORTSIGNALED phaseguards. Also although you can see all instance backups for reference only since upon successful completion of next phase the instance backup from previous phase is no longer required and deleted automatically. So you may not see the directories for other earlier phases except the Postconfigure phase under restart directory upon completion of Fusion Applications provisioning.

Figure 10-6. Important files created during provisioning
Now let’s try to relate the Fusion Applications provisioning phases with the output files created during each phase. As you can see the phase proceeds in following stages. Let’s see the output files created in each of these stages.
1. Phase initiation: Once the phase is initiated, it first creates a phaseguard file named <phase>-<hostname>-STARTED.grd to let other attempts to run the provisioning framework know that the phase has already initiated on this host and not yet completed.
2. Phase execution: During the execution of the phase build targets related to each product family (those part of selected configuration) are executed. This begins with first creating a phaseguard file for the respective product family with name as <phase>-<hostname>-<product family>-STARTED.grd. During the execution of the phase several lock files are created to control asynchronous tasks. Once the tasks related to a particular product family completes then a phaseguard file named <phase>-<hostname>-<product family>-COMPLETED.grd is created. The other product families related build targets may still be running at this stage.
3. Tasks completion: Once all product families related tasks for the particular phase are complete, the installer creates phase tasks completion phaseguard file named <phase>-<hostname>-COMPLETED.grd and the status column of the phase on the wizard screen shows up as completed with a green tick mark sign. However the Next button to initiate the next phase will not be active yet.
4. Phase completion: During the time between tasks completion and phase completion the provisioning framework creates backup of the complete instance directory and local configuration (if available) to the restart directory in the background. It also creates backup lock files to indicate that the backup is going on. Once these tar backups are complete, the framework writes a phaseguard file named <phase>-<hostname>-ENDED.grd. At this stage you will notice that the Next button to proceed to next phase becomes enabled.
Figure 10-7 shows stages of a generic phase as mentioned above in graphical format.

Figure 10-7. Stages of each phase with corresponding files created
Fusion Applications Provisioning Log Files
Provisioning Log files and output files are your most important resources during provisioning process since we will use them heavily to troubleshoot or monitor the provisioning phases. Log files (.log extension) contain details of every task being executed during the provisioning process while the output files (.out extension) contain the standard execution output of each task. The output files are generated for phase only not for each product domain. While log files are crated for each phase as well as every product domain and for some phases there are log files for managed servers as well. Output files generally contain the execution output with timing details while log files contain the verbose messages about the tasks being started, completed or error conditions.
If there are any errors during any of the provisioning phases, you may not find java related exception details in log files so in this case you must refer to the output files since such exception details are found in output files. For individual command-line tasks like cleanup and restore you may see output files containing the console output. In later sections we will see how to clean up the phase and restore to previous state before restarting the same phase again. In this case the provisioning framework creates a directory named <phase>-<timestamp> inside <logfiles location>/archive and moves previous log files related to failed phase. This is done in order to avoid the files from being overwritten and to keep them available for future reference or troubleshooting.
The default logging level in the log files is specified in the configuration file prov-logging-config.xml located at <FRAMEWORK_LOCATION>/provisioning/bin directory, the same directory where from where we run the provisioning wizard scripts. Names of the logger parameters that control the level of logging in the files as well as on the console are runProvisioning-default-main and runProvisioning-console respectively. The default level of these logger is TRACE:1 and NOTIFICATION:1 respectively which are FINE and INFO levels. There are various other levels like TRACE:16 (FINER), TRACE:32 (FINEST) etc. for more detailed log for further debugging purpose. All you need to do is to back up prov-logging-config.xml file and modify the following lines temporarily to change the logging level.
<logger name="runProvisioning-default-main" level="TRACE:1">
<logger name="runProvisioning-console" level="NOTIFICATION:1">
Let’s look at some of the important log and output files created during the provisioning process. Figure 10-8 shows the name format and location of the important provisioning log and output files.

Figure 10-8. Fusion Applications Provisioning Log files
As you can see the files are generated at <APPLICATIONS_BASE>/log/provisioning/plan<timestamp>/<hostname>, where hostname is the host where the current provisioning phase is running and timestamp format is number of milliseconds from 1-Jan-1970 00:00:00 not counting the leap seconds. This value is generated at runtime using java.lang.System.currentTimeMillis() method. You can also see the archive folder and corresponding archived log files for each phase.
Provision Fusion Applications Environment
In this crucial section we will look at the step-by-step process to Provision Fusion Applications environment on application and web tier nodes. Once you initiate this process, it may take fairly long time to complete the wizard so be patient as you may need to let some phase run overnight in order to save time. Make full use of the Fusion Applications Provisioning log files and output files as discussed earlier. Make sure to monitor the provisioning process continuously at host level, database level including on Identity Management nodes since there will be a lot of processing on each of the nodes of selected topology during the installation.
Tip
The Fusion Applications provisioning framework invokes the tasks in parallel depending on the number of CPUs installed on the host. If you have fewer CPU cores with more processing power then it is more likely to complete successfully as compared to more cores with less processing power. You can see the number of threads to initiate per CPU core in your provisioning plan file, which was generated automatically.
We have two types of interfaces to run the provisioning process. Let’s look at both available options with the associated advantages and restrictions for selecting between these interfaces.
Provisioning Through the Graphical interface
Graphical interface (GUI) wizard is the default installation method used for Single host topology. We need to run the same Provisioning wizard which we used for creating Fusion Applications Transaction database and for creating the provisioning response file. Although we can run the installation using the command-line interface as well, installing through the graphical interface allows us to monitor the progress of installation in near real time with status of the phase on each host for each product family. Only for phase running on DMZ host we cannot monitor the progress on the wizard screen since the log status location on DMZ host is not shared with the primordial host. For multi-host topologies we can run the installation using GUI interface on the primordial host while for other hosts we need to run using the command-line interface, as explained in the next section.
In order to install Fusion Applications using a graphical interface we need to run the provisioning wizard using provisioningWizard.sh script (provisioningWizard.bat on the Windows platform) located at <FRAMEWORK_LOCATION>/provisioning/bin directory. The syntax of running the wizard is as follows.
./provisioningWizard.sh [-invPtrLoc <inventory pointer file> -ignoreSysPrereqs <true/false>]
Note that the arguments ivPtrLoc and ignoreSysPrereqs are optional. Let’s look at these arguments.
invPtrLoc : You may optionally specify the location of Oracle inventory pointer file if it is not at the default /etc/oraInst.loc location. In general you may not need to specify the same for most installations.
ignoreSysPrereqs : This argument allows you to skip most validation errors in the Preverify phase. For current releases of Fusion Applications installation you may need to specify -ignoreSysPrereqs true since default value is false. If you do not specify this switch then the Next button may not be activated on Prerequisites check screen even if you encountered known errors for the particular release that can be skipped.
Provisioning Through the Command-Line Interface
Installation using the command-line interface (CLI) is optional for a single-host topology and mandatory for multi-host scenarios where you must install using the command-line interface on non-primordial hosts. Even if you run installation using CLI on non-primordial hosts, you can still track the same using GUI wizard screen on the primordial host. Note that until the phase has not completed on all hosts, the Next button will not be activated on the GUI screen to move to next phase.
The command-line interface scripts are located in same location as GUI scripts i.e. <FRAMEWORK_LOCATION>/provisioning/bin. In order to run the installation phase using the command-line interface you need to run the script runProvisioning.sh (runProvisioning.bat for Windows platform) as follows.
./runProvisioning.sh -responseFile <Response File path> -target <phase name>
[-invPtrLoc <Inventory Pointer file> -ignoreSysPrereqs <true/false>]
Let’s look at these arguments for the command-line interface.
responseFile : This is mandatory argument for the script. Although we do not need to specify this on GUI since there we manually select the response file, for command-line interface we must specify the response filename with full path as an argument to the script.
Note
From Oracle Fusion Applications 11g, Release 3 (11.1.3) onward the command-line argument -plan was replaced with -responseFile and the argument provisioning_plan_location was replaced with response_file_location.
target : This is also mandatory argument for the script. Usually the target name is the name of the provisioning phase except for cleanup and restore where we specify the argument as <cleanup>-<phase> or <restore>-<phase>.
invPtrLoc : This argument is the same as we discussed in the GUI script and here also it is optional. The default value for Linux is /etc/oraInst.loc, which is true for most installations.
ignoreSysPrereqs : This argument is also same as we discussed in the GUI script and here also it is optional. Note that if you have specified ignoreSysPrereqs on one host or phase then you must specify the same on other hosts and next phases regardless of whether you had specified this argument in GUI or CLI.
Multi-Host Installation of Fusion Applications
Before you begin the example installation, let’s have a quick look at the multi-host scenario. Although we have selected two-tier topology with single-node for Fusion Applications and web tier, let me explain what steps are involved when you have multiple hosts involved in the topology. We will also look at DMZ scenario to get an understanding of additional steps required. Also during our example installation we mention any additional steps in the multi-host topology.
Figure 10-9 shows the list of steps required during the Fusion Applications installation in single host, multi-host, and DMZ scenarios. The diagram legend marks the steps in these three categories so depending on which topology you have selected you need to run the corresponding steps only.

Figure 10-9. List of steps required based on different topologies
For single node scenario you just need to run through the Provisioning wizard and no manual action is required. Let’s have a quick summary of the required steps which may help you in the next section of installation.
1. Start the Fusion Applications Provisioning wizard on the primordial host.
2. Once the Preverify phase is kicked off on the primordial host, initiate the Preverify phase on the primary host (if available) and the secondary host (if available) using the command-line interface (CLI) and wait for the phase to complete on all hosts.
3. Since the internal provisioning plan, called provisioning.plan, is generated during the Preverify phase, if you have DMZ set up in selected topology then you must copy the file to DMZ host since DMZ host does not have the shared directory that’s available on other hosts. Copy the file provisioning.plan from the <APPLICATIONS_BASE>/provisioning/plan to same local location in the DMZ host. You may skip this step if you do not have a DMZ host.
4. Start the Install phase on the primordial host. Once the progress is visible on the screen, initiate the Install phase on the primary host (if available), the secondary host (if available), and the DMZ host (if available) using the command-line interface (CLI) and wait for the phase to complete on all hosts.
5. The Install phase creates the webtier_dmz_artifacts.zip file at <APPLICATIONS_BASE> in any selected topology. If you have a DMZ host in your selected topology then you must copy this file to the same location on the DMZ host local disk. Otherwise you can skip this step.
6. Initiate the Preconfigure, Configure, Postconfigure, and Startup phases one by one in a similar fashion by starting the wizard on the primordial host and CLI on the remaining hosts. Only once the current phase completes can you can start the next phase. Once all these phases are complete, proceed to run the Validate phase for validation of the installation.
7. Start the Validate phase on the primordial host using the Provisioning wizard and track the progress on the screen. You can run the Validate phase on the primary or secondary host (if available) using the command-line interface.
Begin the installation
After going through all the theory, now it’s time to begin the installation of the Fusion Applications environment. Make sure that the provisioning framework is installed on the application and web hosts. Once you start the installation and complete the Install phase, you cannot go back to the previous phase so make sure you understand the related input or output files for monitoring before you proceed.
Launch the installer from <FRAMEWORK_LOCATION>/provisioning/bin as follows. The current release advises that you start with the -ignoreSysPrereqs true argument to avoid any known validation failures. This is stated in the release notes of the release that you are installing.
[fusion@fahost bin]$ cd /app/fusion/provisioning/bin/
[fusion@fahost bin]$ ./provisioningWizard.sh -ignoreSysPrereqs true &
Make sure that you either have access to the service console or VNC access to the server before you initiate the graphical interface. There are several ways to launch GUI screens on a Unix platform so we will not discuss any specific method here. Once you execute the script, the GUI Provisioning Wizard screen will pop up. As you can see in Figure 10-10, the Welcome screen displays important prerequisite information related to each task the wizard can perform.

Figure 10-10. Fusion Applications provisioning welcome screen
In our case since we are provisioning the Fusion Applications environment, we should read the paragraph on the screen that’s highlighted in Figure 10-10 and make sure that all the prerequisites are met. In general, all of the following tasks must be completed before you can initiate Fusion Applications installation.
The installation media must be extracted to the installation repository location and be available on the shared location that’s accessible to all hosts in the selected topology except the DMZ host.
The Identity Management environment must be provisioned and be running.
The Fusion Applications transaction database must be created and the Repository Creation Utility must be running on this database.
You must have already created Fusion Applications provisioning response file since you will need this file in order to initiate the provisioning process.
Once you have made sure that the installation prerequisites are met, click Next to continue to the Installation options screen, as shown in Figure 10-11.

Figure 10-11. Installation Options screen
We have already discussed the options on the Installation Options screen in the previous chapter. Note that the third option, called Create a Response File for Extending an Existing Fusion Applications Environment, is only available on Fusion Applications 11g, Release 9 (11.1.9) onward. In previous releases, only five options were available on this screen.
In this chapter we are going to focus on the option titled Provision an Applications Environment. This option requires the name of the provisioning response file as an input in order to proceed. This response file must have been created in advance and must be complete. Incomplete response files (created by using the Save option in middle of Response File Creation wizard) is not supported for Fusion Applications provisioning. Select Provision an Applications Environment and enter the full path of the existing response file in the textbox or use the Browse button to locate the response file.
Once you click Next, the wizard reads the response file and once the response file is validated and loaded, it will initialize the values in other screens. In the next few screens it will allow you to make last-minute modifications or verify the response file (with few exceptions including provisioning configuration selection and so on).
As soon as the response file’s values have been loaded, you will see Response File Description screen as shown in Figure 10-12. It allows you to review the response file, version and description and allows you to edit any fields if required. You can see that two fields called Created By and Created Date are grayed out and they show the values as of the creation time of response file and not as of the last update of the response file.

Figure 10-12. Response File Description screen
If you are planning to make any modifications to the response file in the upcoming screens, you can modify the description with changes mentioned for documentation purposes. You can also change the version number to a custom number for the same reasons. Click Next to proceed to installation location screen, as shown in Figure 10-13.

Figure 10-13. Installation Location details screen
The Installation Location screen is shown separately since it mainly deals with installer and installation directories, which you may want to change if you have mounted the installer at different location as compared to response file creation or while creating shared file system for the hosts. We discussed the contents of this screen in the previous chapter so we will not discuss that again here.
During the installation if you use the Cancel button to close the wizard or if the wizard crashes, you can restart the installation by running the same provisioning wizard script again. Upon restarting the installation by starting the wizard again, you may be asked to confirm if you want to resume from the same phase by running the necessary cleanup procedures. Or else you can choose to restart from the beginning. In that case you will be brought to this screen again. At this point if you have not deleted your Fusion Applications instance directory then the installer will show an error message stating that the instance directory must be empty.
Validate the information on this screen and modify any values if necessary. Click Next to proceed to the Review Provisioning Configuration screen, as shown in Figure 10-14.

Figure 10-14. Provisioning configuration review selection screen
The Review Provisioning Configuration selection is optional. If you have any doubt about any of the given configuration in the response file or if you want to change any of the previously selected values, select the appropriate configuration which you want to review and/or modify. The options available in this screen are as follows:
Database Configuration: Select this option if you want to make any changes to the Database Configuration parameters selected during response file creation. You can refer to Figure 9-12 from previous chapter to know which screen will be presented again if you select this option.
Schema Passwords: Select this option if you want to change any parameters specified earlier in the Schema Passwords screen, as shown in Figure 9-13 during response file creation.
ODI Password Configuration: Select this option if you want to change any parameters specified in the ODI Password Configuration screen, as shown in Figure 9-14 during response file creation.
System Port Allocation: Select this option if you want to change any parameters specified earlier in the System Port Allocation screen, as shown in Figure 9-11 during response file creation.
Domain Topology: Select this option if you want to change any parameters specified earlier in the Domain Topology and related screens, as shown in Figure 9-15 during response file creation.
Web Tier Configuration: Select this option if you want to change any parameters specified earlier in the Web Tier Configuration screen, as shown in Figure 9-18 during response file creation.
Virtual Hosts Configuration: Select this option if you want to change any parameters specified earlier in the Virtual Hosts Configuration screen, as shown in Figure 9-19 during response file creation.
Load Balancer Configuration: Select this option if you want to change any parameters specified earlier in the Load Balancer Configuration screen, as shown in Figure 9-22 during response file creation.
Web Proxy Configuration: Select this option if you want to change any parameters specified earlier in the Web Proxy Configuration screen, as shown in Figure 9-23 during response file creation.
IDM Properties File: Select this option if you want to change any parameters specified earlier in the IDM Properties File selection screen, as shown in Figure 9-24 during response file creation.
Identity Management: Select this option if you want to change any parameters specified earlier in the Identity Management screen, as shown in Figure 9-26 during response file creation.
Access and OPSS Configuration: Select this option if you want to change any parameters specified earlier in the Access and OPSS Configuration screen, as shown in Figure 9-28 during response file creation.
IDM Database Configuration: Select this option if you want to change any parameters specified earlier in the IDM Database Configuration screen, as shown in Figure 9-30 during response file creation.
If you want to revisit some of these sections of the response file, select the appropriate checkboxes and click Next to continue to the pre-provisioning summary, as shown in Figure 10-15. In this example we will not select any checkboxes for now.
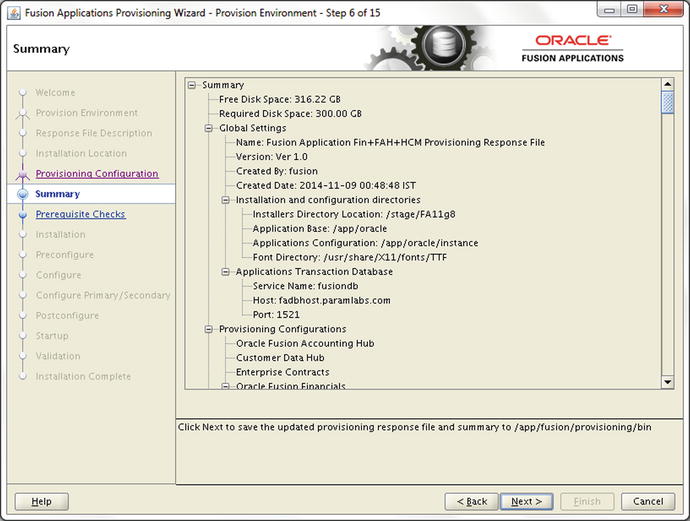
Figure 10-15. Pre-provisioning summary screen
The pre-provisioning summary is similar to response file creation summary screen with the only difference being that this screen does not have options to select a response file, a summary filename, or a location to save the files. If you have made any changes to the response file in previous screens, you will see the updated information. Once you review the summary and click Next, the wizard will update the response file and the related summary file.
Note that the further screens do not require any additional inputs from your end except you need to click Next once the phase is complete or Retry if the phase fails.
Preverify Phase
Figure 10-16 shows the Prerequisite Checks screen, which runs the Preverify phase behind the scenes.

Figure 10-16. Prerequisite Checks screen
Once you see the target-tasks tree on the screen, you can initiate the phase from other primary and/or secondary hosts if they are selected in your installation topology. You must initiate the phase on these nodes using the command-line interface only. You can monitor the progress of the phase on each non-DMZ host on this same screen. The following is the script you need to run to initiate the phase on other hosts. Note that you may need to use the -ignoreSysPrereqs true argument on the command line if you have used the same option while invoking the wizard earlier.
./runProvisioning.sh -responseFile <Response File path> -target preverify
[-ignoreSysPrereqs true]
For example:
[fusion@primaryhost ]$ cd /app/fusion/provisioning/bin
[fusion@primaryhost bin]$ ./runProvisioning.sh -responseFile /app/fusion/provisioning/bin/provisioning.rsp -target preverify -ignoreSysPrereqs true
Since the selected topology has only one node for the Fusion applications tier, we need not run this command on any host. We will use only the wizard for Fusion Applications installation but we will mention the steps required for multi-host topology as well wherever applicable.
As mentioned earlier you can monitor the progress of the phase on the corresponding Wizard screen. The screen shows a target-task based tree with each product family or domain as the parent of the tree node and all related tasks as sub-nodes of the same starting from orchestration product family. Although there is no domain for orchestration product family, it is the starting point of each phase build. The script that’s internally called by the wizard to run the actual ANT build command is as follows.
/app/fusion/provisioning/ant/bin/ant
-f /app/fusion/provisioning/provisioning-build/orchestration-build.xml
-Dresponsefile.input=/app/fusion/provisioning/bin/provisioning.rsp
-Dconfigframework.lib.dir=/app/fusion/provisioning/lib
-Dtools.lib.dir=/app/fusion/provisioning/lib
-logger oracle.apps.fnd.provisioning.ant.taskdefs.util.logger.ProvisioningLogger
-lib /app/fusion/provisioning/lib/oracle-provisioning-antlogger.jar
-lib /app/fusion/provisioning/lib/ojdl.jar
-lib /app/fusion/provisioning/lib/dms.jar
-Dpreverify.ignore true
-Ddebug.timestamp 09_11_14_01_49_46
-Dprovisioning.target preverify preverify
As you can see, the build file being called internally is orchestration-build.xml, which is essentially the provisioning entry point. The response file is passed using the parameter DresponseFile.input. Based on the target mentioned as the parameter Dprovisioning.target, the ANT utility runs the appropriate target in the orchestration.xml build file. In this case, it is a preverify target.
Tip
Apache ANT uses the concept of listeners and loggers to monitor a build process. A listener is alerted to every change of state for build targets or individual tasks. It receives alerts for start, completion, and error for each task and target. Based on the logging level specified, logger handles these events and writes them to log files or to the console. Whenever an error is encountered the task status changes as BUILD_ERROR in the logstatus file and you may see a message in log file containing listener-log-status-in-error. Do not get confused with this generic error; see the output file for further details about the error.
While the tasks in a target are executing you will see a clock symbol next to the target name. Once all the tasks in any target are complete, you will see a green checkmark next to the target name. Any errors or warnings in the task will be displayed by red x mark or yellow exclamation symbol respectively next to the task as well as the product family tree parent node. The orchestration family node will also reflect the same symbol but if there are errors or warnings then the orchestration node will be marked with error symbol.
You can see the home icon on top of the screen before hosts column, which suggests that the host where the wizard is running is essentially the primordial host. The current provisioning phase is highlighted in the left panel. The bottom messages panel will remain empty until you select any member of the tree. Once you click on any line in the tree, it will show a success, warning, or failure message in the messages tab whenever such message is available.
There are a lot of documented known errors or warnings for this phase depending on the topology. You can refer to the release notes for current release to determine which errors can be skipped. For example, the following was a known error in Fusion Applications 11g, Release 7 and, in some cases, you may see this error even in the latest release. This error can be ignored if you have already validated your Identity Management environment manually.
OAM_Validation: Cannot perform OAM Validation as null
In such cases if you have not initiated the script with the ignoreSysPrereqs true argument then the Next button may not be activated and you may see the Retry button to rerun the phase. If you have used ignoreSysPrereqs argument then both the Retry and Next buttons will be activated. Note that this is not applicable for other phases so even if you have used the same argument, you cannot skip the errors in any other phases and any error must be fixed before you can proceed to the next phase. Make sure not to use any workarounds to skip the phase (except validate phase) since it may result in incomplete and erroneous installation of Fusion Applications.
Here are the major activities performed during the Preverify phase.
Runs various validation tests to check if the environment meets the installation prerequisites.
It checks if the installation location is writable, checks available physical memory, disk space, swap space, ports availability, JDK version, kernel parameters, and so on.
Validates connection to FA and IDM databases.
Validates the Identity Management managed servers and URLs reachability.
Creates a provisioning plan file from the response file.
If you did not select the Create Administrators Group checkbox in Identity Management screen of response file creation then it checks whether the Administrator group already exists.
It also checks whether the super user specified in the same screen already exists in identity store or a new user needs to be created.
In this example the only warning it shows is related to HWR mount point size which is a special file system path where HWR reporting files are stored. The minimum required size is 1024 GB as per documentation. You can ignore the warning about HWR mount point size (1024 GB) if you are not using this functionality.
The following are the important files created during the Preverify phase. If there are any issues with the phase you may need to refer to these files for troubleshooting.
Log files: Created at <APPLICATIONS_BASE>/logs/provisioning/plan<timestamp>/<hostname>. For example, /app/oracle/logs/provisioning/plan1415477981901/fahost.
runProvisioning-preverify.log
runProvisioning-preverify-logstatus.log
runProvisioning-preverify.out
Phaseguards: Created at <APPLICATIONS_BASE>/provisioning/phaseguards. For example, /app/oracle/provisioning/phaseguards.
preverify-fahost-STARTED.grd
preverify-fahost-ENDED.grd
preverify-fahost-COMPLETED.grd
pf/preverify-fahost-<phase>-STARTED.grd
pf/preverify-fahost-<phase>-COMPLETED.grd
Provisioning Plan: The provisioning.plan file is created at <APPLICATIONS_BASE>/provisioning/plan. For example, /app/oracle/provisioning/plan/provisioning.plan.
As you can see, the Preverify phase creates the internal provisioning plan file <APPLICATIONS_BASE>/provisioning/plan/provisioning.plan from provisioning response file. Since this is a shared location, this file will be available to primordial, primary, and secondary hosts except a DMZ host since DMZ uses the local file system. If your architecture involves a DMZ host then you must manually copy this file to <APPLICATIONS_BASE>/provisioning/plan on the DMZ host before you proceed to the Install phase.
Install Phase
Once the Preverify phase is completed successfully, click Next to proceed to the Install phase, as shown in Figure 10-17.

Figure 10-17. Installation phase status screen
Now you will see the installation (install) phase progress screen. The interface for all phases looks exactly the same with same top-level titles in the task tree. Each phase runs on each of the configured product domains and, depending on the number of physical CPUs on the host, tasks related to multiple product families may start in parallel.
Once the Install phase has been kicked off on the primordial host, you can initiate the phase on primary hosts (if present), secondary hosts (if present), and DMZ host (if present) from the command-line interface as follows.
./runProvisioning.sh -responseFile <Response File path> -target install [-ignoreSysPrereqs true]
For example:
[fusion@primaryhost ]$ cd /app/fusion/provisioning/bin
[fusion@primaryhost bin]$ ./runProvisioning.sh -responseFile /app/fusion/provisioning/bin/provisioning.rsp -target install -ignoreSysPrereqs true
Caution
Before starting the Install phase on DMZ host, make sure that you have already copied the provisioning.plan file to the <APPLICATIONS_BASE>/provisioning/plan location.
The following important actions are performed during the Install phase.
Installs Fusion Middleware and Fusion Application components in respective home directories.
Once installation of each component is done, it applies the tech patches from the patches directories that are bundled with the installation media and extracted at the respective product directory in the installation repository.
This phase involves any Identity Management environment-related actions.
The actual ANT command executed behind the scenes is as follows.
/app/fusion/provisioning/ant/bin/ant
-f /app/fusion/provisioning/provisioning-build/orchestration-build.xml
-Dresponsefile.input=/app/fusion/provisioning/bin/provisioning.rsp
-Dconfigframework.lib.dir=/app/fusion/provisioning/lib
-Dtools.lib.dir=/app/fusion/provisioning/lib
-logger oracle.apps.fnd.provisioning.ant.taskdefs.util.logger.ProvisioningLogger
-lib /app/fusion/provisioning/lib/oracle-provisioning-antlogger.jar
-lib /app/fusion/provisioning/lib/ojdl.jar
-lib /app/fusion/provisioning/lib/dms.jar
-Dpreverify.ignore true
-Ddebug.timestamp 09_11_14_02_02_07
-Dprovisioning.target install install
The following are the important files created during the Install phase. If there are any issues with this phase, you may need to refer to these files for troubleshooting.
Log files: Created at <APPLICATIONS_BASE>/logs/provisioning/plan<timestamp>/<hostname>. For example, /app/oracle/logs/provisioning/plan1415477981901/fahost.
runProvisioning-install.log
runProvisioning-install-logstatus.log
runProvisioning-install.out
Phaseguards: Created at <APPLICATIONS_BASE>/provisioning/phaseguards. For example, /app/oracle/provisioning/phaseguards.
install-fahost-STARTED.grd
install-fahost-ENDED.grd
install-fahost-COMPLETED.grd
pf/install-fahost-<phase>-STARTED.grd
pf/install-fahost-<phase>-COMPLETED.grd
Instance directory Backup: Back up of the instance directory <APPLICATIONS_BASE>/instance is created at <APPLICATIONS_BASE>/provisioning/restart/backup_<phase>. For example, a .tar backup of /app/oracle/instance directory is created at /app/oracle/provisioning/restart/backup_install/instance.tar.
Installation takes a few hours depending on the type of disk selected and other hardware configuration. Once the Installation phase is complete on all hosts, the Next button will be activated. The Installation phase creates a file named webtier_dmz_artifacts.zip at <APPLICATIONS_BASE>. If you have a DMZ host in your topology, you must copy this file to the same location on the DMZ host before you can proceed.
Preconfigure Phase
Once Install phase has completed successfully, click Next to proceed to the Preconfigure phase, as shown in Figure 10-18.

Figure 10-18. Preconfigure phase status screen
As you know the phase runs on each of the configured product domains and, depending on the number of physical CPUs on the host, tasks related to multiple product families may start in parallel. But there are some tasks that should not run in parallel. To make sure that these tasks are not run in parallel, the provisioning framework makes use of lock files, which are empty files that act as a flag to indicate that the task is already being executed by another process. So once such a task is initiated, the task creates the appropriate lock file. If any other task wants to run the same action then it will first check if it is possible to acquire a lock on this file and such lock already exists then it will need to wait for the previous task to complete. There is a stipulated time until which the process will wait after which also if it cannot acquire lock then it will fail. These timeout parameters are specified in relevant XML build files and should not be modified as a workaround to get rid of timeout errors unless specified by a provisioning expert or by Oracle Support.
Once the Preconfigure phase has been kicked off on the primordial host, you can initiate the phase on the primary hosts (if present), secondary hosts (if present), and DMZ host (if present) from the command-line interface as follows. In case of single FA host topology, you should skip this step.
./runProvisioning.sh -responseFile <Response File path> -target preconfigure
[-ignoreSysPrereqs true]
For example:
[fusion@primaryhost ]$ cd /app/fusion/provisioning/bin
[fusion@primaryhost bin]$ ./runProvisioning.sh -responseFile /app/fusion/provisioning/bin/provisioning.rsp -target preconfigure -ignoreSysPrereqs true
The following important actions are performed during the Preconfigure phase.
Performs ESS ADF configuration by updating connections.xml with the Fusion Applications database MDS schema details (FUSION_MDS_ESS) so that ADF uses this as the metadata services repository.
Uploads the LDIF files containing tasks to create Application administrator groups. These files with the .ldif extension are already copied as part of the Install phase under /app/oracle/fusionapps/applications/com/acr/security/ldif.
Creates system administrator groups if selected during response file creation and if it does not already exist.
Seeds AppID users and AppID groups to the identity store using oid_appid_users.ldif and oid_appid_groups.ldif files. Gives the bootstrap AppID membership of the system administrators group.
Makes the designated super user (FAAdmin in this case) member of the administrator groups and other groups related to the application family.
The actual ANT command executed behind the scenes is as follows.
/app/fusion/provisioning/ant/bin/ant
-f /app/fusion/provisioning/provisioning-build/orchestration-build.xml
-Dresponsefile.input=/app/fusion/provisioning/bin/provisioning.rsp
-Dconfigframework.lib.dir=/app/fusion/provisioning/lib
-Dtools.lib.dir=/app/fusion/provisioning/lib
-logger oracle.apps.fnd.provisioning.ant.taskdefs.util.logger.ProvisioningLogger
-lib /app/fusion/provisioning/lib/oracle-provisioning-antlogger.jar
-lib /app/fusion/provisioning/lib/ojdl.jar
-lib /app/fusion/provisioning/lib/dms.jar
-Dpreverify.ignore true
-Ddebug.timestamp 09_11_14_01_49_46
-Dprovisioning.target preverify preverify
The following are the important files created during the Preconfigure phase. If you have any issues with the phase you may need to refer to these files for troubleshooting.
Log files: Created at <APPLICATIONS_BASE>/logs/provisioning/plan<timestamp>/<hostname>. For example, /app/oracle/logs/provisioning/plan1415477981901/fahost.
runProvisioning-preconfigure.log
runProvisioning-<product_family>-preconfigure.log
runProvisioning-preconfigure-logstatus.log
runProvisioning-preconfigure.out
Phaseguards: Created at <APPLICATIONS_BASE>/provisioning/phaseguards. For example, /app/oracle/provisioning/phaseguards.
preconfigure-fahost-STARTED.grd
preconfigure-fahost-ENDED.grd
preconfigure-fahost-COMPLETED.grd
pf/preconfigure-fahost-<phase>-STARTED.grd
pf/preconfigure-fahost-<phase>-COMPLETED.grd
Instance directory backup: Back up of the instance directory <APPLICATIONS_BASE>/instance is created at <APPLICATIONS_BASE>/provisioning/restart/backup_<phase>. For example, a .tar backup of /app/oracle/instance directory is created at /app/oracle/provisioning/restart/backup_preconfigure/instance.tar.
Configure Phase
Once the Preconfigure phase is complete on all hosts, click Next to proceed to the Configure phase, as shown in Figure 10-19.

Figure 10-19. Configure phase status screen
Configure and Postconfigure are two of the most time-consuming phases after the Install phase. You can monitor this screen to see the progress of the Configure phase for each product family on each host (except DMZ). Once the Configure phase has been kicked off from the primordial host, start it from the primary hosts (if available), secondary hosts (if available), and DMZ host (if available) using the following command-line interface scripts.
./runProvisioning.sh -responseFile <Response File path> -target configure
[-ignoreSysPrereqs true]
For example:
[fusion@primaryhost ]$ cd /app/fusion/provisioning/bin
[fusion@primaryhost bin]$ ./runProvisioning.sh -responseFile /app/fusion/provisioning/bin/provisioning.rsp -target configure -ignoreSysPrereqs true
The Configure phase performs a lot of important activities with respect to Fusion Applications installation. The following are some of the actions performed during the Configure phase.
Creates WebLogic domains for all required product families, including CommonDomain and other Application domains required for the products selected for installation on the selected host with the bootstrap AppID as the administrator.
Once the domains are created, it creates WebLogic clusters and managed servers as part of the clusters.
Configures the data sources for each domain and wires the middleware components.
Deploys the application products to the respective managed servers.
Registers the node managers on servers and enrolls the product domains with the node manager.
Starts up the administration server for each configured WebLogic domain.
Creates Oracle HTTP Server virtual host configuration files for each domain.
Disables the default authenticator and enables LDAP authenticator in order to use SSO.
The actual ANT command executed behind the scenes is as follows.
/app/fusion/provisioning/ant/bin/ant
-f /app/fusion/provisioning/provisioning-build/orchestration-build.xml
-Dresponsefile.input=/app/fusion/provisioning/bin/provisioning.rsp
-Dconfigframework.lib.dir=/app/fusion/provisioning/lib
-Dtools.lib.dir=/app/fusion/provisioning/lib
-logger oracle.apps.fnd.provisioning.ant.taskdefs.util.logger.ProvisioningLogger
-lib /app/fusion/provisioning/lib/oracle-provisioning-antlogger.jar
-lib /app/fusion/provisioning/lib/ojdl.jar
-lib /app/fusion/provisioning/lib/dms.jar
-Dpreverify.ignore true
-Ddebug.timestamp 09_11_14_10_46_10
-Dprovisioning.target configure configure
The following are the important files created during the Configure phase. If there are any issues with the phase you may need to refer to these files for troubleshooting.
Log files: Created at <APPLICATIONS_BASE>/logs/provisioning/plan<timestamp>/<hostname>. For example, /app/oracle/logs/provisioning/plan1415477981901/fahost.
runProvisioning-configure.log
runProvisioning-<product_family>-configure.log
runProvisioning-configure-logstatus.log
runProvisioning-configure.out
Phaseguards: Created at <APPLICATIONS_BASE>/provisioning/phaseguards. For example, /app/oracle/provisioning/phaseguards.
configure-fahost-STARTED.grd
configure-fahost-ENDED.grd
configure-fahost-COMPLETED.grd
pf/configure-fahost-<phase>-STARTED.grd
pf/configure-fahost-<phase>-COMPLETED.grd
Instance directory Backup: Back up of the instance directory <APPLICATIONS_BASE>/instance is created at <APPLICATIONS_BASE>/provisioning/restart/backup_<phase>. For example, a .tar backup of /app/oracle/instance directory is created at /app/oracle/provisioning/restart/backup_configure/instance.tar.
Configure Secondary Phase
The Configure phase takes a few hours to complete. Once the Configure phase is complete on all hosts, click Next to proceed to the Configure-Secondary phase, as shown in Figure 10-20.

Figure 10-20. Configure Primary/Secondary phase status screen
The Configure-Secondary phase is also called Configure Primary/Secondary. It was shown on the screen as Configure Secondary in older releases but the name was changed to Configure Primary/Secondary. Once the Configure-Secondary phase has been kicked off from the primordial host, start it from the primary hosts (if available), secondary hosts (if available), and DMZ host (if available) using the following command-line interface scripts.
./runProvisioning.sh -responseFile <Response File path> -target configure-secondary
[-ignoreSysPrereqs true]
For example:
[fusion@primaryhost ]$ cd /app/fusion/provisioning/bin
[fusion@primaryhost bin]$ ./runProvisioning.sh -responseFile /app/fusion/provisioning/bin/provisioning.rsp -target configure-secondary
-ignoreSysPrereqs true
The following important actions are performed during the Configure-Secondary phase.
If there are primary and/or secondary servers in your selected topology then this phase will run the same configure actions on those servers.
Registers managed servers configured on primary and secondary hosts with the node manager of the respective host.
If there are no primary or secondary hosts present in your selected topologies then it skips these actions.
Creates web tier instance ohs1 under <APPLICATIONS_TOP>/CommonDomain_webtier on the web host. Note that this activity is done in this phase even if you have a single-node topology.
The actual ANT command executed behind the scenes is as follows.
/app/fusion/provisioning/ant/bin/ant
-f /app/fusion/provisioning/provisioning-build/orchestration-build.xml
-Dresponsefile.input=/app/fusion/provisioning/bin/provisioning.rsp
-Dconfigframework.lib.dir=/app/fusion/provisioning/lib
-Dtools.lib.dir=/app/fusion/provisioning/lib
-logger oracle.apps.fnd.provisioning.ant.taskdefs.util.logger.ProvisioningLogger
-lib /app/fusion/provisioning/lib/oracle-provisioning-antlogger.jar
-lib /app/fusion/provisioning/lib/ojdl.jar
-lib /app/fusion/provisioning/lib/dms.jar
-Dpreverify.ignore true
-Ddebug.timestamp 09_11_14_15_56_16
-Dprovisioning.target configure-secondary configure-secondary
The following are the important files created during the Configure-Secondary phase. If that are any issues with the phase you may need to refer to these files for troubleshooting.
Log files: Created at <APPLICATIONS_BASE>/logs/provisioning/plan<timestamp>/<hostname>. For example, /app/oracle/logs/provisioning/plan1415477981901/fahost.
runProvisioning-configure-secondary.log
runProvisioning-<product_family>-configure-secondary.log
runProvisioning-configure-logstatus-secondary.log
runProvisioning-configure-secondary.out
Phaseguards: Created at <APPLICATIONS_BASE>/provisioning/phaseguards. For example, /app/oracle/provisioning/phaseguards.
configure-secondary -fahost-STARTED.grd
configure-secondary -fahost-ENDED.grd
configure-secondary -fahost-COMPLETED.grd
pf/configure-secondary -fahost-<phase>-STARTED.grd
pf/configure-secondary -fahost-<phase>-COMPLETED.grd
Instance directory Backup: Back up of the instance directory <APPLICATIONS_BASE>/instance is created at <APPLICATIONS_BASE>/provisioning/restart/backup_<phase>. For example, a .tar backup of /app/oracle/instance directory is created as follows: /app/oracle/provisioning/restart/backup_configure-secondary/instance.tar.
Postconfigure Phase
The Configure Primary/Secondary phase may take a few minutes. Click Next to proceed to the Postconfigure phase, as shown in Figure 10-21.

Figure 10-21. Postconfigure phase status screen
The Postconfigure phase is the most error-prone phase if you do not have the right hardware or if the process parallelism does not initiate correctly. In such cases it may cause timeout errors. We will discuss that soon. The Postconfigure phase takes a very long time. Do not panic if you see errors during this phase since most of the errors are transient and can be fixed upon rerunning based on the error. In the previous example you saw that the CRM postconfigure failed and the error was related to a timeout during high CPU activity.
Once the Postconfigure phase has been kicked off from the primordial host, start it from the primary hosts (if available), secondary hosts (if available), and DMZ host (if available) using the following command-line interface scripts.
./runProvisioning.sh -responseFile <Response File path> -target postconfigure
[-ignoreSysPrereqs true]
For example:
[fusion@primaryhost ]$ cd /app/fusion/provisioning/bin
[fusion@primaryhost bin]$ ./runProvisioning.sh -responseFile /app/fusion/provisioning/bin/provisioning.rsp -target postconfigure -ignoreSysPrereqs true
The following important actions are performed during the Postconfigure phase.
Performs tasks that require the components while they are online.
Seeds policies and grants.
Configures and deploys Oracle SOA composites.
Performs post-deployment security configurations.
Sets the value for FusionAppsFrontendHostUrl to the designated port on the Oracle HTTP Server for each domain.
Assigns administrator privileges and function setup privileges on each Fusion Application offering to the designated super user.
The actual ANT command executed behind the scenes is as follows.
/app/fusion/provisioning/ant/bin/ant
-f /app/fusion/provisioning/provisioning-build/orchestration-build.xml
-Dresponsefile.input=/app/fusion/provisioning/bin/provisioning.rsp
-Dconfigframework.lib.dir=/app/fusion/provisioning/lib
-Dtools.lib.dir=/app/fusion/provisioning/lib
-logger oracle.apps.fnd.provisioning.ant.taskdefs.util.logger.ProvisioningLogger
-lib /app/fusion/provisioning/lib/oracle-provisioning-antlogger.jar
-lib /app/fusion/provisioning/lib/ojdl.jar
-lib /app/fusion/provisioning/lib/dms.jar
-Dpreverify.ignore true
-Ddebug.timestamp 10_11_14_10_06_17
-Dprovisioning.target postconfigure postconfigure
The following are the important files created during the Postconfigure phase. If you have any issues with the phase you may need to refer to these files for troubleshooting.
Log files: Created at <APPLICATIONS_BASE>/logs/provisioning/plan<timestamp>/<hostname>. For example, /app/oracle/logs/provisioning/plan1415477981901/fahost. You may notice that some startup log files are also created during this phase. This is because the Postconfigure phase brings up these managed servers for processing.
runProvisioning-postconfigure.log
runProvisioning-<product_family>-postconfigure.log
runProvisioning-postconfigure-logstatus.log
runProvisioning-postconfigure.out
runProvisioning-<product_family>-<managed_server>-startup.log
Phaseguards: Created at <APPLICATIONS_BASE>/provisioning/phaseguards. For example, /app/oracle/provisioning/phaseguards.
postconfigure-fahost-STARTED.grd
postconfigure-fahost-ENDED.grd
postconf/igure-fahost-COMPLETED.grd
pf/postconfigure-fahost-<phase>-STARTED.grd
pf/postconfigure-fahost-<phase>-COMPLETED.grd
Instance directory Backup: Back up of the instance directory <APPLICATIONS_BASE>/instance is created at <APPLICATIONS_BASE>/provisioning/restart/backup_<phase>. For example, a tar backup of /app/oracle/instance directory is created at /app/oracle/provisioning/restart/backup_postconfigure/instance.tar.
We can rerun the phase by clicking on Retry and it will do cleanup/restore to the previous step (only for the failed product domains).
Restarting the Installation After a Failure in a Phase
Fusion Applications provisioning allows granular restart functionality for each phase. If a phase fails due to errors in executing some tasks or a task timed out waiting for locks, you will see the product domain status for that phase marked as FAILED and it will stop any further processing of that particular product domain. However it will continue to process the remaining product domains until their completion. At the end of the processing, the installer will display successful and failed targets (product domains) with the relevant symbol with overall phase status also as FAILED. You will see appropriate phaseguard files being generated in <APPLICATIONS_BASE>/provisioning/phaseguards. At this stage, the wizard will activate the Retry button. Once you click on the Retry button, the wizard will initiate the cleanup and restore operations on the failed host, as shown in Figure 10-22.

Figure 10-22. Cleanup and Restore status screen
Sometimes, the cleanup or restore or both may fail to complete. In that case you may need to run the cleanup and restore from command-line tools even on the primordial host. Also for the other hosts, you will need to run cleanup and restore using the same command-line options. The syntax of running this using CLI is as follows. Note that once the cleanup operation completes on all hosts you can only initiate the Restore operation.
cd <FRAMEWORK_LOCATION>/provisioning/bin
./runProvisioning.sh -responseFile <Response File path> -target cleanup-<phase>
./runProvisioning.sh -responseFile <Response File path> -target restore-<phase>
For example:
[fusion@fahost ]$ cd /app/fusion/provisioning/bin
[fusion@fahost bin]$ ./runProvisioning.sh -responseFile /app/fusion/provisioning/bin/provisioning.rsp -target cleanup-postconfigure
[fusion@fahost bin]$ ./runProvisioning.sh -responseFile /app/fusion/provisioning/bin/provisioning.rsp -target restore -postconfigure
You can see the following cleanup and restore log files generated at <APPLICATIONS_BASE>/logs/provisioning/plan<timestamp>/<hostname>. The log files are moved to the archive directory upon restart.
runProvisioning-cleanup-<phase>.out
runProvisioning-cleanup-<phase>.log
runProvisioning-restore-<phase>.out
runProvisioning-restore-<phase>.log
During restore, the installer will restore the failed domains’ subdirectories from backup_<previous_phase>/instance.tar located at <APPLICATIONS_BASE>/provisioning/restart. It will also remove the phaseguard files for FAILED product families and the phase followed by restart of the same phase. On the primordial host once you have completed clean-up and restore and clicked OK on the confirmation screen, it will automatically restart the phase. For other hosts you need to run the command-line script to restart the phase on that host. During restart the installer will detect completed product domains and will only proceed to the previously failed targets.
Restarting Aborted or Crashed Installation
Note that if the host was restarted to resolve certain issues or if the installation was canceled in between or the installer crashed during the installation, you can restart the installation from same state as it was aborted. The phaseguards and restart directories provide a mechanism to restart the installation. When you restart the Provisioning wizard it will automatically detect where it had left off and display the prompt to resume provisioning, as shown in Figure 10-23.

Figure 10-23. Resume Provisioning prompt
As you can see in Figure 10-23, you have two options to select from by clicking Yes or No. Be very careful before choosing.
Start provisioning from beginning
If you select No the installer will reset all the status information and take you back to the first screen of installation location details. You must kill all running processes related to the Fusion Applications environment, clean up the <APPLICATIONS_BASE> directory, and restore the Fusion Applications transaction database to its post-RCU stage. If you do not have any backup of the database then you must create a fresh database and run RCU on that.
Resume provisioning from previously running or failed phase
If you select Yes then the installation will resume from where it left off. It could be an already running, failed, or successful phase. If the last phase was successful and the installation was aborted before proceeding to the next phase, you will see the success screen again and you will be able to click Next to proceed to the next phase. If the phase was failed or running while installation was aborted, it will show the failed phase screen and allow you to initiate cleanup and restore by clicking on the Retry button.
Before running the cleanup target, make sure that Identity Management environment is running and the Fusion Applications Transaction database is up. For the Configure phase onward, you must also ensure that the node manager has been started on the host. This also applies to the scenario when a phase had completed successfully and before starting the next phase you had restarted the host. Before any new provisioning target including cleanup or restore can start, the installer will need to connect to the node manager to check the status of the WebLogic servers status on that node. It will start them if required. You can start the node manager by running the following script. For all startup steps, including Identity Management and Fusion Applications components, refer to the components startup section in Chapter 12.
[fusion@fahost ∼]$ cd /app/oracle/instance/nodemanager/fahost/
[fusion@fahost fahost]$ nohup ./startNodeManagerWrapper.sh &
You can monitor the progress in the nohup.out file until you see the following message:
INFO: Secure socket listener started on port 5556
Let’s move the focus back to the Postconfigure phase error. As you saw in Figure 10-21, the CRM postconfigure encountered error while rest of the products postconfigure was successful. We clicked the Retry button and, as shown in Figure 10-22, the Provisioning wizard completed clean and restarted the operation. The Cleanup phase shut down any processes related to the failed product domain. The Restore phase deletes any identity and policy store-related entries for the CRM product and restores only the failed CRM domain directory from the <APPLICATIONS_BASE>/provisioning/restart/backup_configure-secondary/instace.tar backup file.
If the cleanup or restart fails to complete automatically, you may need to resolve any underlying errors followed by running cleanup and restore using the command-line or the wizard. Once Restore is complete, click OK to restart the failed phase. Figure 10-24 shows successful completion of the previously failed target (CRM product domain).

Figure 10-24. Postconfigure phase post-restart screen
Before activating the Next button, the wizard will take a full backup of instance directory and place the instance.tar backup file in the <APPLICATIONS_BASE>/provisioning/restart/backup-postconfigure directory. This will create the following phaseguard files to record the phase status as completed:
postconfigure-<hostname>-COMPLETED.grd
postconfigure-<hostname>-ENDED.grd
Before you proceed to the next phase, take a look at an an example of false errors during the provisioning phase. Figure 10-25 shows an example. This might not occur during your installation.

Figure 10-25. Ignorable errors example
Here you can see that, despite the red mark against various tasks in HCM postconfigure, the phase has not failed and it continues processing. This is due to known flexfield related errors that are not actually “errors” but the Provisioning wizard incorrectly shows them as so. This does not affect the phase at all and installation continues. For example, the demo installation did not face this error. These errors can be ignored and no action is necessary. Although the product family tree node will show the error symbol, the overall postconfigure phase will show a completed status.
Startup Phase
Once the Postconfigure phase is complete on all nodes, click Next in the wizard to proceed to the Startup phase shown in Figure 10-26.

Figure 10-26. Startup phase status screen
After completion of the Postconfigure phase your installation is near complete and there is no further backup taken from here onward. Once the Startup phase has been kicked off from the primordial host, start the same from primary hosts (if available), secondary hosts (if available), and DMZ host (if available) using following command-line interface scripts.
./runProvisioning.sh -responseFile <Response File path> -target startup
[-ignoreSysPrereqs true]
For example:
[fusion@primaryhost ]$ cd /app/fusion/provisioning/bin
[fusion@primaryhost bin]$ ./runProvisioning.sh -responseFile /app/fusion/provisioning/bin/provisioning.rsp -target startup -ignoreSysPrereqs true
The following important actions are performed during the Startup phase.
Startup phase essentially brings up all domains administration servers and managed servers including middleware and Application managed servers for the host where the phase is running. Although these servers are supposed to be running from the Postconfigure phase, it does a clean restart of all required servers just in case the host was restarted after successful completion of postconfigure.
Performs GUID reconciliation to make sure the seeded policies and grants are reconciled between the Oracle Fusion Data Security and policy store.
The actual ANT command executed behind the scenes is as follows.
/app/fusion/provisioning/ant/bin/ant
-f /app/fusion/provisioning/provisioning-build/orchestration-build.xml
-Dresponsefile.input=/app/fusion/provisioning/bin/provisioning.rsp
-Dconfigframework.lib.dir=/app/fusion/provisioning/lib
-Dtools.lib.dir=/app/fusion/provisioning/lib
-logger oracle.apps.fnd.provisioning.ant.taskdefs.util.logger.ProvisioningLogger
-lib /app/fusion/provisioning/lib/oracle-provisioning-antlogger.jar
-lib /app/fusion/provisioning/lib/ojdl.jar
-lib /app/fusion/provisioning/lib/dms.jar
-Dpreverify.ignore true
-Ddebug.timestamp 11_11_14_10_07_32
-Dprovisioning.target startup startup
The following are the important files created during the Startup phase. If you have any issues with the phase you may need to refer to these files for troubleshooting.
Log files: Created at <APPLICATIONS_BASE>/logs/provisioning/plan<timestamp>/<hostname>. For example, /app/oracle/logs/provisioning/plan1415477981901/fahost.
runProvisioning-startup.log
runProvisioning-<product_family>-startup.log
runProvisioning-<product_family>-<managed_server>-startup.log
runProvisioning-startup-logstatus.log
runProvisioning-startup.out
Phaseguards: Created at <APPLICATIONS_BASE>/provisioning/phaseguards. For example, /app/oracle/provisioning/phaseguards. You may notice that there are no product domains related phaseguard files created in this phase. Hence the cleanup and restore are done for complete phase instead of failed product domains.
startup-fahost-STARTED.grd
startup-fahost-ENDED.grd
startup-fahost-COMPLETED.grd
Validate Phase
Once the Startup phase is complete on all hosts, click Next in the wizard to proceed to the Validate phase, as shown in Figure 10-27.

Figure 10-27. Validation phase status screen
Once all the services are started, the installer will proceed to the final phase of provisioning—the Validate phase. You may see the errors shown in Figure 10-27 but be patient since these errors are expected on current release. We will discuss this in a little while. Once the Validate phase has been kicked off from the primordial host, start it from the primary hosts (if available), the secondary hosts (if available), and the DMZ host (if available) using the following command-line interface scripts.
./runProvisioning.sh -responseFile <Response File path> -target validate
[-ignoreSysPrereqs true]
For example,
[fusion@primaryhost ]$ cd /app/fusion/provisioning/bin
[fusion@primaryhost bin]$ ./runProvisioning.sh -responseFile /app/fusion/provisioning/bin/provisioning.rsp -target validate -ignoreSysPrereqs true
The Validate phase does a variety of checks to validate the installation. These checks include application URLs reachability, validation of data sources, and more. Similar to the Preverify phase, the Validate phase also does not stop processing if a particular build target or product domain validation if any errors or warnings are encountered. Instead it keeps track of the errors and displays a consolidated list of errors at the end. Also similar to the Startup phase, this phase needs to be restarted as a whole even when only specific product domains encountered errors.
The actual ANT command executed behind the scenes is as follows.
/app/fusion/provisioning/ant/bin/ant
-f /app/fusion/provisioning/provisioning-build/orchestration-build.xml
-Dresponsefile.input=/app/fusion/provisioning/bin/provisioning.rsp
-Dconfigframework.lib.dir=/app/fusion/provisioning/lib
-Dtools.lib.dir=/app/fusion/provisioning/lib
-logger oracle.apps.fnd.provisioning.ant.taskdefs.util.logger.ProvisioningLogger
-lib /app/fusion/provisioning/lib/oracle-provisioning-antlogger.jar
-lib /app/fusion/provisioning/lib/ojdl.jar
-lib /app/fusion/provisioning/lib/dms.jar
-Dpreverify.ignore false
-Ddebug.timestamp 11_11_14_17_11_07
-Dprovisioning.target validate validate
The following are the important files created during the Configure phase. If you have any issues with the phase, you may need to refer to these files for troubleshooting.
Log files: Created at <APPLICATIONS_BASE>/logs/provisioning/plan<timestamp>/<hostname>. For example, /app/oracle/logs/provisioning/plan1415477981901/fahost:
runProvisioning-validate.log
runProvisioning-validate-logstatus.log
runProvisioning-validate.out
Phaseguards : Created at <APPLICATIONS_BASE>/provisioning/phaseguards. For example, /app/oracle/provisioning/phaseguards. You may notice that there are no product domains related phaseguard files created in this phase. Hence the cleanup and restore are done for the complete phase instead of failed product domains.
validate-fahost-STARTED.grd
validate-fahost-FAILED.grd (if validate phase has failed)
validate-fahost-ENDED.grd (if validate phase is successful)
validate-fahost-COMPLETED.grd (if validate phase is successful)
As of the current release, the Validate phase may encounter some of the known errors as mentioned next. These and a few more expected error messages are documented in the Oracle Support Document ID 1487115.1 and 1404577.1. If there are any other validation errors you must resolve them before proceeding to the Summary phase.
MESSAGE=Failed connecting to http://fahost:7010/integration/worklistapp/faces/login.jspx , Server redirected too many times (20)!DETAIL=Failed connecting to http://fahost:7010/integration/worklistapp/faces/login.jspx , Server redirected too many times (20)
The following error is also ignorable.
The web page http://fahost:7001/em/faces/fa-faLogin;jsessionid=UUk-ZidyFeG2FHkJupePpadc6Jwez7Iy9yk5uqIxxteJK7VQDv_d!-1008637013?target=Farm_CommonDomain&type=oracle_ias_farm&FromContextInitFilter=true does not contain the text, html
After resolving all the validation errors, the Next button on the Provisioning wizard will still not be enabled as the status of the phase is still FAILED. Perform these steps from the command-line to enable the Next button and manually change the phase status to completed successfully.
Caution
Deleting and creating files in the phaseguard directory should be used as a workaround to resolve validation phase issues only if none of the other options works. In any other case, you should never modify or make changes to the phaseguard files.
cd <APPLICATIONS_CONFIG>/phaseguards
rm validate-<host>-FAILED.grd
touch validate-<host>-COMPLETED.grd
The previous command will change the phase status as completed successfully and disable the Retry button. The Next button will still be disabled.
touch validate-<host>-ENDED.grd
The previous command will change the phase status as ended and enable the Next button. For example,
[fusion@fahost ∼]$ cd /app/oracle/provisioning/phaseguards/
[fusion@fahost phaseguards]$ ls -ltr validate-fahost-*
-rwx—— 1 fusion dba 0 Nov 10 13:02 validate-fahost-STARTED.grd
-rwx—— 1 fusion dba 0 Nov 10 14:23 validate-fahost-FAILED.grd
[fusion@fahost phaseguards]$ rm validate-fahost-FAILED.grd
[fusion@fahost phaseguards]$ touch validate-fahost-COMPLETED.grd
[fusion@fahost phaseguards]$ touch validate-fahost-ENDED.grd
Now you can see that the Next button is enabled. Click Next to proceed to the final screen of post-installation summary, as shown in Figure 10-28.

Figure 10-28. Post-installation summary screen
The post-installation summary screen provides vital information about your Fusion Applications environment. The following are the few important details that the screen displays. You need not copy the content manually since once you click Finish, it will create a provisioning summary file that contains this information.
Disk space information
Response file details
Applications transaction database host, port, and service name
List of products and configurations provisioned
Details of each domain, respective admin server, each managed server and related ports, URLs, and home directories
Web tier host detail
Identity Management environment details
Identity Management database host, port, and service name
Identity and OPSS policy store details
Identity Manager details including host, port, and URLs
Access Manager details including host, port, OAM AAA server details, and so on
Once you have reviewed the information, click Finish. This will create a file named provisioning-<timestamp>.summary in the same location as the existing response file and pre-installation summary file. You can back up this file for documentation purposes.
This concludes the provisioning of the Fusion Applications environment.
Manually Validating the Installation
Although the Validate phase performs all the required validation steps, we need to validate the installation from the client machine as well. Here we will log in to Fusion Applications using the designated super user account, which has administrator privileges to all application domains. In this example, the username is FAAdmin.
Launch the Oracle Fusion Applications homepage URL at https://<webhost>:<port>/homePage where webhost is either physical hostname or load balancer name depending on your installation. The port is CommonDomain HTTP server SSL port or load balancer port depending on your installation. For example, https://fahost.paramlabs.com:10634/homePage .
As you can see in Figure 10-29, the page will redirect to Identity Management single sign-on OAM credentials collection page.

Figure 10-29. Fusion Applications Login screen
Log in as the FAADMIN user here. Once the login is successful you will be redirected to the Fusion Applications homepage, as shown in Figure 10-30.

Figure 10-30. Oracle Fusion Applications homepage
We will discuss about the Fusion Applications interface in coming chapters. For now our focus is only to validate the installation. Click on Navigator to see list of functions available for the user. Once you have clicked on the Navigator icon you will see a menu that contains specific functions for the user (in this case FAAdmin), as shown in Figure 10-31.

Figure 10-31. Fusion Applications Navigator menu
Click on the Setup and Maintenance link to go to the Oracle Fusion Functional Setup Manager screen, as shown in Figure 10-32.

Figure 10-32. Fusion Applications Setup and Maintenance screen
Figure 10-32 shows the homepage for setup and maintenance, which is the Getting Started with Oracle Fusion Applications page. You can see the Fusion Applications implementation process flowchart on the top along with the list of all Fusion Applications product offerings at the bottom regardless of their provisioning status. We will look at Oracle Functional Setup Manager in detail in later chapters but here our aim is to make sure that the provisioning has been completed normally and that all the selected product families and related product offerings are actually provisioned.
In order to see which products are provisioned, you need to go to the Configure Offerings page. You can click on the Configure Offerings link on the left panel or the link in the implementation flowchart on the top section of the screen to launch the required work area, as shown in Figure 10-33.

Figure 10-33. Configure Offerings page
The Configure Offerings page shows you list of all Fusion Applications products available for the release along with the Provisioned column which suggests whether the product offering has been provisioned or not. There are other columns like Enable for Implementation and Implementation Status, Select Feature Choices, and so on, which are required in order to do the functional implementation of the Fusion Applications product. We will look at this in later chapters. You can see that the selected products are Provisioned but the implementation status is Not Started. This is the expected status. You can refer to individual product implementation guide to further implement the products.
This concludes the Fusion Applications installation. The following chapters look at the Fusion Applications administration activities.
Summary
In this final chapter of installation you saw the main installation actions for provisioning an Oracle Fusion Applications environment. You saw both the command-line as well as graphical interface options for provisioning on single-node and multi-node topologies. You also explored the basics of Apache ANT and learned how the build process works. You explored the concept of ANT projects, targets, tasks, properties, and so on, and the vital role they play in the Fusion Applications provisioning process.
We saw the important input files used by the provisioning framework, including XML build files, tasks, and libraries, and learned about their location in the provisioning framework home. You also explored the important output files generated during provisioning and how they help you troubleshoot any issues encountered during provisioning. You also saw how to restart a failed or aborted installation using automated and manual cleanup/restore. At the end of the chapter, you saw how to manually make sure that the provisioning was complete and consistent with the product configurations you selected earlier.