
Now that you're up to speed on the concept of object-oriented programming, you can start working on the project that will be the meat and potatoes of this book: the events calendar. It all starts here, and as this book progresses, you'll be adding more and more functionality using both PHP and jQuery.
Because you're starting from absolute scratch, you need to take a minute to plan the application. This application will be database-driven (using MySQL), so the planning will take part in two stages: first the database structure and then a basic map of the application that will access and modify the database.
To make building the application much easier, the first thing you should plan is how the data will be stored. This shapes everything in the application.
For a basic events calendar, all the information you'll need to store is the following:
event_id: An automatically incremented integer that uniquely identifies each eventevent_title: The title of the eventevent_desc: A full description of the eventevent_start: The start time of the event (in formatYYYY-MM-DD HH:MM:SS)event_end: The end time of the event (in formatYYYY-MM-DD HH:MM:SS)
The next step is to lay out the main class that will handle all the actions our application will perform related to the calendar events. This class will be called Calendar; the methods and properties will be laid out like so:
Make sure a database connection exists or create one.
Set the following basic properties: a database object,
the date to use, the month being viewed,
the year to view,
the number of days in the month, and the weekday on which the month starts.
Generate HTML to build the events form.
Check if an event is being edited or created.
Load event information into the form if editing is needed.
Save new events in the database and sanitize input.
Delete events from the database and confirm deletion.
Load events information.
Load events data from the database.
Store each event as an array in the proper day for the month.
Output HTML with calendar information. Using the events array, loop through each day of the month and attach event titles and times where applicable.
Display event information as HTML. Accept an event ID and load the description and details for the event
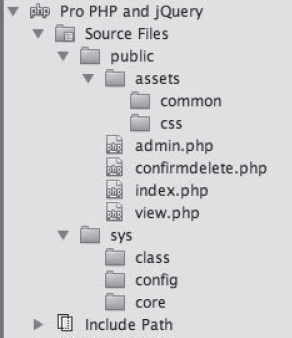
This application is going to be somewhat elaborate when it's finished, so it's worth taking a few minutes to think about how files are going to be organized.
For the sake of security, everything possible will be kept out of the web root, or publicly available folders: this includes database credentials, the core of the application, and the classes that will run it. With nothing in the web root, mischievous users won't be able to poke around in your folder structure without being on the server itself, which is a good practice for security.
To start, you'll have two folders: public to contain all files available for direct access by the application's users, such as CSS, the index file, and JavaScript files and sys to contain the nonpublic files, such as database credentials, the application's classes, and the core PHP files.
The public folder will serve as the web root. When a user accesses your application's URL, this is the folder in which the server will look first. At the root level, it contains the files accessed by users to view and manipulate the data stored in the database:
index.php: This is the main file, which displays the month in calendar format with event titles displayed in the box of the day on which they occur.view.php: If users clicks an event title, they're taken to this page where the event's data is displayed in detail.admin.php: To create or modify new events, the form displayed on this page is used.confirmdelete.php: To delete an event, the user must first confirm that choice by submitting the confirmation form on this page.
The public folder will also have a subfolder called assets, which will contain additional files for the site. Those files will be grouped by their usage, which in this section falls into four categories: common files, CSS files, JavaScript files, and form-processing files.
Create four folders within assets called common, css, inc, and js. The common folder will store files that will be used on all the publicly accessible pages (namely the header and footer of the app); the css folder will store site style sheets; the inc folder will store files to process form-submitted input; and the js folder will store site JavaScript files.
The sys folder will be broken into three subfolders: class, which will store all class files for the application (such as the Calendar class); config, which stores application configuration information such as database credentials; and core, which holds the files that initialize the application.
When everything is organized and all files are created, the file structure will be well organized and easy to scale in the future (see Figure 4-1).
Because you're using public and nonpublic folders for this application, a quick modification to your development environment is necessary: you need to point the server to your public folder, rather that the folder containing both.
In this section, you'll learn how to point your server to the public folder.
Note
You can skip this section and keep the sys folder inside the public folder without losing any functionality in the application (keep in mind that file paths will differ from those used throughout the exercises in this book). You will, however, open the application to potential security risks. It's highly recommended that you take a minute to follow these steps.
To change the document root (public folder) in a local installation, you need to modify the server's configuration file. This book assumes Apache is being used as your server in the XAMPP stack, so you need to locate the httpd.conf file (located at /xamppfiles/etc/httpd.conf on Mac, /opt/lampp/etc/httpd.conf on Linux, and xamppapacheconfhttpd.conf on Windows).
Inside httpd.conf, search for the DocumentRoot directive. This is where you set the path to your public folder. The file should look something like this:
#
# DocumentRoot: The directory out of which you will serve your
# documents. By default, all requests are taken from this directory, but
# symbolic links and aliases may be used to point to other locations.
#
DocumentRoot "/Applications/XAMPP/xamppfiles/htdocs/public"
Additionally, search for a line in your httpd.conf file that references document root to set permissions. It will look something like this:
<Directory "/Applications/XAMPP/xamppfiles/htdocs/public">
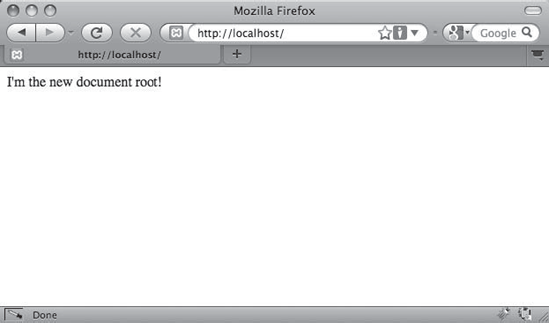
After locating and altering the paths above, restart Apache using the XAMPP control panel. Now, the default folder accessed is the public folder of the application. To test this, create the file index.php and add the following code snippet:
<?php echo "I'm the new document root!"; ?>
Navigate to document root of your development environment in a browser (localhost by default) to make sure the reconfiguration worked (see Figure 4-2).
Because remote development usually takes place on a hosting company's server, the steps to point your domain to the app's public folder will vary from hosting provider to hosting provider, and therefore won't be covered in this book.
However, in many cases, the host will allow you to point a domain to a folder within your hosting account. If this is the case, simply point the domain to the public folder, and everything should work properly.
Some hosts do not allow access outside of document root. If this is the case with your hosting provider, simply place the sys folder in the public folder and alter file paths accordingly.
With the folder structure ready and your development environment set up, it's time to actually start developing. We'll cover each of the three event views (main view, single event view, and administrative view) in steps, starting with the main calendar view.
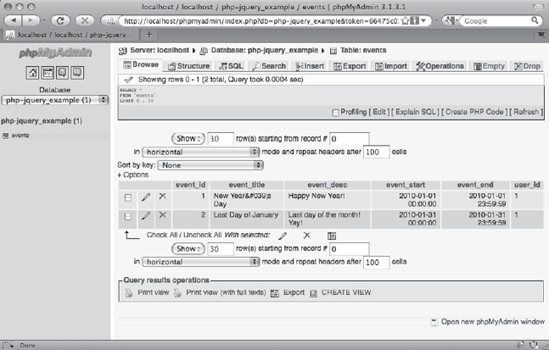
As with the application planning process, the first step in developing the application is to create the database. In your local development environment, pull up phpMyAdmin (http://localhost/phpmyadmin in XAMPP), and open the SQL tab (you can also execute these commands in a PHP script if not using phpMyAdmin). Create the database, a table to store event data called events, and a few dummy entries using the following SQL:
CREATE DATABASE IF NOT EXISTS `php-jquery_example`
  DEFAULT CHARACTER SET utf8
  COLLATE utf8_unicode_ci;

CREATE TABLE IF NOT EXISTS `php-jquery_example`.`events` (
  `event_id` INT(11) NOT NULL AUTO_INCREMENT,
  `event_title` VARCHAR(80) DEFAULT NULL,
  `event_desc` TEXT,
  `event_start` TIMESTAMP NOT NULL DEFAULT '0000-00-00 00:00:00',
  `event_end` TIMESTAMP NOT NULL DEFAULT '0000-00-00 00:00:00',

  PRIMARY KEY (`event_id`),
  INDEX (`event_start`)
) ENGINE=MyISAM CHARACTER SET utf8 COLLATE utf8_unicode_ci;

INSERT INTO `php-jquery_example`.`events`
  (`event_title`, `event_desc`, `event_start`, `event_end`) VALUES
  ('New Year's Day', 'Happy New Year!',
    '2010-01-01 00:00:00', '2010-01-01 23:59:59'),
  ('Last Day of January', 'Last day of the month! Yay!',
    '2010-01-31 00:00:00', '2010-01-31 23:59:59'),
Note
All the preceding commands are specific to MySQL. Since this book is focused on jQuery and PHP, I won't go into detail about MySQL here. For more information on MySQL, check out Beginning PHP and MySQL by Jason Gilmore (Apress).
After you execute the preceding commands, a new database called php-jquery_example will appear in the left-hand column. Click the database name to display the tables, and then click the events table to view the entries you created (see Figure 4-3).
Because you'll be creating multiple classes in this application that need database access, it makes sense to create an object that will open and store that database object. This object will be called DB_Connect, and it will reside in the class folder with the name class.db_connect.inc.php (/sys/class/class.db_connect.inc.php).
This class will have one property and one method, both of which are protected. The property will be called $db and will store a database object. The method will be a constructor; this will accept an optional database object to store in $db, or it will create a new PDO object if no database object is passed.
Insert the following code into class.db_connect.inc.php:
<?php

/**
 * Database actions (DB access, validation, etc.)
 *
 * PHP version 5
 *
 * LICENSE: This source file is subject to the MIT License, available
 * at http://www.opensource.org/licenses/mit-license.html
 *
 * @author     Jason Lengstorf <[email protected]>
 * @copyright  2009 Ennui Design
 * @license    http://www.opensource.org/licenses/mit-license.html
 */
class DB_Connect {

    /**
     * Stores a database object
     *
     * @var object A database object
     */
    protected $db;

    /**
     * Checks for a DB object or creates one if one isn't found
     *
     * @param object $dbo A database object
     */
    protected function __construct($dbo=NULL)
    {
        if ( is_object($db) )
        {
            $this->db = $db;
        }
        else
        {
            // Constants are defined in /sys/config/db-cred.inc.php
            $dsn = "mysql:host=" . DB_HOST . ";dbname=" . DB_NAME;
            try
            {
                $this->db = new PDO($dsn, DB_USER, DB_PASS);
            }
            catch ( Exception $e )
            {
                // If the DB connection fails, output the error
                die ( $e->getMessage() );
}
        }
    }

}

?>To build the application itself, start by creating the file class.calendar.inc.php in the class folder that resides within the non-public sys folder (/sys/class/class.calendar.inc.php). This class will extend the DB_Connect class in order to have access to the database object. Open the file in your editor of choice and create the Calendar class using the following code:
<?php/*** Builds and manipulates an events calendar** PHP version 5** LICENSE: This source file is subject to the MIT License, available* at http://www.opensource.org/licenses/mit-license.html** @author Jason Lengstorf <[email protected]>* @copyright 2009 Ennui Design* @license http://www.opensource.org/licenses/mit-license.html*/class Calendar extends DB_Connect{// Methods and properties go here}?>
With the class created, you can start adding the properties and methods to the class.
The Calendar class doesn't need any public properties, and you won't be extending it in the examples contained within this book, so all class properties will be private.
As defined in the section on planning, create the properties for the Calendar class:
<?php

class Calendar extends DB_Connect
{
    /**
     * The date from which the calendar should be built
     *
     * Stored in YYYY-MM-DD HH:MM:SS format
     *
     * @var string the date to use for the calendar
     */
    private $_useDate;

    /**
     * The month for which the calendar is being built
     *
     * @var int the month being used
     */
    private $_m;

    /**
     * The year from which the month's start day is selected
     *
     * @var int the year being used
     */
    private $_y;

    /**
     * The number of days in the month being used
     *
     * @var int the number of days in the month
     */
    private $_daysInMonth;

    /**
     * The index of the day of the week the month starts on (0-6)
     *
     * @var int the day of the week the month starts on
     */
    private $_startDay;

    // Methods go here
}

?>According to the original planning, the class properties are as follows:
$_useDate: The date to use when building the calendar inYYYY-MM-DD HH:MM:SSformat$_m: The month to use when building the calendar$_y: The year to use when building the calendar$_daysInMonth: How many days are in the current month$_startDay: Index from 0–6 representing on what day of the week the month starts
Next, you can build the class constructor. Start out by declaring it:
<?php

class Calendar extends DB_Connect
{


    private $_useDate;

    private $_m;

    private $_y;

    private $_daysInMonth;

    private $_startDay;

   /**
     * Creates a database object and stores relevant data
     *
     * Upon instantiation, this class accepts a database object
     * that, if not null, is stored in the object's private $_db
     * property. If null, a new PDO object is created and stored
     * instead.
     *
     * Additional info is gathered and stored in this method,
     * including the month from which the calendar is to be built,
     * how many days are in said month, what day the month starts
     * on, and what day it is currently.
     *
* @param object $dbo a database object* @param string $useDate the date to use to build the calendar* @return void*/public function __construct($dbo=NULL, $useDate=NULL){}} ?>
The constructor will accept two optional parameters: the first is a database object, and the second is the date around which the calendar display should be built.
To function properly, the class needs a database connection. The constructor will call the parent constructor from DB_Connect to check for an existing database object and use that when available, or it will create a new object if none is supplied.
Set up the call to make this check using the code shown in bold:
<?php

class Calendar extends DB_Connect
{


    private $_useDate;

    private $_m;

    private $_y;

    private $_daysInMonth;

    private $_startDay;

    public function __construct($dbo=NULL, $useDate=NULL)
    {
        /*
         * Call the parent constructor to check for
         * a database object
         */
         parent::__construct($dbo);
    }
} ?>
Note
That the Calendar class constructor accepts an optional $dbo argument that is passed in turn to the DB_Connect constructor. This allows you to create a database object and pass it for use in the class easily.
To keep the database credentials separate from the rest of the application for easy maintenance, you want to use a configuration file. Create a new file called db-cred.inc.php in the config folder (/sys/config/db-cred.inc.php). Inside, create an array called $C (for constants), and store each piece of data as a new key-value pair:
<?php/** Create an empty array to store constants*/$C = array();/** The database host URL*/$C['DB_HOST'] = 'localhost';/** The database username*/$C['DB_USER'] = 'root';/** The database password*/$C['DB_PASS'] = '';/** The name of the database to work with*/$C['DB_NAME'] = 'php-jquery_example';?>
Note
Initializing $C as an empty array is a safeguard against any tainted pieces of data being stored in $C and defined as constants. This is a good habit, especially when dealing with sensitive data.
Save this file. If you're not using XAMPP or if you've modified the default database credentials, you'll need to substitute your own host, username, password, and database name in the code.
At this point, your database credentials still aren't stored as constants. You'll be using an initialization file to handle this.
An initialization file collects data, loads files, and organizes information for an application. In this example, it will load and define all necessary constants, create a database object, and set up an automatic loading function for classes. Other functionality will be added later on as it becomes necessary.
Create a file called init.inc.php, and place it in the core folder (/sys/core/init.inc.php). Inside, add the following:
<?php/** Include the necessary configuration info*/include_once '../sys/config/db-cred.inc.php';/** Define constants for configuration info*/foreach ( $C as $name => $val ){define($name, $val);}/** Create a PDO object*/$dsn = "mysql:host=" . DB_HOST . ";dbname=" . DB_NAME;$dbo = new PDO($dsn, DB_USER, DB_PASS);/** Define the auto-load function for classes*/function __autoload($class){$filename = "../sys/class/class." . $class . ".inc.php";if ( file_exists($filename) ){
include_once $filename;}}?>
An automatic loading function is called when a script attempts to instantiate a class that hasn't been loaded yet. It's a convenient way to easily load classes into a script on demand. For more information on automatic loading, visit http://php.net/autoload.
To see everything in action, modify index.php in the public folder. Inside, simply include the initialization file and instantiate the Calendar class. Next, check if the class loaded properly, and output the object's structure if so:
<?php/** Include necessary files*/include_once '../sys/core/init.inc.php';/** Load the calendar for January*/$cal = new Calendar($dbo, "2010-01-01 12:00:00");if ( is_object ($cal) ){echo "<pre>", var_dump($cal), "</pre>";}?>
Once you navigate to http://localhost/, the following message is output:
object(Calendar)#2 (6) {
["_useDate:private"]=>
NULL
["_m:private"]=>
NULL["_y:private"]=>
NULL
["_daysInMonth:private"]=>
NULL
["_startDay:private"]=>
NULL
["db:protected"]=>
object(PDO)#3 (0) {
}
}With all that infrastructure taken care of, you can get back to finishing the Calendar class's constructor.
After checking the database object, the constructor needs to store several pieces of data about the month with which it will be building a calendar.
First, it checks if a date was passed to the constructor; if so, that is stored in the $_useDate property; otherwise, the current date is used.
Next, the date is converted to a UNIX timestamp (the number of seconds since the Unix epoch; read more about this at http://en.wikipedia.org/wiki/Unix_time) before the month and year are extracted and stored in $_m and $_y, respectively.
Finally, $_m and $_y are used to determine how many days are in the month being used and which day of the week the month starts on.
The following bold code adds this functionality to the constructor:
<?php
class Calendar extends DB_Connect
{
private $_useDate;
private $_m;
private $_y;
private $_daysInMonth;private $_startDay;
public function __construct($dbo=NULL, $useDate=NULL)
{
/*
* Call the parent constructor to check for
* a database object
*/
parent::__construct($dbo);
/*
* Gather and store data relevant to the month
*/
if ( isset($useDate) )
{
$this->_useDate = $useDate;
}
else
{
$this->_useDate = date('Y-m-d H:i:s'),
}
/*
* Convert to a timestamp, then determine the month
* and year to use when building the calendar
*/
$ts = strtotime($this->_useDate);
$this->_m = date('m', $ts);
$this->_y = date('Y', $ts);
/*
* Determine how many days are in the month
*/
$this->_daysInMonth = cal_days_in_month(
CAL_GREGORIAN,
$this->_m,
$this->_y
);
/*
* Determine what weekday the month starts on
*/
$ts = mktime(0, 0, 0, $this->_m, 1, $this->_y);
$this->_startDay = date('w', $ts);
}} ?>
Now all the properties that were previously NULL will have values when you reload http://localhost/:
object(Calendar)#2 (6) {
["_useDate:private"]=>
string(19) "2010-01-01 12:00:00"
["_m:private"]=>
string(2) "01"
["_y:private"]=>
string(4) "2010"
["_daysInMonth:private"]=>
int(31)
["_startDay:private"]=>
string(1) "5"
["db:protected"]=>
object(PDO)#3 (0) {
}
}To load data about events, you need to create a new method to access the database and retrieve them. Because event data will be accessed in two ways (the second of which will be addressed later in this chapter), the act of loading data will be kept generic for easy reuse.
This method will be private and named _loadEventData(). It accepts one optional parameter—the ID of an event—and follows these steps to load events:
Create a basic
SELECTquery to load the available fields from the events table.Check if an ID was passed, and if so, add a
WHEREclause to the query to return only one event.Otherwise, do both of the following:
Find midnight of the first day of the month and 11:59:59PM on the last day of the month.
Add a
WHERE...BETWEENclause to only load dates that fall within the current month.
Execute the query.
Return an associative array of the results.
All put together, this method looks like so:
<?php
class Calendar extends DB_Connect
{
private $_useDate;
private $_m;
private $_y;
private $_daysInMonth;
private $_startDay;
public function __construct($dbo=NULL, $useDate=NULL) {...}
/**
* Loads event(s) info into an array
*
* @param int $id an optional event ID to filter results
* @return array an array of events from the database
*/
private function _loadEventData($id=NULL)
{
$sql = "SELECT
`event_id`, `event_title`, `event_desc`,
`event_start`, `event_end`
FROM `events`";
/*
* If an event ID is supplied, add a WHERE clause
* so only that event is returned
*/if ( !empty($id) ){$sql .= "WHERE `event_id`=:id LIMIT 1";}/** Otherwise, load all events for the month in use*/else{/** Find the first and last days of the month*/$start_ts = mktime(0, 0, 0, $this->_m, 1, $this->_y);$end_ts = mktime(23, 59, 59, $this->_m+1, 0, $this->_y);$start_date = date('Y-m-d H:i:s', $start_ts);$end_date = date('Y-m-d H:i:s', $end_ts);/** Filter events to only those happening in the* currently selected month*/$sql .= "WHERE `event_start`BETWEEN '$start_date'AND '$end_date'ORDER BY `event_start`";}try{$stmt = $this->db->prepare($sql);/** Bind the parameter if an ID was passed*/if ( !empty($id) ){$stmt->bindParam(":id", $id, PDO::PARAM_INT);}$stmt->execute();$results = $stmt->fetchAll(PDO::FETCH_ASSOC);$stmt->closeCursor();return $results;}catch ( Exception $e ){die ( $e->getMessage() );}}
}

?>
This method returns an array that, when using the test entries you entered into the database previously, looks like this:
Array
(
[0] => Array
(
[event_id] => 1
[event_title] => New Year's Day
[event_desc] => Happy New Year!
[event_start] => 2010-01-01 00:00:00
[event_end] => 2010-01-01 23:59:59
)
[1] => Array
(
[event_id] => 2
[event_title] => Last Day of January
[event_desc] => Last day of the month! Yay!
[event_start] => 2010-01-31 00:00:00
[event_end] => 2010-01-31 23:59:59
)
)The raw output of _loadEventData() isn't immediately usable in the calendar. Because events need to be displayed on the proper day, the events retrieved from _loadEventData() need to be grouped by the day on which they occur. For easy reference, the event fields will be simplified as well.
The end goal is an array of events that will use the day of the month as its index, containing each event as an object. The two test entries in your database should end up being stored like so when the new method is complete:
Array
(
[1] => Array
(
[0] => Event Object(
[id] => 1
[title] => New Year's Day
[description] => Happy New Year!
[start] => 2010-01-01 00:00:00
[end] => 2010-01-01 23:59:59
)
)
[31] => Array
(
[0] => Event Object
(
[id] => 2
[title] => Last Day of January
[description] => Last day of the month! Yay!
[start] => 2010-01-31 00:00:00
[end] => 2010-01-31 23:59:59
)
)
)To accomplish this, you must first create a new class called Event in the class folder (/sys/class/class.event.inc.php). It will have five public properties: $id, $title, $description, $start, and $end; and a constructor that will set each of those properties using the associative array returned by the database query. Create the file, and insert the following code inside it:
<?php/*** Stores event information** PHP version 5** LICENSE: This source file is subject to the MIT License, available* at http://www.opensource.org/licenses/mit-license.html** @author Jason Lengstorf <[email protected]>* @copyright 2010 Ennui Design* @license http://www.opensource.org/licenses/mit-license.html*/class Event{/**
* The event ID** @var int*/public $id;/*** The event title** @var string*/public $title;/*** The event description** @var string*/public $description;/*** The event start time** @var string*/public $start;/*** The event end time** @var string*/public $end;/*** Accepts an array of event data and stores it** @param array $event Associative array of event data* @return void*/public function __construct($event){if ( is_array($event) ){$this->id = $event['event_id'];$this->title = $event['event_title'];$this->description = $event['event_desc'];$this->start = $event['event_start'];$this->end = $event['event_end'];}else
{throw new Exception("No event data was supplied.");}}}?>
Now that each event can be stored as an object, you can create the method that will loop through the available events and store them in an array corresponding to the dates on which they occur. First, load the event data from the database using _loadEventData(). Next, extract the day of the month from each event's start date and add a new value to the array at that day's index. In the Calendar class, create a new method called _createEventObj() and set it to private. Load the events from the database, and create the new array using the following bold code:
<?php

class Calendar extends DB_Connect
{


    private $_useDate;

    private $_m;

    private $_y;

    private $_daysInMonth;
private $_startDay;
public function __construct($dbo=NULL, $useDate=NULL) {...}
private function _loadEventData($id=NULL) {...}
/**
* Loads all events for the month into an array
*
* @return array events info
*/
private function _createEventObj()
{
/*
* Load the events array
*/
$arr = $this->_loadEventData();
/** Create a new array, then organize the events* by the day of the monthon which they occur*/$events = array();foreach ( $arr as $event ){$day = date('j', strtotime($event['event_start']));try{$events[$day][] = new Event($event);}catch ( Exception $e ){die ( $e->getMessage() );}}return $events;}} ?>
Now the events can be loaded and organized in such a way that the method to output the actual calendar, HTML can easily put dates in the proper place.
At this point, you have the database set up, test events stored, and methods in place to load and organize the event data into an easy-to-use array. You're ready to put the pieces together and build a calendar!
The calendar will be built by a public method called buildCalendar(). This will generate a calendar with the following attributes:
A heading that will show the month and year being displayed
Weekday abbreviations to make the calendar look like a calendar
Numbered boxes that contain events if they exist for the given date
To start, declare the buildCalendar() method in the Calendar class, and create the heading in an H2 element. Also, create an array of weekday abbreviations and loop through them to generate an unordered list. Add the following bold code to do so:
<?php
class Calendar extends DB_Connect
{
private $_useDate;
private $_m;
private $_y;
private $_daysInMonth;
private $_startDay;
public function __construct($dbo=NULL, $useDate=NULL) {...}
private function _loadEventData($id=NULL) {...}
private function _createEventObj() {...}
/**
* Returns HTML markup to display the calendar and events
*
* Using the information stored in class properties, the
* events for the given month are loaded, the calendar is
* generated, and the whole thing is returned as valid markup.
*
* @return string the calendar HTML markup
*/
public function buildCalendar()
{
/*
* Determine the calendar month and create an array of
* weekday abbreviations to label the calendar columns
*/
$cal_month = date('F Y', strtotime($this->_useDate));
$weekdays = array('Sun', 'Mon', 'Tue',
'Wed', 'Thu', 'Fri', 'Sat'),
/*
* Add a header to the calendar markup
*/
$html = "
<h2>$cal_month</h2>";
for ( $d=0, $labels=NULL; $d<7; ++$d )
{
$labels .= "
<li>" . $weekdays[$d] . "</li>";
}
$html .= "
<ul class="weekdays">"
. $labels . "
</ul>";/** Return the markup for output*/return $html;}} ?>
To see the output of the buildCalendar() method, you'll need to modify index.php in the public folder to call the method. Update the file with the code shown in bold:
<?php /* * Include necessary files */ include_once '../sys/core/init.inc.php'; /* * Load the calendar for January */ $cal = new Calendar($dbo, "2010-01-01 12:00:00");/** Display the calendar HTML*/echo $cal->buildCalendar();?>
Pull up the file in your browser to see the results so far (see Figure 4-4).
The next step is to build the actual calendar days. Several steps need to be completed for this to work out:
Create a new unordered list.
Set up a loop (with an iteration counter, a calendar date counter, today's date, and the month and year stored as variables) that runs as long as the calendar date counter is less than the number of days in the month.
Add a
fillclass to the days of the week that occur before the first.Add a
todayclass if the current date is contained within the same month and year and matches the date being generated.Create an opening and closing list item tag for each day.
Check if the current calendar box falls within the current month, and add the date if so.
Check if the current calendar box is a Saturday, and close the list and open a new one if so.
Assemble the pieces of the list item and append them to the markup.
After the loop, run another loop to add filler days until the calendar week is completed.
Close the final unordered list and return the markup.
To start, complete steps 1 and 2 by adding the following bold code to the buildCalendar() method:
public function buildCalendar()
{
/*
* Determine the calendar month and create an array of
* weekday abbreviations to label the calendar columns
*/
$cal_month = date('F Y', strtotime($this->_useDate));
$weekdays = array('Sun', 'Mon', 'Tue',
'Wed', 'Thu', 'Fri', 'Sat'),
/*
* Add a header to the calendar markup
*/
$html = "
<h2>$cal_month</h2>";
for ( $d=0, $labels=NULL; $d<7; ++$d )
{
$labels .= "
<li>" . $weekdays[$d] . "</li>";
}
$html .= "
<ul class="weekdays">"
. $labels . "
</ul>";
/*
* Create the calendar markup
*/
$html .= "
<ul>"; // Start a new unordered list
for ( $i=1, $c=1, $t=date('j'), $m=date('m'), $y=date('Y'),
$c<=$this->_daysInMonth; ++$i )
{
// More steps go here
}
/*
* Return the markup for output
*/
return $html;
}Next, add the bold code below to complete steps 3–5:
public function buildCalendar()
{
/*
* Determine the calendar month and create an array of
* weekday abbreviations to label the calendar columns
*/$cal_month = date('F Y', strtotime($this->_useDate));
$weekdays = array('Sun', 'Mon', 'Tue',
'Wed', 'Thu', 'Fri', 'Sat'),
/*
* Add a header to the calendar markup
*/
$html = "
<h2>$cal_month</h2>";
for ( $d=0, $labels=NULL; $d<7; ++$d )
{
$labels .= "
<li>" . $weekdays[$d] . "</li>";
}
$html .= "
<ul class="weekdays">"
. $labels . "
</ul>";
/*
* Create the calendar markup
*/
$html .= "
<ul>"; // Start a new unordered list
for ( $i=1, $c=1, $t=date('j'), $m=date('m'), $y=date('Y'),
$c<=$this->_daysInMonth; ++$i )
{
/*
* Apply a "fill" class to the boxes occurring before
* the first of the month
*/
$class = $i<=$this->_startDay ? "fill" : NULL;
/*
* Add a "today" class if the current date matches
* the current date
*/
if ( $c==$t && $m==$this->_m && $y==$this->_y )
{
$class = "today";
}
/*
* Build the opening and closing list item tags
*/
$ls = sprintf("
<li class="%s">", $class);
$le = "
</li>";
// More steps go here
}
/*
* Return the markup for output
*/
return $html;
}To complete steps 6-10—actually build the dates; check if the week needs to wrap; assemble the date markup; finish the last week out with filler, and return the markup—add the following bold code:
public function buildCalendar()
{
/*
* Determine the calendar month and create an array of
* weekday abbreviations to label the calendar columns
*/
$cal_month = date('F Y', strtotime($this->_useDate));
$weekdays = array('Sun', 'Mon', 'Tue',
'Wed', 'Thu', 'Fri', 'Sat'),
/*
* Add a header to the calendar markup
*/
$html = "
<h2>$cal_month</h2>";
for ( $d=0, $labels=NULL; $d<7; ++$d )
{
$labels .= "
<li>" . $weekdays[$d] . "</li>";
}
$html .= "
<ul class="weekdays">"
. $labels . "
</ul>";
/*
* Create the calendar markup
*/
$html .= "
<ul>"; // Start a new unordered list
for ( $i=1, $c=1, $t=date('j'), $m=date('m'), $y=date('Y'),
$c<=$this->_daysInMonth; ++$i )
{
/*
* Apply a "fill" class to the boxes occurring before
* the first of the month
*/
$class = $i<=$this->_startDay ? "fill" : NULL;
/*
* Add a "today" class if the current date matches
* the current date
*/
if ( $c+1==$t && $m==$this->_m && $y==$this->_y )
{
$class = "today";
}
/*
* Build the opening and closing list item tags
*/
$ls = sprintf("
<li class="%s">", $class);$le = "
</li>";
/*
* Add the day of the month to identify the calendar box
*/
if ( $this->_startDay<$i && $this->_daysInMonth>=$c)
{
$date = sprintf("
<strong>%02d</strong>",$c++);
}
else { $date=" "; }
/*
* If the current day is a Saturday, wrap to the next row
*/
$wrap = $i!=0 && $i%7==0 ? "
</ul>
<ul>" : NULL;
/*
* Assemble the pieces into a finished item
*/
$html .= $ls . $date . $le . $wrap;
}
/*
* Add filler to finish out the last week
*/
while ( $i%7!=1 )
{
$html .= "
<li class="fill"> </li>";
++$i;
}
/*
* Close the final unordered list
*/
$html .= "
</ul>
";
/*
* Return the markup for output
*/
return $html;
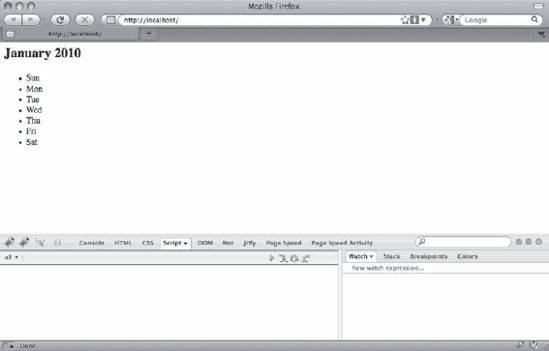
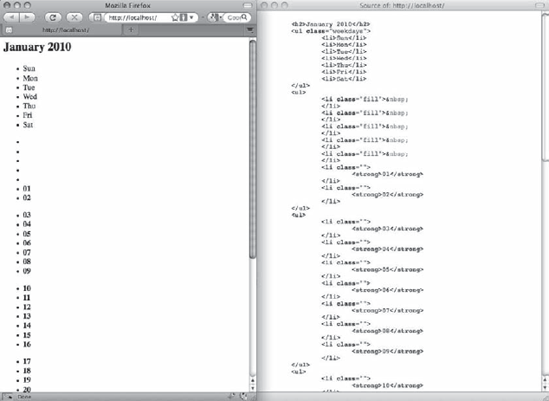
}Test the function as it stands now, and you'll see the unordered lists in your browser (see Figure 4-5).
Adding the events to the calendar display is as easy as loading the events array from _createEventObj() and looping through the events stored in the index that matches the current day if any exist. Add event data to the calendar markup using the following bold code:
public function buildCalendar()
{
/*
* Determine the calendar month and create an array of
* weekday abbreviations to label the calendar columns
*/
$cal_month = date('F Y', strtotime($this->_useDate));
$weekdays = array('Sun', 'Mon', 'Tue',
'Wed', 'Thu', 'Fri', 'Sat'),
/*
* Add a header to the calendar markup*/
$html = "
<h2>$cal_month</h2>";
for ( $d=0, $labels=NULL; $d<7; ++$d )
{
$labels .= "
<li>" . $weekdays[$d] . "</li>";
}
$html .= "
<ul class="weekdays">"
. $labels . "
</ul>";
/*
* Load events data
*/
$events = $this->_createEventObj();
/*
* Create the calendar markup
*/
$html .= "
<ul>"; // Start a new unordered list
for ( $i=1, $c=1, $t=date('j'), $m=date('m'), $y=date('Y'),
$c<=$this->_daysInMonth; ++$i )
{
/*
* Apply a "fill" class to the boxes occurring before
* the first of the month
*/
$class = $i<=$this->_startDay ? "fill" : NULL;
/*
* Add a "today" class if the current date matches
* the current date
*/
if ( $c+1==$t && $m==$this->_m && $y==$this->_y )
{
$class = "today";
}
/*
* Build the opening and closing list item tags
*/
$ls = sprintf("
<li class="%s">", $class);
$le = "
</li>";
/*
* Add the day of the month to identify the calendar box
*/
if ( $this->_startDay<$i && $this->_daysInMonth>=$c)
{
/*
* Format events data
*/
$event_info = NULL; // clear the variableif ( isset($events[$c]) ){foreach ( $events[$c] as $event ){$link = '<a href="view.php?event_id='. $event->id . '">' . $event->title. '</a>';$event_info .= " $link";}}$date = sprintf(" <strong>%02d</strong>",$c++); } else { $date=" "; } /* * If the current day is a Saturday, wrap to the next row */ $wrap = $i!=0 && $i%7==0 ? " </ul> <ul>" : NULL; /* * Assemble the pieces into a finished item */$html .= $ls . $date . $event_info . $le . $wrap;} /* * Add filler to finish out the last week */ while ( $i%7!=1 ) { $html .= " <li class="fill"> </li>"; ++$i; } /* * Close the final unordered list */ $html .= " </ul> "; /* * Return the markup for output */ return $html; }
Warning
Don't forget to add the new $event_info variable into the markup at the bottom of the loop!
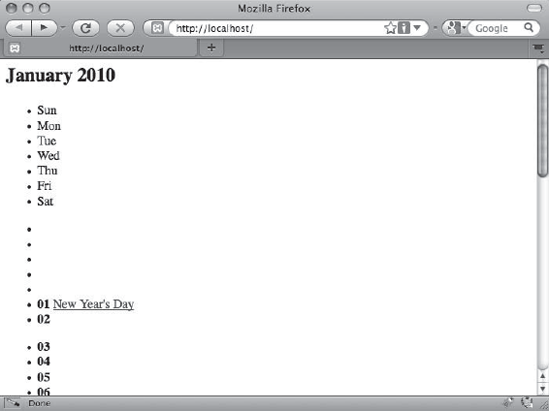
When the database events are loaded into the calendar display, the titles show up next to the appropriate date (see Figure 4-6).
Note
The linked event titles point to a file called view.php that doesn't exist yet. This file will be built and explained in the "Outputing HTML to Display Full Event Descriptions" section later in this chapter.
At this point, your markup is proper and your events are there, but the generated code doesn't look much like a calendar at all.
To rectify this, you'll now be taking a moment to complete the HTML markup and style the page using CSS.
Note
Because this book is not about CSS, the rules used won't be explained in detail. For more information on CSS, check out Beginning CSS Web Development by Simon Collison (Apress, 2006).
In a nutshell, the CSS file will do the following:
Float each list item to the left.
Adjust margins and borders to make the dates look like a traditional calendar.
Add a hover effect so the day over which the mouse is hovering will be highlighted.
Style event titles.
Add hover effects for event titles as well.
Add some CSS3 flair, including rounded corners and drop shadows, for fun.
Tip
For more information on CSS3, visit http://css3.info/.
Create a new file called style.css in the css folder (/public/assets/css/style.css) and add the following rules:
body {background-color: #789;font-family: georgia, serif;font-size: 13px;}#content {display: block;width: 812px;margin: 40px auto 10px;padding: 10px;background-color: #FFF;-moz-border-radius: 6px;-webkit-border-radius: 6px;border-radius: 6px;border:2px solid black;-moz-box-shadow: 0 0 14px #123;-webkit-box-shadow: 0 0 14px #123;box-shadow: 0 0 14px #123;}h2,p {margin: 0 auto 14px;
text-align: center;}ul {display: block;clear: left;height: 82px;width: 812px;margin: 0 auto;padding: 0;list-style: none;background-color: #FFF;text-align: center;border: 1px solid black;border-top: 0;border-bottom: 2px solid black;}li {position: relative;float: left;margin: 0;padding: 20px 2px 2px;border-left: 1px solid black;border-right: 1px solid black;width: 110px;height: 60px;overflow: hidden;background-color: white;}li:hover {background-color: #FCB;z-index: 1;-moz-box-shadow: 0 0 10px #789;-webkit-box-shadow: 0 0 10px #789;box-shadow: 0 0 10px #789;}.weekdays {height: 20px;border-top: 2px solid black;}.weekdays li {height: 16px;padding: 2px 2px;background-color: #BCF;}.fill {
background-color: #BCD;}.weekdays li:hover,li.fill:hover {background-color: #BCD;-moz-box-shadow: none;-webkit-box-shadow: none;box-shadow: none;}.weekdays li:hover,.today {background-color: #BCF;}li strong {position: absolute;top: 2px;right: 2px;}li a {position: relative;display: block;border: 1px dotted black;margin: 2px;padding: 2px;font-size: 11px;background-color: #DEF;text-align: left;-moz-border-radius: 6px;-webkit-border-radius: 6px;border-radius: 6px;z-index: 1;text-decoration: none;color: black;font-weight: bold;font-style: italic;}li a:hover {background-color: #BCF;z-index: 2;-moz-box-shadow: 0 0 6px #789;-webkit-box-shadow: 0 0 6px #789;box-shadow: 0 0 6px #789;}
Save the style sheet, and close it; you won't need to modify it again in this chapter. In the next section, you'll create common files that will, among other things, include these styles into the page.
There are going to be multiple pages viewed by your users in this application, and they all need a common set of HTML elements, style sheets, and more. To simplify maintenance as much as possible, you'll be using two files—header.inc.php and footer.inc.php—to contain those common elements.
First, create a file called header.inc.php in the common folder (/public/assets/common/header.inc.php). This file will hold the DOCTYPE declaration for the HTML and create a head section that contains a Content-Type meta tag, the document title, and links to any CSS files required for the document.
Because the document title will vary from page to page, you'll be setting a variable—$page_title—to store each page's title.
Also, because more than one CSS file may be needed for a page, an array of CSS file names will be passed in a variable called $css_files and looped through to generate the proper markup.
Inside this file, place the following code:
<!DOCTYPE htmlPUBLIC "-//W3C//DTD XHTML 1.0 Strict//EN""http://www.w3.org/TR/xhtml1/DTD/xhtml1-strict.dtd"><html xmlns="http://www.w3.org/1999/xhtml" xml:lang="en" lang="en"><head><meta http-equiv="Content-Type"content="text/html;charset=utf-8" /><title><?php echo $page_title; ?></title><?php foreach ( $css_files as $css ): ?><link rel="stylesheet" type="text/css" media="screen,projection"href="assets/css/<?php echo $css; ?>" /><?php endforeach; ?></head><body>
Next, create a file called footer.inc.php in the common folder (/public/assets/common/footer.inc.php) to contain the closing parts of the markup.
For now, this file doesn't need to do much: it simply closes the body and html tags opened in header.inc.php. As you continue developing this application, more will be added here.
Insert the following into footer.inc.php:
</body></html>
To bring the new pieces together, you'll need to modify the index file. First, you'll need to add values to the $page_title and $css_files variables, and then you should include the header file.
Also, to wrap the page content, add in a new div with the ID content that wraps around the call to buildCalendar().
Finally, add a call to the footer file to finish the page. When it's completed, the index file will be modified with the code shown in bold:
<?php /* * Include necessary files */ include_once '../sys/core/init.inc.php'; /* * Load the calendar */ $cal = new Calendar($dbo, "2010-01-01 12:00:00");/** Set up the page title and CSS files*/$page_title = "Events Calendar";$css_files = array('style.css'),/** Include the header*/include_once 'assets/common/header.inc.php';?><div id="content"><?php/* * Display the calendar HTML */ echo $cal->buildCalendar();?></div><!-- end #content --><?php/** Include the footer*/include_once 'assets/common/footer.inc.php';?>
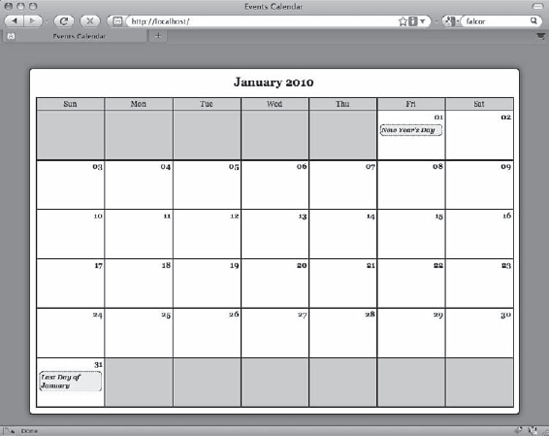
After saving the changes, reload your browser to see the results (see Figure 4-7).
The next step in this application is to allow the user to view the details of an event. This will be done in three steps:
Create a method to format an array of a single event's data when loaded by ID.
Create a method to generate markup containing the data as loaded by the first method.
Create a new file to display the markup generated by the second method.
Similar to _createEventObj(), the purpose of this method, which you'll call _loadEventById(), is to generate an Event object from the result set returned by _loadEventData().
Because the markup generation is fairly simple when only using one event, all this method will do is load the desired event by its ID using _loadEventData() and then return the first—and only, due to the LIMIT 1 clause—result from the method.
Add the following method to the Calendar class:
<?php
class Calendar extends DB_Connect
{
private $_useDate;
private $_m;
private $_y;
private $_daysInMonth;
private $_startDay;
public function __construct($dbo=NULL, $useDate=NULL) {...}
public function buildCalendar() {...}
private function _loadEventData($id=NULL) {...}
private function _createEventObj() {...}
/**
* Returns a single event object
*
* @param int $id an event ID
* @return object the event object
*/
private function _loadEventById($id)
{
/*
* If no ID is passed, return NULL
*/
if ( empty($id) )
{
return NULL;
}
/*
* Load the events info array
*/
$event = $this->_loadEventData($id);
/*
* Return an event object*/if ( isset($event[0]) ){return new Event($event[0]);}else{return NULL;}}} ?>
When called, this method will return an object (for the ID of 1) that looks like this:
Event Object
(
[id] => 1
[title] => New Year's Day
[description] => Happy New Year!
[start] => 2010-01-01 00:00:00
[end] => 2010-01-01 23:59:59
)Now that an array of a single event's data is available, you can build a new public method to format the event data into HTML markup.
This method will be called displayEvent(); it will accept an event's ID and generate HTML markup using the following steps:
Load the event data using
_loadEventById().Use the start and end dates to generate strings to describe the event.
Return the HTML markup to display the event.
Create the displayEvent() method by adding the bold code to the Calendar class:
<?php
class Calendar extends DB_Connect
{
private $_useDate;
private $_m;
private $_y;private $_daysInMonth;
private $_startDay;
public function __construct($dbo=NULL, $useDate=NULL) {...}
public function buildCalendar() {...}
/**
* Displays a given event's information
*
* @param int $id the event ID
* @return string basic markup to display the event info
*/
public function displayEvent($id)
{
/*
* Make sure an ID was passed
*/
if ( empty($id) ) { return NULL; }
/*
* Make sure the ID is an integer
*/
$id = preg_replace('/[^0-9]/', '', $id);
/*
* Load the event data from the DB
*/
$event = $this->_loadEventById($id);
/*
* Generate strings for the date, start, and end time
*/
$ts = strtotime($event->start);
$date = date('F d, Y', $ts);
$start = date('g:ia', $ts);
$end = date('g:ia', strtotime($event->end));
/*
* Generate and return the markup
*/
return "<h2>$event->title</h2>"
. "
<p class="dates">$date, $start—$end</p>"
. "
<p>$event->description</p>";
}
private function _loadEventData($id=NULL) {...}private function _createEventObj() {...}
private function _loadEventById($id) {...}
}

?>To display the output of displayEvent(), you'll create a new file. This file will be called view.php, and it will reside in the public folder (/public/view.php).
This file will be called with a query string containing the ID of the event to be displayed. If no ID is supplied, the user will be sent back out to the main view of the calendar.
At the top of view.php, check for an event ID, and then load the initialization file; the page title and CSS file are set up in variables, and the header file is called. After that, a new instance of the Calendar class is created.
Next, set up a new div with the ID of content and call the displayEvent() method. Add a link to go back to the main calendar page, close the div, and include the footer.
All things considered, the file should end up looking like this:
<?php/** Make sure the event ID was passed*/if ( isset($_GET['event_id']) ){/** Make sure the ID is an integer*/$id = preg_replace('/[^0-9]/', '', $_GET['event_id']);/** If the ID isn't valid, send the user to the main page*/if ( empty($id) ){header("Location: ./");exit;}}else{/** Send the user to the main page if no ID is supplied*/header("Location: ./");exit;}
/** Include necessary files*/include_once '../sys/core/init.inc.php';/** Output the header*/$page_title = "View Event";$css_files = array("style.css");include_once 'assets/common/header.inc.php';/** Load the calendar*/$cal = new Calendar($dbo);?><div id="content"><?php echo $cal->displayEvent($id) ?><a href="./">« Back to the calendar</a></div><!-- end #content --><?php/** Output the footer*/include_once 'assets/common/footer.inc.php';?>
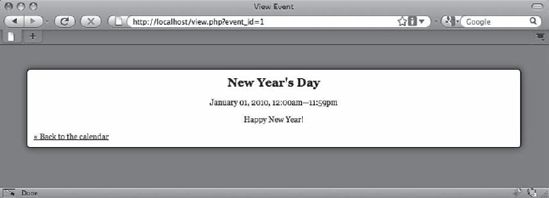
Test this file by going back to the main calendar and clicking an event title. The view.php file loads and displays the event information in a format that matches the calendar (see Figure 4-8).
You now have a fully functional events calendar, which you created using object-oriented PHP and MySQL. Along the way, you learned how to handle dates, how to organize entries into objects for easy access, and how to output markup and stylesheets to resemble a traditional calendar. In the next chapter, you'll build controls to add, edit, and create events.