
Now that you understand how element selection works, you can start learning the basics of how jQuery simplifies interaction with web pages. In this chapter, you'll get your hands dirty with the most common and useful aspects of jQuery.
This chapter will read more like a reference and may be a bit dry at times, but it's definitely in your best interest to work through the examples presented within. Having a basic understanding of how these methods work and what they do will prove invaluable as you start building the example project later on in this book.
One of the most convenient features of jQuery is the fact that nearly all its methods are chainable, which means methods can be executed one right after the other. This leads to clear, concise code that is easy to follow:
$('p')
    .addClass('new-class')
    .text("I'm a paragraph!")
    .appendTo('body'),
Chainable methods are possible because each method returns the jQuery object itself after modification. At first, this concept may seem difficult to understand, but as you work through the examples in this chapter, it should become clearer.
jQuery attempts to make several common programming tasks easier. At a glance, it simplifies JavaScript development by providing the following powerful tools:
DOM element selection using CSS syntax (which you learned in Chapter 1)
Simple traversal and modification of the DOM
Easy syntax for handling browser events (such as clicks and mouse-overs)
Access to all attributes of an element, including CSS and styling properties, and the ability to modify them
Animation and other effects
Simple AJAX controls
Note
The preceding list is only a partial list of jQuery's features and capabilities. As you continue on through the projects in this book, other helpful features will be explored. As always, for a complete reference, visit the documentation at http://api.jquery.com.
Traversal in jQuery is the act of moving from one DOM element to another; traversal is essentially another form of filtering performed after the initial selection has been made. This is useful because it allows developers to complete an action and then move to another part of the DOM without needing to perform another search by selector.
It also aids developers in affecting the elements immediately surrounding an element that is being manipulated or otherwise utilized by a script. This can range from adding a class to parent elements to indicate activity to disabling all inactive form elements to any number of other useful tasks.
Note
You will be using the same HTML test file from Chapter 1 for the examples in this chapter as well. If you're using XAMPP to test locally, point your browser to http://localhost/testing/ to load this file. Make sure the Firebug console is open and active (see Chapter 1 for a refresher on using the Firebug console).
If a set of elements needs to be narrowed down to just one element identified by its index, then you're able to use the .eq() method. This method accepts one argument: an index for the desired element. For .eq(), indices start at 0.
$("p").eq(1);When executed in the Firebug console, the following returns:
>>> $("p").eq(1);
[ p.foo ]
Additionally, a negative number can be supplied to .eq() to count backward from the end of the selection set (e.g., passing −2 will return the second-to-last element from the set).
To select the same paragraph as the preceding example by counting backward from the end of the result set, use the following code:
$("p").eq(−3);This returns the same paragraph in the console:
>>> $("p").eq(−3);
[ p.foo ]To use a whole new selector within a set of elements, the .filter() method comes in handy. It accepts any selector that can be used in the jQuery function, but it applies only to the subset of elements contained within the jQuery object.
For instance, to select all paragraphs and then filter out all but the ones with class foo, you would use the following:
$("p").filter(".foo");The result in the console will read as follows:
>>> $("p").filter(".foo");
[ p.foo ]
The inverse of .find() is .not(), which will return all elements from a result set that do not match the given selector. For instance, to select all paragraphs and then limit the selection to paragraphs that do not have the class foo, you would use the following:
$("p").not(".foo");This results in the following:
>>> $("p").not(".foo");
[ p, p, p#bar ]The .first() and .last() methods work identically to .eq(0) and .eq(−1), respectively. To select the last paragraph from a set of all paragraphs on the page, use the following:
$("p").last();This results in the following:
>>> $("p").last();
[ p#bar ]To select an element that contains elements matching a certain pattern, you can use the .has() method. For instance, you would use the following to select all paragraphs and filter the results to only paragraphs that contain a span element:
$("p").has("span");This outputs the following:
>>> $("p").has("span");
[ p, p#bar ]The .is() method is a little different from other methods in that it does not return the jQuery object. It evaluates a result set without modifying it, which makes it ideal for use in callback functions or functions executed after the successful execution of a function or method.
You'll learn more about practical uses of .is() in later examples of this book; right now, select all paragraphs in your test document then check if one has the class foo:
$("p").is(".foo");The result is a Boolean (true or false) answer:
>>> $("p").is(".foo");
trueTo select a subset of elements based on its index, the .slice() method comes into play. It accepts two arguments: the first is a starting index from which to generate the subset, and the second is an optional ending point. If the second parameter isn't supplied, the subset will continue until the end of the selection is reached.
Note
The index passed in the second parameter will not be included in the result set. Therefore, if you need the second through the fourth elements in a set (indices 1 to 3), your parameters would need to be 1 and 4.
Additionally, like with .eq(), a negative index can be used. This can be applied to the start and/or end point.
To select all paragraphs and then limit the selection to the second and third paragraphs, use the following code:
$("p").slice(1,3);The result in the console reads as follows:
>>> $("p").slice(1,3);
[ p.foo, p ]
To select the last two elements from the paragraph set, you would use the following:
$("p").slice(−2);This generates the following result:
>>> $("p").slice(−2);
[ p, p#bar ]Oftentimes, it becomes necessary to drill down in a result set to find child elements. This is accomplished using the .children() method, which accepts one optional parameter: a selector to match child elements against.
To select all paragraphs and then change the selection to match all child elements of the paragraphs, execute the following code:
$("p").children();This outputs the following:
>>> $("p").children();
[ span, span.foo ]
If you need a more specific set of children than that, you're able to pass an optional selector to the .children() method. To select all paragraphs and then find all children with a class foo, use the following:
$("p").children(".foo");The results in the console are as follows:
>>> $("p").children(".foo");[ span.foo ]
The .closest() method is an easy way to find elements up the DOM tree, which is the nesting order of elements (a DOM tree relationship in your example is the span within a paragraph within the body element).
For example, to find the closest paragraph to the span with class foo, run the following code snippet in the console:
$("span.foo").closest("p");This outputs the following:
>>> $("span.foo").closest("p");
[ p#bar ]Similar to the .children() method, the .find() method matches descendants of elements within the current set. The main difference between .find() and .children() is that .children() only checks one level down in the DOM tree, whereas .find() doesn't care how deep the matched elements are.
To demonstrate, select the body tag and then find any contained span elements using the following:
$("body").find("span");This results in both spans being returned:
>>> $("body").find("span");
[ span, span.foo ]
However, if you were to try the same thing using .children(), an empty result set is returned:
>>> $("body").children("span");
[ ]A trio of useful methods for finding the next sibling elements in a set is provided in .next(), .nextAll(), and .nextUntil().
The .next() method will find the next sibling element in the set for each of the elements in the original result set. To select a paragraph with class foo and then traverse to the next sibling element, execute the following code in the console:
$("p.foo").next();This generates the following output:
>>> $("p.foo").next();
[ p ]
A selector can be passed to .next() as well, which allows developers to determine which type of next sibling element should be matched:
$("p.foo").next("#bar");This returns an empty result set, since the next element does not have an ID of bar:
>>> $("p.foo").next("#bar");
[ ]
Because .next() returns only one element, a companion method was created that returns all next sibling elements, .nextAll(). To select all paragraphs after the paragraph with the class foo, use the following code:
$(".foo").nextAll("p");This returns the following result:
>>> $(".foo").nextAll("p");
[ p, p#bar ]
Note
The selector is optional in .nextAll(), as it is in .next().
The third method available for selecting next sibling elements is the .nextUntil() method. As its name suggests, this method will return all next elements until a selector is matched. It's important to note that the element matched by the selector will not be included in the result set.
To demonstrate this, select the paragraph with the class foo and use .nextUntil() with a selector of "#bar":
$(".foo").nextUntil("#bar");Only one paragraph is returned in the result set, and the paragraph with the ID of bar is not included:
>>> $(".foo").nextUntil("#bar");[ p ]
To include the paragraph with an ID of bar, you need to look at the element immediately following, which is the form element in this case. Try the selector again using this updated code:
$(".foo").nextUntil("form");Now, both following paragraphs are returned:
>>> $(".foo").nextUntil("form");
[ p, p#bar ]The .prev(), .prevAll(), and .prevUntil() functions work exactly like .next(), .nextAll(), and .nextUntil(), except they look at previous sibling elements rather than next sibling elements:
>>> $("#bar").prev();

[ p ]


>>> $("#bar").prevAll();

[ p, p.foo, p ]


>>> $("#bar").prevUntil(".foo");

[ p ]To select sibling elements on both sides of an element, use the .siblings() method. This accepts a selector as an argument to limit what types of elements are returned. To match all sibling paragraph elements to the paragraph with ID bar, execute the following code:
$("#bar").siblings("p");The results will look as follows:
>>> $("#bar").siblings("p");[ p, p.foo, p ]
The .parent() method returns a set of the immediate parent elements of the current selection. For instance, to select all parent elements of any elements with the class foo, use the following:
$(".foo").parent();This returns the following:
>>> $(".foo").parent();
[ body, p#bar ]
To match only paragraph elements that are parents of elements with class foo, modify the code to the following:
$(".foo").parent("p");This narrows the result set:
>>> $(".foo").parent("p");
[ p#bar ]Unlike .parent(), .parents() will return all parent elements, with an optional selector passed to filter the results.
To select all parent elements of the check box in the form on the example page, use the following code:
$(":checkbox").parents();This finds every parent element, all the way out to the html element:
>>> $(":checkbox").parents();
[ label, fieldset, form #, body, html ]
To filter the results so that only the parent form element is returned, modify the code as follows:
$(":checkbox").parents("form");This returns only the parent form element:
>>> $(":checkbox").parents("form");[ form # ]
Finally, to select a range of parents until a selector is matched, similar to .nextUntil() or .prevUntil(), use .parentsUntil():
$(":checkbox").parentsUntil("form");This returns all parent elements until the form element is encountered:
>>> $(":checkbox").parentsUntil("form");
[ label, fieldset ]The .add() method is versatile and, therefore, a bit more complicated. Essentially, it allows you to add additional elements to the existing jQuery object using a selector or a string of HTML.
To select all paragraphs and then add the span with class foo to the object, use the following:
$("p").add("span.foo");This outputs the following:
>>> $("p").add("span.foo");
[ p, p.foo, p, p#bar, span.foo ]
The .add() method also allows you to create elements on the fly, like so:
$("p").add('<span id="bat">This is a new span</span>'),Executing the preceding code will output this:
>>> $("p").add('<span id="bat">This is a new span</span>'),
[ p, p.foo, p, p#bar, span#bat ]
Note
Notice that the element span#bat is faded in the console output. This happens because, while the element exists in the jQuery object, it has not been appended to the DOM and, therefore, does not display on the page. You'll learn how to add new elements to the DOM in the next section, "Creating and Inserting DOM Elements."
If you're using a traversal method, you may want to keep the original matched set of elements as well. The .andSelf() method provides this ability by allowing the original set to be recalled and appended to the new set.
For instance, to match all paragraph elements and then find child spans, use the following code:
$("p").find("span");This returns the spans in the document, but you've lost the paragraphs:
>>> $("p").find("span");
[ span, span.foo ]
To keep the paragraphs and match the spans, add a call to .andSelf() to the end of the code:
$("p").find("span").andSelf();This results in the desired output:
>>> $("p").find("span").andSelf();
[ p, p.foo, p, span, p#bar, span.foo ]The .contents() method works similarly to the .children() method, except .contents() returns text nodes as well, which are simply the character data contained within an element (the actual text displayed by an element).[2]
To find all contents of the span with class foo, use the following:
$("span.foo").contents();This results in the following output:
>>> $("span.foo").contents();
[ <TextNode textContent="And this sentence is in a span."> ]At times in jQuery scripts, you will find it necessary to back up to the last set of elements stored in the jQuery object. The .end() method does exactly that: it reverts the jQuery object to the state immediately preceding the last filtering action in the current jQuery object chain.
To select all paragraphs, then find all spans, the original set of paragraphs is no longer available:
>>> $("p").find("span");
[ span, span.foo ]
To revert back to the set of paragraphs, add .end() to the chain:
>>> $("p").find("span").end();
[ p, p.foo, p, p#bar ]The first thing you'll learn that actually changes the DOM, rather than simply selecting elements from it, is how to create new elements and insert them into the DOM. Since the release of jQuery 1.4, this is pretty straightforward.
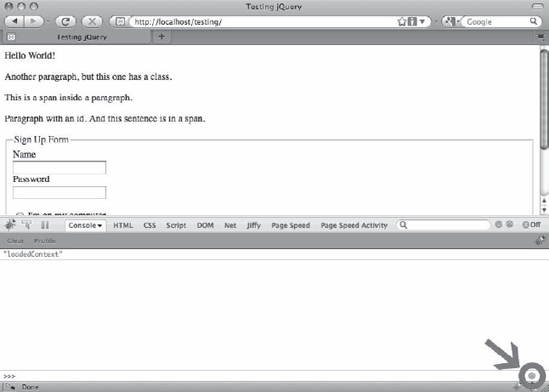
This section of the book starts using more involved code snippets, and will therefore require a minor adjustment to your Firebug console. At the bottom right of the console, there is a round button with an arrow pointing upward (see Figure 2-1).
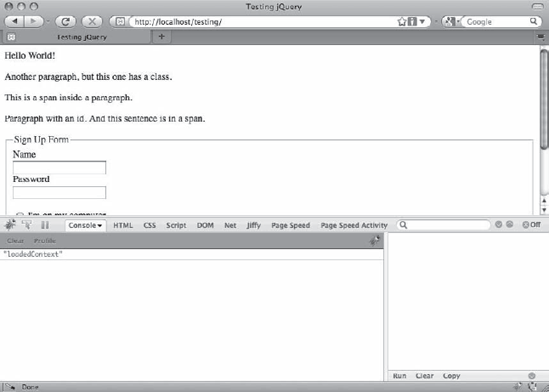
Click this button to activate the multiline testing area, where you'll be able to enter commands across multiple lines, making them easier to read and allowing for more advanced examples (see Figure 2-2).
With the multiline testing area, you now need to click the Run button at the bottom to execute the code. Pressing Enter, as with the single-line test console, will now break to a new line.
To create a new DOM element, jQuery only needs the tag to be created. For instance, to create a new paragraph element, you would use the following:
$("<p>");To add attributes and text to this element, you can simply write it out as plain HTML:
$('<p class="bat">This is a new paragraph!</p>'),Note
The preceding example uses single quotation marks to enclose the string of HTML rather than double ones. This has no effect on the jQuery function; it merely eliminates the need to escape the double quotes used in the class attribute (e.g., class="bat").
As of jQuery 1.4, you can also add attributes to this new element by passing a second argument as JavaScript Object Notation (JSON)[3]:
$("<p>", {
    "class":"bat",
    "text":"This is a new paragraph!"
});
The result of the above code snippet is the following:
>>> $("<p>", { "class":"bat", "text":"This is a new paragraph!" });
[ p.bat ]
Because this is only creating the element, it hasn't been attached to the DOM yet and, therefore, isn't visible in the browser window. You'll learn to insert new elements in the next section, "Inserting New Elements into the DOM."
Note
At its simplest, JSON is a key-value pairing where both the key and value are surrounded by quotation marks and all key-value pairs are comma-separated and enclosed in curly braces ({}). A sample of JSON data would be { "key":"value" } or { "key1":"value1", "key2":"value2" }.
Now that you have a basic understanding of how to create new elements, you can begin learning how to insert them into the DOM. jQuery provides several methods for handling this, which you'll explore in this section.
An important note to make here is that the modification of the DOM is temporary, meaning that any changes made will be reset back to the original HTML document once the page is refreshed. This happens because JavaScript is a client-side language, which means it isn't modifying the actual files from the server, but the browser's individual interpretation of the file.
Changes made with JavaScript can be saved on the server through the use of AJAX (which you'll learn about later in this chapter), which allows JavaScript to interface with server-side languages such as PHP.
Note
After performing the examples in each of the following sections, refresh your page so each new example is starting with a fresh copy of the example HTML file.
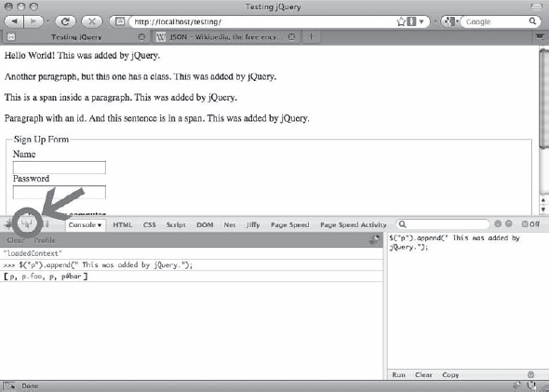
The .append() and .prepend() functions will attach the elements passed as arguments to the jQuery object to which they are chained. The only difference is that .append() attaches the elements at the end, and .prepend() attaches at the beginning.
The content will be appended or prepended inside the matched elements, meaning if you match all paragraphs on the page and append a new sentence, "This was added by jQuery", it will be appended inside the closing paragraph tag (</p>).
Try this out by entering the following code into your console:
$("p").append(" This was added by jQuery.");Executing the code will add this sentence to the end of each paragraph inside the closing paragraph tag. This is evident because the text is not knocked to the next line, as it would be if it were outside the closing tag.
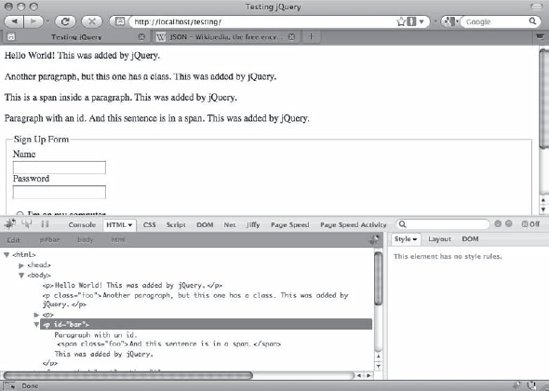
INSPECTING HTML USING THE ELEMENT INSPECTOR IN FIREBUG
You can also see this by using the element inspection tool provided by Firebug. Near the top left of the console, there's a button that looks like a mouse cursor over a rectangle (see Figure 2-3). Click it to activate the element inspector.
After the inspector is active, you can hover over different elements in the browser, and they'll highlight with a blue outline. Hover over one of the paragraphs you just appended text to, and click it. This brings up the HTML panel of Firebug with the current element collapsed and highlighted, and a tab to expand the element (see Figure 2-4).
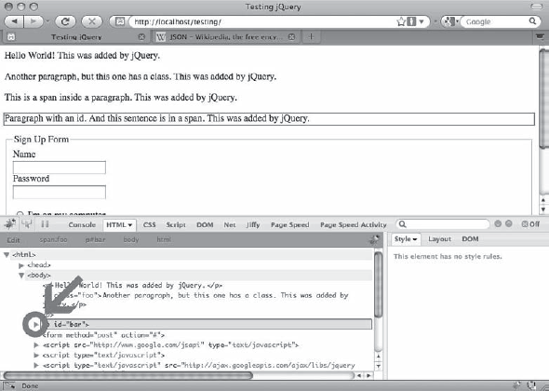
Click the tab to expand the element, and you can see the contents, including the appended text, which is contained within the paragraph element (see Figure 2-5).
You can use this technique throughout the rest of the exercises in this book to see where content and elements are being added to the DOM.
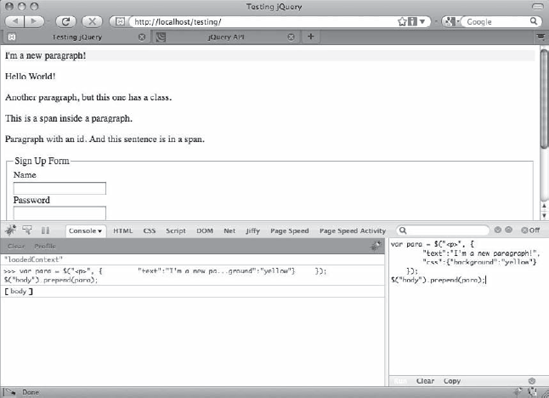
Using .append() and .prepend(), you can also add new elements to the DOM. For instance, to add a new paragraph at the top of the browser page, prepend a new element to the body using this code:
var para = $("<p>", {
        "text":"I'm a new paragraph!",
        "css":{"background":"yellow"}
    });
$("body").prepend(para);
Note
This example uses a variable to store the new element before prepending it to the body. This is done to increase the legibility of the script. You'll be using this technique often throughout this book.
After executing the preceding code in your console, a new paragraph with a yellow background appears at the top of your browser window (see Figure 2-6).
In the last example, you had to create an element, store it, and then select the element to which it was appended. This can be a somewhat roundabout approach, but fortunately, jQuery provides .appendTo() and .prependTo(), which chain instead to the object to be appended and accept the selector of the element to which you wish to append.
Using the last example as a starting point, to add the same paragraph element to the body using .prependTo(), your code would simplify thusly:
$("<p>", {
        "text":"I'm a new paragraph!",
        "css":{"background":"yellow"}
    })
    .prependTo("body");
This produces an identical result with a much more concise snippet of code.
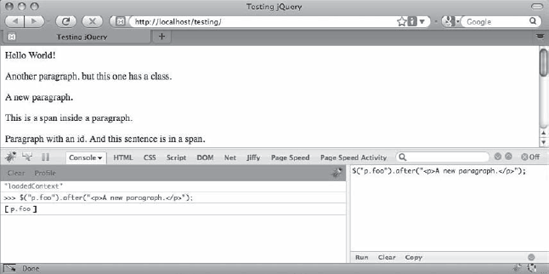
The .after() and .before() methods are similar to .append() and .prepend(), except they add the content outside the element either before or after it, instead of inside the element at the beginning or end.
To add a new paragraph after the paragraph with class foo, use the following snippet:
$("p.foo").after("<p>A new paragraph.</p>");Executing the code results in a new paragraph insertion just below the paragraph with class foo (see Figure 2-7).
The same way that .appendTo() and .prependTo() allow for more concise addition of new elements to the DOM, .insertAfter() and .insertBefore() offer the same alternative for .after() and .before().
To repeat the example from the previous section using .insertAfter(), alter the code to read as follows:
$("<p>", {
        "text":"A new paragraph."
    })
    .insertAfter("p.foo");
This duplicates the result from before (see Figure 2-14).
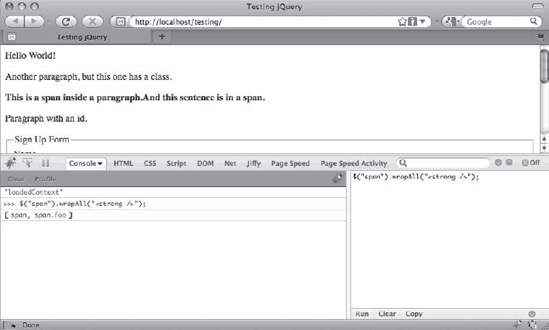
The .wrap() method allows developers to enclose existing elements with one or more new elements quickly and easily.
The argument accepted by .wrap() can either be a collection of one or more tags to wrap around the selected elements, or a callback function to generate the tags.
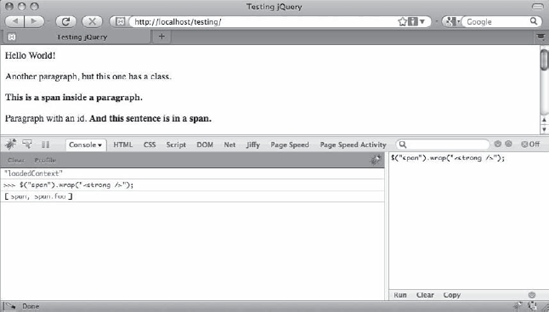
First, wrap all the spans in the example document with a strong tag using the following:
$("span").wrap("<strong />");This results in the text of the two spans becoming bold (see Figure 2-8).
The syntax used for the wrapping element is relatively forgiving, and the output shown in Figure 2-7 could have been accomplished using either "<strong />", "<strong>", or "<strong></strong>".
Additionally, multiple tags can be wrapped around elements by passing a nested set of tags to the .wrap() method:
$("span").wrap("<strong><em></em></strong>");After executing the preceding line, the text in the spans will appear bold and italicized (see Figure 2-9).

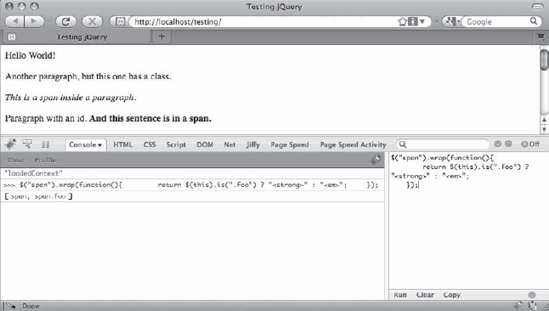
To use a callback function to generate the desired HTML tag to wrap an element with, you must return a tag from the callback. For instance, to wrap all spans with the class foo in strong tags and all other spans in em tags, execute the following code:
$("span").wrap(function(){
        return $(this).is(".foo") ? "<strong>" : "<em>";
    });
After executing this snippet, the browser shows one span in italics, and the other (the one with class foo) in bold (see Figure 2-10).
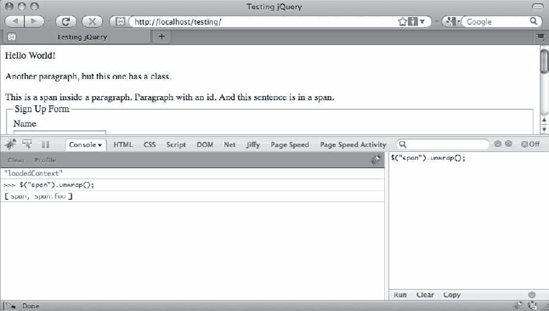
The inverse of .wrap(), .unwrap() will remove tags that surround a given element. It does not accept any arguments; it simply finds the immediate parent element and removes it.
To unwrap the span elements in the example file, execute this code:
$("span").unwrap();This removes the parent elements (but leaves the text nodes intact), which alters the layout (see Figure 2-11).
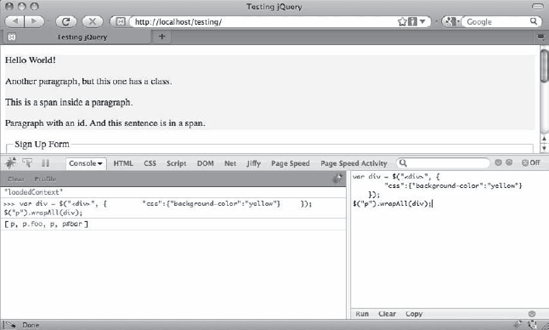
If an entire set of elements needs to be wrapped in a new tag, .wrapAll() is used. Instead of individually wrapping each selected element with a new tag, it groups all selected elements and creates one wrapper around the whole group.
To wrap a div element with a yellow background around all paragraphs on the page, use the following code:
var div = $("<div>", {
        "css":{"background-color":"yellow"}
    });
$("p").wrapAll(div);
After executing this code, the new div is in place, and all paragraphs appear within its yellow background (see Figure 2-12).
There's one important note about .wrapAll(): it will move elements in the DOM to group them. To demonstrate this, use .wrapAll() to add a strong tag around all spans in the document:
$("span").wrapAll("<strong />");After executing the command, note that the second span in the document was moved next to the first one so they could be wrapped in the same tag (see Figure 2-13).
In some cases, it's desirable to wrap the content of an element but not the tag itself. A good example of this is making an entire paragraph bold: to wrap strong tags around a paragraph is not valid HTML and, therefore, isn't a desirable solution. Fortunately, jQuery provides .wrapInner(), which wraps everything contained within an element in a new tag.
To italicize all text in the paragraphs on the test page, use the following code:
$("p").wrapInner("<em />");After execution, all the text on the page is italicized and the markup is validly nested (see Figure 2-14).

To remove an element from the DOM entirely, the .remove() and .detach() methods are used. Both methods remove selected elements from the DOM, but the .detach() method keeps jQuery data for the element intact, which makes it ideal for situations in which an element will be reattached to the DOM at some point.
Both .remove() and .detach() accept an optional selector to filter the elements being removed. In your example, remove all paragraphs with class foo using the following:
$("p").remove(".foo");When the code is run, the paragraph with class foo is removed from view and is no longer part of the DOM.
To demonstrate the difference between .remove() and .detach(), you'll have to jump ahead a bit and use a method called .data(), which allows developers to attach information to an element without adding additional tags or attributes .data() will be covered more thoroughly in the next section.)
First, add some data to the first paragraph in the DOM. Then, with the data added, remove the element from the DOM using .detach(), reattach it, and attempt to read the data:
$("p:first").data("test","This is some data.");
var p = $("p:first").detach();
console.log("Data stored: "+p.data("test"));
Note
You're using a Firebug-specific object, console, and its .log() method to output specific information to the Firebug console. This is especially useful for debugging, but it needs to be removed before a project goes live to avoid JavaScript errors on computers that don't have Firebug installed.
After running this code, the .data() method attaches some information to the first paragraph and gets removed from the DOM and stored in a variable; then the script attempts to output the value of the information stored with .data(). The console will output the following:
>>> $("p:first").data("test","This is some...ored: "+p.data("test"));
Data stored: This is some data.
Now, run the same test, but use .remove() instead of .detach():
$("p:first").data("test","This is some data.");
var p = $("p:first").remove();
console.log("Data stored: "+p.data("test"));
The output shows that the data was lost when the element was removed:
>>> $("p:first").data("test","This is some...ored: "+p.data("test"));
Data stored: undefinedPreviously, when you were creating DOM elements, you were able to define attributes such as CSS styles, the text contained within, and more. To access and modify this information for existing elements, jQuery has a set of built-in methods.
For most element attributes, the .attr() method is used. This method has two purposes: The first is to read a given attribute, which is accomplished by supplying the name of the desired attribute as the first argument to the method with no other arguments. The second is to set an attribute by passing the name of the attribute to be set as the first argument and the value to which it is to be set as the second.
First, retrieve the ID of the last paragraph using the following:
$("p:eq(3)").attr("id");In the console, this produces the following output:
>>> $("p:eq(3)").attr("id");
"bar"
Next, change the ID attribute of the last paragraph to "bat" using this code:
$("#bar").attr("id", "bat");After execution, the following displays in the console:
>>> $("#bar").attr("id", "bat");
[ p#bat ]
Now, if you try to select elements with an ID of bar, an empty result set is returned:
>>> $("#bar");
[ ]
However, you can now select a paragraph element with an ID of bat:
>>> $("#bat");
[ p#bat ]
Additionally, multiple attributes can be set using JSON format:
$("p:eq(3)").attr({
        "id":"baz",
        "title":"A captivating paragraph, isn't it?"
   });
After executing this code, the HTML panel of Firebug reveals that the paragraph's markup has been changed:
<p id="baz" title="A captivating paragraph, isn't it?">
To remove an attribute, simply call .removeAttr() on the element from which you wish to remove the attribute and pass the attribute's name.
Enable the check box in the sample form by removing the disabled attribute:
$(":checkbox").removeAttr("disabled");After executing this code, the check box can now be checked and unchecked at will.
The .css() method works just like .attr(), except it applies to styling rules. To return a value, pass the name of the value as the only argument to the method; to set a value, pass both an attribute name and a new value for it. Like .attr(), multiple values can be set using JSON format.
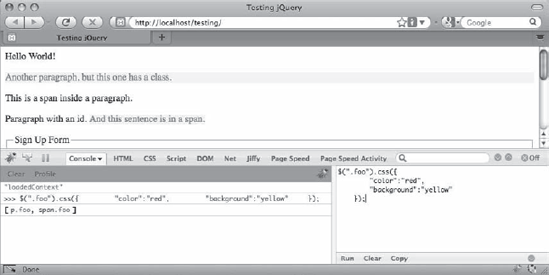
To change all elements with class foo to have red text and a yellow background, use the following:
$(".foo").css({
        "color":"red",
        "background":"yellow"
    });
This code, once executed, adds new style rules to the selected elements (see Figure 2-15).
Before reloading the page, retrieve the background value from elements with class foo using the following code:
$(".foo").css("background");This will return the following:
>>> $(".foo").css("background");
"yellow none repeat scroll 0% 0%"
Tip
The values returned are CSS shorthand properties.[4] An added bonus of jQuery is the ability to set CSS properties using CSS shorthand, which doesn't work using basic JavaScript.
When dealing with the contents of an element, the .text() and .html() methods are used. The difference between the two is that .html() will allow you to read out and insert new HTML tags into an element, where .text() is for reading and writing text only.
If either of these methods is called on an element set with no arguments, the contents of the element are returned. When a value is passed to the method, the existing value is overwritten, and the new one put in its place.
To read the text out of the paragraph with ID bar, run the following code in the console:
$("#bar").text();This captures all text (including whitespace) but ignores the span tag. The following is output:
>>> $("#bar").text();

"Paragraph with an id.

        And this sentence is in a span.

    "
To read everything out of the paragraph, including the span tag, use the following code:
$("#bar").html();This results in the following:
>>> $("#bar").html();

"Paragraph with an id.

     <span class="foo">And this sentence is in a span.</span>

"
Now, change the text by passing a value to the .text() method:
$("#bar").text("This is new text.");The previous content of the paragraph is removed, and the new text is inserted. Note that the span tag was removed as well; all contents of an element are replaced when using .text() and .html().
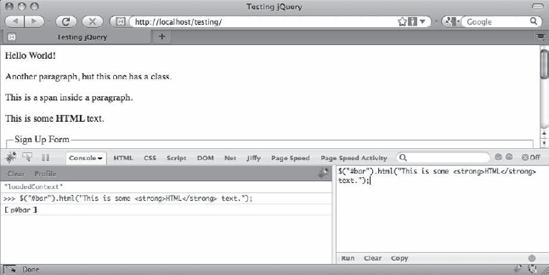
To insert HTML into the paragraph, replace its contents again with the following snippet:
$("#bar").html("This is some <strong>HTML</strong> text.");After execution, the new text appears in the paragraph and the word "HTML" appears in bold (see Figure 2-16).
Accessing and modifying the content of form elements is accomplished through the .val() method. This method returns the value of an input, or if a value is supplied, sets the value of an input.
Retrieve the value of the submit button in your test form using the following:
$(":submit").val();which outputs this:
>>> $(":submit").val();
"Log In"
Now, update the value of the submit input to read "Sign In" using this code:
$(":submit").val("Sign In");The submit button is called Sign In after running the preceding code snippet.
Previously, you used the .data() method to store information for a test of .remove() and .detach(). The .data() method does exactly that: it allows you to store information about an element within the jQuery object in a safe, easy manner.
To give the first two paragraphs in the test document nicknames, store the information using .data() and then log it in the console:
$("p:first")
    .data("nickname", "Pookie")
    .next("p")
        .data("nickname", "Shnookums");
console.log("My nickname: "+$("p:first").data("nickname"));
console.log("My nickname: "+$("p:eq(1)").data("nickname"));
After executing this script, the following will be logged in the console:
>>> $("p:first") .data("nick...name: "+$("p:eq(1)").data("nickname"));My nickname: Pookie
My nickname: Shnookums
Data can be added to an element en masse as in JSON format as well:
$("p.foo").data({
    "nickname":"Wubby",
    "favorite":{
        "movie":"Pretty Woman",
        "music":"Sade",
        "color":"pink"
    }
});
console.log("Nickname: "+$("p.foo").data("nickname"));
console.log("Favorite Movie: "+$("p.foo").data("favorite").movie);
The preceding will produce the following output when executed:
>>> $("p.foo").data({ "nickname":"Wubby",....data("favorite").movie);

Nickname: Wubby

Favorite Movie: Pretty Woman
This can also be simplified by caching the data in a variable, like so:
$("p.foo").data({
    "nickname":"Wubby",
    "favorite":{
        "movie":"Pretty Woman",
        "music":"Sade",
        "color":"pink"
    }
});
var info = $("p.foo").data(); // cache the data object in a variable
console.log("Nickname: "+info.nickname);
console.log("Favorite Movie: "+info.favorite.movie);
This produces an identical result to the previous example, but performs a little better and is a bit easier to read.
A trio of shortcut methods was written for dealing with classes, since their use is so integral to modern web design. The first two methods, .addClass() and .removeClass(), simply add or remove a class attribute, respectively:
$("p:first").addClass("bat");
console.log("Text: "+$(".bat").text());
$("p:first").removeClass("bat");
console.log("Text: "+$(".bat").text());
The preceding snippet outputs the following in the console:
>>> $("p:first").addClass("bat"...le.log("Text: "+$(".bat").text());

Text: Hello World!

Text:
The third method, .toggleClass(), accepts a class name or names and then either adds the class if it doesn't already exist for the element or removes it if the class already exists.
Add the class baz and remove the class foo from the second paragraph in the example page using the following code:
$("p.foo").toggleClass("foo baz");Upon execution, the paragraph is modified and appears with the old class removed and the new one added (see Figure 2-17).
To revert to the original class of foo and remove baz, select the paragraph, and apply .toggleClass() again:
$("p.baz").toggleClass("foo baz");This results in the paragraph going back to having only one class: foo.
The .hasClass() method works similarly to the .is() method in that it determines if a class exists on a selected element and then returns either true or false. This makes it ideal for callback functions.
Check if the first paragraph has class foo, and conditionally output a message using the following:
var msg = $("p:eq(1)").hasClass("foo") ? "Found!" : "Nope!";
console.log("Class? "+msg);To obtain the height or width of an element, the .height() and .width() methods are handy. Both return a value without units, meaning the value returned is an integer (if the element is 68 pixels high, .height() will return 68). This differs from .css(), which will return the units of measure as well.
Get the height of the form by running the following code:
console.log("Form height: "+$("form").height()+"px");This outputs the following in the console:
>>> console.log("Form height: "+$("form").height()+"px");
Form height: 238px
Note
The actual height returned may vary on your browser depending on which operating system you're using.
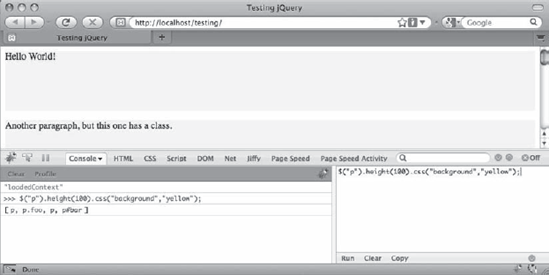
By passing a value to .height() or .width(), a new value is set. Make all paragraphs on the page 100 pixels high with a yellow background using the following code:
$("p").height(100).css("background","yellow");Upon execution, all paragraph heights change and their backgrounds become yellow (see Figure 2-18).
The inner height and width of an element is the width or height not counting borders or margins. You can access this information using the .innerHeight() and .innerWidth() methods.
If you wish to include the borders in the height or width of the element, use .outerHeight() or .outerWidth(). To include margins as well, use .outerHeight(true) or .outerWidth(true).
Add a margin and border to the paragraph with class foo and then log its different widths and heights:
var el = $("p.foo");
el.css({
        "margin":"20px",
        "border":"2px solid black"
   });
console.log("Inner width: "+el.innerWidth()+"px");
console.log("Inner height: "+el.innerHeight()+"px");
console.log("Outer width: "+el.outerWidth()+"px");
console.log("Outer height: "+el.outerHeight()+"px");
console.log("Outer width with margins: "+el.outerWidth(true)+"px");
console.log("Outer height with margins: "+el.outerHeight(true)+"px");
This outputs the following in the console:
>>> var el = $("p.foo"); el.c...rgins: "+el.outerHeight(true)+"px");

Inner width: 840px

Inner height: 19px

Outer width: 844px

Outer height: 23px

Outer width with margins: 884px

Outer height with margins: 63px
Note
Again, your results may vary depending on what operating system you're using.
To process a set of elements, we need a set of methods that allows us to affect each element in the set.
The .map() and .each() methods allow developers to apply a function individually to each element in a set using a callback function that has two arguments: the current element index and the current DOM element.
The difference between the two is that .map() returns a new object containing the returned values of the callback, whereas .each() will return the original object with the changes performed by the callback included. This means that .each() is chainable, while .map() is not.
To loop through each paragraph and element with class foo and append the tag name and element index, use the following code:
$("p,.foo").map(function(index, ele){
        $(this).append(" "+ele.tagName+" #"+index);
    });
This adds the element's tag name and the index number to the end of each matched element (see Figure 2-19).
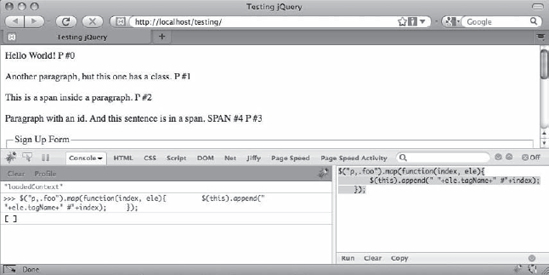
Figure 2-19. The test page after mapping a callback function to display names and indexes for each element
To accomplish the same thing with .each(), simply swap out the call to .map():
$("p,.foo").each(function(index, ele){
        $(this).append(" "+ele.tagName+" #"+index);
    });
This produces an identical result.
The difference comes into play if you need to perform further processing after the call to .map() or .each(). For instance, if you wanted to append the tag name and index to each paragraph and the span with class foo as previously illustrated and then filter to just the span with class foo and change its background and text colors, you might try the following:
$("p,.foo").map(function(index, ele){
        $(this).append(" "+ele.tagName+" #"+index);
    })
    .find("span.foo")
        .css({
                "color":"red",
                "background":"yellow"
            });
After execution, the tag names and indices are appended, but the span doesn't have any style changes applied. This happens because the elements are no longer referenced by the object returned from .map().
To get the preceding snippet to perform as expected, you must swap out the call to .map() for a call to.each():
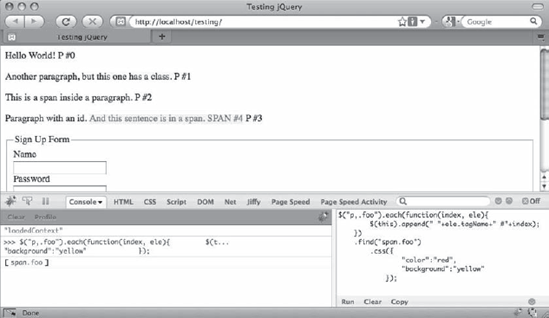
$("p,.foo").each(function(index, ele){
        $(this).append(" "+ele.tagName+" #"+index);
    })
    .find("span.foo")
        .css({
                "color":"red",
                "background":"yellow"
            });
Now, running the code produces the desired result (see Figure 2-20).
One of the most exciting features of jQuery is its library of methods that allow for animation and special effects, which are all possible with plain JavaScript but are incredibly easy using jQuery. A traditional JavaScript approach is tricky and much more involved.
Note
Because it's difficult to show animations as static images, you'll need to rely on your browser for an illustration of how these examples should look. For live demonstrations of the different animation effects, visit the jQuery API at http://api.jquery.com, and look up the individual method you wish to see demonstrated.
The most basic effects functions are .show() and .hide(). When fired without a parameter, they simply add or remove display:none; from the element's style attribute.
Hide the paragraph with ID bar using the following:
$("#bar").hide();The paragraph disappears from the browser window but is still visible in the DOM using the element inspector. To bring it back into view, call .show():
$("#bar").show();The element comes back as it was before.
To make the hiding and showing of elements animated, the duration (in milliseconds) can be passed, as well as an optional callback to be fired after the animation is complete. To demonstrate, add a background and border to the paragraph with ID bar and then hide it with a duration of 2 seconds and a callback function that will log a message in the console:
$("#bar")
    .css({
            "background":"yellow",
            "border":"1px solid black"
        })
    .hide(2000,function(){
            console.log("Animation complete!");
        });
Upon execution, the CSS styles are added to the element, and the .hide() method fires. This causes the element to shrink horizontally and vertically, as well as fading its opacity. After two seconds it will finish disappearing and the callback function logs the "Animation complete!" message in the console.
Note
The callback function will be fired for each element in a set that is animated.
To fade an element in or out (using opacity), use .fadeIn() and .fadeOut(). When called, these methods adjust the opacity of the elements either from 0 to 1 in .fadeIn() or 1 to 0 in .fadeOut(). When an element is faded out, display:none; is applied to the element as well. When faded in, display:none; is removed from the element if it exists.
Both methods accept optional parameters for the duration of the animation (the default is 400 milliseconds) and a callback to be fired when the animation completes. The duration has two shortcut strings, "fast" and "slow", which translate to 200 and 600 milliseconds, respectively.
To fade out the form, log a message, fade it back in, and log another message, use the following:
$("form")
    .fadeOut(1000, function(){
            console.log("Faded out!");
        })
    .fadeIn(1000, function(){
            console.log("Faded in!");
        });
Alternatively, .fadeTo() allows you to specify the opacity to which the element should fade. This method requires two arguments: a duration and the opacity to which the element show fade (a number between 0 and 1). An optional callback can be passed as the third argument as well.
Fade the form to 50 percent opacity and log a message using the following:
$("form")
    .fadeTo(1000, 0.5, function(){
            console.log("Faded to 50%!");
});To hide an element by reducing its height to 0, .slideUp() is a shortcut method. It animates the reduction of the element's height until it reaches 0 and then sets display:none; to ensure the layout is no longer affected by the element. To reverse this, the .slideDown() method removes the display:none; and animates the height from 0 back to the original height of the element.
Just like .fadeIn() and .fadeOut(), two optional parameters are accepted: the duration and a callback function.
Slide up the paragraph with class foo, log a message, slide it back down, and log another message:
$("p.foo")
    .slideUp(1000, function(){
            console.log("Hidden!");
        })
    .slideDown(1000, function(){
            console.log("Shown!");
        });
The .slideToggle() method does the same thing as .slideUp() and .slideDown(), but it's smart enough to know if an element is hidden or shown and uses that information to determine which action to take.
To set up a display toggle for the paragraph with class foo, use the following:
$("p.foo")
    .slideToggle("slow", function(){
            console.log("Toggled!");
        });
By running this code multiple times, you'll see the paragraph slide up and down in alternating fashion.
The previously discussed animation methods are shortcuts that all call the .animate() method. This method will animate most visual CSS properties of an element and supports easing, which is one of any number of mathematical formulas that alter the way the animation operates. By default, "linear" and "swing" easing are supported, but an easy-to-include easing plug-in is available for jQuery (you'll learn about plug-ins later in this book).
The .animate() method accepts several arguments in two formats: In the first format, the method is passed a JSON-formatted set of CSS properties to animate as the first argument, an optional duration in milliseconds for the second argument, an optional easing formula as the third argument, and an optional callback as the fourth argument. The second format passes a JSON-formatted set of CSS properties as its first argument and a JSON-formatted set of options as its second.
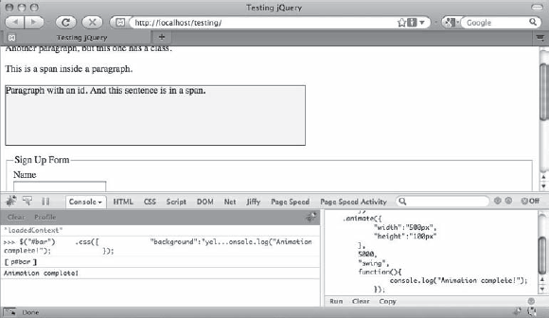
After setting a background and border style, to animate the height and width of the paragraph element with ID bar over the span of 5 seconds using the "swing" easing type and logging a message upon completion, you would use the following for the first format:
$("#bar")
    .css({
            "background":"yellow",
            "border":"1px solid black"
        })
    .animate({
            "width":"500px",
            "height":"100px"
        },
        5000,
        "swing",
        function(){
                console.log("Animation complete!");
            });
Upon completion, the paragraph is yellow with a black border and has changed its size to match the parameters passed (see Figure 2-21).
Using the second format, the code would change as follows:
$("#bar")
    .css({
            "background":"yellow",
            "border":"1px solid black"
        })
    .animate({
            "width":"500px",
            "height":"100px"
        },
        {
            "duration":5000,
            "easing":"swing",
            "complete":function(){
                console.log("Animation complete!");
            }
        });
This produces an identical result. The second format of .animate() provides for additional options as well. To complete the same action using all available options, your code might look like this:
$("#bar")
    .css({
            "background":"yellow",
            "border":"1px solid black"
        })
    .animate({
            "width":"500px",
            "height":"100px"
        },
        {
            "duration":5000,
            "easing":"swing",
            "complete":function(){
                    console.log("Animation complete!");
                },
            "step":function(){
                    console.log("Step completed!");
                },
            "queue":true,
            "specialEasing":{
                    "width":"linear"
                }
        });
The step option allows developers to create a callback function to be fired after each step of the animation. This is each time the property is adjusted, so the preceding example ends up outputting quite a few log messages of "Step completed!".
The queue option tells the animation whether or not it should be added to the current queue, that is, the order in which animations have been called. If multiple animations are called and queued, the first animation will complete before the second begins; the second will complete before the third begins, and so on.
The specialEasing option allows developers to attach different easing styles to each CSS property being animated.
Note
specialEasing is a new feature in jQuery 1.4 and the brainchild of James Padolsey. He posted a great example available at http://james.padolsey.com/demos/jquery/easing/easing-jq14.html.
The .delay() method is new in jQuery 1.4 and essentially allows developers to pause a script's execution for a given number of milliseconds. It provides the ability to run one animation and wait for a bit before starting the next animation.
To slide up the paragraph with ID bar, wait 3 seconds, and slide it back down, use the following code:
$("#bar")
    .css({
            "background":"yellow",
            "border":"1px solid black"
        })
    .slideUp(1000, function(){
            console.log("Animation completed!");
        })
    .delay(3000)
    .slideDown(1000, function(){
              console.log("Animation completed!");
});To stop an animation, the .stop() method is used. This method accepts two Boolean argument: one to determine whether the queue should be cleared and another to determine whether the animation should jump to the end. Both values default to false.
To start an animation, stop the animation, clear the queue, and jump to the end after 200 steps, use the following:
var count = 0; // Keep track of the current step count
$("#bar")
    .css({
            "background":"yellow",
            "border":"1px solid black"
        })
    .animate({
                "width":"500px"
},
{
"duration":6000,
"step":function(){
if(count++==200)
{
$(this).stop(true, true);
}
}
});In many scripts, it's desirable to have certain actions occur when certain events, or browser actions, occur. Support is built into jQuery to handle browser events, which you'll learn in this section.
Browser events occur when the browser itself experiences a change or error.
If a browser error occurs, this event is triggered. One common instance of a browser error would be an image tag that tries to load an image that does not exist. The .error() method allows developers to bind a handler (i.e., a function to be fired if the event occurs) to the event.
Create an image tag that tries to display an image that doesn't exist, and attach an error handler to the error event that outputs a message to the console:
$("<img />", {
        "src":"not/an/image.png",
        "alt":"This image does not exist"
    })
    .error(function(){
            console.log("The image cannot be loaded!");
        })
    .appendTo("body");
Upon execution of this code, the console will display the following:
>>> $("<img />", { "src":"not/an/image.png", ...ot be loaded!"); }) .appendTo("body");

[ img image.png ]

The image cannot be loaded!If the document is scrolled, the scroll event is fired. To bind a handler to this event, use the .scroll() method:
$(window)
    .scroll(function(){
            console.log("The window was scrolled!");
        });
After executing this code, scrolling the browser window will cause a message to be logged in the console.
Additionally, calling the .scroll() method without any parameters will trigger the scroll event to fire. After binding the preceding handler to the window, trigger the event by running the following:
$(window).scroll();
Executing this code will log the scroll event handler's message in the console.
Often, JavaScript needs to wait until the document is ready before executing any scripts. Also, when users exit a page, sometimes it's desirable to fire a function to ensure they meant to navigate away from it.
The .ready() method is used in nearly every jQuery script as a safeguard against the script executing too early and, therefore, not performing properly. This method waits for the DOM to be ready for manipulation before firing its handler.
Common practice is to make the entire script a callback function to be fired by the .ready() handler:
$(document).ready(function(){
        // All jQuery functionality here
    });
Additionally, the .ready() method accepts a parameter to use as an alias for the jQuery function. This allows you to write failsafe jQuery scripts that will work as expected even if the $ alias is given back to another library using jQuery.noConflict() (which allows for multiple JavaScript libraries that use the $ alias to be used on the same project without issue).
You can guarantee the $ alias will work using the following:
jQuery.ready(function($){
        // All jQuery functionality here
        $("p").fadeOut();
    });
Technically, any alias can be passed here:
jQuery(document).ready(function(xTest){
        xTest("#bar").click(function(){console.log("Clicked!");});
    });
This performs as expected, with no errors. There aren't many cases in which this check would be necessary, but it illustrates how the alias works with the .ready() method.
Finally, the jQuery function itself can be used as an alias for .ready():
jQuery(function($){
        // actions to perform after the DOM is ready
});The unload event is triggered whenever a user exits a page by clicking a link, reloading the page, using the forward or back buttons, or closing the window entirely. However, the handling of unload is not consistent across all browsers. And therefore should be tested in multiple browsers before being used in production scripts. To create a link to Google and attach an alert to the unload event, use the following code:
$("<a>", {
            "href":"http://google.com",
            "text":"Go to Google!"
        })
    .appendTo("#bar");
$(window).unload(function(){
        alert("Bye! Google something neat!");
    });
Execute this code, and click the new link. The alert fires, and you're redirected to the Google home page.
There are a whole slew of browser events triggered by the user, and jQuery provides several methods to handle them easily.
The available events are blur, focus, focusin, focusout, load, resize, scroll, unload, click, dblclick, mousedown, mouseup, mousemove, mouseover, mouseout, mouseenter, mouseleave, change, select, submit, keydown, keypress, keyup, and error.
To bind an event handler to an element, the .bind() method is used. It accepts an event as its first argument and a handler function as the second argument.
Multiple events can be bound using a space separated list of events as the first argument as well. To bind different handlers to different events, a JSON-formatted object can be passed to .bind() as well.
To bind a console message log to the click event, use the following:
$("p")
    .bind("click", function(){
        console.log("Click happened!");
    });
Clicking a paragraph after running this code will result in a message being logged to the console.
To bind a handler to both the click and mouseover events, use the following:
$("p")
    .bind("click mouseover", function(){
            console.log("An event happened!");
        });
Now, either clicking or hovering over a paragraph will log a message in the console.
If the handler needs to have data passed to it, an additional parameter is available. This is a JSON-formatted object containing variables to be used in the function. These variables are bound to the event object so that the values remain intact within the given handler.
Set a click handler for two paragraphs in the test document with identical functionality but different log messages using the following:
// Create a value for the notice variable
var notice = "I live in a variable!";
$("p.foo").bind("click", { n:notice }, function(event){
        console.log(event.data.n);
    });
// Change the value of the notice variable
var notice = "I live in a variable too!";
$("#bar").bind("click", { n:notice }, function(event){
        console.log(event.data.n);
    });
To bind different handlers to the click and mouseover events, you would use this:
$("p")
    .bind({
            "click":function(){
                    console.log("Click happened!");
                },
"mouseover":function(){
console.log("Mouseover happened!");
}
});After execution, a different message will be logged to the console for each event when it occurs.
To remove an event, simply call the .unbind() method. If called with no parameters, all event bindings are removed from an element. To specify, the name of the event to unbind can be passed as the first argument. To further specify, the function to be removed from the event can be passed as a second argument.
To unbind all events from the paragraphs in your example, use the following:
$("p").unbind();To only remove the click event handler, use this code:
$("p").unbind("click");Or, if a specific function was bound to an element, it could be unbound like so:
var func1 = function(){
            console.log("An event was triggered!");
        },
    func2 = function(){
            console.log("Another handler!");
        };
$("#bar")
    .bind("click", func1)
    .bind("click", func2)
    .trigger("click") // fire the event once
    .unbind("click", func1);
The preceding code will create two functions (stored in the func1 and func2 variables), bind them to the click event for the paragraph with ID bar, trigger the event once (you'll learn about .trigger() later in this section), and unbind the function stored in func1.
After running this code, clicking the paragraph will fire only the function stored in func2.
Similar to .bind() and .unbind(), .live() and .die() will attach and remove event handlers from elements, respectively. The main difference is that .live() will attach handlers and JavaScript properties not only to existing events but to any new elements added to the DOM that match the selector afterward as well.
For instance, add a click event handler for any anchor elements using the following:
$("a")
    .live("click", function(){
            console.log("Link clicked!");
            return false; // prevent the link from firing
        });
Of course, there are not any links on the example page at the moment. Without reloading, add an anchor tag to the paragraph with ID bar using the following:
$("<a>", {
            "href":"http://google.com",
            "text":"Go to Google!"
        })
    .appendTo("#bar");
The new link appears, and even though the event was bound before any anchor tags existed in the DOM, clicking the link results in a message logged in the console and the link not firing.
Performing the previous action using .bind() does not work. Additionally, the click event handler bound with .live() cannot be removed with .unbind(); to remove the event, you must use .die(). The use of .die() is the same as that of .unbind().
The function and use of the .one() method is identical to that of .bind(), except that the event handler is unbound after one occurrence of the event.
Add a new click event handler for the paragraph with ID bar that will only fire once using the following:
$("#bar").one("click", function(){
        console.log("This will only fire once.");
    });
After execution, clicking the paragraph with ID bar results in one message logged to the console, with subsequent clicks having no effect.
The .toggle() function allows developers to bind two or more functions to the click event to be fired on alternating clicks. Alternatively, the function can be used to toggle visibility of elements (like toggling .show() and .hide()—similar to how .slideToggle() alternatively performs the functionality of .slideUp() and .slideDown() when called).
First, bind three different log messages to the click event for the paragraph with ID bar using the following:
$("#bar")
    .toggle(function(){
                console.log("Function 1");
            },
        function(){
                console.log("Function 2");
            },
        function(){
                console.log("Function 3");
            });
After execution, upon clicking the paragraph with ID bar, the three messages are logged in succession on consequent clicks.
Next, toggle the visibility of the paragraph with ID bar with the following code:
$("#bar").toggle();Firing this function hides the paragraph. Firing it again brings it back. By adding the duration as the first argument, the method will animate the element as it's hidden or shown:
$("#bar").toggle(2000);Last, a Boolean flag can be passed to determine whether all elements should be shown or hidden:
$("#bar").toggle(true); // all elements will be shown
$("#bar").toggle(false); // all elements will be hiddenTo trigger an event, the .trigger() method is used. This method accepts an event to trigger and an optional array of arguments to be passed to the handler.
Bind a handler to the paragraph with ID bar, and trigger it using the following code:
$("#bar")
    .bind("click", function(){
            console.log("Clicked!");
        })
    .trigger("click");
To pass additional data, modify the code as follows:
// create a variable
var note = "I was triggered!";
$("#bar")
    .bind("click", function(event, msg){ // allow a 2nd argument
            // If no msg variable is passed, a default message
            var log = msg || "I was clicked!";
            console.log(log);
        })
    .trigger("click", [ note ]); // array passed in square brackets
This outputs the message stored in the note variable to the console.
Every event has a shortcut method that accepts the handler function as an argument. If passed without an argument, it calls .trigger() for its event type.
The available shortcut functions are .blur(), .focus(), .focusin(), .focusout(), .load(), .resize(), .scroll(), .unload(), .click(), .dblclick(), .mousedown(), .mouseup(), .mousemove(), .mouseover(), .mouseout(), .mouseenter(), .mouseleave(), .change(), .select(), .submit(), .keydown(), .keypress(), .keyup(), and .error().
As an example, the following will bind a handler to the click event, and fire the event.
$("#bar").click(function(){ console.log("Clicked!"); }).click();The last set of jQuery methods we're going to cover are probably the most useful, and more than likely played a large role in the widespread adoption of jQuery. The methods providing AJAX[5] functionality are incredibly useful and, especially for anyone who has built AJAX scripts in plain JavaScript before, as easy as pie.
Note
For further reading on AJAX, see the Wikipedia article here: http://en.wikipedia.org/wiki/AJAX_%programming%29
For this section, you'll need an external file to access using the AJAX controls. Create a new file in the testing folder called ajax.php. Inside, insert the following code:
<?php

echo '<p class="ajax">This paragraph was loaded with AJAX.</p>',
                '<pre>GET variables: ', print_r($_GET, TRUE), '</pre>',
                '<pre>POST variables: ', print_r($_POST, TRUE), '</pre>';

?>
This file will be called by the various AJAX methods available in jQuery. It will show you the data passed to the script for illustrative purposes.
The low-level, or most basic, function for sending AJAX requests is $.ajax(). Notice that this function is called without a selector, because it doesn't apply to the jQuery object. AJAX actions are global functions, carried out independently of the DOM.
The $.ajax() function accepts one argument: an object containing settings for the AJAX call. If called without any settings, the method will load the current page and do nothing with the result.
Quite a few settings are available for $.ajax(), not all of which are covered here or used in this book. See http://api.jquery.com/jQuery.ajax for a full list of available settings. The most common follow:
data: This describes any data to be sent to the remote script, either as a query string(key1=val1&key2=val2)or asJSON ({"key1":"val1","key2":"val2"}).dataFilter(data, type): This callback allows prefiltering of data and is great for sanitizing data as it comes from the remote script.dataType: This described the type of data expected from the request. jQuery makes an intelligent guess if this is left undefined. The available types are"xml", "html", "script", "json", "jsonp", and"text".error(XMLHttpRequest, textStatus, errorThrown): This callback is to be executed in the event of a request error. TheXMLHttpRequestobject, a string communicating the status of the request, and an error code are passed as arguments.success(data, textStatus, XMLHttpRequest): This callback is to be executed if the request completes successfully. The data returned from the remote script, a string communicating the status of the request, and theXMLHttpRequestobject are passed as arguments.type: This is the type of request to send. The default isGET, butPOSTis also available.PUTandDELETEcan be used but may not work properly in all browsers.url: This is the URL to which the request is to be sent.
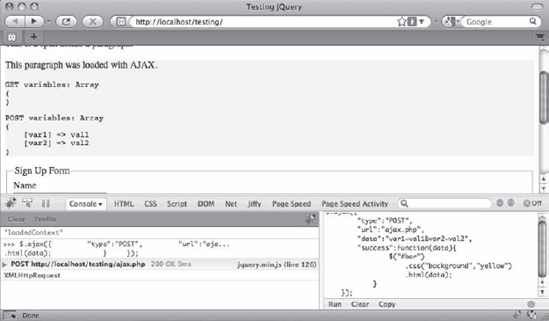
To send a basic POST request to your sample script and load the results into the paragraph with ID bar, you would use the following:
$.ajax({
        "type":"POST",
        "url":"ajax.php",
        "data":"var1=val1&var2=val2",
        "success":function(data){
                $("#bar")
                    .css("background","yellow")
                    .html(data);
            }
      });
After executing this code, the contents of the paragraph are replaced with the loaded information (see Figure 2-22).
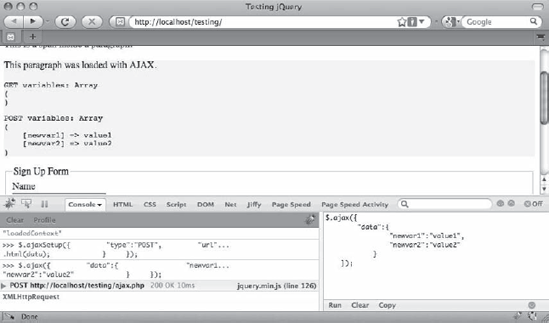
To set default options for AJAX calls, the $.ajaxSetup() function is used. For instance, to specify that, by default, all AJAX requests should be sent to ajax.php using POST and then loaded into the paragraph with ID bar, the following would be used:
$.ajaxSetup({
        "type":"POST",
        "url":"ajax.php",
        "success":function(data){
                $("#bar")
                    .css("background","yellow")
                    .html(data);
            }
    });
Now, new AJAX requests can be made easily by simply passing new data:
$.ajax({
        "data":{
                "newvar1":"value1",
                "newvar2":"value2"
            }
    });
This results in the paragraph's contents being replaced with new content from ajax.php (see Figure 2-23).
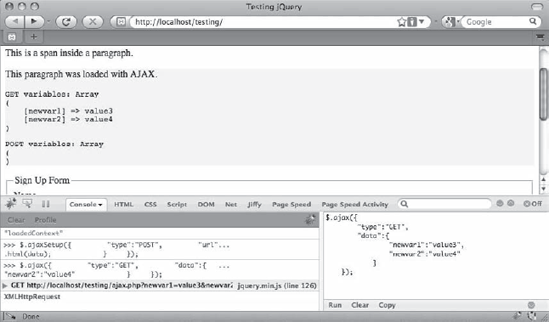
These defaults can be overwritten in subsequent calls to $.ajax() by simply redefining the option in the new call:
$.ajax({
        "type":"GET",
        "data":{
                "newvar1":"value3",
                "newvar2":"value4"
            }
    });
This results in the data being sent using GET (see Figure 2-24).
There are several simple, one-use functions, available for performing common AJAX tasks. In a nutshell, these shorthand methods are simply wrapper functions that call $.ajax() with some of the parameters already set.
Using these methods will incur a slight performance penalty, since you're essentially calling a method that sets up parameters and calls $.ajax() within itself. However, the convenience of using shorthand methods really speeds up development in many scripts.
For standard GET and POST requests, the $.get() and $.post() functions are easy to use. Both take four arguments: the URL to which the request is to be sent, optional data to be sent to the remote script, an optional callback to be executed if the request is successful, and an optional dataType setting.
To load the result of ajax.php using GET with no data sent, use the following:
$.get("ajax.php", function(data){
        $("#bar")
            .css("background","yellow")
            .html(data);
   });
To send a request with data using POST, the following code could be used:
$.post("ajax.php", {"var1":"value"}, function(data){
        $("#bar")
            .css("background","yellow")
            .html(data);
});When loading JSON data, $.getJSON() is a shortcut function. It accepts the URL to which requests are sent, optional data, and an optional callback function.
To run an example of this function, another test file needs to be created: create a new file called json.php in the testing folder, and insert the following JSON into it:
{"var1":"value1","var2":"value2"}Now, load the contents of json.php and output the contents in the paragraph with ID bar:
$.getJSON("json.php",
        function(data){
                $("#bar")
                    .css("background","yellow")
                    .html(data.var1+", "+data.var2);
            });
Upon execution, the contents of the paragraph will be replaced with the string "value1, value2".
To load external JavaScript, use the $.getScript() function. This accepts a URL to which the request is sent and an optional callback (which is generally not needed, as the script will execute automatically on a successful load).
Create a new file called script.php in the testing folder, and insert the following:
alert("This script was loaded by AJAX!");Now, load this script by executing the following code in the console:
$.getScript("script.php");Upon execution, the alert fires.
The .load() method works just like $.get() or $.post(), except it's a method instead of a global function. It has an implicit callback, which is to replace the HTML of the matched elements with the content returned from the remote file.
The method accepts the same three arguments: destination URL, optional data, and an optional callback (which fires after the element content has been replaced).
Load the contents of ajax.php in the paragraph with ID bar after sending some data using this code:
$("#bar").load("ajax.php", {"var1":"value1"});After running this snippet, the content of the paragraph is replaced with the returned result.
This chapter was intense and covered an awful lot of ground. Remember to check the jQuery API documentation online for more examples, further explanation, and discussion by other developers in the community. To search a method, simply add its name to the end of the API's URL; for instance, to look up the .slideup() method, navigate to http://api.jquery.com/slideup in your browser.
In the next part of this book, you'll brush up on your PHP skills, including object-oriented programming, before jumping into the backend development of the events calendar you'll be building from Chapter 4 on.