
Now that the calendar can be viewed, you need to add controls that will allow administrators to create, edit, and delete events.
To edit an event or add new events to the calendar, you need to use a form. You do this by adding a method called displayForm() that generates a form for editing and creating events to the Calendar class.
This simple method accomplishes the following tasks:
Checks for an integer passed as the event ID.
Instantiates empty variables for the different fields used to describe events.
Loads event data if an event ID was passed.
Stores event data in the variables instantiated earlier if it exists.
Outputs a form.
Note
By explicitly sanitizing the event ID passed in the $_POST superglobal, you ensure that the ID is safe to use since any non-integer values will be converted to 0.
You build the displayForm() method by adding the following bold code to the Calendar class:
<?php

class Calendar extends DB_Connect
{

    private $_useDate;

    private $_m;
private $_y;
private $_daysInMonth;
private $_startDay;
public function __construct($dbo=NULL, $useDate=NULL) {...}
public function buildCalendar() {...}
public function displayEvent($id) {...}
/**
* Generates a form to edit or create events
*
* @return string the HTML markup for the editing form
*/
public function displayForm()
{
/*
* Check if an ID was passed
*/
if ( isset($_POST['event_id']) )
{
$id = (int) $_POST['event_id'];
// Force integer type to sanitize data
}
else
{
$id = NULL;
}
/*
* Instantiate the headline/submit button text
*/
$submit = "Create a New Event";
/*
* If an ID is passed, loads the associated event
*/
if ( !empty($id) )
{
$event = $this->_loadEventById($id);
/*
* If no object is returned, return NULL
*/
if ( !is_object($event) ) { return NULL; }
$submit = "Edit This Event";}/** Build the markup*/return <<<FORM_MARKUP<form action="assets/inc/process.inc.php" method="post"><fieldset><legend>$submit</legend><label for="event_title">Event Title</label><input type="text" name="event_title"id="event_title" value="$event->title" /><label for="event_start">Start Time</label><input type="text" name="event_start"id="event_start" value="$event->start" /><label for="event_end">End Time</label><input type="text" name="event_end"id="event_end" value="$event->end" /><label for="event_description">Event Description</label><textarea name="event_description"id="event_description">$event->description</textarea><input type="hidden" name="event_id" value="$event->id" /><input type="hidden" name="token" value="$_SESSION[token]" /><input type="hidden" name="action" value="event_edit" /><input type="submit" name="event_submit" value="$submit" />or <a href="./">cancel</a></fieldset></form>FORM_MARKUP;}private function _loadEventData($id=NULL) {...} private function _createEventObj() {...} private function _loadEventById($id) {...} } ?>
If you look at the preceding form, there's a hidden input named token that holds a session value, also called token. This is a security measure to prevent cross-site request forgeries (CSRF), which are form submissions that are faked by submitting a form to your app's processing file from somewhere other than the form itself. This is a common tactic used by spammers to send multiple forged entry submissions, which is annoying, potentially harmful, and definitely undesirable.
This token is created by generating a random hash and storing it in the session, and then posting the token along with the form data. If the token in the $_POST superglobal matches the one in the $_SESSION superglobal, then it's a reasonably sure bet that the submission is legitimate.
You add an anti-CSRF token into your application by modifying the initialization file with the code shown in bold:
<?php/** Enable sessions*/session_start();/** Generate an anti-CSRF token if one doesn't exist*/if ( !isset($_SESSION['token']) ){$_SESSION['token'] = sha1(uniqid(mt_rand(), TRUE));}/* * Include the necessary configuration info */ include_once '../sys/config/db-cred.inc.php'; // DB info /* * Define constants for configuration info */ foreach ( $C as $name => $val ) { define($name, $val); } /* * Create a PDO object */ $dsn = "mysql:host=" . DB_HOST . ";dbname=" . DB_NAME; $dbo = new PDO($dsn, DB_USER, DB_PASS); /* * Define the auto-load function for classes */ function __autoload($class) { $filename = "../sys/class/class." . $class . ".inc.php"; if ( file_exists($filename) ) { include_once $filename; }
}

?>
Warning
You may want to include a time limit for tokens to increase security further. Making sure a token is no older than 20 minutes, for instance, helps prevent a user from leaving a computer unattended and having a mischievous user start poking around later. For more information on tokens and preventing CSRF, visit Chris Shiflett's blog and read his article on the topic at http://shiflett.org/csrf.
Now that the method exists to display the form, you need to create a file that will call that method. This file will be called admin.php, and it will reside in the root level of the public folder (/public/admin.php).
Similar to view.php, this file accomplishes the following:
Loads the initialization file.
Sets up a page title and CSS file array.
Includes the header.
Creates a new instance of the
Calendarclass.Calls the
displayForm()method.Includes the footer.
Next, add the following inside the new admin.php file:
<?php/** Include necessary files*/include_once '../sys/core/init.inc.php';/** Output the header*/$page_title = "Add/Edit Event";$css_files = array("style.css");include_once 'assets/common/header.inc.php';/** Load the calendar*/$cal = new Calendar($dbo);
?><div id="content"><?php echo $cal->displayForm(); ?></div><!-- end #content --><?php/** Output the footer*/include_once 'assets/common/footer.inc.php';?>
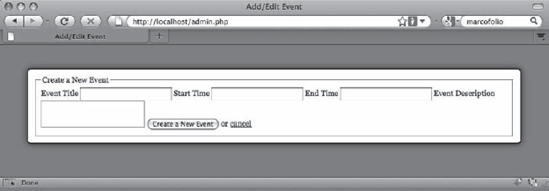
After saving this code, navigate to http://localhost/admin.php to see the resulting form (see Figure 5-1).
Obviously, the preceding form needs some visual enhancement to make it more usable. However, this form will ultimately be accessible only to administrators (because you don't want just anyone making changes to your calendar), so the CSS rules will be separated out to a separate stylesheet called admin.css. You can find this file in the css folder (/public/assets/css/).
Again, since this book is not about CSS, the rules won't be explained. Essentially, the following CSS makes the form elements look more like what your user expects a form to look like; it also adds a couple rules for elements that will be created shortly.
Now add the following code into admin.css:
fieldset {border: 0;
}legend {font-size: 24px;font-weight: bold;}input[type=text],input[type=password],label {display: block;width: 70%;font-weight: bold;}textarea {width: 99%;height: 200px;}input[type=text],input[type=password],textarea {border: 1px solid #123;-moz-border-radius: 6px;-webkit-border-radius: 6px;border-radius: 6px;-moz-box-shadow: inset 1px 2px 4px #789;-webkit-box-shadow: inset 1px 2px 4px #789;box-shadow: inset 1px 2px 4px #789;padding: 4px;margin: 0 0 4px;font-size: 16px;font-family: georgia, serif;}input[type=submit] {margin: 4px 0;padding: 4px;border: 1px solid #123;-moz-border-radius: 6px;-webkit-border-radius: 6px;border-radius: 6px;-moz-box-shadow: inset −2px −1px 3px #345,inset 1px 1px 3px #BCF,1px 2px 6px #789;-webkit-box-shadow: inset −2px −1px 3px #345,inset 1px 1px 3px #BCF,1px 2px 6px #789;box-shadow: inset −2px −1px 3px #345,inset 1px 1px 3px #BCF,1px 2px 6px #789;background-color: #789;font-family: georgia, serif;text-transform: uppercase;
font-weight: bold;font-size: 14px;text-shadow: 0px 0px 1px #fff;}.admin-options {text-align: center;}.admin-options form,.admin-options p {display: inline;}a.admin {display: inline-block;margin: 4px 0;padding: 4px;border: 1px solid #123;-moz-border-radius: 6px;-webkit-border-radius: 6px;border-radius: 6px;-moz-box-shadow: inset −2px −1px 3px #345,inset 1px 1px 3px #BCF,1px 2px 6px #789;-webkit-box-shadow: inset −2px −1px 3px #345,inset 1px 1px 3px #BCF,1px 2px 6px #789;box-shadow: inset −2px −1px 3px #345,inset 1px 1px 3px #BCF,1px 2px 6px #789;background-color: #789;color: black;text-decoration: none;font-family: georgia, serif;text-transform: uppercase;font-weight: bold;font-size: 14px;text-shadow: 0px 0px 1px #fff;}
Save this file, then add admin.css to the $css_files array in admin.php by making the changes shown in bold:
<?php
/*
* Include necessary files
*/
include_once '../sys/core/init.inc.php';
/*
* Output the header
*/
$page_title = "Add/Edit Event";
$css_files = array("style.css", "admin.css");
include_once 'assets/common/header.inc.php';
/*
* Load the calendar
*/
$cal = new Calendar($dbo);
?>

<div id="content">
<?php echo $cal->displayForm(); ?>

</div><!-- end #content -->

<?php

/*
 * Output the footer
 */
include_once 'assets/common/footer.inc.php';

?>
After saving the preceding code, reload http://localhost/admin.php to see the styled form (see Figure 5-2).

To save events entered in the form, you create a new method in the Calendar class called processForm() that accomplishes the following:
Sanitizes the data passed from the form via
POSTDetermines whether an event is being edited or created
Generates an
INSERTstatement if no event is being edited; or it generates anUPDATEstatement if an event ID was postedCreates a prepared statement and binds the parameters
Executes the query and returns
TRUEor the error message on failure
The following code creates the processForm() method in the Calendar class:
<?php

class Calendar extends DB_Connect
{

    private $_useDate;
private $_m;
private $_y;
private $_daysInMonth;
private $_startDay;
public function __construct($dbo=NULL, $useDate=NULL) {...}
public function buildCalendar() {...}
public function displayEvent($id) {...}
public function displayForm() {...}
/**
* Validates the form and saves/edits the event
*
* @return mixed TRUE on success, an error message on failure
*/
public function processForm()
{
/*
* Exit if the action isn't set properly
*/
if ( $_POST['action']!='event_edit' )
{
return "The method processForm was accessed incorrectly";
}
/*
* Escape data from the form
*/
$title = htmlentities($_POST['event_title'], ENT_QUOTES);
$desc = htmlentities($_POST['event_description'], ENT_QUOTES);
$start = htmlentities($_POST['event_start'], ENT_QUOTES);
$end = htmlentities($_POST['event_end'], ENT_QUOTES);
/*
* If no event ID passed, create a new event
*/
if ( empty($_POST['event_id']) )
{
$sql = "INSERT INTO `events`
(`event_title`, `event_desc`, `event_start`,
`event_end`)
VALUES
(:title, :description, :start, :end)";
}/** Update the event if it's being edited*/else{/** Cast the event ID as an integer for security*/$id = (int) $_POST['event_id'];$sql = "UPDATE `events`SET`event_title`=:title,`event_desc`=:description,`event_start`=:start,`event_end`=:endWHERE `event_id`=$id";}/** Execute the create or edit query after binding the data*/try{$stmt = $this->db->prepare($sql);$stmt->bindParam(":title", $title, PDO::PARAM_STR);$stmt->bindParam(":description", $desc, PDO::PARAM_STR);$stmt->bindParam(":start", $start, PDO::PARAM_STR);$stmt->bindParam(":end", $end, PDO::PARAM_STR);$stmt->execute();$stmt->closeCursor();return TRUE;}catch ( Exception $e ){return $e->getMessage();}}private function _loadEventData($id=NULL) {...} private function _createEventObj() {...} private function _loadEventById($id) {...} } ?>
The form to add and edit events is submitted to a file called process.inc.php, which is located in the inc folder (/public/assets/inc/process.inc.php). This file checks the submitted form data and saves or updates entries by performing the following steps:
Enables the session.
Includes the database credentials and the
Calendarclass.Defines constants (as occurs in the initialization file).
Creates an array that stores information about each action.
Verifies that the token was submitted and is correct, and that the submitted action exists in the lookup array. If so, go to Step 6. If not, go to Step 7.
Creates a new instance of the
Calendarclass.Calls the
processForm()method.Sends the user back to the main view or output an error on failure.
Sends the user back out to the main view with no action if the token doesn't match.
The array created in Step 4 allows you to avoid a long, repetitive string of if...elseif blocks to test for each individual action. Using the action as the array key and storing the object, method name, and page to which the user should be redirected as array values means that you can write a single block of logic using the variables from the array.
Insert the following code into process.inc.php to complete the steps just described:
<?php/** Enable sessions*/session_start();/** Include necessary files*/include_once '../../../sys/config/db-cred.inc.php';/** Define constants for config info*/foreach ( $C as $name => $val ){define($name, $val);}/** Create a lookup array for form actions
*/$actions = array('event_edit' => array('object' => 'Calendar','method' => 'processForm','header' => 'Location: ../../'));/** Make sure the anti-CSRF token was passed and that the* requested action exists in the lookup array*/if ( $_POST['token']==$_SESSION['token']&& isset($actions[$_POST['action']]) ){$use_array = $actions[$_POST['action']];$obj = new $use_array['object']($dbo);if ( TRUE === $msg=$obj->$use_array['method']() ){header($use_array['header']);exit;}else{// If an error occured, output it and end executiondie ( $msg );}}else{// Redirect to the main index if the token/action is invalidheader("Location: ../../");exit;}function __autoload($class_name){$filename = '../../../sys/class/class.'. strtolower($class_name) . '.inc.php';if ( file_exists($filename) ){include_once $filename;}}?>
Save this file, and then navigate to http://localhost/admin.php and create a new event with the following information:
Event Title: Dinner Party
Start Time: 2010-01-22 17:00:00
End Time: 2010-01-22 19:00:00
Description: Five-course meal with wine pairings at John's house
After clicking the Create new event button, the calendar is updated with the new event (see Figure 5-3).
To make it easier for your authorized users to create new events, add a button to the calendar that takes the user to the form in admin.php. Do this by creating a new private method called _adminGeneralOptions() in the Calendar class:
<?php

class Calendar extends DB_Connect
{

    private $_useDate;

    private $_m;

    private $_y;

    private $_daysInMonth;

    private $_startDay;

    public function __construct($dbo=NULL, $useDate=NULL) {...}

    public function buildCalendar() {...}

    public function displayEvent($id) {...}

    public function displayForm() {...}

    public function processForm() {...}

    private function _loadEventData($id=NULL) {...}

    private function _createEventObj() {...}

    private function _loadEventById($id) {...}

    /**
     * Generates markup to display administrative links
     *
     * @return string markup to display the administrative links
     */
    private function _adminGeneralOptions()
    {
        /*
         * Display admin controls
         */
        return <<<ADMIN_OPTIONS

    <a href="admin.php" class="admin">+ Add a New Event</a>
ADMIN_OPTIONS;
    }

}

?>
Note
Checks to ensure that this button is only displayed to authorized users will be added Chapter 6.
Next, modify the buildCalendar() method to call your new _adminGeneralOptions() method by inserting the following bold code:
public function buildCalendar()
{
    // To save space, the bulk of this method has been omitted

    /*
     * Close the final unordered list
     */
    $html .= "
	</ul>

";

    /*
     * If logged in, display the admin options
     */
    $admin = $this->_adminGeneralOptions();

    /*
     * Return the markup for output
     */
    return $html . $admin;
}
Finally, add the admin stylesheet (admin.css) to index.php using the following code in bold to make sure the link displays correctly:
<?php

/*
 * Include necessary files
 */
include_once '../sys/core/init.inc.php';

/*
 * Load the calendar
 */
$cal = new Calendar($dbo, "2010-01-01 12:00:00");

/*
 * Set up the page title and CSS files
 */
$page_title = "Events Calendar";
$css_files = array('style.css', 'admin.css'),

/*
 * Include the header
*/ include_once 'assets/common/header.inc.php'; ?> <div id="content"> <?php /* * Display the calendar HTML */ echo $cal->buildCalendar(); ?> </div><!-- end #content --> <?php /* * Include the footer */ include_once 'assets/common/footer.inc.php'; ?>
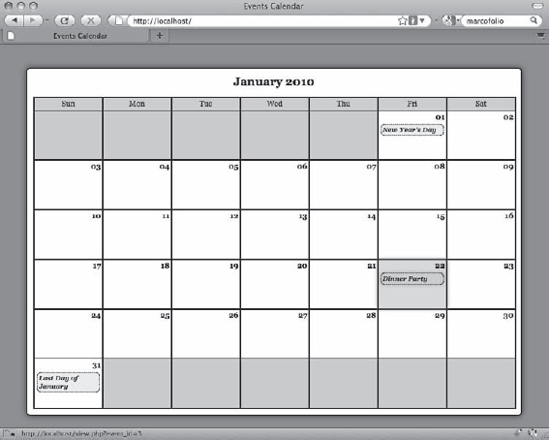
Save the file and reload http://localhost/ to see the button (see Figure 5-4).

Next, you need to make it possible for authorized users to edit events. You will do this by adding a button to the full view of an event in view.php.
However, unlike the simple link used to create a new option, an Edit button will require an actual form submission. To keep this code manageable, you'll create a new private method called _adminEntryOptions() in the Calendar class that will generate the markup for the form.
For now, this form will simply return the form markup to display the Edit button. More will be added to the form as you continue on through the exercises in this book.
You create this method by adding the following bold code to the Calendar class:
<?php

class Calendar extends DB_Connect
{
private $_useDate;
private $_m;
private $_y;
private $_daysInMonth;
private $_startDay;
public function __construct($dbo=NULL, $useDate=NULL) {...}
public function buildCalendar() {...}
public function displayEvent($id) {...}
public function displayForm() {...}
public function processForm() {...}
private function _loadEventData($id=NULL) {...}
private function _createEventObj() {...}
private function _loadEventById($id) {...}
private function _adminGeneralOptions() {...}
/**
* Generates edit and delete options for a given event ID
*
* @param int $id the event ID to generate options for
* @return string the markup for the edit/delete options
*/
private function _adminEntryOptions($id)
{
return <<<ADMIN_OPTIONS
<div class="admin-options">
<form action="admin.php" method="post">
<p>
<input type="submit" name="edit_event"
value="Edit This Event" />
<input type="hidden" name="event_id"
value="$id" />
</p>
</form>
</div><!-- end .admin-options -->
ADMIN_OPTIONS;
}} ?>
Before the Edit button will be displayed, the _adminEntryOptions() method needs to be called from within the displayEvent() method. This is as simple as storing the return value of _adminEntryOptions() in a variable, $admin, and outputting that variable along with the rest of the entry markup.
Add the following bold modifications to displayEvent() in the Calendar class:
/**
 * Displays a given event's information
 *
 * @param int $id the event ID
 * @return string basic markup to display the event info
 */
public function displayEvent($id)
{
    /*
     * Make sure an ID was passed
     */
    if ( empty($id) ) { return NULL; }

    /*
     * Make sure the ID is an integer
     */
    $id = preg_replace('/[^0-9]/', '', $id);

    /*
     * Load the event data from the DB
     */
    $event = $this->_loadEventById($id);        /*
     * Generate strings for the date, start, and end time
     */
    $ts = strtotime($event->start);
    $date = date('F d, Y', $ts);
    $start = date('g:ia', $ts);
    $end = date('g:ia', strtotime($event->end));

    /*
     * Load admin options if the user is logged in
     */
    $admin = $this->_adminEntryOptions($id);
    /*
     * Generate and return the markup
     */
    return "<h2>$event->title</h2>"
        . "
	<p class="dates">$date, $start—$end</p>"
. "
<p>$event->description</p>$admin";
}Note
As with the Create a new entry button, checks will be added later to ensure that only authorized users see the editing controls.
The last step before the Edit button is ready for use is to include the admin.css stylesheet in the $css_files variable of view.php:
<?php

/*
 * Make sure the event ID was passed
 */
if ( isset($_GET['event_id']) )
{
    /*
     * Collect the event ID from the URL string
     */
    $id = htmlentities($_GET['event_id'], ENT_QUOTES);
}
else
{
    /*
     * Send the user to the main page if no ID is supplied
     */
    header("Location: ./");
    exit;
}

/*
 * Include necessary files
 */
include_once '../sys/core/init.inc.php';

/*
 * Output the header
 */
$page_title = "View Event";
$css_files = array("style.css", "admin.css");
include_once 'assets/common/header.inc.php';
/*
* Load the calendar
*/
$cal = new Calendar($dbo);
?>
<div id="content">
<?php echo $cal->displayEvent($id) ?>
<a href="./">« Back to the calendar</a>
</div><!-- end #content -->
<?php
/*
* Output the footer
*/
include_once 'assets/common/footer.inc.php';
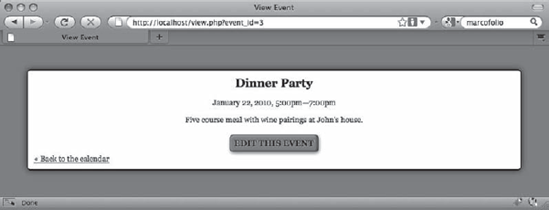
?>Save this file, then click an event to see the Edit button (see Figure 5-5).
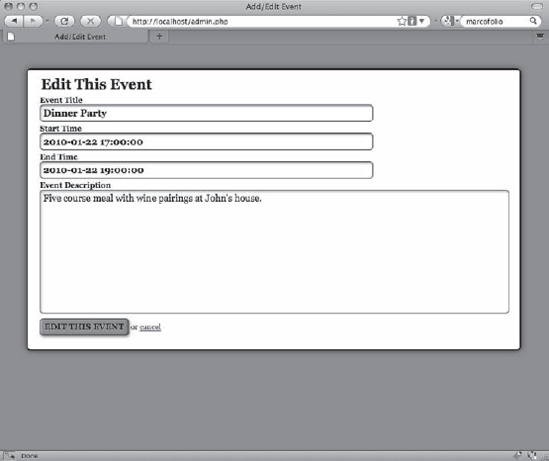
Clicking the Edit button will bring up the form on admin.php with all the event's data loaded in the form (see Figure 5-6).
The last step in creating the Calendar class is to allow authorized users to delete events. Event deletion is different from creating or editing events in that you want to confirm a user's intentions before deleting the event. Otherwise an accidental click could result in frustration and inconvenience for the user.
This means that you must implement the Delete button in two stages:
The Delete button is clicked, and the user is taken to a confirmation page.
The confirmation button is clicked, and the event is removed from the database.
To start, add a Delete button to the full view edit controls by modifying _adminEntryOptions() in the Calendar class with the code shown in bold:
/**
* Generates edit and delete options for a given event ID
*
* @param int $id the event ID to generate options for
* @return string the markup for the edit/delete options
*/
private function _adminEntryOptions($id)
{
return <<<ADMIN_OPTIONS
<div class="admin-options">
<form action="admin.php" method="post">
<p>
<input type="submit" name="edit_event"
value="Edit This Event" />
<input type="hidden" name="event_id"
value="$id" />
</p>
</form>
<form action="confirmdelete.php" method="post">
<p>
<input type="submit" name="delete_event"
value="Delete This Event" />
<input type="hidden" name="event_id"
value="$id" />
</p>
</form>
</div><!-- end .admin-options -->
ADMIN_OPTIONS;
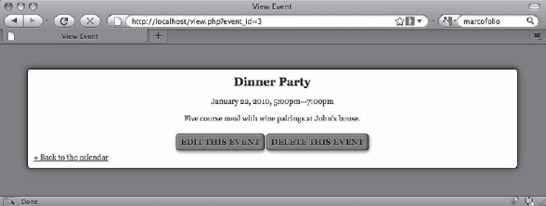
}This adds a button that sends the user to a yet-to-be-created confirmation page called confirmdelete.php, which you'll build later in this section. After saving the preceding changes, you will see both edit and delete options when viewing a full event description (see Figure 5-7).
When a user clicks the Delete button, he is sent to a confirmation page that contains a form to make sure he really wants to delete the event. That form will be generated by a new public method in the Calendar class called confirmDelete().
This method confirms that an event should be deleted by performing the following actions:
Checks if the confirmation form was submitted and a valid token was passed. If so, go to Step 2. If not, go to Step 3.
Checks whether the button clicked was the Confirmation button.
If so, it deletes the event.
If not, it sends the user back out to the main calendar view.
It loads the event data and displays the confirmation form.
You accomplish the preceding steps by adding the new method, shown in bold, to the Calendar class:
<?php

class Calendar extends DB_Connect
{

    private $_useDate;

    private $_m;

    private $_y;

    private $_daysInMonth;

    private $_startDay;
public function __construct($dbo=NULL, $useDate=NULL) {...}
public function buildCalendar() {...}
public function displayEvent($id) {...}
public function displayForm() {...}
public function processForm() {...}
/**
* Confirms that an event should be deleted and does so
*
* Upon clicking the button to delete an event, this
* generates a confirmation box. If the user confirms,
* this deletes the event from the database and sends the
* user back out to the main calendar view. If the user
* decides not to delete the event, they're sent back to
* the main calendar view without deleting anything.
*
* @param int $id the event ID
* @return mixed the form if confirming, void or error if deleting
*/
public function confirmDelete($id)
{
/*
* Make sure an ID was passed
*/
if ( empty($id) ) { return NULL; }
/*
* Make sure the ID is an integer
*/
$id = preg_replace('/[^0-9]/', '', $id);
/*
* If the confirmation form was submitted and the form
* has a valid token, check the form submission
*/
if ( isset($_POST['confirm_delete'])
&& $_POST['token']==$_SESSION['token'] )
{
/*
* If the deletion is confirmed, remove the event
* from the database
*/
if ( $_POST['confirm_delete']=="Yes, Delete It" )
{
$sql = "DELETE FROM `events`
WHERE `event_id`=:idLIMIT 1";try{$stmt = $this->db->prepare($sql);$stmt->bindParam(":id",$id,PDO::PARAM_INT);$stmt->execute();$stmt->closeCursor();header("Location: ./");return;}catch ( Exception $e ){return $e->getMessage();}}/** If not confirmed, sends the user to the main view*/else{header("Location: ./");return;}}/** If the confirmation form hasn't been submitted, display it*/$event = $this->_loadEventById($id);/** If no object is returned, return to the main view*/if ( !is_object($event) ) { header("Location: ./"); }return <<<CONFIRM_DELETE<form action="confirmdelete.php" method="post"><h2>Are you sure you want to delete "$event->title"?</h2><p>There is <strong>no undo</strong> if you continue.</p><p><input type="submit" name="confirm_delete"value="Yes, Delete It" /><input type="submit" name="confirm_delete"
value="Nope! Just Kidding!" /><input type="hidden" name="event_id"value="$event->id" /><input type="hidden" name="token"value="$_SESSION[token]" /></p></form>CONFIRM_DELETE;}private function _loadEventData($id=NULL) {...} private function _createEventObj() {...} private function _loadEventById($id) {...} private function _adminGeneralOptions() {...} private function _adminEntryOptions($id) {...} } ?>
In order to call the confirmDelete() method, the file confirmdelete.php needs to be created. This file will reside in the root level of the public folder (/public/confirmdelete.php), and it will be very similar to index.php. This file accomplishes the following tasks:
Ensures an event ID was passed and stored in the
$idvariable; sends the user to the main view otherwise.Loads the initialization file.
Creates a new instance of the
Calendarobject.Loads the return value of
confirmDelete()into a variable,$markup.Defines the
$page_titleand$css_filesvariables and includes the header.Outputs the data stored in
$markup.Outputs the footer.
Note
The reason you load the output of confirmDelete() into a variable before including the header is because the method sometimes uses header() to send the user elsewhere in the app; if the header file was included before calling confirmDelete(), the script would fail in certain cases because no data can be output to the browser before header() is called or a fatal error occurs. For more information on the header() function, visit http://php.net/header
Now add the following code inside confirmdelete.php:
<?php/** Make sure the event ID was passed*/if ( isset($_POST['event_id']) ){/** Collect the event ID from the URL string*/$id = (int) $_POST['event_id'];}else{/** Send the user to the main page if no ID is supplied*/header("Location: ./");exit;}/** Include necessary files*/include_once '../sys/core/init.inc.php';/** Load the calendar*/$cal = new Calendar($dbo);$markup = $cal->confirmDelete($id);/** Output the header*/$page_title = "View Event";$css_files = array("style.css", "admin.css");
include_once 'assets/common/header.inc.php';?><div id="content"><?php echo $markup; ?></div><!-- end #content --><?php/** Output the footer*/include_once 'assets/common/footer.inc.php';?>
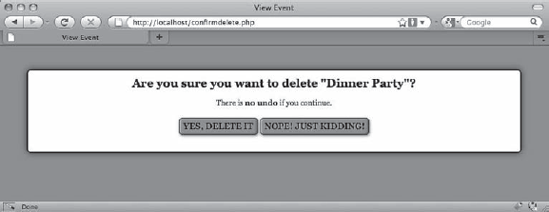
Save this file, then test the system by deleting the "Dinner Party" entry. After showing you the full event description, the calendar takes you to the confirmation form (see Figure 5-8).
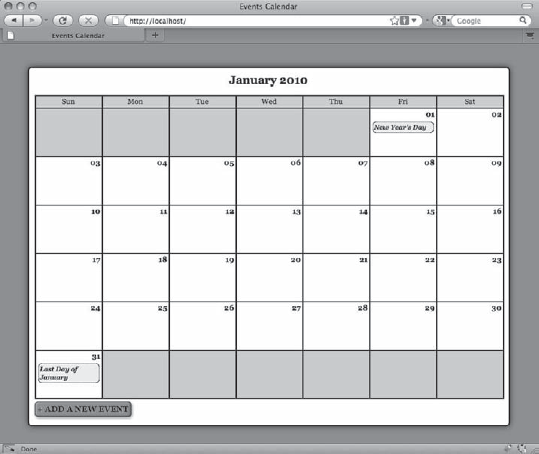
After clicking the Yes, Delete It button, the event is removed from the calendar (see Figure 5-9).
At this point, you have a fully functional events calendar. You've learned how to create a form to create, edit, save, and delete events, including how to confirm event deletion. However, the administrative controls are currently available to anyone who visits the site.
In the next chapter, you'll build a class to grant authorized users access to your site's administrative controls.