
Records Management in SharePoint 2010
Records management is about the policy for processing content and routing of documents and data in SharePoint. SharePoint 2007 introduced the Records Center, which was a site collection for centralized collection of documents and content routed based on policy. One of the many jobs of the Records Center is to manage the long-term archive of documents that become records in the Records Center.
SharePoint 2010 also includes the Records Center, with enhancements, but in addition, SharePoint now brings in-place records management. Owners of regular document libraries can now apply policy to their documents.
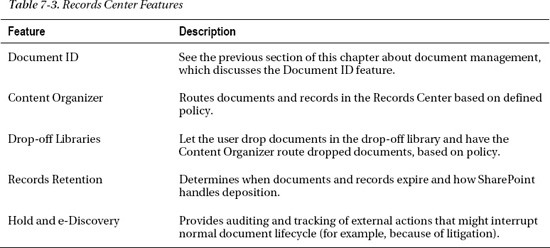
Table 7-3 lists some of the features included in the Records Center, which we discuss in this section of the chapter.
Before discussing records management further, I should mention that, like many of the areas in SharePoint 2010, records management and information policy are a huge topic, and so what you read here is simply an overview for administrative purposes. Without further delay, let us create a new Records Center site collection by following the steps below:
1. Open Central Admin.
2. Click the Create Site Collections link (under Application Management). If you need to create a new IIS web application, see Chapter 2 for details on performing this task.
3. Select the web application to create the new site collection.
4. Give the site collection a name (such as Records Center).
5. Populate the URL suffix, if not a root site collection.
6. In the Template Selection, click the Enterprise tab, and then select Records Center.
7. Provide user names for the administrators; then click OK.
8. Once it is complete, navigate to the new Records Center site collection (see Figure 7-14).
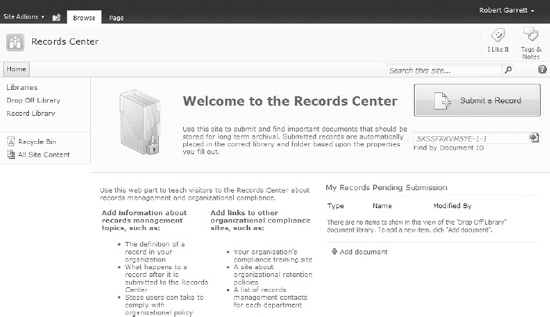
Figure 7-14. Records Center in SharePoint 2010
Setting Up the Content Organizer
The Content Organizer feature is responsible for routing documents, found in drop off libraries, to other areas in SharePoint. In the next section, we will configure the Records Center, which you created in the previous section. Before doing so, we need to configure the Content Organizer and send-to locations for document routing.
1. In the Records Center site collection, click the Site Actions menu.
2. Click the Site Settings menu item.
3. Click the Content Organizer Settings link, under the Site Administration heading. SharePoint shows a page like that in Figure 7-15.
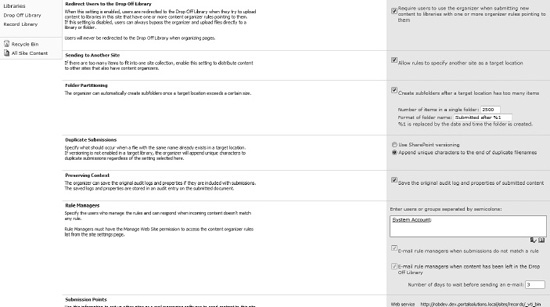
Figure 7-15. The Settings page for the Content Organizer
The Content Organizer Settings page provides the following settings:
- Redirect users to the Drop-off Library—Ensures that users cannot upload documents to document libraries that have content organizer rules. This forces the user to comply with using the drop-off library to route content, rather than decide manually.
- Sending to Another Site—Check this option if you would like to submit documents to another location. Check it for this exercise so you can try this capability later.
- Folder Partitioning—Ensures that target document libraries do not become too large.
- Duplicate Submissions—Tells the Content Organizer how to handle repeat submissions of the same document.
- Rule Managers—Specifies the users who can execute rules for incoming content.
- Submission Points—Provide points so that other sites can submit documents to this site collection.
Ordinarily, when configuring Content Organizer rules in a Records Center, you would likely want documents routed to a document or record library. For the purpose of demonstration, I am going to show you how to specify our Documents Center site collection as a destination location. Once it is configured, users can submit a record (document) and have the document routed to the Document Center.
4. Open Central Administration.
5. Click the General Application Settings link from the left navigation.
6. Click the Configure Send To Connections link, under External Service Connections.
7. Add a new connection to a documents library in the Document Center, such as http://www.server/sites/dms/_vti_bin/officialfile.asmx
![]() Note the URL
Note the URL http://server/sites/dms/_vti_bin/officialfile.asmx is specific to the structure of the target site.
8. Navigate to the Document Center site collection.
9. Navigate to the site that has the target location to route documents, in my case the root of the site collection.
10. Click the Site Actions menu, and then click the Site Settings menu item.
11. Under Site Actions, click the Manage Site Features link.
12. Activate the Content Organizer feature (if not already activated).
Setting up the Records Center
Assuming you followed the steps in the earlier section, you now have a new Records Center site collection. The following steps detail setting up the records center to accept documents as records.
1. Click the Site Actions menu.
2. Notice the new menu item Manage Records Center; click it.
The Manage Records Center page provides high-level steps for establishing tasks and file plans so the new Records Center may accept documents as records.
3. Click the Step1: Create Content Types link, and SharePoint navigates you to the site collection Content Type Gallery. Create content types for all documents you wish to store as records in the Records Center. Please review Chapter 6, on metadata, for steps to creating content types.
4. Navigate back to the management page from the Site Actions menu.
5. Click the Step2: Create Records Libraries link. SharePoint navigates you to a page to create new libraries.
6. Under Libraries, click Record Library. In the resulting page, give the new library a name and click the Create button.
![]() Note The Records Center has a default Record Library and Drop-Off library.
Note The Records Center has a default Record Library and Drop-Off library.
7. Navigate back to the management page from the Site Actions menu.
8. Click the Step3: Create Content Organizer Rules link.
SharePoint navigates you to a list of rules. Each contains a list item based on the Rule content type. Let us take this opportunity to create a new rule.
9. Click the Add New Item link.
10. Give the rule a name, and make sure the rule is active.
11. Choose the content type; rules apply to documents added to the records list with designated content type. In this case, choose the default Document content type.
12. Add any conditions, based on the properties of the content type, name, or title.
13. Specify the target location for the document. I chose the Documents library in my Document Center site—shown in the drop-down, if you completed the steps in the previous section.
14. Click OK.
15. At this stage, we have a Content Organizer rule to route all documents submitted to the Drop-off library to the Document Center Drop-off library. We now need a similar Content Organizer rule to route documents in the Document Center.
16. Head over to the Document Center.
17. Click the Site Actions menu and click the Site Settings menu item.
18. Click the Content Organizer Rules link, under Site Administration.
19. Repeat the earlier steps to create a new rule to route documents from the Document Center Drop-off library to the Documents library.
This procedure is a lot to digest, so allow me to recap. We provisioned a new Records Center site collection, set up the Content Organizer to allow routing of documents to our Document Center site collection, and created a rule to route documents with content type Document in both the Records Center and the Document Center.
Assuming all is well, we can now click the Submit a Record button, on the home page of the Records Center, specify a document, and see the document route to the Document Center.
20. Click the Submit a Record button on the home page of the Records Center. This effectively is the same process as dropping a document in the Drop-off library in the Records Center.
21. Choose a document from your computer.
22. Click OK.
23. SharePoint shows a dialog to provide a title and confirm the file name.
24. Click the Submit button.
25. SharePoint pauses to think and then shows a dialog with status. If all worked, then the status indicates that the Content Organizer routed your document to the Drop-off library in the Document Center.
26. Head over to the Document Center Drop-off library, and notice that it is empty; this is because the Content Organizer rule in the Document Center routed the document to the Documents Library. The net effect here is that the document passed from Record Center Drop-Off Library, to Document Center Drop-Off Library, and then to a final document library in the Document Center.
Hold and e-Discovery
Any organization that maintains a large enough collection of documents, and defines policy that warrants the use of Records Management, may need to locate documents and put policy on hold. One common example in US business is that of litigation—when a court wants to review an organization's documents, the organization may want to isolate documents from typical routing, and retention polices—this is where the Hold and e-Discovery feature of SharePoint 2010 comes in handy.
The Hold and e-Discovery feature activates for each site in a site collection and is enabled by default in Records Center site. To verify that you have this feature enabled, follow the steps below:
1. Click the Site Actions menu for the site.
2. Select the Site Settings menu item.
3. Under the Site Actions heading, click the Manage Site Features link.
4. Scroll down the features and see if the Hold and e-Discovery feature activated.
5. Head back to the Site Settings page, and look for the Hold and e-Discovery heading.
At this stage, we have enabled the Hold and e-Discovery feature for the current site; the following steps detail how to make use of this feature to hold documents in the site. Before proceeding with the steps, upload a number of documents to the Records Library in the Records Center (which we are using for this demonstration).
6. From the Site Settings page, under Hold and e-Discovery click the Discover and Hold Content link.
7. Select the site to search for documents to hold.
8. Provide search terms to search for documents to hold, click the Preview Results button.
9. Choose to hold locally or export and then hold. Local hold consists of locking the record in the current place, whereas export and hold involves copying the content to another location (such as a records repository) and then holding.
10. Select or create a hold for all the documents in the result set.
11. Click the Add Results to Hold button to hold documents in the result set.
You may also hold documents directly from the Record/Document library, as follows:
1. Navigate to the Records library in the Records Center.
2. Upload a document.
3. Hover over the name of the document, and click on the drop-down arrow.
4. Click the Compliance Details link from the ECB.
5. Click the Add/Remove from Hold link.
6. You may add or remove the document from hold, using the resulting screen.
The following steps demonstrate how to create a hold, which you may then apply to a document in the preceding steps:
1. Navigate to the Site Settings for the Records Center.
2. Click the Holds link under the Holds and e-Discovery header.
3. Click the Add New Item link to add a new hold.
4. A hold consists of a Title, Description, and Manager of the hold; define these in the dialog that appears.
Records Retention
Records Retention and Deposition is the process of managing the lifecycle of a document, from inception to deprecation. SharePoint 2010 handles document retention by default at the content type level, but it also permits retention schedules at the library and folder level. The following steps detail how to set up Records Retention on a document library in the Records Center.
1. From the root of the Records Center site collection, click the Site Actions menu.
2. Select the Site Settings menu item.
3. From the Site Settings page, click the Site Content Types link under Galleries.
4. Click the content type name to add a retention schedule; I chose the Document content type.
5. Click the Information Management Policy Settings link.
6. Check the Enable Retention checkbox (wait for the page to post back).
7. You may establish retention policy on documents as records, and non-records.
8. Leave the default for non-records as not to expire (this exercise demonstrates retention stages in records).
9. Change the setting for Records to Define Different Retention Stages for Records.
10. Click the Add a Retention Stage for Records link; see Figure 7-16 for the resulting dialog.
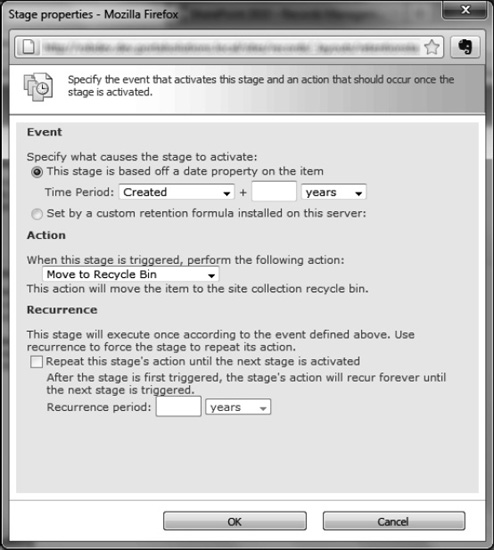
Figure 7-16. The Add retention stage for a record
11. In this dialog, set the time period and action.
12. Click OK to save the stage.
13. You may create additional stages for different periods and set the action to move to the next step.
![]() Note You can only set a custom retention formula from custom code.
Note You can only set a custom retention formula from custom code.
14. Click t OK at the end of the Information management policy settings page to save the new policy.
We have now created a retention policy for all documents that use the Document content type. Continue the steps to assign a retention policy to the Records library in the Records center (applicable to any document library).
15. Navigate to the Records document library in the Records Center.
16. Click the Library tab in the Ribbon, and then click the Library Settings icon from the Ribbon.
17. Click the Information Management Policy Settings link.
SharePoint displays a page with a list of content types and current policies defined for each (if any).
18. Click the Change Source link.
19. Change the radio button to the Library and Folders setting.
20. SharePoint displays a quick warning about overriding the policy of content types.
21. Click the Add a Retention Stage for Records link. (The link is Add a Retention Stage when working with document libraries).
22. Repeat steps 11–23 to add more retention stages.
In-Place Records Management
New to SharePoint 2010 is the ability to define documents as records in regular document libraries. SharePoint previously required you to move documents to a Records Center, with a Records Library to use records retention and policies (different from those defined for documents). The setting to enable automatic or manual record creation exists at the site collection level. Individual document libraries may override the site collection setting.
1. From the root of the site collection, click the Site Action menu, and then click the Site Settings menu item.
2. Click the Site Collection Features link, under the Site Collection Administration heading.
3. Ensure that the In Place Records Management feature is activated.
4. Navigate back to the Site Settings page.
5. Click the Record Declaration Settings link, under Site Collection Administration, to display the window shown in Figure 7-17. This page defines settings for the edit/delete restrictions once a document becomes a record, whether in place records management available globally in the site collection, and the user roles that may turn a document into a record and back again.
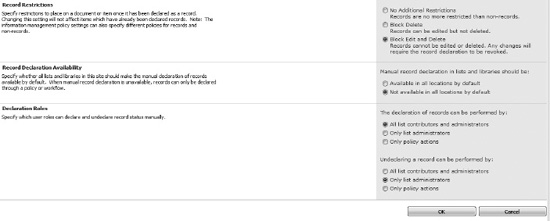
Figure 7-17. Records declaration settings
6. Navigate to the document library in the site collection, in my case the Documents library in my Document Center site collection.
7. Click the Library tab on the Ribbon, and then click the Library Settings icon from the Ribbon.
8. Click the Record Declaration Settings link.
9. In the next page, you may override the setting at that site collection level to enable/disable in place records management. You may also check the setting so that all documents added to the library become records.
10. Enable manual declaration of records for the document library.
11. Navigate to the default view page of the document library.
12. Select one or many documents in the view, and then click the Documents tab in the Ribbon.
13. Check out the document, and then click the Declare Record icon in the Ribbon.
The document icon now has a padlock, meaning that SharePoint has protected the document as a record, which now subscribes to all record retention policies and stages. How to undeclared the document as a record (assuming you have rights)?
14. Select the document in the view.
15. Click the drop-down arrow and click the Compliance Details link from the ECB.
16. Click the Undeclared Record link.
Auditing
SharePoint 2010 provides basic auditing for events in a list or document library. Similar to the way we configured barcodes in a document library, a list owner may configure auditing at the content type level.
1. Navigate to the List/Library Settings page.
2. Click the Information Management Policy Settings link.
3. Click the content type in the list to audit.
4. Change the setting to Define a Policy (unless one already exists in the site collection, in which choose the last option and select the policy).
5. In the next page, give the policy a name and policy description.
6. Check the Enable Auditing checkbox.
7. Select your choice from the available events to audit and Click OK to save the policy.
8. To view audit reports, navigate to the site collection Site Settings page.
9. Click the Audit Log Reports link.