
Office Web Applications
Office Web Applications (Office Web Apps) are web-browser based applications that enable users to edit Word, Excel, PowerPoint, and OneNote files without needing Microsoft Office applications installed on client machines. The Windows Live service provides an Office Web Apps service for personal users and consumers, and enterprise organizations may install Office Web Apps within the SharePoint 2010 infrastructure, which is what I shall discuss in this chapter.
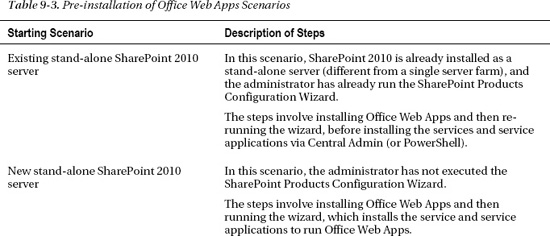
Unlike most of the features and service components of SharePoint 2010, Office Web Apps is installed using a separate installation package, which is available from the Microsoft Volume License Center. To make life a little more complicated, Office Web Apps requires different steps to install, depending on the following scenarios in Table 9-3.
Administrators may install Office Web Apps with both SharePoint 2010 Foundation and Server.

Installing Office Web Apps on an Existing Stand-Alone SharePoint 2010 Server
In this scenario, you have SharePoint 2010 installed in stand-alone mode, and thus the SharePoint Products Configuration Wizard already executed. Execute the following steps as a local administrator on the stand-alone SharePoint 2010 server.
- Run the setup.exe application in the Office Web Apps installation folder.
- Provide your product key and then click the Continue button.
- Specify the installation location (or leave the default), and then click the Install button.
- At the end of the installation, make sure the checkbox for Run the SharePoint Products Configuration Wizard Now is checked.
- Click the Close button and the wizard starts.
- If you forgot to check the check box to run the wizard, you may run the wizard from Start All Programs Microsoft SharePoint 2010 Products.
- On the Welcome to SharePoint page, click the Next button.
- The wizard will ask you about restarting services, click the Yes button.
- When the wizard ends with a successful message, click the Finish button.
At this point, you installed everything and you now must start the necessary services and install the service applications for Office Web Apps to work.
- Open Central Admin.
- Click the Manage Services On Server link under the System Settings heading.
- Start the following services:
Excel Calculation Services
Word Viewing Service
- Navigate back to the home page of Central Admin.
- Click the Manage Service Applications link, under the Application Management heading.
- Click the New icon on the Ribbon and select the PowerPoint Service Application.
- Provide a name, description, and application pool, and then click the OK button.
- Click the New icon on the Ribbon and select the Word Viewing Service Application.
- Provide a name, description, and application pool, and then click the OK button.
- Click the New icon on the Ribbon and select the Excel Services Application.
- Provide a name, description, and application pool, and then click OK.
At this point, you may activate the feature in your site collection to enable Office Web Apps for documents in your site hierarchy.
- Navigate to your root SharePoint 2010 site collection.
- Click the Site Actions menu.
- Select the Site Settings menu item.
- Click the Site collection Features link, under the Site Collection Administration heading.
- Scroll to the Office Web Apps feature and click the Activate button.
Installing Office Web Apps on a New Stand-alone SharePoint 2010 Server
In this scenario, you have not configured the stand-alone server via the SharePoint Products Configuration Wizard. The following steps detail installing Office Web Apps in this scenario as an administrator.
- Run the setup.exe application in the Office Web Apps installation folder.
- Provide your product key and then click the Continue button.
- Specify the installation location (or leave the default), and then click the Install button.
- At the end of the installation, make sure the checkbox for Run the SharePoint Products Configuration Wizard Now is checked.
- Click the Close button and the wizard starts.
- If you forgot to check the check box to run the wizard, you may run the wizard from Start All Programs Microsoft SharePoint 2010 Products.
- On the Welcome to SharePoint page, click the Next button.
- The wizard will ask you about restarting services; click the Yes button.
- When the wizard ends with a successful message, click the Finish button. Your browser opens to the site collection template selection page.
- Click the preferred site template and customize the site using the Solutions Gallery section.
- Click the OK button.
- Set up the groups for your new site collection and then click OK to complete the installation.
Installing Office Web Apps into an Existing SharePoint 2010 Server Farm
A SharePoint 2010 server farm typically consists of multiple servers, but at the very least assumes separate installation of SQL Server (which can be on the same server as SharePoint 2010, but that is not recommended). This type of setup is different from the stand-alone setup where the SharePoint 2010 installer installs its own instance of SQL Server Express and preconfigures services and service applications. Similar to the main SharePoint 2010 install, Office Web Apps requires different steps to install in an existing server farm, where the administrator has already executed the SharePoint Products Configuration Wizard.
- Run the setup.exe application in the Office Web Apps installation folder.
- Provide your product key and then click Continue.
- Specify the installation location (or leave the default), and then click Install.
- At the end of the installation, make sure the checkbox for Run the SharePoint Products Configuration Wizard Now is checked.
- Click the Close button and the wizard starts.
- Repeat the above steps for all SharePoint servers in the farm (not the SQL Server if a separate server).
- If you forgot to check the check box to run the wizard, you may run the wizard from Start All Programs Microsoft SharePoint 2010 Products.
- On the Welcome to SharePoint page, click the Next button.
- The wizard will ask you about restarting services; click Yes.
- When the wizard ends with a successful message, click the Finish button.
- On the Configure your SharePoint farm page, click No, I Will Configure Everything Myself to cancel.
At this point, you have installed everything and you now must start the necessary services and install the service applications for Office Web Apps to work.
- Navigate to the home page of Central Admin.
- Click the Manage Services on Server link under the System Settings heading.
- Start the following services:
• Excel Calculation Services
• PowerPoint Service
• Word Viewing Service
- Navigate back to the home page of Central Admin.
- Click the Manage Service Applications link, under the Application Management heading.
- Click the New icon on the Ribbon and select the PowerPoint Service Application.
- Provide a name, description, and application pool, and then click OK.
- Click the New icon on the Ribbon and select the Word Viewing Service Application.
- Provide a name, description, and application pool, and then click OK.
- Click the New icon on the Ribbon and select the Excel Services Application.
- Provide a name, description, and application pool, and then click OK.
At this point, you may activate the feature in your site collection to enable Office Web Apps for documents in your site hierarchy.
- Navigate to your root SharePoint 2010 site collection.
- Click the Site Actions menu.
- Select the Site Settings menu item.
- Click the Site Collection Features link, under the Site Collection Administration heading.
- Scroll to the Office Web Apps feature and click the Activate button.
Installing Office Web Apps into a New SharePoint 2010 Server Farm
In this scenario, I assume that you have yet to install or configure SharePoint 2010 as a new farm. The following steps may appear misleading because we start with an Office Web Apps binary install, regardless of whether you ever installed any SharePoint 2010 binaries. Do not worry; this is correct.
![]() Note Some of the steps in the installation and SharePoint Products Configuration Wizard mirror those discussed in Chapter 2.
Note Some of the steps in the installation and SharePoint Products Configuration Wizard mirror those discussed in Chapter 2.
- Run the
setup.exeapplication in the Office Web Apps installation folder.- Provide your product key and then click the Continue button.
- Specify the installation location (or leave the default), and then click the Install button.
- At the end of the installation, make sure the checkbox for Run the SharePoint Products Configuration Wizard Now is checked.
- Click the Close button, and the wizard starts.
- Repeat the above steps for all SharePoint servers in the farm (not the SQL Server if a separate server).
- If you forgot to check the check box to run the wizard, you may run the wizard from Start All Programs Microsoft SharePoint 2010 Products.
- On the Welcome to SharePoint page, click the Next button.
- The wizard will ask you about restarting services; click Yes.
- On the following pages, either create a new farm or connect to an existing farm by providing connection settings for your SQL server.
- Provide a passphrase for the farm.
- Provide details for configuring a default web application (typically NTLM authentication and an application on port 80).
- On the summary page, if this is the first server in the farm, click the Next button. If not, and you want to host Central Admin on the current server, click Advanced Settings and then click Use This Machine to Host the Web Site.
Note Make sure you have installed Office Web Apps and executed the SharePoint Products Configuration Wizard on ALL servers in the farm, before running the farm wizard.
- Open Central Admin.
- Run the Farm Configuration wizard.