
Business Connectivity Services
Business Connectivity Services replaces the legacy Business Data Catalog from SharePoint 2007. BCS allows administrators to configure external data sources or Line of Business data connectors from almost any source outside SharePoint 2010. BCS then allows users of SharePoint to interact with external data via external content lists, which for all intended purposes look and behave just like any other SharePoint list, from the end-user standpoint. This new capability is a major improvement over the BDC approach of complicated web parts to render external data.
BCS components are packaged with SharePoint 2010 Foundation and allow administrators to configure external content types (ECTs) when referencing external data types. These ECTs then shape the data exposed to users via external data lists. Administrators and developers may define ECTs via SharePoint Designer or Visual Studio 2010. By writing them in code, developers have almost limitless capability in exposing external data in SharePoint as long as they can query the external data source via some form of code API.
The following list is an overview of some of the enhancements that BCS brings to the table in SharePoint 2010:
- True integration: Users view all external data like SharePoint. SharePoint abstracts the end user from the external data.
- Read/Write: Whereas BDC only allowed read-only view of data, BCS allows write-back. Users can make changes to data in external data lists, and BCS will update the external data source.
- Office Application Integration: Since external data is surfaced via SharePoint lists, any Office application that understands SharePoint list technology may query the external data. Developers may access external data via the same API they would use to open any standard list in SharePoint.
- Offline Data: BCS caches data in SharePoint, so if the external data source goes offline, as soon as it is back online any changes sync back to the source.
- Support for BLOBs: Unlike BDC, BCS supports source content in the form of Binary Objects (BLOBs).
- Extensive security control: BCS provides greater security over data pulled into SharePoint, as well as the various authentication methods required to access external data sources.
Although BCS integrates in the core platform of SharePoint 2010 Foundation, some of the inherent features built atop of BCS are only available in SharePoint Server 2010, as listed in Table 8-4.


BCS Service Installation
Like most architecture components in SharePoint 2010, BCS operates as a service application. In the full server version of SharePoint 2010, BCS makes use of the Secure Store Service. I explained how to install the SSS earlier in this chapter, as part of the PerformancePoint Server installation. The following steps demonstrate how to create a new BCS service application (assuming it is not already installed and operational).
- Open Central Admin.
- Click the Manage Services On Server link, under the System Settings heading.
- Make sure the Business Data Connectivity Service is started on your application server.
- Navigate back to the Central Admin home page.
- Click the Manage Service Applications link, under the Application Management heading.
- Scroll down the list to verify that no BCS application exists.
- Click the New icon in the Ribbon.
- Choose the Business Data Connectivity Service menu item.
- In the dialog that appears, provide a name for the new BCS service application.
- Provide the SQL server name and the name of the BCS database.
- Provide a new application pool for the BCS application.
- Click the OK button to create the service application.
- After SharePoint tells you that the service application was created without problem, click the OK button to close the dialog.
- Click to the right of the name of the new BCS service application, and then click the Manage icon from the Ribbon.
- Confirm that BCS shows a page of empty connections and a search box (Figure 8-13).

Figure 8-13. The Manage page for BCS
With the BCS service application and the Secure Store Service configured, the next sections take you on a tour of configuring external content within SharePoint 2010, starting with defining an external content type (ECT).
Creating an External Content Type
In this section, I will demonstrate defining an external content type (ECT), using SharePoint Designer 2010. Developers may create ECTs in code, using Visual Studio 2010. Since this is an administration book, I will leave the development aspect to a book on SharePoint 2010 development.
Before we start, ensure that you have a copy of SharePoint 2010 installed on either the application server of your farm or a computer that can access your SharePoint 2010 farm and your SQL Server. Also, install the Adventure Works databases—details at the following link: http://msftdbprodsamples.codeplex.com/
- Open SharePoint Designer 2010 (SPD).
- Open the SharePoint 2010 site collection (click the Open Site button and supply the site URL), where we are going to create an external content type.
- From the left Navigation pane, under Site Objects, click the External Content Types item.
- SPD will show any ECTs defined for your site in the right main pane.
- In the New group of the Ribbon, click the External Content Type icon.
- SPD shows a page like that in Figure 8-14, in the main pane that allows you to configure your ECT.

Figure 8-14. Configuring an ECT in SharePoint Designer
- Click the New External Content Type name to change the name.
- Click the Click Here to Discover External Data Sources and Define Operations link to open the Operation Designer.
- Click the Add Connection button to create a new connection to our external data source. In the External Data Source Type popup, select SQL Server. Notice that you can connect using a defined .NET connector or WCF service also.
- Provide the name of your SQL Server and the name of the AdventureWorks database, and then decide on the security type (I chose the User Identity for this demonstration):
- User's Identity: Connect to the data source as the user in context, accessing the external data source from SharePoint (pass-through)
- Impersonated Windows Identity: The identity of another windows user; provide the Secure Store ID of the Windows user.
- Impersonated Custom Identity: Provide the Secure Store ID of the custom user.
- Expand the connection to show Tables, Views, and Routines; then expand Tables and right-click one of the tables we will use to create our ECT; I chose the Employee table.
- You have the option of the various CRUD (Create, Read, Update, and Delete) operations you can create on the data source; I chose to create all operations.
- A dialog opens; click the Next button, and then select the columns for the ECT (see Figure 8-15).
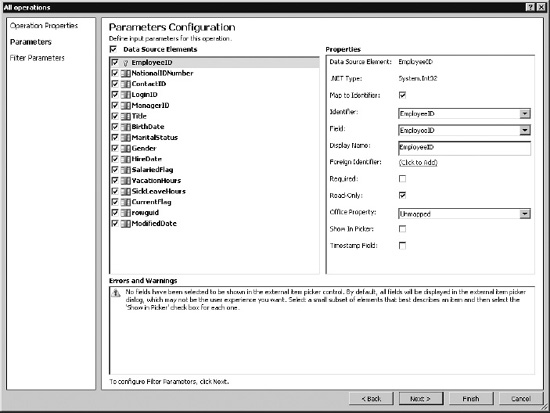
Figure 8-15: Choose fields for the ECT from the Data Source.
- Click the Next button. In the next dialog you may supply data filters, demonstrated in the following steps.
- Click the Add Filter Parameter button.
- Change the Data Source Element to VacationHours (or your choice of field to filter).
- Click the Click to Add link, and give the filter a name.
- Leave the default values for the operator, and click OK.
- Provide the Default Value as 0; my filter will list all employees that have not taken any vacation.
We will now add a row limit—a good idea for read operations:
- Click the Add Filter Parameter button.
- Click the Click to Add link, and give the filter a name.
- Change the Filter Type to Limit, and click OK.
- Provide the Default Value as 500.
- Click the Finish button when done.
SPD updates the External Content Type page to appear as in Figure 8-16.
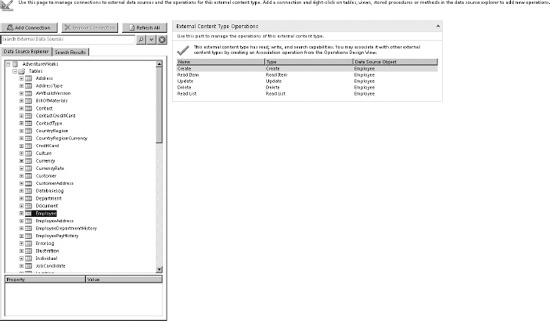
Figure 8-16. Updated External Content Type page in SPD
- Click the Save icon (the floppy disk) on the very top title bar of SPD, to save our ECT to the site.
- Open Central Admin.
- Click the Manage Service Applications link, under Application Management heading.
- Scroll to the BCS application, click to the right of the title, and then click the Manage icon from the Ribbon to see the BCS Management page.
- You should see your new ECT in the list; click the name to view its details (see Figure 8-17).
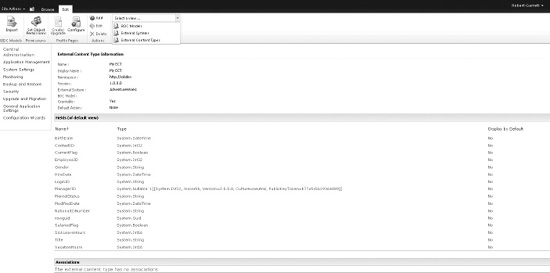
- Ensure that the page has the Edit tab selected, and then select BDC Metadata from the View drop-down box.
SharePoint 2010 and BCS has done all the heavy lifting and created a BDC XML model, which administrators had to create by hand in SharePoint 2007.
- Click the BDC model drop-down (if you have more than one, find the model for the ECT you just created).
- Choose the Export BDC Model menu item.
- Leave the options on the next page at their defaults, click the Export button, and save the file.
- Open the file in Notepad—it's an XML file—to view.
In the next section of this chapter, I will demonstrate how to create an external list, using the ECT, we just created.
Creating an External List
If you followed the steps in the previous section, you should have an external content type, pointing to a table in the Adventure Works database in your SQL Server. I created an ECT called “My CT” and configured it around the Employee table. In that procedure, I also added a row limit filter of 500 items and a filter to select only employees with zero vacation hours. With our ECT configured, I will now demonstrate how to create an external list, so that users may interact with the Adventure Works data from the SharePoint UI.
- Navigate to the SharePoint site collection to host the external list.
- Click the Site Actions button, and then choose View All Site Content.
- Click the Create button. SharePoint launches a dialog to create new content.
- Filter by List and Data, and then choose an External List.
- Click the Create button.
- Give your external list a name and description.
- In the Data Source Configuration section, click the far right icon to choose an ECT. In the dialog that appears, click the ECT we created in the previous section, and then click OK.
- Click the Create button.
SharePoint 2010 shows you the page of the External List with data populated from the external table in SQL, as in Figure 8-18.
- If you instead see Access Denied, then you may need to grant permissions to your current user to the ECT. See the following steps: Open Central Admin.
- Click the Manage Service Applications link, under Application Management.
- Scroll to the BCS application, click to the right of the title, and then click the Manage icon from the Ribbon to see the BCS Management page.
- Find the ECT, click drop-down and select the Set Permissions menu item.
- In the dialog that appears, give the user or group of users permissions to the ECT.

Figure 8-18. An external list
In Figure 8-18, you can see that the list looks identical to any other list in SharePoint. Try changing some of the data values in the list and adding new list items. Then head over to SQL Server to see the changes reflected in the database.