
C H A P T E R 12
Automating with Workflows
SharePoint Server 2010 contains a powerful workflow engine based on the .NET Framework's Workflow Foundation. Using SharePoint Designer, you can leverage this engine to automate many business processes quickly and easily.
In this chapter, you will explore the concepts and tools used to build and customize workflows in SharePoint Designer 2010. You will begin with the basic ideas behind the workflow engine. Then, you will learn about the components that are available to create new workflows. Finally, you will go through a series of exercises designed to touch on the most important use cases, where workflows can add value to a SharePoint solution.
You will learn about the following topics in this chapter:
- Using the concepts and building blocks available within SharePoint Designer to automate processes with workflows
- Using mechanisms to control security in workflows
- Understanding the collection and storage of data within a workflow instance
- Creating flexible, reusable workflow definitions
- Customizing the built-in workflows that come with SharePoint Server 2010
- Customizing the end-user experience by using InfoPath forms
- Creating all-new workflows with SharePoint Designer
- Automating SharePoint maintenance with site workflows
Introduction to Workflow
With version 3.0 of the .NET Framework, Microsoft introduced a standard infrastructure for creating and hosting custom business processes called the Windows Workflow Foundation (WF). WF is a set of libraries that contain a complete in-process workflow engine and associated classes. The workflow engine manages the instances of a workflow that are running within the process.
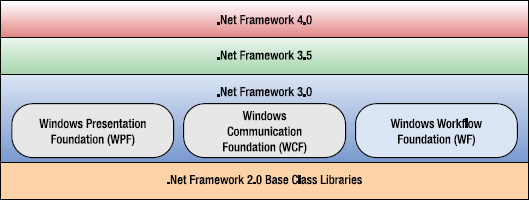
Figure 12-1. Windows Workflow Foundation in the .NET stack
Although the engine is designed to be hosted within any .NET application, SharePoint Server 2010 provides a wide variety of tools for designing, deploying, and managing workflows within a SharePoint server farm. Workflows are defined by using a designer, typically either SharePoint Designer 2010 or Visual Studio 2010. The workflow definition is then deployed to the SharePoint environment and associated with a list, a content type, or a site. An instance of the workflow may be started based on the creation of a document, a manual action, or the action of a program.
A workflow running in SharePoint has access to many of SharePoint's resources and can perform actions such as checking files in and out, creating or moving list items, setting item permissions, and so on. The most common actions taken by workflows are to send e-mail notifications and to assign tasks to users. SharePoint maintains the state of the workflows and provides the interface for managing instances. SharePoint also maintains a detailed log of all workflow actions and results.
As stated earlier, the tools most commonly used to create workflows in SharePoint are SharePoint Designer and Visual Studio. SharePoint Designer places certain restrictions on the types of workflows that can be created. For example, SharePoint Designer does not support custom .NET code, looping constructs, or state machine workflows. Even so, most common business processes can be modeled very well with the workflow features that are available in SharePoint Designer. Those that cannot are generally complex enough that a development team should be engaged to create the best implementation possible. These highly customized workflows should be created through a development tool such as Visual Studio. This chapter focuses on the features available to site designers and power users in SharePoint Designer.
As with other aspects of SharePoint Server, workflow could easily fill its own book, or several of them. To get a more in-depth look at workflow development, see Beginning WF: Windows Workflow in .NET 4.0 by Mark Collins (Apress, 2009) and Pro WF: Windows Workflow in .NET 4.0 by Bruce Bukovics (Apress, 2010).
What's New in SharePoint Designer 2010 Workflows?
In SharePoint Designer 2007, the scenarios available to workflow developers were limited by several barriers that have been removed in SharePoint Designer 2010. It is now much easier to create and deploy a wider variety of workflows from entirely within SharePoint Designer. There is far less need to abandon designer-based workflows in favor of Visual Studio. The introduction of the Ribbon menu and improvements to the designer interface have made SharePoint Designer a more productive workflow design environment as well.
Here is a list of some of the more important changes that have been made in the latest release:
- More-flexible workflow definitions
- Reusable workflows are associated with a content type instead of a specific list.
- Site workflows are associated with a site and not a specific list or item in a list.
- SharePoint's out-of-the-box workflows can now be customized by using SharePoint Designer.
- Association columns can be defined in a workflow and are automatically added to a list that uses the workflow.
- Solution files (WSP) can be generated by exporting a workflow through SharePoint Designer. These can then be imported into another farm.
- InfoPath forms are generated by SharePoint Designer for association, initiation, and task forms. These forms can be customized by using InfoPath Designer.
- Workflow step and action improvements
- Parallel blocks allow the workflow designer to create multiple simultaneous paths through the workflow instead of all steps occurring in a strict sequence.
- Nested steps allow for more-sophisticated workflow structures.
- Document set actions can be used to control a document set and the documents within it as a unit.
- Impersonation steps enable workflows to manage security permissions on list items by using the credentials of the workflow author instead of the user who started the workflow.
- Set Workflow Status is a new action that allows the workflow designer to set an arbitrary status string for the workflow.
- The Task Process action supports the creation of complex task sequences with rules for completing and continuing a series of tasks within a workflow.
- Start Approval Process and Start Feedback Process are customized instances of the Task Process action that implement the standard approval and feedback workflows. These actions allow the default workflows to be customized.
- Improved workflow visualization
Microsoft Visio 2010 can now be used to create the overall structure of a workflow. That structure can then be imported into SharePoint Designer for implementation.
The Workflow Status page can contain a visual representation of the current state of a running workflow in a Visio diagram embedded in the page.
Workflow Concepts
In this section, you will explore the concepts on which SharePoint workflows are built. You will start by looking the security context of your workflows. Then you will look at the different types of workflows that SharePoint can host. A workflow instance contains various data elements and often has forms associated with it that provide an interface for data entry. Finally, you will learn about the tools available to create and customize workflow definitions, with an emphasis on choosing the right tool for the job.
Security
When a user starts a workflow instance, either intentionally or as a side effect to some other action, that instance will execute using that user's credentials. Even if the workflow continues to run long after the user has left the site, the workflow engine will still use those credentials. Any permissions (such as file or list item access rights) associated with the initiating user will be applied to the instance when it is running.
This security context has often proven too restrictive for some proposed workflow designs. For example, say a user creates a vacation request and saves it in a document library. As a result, an approval workflow is started. Once the request is approved, you want to move it into a protected archive for approved requests. Because the user who initiated the workflow doesn't have access to the protected archive, the workflow can't move the request into it.
One of the most important workflow improvements in SharePoint 2010 was created specifically to deal with this type of situation. A new type of workflow step, called an impersonation step, can be added to a workflow just like any other step. The difference is that the security context for the impersonation step is not that of the initiating user but of the workflow's author. The workflow's author is generally the user who last updated the workflow's definition. That user can be given the necessary permissions to perform the needed actions that the initiator may lack.
An impersonation step can contain conditions and actions like any other step, but the following set of actions can appear only within an impersonation step:
- Add List Item Permissions
- Remove List Item Permissions
- Replace List Item Permissions
- Inherit List Item Parent Permissions
These actions are designed to provide the workflow designer with greater flexibility when working with items and document permission settings. This enables SharePoint Designer to create workflows that have far more sophisticated security requirements.
Types of Workflows
One of the most common reasons for not using SharePoint Designer 2007 for building workflows had to do with way designer workflows were associated with lists. When designing a workflow, the user had to identify the one unique SharePoint list with which the workflow was to be associated. This was useful in that it gave the workflow access to all of the fields associated with the list, but it made it impossible to reuse workflow definitions between lists. Creating a list-independent workflow definition required Visual Studio.
In SharePoint Designer 2010, the site designer can create a list workflow as described in the preceding paragraph or a reusable workflow that is not tied to a specific list. Instead, a reusable workflow is designed using a SharePoint content type. The content type acts as a template for the eventual list item that will be associated with an instance of the workflow. Because content types inherit from one another, a workflow designed for one content type can also be used for any content type that is derived from it. Because all list and library items in SharePoint ultimately derive from the Item content type (called All in the SharePoint Designer interface), a workflow designed against that type can be used with any list or library item.
Reusable workflows can also be configured as part of the content type's definition. Whenever the content type is used in a SharePoint list, the workflow is automatically configured. This is a powerful means of standardizing processes across your SharePoint farm, because content types can also be shared between site collections in SharePoint Server 2010.
Another useful new type of workflow in SharePoint 2010 is the site workflow. In SharePoint 2007, all workflows had to be associated with a list or library item. What if the workflow process you are automating doesn't naturally correspond to a single content item in the site? In the previous release of SharePoint, this meant that a document or list item had to be created just to allow the execution of a workflow.
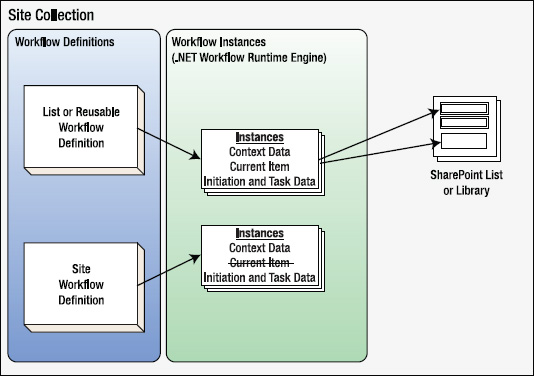
Figure 12-2. Workflow instances in SharePoint
A site workflow definition runs at the site level, so it has no current item associated with it. However, a site workflow is a normal workflow in most other respects. It can create list items, check files in or out, send e-mails, and take any other action that does not require an associated list item.
![]() Tip The actions that operate against the current workflow item, and are therefore not usable in a site workflow, often have Current Item in their name.
Tip The actions that operate against the current workflow item, and are therefore not usable in a site workflow, often have Current Item in their name.
Workflow Context Data
A workflow instance stores data that controls the processing of the workflow. There are several classifications of this data, depending on how it came to be associated with the workflow. Together, the data and status information for a workflow instance is referred to as its context. Most actions within a workflow have parameters that can be set by using values from the workflow context.
The workflow context contains status values related to the running of the instance. These include the current status of the workflow, when the workflow was started, and which user initiated the workflow. These values are set automatically by the workflow engine and can be used throughout the workflow.
Workflow parameters are data elements that are declared in the workflow definition and are passed into the workflow at startup. Parameters can be defined to receive their value at association or initiation. Association refers to the point in time when the workflow definition is associated with a SharePoint list. Association parameters can be thought of as configuration values for a workflow. Initiation parameters are set when the workflow instance is started manually in a SharePoint web site. A parameter can be defined as both an association and an initiation parameter. In this case, the association parameter setting becomes a default for the initiation parameter, which can then be overridden by the user starting the workflow. To create a parameter for a workflow that cannot be changed by the initiator, it should be created as an association-only parameter. Because site workflows are not associated with SharePoint lists, they do not have association parameters, only initiation parameters.
In a list or reusable workflow, the context contains a reference to the list item associated with the workflow instance. This item is called Current Item within SharePoint Designer. This object gives the workflow the ability to read and write the field values for the list item. For a list workflow, the current item contains all of the item's fields. For a reusable workflow, the current item contains the fields that are part of the associated content type. There is no current item for a site workflow.
A special type of column on the current item is called an association column. An association column is declared in the workflow definition just like a parameter, but instead of being passed into or out of the workflow, it is part of the current list item. When a workflow definition is associated with a list, SharePoint checks to ensure that each of the workflow's association columns is present in the list. If not, a new column is automatically created for the association column. Association columns can be read and written in the same way as any other column, by using the Current Item object.
The final data elements in the workflow context are workflow variables. These are simple variables that store data throughout the lifetime of the workflow. They can be dates, strings, numbers, Boolean values, or list item IDs. These values are retained until the workflow terminates. They are used to store transient data that will not be needed after the workflow completes.
Workflow Forms
During the execution of a workflow, SharePoint often needs to collect information from a user. To accomplish this, a form is rendered on the web site that collects the data and adds it to the workflow's context. There are three types of workflow forms distinguished by the workflow action that causes them to be displayed:
- Association forms are displayed when the workflow definition is attached to a SharePoint list. This form collects the values of the workflow's association parameters.
- Initiation forms are displayed when a user manually starts a workflow instance. This form collects initiation parameters.
- Task forms are designed to collect data during the processing of a workflow task. The data collected is generally written to the current item, to the History list, or to a workflow variable.
![]() Tip It is easy to get confused about which data fields should appear on which workflow form. Remember that the audience is different for each form. The association form is filled out by the administrator who configures the workflow. The initiation form is seen by the user initiating the workflow instance. A task form is presented to the user assigned to the task.
Tip It is easy to get confused about which data fields should appear on which workflow form. Remember that the audience is different for each form. The association form is filled out by the administrator who configures the workflow. The initiation form is seen by the user initiating the workflow instance. A task form is presented to the user assigned to the task.
Workflow forms can be implemented in a variety of ways but, historically, the most popular types have been ASP.NET and InfoPath forms. In the past, ASP.NET forms have held two big advantages. First, many developers are more familiar with ASP.NET development than InfoPath development. Second, InfoPath has imposed restrictions with regards to security and the edition of the SharePoint server product required.
![]() Annoying but True An initiation form appears only when a workflow is started manually, not when it is started automatically as an item is created or changed!
Annoying but True An initiation form appears only when a workflow is started manually, not when it is started automatically as an item is created or changed!
This seemingly odd behavior occurs because the web browser is only one way a workflow could be started. Imagine a workflow starting automatically when an item is created by another program or workflow instance. Where would the initiation form be displayed? When a workflow is started automatically, the initiation parameters will be set to their default values. These could be set in the workflow definition or be inherited from the values set on the association form. A workflow that has a required initiation parameter without a default value cannot be started automatically.
In SharePoint 2010, InfoPath forms are much easier to use because of automated form generation and sandboxing. Sandboxing, described in Chapter 11, involves the ability to execute .NET Framework code within a secure InfoPath form template.
SharePoint Designer 2010 makes using InfoPath forms almost trivially easy. When you create a workflow in SharePoint Designer, you declare the association and initiation parameters along with the data for each type of task. SharePoint Designer automatically creates basic InfoPath data entry forms for entering this data, as shown in Figure 12-3. As you will see in a later exercise, the workflow designer can open these form templates in InfoPath Designer and customize them as needed.
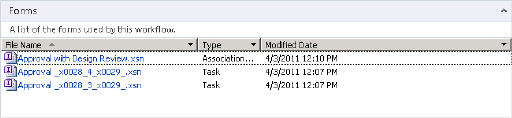
Figure 12-3. Workflow Forms list in SharePoint Designer
Workflow Components
SharePoint Designer 2010 workflows are built from a set of basic building blocks. Although these components seem quite simple at first, they provide a wide range of options for managing data and processes.
Steps
All workflows created in SharePoint Designer 2010 are known as sequential workflows in Windows Workflow Foundation parlance. This means that they are structured as a series of steps that are executed in sequence. Branching logic is limited to if-then-else conditions, and looping is not supported. If looping or advanced flow control logic (for example, a State Machine workflow) is needed, the workflow will need to be constructed using Visual Studio.
When a new workflow is created, a single step is added to the work surface. A workflow must always contain at least one step. Additional step objects are added to the workflow by using the Step button in the Insert group of the menu bar, as shown in Figure 12-4. Objects will always be inserted at the point designated by the flashing orange cursor. This cursor can be moved by clicking another location on the workflow design surface.
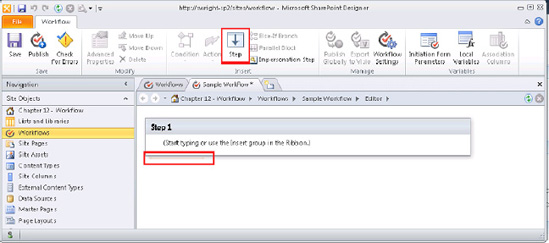
Figure 12-4. Workflow Designer (initial view)
A new feature in SharePoint Designer 2010 is the ability to create nested steps (see Figure 12-5). The nesting can be as deep and complex as needed.
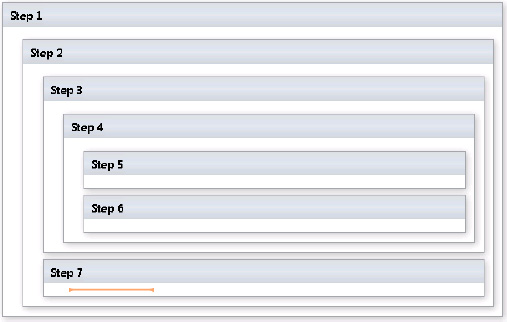
Figure 12-5. Nested workflow steps
Another useful new feature in SharePoint Designer 2010 allows steps to be executed along multiple simultaneous paths by using the parallel block. The steps or actions within a parallel block will run in parallel with one another, creating two or more independent paths of execution. The workflow will pause at the bottom of the parallel block until all of the blocks inside have completed. Figure 12-6 depicts a parallel block with steps embedded within the block, but any action can be used within a parallel bock, whether enclosed in nested steps or not.
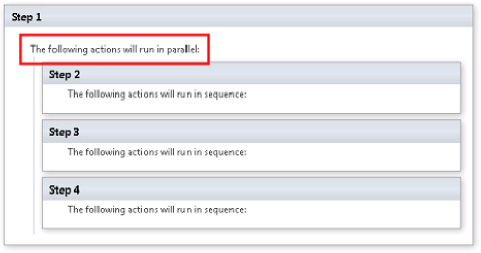
Figure 12-6. A parallel block with embedded steps
The last type of workflow step is new to SharePoint Designer 2010. This is the impersonation step described in the “Security” subsection earlier in this chapter. This type of step executes its actions in the security context of the workflow author instead of the initiator. Impersonation steps are different from other steps in that they do not support nesting or being nested within other steps.
Conditions and Actions
Within the steps of a workflow are a series of conditions and actions. A condition provides the ability to perform conditional branching within the workflow. Actions are components that perform an action on behalf of the workflow initiator.
Conditions can be chained together to create if-then-else logic. Adding additional conditions can also create else-if logic, as shown in Figure 12-7.
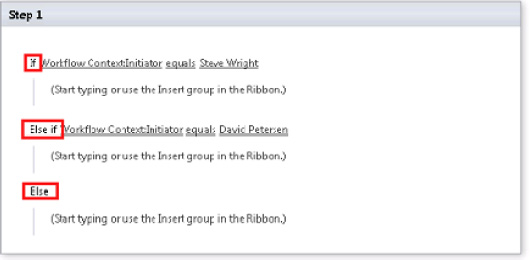
Figure 12-7. Conditional blocks
Conditional blocks can be nested inside other conditional blocks, creating sophisticated logical structures.
Action shapes in a workflow represent the work that is to be accomplished by the workflow. See the upcoming section “SharePoint Server Built-In Components” for a complete listing of the actions available within SharePoint Designer. Note also that new actions (a.k.a. custom activities) can be created using Visual Studio and used from within SharePoint Designer workflows.
When an action is added to the workflow design surface, its parameters are rendered as a set of hyperlinks, as shown in Figure 12-8. Clicking one of these parameters will launch an editor specific to that parameter. Most actions have at least one parameter. Many have more than one. Becoming familiar with the parameters and options associated with each available action is the key to creating powerful workflows in SharePoint Designer.

Figure 12-8. Action parameters
SharePoint Server Built-In Components
SharePoint Server 2010 comes with many built-in objects to enable the creation of workflows.
Workflow Definitions
The out-of-the-box workflows can be used as is or they can provide a starting point for creating customized approval processes. These include the following:
- Approval—SharePoint 2010
- Collect Feedback—SharePoint 2010
- Collect Signatures—SharePoint 2010
- Publishing Approval
The first three workflows are updated versions of the workflows that were included in SharePoint Server 2007. The fourth is the enhanced approval process used in SharePoint publishing sites. The Publishing Approval workflow may not be present if the publishing feature is not in use. The difference between these workflows in SharePoint 2010 and their 2007 counterparts is that they can now be copied and customized in SharePoint Designer 2010. Although it is possible to edit the SharePoint-provided versions of these workflow definitions, it is considered a best practice to make a copy and modify the copy.
Actions
SharePoint Designer 2010 comes with a large number of built-in actions that can be used to build most common business processes. When selecting the actions for a workflow, remember that some actions are not available in certain situations.
Many of the available actions are straightforward in their purpose and configuration. However, SharePoint 2010 has introduced a new action called the Task Process action that is a bit different. This action is a container for an entire task-oriented process such as an approval sequence. This action is almost a workflow within a workflow, but it is specifically designed to manage a process consisting of many tasks routed based on a set of rules instead of a simple sequence. The standard Approval, Collect Feedback, and Collect Signatures workflow definitions are all based on a single instance of this action. There is an entire subset of actions, called Task Behavior actions, that are designed to be used within the Task Process action shape.
SharePoint Foundation 2010 is a subset of the functionality that is available in SharePoint Server 2010. Therefore, it is reasonable to expect that the actions available in SharePoint Foundation would be a subset as well. Generally, the actions that are not available in SPF are those that use features that do not exist in that product. For example, the Declare Record action is not available in SPF workflows because record management is a feature of SharePoint Server 2010, not SPF.
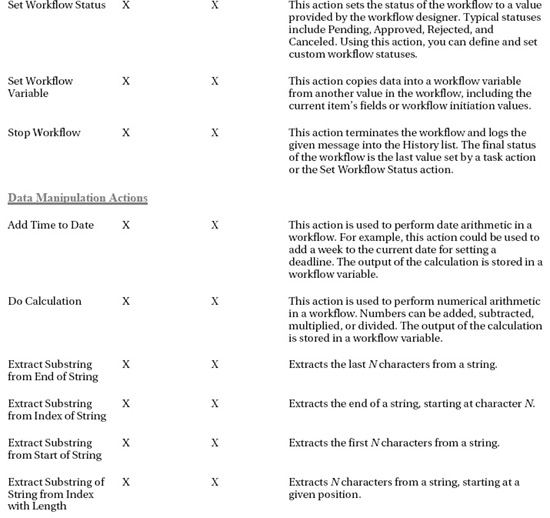
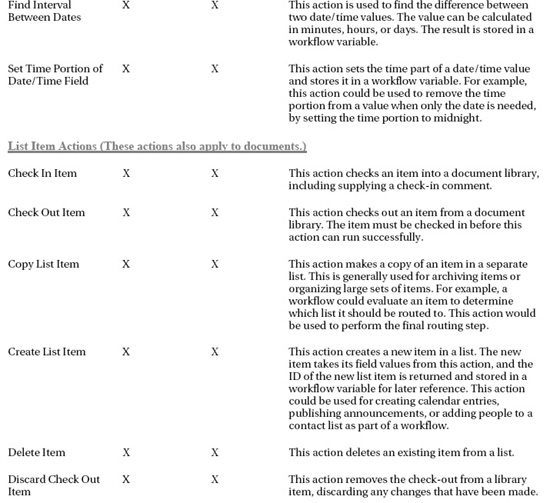
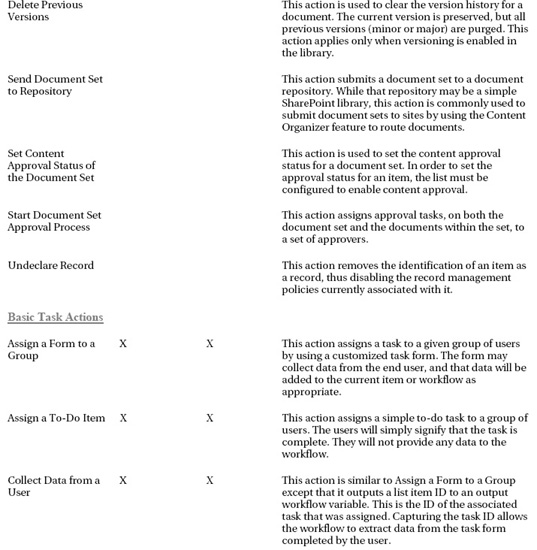
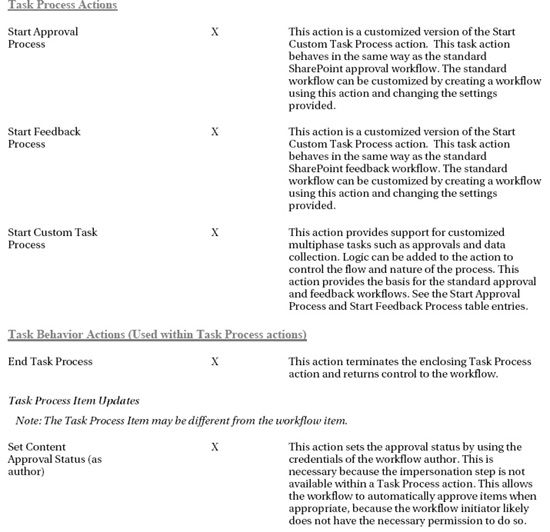
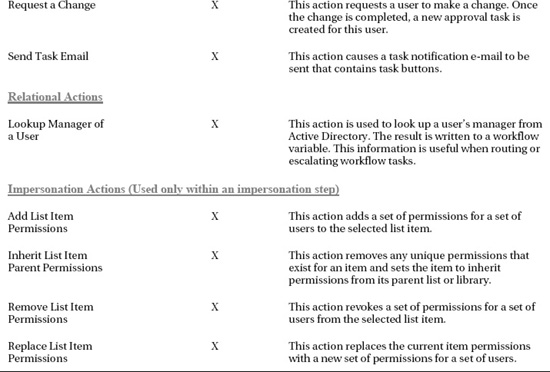
Table 12-1 lists the actions that are available out of the box with SharePoint Server 2010. The table indicates which actions are available using SharePoint Foundation 2010, as well as in SharePoint Server 2010, and which are available within site workflows. Remember that site workflows cannot use actions that require a Current Item.


Building Workflows with SharePoint Designer
Now that you have a firm grasp of the concepts behind workflows in SharePoint Designer, let's walk through some real-world examples. In the exercises that follow, you will create and customize workflows by using SharePoint Designer. First, you will customize one of the built-in workflows. After that, you will customize the InfoPath forms generated for that workflow. Then you will create your own reusable workflow from scratch. Finally, you will create and deploy a site workflow.
EXERCISE 12-1. CUSTOMIZE A BUILT-IN WORKFLOW
In this exercise, you will create a workflow definition that customizes the behavior of the built-in approval workflow. You will prevent the approver from reassigning approval tasks, prevent the initiator from altering the configured approver(s), and add logic to log the elapsed time in the History list when the workflow completes.
Because your task is to create a workflow definition that is very similar to a built-in workflow, you will use that workflow as a starting point. You will make a copy of the built-in workflow (because we do not recommend altering those delivered by Microsoft) and make the changes necessary to create the desired behaviors. You will then publish the workflow to our site, associate it with a list, and then run a workflow instance to verify its behavior.
- Open the site in SharePoint Designer 2010.
- In the Navigation pane, select Workflows.
- Select the Approval – SharePoint 2010 workflow definition in the gallery list.
- Click Copy & Modify in the Manage group on the menu, as shown in Figure 12-9.
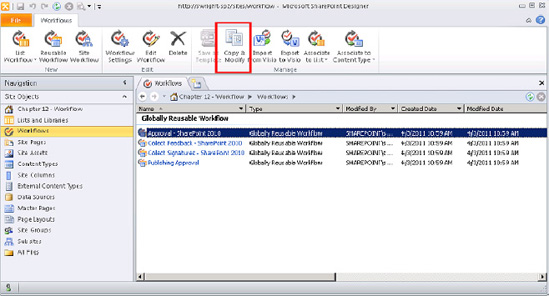
Figure 12-9. Copying and modifying a built-in workflow eefinition
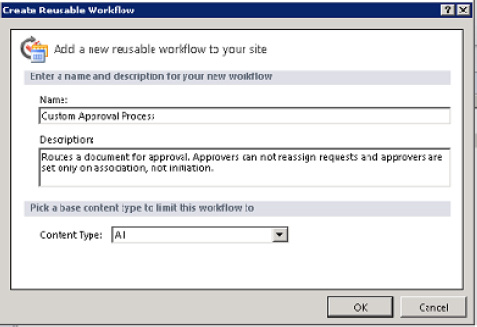
- In the Create Reusable Workflow dialog box that opens, enter Custom Approval Process for the name and click OK (see Figure 12-10).
- In step 1, click theApproval Workflow Task (en-US) Copy 1 link, as shown in Figure 12-11.

Figure 12-11. Default approval workflow
The action in step 1 is a Task Process action. Because you copied it from the built-in workflow definition, it is already configured to perform the entire approval process. Take a few moments to explore the options in the Customization panel. This will give you an inside look at how the task process operates. You will use this screen to disable the task reassignment feature.
- Turn off the Reassignment check box, as shown in Figure 12-12.

- In the Customization panel, click the Return to the Workflow link.
Note that the last parameter on the action reads Parameter: Approvers. This means that the workflow parameter called Approvers will be used to route the approval tasks. One of our requirements is that this parameter be set only when the workflow is associated, not initiated.
- Click Initiation Form Parameters in the Variables group on the menu.
- In the Association and Initiation Form Parameters dialog box that opens, select the Approvers parameter from the list. Then click the Modify button.
- In the Modify Field dialog box, select Association (Attaching to a List) from the Collect from Parameter During drop-down box. Then click Next.

- Click Finish.
- Verify that the Approvers parameter now indicates Association below Show on Form. Click OK.
- Now you will add an action to log the elapsed time in hours to the History list:
- Click beneath the existing action but inside the Step 1 box. This moves the orange insertion point indicator after the approval process is complete.
- From the Action drop-down list in the Insert group on the menu, select Find Interval Between Dates.
- Click the Minutes link and select Hours.
- In the action that was added, click the first Date link. This changes the link into a text box followed by an ellipsis button and a function button, as shown in Figure 12-14.

Figure 12-14. Function Editor button
- Click the function button to launch the lookup dialog box.
- Select Current Item for the data source. Select Modified for the field. Then click OK.
- Click the second Date parameter.
- Click the function button to launch the lookup dialog box.
- Select Workflow Context for the data source. Select Date and Time Started for the field. (See Figure 12-15.)Then click OK.
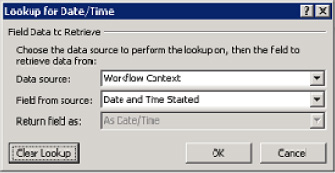
Figure 12-15. Lookup workflow start date and time
- Click the link after Output To.
- Select Create a New Variable from the drop-down list.
- Enter Elapsed Hours for the variable name and Number for the type. Click OK.
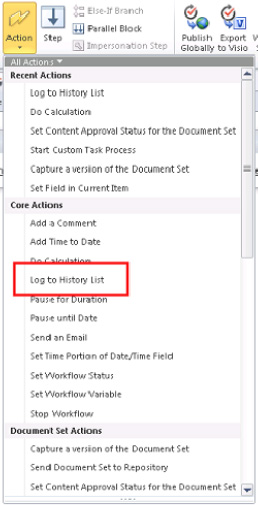
- From the Action drop-down list in the Insert group on the menu, select Log to History List, as shown in Figure 12-16.
- Click the This Message link.
- Click the ellipsis button, shown in Figure 12-17. This opens the string builder dialog box.

Figure 12-17. Launching the string builder (ellipsis)
- Type The approval process was completed in in the text box.
- Click the Add or Change Lookup button.
- Select Elapsed Hours from the Workflow Variables and Parameters data source. Then click OK.
- Append Hours after the lookup field that was added to the string. Click OK.

Figure 12-18. Completed workflow
Your customized approval workflow is now complete. You need to save it, publish it, and associate it with a list:
- On the menu, click the Check for Errors button.
- If all goes well, a dialog box stating that the workflow contains no errors appears. Click OK to dismiss the dialog box.
- Click the Save button and then the Publish button.
A progress window appears. When the process completes, the workflow is ready to use. You will now associate the workflow with a list and run the workflow:
- Create a list or document library in your site. For this example, use the Documents library.
- In SharePoint Designer, select the Custom Approval Process from the Workflows Gallery page.
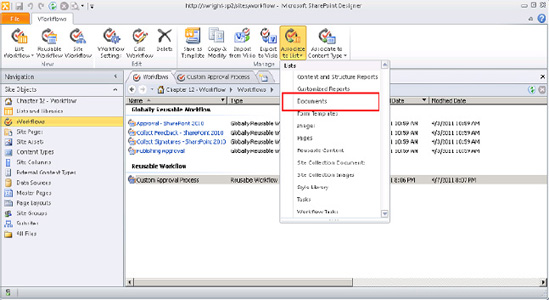
- In the Manage group in the menu, select Documents from the Associate to List drop-down, as shown in Figure 12-19.
- The workflow configuration form is now launched in the web browser (see Figure 12-20). Click the Next button.
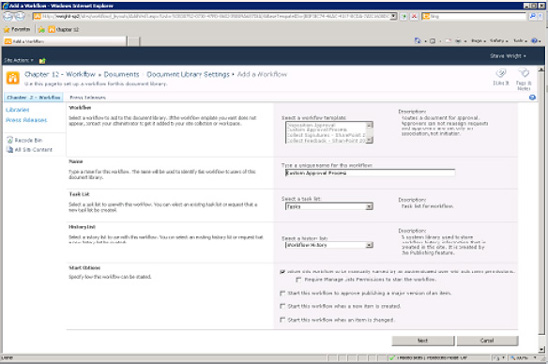
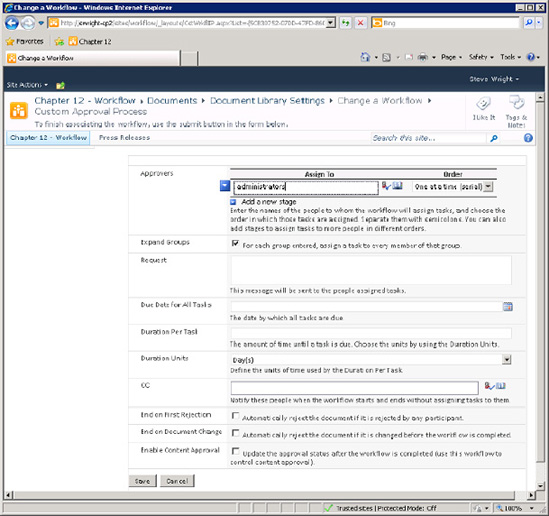
- This shows the workflow's association form (see Figure 12-21). Set the Approvers field and any other desired settings. Then click Save.
- Navigate to the list in your web browser and upload a document or create a list item.
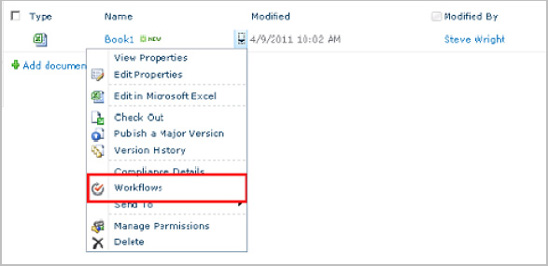
- Open the drop-down menu associated with the item you added and select Workflows, as shown in Figure 12-22.
- Click the Custom Approval Process link under Start a New Workflow.
The initiation form is now displayed (see Figure 12-23). Note that the Approvers field is not shown on this form as it would have been in the default workflow.
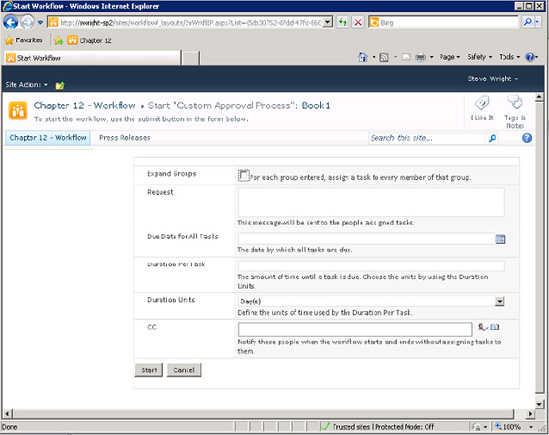
Figure 12-23. Start a Workflow Manually
- At the top of the page, deselect the check box labeled “For each group entered, assign a task to every member of that group.” Then click the Start button at the bottom of the page.
- Open the drop-down menu associated with the item you added and select Workflows.
- Click the Custom Approval Process link under Running Workflows.
The workflow status page, shown in Figure 12-24, provides details of a workflow during or after execution. The Tasks section shows all of the tasks created by the workflow, who they were assigned to, and their current statuses. In this case, there is a single task.
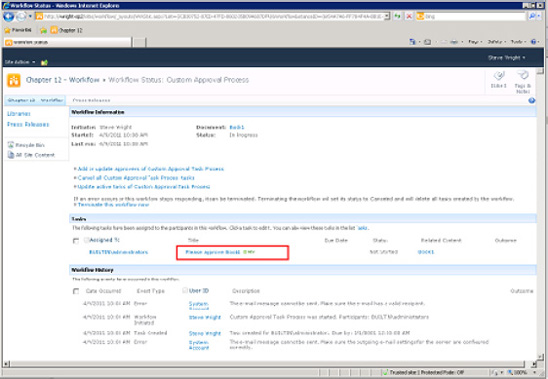
Figure 12-24. Workflow status page
- Sign on as a valid approver, if necessary.
- Open the task form by clicking the Please Approve Book1 link.
The task form appears in the web browser at this point (see Figure 12-25). Note that the Reassign Task button is missing because you turned off that option in the workflow definition.
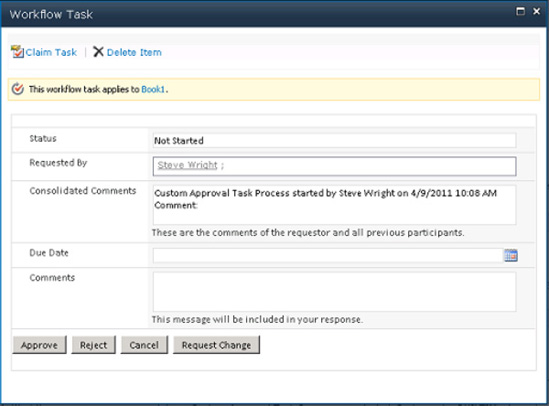
- Click theApprove button.
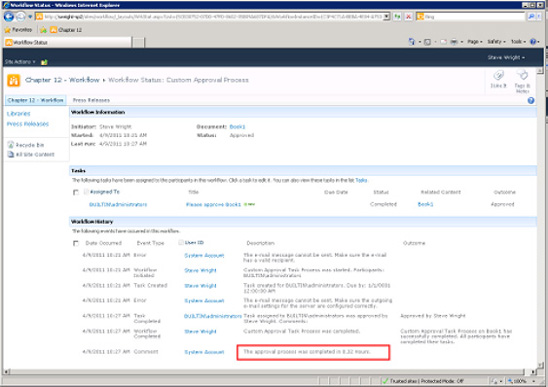
On the workflow status page, you can see the audit trail recorded in the History list. Note that the elapsed time was appended to the log because of the changes you made to the workflow definition (see Figure 12-26).
EXERCISE 12-2. CUSTOMIZE A GENERATED INFOPATH FORM
In this exercise, company design standards require that the forms associated with your workflows use a particular color scheme. You need to update the association, initiation, and task forms for the Custom Approval Process workflow to meet this requirement.
Unlike in previous versions of SharePoint Designer, using and customizing InfoPath forms in workflows is quite easy in SharePoint 2010. This is because SharePoint Designer 2010 automatically generates the forms necessary and adds them to the workflow definition. All you need to do is open the forms and customize them:
- Open the site in SharePoint Designer 2010.
- From the Navigation pane, select Workflows.
- Click the Custom Approval Process link in the gallery list.
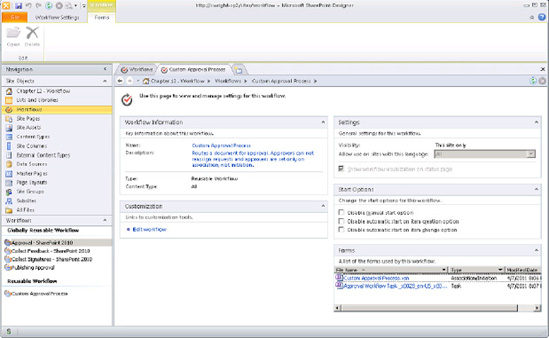
Figure 12-27. Workflow Settings page
On the Workflow Settings page, the generated InfoPath forms appear in the Forms panel in the lower-right corner of the screen. The first form contains both the association and initiation forms for the workflow. Each task form is listed as well. In our case, there is only one task form. It is used for the approval task in the workflow.
- In the Views group, on the Page Design tab of the menu, select Associate from the View drop-down list. This switches to the initiation form view.
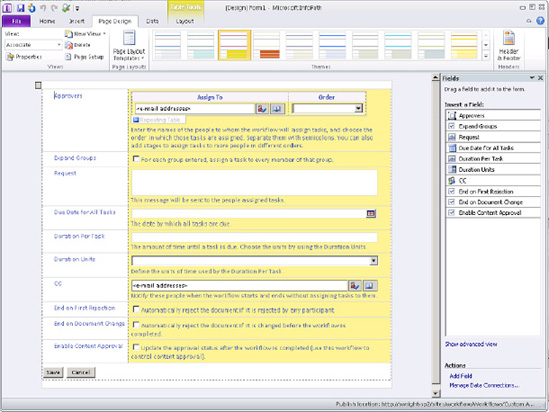
- Click Custom Approval Process.xsn in the Form panel. InfoPath Designer 2010 is launched and it displays the association form template, as shown in Figure 12-28.
- Click the Page Design tab in the menu.
- Select one of the themes from the Theme list in the menu. (Personally, I like yellow.)
- In the Views group, on the Page Design tab of the menu, select Start (Default) from the View drop-down list, as shown in Figure 12-29. This switches to the initiation form view.
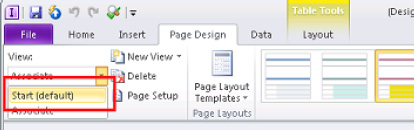
Figure 12-29. Switching views in InfoPath Designer
- Select the same theme you used for the association view.

Figure 12-30. Initiation form in InfoPath Designer
- Click the File menu tab.
- Click the Quick Publish button.
- Save the template file somewhere on your hard drive. This is the unpublished version, which you won't be using.
- When InfoPath indicates that your form template was published successfully, click OK to dismiss the dialog box and close InfoPath Designer.
- Repeat steps 4–12 to customize the task form for the workflow in the same way.
- In the web browser, start a new instance of the workflow as you did in the previous exercise. Note the new colors that appear in the various forms.
Obviously, changing the color scheme is not the extent of what you can do to customize these forms. These templates are fully functional forms that can use any of InfoPath's features, as described in Chapter 11. The value of having these forms initially generated by SharePoint Designer is that the workflow author doesn't have to create the forms, configure the data fields, or attach the forms to the workflow. All of this is done for you in SharePoint Designer 2010.
EXERCISE 12-3. CREATE A REUSABLE WORKFLOW
In this exercise, you will create a workflow that creates a task to assign a moderator to the current item. The moderator's username will be recorded in an association column. When a new item is created, this workflow will be started automatically.
- Open the site in a web browser.
- Create a SharePoint group called Moderators and add at least one user to it.
- Create a SharePoint group called Moderator Leads and add at least one user to it.
- Open the site in SharePoint Designer 2010.
- Select Site Columns from the Navigation pane.
- Select Person or Group from the New Column drop-down list in the New group on the menu.
- In the Name text box, enter Moderator, as shown in Figure 12-31. Then click OK.
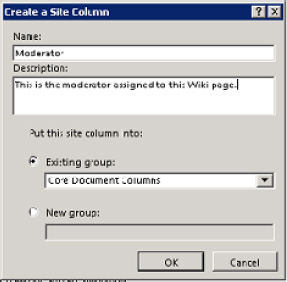
Figure 12-31. Creating a Moderator site clumn
- Double-click Moderator in the Site Columns Gallery to open the Column Editor dialog box, shown in Figure 12-32.
- Set the Allow Selection Of radio button to People Only.
- In the Choose From section, ensure that the SharePoint group radio button is selected and choose Moderators from the drop-down list.
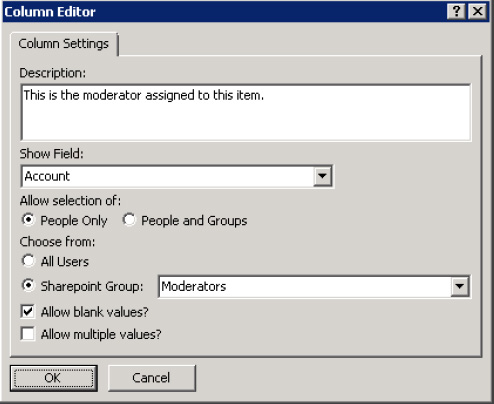
- Accept the other defaults and click OK.
- Save the changes to the site column.
The site column you have created will be used as an association column in the workflow and will be present in any lists with which you associate the workflow.
- Select Workflows from the Navigation pane.
- Select Reusable Workflow from the New group in the menu.
- Enter Assign Moderator Process for the workflow name.
- Select All as the content type. Then click OK.
- Select Association Columns from the Variables group in the menu.
- Click Select Site Column.
- Find and select the Moderator column. Click OK.
- Click OK again to close the association columns dialog box.
- From the Action drop-down list in the menu, select the Collect Data from a User action under the Task Actions category.

- In the new action, click the Data link.
- Click Next in the Custom Task Wizard.
- Type Assign the Moderator in the Name text box, as shown in Figure 12-34. Click Next.
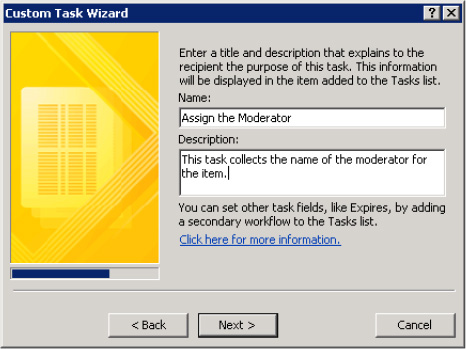
Figure 12-34. Custom Task Wizard—assigning a task name
- Click the Add button.
- In the Add Field dialog box, type Moderator for the field name, as shown in Figure 12-35. In the Information Type drop-down list, select Person or Group. Then click Next.
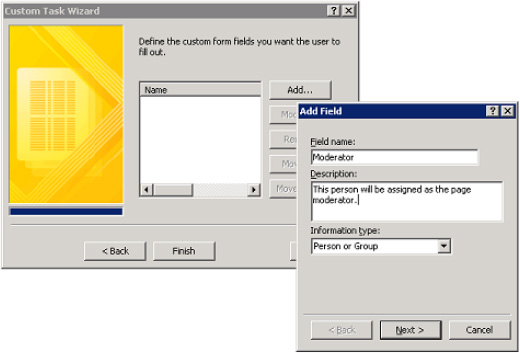
- In the Column Settings dialog box, select the People Only radio button, as shown in Figure 12-36. Select the Moderators SharePoint Group and deselect the Allow Blank Values check box. Then click Finish.
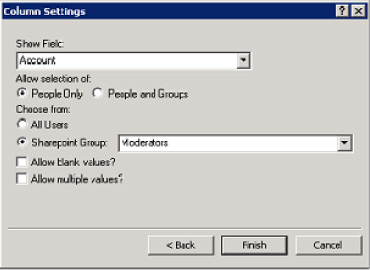
Figure 12-36. Custom Task Wizard—task field settings
- Click the This User link on the action.
- In the Select Users dialog box, select People/Groups from SharePoint site and then click the Add button.
- In the Select People and Groups dialog box, select the Moderator Leads group, as shown in Figure 12-37. Then click OK.
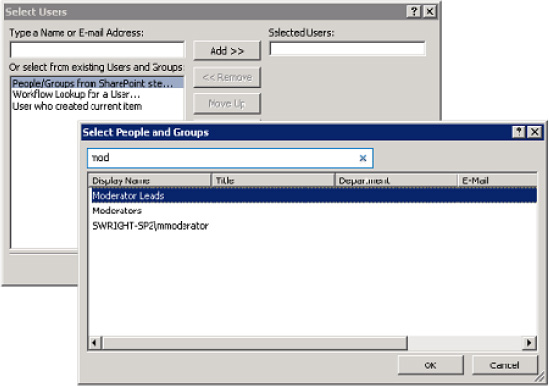
Figure 12-37. Setting the task user/group assignment
- Click OK to close the Select Users dialog box.
- Click the Variable: collect link.
- Select Create a New Variable from the drop-down list.
- Enter Assignment Task ID for the variable name.

Figure 12-38. Collecting data from the user action (configured)
At this point, you have assigned a task to the Moderator Leads group to collect the name of the new moderator. The action will pause the workflow until one of the members of the group completes the task. The workflow should look like this:
- From the Action drop-down on the menu, select the Set Field in Current Item action.
- Click the Field link.
- Select the Moderator field from the drop-down list, as shown in Figure 12-39.
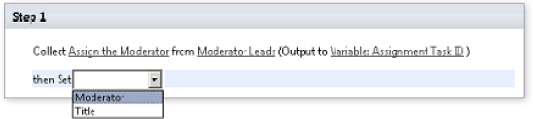
Figure 12-39. Setting the Moderator field in the current item
- Click the Value link in the action.
- Select Workflow Lookup for a User.
- Click the Add button.
- In the Lookup for Person or Group dialog box, click the Data Source drop-down list and select Association: Task List, as shown in Figure 12-40.
- From the Field from Source drop-down list, select Moderator.
- From the Return Field As drop-down list, select Login Name.
- In the Find the List Item section, select ID from the Field options.
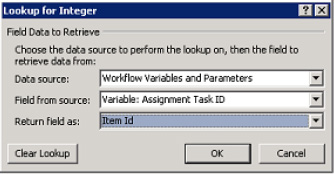
Figure 12-40. Moderator lookup from the data collection task
- Click the function button next to Value.
- In the Lookup for Integer dialog box, click the Data Source drop-down list and select Workflow Variables and Parameters, as shown in Figure 12-41.
- In the Field from Source drop-down, select Variable: Assignment Task ID.
- From the Return Field As drop-down list, select Item Id. Click OK.
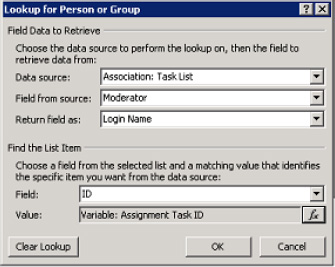
Figure 12-41. Lookup ID of the data collection task
- Click OK to close the Lookup for Person or Group dialog box.
- Click OK to close the Select Users dialog box.

Figure 12-42. Completed workflow
Now your workflow should look like this. You could include additional steps to set permissions on the page by using the impersonation step or to send e-mail notifications to the moderators.
- Click Save in the menu bar.
- Click Publish in the menu bar.
- From the Navigation pane, select Workflows.
- Select the Assign Moderator Process workflow from the gallery list.
- Select any list from the Associate to List drop-down in the Manage group on the menu. The Add a Workflow page comes up in your browser.
- Select the check box labeled “Start this workflow when a new item is created.” Then click OK.
The workflow is now ready to use. Try adding an item to the list, and the workflow will be started automatically. Also, notice that the list now has a Moderator column because of the association column in the workflow.
EXERCISE 12-4. CREATE A SITE WORKFLOW
In this exercise, you will create a form that allows site users to submit feedback to the site owners. When feedback is submitted, it will be placed into a list on the site, and an e-mail will be sent to the site owners.
This type of feature is fairly common on many sites. It is well suited to using a workflow because the process runs behind the scenes and may change frequently as business needs change. This could be implemented by using a reusable workflow, but that would require creating a visible list and asking users to create a list item for their feedback.
In this exercise, you will create a simple site workflow that collects the required information, stores it on the site, and sends an e-mail to the site owners. The workflow will then immediately terminate without generating any tasks.
- Open the site in SharePoint Designer 2010.
- Select the Lists and Libraries gallery from the Navigation pane.
- Create a new Custom List called Site Feedback.
- Rename the Title field to Subject.
- Add a new column called Category, which is a choice field containing options for Design, Functionality, and Content. Make the field required.
- Add the existing site column Append-Only Comments to the list.
- Save the changes to the list.
- Select the Workflows Gallery from the Navigation pane.
- Select Site Workflow from the New group on the menu.
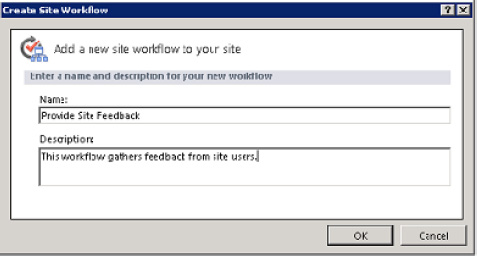
- Enter Provide Site Feedback for the name of the workflow, as shown in Figure 12-43. Then click OK.
- Select Initiation Form Parameters from the Variables group in the menu.
- Add the following initiation parameters:
- Subject—Single line of text
- Category—Choice field with Design, Functionality, and Content
- Comment—Multiple lines of text
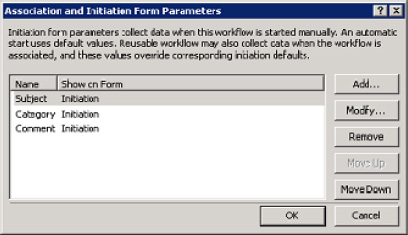
Figure 12-44. Initiation form parameters
- Click OK.
- Click within Step 1.
- Type cre. This is another way to select actions. In this case, the first three letters are enough to find the action we want: Create List Item. Press Enter.
- Click the This List link.
- Select Site Feedback from the drop-down list at the top of the dialog box. The required fields appear immediately.
- Double-click Subject (*).
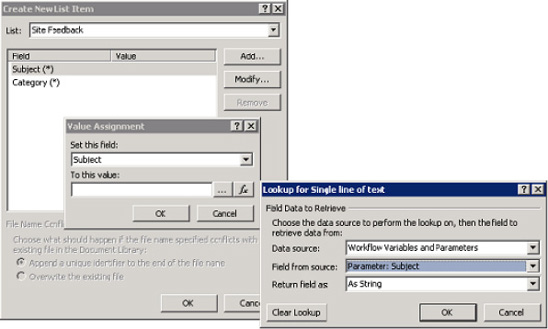
Figure 12-45. Mapping values to a new list item
- Click the function button next to the value field.
- Select the Subject workflow parameter.
- Click OK.
- Click OK.
- Use the same procedure to set the Category field using the Category workflow parameter.
- Click the Add button.
- Select the Append-Only Comments field from the drop-down list.
- Map that field to the value of the Comment workflow parameter.
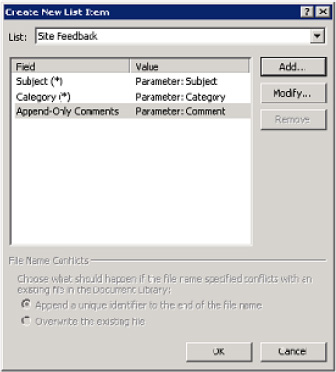
- Click OK.
- Click OK.
- In Step 1, click the Variable: create link.
- Select Create a New Variable from the drop-down list.
- Name the variable Feedback Item ID.
- Select List Item ID for the variable type.
- Click OK.
- Insert a Send an Email action into the step.
- Click the These Users link.
- Select the site owners group in the To field.
- Click the function button to the right of the Subject field.
- Select the Subject workflow parameter.
- Click OK.
- Type URL:.
- Click the Add or Change Lookup button.
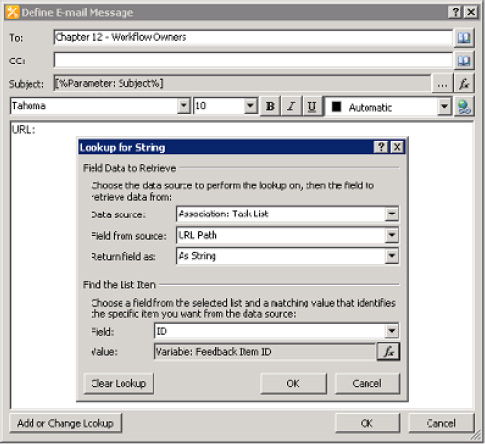
Figure 12-47. Configuring an e-mail message
- Using the Feedback Item ID variable, look up the URL Path value on the Site Feedback list, as shown here. Then click OK.
- On the next line of the e-mail, type Category:.
- Press the Add or Change Lookup button.
- Add the value of the Category workflow parameter.
- On the next line of the e-mail, type Feedback:.
- Click the Add or Change Lookup button.
- Add the value of the Comment workflow parameter.
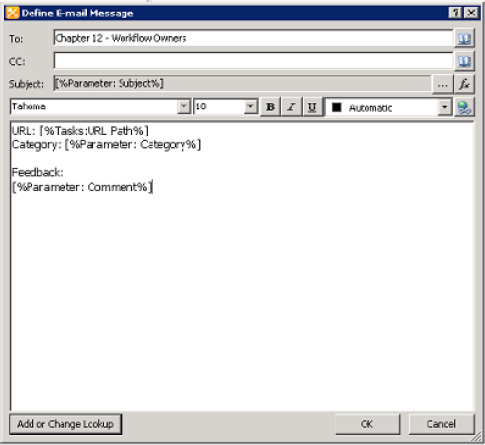
- Click OK to close the Define E-mail Message dialog box.
- Save the workflow.
- Publish the workflow.
The workflow is now active on the web site. Next, you will open the site and use the workflow to give yourself some feedback. This is known as positive self-talk, and it's supposed to be good for you.
- Open the site in a web browser.
- Select View All Site Content from Site Actions or the menu if it is there.
- Click Site Workflows at the top of the All Site Content page, as shown in Figure 12-49.

- Click Provide Site Feedback.
- On the initiation form, enter a subject, category, and comment.
- Click Start.
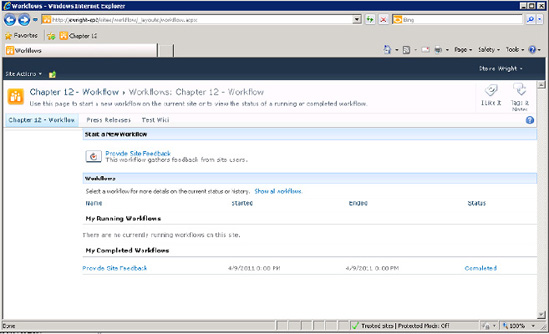
- By the time the workflow status page appears again, the workflow has been completed.
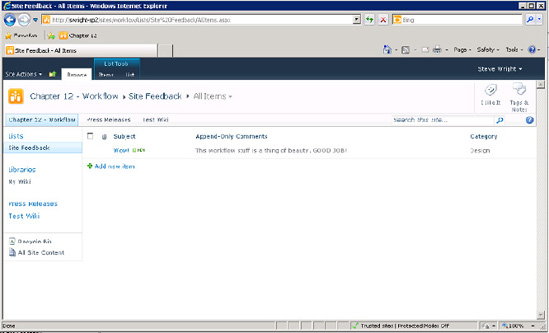
- Go to the Site Feedback list and view the item that was created by the workflow.
![]() Tip It is sometimes cumbersome to start a site workflow by opening the View All Site Content page. Many sites do not even surface that page for security reasons. An easy way to let your users start a site workflow is to copy the URL associated with the link for the workflow on the Workflows page. That URL typically looks like this:
Tip It is sometimes cumbersome to start a site workflow by opening the View All Site Content page. Many sites do not even surface that page for security reasons. An easy way to let your users start a site workflow is to copy the URL associated with the link for the workflow on the Workflows page. That URL typically looks like this: <;SiteURL>/_layouts/IniWrkflIP.aspx?TemplateID=<FormTemplateGUID>. Placing a link to this URL somewhere on your site will allow users to start the workflow without having to know how to navigate to it.
Site workflows can be used in any situation where a workflow needs to run outside of the context of a list or a specific list item. They can perform all of the same actions as other workflows except for those that manipulate the current item. This makes them useful in many situations that are not elegantly handled with list or reusable workflows.
Summary
In this chapter, you have:
- Explored the tools available within SharePoint Designer for automating processes with workflows
- Explored managing security and data in workflows
- Built a reusable workflow definition
- Customized one of SharePoint's built-in workflows
- Created a new workflow from scratch in SharePoint Designer
- Customized workflow forms by using InfoPath Designer
- Created a site workflow to run outside of any list or library