C H A P T E R 4
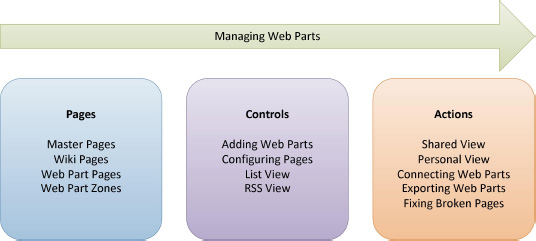
Managing Web Parts
Web parts are an important piece for quickly creating dynamic and robust SharePoint sites. SharePoint 2010 provides several web parts to help you quickly get started. Although you can add web parts to web pages in the browser, it is much quicker and more efficient to create web part pages in SharePoint Designer.
You will learn about the following topics in this chapter:
- Creating Web part pages, master pages, and wiki pages
- Working with Web parts and controls
- Using the Web Part Gallery
- Adding and configuring web parts
- Using personal views vs. shared views
- Connecting web parts
- Exporting web parts
- Fixing broken pages
If lists are the foundation for the data stored in SharePoint, web parts are the foundation for the presentation of that data to the user. One of the great benefits of SharePoint is that it enables an end user to create portals and web sites without programming skills, by using only the web browser. By using lists to store content and preprogrammed web parts to display data, almost anyone can create dynamic, content-rich web sites.
Web parts are small applications that perform a specific function on a web page. You can have a web part that displays the contents of a list. You can have a web part that displays the status of a project. Web parts are self-contained so that they are portable, which enables them to be used multiple times in a web site. For example, you could have a List View web part display only the top five new items in the list on the welcome page of the site, but display all of the list items in a details page—same web part, different presentation.
This chapter covers the web parts available to users in the different versions of SharePoint 2010. You will learn about the pages that can and cannot contain web parts. You will also learn how to connect web parts to provide a richer user experience. Then finally, you’ll see how you can export your web part configurations to reuse them on other sites.
Creating Pages for Web Parts
A discussion about web parts can’t really begin without talking about the pages they can be placed on, and the pages they can’t. SharePoint Designer 2010 provides the ability to create many types of files you can use on a web site:
- Web content pages
- Master pages
- Page layouts
- Web part pages
- Wiki pages
- ASPX pages
- HTML pages
- Artifacts
- CSS
- JavaScript
- XML
- Text files
This section covers the web content pages. Chapters 6–9 provide detailed discussions on the types of artifacts that you can create in SharePoint Designer 2010.
![]() Note SharePoint sites come in two flavors: publishing and nonpublishing. The Publishing Site template, combined with the publishing features, contains specific functionality to manage the content publishing process, such as content approval, versioning, and publishing. It uses three files to create a web page: the master page, the page layout, and the content page. Publishing is covered in detail in Chapter 7.
Note SharePoint sites come in two flavors: publishing and nonpublishing. The Publishing Site template, combined with the publishing features, contains specific functionality to manage the content publishing process, such as content approval, versioning, and publishing. It uses three files to create a web page: the master page, the page layout, and the content page. Publishing is covered in detail in Chapter 7.
Master Pages
In order to provide your site with a consistent look and user experience, SharePoint employs ASP.NET master pages. A master page defines the basic layout, structure, and functionality of the site content. The master page provides placeholders to indicate where content can go. When a new page is created based on the master page, the new page content and the master page are merged by replacing the placeholders with the page content. SharePoint 2010 uses one main master page called v4.master, but you can create your own master pages and use them as your default master page.
To create a new master page, you can click the All Files link in the Navigation pane and then select Blank Master Page from the New File menu on the Ribbon. It is important to remember that when you create a new master page in SharePoint, it is going to expect certain placeholders, such as PlaceHolderMain, to exist in order to display the site content on the page. It is because of these requirements that most people begin with a copy of v4.master when making their own master page. Working with v4.master is covered more in Chapter 6.
Wiki Pages
Wiki pages are a new page type in SharePoint 2010. These special SharePoint web part pages contain a SharePoint embedded form field, or content editor. With this type of form field, you can edit the content either in SharePoint Designer or the browser. You can also add other web parts to the page. Although it’s possible to create a wiki page in SharePoint Designer, it is much more efficient to create the page in the browser. A simple way of creating a new page in SharePoint Designer is to make a copy of an existing wiki page and then rename it.
EXERCISE 4-1. CREATE AND EDIT A NEW WIKI PAGE
- Open the browser to a SharePoint team site. If you don’t already have a team site to work with, create a new site called Chapter 4 by using the Team Site template.
- From the Site Actions menu, select New Page.
- Give the new page the name Chapter 4, as shown in Figure 4-1.
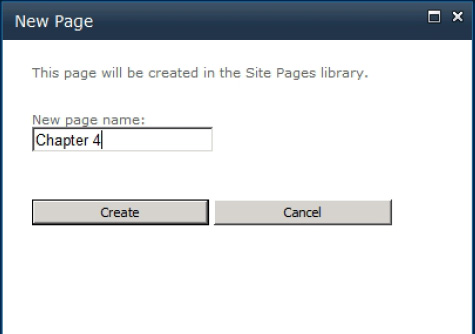
Figure 4-1. New Page dialog box
- Your browser then displays the page in Edit mode. Click the different menu tabs on the Ribbon. Notice the different options you have for creating content.
- Click your mouse in the main content area of the page.
- On the Format Text menu, select Text Layout and then Two Columns, as shown in Figure 4-2.
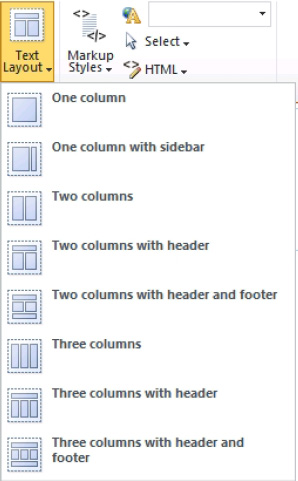
Figure 4-2. Text Layout menu
- In the left column, type some content. You can use any of the formatting tools available to you on the Ribbon. In the right column, do the same thing.
- When you are finished creating content in the two columns, save your changes by clicking the Page tab and then Save & Close.
- Open the same site in SharePoint Designer.
- Click Site Pages.
- If the new page is not listed, press the F5 key to refresh the list display. Click the
Chapter 4.aspxpage. - When the page settings page comes up, click Edit File in the Customization section in the middle of the page.
- Once the page opens in Edit mode, make sure you are in the Design view.
- To make it easier to edit the content, either right-click in the content area and choose Zoom to Contents or choose it from the View menu on the Ribbon, as shown in Figure 4-3. This isolates the content area of the page.
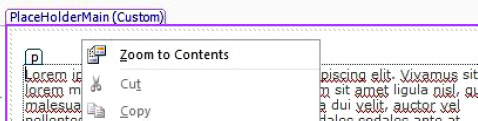
Figure 4-3. Zoom to Contents menu
- Click anywhere on the content of the page that you just added. Notice that you can edit the contents of the page.
- Switch to Code view. The content area appears in
<div>tags, as you can see in Figure 4-4.
Figure 4-4. Content area in Code view
- Switch back to Design view and position your cursor in a blank area of the left content section.
- From the Insert menu on the Ribbon, select Web Part and then select Image Viewer under the Media and Content section (see Figure 4-5).
 Note Although you are adding an Image Viewer web part to the wiki page, you could have added any web part in the Web Part list.
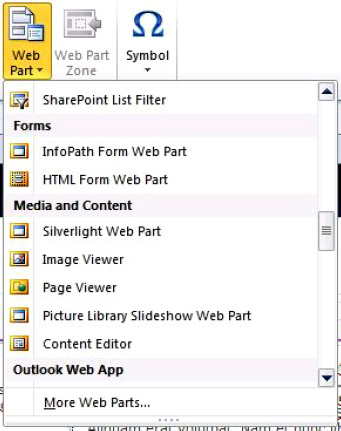
Figure 4-5. Web Part menu
- Right-click the web part and select Web Part Properties.
- In the Image Link box, type /_layouts/images/homepageSamplePhoto.jpg (see Figure 4-6). Type Sample Homepage Picture in the Alternative Text box. Then click OK.
Figure 4-6. Image Viewer web part properties
- From the File menu, choose Save.
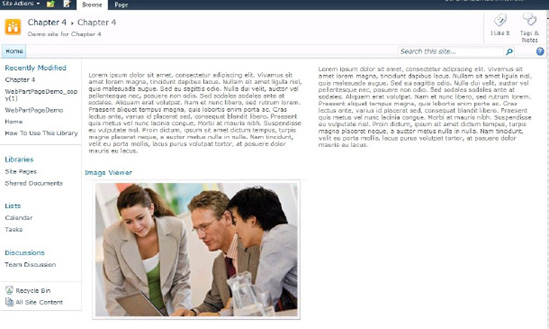
- Go back to your browser and refresh the page. You can see the changes that you made in the Designer (see Figure 4-7).
Figure 4-7. Final wiki page
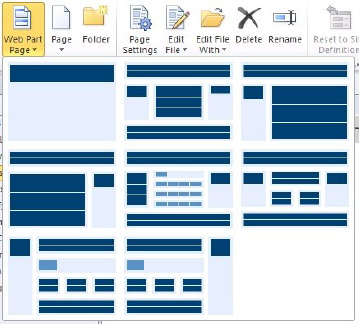
Figure 4-8. Web Part Page men

Web Part Pages
Web part pages are special web pages in that they specify different zones that can contain content. These zones allow end users to add web parts to pages and customize pages to their needs. SharePoint Designer provides web part page layout templates that you can select right out of the box, as you can see in Figure 4-8. You can also create your own layouts. Web part pages enable this functionality through the use of web part zones.
Although you can place web parts outside a web part zone when using SharePoint Designer in Advanced edit mode, web part zones are the only area that a user can edit in the browser. Web parts placed outside a web part zone are referred to as static web parts, and those web parts placed inside web part zones are dynamic web parts. Figure 4-9 shows web part zones on a page.
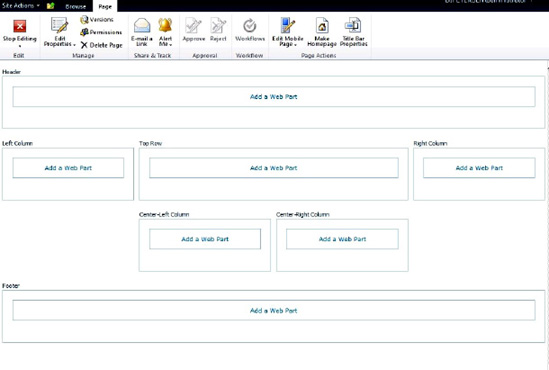
Figure 4-9. Web part page showing web part zones
ASPX and HTML Pages
SharePoint Designer 2010 provides the ability to create and edit ASPX pages and standard HTML pages. This functionality is provided in case there is a need to create or edit regular web pages as part of a site. These pages do not automatically inherit the site master page and can be edited only in Advanced mode. You cannot put web parts on them unless you manually add a web part manager and web part zones (thereby creating a web part page), which is beyond the scope of this chapter.
Using the Web Part Gallery
The Web Part Gallery, shown in Figure 4-10, is a special document library that resides at the root of the site collection and contains a list of all of the web parts that can be used for the site collection. You can upload new web parts here or you can export your other web part configurations and upload them here. An easy way to find the Web Part Gallery is to add /_catalogs/wp to the end of your site collection URL. For example, if your site collection is at http://sharepointdesigner2010, then the Web Part Gallery is at http://sharepointdesigner2010/_catalogs/wp.

Figure 4-10. Web Part Gallery
The exact web parts that in you have available to you are different depending on the version of SharePoint you have installed and the features you have activated. Microsoft does not provide a specific list of which web parts are in which version, but a quick search of the Internet turns up a couple of comprehensive lists.
To add a new web part to the Web Part Gallery, navigate to the Web Part Gallery by clicking Site Actions ![]() Site Settings
Site Settings ![]() Galleries
Galleries ![]() Web Parts. Once there, click the Documents tab of the Ribbon and select New Document. A list of all available web parts registered with the
Web Parts. Once there, click the Documents tab of the Ribbon and select New Document. A list of all available web parts registered with the web.config file will be displayed. Select the check boxes of the web parts you wish to install and click the Populate Gallery button.
![]() Note To enable web parts in the site collection Web Part Gallery, the web parts must be properly installed and registered with the site collection’s
Note To enable web parts in the site collection Web Part Gallery, the web parts must be properly installed and registered with the site collection’s web.config file. This can be accomplished manually or by a deployment package, usually as part of a WSP file. More information on deployment can be found at http://technet.microsoft.com/en-us/library/cc261736.aspx.
Adding and Configuring Web Parts on a Page
To use web parts, you first need to have a container to put them in. As mentioned earlier, SharePoint has page templates with web part zones already defined. When you create a web part page based on one of these templates, it is saved in a special document library called Site Pages that is created automatically when the site is created. You can also create web pages in other document libraries and in folders within those document libraries. Once you create a page, you can place web parts in defined web zones.
With SharePoint Designer, you can also add or delete web part zones. You can edit pages in Basic mode or Advanced mode. In Basic mode, you can add or remove web parts from a page but you can’t modify layouts. In Advanced mode, you have full control over the page, but it is done at a price. When you edit pages in Advanced mode, you separate the file from its original site definition file that resides on the file system. Performance is affected because the modified file is stored in the content database. When the page is requested, it is read from the content database each time, which is slower. If you find that you accidentally modify a page in Advanced mode and you wish to go back to its original form, you can select Reset to Site Definition anytime to get rid of your changes.
EXERCISE 4-2. CREATE A WEB PART PAGE
In this exercise, you will create a new web part page in SharePoint Designer 2010 from the predefined templates provided. This page will then be used in the subsequent exercises.
- If you don’t already have a practice site to work with, create a new site called Chapter 4 by using the Team Site template.
- From within SharePoint Designer, click the Site Pages link in the left Navigation pane.
- From the Ribbon menu, choose New
 Web Part page, and then select the template that has a Header web part zone, a Left web part zone, and a Right web part zone, as shown in Figure 4-11.

Figure 4-11. Web part page
- Name the page
WebPartPageDemo.aspx. - When the file is created, click the filename to get to the Page Settings page and then click the Edit File link in the Customization pane.
- Let’s display the Announcements list on this page. Click inside the Right web part zone. Then, on the Ribbon, click Insert Data View Announcements (see Figure 4-12). You should see the default display of the Announcements list. You’ll customize that later.
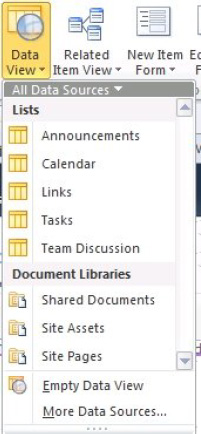
Figure 4-12. Data View menu
- In the Header web part zone, type Web Part Page Demo Page. Use the formatting tools on the Ribbon to center the text and give it the Heading 1 style.
- Switch to Split mode and notice that a WikiContentWebpart was added automatically for you in Basic editing mode (see Figure 4-13).
Figure 4-13. WikiContentWebpart in Code view
Note The web part was automatically added because in Basic mode, you can configure and edit web parts only in web part zones. To have static text, you would have to place the page into Advanced editing mode, which would customize the page. - Switch back to Design mode and click in the Left web part zone.
- On the Ribbon menu, choose Insert Data View Links.
- When the Links web part is rendered on your page, choose Options from the List View Tools menu. Then select Add/Remove Columns.
- Remove all fields except Notes (see Figure 4-14).
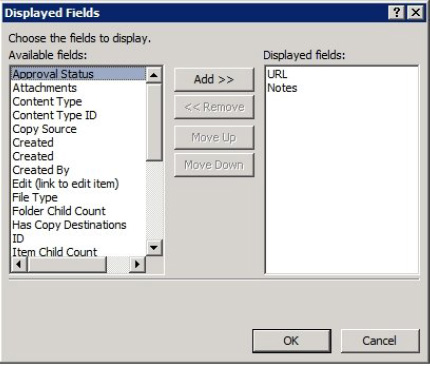
Figure 4-14. Data view column picker
- Add the regular URL field back into the Displayed Fields list. Then move the URL field to the first position by clicking the Move Up button. Click OK.
- Click the Design menu, and select the sixth display option, which looks like Figure 4-15.
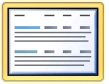
Figure 4-15. Data view display template
- Right-click the web part and select Web Part Properties from the context menu.
- In the Appearance section, under Width, type 300px in the Width box of the web part and make sure Yes is selected. Click OK.
- Save the page by clicking the Save button or by pressing Ctrl+S.
- Press F12 or choose Home Preview in Browser from the Ribbon menu to see your new page in the browser.

This is a simple web part page, as you can see in Figure 4-16. You will customize it later in the chapter. For now, add a few links and a few announcements to give the page some content.
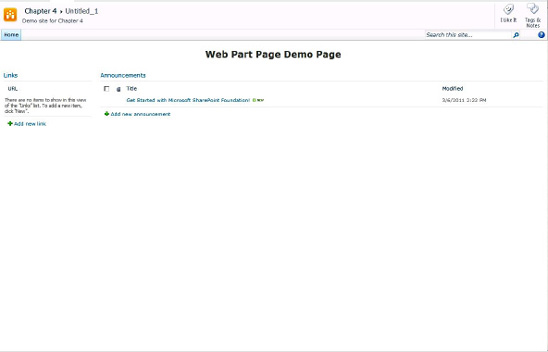
Figure 4-16. Final web part page
Working in a Personal View vs. a Shared View
Normally, when a user navigates to a web part page, that user is viewing the Shared view of the page. This view is the same view that everyone else sees. SharePoint provides a way for a user to customize the page and the different web parts on the page to give them a Personal view of the page. This is one of the powerful aspects of SharePoint. Each user can have a different experience, within limits, based on the web parts they decide to place on the web part page. This functionality is achieved through the Personal menu attached to the person’s login name. All personal configuration information is stored separately for each user. Personalization can be done only from the browser, but you can enable or restrict some personalization features in SharePoint Designer. For example, a user might want to display an RSS feed that applies to his job, but you don’t want users to be able to delete an RSS feed to your corporate site.
EXERCISE 4-3. CREATE A PERSONAL VIEW OF A WEB PART PAGE
- In the browser, navigate to the WebPartPageDemo page you created in Exercise 4-2.
- In the upper-right corner, click your login name. The Personalization drop-down menu shows, as you can see in Figure 4-17.
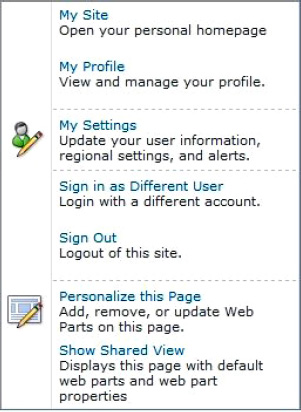
Figure 4-17. Personalization menu
- Select Personalize This Page from the menu.
- In the web editor, click in the left web part zone labeled Add a Web Part.
- When the web part selector opens, select the RSS viewer from the Content Rollup category, as shown in Figure 4-18.
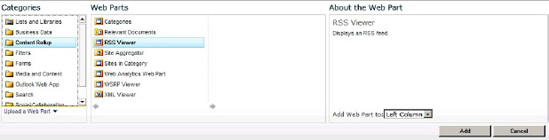
Figure 4-18. Web part selector
- Make sure the Add Web Part To drop-down list displays Left Column, and then click the Add button.
- In the RSS Viewer web part, click Open the Tool Pane Link to edit the settings of the web part (see Figure 4-19).
- Type http://www.apress.com/resource/feed/newbook in the RSS Feed URL text box.
Figure 4-19. RSS Viewer web part properties
- Accept all of the other defaults and click OK.
- On the Ribbon menu, click the Stop Editing button. Your view of the page changes.
- From the Personalization menu, select Show Shared View. The RSS Viewer web part does not display.
- Now select Show Personal View in the Personalization menu. At any time, you can reset the page back to the Shared view.
- From the Personalization menu, select Reset Page Content.
- A dialog box opens, prompting you to confirm your selection, as shown in Figure 4-20. When you reset the page, all personalized web part settings will be reset to their shared values, and any private web parts will be deleted.
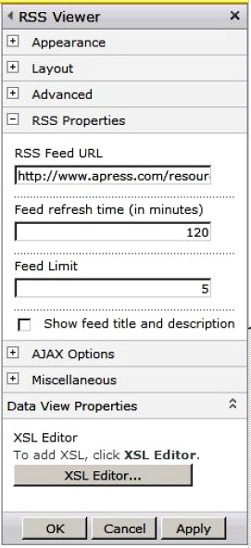
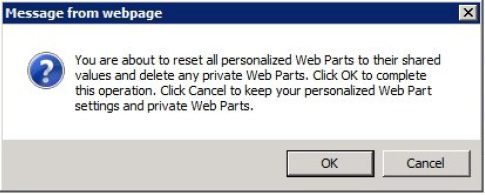
Figure 4-20. Warning dialog box when resetting the web part
Once you reset the page, the Show Personal View menu item is absent until the page is personalized again.
It is sometimes desirable to prevent certain customizations. In Basic mode, you can change options only on the web parts themselves. In Advanced mode, you can place restrictions on the web part zones.
- Open the WebPartPageDemo page in Design mode in SharePoint Designer.
- Click the Announcements web part.
- On the Ribbon menu, click the Web Part tab.
- In the Allow section, deselect all of the check boxes, as shown in Figure 4-21.
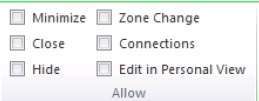
Figure 4-21. Web part Allow settings
- Save your changes.
- In the browser, navigate to the WebPartPageDemo page or refresh the page if you are already there.
- Click the title bar of the Links web part. Notice that there is a drop-down menu that allows you to minimize or export the web part (see Figure 4-22).
Figure 4-22. Edit My Web Part menu.).
- Click the title bar of the Announcements web part. Notice that the option to minimize or export the web part is not there (see Figure 4-23).

Figure 4-23. Web part without edit menu
- Go back to SharePoint Designer.
- Put the page in Advanced editing mode by clicking the Home tab and then clicking Advanced Mode under the Editing section.
- Click in the right zone labeled Body.
- In the status bar at the bottom of the page, locate the entry
<WebPartPages:WebPartZone#Body>and right-click it (Figure 4-24).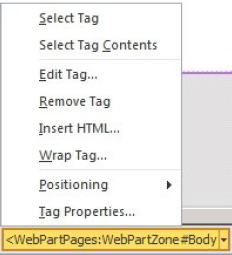
Figure 4-24. Web part zone menu
- Select Tag Properties from the menu. Web Part Zone Properties dialog box pops up, as you can see in Figure 4-25.
- In the Frame Style drop-down list, select None. At the bottom of the dialog box, deselect all three check boxes. Then click OK to close the dialog box.
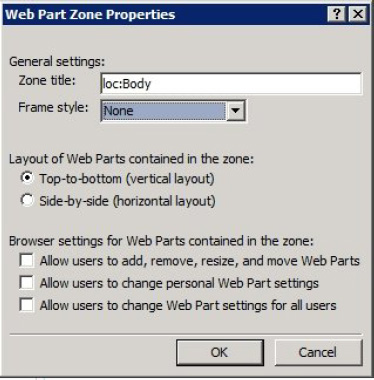
Figure 4-25. Web part zone properties
- Click the Save button or press Ctrl+S.
- A dialog box comes up, warning that you are about to customize the page and that the page will no longer be based on the site definition. For this example, click Yes. A new blue icon appears next to the page name in the Navigation pane. This is an indicator that the page has been customized from the site definition (see Figure 4-26).

Figure 4-26. Customized indicator
- Go back to the browser and refresh the page. (If you are prompted that the page has been modified, click Refresh This Page.) Notice that the Announcements web part does not have a title bar and that nothing changes in the Ribbon menu when you click it.
- From the Personalization menu, select Personalize This Page. You still have web part zones in the Header and Left areas, but cannot edit the Body web part zone.
- Click Stop Editing to return to Browsing mode.
- Go back to SharePoint Designer.
- In the Navigation pane, right-click the WebPartPageDemo page name and select Reset to Site Definition.
- A dialog box displays, informing you that resetting to the site definition will replace the contents of this page with the original contents from the site collection, and that a backup copy of the current page will be created in the same folder. Click Yes to confirm that you want to do this. When the page refreshes in SharePoint Designer, the web parts will still be there, but the web part zone customizations that you made previously are reset.
- Go back to the browser to verify the changes. (You may have to navigate to another page and then back to see your changes.)

Connecting Web Parts
Because web parts by design are meant to be portable, they are programmed to live on any page. But being able to place these web parts on a page by themselves would be boring. It would make web sites more interactive and more dynamic if the web parts could communicate with each other and share data. SharePoint provides that functionality with web part connections. Connecting web parts have the ability to provide values to another web part on the same page or another page or accept data from another web part. The data accepted can be used as filter data to further filter a list or as parameter values. Web parts can exchange single values or multiple values. Not all web parts can be connected, but for those that can, they can help create a rich user interface.
EXERCISE 4-4. CONNECTING WEB PARTS
In this exercise, you will create a page that utilizes the Filter web part and will connect web parts:
- If you have not already created a practice site, create a new site based on the Team Site template and name it Chapter 4.
- Now you’re ready to create and use a new list. Create a new custom list called Territory Sales and add the fields shown in Figure 4-27.
Figure 4-27. Territory Sales field list
- When you have the list set up, add the values shown in Figure 4-28.
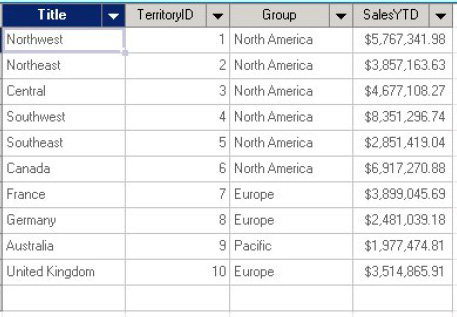
Figure 4-28. Territory list values
Note It is easiest to add data quickly by placing the list in Datasheet view before adding the values. - From within SharePoint Designer, click the Site Pages library in the left Navigation pane.
Create a new web part page called
Connections.aspx. Use the template shown in Figure 4-29.Figure 4-29. Web part page template
- From within the editor, click in the left web part zone. From the Insert Web Part menu, choose a Choice Filter web part.
- Right-click the inserted web part and choose Web Part Properties.
- In the Filter Name text box, type Group.
- In the Values box, type the text shown in Figure 4-30.
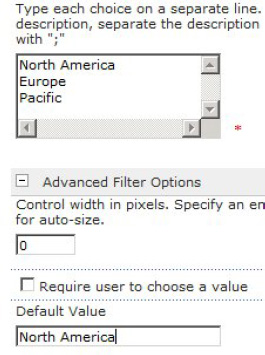
Figure 4-30. Choice Filter web part settings
- Open the Advanced Filter Options and type North America as the default value.
- In the Appearance section, click the Yes radio button and type 300 in the text box indicating a fixed width, as shown in Figure 4-31. Then click OK.
Figure 4-31. Appearance settings
- Click in the main Body web part zone.
- From the Insert menu, insert a Data View web part of the Territory Sales list. Your page should look like Figure 4-32 in SharePoint Designer.
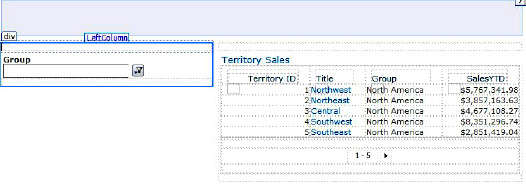
Figure 4-32. Group filter web part page
- Click the Group web part.
- Select Add Connection from the Web Part Tools menu.
- When the Web Part Connection Wizard opens, select Send Filter Values To from the drop-down menu, as shown in Figure 4-33. Then click Next.
Figure 4-33. Web Part Connection Wizard’s Send Filter Values To option
- Accept the defaults and click Next again.
- Select Territory Sales for the Target Web Part. Select Get Filter Values From for Target Action. Then click Next.
- Click Choice Filter on the left and Group on the right (see Figure 4-34). Click Next.
Figure 4-34. Web Part Connection Wizard
- Click Finish.
- Click the Save button or Ctrl+S.
- On the Home menu, click Preview in Browser. You should see the page filtered for North America.
- Click the filter icon and then pick the other filter options. The Data view is filtered based on your selection, as shown in Figure 4-35.
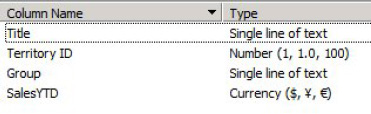

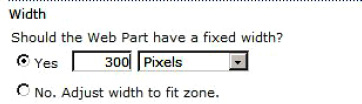
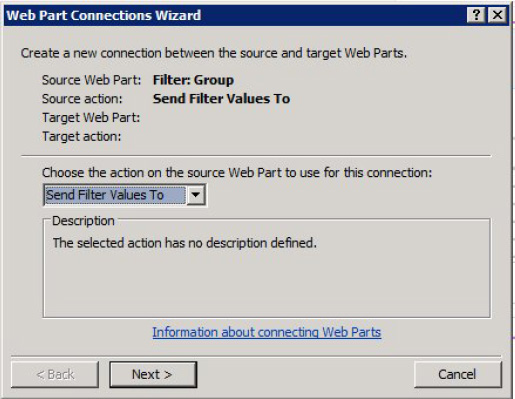
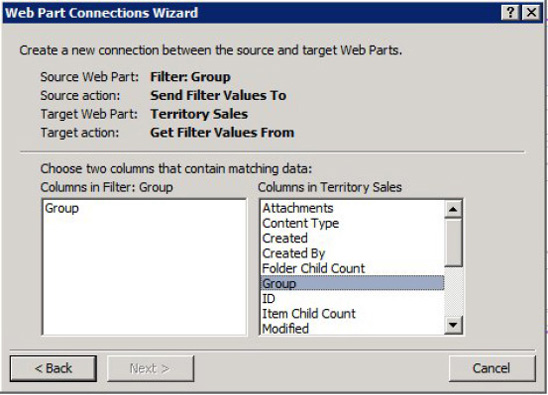
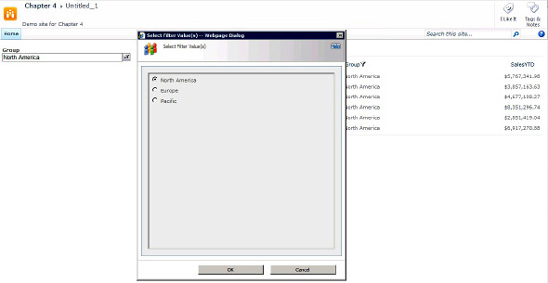
Figure 4-35. Select Filter Value dialog box
Exporting Web Part Configurations
Often times, you might want to save the configuration of a web part to use it on other pages. You can export the configuration of a web part and then import it into another page. You can also import it into another Web Part Gallery file.
To export a web part, open the web part page in SharePoint Designer. Select a web part and then click To Site Gallery on the Web Part tab. A dialog box will open, prompting you to supply a Name and Description for your configuration. It is important that the name be unique and the description detailed so you know exactly what configuration you are saving. Also, by giving it a unique name, you avoid future confusion when selecting web parts for a new page. The dialog box also gives you the opportunity to change the configuration before saving it to the Web Part Gallery.
Once the web part is exported to the Web Part Gallery, it will be available in the drop-down Web Part menu under Custom Web Parts. When you select that custom web part for another page, it will already be configured.
You can also export a web part configuration to a file by clicking the To File button on the Format tab. A Save As dialog box will prompt you to choose a location and filename to save the new web part configuration. It is important to remember that when you export to a file, you are saving only the configuration information. If the web part is not installed in the new environment, you won’t be able to use the exported web part configuration.
![]() Note If you were to open a
Note If you were to open a .dwp or .webpart file, you would see that it is just an XML file storing the web part’s configuration. Because it is an XML file, you can modify the configuration in the file if you are careful. Always remember to make changes only to a copy of the original.
EXERCISE 4-5. EXPORTING WEB PARTS
In this exercise, you will use a page with one Data View web part. However, you could use any web part for this exercise.
- Open the WebPartPageDemo page you created in Exercise 4-2 in Edit mode.
- Click the Links web part to select it.
- From the List View Tools Web Part menu, click Save Web Part To File.
- When the dialog box opens to ask whether you want to always show list data from the current web site, click Yes.
Note You can save the configured web part directly to the Web Part Gallery by selecting To Site Gallery from the List View Tools Web Part menu.
- Close the web page.
- Open the Site Collection settings in the browser and navigate to the Web Part Gallery.
- On the Documents tab of the Library Tools menu, select Upload Document.
- When the dialog box opens, fill out the form as illustrated in Figure 4-36. Then click Save.
Figure 4-36. Export Web Part dialog box
- Open another web part page for editing in SharePoint Designer and click an empty web part zone.
- On the Insert Web Part menu, find the web part you just uploaded to the gallery. In the example here, it is listed in the SharePoint Designer group and is called Configured Links Web Part (see Figure 4-37). When the web part is inserted, it should look exactly like the original.
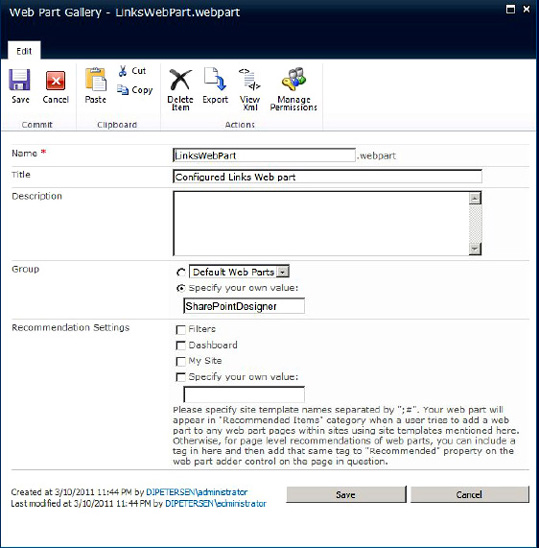
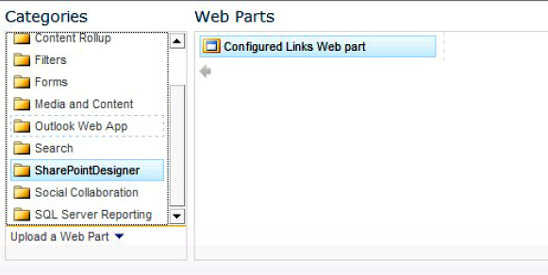
Figure 4-37. Selecting the exported web part
Fixing Broken Pages
At times you may need to recover a page after a code change makes it impossible to render, or you might have some orphaned web parts (web parts that have been closed but not deleted) on a page that you need to restore. You can try to open the page in SharePoint Designer in Maintenance mode. To enter Maintenance mode, open the browser and select the Page tab on the Ribbon menu. Then click the Edit Properties button. Once the menu changes, click the Open Web Part Page in Maintenance View link. If you are unable to reach that menu or the page does not render, you can attempt to open the page in Maintenance mode by appending ?Contents=1 to the end of the page URL—for example, http://SharePointDesigner2010/default.aspx?Contents=1.
Summary
This chapter covered how to manage web parts. You learned where you can place web parts and how to create the pages that can hold those web parts. You also learned about exporting and reusing your preconfigured web parts as well as creating web part connections. As you have seen, web parts make it possible to create all sorts of dynamic web sites quickly and with minimal effort.