
P A R T II
![]()
Advanced Site Customization
C H A P T E R 5
Displaying Data
SharePoint Server 2010 is a platform that can be used to integrate data from many sources. Some of these sources reside within SharePoint itself, such as lists and libraries. Others are external data sources. These include Relational Database Management Systems (RDBMSs) such as Microsoft SQL Server or database products from other vendors such as Oracle and IBM. Data can also be retrieved from web services, Really Simple Syndication (RSS) and Representational State Transfer (REST) feeds, or from XML files. SharePoint's Business Connectivity Services (BCS) system is also a versatile way to access data.
This chapter focuses on the presentation of data. SharePoint Designer has some excellent tools for customizing the presentation of data—including capabilities to read, delete, and update data residing in various types of data sources. Because this chapter focuses on presentation, you will work only with data stored in SharePoint lists and libraries. For details about using other types of data sources, see Chapter 10.
You will learn about the following topics in this chapter:
- Accessing data within a SharePoint Page
- Understanding data sources in SharePoint Designer
- Creating site pages containing data list and form web parts
- Customizing the look and feel of data web parts
- Passing parameters to and between data web parts
- Knowing which web parts to use in different situations
![]() Note The following software is required:
Note The following software is required:
- SharePoint Server 2010 (Enterprise edition recommended)
- SQL Server 2008 (R1 or R2)
- SharePoint Designer 2010
Understanding Data Sources and Data Views
There are three primary considerations when displaying or updating data: the data itself, how the data is accessed, and how the data is presented. SharePoint provides a common platform for presenting data in a web-based format. SharePoint Designer leverages that platform to allow the designer to customize the retrieval and presentation of data from a variety of sources.
As noted earlier, in this chapter you will focus on data that is stored within SharePoint in the form of lists and libraries. As you saw in Chapter 2, lists in SharePoint can be thought of as tables of information. Each item in the list is a row in the table. Each value or attribute associated with the item is a column in the table. When accessing data from lists, it is helpful to think of lists as tables because that is usually how the presentation is formatted; Figure 5-1 shows an example. A SharePoint library is just a specific type of list that is designed to store a document along with each item.

Figure 5-1. A task list as a table of information
The task of accessing data in SharePoint by using SharePoint Designer is divided into two components: a data source and a data view (or form). Data sources provide a description of where the information being displayed will come from. The data source also defines the form of the data, including what values and data types are associated with each field. A data view, or form, is a web part that can be placed on a SharePoint page, bound to a data source, and customized to render the data in precisely the way desired.
In the following sections, you will explore the types of data sources that are available. You will then move on to a description of the various web parts that are available for presenting this data and will learn how to customize their appearance. Finally, you will walk through some common scenarios for creating and customizing the presentation of data by using SharePoint Designer.
Working with Data Sources
As stated in the preceding section, a data source in SharePoint is an object that defines the parameters needed to connect to a particular set of data. For example, a data set might point to a list within SharePoint or to a table in an RDBMSS such as MS SQL Server or Oracle. In addition to retrieving data, data sources can also be configured to insert, update, or delete information from the underlying data source, if the user has the necessary security privileges.
A typical SharePoint site contains some data sources by default, and more can be added through SharePoint Designer. If you open your web site in SharePoint Designer and click Data Sources within the Navigation pane, the Data Sources Gallery displays. This window, shown in Figure 5-2, contains a catalog of all data sources available within the current site.
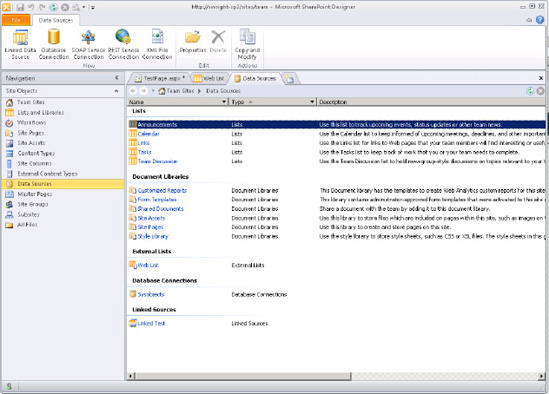
Figure 5-2. The Data Sources Gallery
Lists and Libraries
Data sources are created in one of two ways: automatically or manually. SharePoint Designer automatically exposes data sources associated with internal and external lists and with libraries that exist within the site. These data sources are configured to return all of the information from those sources and, where permitted, to support updates to items in those lists.
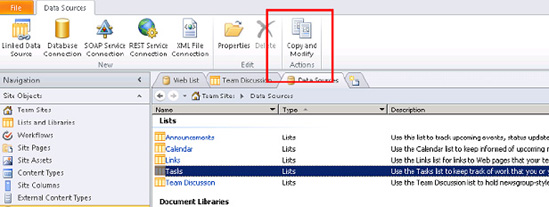
In most cases, it is not necessary to create new data sources for lists and libraries, but it can be done if necessary. The data source automatically created for a list cannot be altered except by changing the underlying list. However, to create a customized view of the data in a list, a new data source can be created and configured:
- Open the Data Sources Gallery by clicking Data Sources in the Navigation pane.
- Select the list you wish to use in the gallery page and then click Copy and Modify from the Actions group on the Data Sources tab on the menu, as shown in Figure 5-3.
- The Data Source Properties dialog box appears (see Figure 5-4). Using the options on the Source tab, you can select the fields to be made available through the data source, the sort order for the data, and any filters that may be needed to limit the items returned. Because lists and libraries may contain folders, there is also an option to select the scope of items to be returned. Leaving these options alone will create a new data source exactly like the old one.
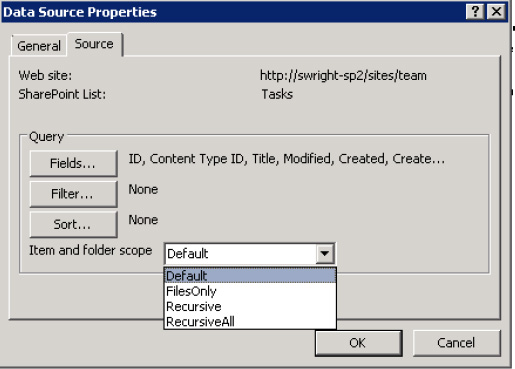
Figure 5-4. Data Source Properties dialog box
- Click the General tab. Set the name and description for the new data source and then click OK to create it.
The new data source can now be used like any of the automatically created data sources except that it can be altered and deleted if necessary.
![]() Note This technique for copying and modifying a data source is not unique to list data sources. Any data source can be copied and altered in the same way.
Note This technique for copying and modifying a data source is not unique to list data sources. Any data source can be copied and altered in the same way.
When you create a new data source, it appears in the Data Source Gallery. The gallery is just a conceptual container within SharePoint Designer, not a physical directory within the site. The data source you created was written as XML to a file in the web site. To work with this file directly, you can locate it in the All Files Gallery:
- Click All Files in the Navigation pane. This displays a Gallery page that looks like Windows Explorer, as shown in Figure 5-5. These are the files and folders that are stored within the site.
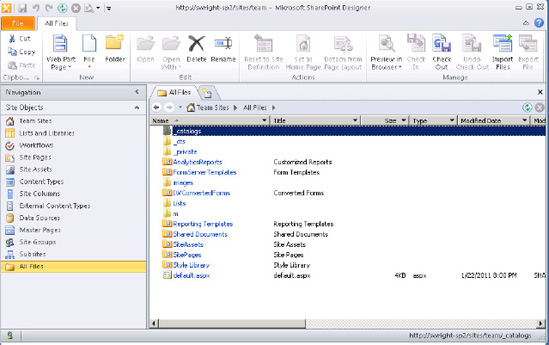
Figure 5-5. The All Files Gallery page
- Click the _
catalogsand thenfpdatasourcesfolders.
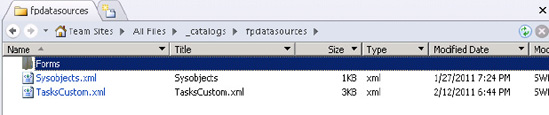
Figure 5-6. The fpdatasources folder
This folder contains all of the manually created data sources within the site. These are stored as XML files. These files can be exported to other locations or managed like any other file within SharePoint Designer. Any changes made to these files are automatically reflected in the Data Source Gallery.
![]() Caution The XML in these data source files can be complex and difficult to understand. Use great care when attempting to edit these by hand. Where possible, use the built-in editors that are launched by clicking the data source in the Data Source Gallery.
Caution The XML in these data source files can be complex and difficult to understand. Use great care when attempting to edit these by hand. Where possible, use the built-in editors that are launched by clicking the data source in the Data Source Gallery.
Linked Data Sources
A linked data source allows the designer to combine the data from multiple data sources into a single set of data. The data sources being linked need not be of the same type. For example, data from a SharePoint list could be linked with relational data or web service data. This opens up many possibilities for using SharePoint Designer to present consolidated views of information from throughout the organization.
A linked data source can combine the information from a pair of data sources in one of two ways: merging or joining.
Merging data sources is like shuffling a deck of cards. The records of the two data sources are simply combined into a single list. The combined list can be sorted and filtered as though all of the data came from a single source. Figure 5-7 illustrates merging data.
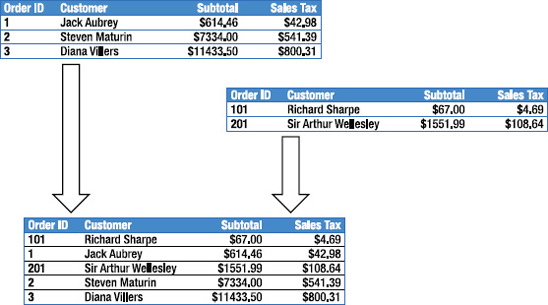
Figure 5-7. Linking data sets by merging data
The other option for linking data sources is to perform a join operation. Joining data involves creating new records by combining the fields of related records in the two data sources. Instead of having a list containing all of the entries of both lists, as in merging data, a joined data set will contain one entry for each combination of related records. This allows you to combine different types of information from different locations to produce new insights into the data. Figure 5-8 illustrates joining data.
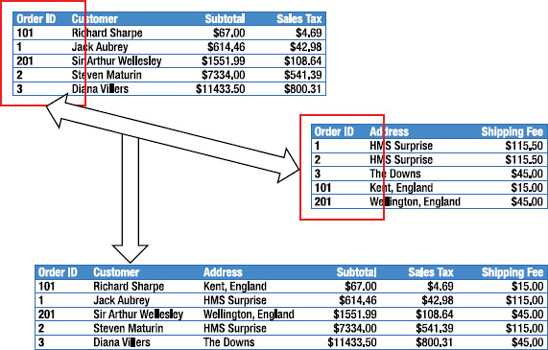
Figure 5-8. Linking data sets by—joining data
External Lists
An external list is a special type of SharePoint list that stores its data outside of SharePoint Server. This data is accessed by using the BCS subsystem within the SharePoint server. To use BCS, you create an external content type that serves the function of defining the data that is being stored externally. An external list is then created by using the external type to give access to the data. An external list is just another list when used as a data source. It may or may not support writing changes back to the underlying data source, but can otherwise be used like any other list.
![]() Note For additional details on using external lists and the other data source types described throughout this section, see Chapter 10.
Note For additional details on using external lists and the other data source types described throughout this section, see Chapter 10.
Database Connections
RDBMSs are among the most common and versatile data storage systems used by most companies. The data stored in these databases is often used by various applications throughout the organization. SharePoint Designer allows this data to be queried and modified through data forms and views presented within a SharePoint site.
SharePoint Designer database connections can connect to most modern relational systems, including those supporting the Object Linking and Embedding, Database (OLE DB) and Open Database Connectivity (ODBC) protocols. For additional functionality, performance, and ease of use, custom interfaces are provided for Microsoft SQL Server and Oracle databases.
When accessing data through a database connection, three methods are available for providing credentials. The simplest means is to provide a user ID and password with the required access privileges as part of the data source. You can also provide a complete, custom connection string as part of the data source's configuration. The problem with both of these options is that there is no way for the back-end database to enforce user-specific permissions because all access is made by using a single account. SharePoint Designer provides a further option to solve this problem. Using SharePoint's Secure Store Service (SSS), a database connection can be configured to access the back-end database using credentials that are specific to the user accessing the data. For more information on SSS, see the TechNet article at http://technet.microsoft.com/en-us/library/ee806889.aspx.
Beyond retrieving data, a database connection can also be configured to support the full range of create, read, update, and delete (CRUD) operations. The user can supply custom SQL or stored procedures to support inserts, updates, and deletes in addition to the default SELECT query.
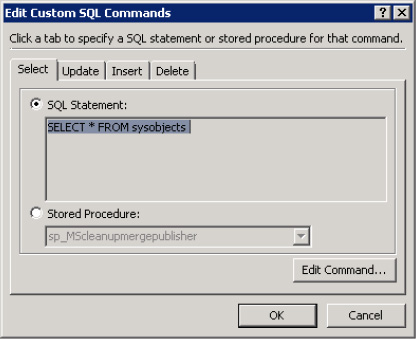
Figure 5-9. Edit Custom SQL Commands dialog box
XML File Connections
An XML file connection allows XML-formatted data to be presented on a SharePoint site. The XML file may be stored locally within the site or accessed from another site by using a URL. When an XML file is added to the local site, it is automatically listed in the Data Sources Gallery. External XML files must be added manually.
When accessing local XML files, SharePoint enforces its normal access controls. When accessing remote XML files, it may be necessary to provide login credentials. This can be done either statically, by providing a fixed username and password, or dynamically, by using Windows Authentication or SSS.
XML files used as data sources are not required to have an associated Document Type Definition (DTD) or XSD schema definition. Therefore, these files can contain any valid XML markup.
Web Service Connections
A web service is a location on the network where a program can make a request and receive data in response. The interaction is similar to a web page, except that there is no user or web browser involved. A program makes a request from the web server behind the scenes. Web services are typically based on the SOAP protocol. SOAP, when it was originally created by Microsoft, stood for Simple Object Access Protocol, but that name is no longer used. SOAP is now a widely accepted Internet standard for web services. SOAP-based services exchange XML requests and responses over a network. SharePoint Designer web service connections allow this data to be presented within a site.
Secure web services may require the caller to provide login credentials. This can be done either statically, by providing a fixed username and password, or dynamically, by using Windows Authentication or SSS.
A web service may require parameters that can be passed into the data source by using a web part connection. This allows the caller to pass information as needed to access the data desired. The request and response required by the web service are defined in its Web Services Description Language (WSDL) file. SharePoint Designer uses this file to properly format calls into a web service. The result is a response XML document that can then be formatted by using SharePoint Designer's data view web parts.
![]() Note If you are running your site by using MS SharePoint Foundation instead of SharePoint Server, you will need to update the
Note If you are running your site by using MS SharePoint Foundation instead of SharePoint Server, you will need to update the web.config file for your site to allow it to use web services. This feature is turned on by default only when using the server product. For details, see http://office.microsoft.com/en-us/sharepoint-designer-help/add-a-soap-service-as-a-data-source-HA010355752.aspx.
Server-Side Script Connections
A server-side script connection is very similar to a web service connection in many ways. A server-side script is a program that runs on a web server and is designed to provide a data feed in XML format. The most obvious example of this type of script is a web log, or blog. When viewed in a web browser, a blog appears to be like any other web page, but behind the scenes, blogs provide a series of XML documents that are consumed by some other application.
The terminology gets somewhat confused because Microsoft also sometimes refers to these connections as REST service connections. REST is an architectural style for exposing web services in a simplified way. REST is only one type of server-side interface supported by SharePoint Designer. RSS feeds are also supported. RSS feeds are the traditional interface for blogs. However, many blogs also use REST and Atom Syndication feeds. These are all supported by SharePoint Designer.
In reality, a server-side script is just a program that accepts parameters and returns XML over a standard HTTP connection. Therefore, a basic service can be written by using almost any server-side technology such as ASPX, CGI, PHP, and so on.
When configuring a server-side script, it is important to have the following information beforehand:
- What is the URL of the script?
- What parameters are necessary?
- Does the service use the HTTP GET or POST protocol?
Unlike a SOAP web service, these services do not provide a WSDL file that can guide SharePoint Designer in preparing the correct parameters for the service.
![]() Note If you are running your site by using MS SharePoint Foundation instead of SharePoint Server, you will need to update the
Note If you are running your site by using MS SharePoint Foundation instead of SharePoint Server, you will need to update the web.config file for your site to allow it to use server-side scripts as a data source. This feature is turned on by default only when using the server product. For details, see http://office.microsoft.com/en-us/sharepoint-designer-help/add-a-soap-service-as-a-data-source-HA010355752.aspx.
Using Data View Web Parts
SharePoint Designer presents data from a data source by using one of several data view web parts. There are several of these web parts, and each is tailored for use in certain situations. They all share certain attributes that make them easier to configure and customize.
The data web parts can be split into two classifications: list views and form views. List views display information as a table of information, as shown in Figure 5-10.

Figure 5-10. List view web part
Form views are most often used to display the details of a record or allow it to be inserted or updated, as shown in Figure 5-11.

Figure 5-11. Form view web part
![]() Note Unfortunately, the names of the data web parts have gotten very confusing over time. Some of the web parts can be used for more than one thing, leading to names that contain seemingly random combinations of the words List, View, Data, and Form. SharePoint 2010 introduced a new set of web parts with XSLT in the name. This has only added to the confusion, because these are not the only web parts that support XSLT formatting. A catalog of these web parts is presented later in this chapter. Be careful to note which web parts are used with which data sources and in which situations. Try not to get hung up on the names because they can be misleading. This is why they are frequently abbreviated with names such as XLV and DFWP that have little meaning on their own.
Note Unfortunately, the names of the data web parts have gotten very confusing over time. Some of the web parts can be used for more than one thing, leading to names that contain seemingly random combinations of the words List, View, Data, and Form. SharePoint 2010 introduced a new set of web parts with XSLT in the name. This has only added to the confusion, because these are not the only web parts that support XSLT formatting. A catalog of these web parts is presented later in this chapter. Be careful to note which web parts are used with which data sources and in which situations. Try not to get hung up on the names because they can be misleading. This is why they are frequently abbreviated with names such as XLV and DFWP that have little meaning on their own.
When working with data web parts, the Data Source Details task pane provides a view of the data that is being presented, as shown in Figure 5-12. The Data Source Details pane appears to the right of the main window automatically when a data web part is present on the page. If it does not appear when needed, it can be activated manually by selecting the View tab on the menu and then selecting the Data Source Details item from the Task Panes drop-down menu in the Workspace group.
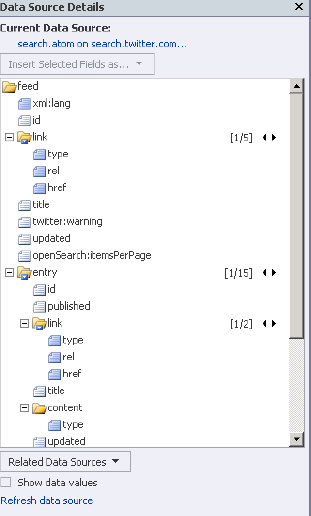
Figure 5-12. Data Source Details task pane
Regardless of the type of data source being used, the data is always described in this task pane as an XML document. XML provides a standard form for describing the data being presented. The Data Source Details pane can be used to view data values, create additional related web parts, and add additional fields to an existing data web part by dragging and dropping fields onto the Page Editor.
The data view web parts can provide highly customized presentations because of their use of XML. The data values from the data source are passed to the web parts as an XML document. The web part then uses XSL Transformations (XSLT) to convert the XML into the HTML that is sent to the user's web browser.
In Figure 5-13, some HTML markup has been added to the XSLT associated with a DataFormWebPart. In the Page Editor's Split view, it is easy to see the result of your modifications in near real-time. Highlighting objects in one view panel causes them to be highlighted in the other. XSLT formatting allows for very tight control of the exact rendering of information in the data web parts, without sacrificing the functionality of the underlying data source.
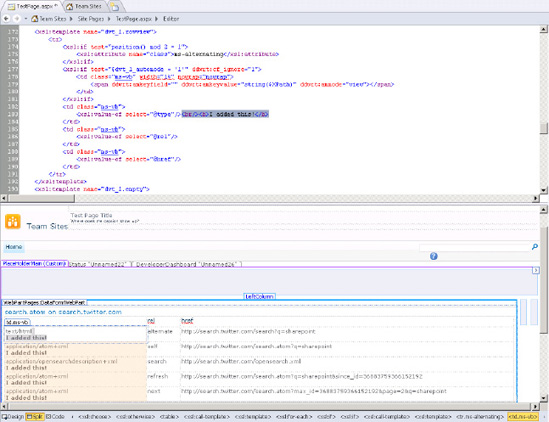
Figure 5-13. XSLT formatting in the Page Editor (Split view)
![]() Note For those wanting to learn more about formatting data by using advanced XSLT markup, take a look at Jeni Tennison's Beginning XSLT 2.0: From Novice to Professional (Apress, 2005).
Note For those wanting to learn more about formatting data by using advanced XSLT markup, take a look at Jeni Tennison's Beginning XSLT 2.0: From Novice to Professional (Apress, 2005).
Data web parts are also designed to work together by passing parameters using web part connections. For example, a list of items can send an item's ID to a form view when an item is selected. These connections can also be used between pages when necessary.
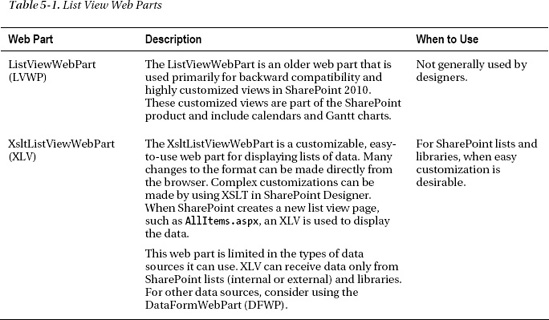
List View Web Parts
List view web parts are primarily used to display lists of information from a data source. There are only two purely list-oriented web parts: the ListViewWebPart and the XsltListViewWebPart. Table 5-1 details the two list view web parts.
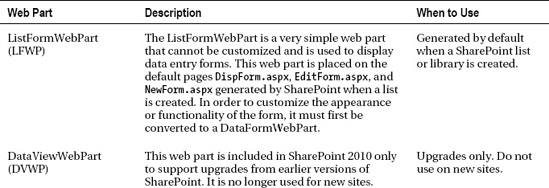
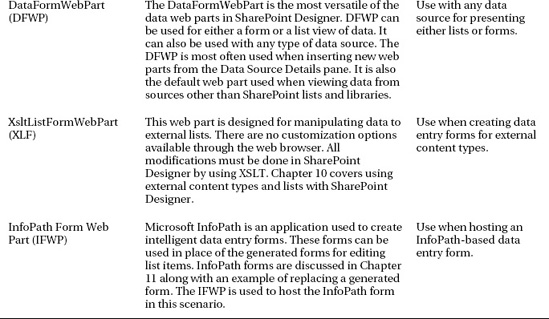
Data Form Web Parts
Form-oriented web parts are primarily for displaying detailed data about an item. These forms can also be used to create and update items in some cases. Table 5-2 lists these data form web parts.
Creating Data Pages in SharePoint Designer
Now that you are familiar with the data access components available through SharePoint Designer, let's try putting the pieces together.
In the following exercises, you will create a set of related lists within SharePoint. These lists will provide the information for your data pages. You will customize the views and forms that are automatically generated by SharePoint. You will then create two new web pages by using SharePoint Designer's data web parts. The first page will be a simple listing of orders that will allow you to subtotal your orders geographically. The second page will provide a means of filtering data, passing parameters, and entering data by using the data web parts.
EXERCISE 5-1. CREATE DATA LISTS
The first thing you need to do is establish some test data in a set of SharePoint lists. In a blank site, create three lists: States, Orders, and Order Lines. These lists will be related with lookup fields that will allow you to relate items in one list with items in the others.
SharePoint 2010 has improved the functionality of lookup fields to include features similar to foreign keys in relational databases. These fields are still somewhat limited compared to true foreign keys but they allow one important new feature that you will use here. This is the concept of projected fields. A projected field is a value taken from the lookup table and made available as a read-only field in the list. For example, if you do a lookup on a state's abbreviation (such as CA), you can also expose the full name of the state (California) as a read-only field in the list making the reference. You will walk through doing this in a moment.
- Open SharePoint Designer and create a new blank site if necessary.
- From the Navigation pane, select Lists and Libraries.
- Select Custom List from the New group on the Lists and Libraries menu tab.
- Type States for the name of the list and click OK.
- Open the column list editor window for States.
- Change the Title field to State Abbr and then create the other fields as shown in Figure 5-14.

Figure 5-14. States list definition
- Save the new list definition.
- Select Lists and Libraries from the Navigation pane.
- Select Custom List from the New group on the Lists and Libraries menu tab.
- Type Orders for the name of the list and click OK.
- Open the column list editor window for Orders.
- Change the Title field to Order Number and then create the other fields as shown in Figure 5-15.
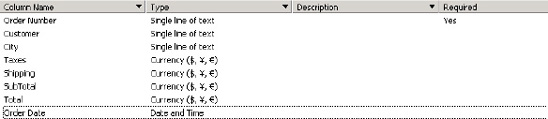
Figure 5-15. Orders list definition (partial)
- Finally, select Lookup (Information Already on This Site) from the Add New Column drop-down list in the New group on the Columns tab. The Column Editor opens, as shown in Figure 5-16.
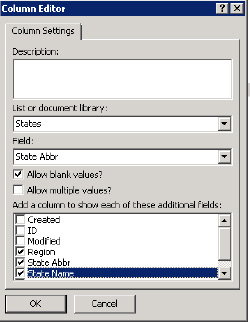
Figure 5-16. Column Editor (State field)
- Select the States list and the State Abbr field.
- At the bottom of the dialog box, select the check boxes for the Region, State Abbr, and State Name fields. This will make these fields appear in the Orders list as read-only columns.
- Click OK and set the field name to State.
- Save the new list definition. The region and state name fields appear only after the list definition is saved (see Figure 5-17).
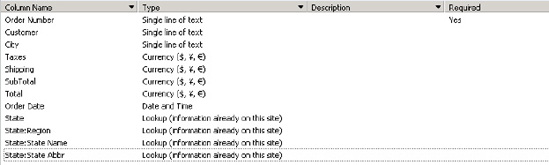
Figure 5-17. Orders List definition (complete)
 Note In Figure 5-17, it may seem strange that we have listed both State and State:State Abbr when they appear to contain the same information. The reason for this will be made clear later. In brief, the State field contains a reference to the ID field in the States list, whereas the State:State Abbr field contains the actual two-letter abbreviation of the state. When simply displaying this field, there is no difference. Both fields are rendered as the two-letter abbreviation. However, when accessing data for sorting, filtering, or joining lists, it is sometimes necessary to use the data value rather than the identifier column.
 - Select Lists and Libraries from the Navigation pane.
- Select Custom List from the New group on the Lists and Libraries menu tab.
- Type Order Lines for the name of the list and click OK.
- Open the column list editor window for Order Lines.
- Change the Title field to Product ID and then create the other fields as shown in Figure 5-18.

Figure 5-18. Order Lines list definition (partial)
- Save the new list definition.
- Select Calculated (Calculation Based on Other Columns) from the Add New Column drop-down list in the New group on the Columns tab.
- Enter the formula to calculate the Line Total value as shown in Figure 5-19.
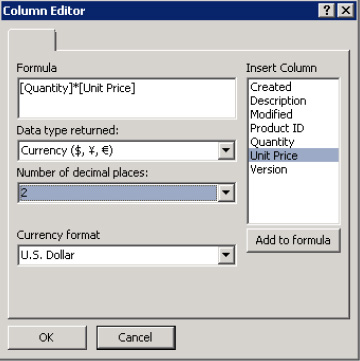
Figure 5-19. Column Editor (Line Total field)
- Select Lookup (Information Already on This Site) from the Add New Column drop-down list in the New group on the Columns tab. The Column Editor opens, as shown in Figure 5-20.
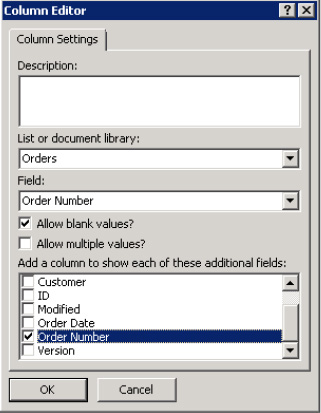
- Select the Orders list and the Order Number field.
- Select the Order Number field under additional fields.
- Click OK and set the field name to Order Number.
- Save the new list definition.

Figure 5-21. Order Lines list definition (complete)
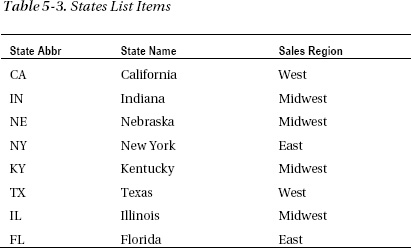
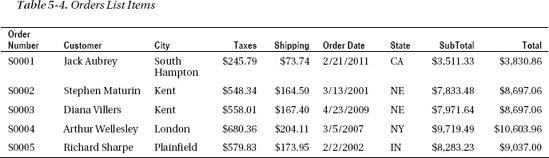
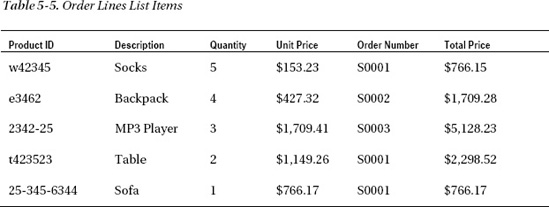
Now that the lists have been created, you need to create some sample data in the lists to work with. You can do this by using the data entry forms available in SharePoint, through the Datasheet view (if available in your configuration) or through the SharePoint Workspace client application. The data you will use in the rest of this chapter is shown in Table 5-3, Table 5-4, and Table 5-5 and can be downloaded from this book's web site.
EXERCISE 5-2. CUSTOMIZE GENERATED VIEWS AND FORMS
When a new SharePoint list or library is created, a set of ASPX pages are generated automatically. These correspond to the views and forms used to access the data in the list. By default, one view (AllItems.aspx) and three forms (DispForm.aspx, EditForm.aspx, and NewForm.aspx) are created. These can be seen by viewing the settings page for the list, as shown in Figure 5-22.
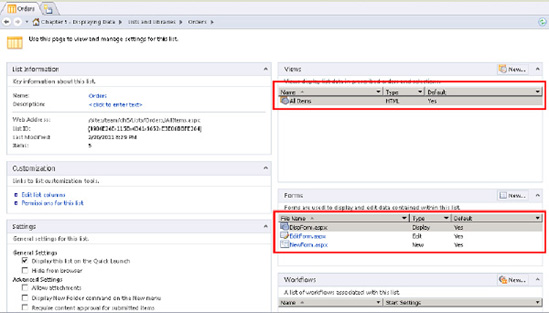
Figure 5-22. Order List settings page
In this exercise, you will explore and customize these views and forms.
- Open the settings page for the Orders list and click the All Items view. This opens the Page Editor for the All Items view, as shown in Figure 5-23.
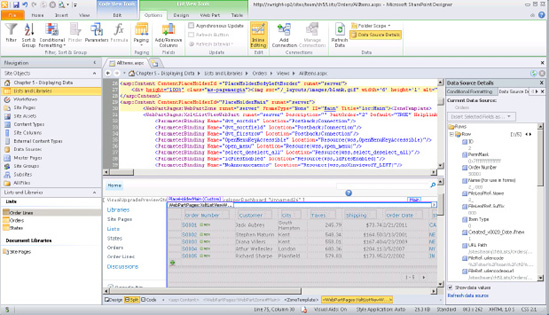
Figure 5-23. All Items View Page Editor (Split mode)
There are several important things to note about this page and the options that SharePoint Designer is presenting:
- This view page contains only a single web part: an XsltListViewWebPart (XLV). This web part is used to display the list on the page.
- In the top half of the Split view, the markup for the view is visible and can be directly edited.
- The markup highlighted in yellow is inherited from the page layout and is not editable except in Advanced mode (see Chapter 2).
- To the right of the Page Editor is the Data Source Details task pane, which displays all the data fields that are available for this view. If the Data Source Details pane does not appear automatically, it can be activated by using the Task Panes drop-down menu on the View tab of the menu.
- The List View Tools tab on the Ribbon menu contains many options for customizing the view without writing any HTML or XSLT markup. This toolbar is available whenever the XLV control is selected.
You will now use some of these options to customize the view in useful ways. Figure 5-24 illustrates the onscreen options.
- The Order Date is currently aligned to the left, making it hard to read. Click one of the dates in the Order Date column.
- On the Table tab under List View Tools, click the center button in the Cell Layout group.
Figure 5-24. Centering Order Date in the All Items view
Let's look at some of the other options available to you on the Ribbon menu. The Options tab, shown in Figure 5-25, allows the designer to sort, group, and filter items and adjust the presentation of the list in other ways.

Figure 5-25. List View Tools menu—Options tab
The Design tab, shown in Figure 5-26, presents commands for radically changing the layout of the list items. You can also adjust the toolbar and add total rows.

Figure 5-26. List View Tools menu—Design tab
The Web Part tab, shown in Figure 5-27, provides a set of tools for web parts when they are edited in SharePoint Designer. This tab allows you to adjust the height, width, chrome appearance, and other options common to all web parts.

Figure 5-27. List View Tools menu—Web Part tab
The Table tab, shown in Figure 5-28, is targeted toward adjusting the table containing the list items. You can add and remove columns and rows, adjust the alignment of contents, set borders, and so on.

Figure 5-28. List View Tools menu—Table tab
Now you will customize the view by setting up paging and allowing inline editing. Inline editing is a feature that allows the user to enter data directly into fields rendered within the list view, as shown in Figure 5-29.
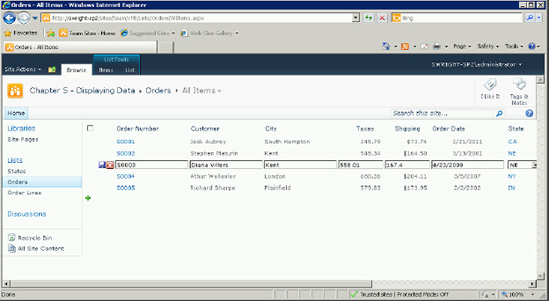
- On the Options tab, open the Paging drop-down menu and select the Display Sets of 5 Items option, as shown in Figure 5-30. The pages displayed will now contain five items instead of the default of ten.
- On the same tab, click the Inline Editing option in the Edit group. This enables the inline editing feature for the web part when it is viewed in the browser.
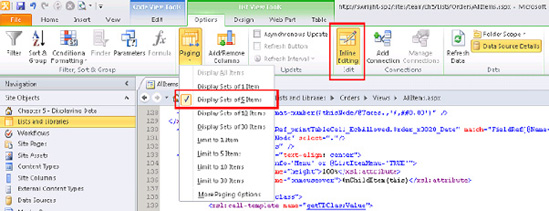
Figure 5-30. Set Paging and Inline Editing modes
Up to now, you have focused on options that affect the entire list. SharePoint Designer also has options for formatting data and elements within the list based on the values found in the data. You are going to apply conditional formatting to the Taxes field in the list. When the tax amount is over $550, you want to highlight the value by changing the background color on the cell.
Before setting this formatting, you need to determine which fields you will be evaluating. Examine the Data Source Details task pane carefully and you will note that there are actually two different Taxes fields, as you can see in Figure 5-31.
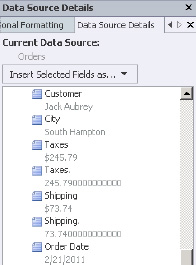
Figure 5-31. Numeric fields in the DSD task pane
The first Taxes field is a nicely formatted version of the currency field. This is useful for display purposes, but not for performing numeric logic, because it doesn't contain a valid number. The second Taxes field(which has a period at the end of its name) is the raw numeric value of the field. This is the field that you will use to perform your formatting.
- Click within one of the data cells in the Taxes column in the web part on the page designer.
- Select Format Column from the Conditional Formatting drop-down menu in the Filter, Sort & Group group on the Options tab.
- In the Condition Criteria dialog box, select the Taxes. field by moving to the bottom of the field list and selecting More Fields.
- Set the condition to Greater Than and enter a value of 550, as shown in Figure 5-32.
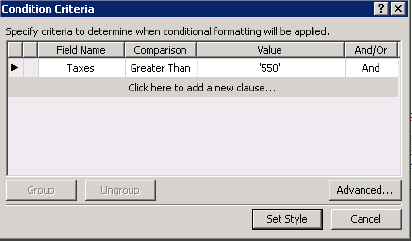
- Click the Set Style button. The Modify Style dialog box opens, as shown in Figure 5-33.
- Select the Background category and set the Background-Color option to your favorite color.
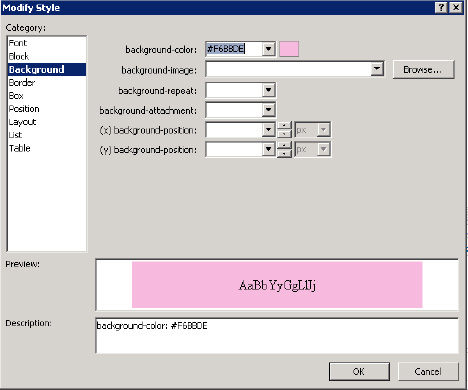
Figure 5-33. Modify Style dialog box
- Click OK. Note that the list in the page designer has taken on the new style and that the Conditional Formatting task pane has appeared to the right (see Figure 5-34).
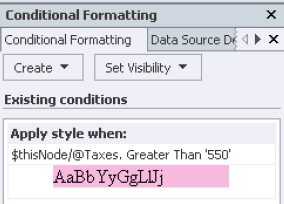
Figure 5-34. Conditional Formatting task pane
- Save the page and view in the web browser.
Using conditional formatting, the XsltListViewWebPart (XLV) web part provides a powerful way to customize SharePoint views without resorting to coding XSLT by hand. Of course, that option is always available when the needed effect isn't available.
Now let's examine the forms that were generated for us by SharePoint. Open the Orders list's settings page and click
EditForm.aspxto launch the Page Editor. Look at the form web part and you will see that it is a ListFormWebPart (LFWP). The same is true for the other forms generated for the list. This web part is very limited. It does not support XSLT or any other form of customization. You could delete this web part from the page and add a new DataFormWebPart (DFWP) web part in its place, but there is an easier way to create a customizable form for the list. - Open the Orders list's settings page.
- Above the Forms list, click New. The Create New List Form dialog box opens, as shown in Figure 5-35.
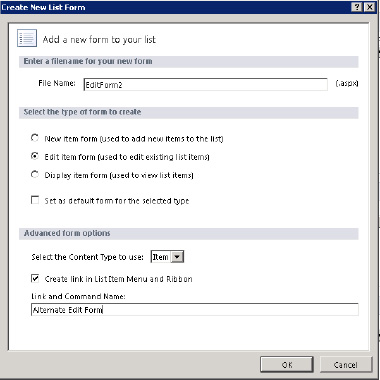
- In the File Name text box, type EditForm2.
- Select the Edit Item Form radio button.
- Select the check box labeled Create Link in List Item Menu and Ribbon.
- In the Link and Command Line field, type Alternate Edit Form. Click the OK button.
Note that two new items have been created on the settings page: a new form and a new custom action. Open the new form in the Page Editor and you will notice that it is very similar to the original EditForm.aspx except that it uses the DFWP, which allows for a wide variety of customization similar to those for the XLV you examined earlier.
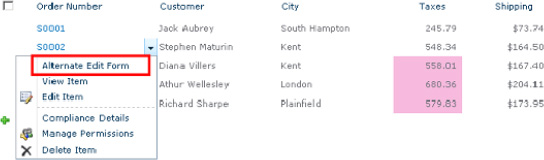
The new custom action appears on menus attached to items in the list. This menu item opens the new form you just created, as you can see in Figure 5-36.
EXERCISE 5-3. CREATE A CUSTOMIZED REPORT PAGE
You are now going to create a page that will allow you to total some of your orders. This will be an ordinary site page, not a list view or form:
- Open the site in SharePoint Designer.
- Select Site Pages from the Navigation pane.
- Select the first template from the Web Part Page drop-down menu on the Pages tab of the menu, as shown in Figure 5-37.
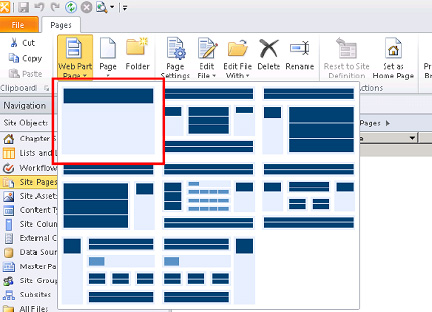
Figure 5-37. Web part page templates
- Rename the new page
OrderReport.aspx. - Open the new page in the Page Editor. Click the web part zone in the center of the page.
- From the Data View drop-down menu in the Data Views & Forms group on the Insert tab of the menu, select Orders, as shown in Figure 5-38.
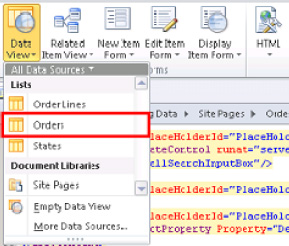
Figure 5-38. Insert the data view web part
- Click Sort & Group from the Options tab on the List View Tools menu.
- Add the State:Sales Region and State:State Name fields, selecting Show Group Header for both.
- Add the Order Number field, but do not show the group header. Click OK.
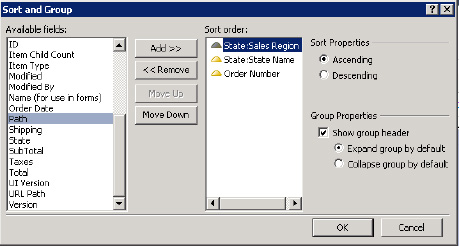
Figure 5-39. Sort and Group dialog box
- Switch to the Design tab on the List View Tools menu and select Totals Rows. After a few moments, a row showing the totals for each group and subgroup appears.
- You don't want to display all of the counts in the Totals row, so select each one and press Delete.
- In the remaining totals fields, select the Sum= text and delete it, being sure to leave the total alone by itself in the cell.
- Switch to the Table tab in the menu.
- Select the top cell from the State:State Name column.
- Select Delete Column from the Delete drop-down menu in the Rows & Columns group on the menu.
- Remove State:State Abbr and State:Sales Region in the same way.
- Select the total row cells that contain the totals to be displayed and click the Align Center Right button from the Cell Layout group on the menu, as shown in Figure 5-40.
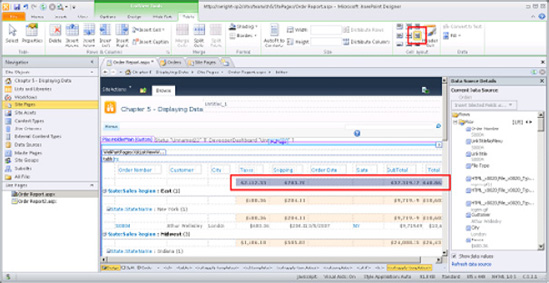
Figure 5-40. Page Editor (
OrderReport.aspx) - Save the page (Ctrl+S) and view the page in the web browser (F12), as shown in Figure 5-41.
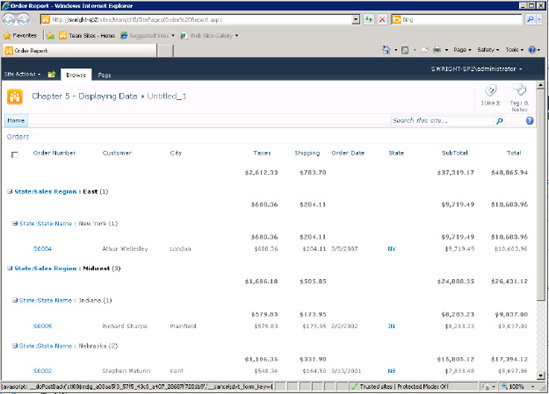
Figure 5-41. Orders report page
With just a few clicks, you have created a custom report based on the order data within these SharePoint lists. With further formatting and XSLT changes, the possible variations of this type of report are virtually limitless.
EXERCISE 5-4. CONNECT AND PARAMETERIZE DATA WEB PARTS
In this exercise, you will explore two important features of SharePoint Designer's data web parts: connections and parameters. Web part connections are not unique to the data web parts. Connections allow data to be passed from one web part to another, usually for the purpose of filtering the data displayed. Parameters serve a similar purpose, except that these can receive their data from sources other than web parts, including cookies, form and server variables, ASP.NET controls and, most commonly, from query string parameters on the page's URL.
In this example, you will create two pages. The first page will list the states in your system and present a filtered list of the orders for the selected state. The order number will link to the second page, passing the order number in the URL. This page will show the selected order's details and line items.
- Open the site in SharePoint Designer.
- Select Site Pages from the Navigation pane.
- Select the first template from the Web Part Page drop-down menu on the Pages tab in the menu. Name the new page
Regions.aspx. - Open
Regions.aspxin the Page Editor and then click in the web part zone. - Select States from the Data View drop-down menu on the Insert tab.
- Click in the web part zone beneath the data view for the States list. This may be easier to do if you use Split mode in the Page Editor. Select the States list and then move the cursor after the web part in the code window.
- Select Orders:State from the Related Item View drop-down menu on the Insert tab. If this option is grayed out, be sure you are not still on the list control itself. You need to have your cursor in the web part zone, but not on the list.
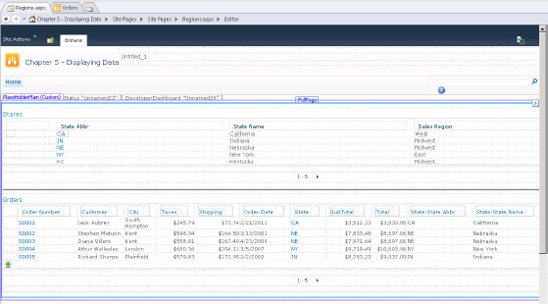
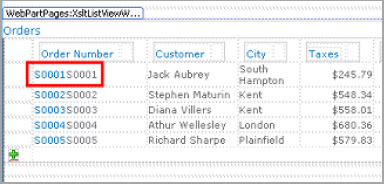
Figure 5-42. Regions page with connected web parts
- Save the page (Ctrl+S) and view the page in the web browser (F12).
- Click the double-arrow icon at the beginning of the Nebraska line, as shown in Figure 5-43. This will refilter the list of orders to show those from Nebraska.
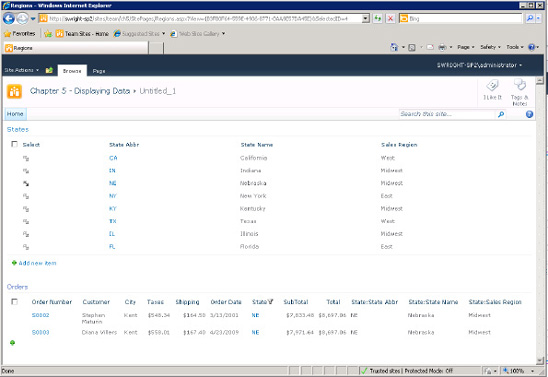
Figure 5-43. Regions page (web browser)
At this point, there are two XSLT list view web parts on the page. The Related Item View option has automatically configured a connection between these views. To see how this connection is configured, right-click either of the web parts and select Manage Connections.
- Select Site Pages from the Navigation pane.
- Select the first template from the Web Part Page drop-down menu on the Pages tab of the menu.
- Name the new page
OrderDetails.aspx. - Open
OrderDetails.aspxin the Page Editor and then click in the web part zone. - Select Orders from the Display Item Form drop-down menu on the Insert tab.

Figure 5-44. Default form for displaying items
The default item form contains only a few fields that do not suit our purposes. Instead, you will remove it and use the Data Source Details pane to create a more appropriate form.
- Select the form and press Delete.
- In the Data Source Details (DSD) task pane, select only the fields to be displayed in the form: Order Number, Order Date, Customer, City, State:State Abbr, Taxes, Shipping, SubTotal, and Total. Be sure to select the formatted versions of the numeric fields. Those are the fields without periods after the name.
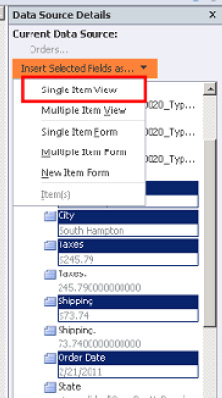
Figure 5-45. Data Source Details task pane
- From the Insert Selected Fields As drop-down list at the top of the DSD pane, select Single Item View.
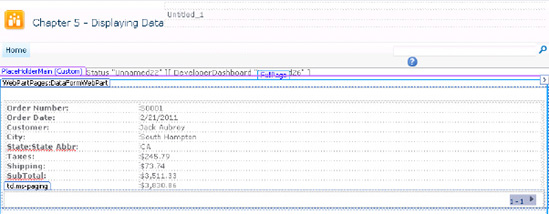
Figure 5-46. Display form for order details
- Select Parameters from the Filter, Sort & Group group on the Options tab of the Data View Tools menu.
- The ListID parameter has already been set and should not be altered. Add a new parameter called OrderNumber.
- Set the Parameter Source to Query String and the Query String Variable name to ord.
- Set the Default Value to S0001. This default value will allow you to view and manipulate the view in SharePoint Designer instead of seeing a message indicating that the view is empty.
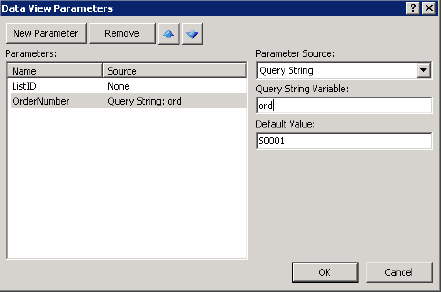
- Click OK.
- Select Filter from the Filter, Sort & Group group on the Options tab of the Data View Tools menu.
- Select the Order Number field and leave the comparison as Equals.
- Select [OrderNumber] from the Value drop-down list, as shown in Figure 5-48. This refers to the parameter you just created. Then click OK.
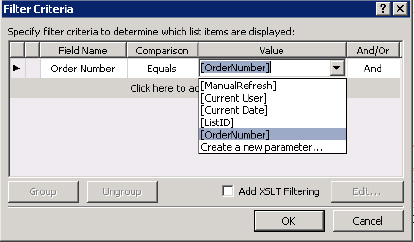
Figure 5-48. Filter Criteria dialog box (order form)
The data view you have just created accepts a parameter from the ord parameter on the page's URL and uses it to find the single order item to be displayed. Now you will create another data view that will display the line items for the order. It will use the same parameter and filter properties that were used in the previous example.
- Click in the web part zone beneath the data view for the order details. Again, this may be easier to do using Split mode.
- Select Order Lines from the Data View drop-down menu on the Insert tab.
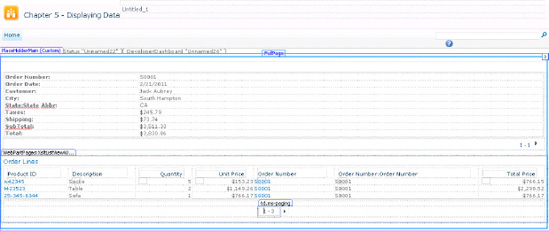
Figure 5-49. Order details web parts
- Select Parameters from the Filter, Sort & Group group on the Options tab of the Data View Tools menu.
- The ListID parameter has already been set and should not be altered. Add a new parameter called OrderNumber.
- Set the Parameter Source to Query String, the Query String Variable name to ord, and the Default Value to S0001. Click OK.
- Select Filter from the Filter, Sort & Group group on the Options tab of the Data View Tools menu.
- Select the Order Number:Order Number field and leave the comparison as Equals.
- Select [OrderNumber] from the Value drop-down list. Click OK.
- Save the page (Ctrl+S) and view the page in the web browser (F12), as shown in Figure 5-50.
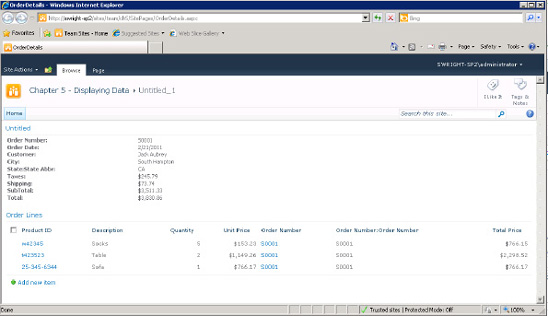
Figure 5-50. Order details page
Because you set the default parameter values to S0001, that is the order shown on the page by default. Add
?ord=S0002to the URL in the browser and press Enter to refresh the page. Details for order number S0002 should now be shown in both web parts. Note The web parts on this page (see Figure 5-50) are not connected to one another as they were on the Regions.aspxpage. Instead, they are both filtering based on the same query string parameter.You have one more step to complete your solution. If you go back to the
Regions.aspxpage, you will see that the order number is a link, but that when clicked, that link opens the default display form for the order. You need to update the page to link to your custom page instead, passing in the order number on the URL. To do this, you will directly edit the XSLT for the orders list. - Open
Regions.aspxin the Page Editor and then click in the cell next to the order number S0001. - From the DSD task pane, select the OrderNumber field.
- From the Insert Selected Fields As drop-down list, select Item(s). This causes the order number to appear twice in that cell, as shown in Figure 5-51.
- Switch the Page Editor to either Split view or Code view and then find the markup for the Order Number cell, as shown in Figure 5-52.
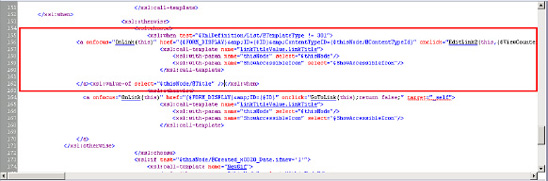
Figure 5-52. Original markup for the Order Number cell
- Replace that markup with
<xsl:value-of select="$thisNode/@Title" />. The resulting section of XSLT should look like Figure 5-53. Note The field name used in the XSLT markup is @Title because the list's original Title field was renamed and is being used for the Order Number field. Order Number is the display name for the field, but the internal name is still Title.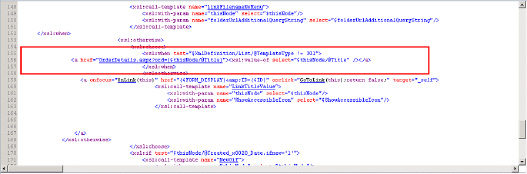
- Save the page (Ctrl+S) and view the page in the web browser (F12).
- Click an order number. The corresponding order should now appear on the new page.
Summary
In this chapter, you have
- Introduced Data Access using SharePoint Designer
- Explored the Data Sources Available in SharePoint Designer
- Examined Which Web Parts to use in Different Situations
- Created and Customized Data Pages Using Data Web Parts
- Enabled the Passing of Parameters Between Data Web Parts
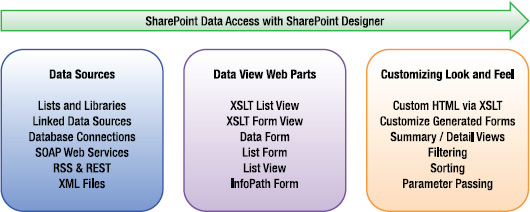
Figure 5-54. Road map to accessing data with SharePoint Designer