
Chapter 6
Deploying Silverlight applications
Finally, you have reached the finishing line after getting the application developed and tested successfully, and now you need to deploy it successfully. However, crossing the finishing line to win the game is not an easy job. For that, you need proper planning and preparation way before you get into the game. The deployment phase comes at the end of the software development life cycle (SDLC), but you need to plan and make coordinated efforts to execute the software deployment process from very early on in the project. The main objective of any application deployment process is to provide a secured, scalable, high-performing application execution platform and effective support and maintenance plan that can provide a great end-user experience.
In this book so far, we have developed Silverlight-based RIAs. Now it's time to discuss how to deploy Silverlight RIAs. Earlier, at a high level, I covered a few Silverlight technology deployment features and approaches such as Silverlight deployment package options, cross-domain deployment, how to host applications on the Microsoft Silverlight Streaming by Windows Live platform, and how to integrate Silverlight applications as plug-ins to your existing web sites. This chapter will define the deployment process, Silverlight deployment features, and Silverlight application deployment options/approaches in detail.
Defining the Deployment Process
In this section, we will quickly go through the key elements involved in defining and executing the deployment process for successful RIA development. The deployment process involves four main phases:
Planning
Definition
Implementation
Support and maintenance
In the Agile SDLC, the deployment planning phase begins from the day the project starts. Team-work plays a critical role for implementing and deploying SOA-based RIAs. In Chapters 3 and 4, we discussed seven key principles—flexibility, usability, simplification, reusability, scalability, maintainability, security—and related dimensions of SOA-based RIAs. The planning of the deployment phase should consider and cover all the principles and related dimensions. The following items are covered as part of the deployment planning phase:
Define key milestones of the deployment phase in alignment with the master project plan.
Identify critical success factors.
Identify user groups, user roles, and security policies.
Analyze the geographical locations of the diversified end-user groups.
Plan for network impact analysis and stress testing to perform performance analysis and security analysis.
Plan for required technical and user training.
Plan for required post-pilot support and system maintenance.
Identify different risks and issues related to the deployment.
A deployment plan is a detailed definition of required steps and provides possible options that help to deploy the application successfully, achieving the defined organization strategic vision and deployment objectives. The deployment plan defines the overall deployment strategy, major milestones, roles and responsibilities, and budget allocation. The following items are covered as part of the deployment process definition phase and are aligned with the items of the deployment planning phase:
Define deployment and operational requirements.
Define the application deployment architecture and approach based on the application system/infrastructure architecture (physical tiers of the application and hardware definition) and application component and service architecture (logical application and service layers).
Define the deployment approach based on globalization and localization requirements.
Define the application installation package.
Finalize user management policies.
Define the system resource usage plan.
Define the approach for performance/stress testing, network impact analysis, and security analysis.
Define administration and system monitoring and instrumentation policies and approaches.
Finalize the support model and the technical and end-user training approach, and define required materials.
Define requirements for pilot to get early feedback on the product (this is an optional step).
Define the postdeployment user feedback and survey approach.
Define and monitor the risk and issue mitigation plan.
It is important to consider deployment and support requirements during the definition and implementation of the application and system/infrastructure architecture, as well as during the design and development of application components and services. Enterprise architects and the development team need to coordinate efforts with the deployment and support teams to implement a successful deployment and system architecture.
System architects need to define the enterprise RIA deployment model based on the complexity of the application. They need to consider the following items while implementing the application deployment model:
Platform scalability requirements in terms of number of users, number of concurrent users, performance expectation, data size, data volume, number of transactions, and network latency
Scope of the customers—internal/external customers (intranet vs. Internet) and types of connectivity
The organization's long-term vision, product roadmap, and technology roadmap in terms of the future usage of the systems, geographically diversified customers, and identity management
IT governance rules and regulation policies (such as cross-border data sharing) and security measures
Same-domain vs. cross-domain deployment
Backup, archive, data retention, discovery, and disaster recovery requirements
Application component and application service version management and upgrade policies
Implementation of instrumentation and reporting requirements for monitoring
Application solution architects need to define application architecture that supports the agreed-upon enterprise RIA deployment model. They need to consider the following items during implementation of the application:
The seven key principles and related dimensions defined in Chapters 3 and 4
Globalization and localization feature and capability requirements
The organization's long-term vision, product roadmap, and technology roadmap in terms of the future usage of the systems, geographically diversified customers, and identity management
IT governance rules and regulations polices (such as cross-border data sharing) and security measures
Same-domain vs. cross-domain deployment
Backup, archive, data retention, and discovery requirements
Metadata model
The ability to support different types of client machine, operating system, and browser
Instrumentation and logging capabilities
Proper error management to provide user-friendly information upon unavailability of services on both the server side and client slide (e.g., Silverlight is not installed on user's machine)
Deployment, support, administration, and training teams will be performing the following activities during the deployment implementation phase:
Effective continuous communication and status reporting on the progress of the deployment plan and actual deployment
Development of required documentation such as user guides, training materials, technical documentation, FAQs, and instruction documents
Running a pilot to get early user feedback
Development of required support tools and support processes that help the organization support team to identify, analyze, debug, and isolate a problem and resolve it
Implementing a support process and rapid action force to provide effective customer support
Arranging training sessions—train the trainers as well as train the users
Support and maintenance plays a very vital role after the deployment of the application, especially for the agile development model, in which you accommodate changes in your next release based on user feedback.
The following activities are involved in the support and maintenance phase:
Continuously monitor and review system usage reports and logs to identify potential issues and usage patterns.
Run post deployment end-user survey and feedback sessions to get productive feedback to improve the system.
Provide effective customer support (technical and nontechnical) via rapid action force.
Provide constructive feedback to the architecture and development team on possible improvements of the application and application hardware.
Deploying Silverlight Applications
The remaining sections of this chapter are focused on detailing how to package, test, and deploy Silverlight applications. You'll also see some tips on providing a better user experience by providing effective error management.
Silverlight Deployment Package Definition
Table 6-1 summarizes the mandatory and optional components to run any Silverlight 2 application on the browser successfully.
Table 6.1 Silverlight Component for Running the Silverlight 2 Application Successfully
| Mandatory/Optional | Silverlight Components | When Is It Installed/Downloaded? |
| Mandatory | Silverlight core runtime library (such as System.dll, System.core.dll, and so forth)Silverlight main application package (XAP file), including in-package files such as AppManifest.xaml, application assembly, and other optional assemblies and resource files |
Installed as Silverlight 2 runtime browser plug-in (not application specific) Downloaded as a startup package when the user accesses the Silver-light application |
| Optional | Silverlight SDK library files (in-package or on-demand .NET library files such as System.Xml.Linq.dll)Application class library assembly files (in-package or on-demand custom class library files developed as part of the Silverlight project) Other referenced XAP packages, which are part of a partitioned application |
Downloaded at startup (for in-package files) and at runtime when referenced (for on-demand files) Downloaded at startup (for in-package files) and at runtime when referenced (for on-demand files) Downloaded at runtime when referenced |
Silverlight 2 core runtime library is a set of core .NET Framework library components that are required on the client's machine to run any Silverlight 2 RIA. These components are installed on the client machine as part of the Silverlight 2 runtime installer. As a result, an individual application does not need to include them as part of the startup XAP package file. This helps to reduce the application startup package size and thus improves the application startup performance by reducing the startup download time.
In the "Custom Error Handling for Better User Experience" section of this chapter, we will develop a user-friendly approach to acknowledge that the Silverlight 2 runtime is not installed on the user's machine. We'll recommend to the user that he or she installs it to run Silverlight applications successfully.
Silverlight Application Package (Xap File)
The Silverlight 2 package is automatically generated as part of the project's build process in Visual Studio 2008. As mentioned in Chapter 2, the Silverlight application package is a standard compressed file with the extension .xap that contains all the required application startup files.
Figure 6-1 shows the SmartTabs Silverlight application project profile demonstrating the deployment profile—deployment package file name, application manifest file name, and startup application assembly name with the namespace definition.
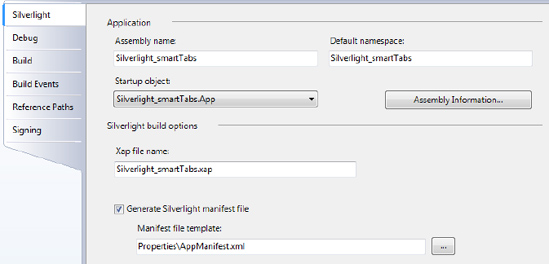
Figure 6.1 Silverlight SmartTabs project properties window
Figure 6-2 shows the SmartTabs Silverlight application package file (XAP file), opened as a ZIP file, containing the mandatory files AppManifest.xaml (application manifest file) and Silverlight_smartTabs.dll (application class assembly), the optional .NET library files System.Windows.Controls.dll and System.Xml.Linq.dll, and the configuration file ServiceReferences.ClientConfig.
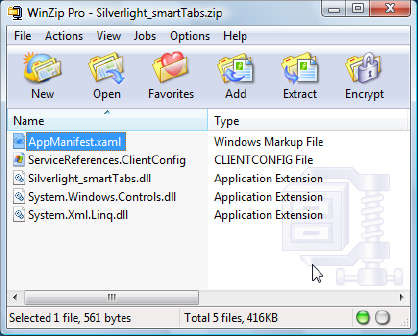
Figure 6.2 Silverlight SmartTabs application XAP package file
AppManifest.xaml: Application Manifest File
The application manifest file is an XAML file that Visual Studio creates when it creates the Silverlight project. It mainly includes a list of assembly files that need to be downloaded upon application startup by defining the Deployment object. Figure 6-3 shows the application manifest file of the Silverlight SmartTabs application we developed in Chapter 4.
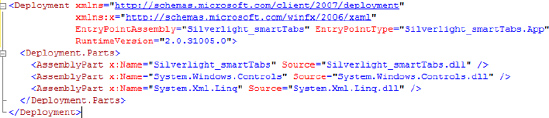
Figure 6.3 AppManifest.xaml of the SmartTabs application
As shown in Figure 6-3, the main <Deployment> element contains attributes such as RuntimeVersion, which defines the Silverlight runtime version that is required on the client machine, and EntryPointAssembly and EntryPointType, which point toward the Silverlight application startup assembly.
The <AssemblyPart> element can appear one or more times as a child element of <Deployment.Parts>. Each <AssemblyPart> element includes information about an assembly (with x:Name and Source attributes) that is part of the Silverlight XAP application package. As you can see in Figure 6-3, the first <AssemblyPart> element defines the startup SmartTabs application assembly Silverlight_smartTabs.dll. The other two optional assemblies, System.Windows.Controls.dll and System.Xml. Linq.dll, are Silverlight SDK component libraries, and for this project they are part of the XAP application package.
Application Startup Assembly File
Once the Silverlight application plug-in is downloaded, the startup application class assembly (Silverlight_smartTabs.dll in our example) containing the Startup event initiates all initialization actions. These initialization actions include displaying the application user interface (driven by the Page class) and other optional application initialization processes, such as retrieving data from a data source and beginning any asynchronous downloads of other on-demand referenced assembly files and resource files.
The XAP file contains the following optional files:
Silverlight SDK library files: These are additional .NET Framework library files, such as
System.XML.Linq.dll, that we can package so that they will be downloaded at application startup. Alternatively, they can be downloaded when referenced. Only referenced files from the SDK library are required as part of the package or are downloaded on demand.Application class library assembly files: These are custom class libraries created to introduce reusability. If you have an application class library assembly file, it can be downloaded upon startup or will be downloaded when referenced.
Resource files: The application may refer to different types of resource files such as images and videos. Usually resource files are large (especially image and video files). You can reference these as on-demand, and they will be downloaded when referenced. You can see in Figure 6-2 earlier that the
ServiceReferences.ClientConfigresource file is part of the Smart-Tabs application XAP package file.Additional XAP packages: In order to support enterprise-level development and maintenance and provide high-performing applications, application partitioning is one way to develop SOA-based RIAs. Using this approach, we can define distributed application modules and deploy them individually. Silverlight enables application partitioning and supports the definition and development of different application modules as separate deployment packages (XAP files) that can be referenced on-demand dynamically. This book does not cover the application partitioning feature in detail. A good article on the subject is contained in Hanu Kommalapati's blog at http://blogs.msdn.com/hanuk/archive/2008/05/19/silverlight-for-the-enterprises-application-partitioning.aspx.
In-Package and On-Demand Files
By now it should be crystal clear that RIAs are usually media-rich applications, and that it is important to consider different options during application and deployment design to improve overall application performance, stability, and security. Silverlight supports the in-package and on-demand file deployment options to balance initial startup performance and rich media functionality.
At minimum, AppManifest.xaml, the application class, and other library assemblies and resource files that are required when initializing the application must be part of the Silverlight XAP file. These are called in-package files. The package needs to be uploaded on the hosting server.
All other remaining files are optional, and the design team has to decide whether to keep them as part of the application package as in-package files or deploy them on the application hosting server. These files are on-demand files and will be downloaded to the client machine when referenced by the application at runtime. The on-demand files can be downloaded with a direct URI reference or using the asynchronous download feature.
At design time, you can control the assembly file (.NET library file or custom class library file) deployment behavior—in-package or on-demand—by setting the Copy Local property of each assembly. If the property value is set to True, the assembly will be part of the XAP deployment package as an in-package file and will be defined in the AppManifest.xaml file. Upon setting it to False, you need to deploy it to the hosting server, and it will be downloaded at runtime asynchronously or when referenced. Figure 6-4 demonstrates the Copy Local property for the System.XML.Linq assembly.

Figure 6.4 Defining in-package/on-demand behavior using the Copy Local property of the assembly file
At design time, you can control the deployment behavior—in-package or on-demand—of resource files (such as image files, video files, and text files) by setting the Build Action property of each resource file. The Build Action property defines how the added file relates to the build and deployment processes. It is an extensible property, and additional options can be added very easily. For Silverlight projects, three Build Action options—None, Resource, and Content—are mainly used. Figure 6-5 shows possible Build Action property values of the 01.jpg image file.
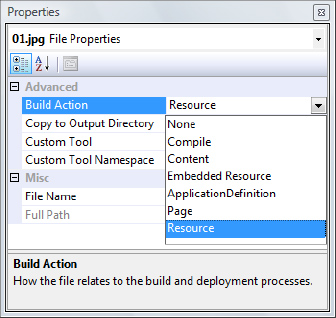
Figure 6.5 Setting the Build Action property of a resource file
If the property value is set to None, the resource file will not be part of the XAP deployment package or part of the main application assembly. The file will be deployed as an on-demand file on the hosting server. If the property value is set to Resource, during the application project build process the resource file will be embedded in the assembly file. If the property value is set to Content, the resource file is part of the XAP file and can be referenced by multiple assemblies of the project.
Hosting Silverlight Applications
If planned and designed properly, deploying Silverlight 2 applications in a secured enterprise environment is very straightforward compared to deploying Silverlight 1 applications. As shown in Figure 6-6, to deploy and consume a Silverlight 2 application successfully, you need to follow these steps on the server and client side:
Server side:
1. Deploy the Silverlight application package (XAP file).
2. Deploy additional resource files (video files, image files, other files, assembly files).
3. Deploy additional services (with required cross-domain policy files).
4. Deploy required database (with required cross-domain policy files).
5. Add the Silverlight plug-in or reference the deployed Silverlight application in your ASP.NET or HTML web page.
-
1. Install the Silverlight 2 runtime.
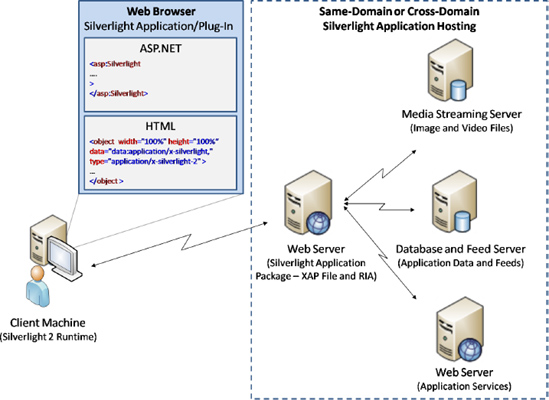
Figure 6.6 Deploying and consuming a Silverlight application
Server-Side Silverlight RIA Deployment
At minimum, you need to host the Silverlight XAP file on the web server. In more complex scenarios, you may have additional resource files, assembly files, databases, and web services to be deployed in the same-domain or cross-domain environment.
The simplest deployment option is to manually copy the deployment package and related resource files to the web server under the ClientBin directory.
If you are using IIS 6 or earlier on the web server, you need to add the MIME type related to the Silverlight application deployment package XAP file type. You can right-click the IIS manager to open the Properties window. Click the MIME Type button to add a new MIME type for the file type XAP with the MIME type application/x-silverlight-app.
Note If you are using IIS 7, the XAP Silverlight package file type is already related to the application/x-silverlight-app MIME type. No additional steps are required.
Same-Domain and Cross-Domain Deployment
It is critical to consider different security aspects as part of your deployment strategy. RIAs and social networking are dynamic in nature and need to access different services and data across domains, which exposes you to possible computer security vulnerability such as cross-site scripting (XSS) and cross-site request forgery (CSRF or XSRF).
XSS is a type of vulnerability where, with the help of client-side scripting of web applications, hackers can gather sensitive user data by accessing stored cookies and session information.
CSRF exploits trusted web sites or services, where hackers can perform unauthorized actions to get data and information from the trusted web sites and services by gaining unauthorized control on the logged-in user's web application session. The CSRF threat enables malicious access to web-based controls of the application and executing unauthorized commands to cross-domain applications and services.
As mentioned on Wikipedia:1
Cross-site scripting exploits the trust a user has for a particular site [whereas] cross-site request forgery exploits the trust that a site has for a particular user.
Note Get more information on XSS by visiting http://en.wikipedia.org/wiki/Cross-site_scripting and CSRF by visiting http://en.wikipedia.org/wiki/Cross-site_request_forgery.
To provide a secured environment that prevents CSRF threats, Silverlight supports same-domain and policy-based cross-domain networking to deploy Silverlight-based enterprise RIAs. Except for images and media, Silverlight allows only site-of-origin (i.e., within the same domain) communication to prevent cross-site request forgery vulnerabilities such as a malicious Silverlight control performing unauthorized actions to cross-domain applications and services. Here the term "same domain" covers the domain name, protocol, and port. As a result, the following scenarios are considered to be cross-domain deployment:
Same protocol and domain name but different ports—as an example, http://www.technologyopinion.com and http://www.technologyopinion.com:81
Same domain name and port but different protocol—as an example, http://www.technologyopinion.com and https://www.technologyopinion.com
Same port and protocol but different domain names—as an example, http://www.technologyopinon.com and http://www.apress.com
Application services must explicitly opt in, detailing the scope of the cross-domain service access by a Silverlight application from all or specific domains by publishing policy files.
Silverlight enables cross-domain integration by providing two types of declaration policy method:
crossdomain.xmlpolicy fileclientaccesspolicy.xmlpolicy file
The crossdomain.xml Policy File
This approach is very similar to the Adobe Flash policy. Silverlight supports a subset of the crossdomain.xml schema developed by Macromedia (now owned by Adobe). The following is a sample snapshot of the crossdomain.xml file:
<?xmlversion="1.0"?>

<!DOCTYPE cross-domain-policy

      SYSTEM "http://www.macromedia.com/xml/dtds/cross-domain-policy.dtd">

<cross-domain-policy>

  <allow-http-request-headers-from domain="*" headers="*"/>

</cross-domain-policy>
This policy file must be copied to the root of the domain where the service is hosted. As an example, if the service is hosted at http://servicesfortechnologyopinion.com, the crossdomain.xml policy file must be available at http://servicesfortechnologyopinion.com/crossdomain.xml. By deploying this file at the host service location, the service is publically available and can be accessed by any application from any other domain.
However, the following are two disadvantages of using crossdomain.xml as the security policy file to enable cross-domain access:
For Silverlight, you must use the
"*"value for thedomainattribute and thus allow access to all external domains (<allow-http-request-headers-fromdomain="*"headers="*"/>). If you would like to enable access to only specific domain(s), say, only to the technologyo-pinion.com domain, you cannot achieve this using thecrossdomain.xmlpolicy file. Here theheadersattribute is an optional attribute.With the use of this method, you can decide who has access (in Silverlight's case, it is all external domains). You do not have capabilities to specify what can be accessed.
The clientaccesspolicy.xml Policy File
Use of the clientaccesspolicy.xml as a security policy file is a Silverlight-specific approach. Its detailed schema supports a more selective and controlled approach, overcoming the disadvantages discussed for the crossdomain.xml file.
The following is a sample snapshot of the clientaccesspolicy.xml file:
<?xml version="1.0"  encoding="utf-8"?>

<access-policy>

  <cross-domain-access>

     <policy>

        <allow-from http-request-headers="*">

          <domain uri="http://technologyopinion.com"/>

        </allow-from>

        <grant-to>

          <resource path="/servicesforTO/"  include-subpaths="true"/>

        </grant-to>

     </policy>

   </cross-domain-access>

</access-policy>
This policy file must be copied to the root of the domain where the service is hosted. As an example, if the service is hosted at http://servicesfortechnolgoyopinion.com, the clientaccesspolicy.xml policy file must be available at http://servicesfortechnologyopinion.com/clientaccesspolicy.xml. By deploying this file at the host service location, the following rules are set:
The service can be accessed only from the technologyopinion.com domain. We achieve this by setting the
uriattribute of the<domain>element to http://technologyopinion.com. If you set it to the wildcard*, the services will be accessible from any cross-domain application.Only resources that are located at
/servicesforTO/can be accessed. We achieve this restriction by setting thepathattribute of the<resource>element to/servicesforTO/. The default value is/, which enables full access.
When a Silverlight application web client identifies the requirement to access the cross-domain service, it will first look at the existence of the clientaccesspolicy.xml file at the root of the deployed service. If it exists, it will authorize against the policy file and upon successful authorization can access and utilize the cross-domain deployed service. If the clientaccesspolicy.xml file does not exist at the root of the service's domain, next it will look for the crossdomain.xml file and authorize against it to gain access.
In this book, we use the clientaccesspolicy.xml policy file to enable cross-domain communication.
Embedding Silverlight Plug-ins into the Web Page
In the previous section, we looked at the Silverlight application security settings. Now it's time to embed the Silverlight application plug-in into your web page. Enterprises can embed the Silverlight plug-ins into web applications using the following three options:
ASP.NET
Silverlightserver controlHTML
<object>elementSilverlight.jsJavaScript helper file
Upon creating a Silverlight 2 application project using Visual Studio 2008 SP1, if the user selects "Add a new ASP.NET Web project to the solution to host Silverlight" as the hosting platform option, a separate ASP.NET web site project with two additional test web pages (.aspx and .html) are added to host the Silverlight application/user control. The naming convention of these test pages is based on the Silverlight application name—<Name of the Silverlight Application>TestPage.aspx for the ASPX file and <Name of the Silverlight Application>TestPage.html for the HTML file.
ASP.NET Silverlight Server Control
The Silverlight 2 SDK installed along with the Microsoft Silverlight Tools for Visual Studio 2008 SP1 includes the Silverlight server control to host Silverlight plug-ins. The following code snippet demonstrates this control, added in the myAlbumTestPage.aspx file to host the My Album Silverlight application developed in Chapter 2:
<form id="form1" runat="server" style="height:100%;">

     <asp:ScriptManager ID="ScriptManager1" runat="server"></asp:ScriptManager>

     <div  style="height:100%;">

        <asp:Silverlight

            ID="Xaml1"

            runat="server"

            Source="~/ClientBin/myAlbum.xap"

            MinimumVersion="2.0.31005.0"

            Width="100%"

            Height="100%" />

     </div>

</form>
As shown in this code snippet, in addition to common attributes, the Silverlight control has a Source attribute containing the location of the Silverlight application XAP file (in this example, it is ~/ClientBin/myAlbum.xap) and a MinimumVersion attribute, which defines the minimum Silverlight runtime version that is required on the client machine to run the Silverlight application successfully.
The HTML <object> element enables us to embed the Silverlight plug-in into the HTML web page. The following code snippet demonstrates the Silverlight control added in the myAlbumTestPage.html file to host the My Album Silverlight application developed in Chapter 2:
<object  data="data:application/x-silverlight-2,"

          type="application/x-silverlight-2"

          width="100%"

          height="100%">

   <param name="source" value="ClientBin/myAlbum.xap"/>

   <param name="minRuntimeVersion" value="2.0.31005.0" />

</object>
As shown in this code snippet, you need to define attributes of the <object> element in order to run the Silverlight plug-in in all browsers with optimal performance.
The
dataattribute is required for some browsers to avoid performance issues. The value ends with a comma, which indicates that the second parameter is an empty value.The
typeattribute defines the MIME type of Silverlight to allow the browser to identify the plug-in and the required Silverlight version.The
widthandheightattributes are required (with fixed pixel values or with relative percentages) to run across different types of browsers properly.
A <param> child element with its name attribute set to source is required. The value attribute of this element contains the location of the Silverlight XAP file (in this example, it is ClientBin/myAlbum.xap).
The <param> child element with the name attribute set to minRuntimeVersion defines the minimum Silverlight runtime version that is required on the client machine to run the Silverlight plug-in successfully. Set the Silverlight version number as a value of the value attribute of this element.
Silverlight.js JavaScript Helper File
You can use the Silverlight.js JavaScript helper file and use the createObject and createObjectEx functions defined in this file to embed the Silverlight plug-in in a web page. This approach would be useful if there is a need to have multiple plug-in instances in a single web page by specifying a unique identifier for each embedded Silverlight plug-in.
However, it is recommended you use the ASP.NET Silverlight server control or HTML <object> element approach to integrate enterprise SOA-based Silverlight 2 plug-ins in your web pages. This book will not cover this approach in detail. A reference to the Microsoft MSDN site where you can get more details on this subject is provided in the "Additional References" section.
Custom Error Handling for Better User Experience
Clients' machines must have the Silverlight runtime installed in order to run Silverlight plug-ins successfully. However, it is very likely that a user's machine may not have Silverlight installed. In this scenario, instead of providing the default Microsoft message to install Silverlight, it would be friendlier if we provided a branded explanatory message and a link to the Silverlight runtime installer to make the user's machine Silverlight application compatible.
Both recommended Silverlight plug-in integration approaches—the ASP.NET Silverlight server control and the HTML <object> element—support custom error handling if the Silverlight runtime is not installed on a user's machine. This section describes how to implement custom error management for Silverlight 2 RIAs.
ASP.NET Silverlight Server Control Error Management
The ASP.NET Silverlight server control exposes the PluginNotInstalledTemplate object that we can use to provide a custom branded error handling message when the selected Silverlight version (defined by the MinimumVersion attribute of the Silverlight control) is not installed on the user's machine. The PluginNotInstalledTemplate object contains the HTML content to display the custom message. The following code snippet demonstrates the use of the PluginNotInstalledTemplate object:
<form id="form1" runat="server" style="height:100%;">

     <asp:ScriptManager ID="ScriptManager1" runat="server"></asp:ScriptManager>

     <div  style="height:100%;">

        <asp:Silverlight

            ID="Xaml1"

            runat="server"

            Source="~/ClientBin/myAlbum.xap"

            MinimumVersion="2.0.31005.0"

            Width="100%"

            Height="100%">


           <PluginNotInstalledTemplate>

               <div>

                        Write HTML markup to render in the browser providing

                          custom enterprise branded message with

                          Silverlight installation link

                </div>

            </PluginNotInstalledTemplate>


       </asp:Silverlight>


    </div>

 </form>
HTML <object> Element Error Management
You need to add the HTML markup representing the branded message with its Silverlight installation link after all <param> child elements of the HTML <object> element. If the required version of Silverlight is not installed on the user's machine, the custom message will be displayed; otherwise, the message will be skipped.
The following code snippet demonstrates the custom error handling for Silverlight when the HTML <object> element is used to embed the Silverlight plug-in:
<object  data="data:application/x-silverlight-2,"

         type="application/x-silverlight-2"

         width="100%"

         height="100%">


   <param name="source" value="ClientBin/myAlbum.xap"/>

   <param name="minRuntimeVersion" value="2.0.31005.0" />


   <div>
     Write HTML markup to render in the browser providing

     custom enterprise branded message with Silverlight installation link

  </div>

</object>
Silverlight Applications Supporting Globalization and Localization
Implementation of globalization and localization plays a critical role in the success of Web 2.0 RIAs supporting Enterprise 2.0. Enterprises must consider the globalization factor in the design and implementation of Silverlight-based RIAs. During the deployment, enterprises must consider the localization factor and support application localization requirements in their deployed Silverlight RIAs.
Globalization is defined as the following:2
Globalization (or globalisation) in its literal sense is the process of transformation of local or regional phenomena into global ones.
Any global application must support requirements of global and diversified user groups with different culture and requirements. At a minimum, global applications should be designed and developed to support the requirements of local culture-based language, numbers, currency, and date formats. With these requirements in mind, we can define globalization for RIAs as follows:
Globalization is the application design and development process that incorporates local culture-specific requirements such as local language support in the user interface design and support for local numbers, currency, and date formats in the data representation.
The key enterprise-level design concept behind globalization is to implement externalization. The localized information should not be part of the core application component; rather, it should be externalized, and at runtime, based on the user's locale information, the localized resources should be retrieved.
Silverlight 2 is based on the .NET Framework 3.5 and thus supports globalization features using traditional .NET Framework techniques. We can use the CultureInfo class of the System. Globalization namespace to retrieve information about the specific culture. The CultureInfo class provides culture-specific information such as languageCode-regionCode (e.g., en-US for English language and US region), character set, currency symbol, and number and date (calendar) format.
Localization is defined as the following:3
Localization is the process of adapting software for a specific region or language by adding locale-specific components and translating text.
Based on the design concepts implemented as part of the globalization process, localization is the physical process of implementing culture-specific language requirements, which mainly involves the process of translating text and images into the local language to provide a localized presentation layer. For Silverlight applications, one of the standard ways of implementing localization is to develop culture-or locale-specific resource files, including translated text and images.
The .NET Framework uses satellite assemblies to package and deploy resources and uses the traditional hub-and-spoke model to locate the appropriate resources in those satellite assemblies at runtime based on the user's locale-specific culture information. The hub is the main application assembly containing the application executable and the neutral culture or default culture. The neutral or default culture assembly refers to only the default language (e.g., en for English) and is not associated with any region (e.g., US or UK).
Each satellite assembly is a spoke and contains resources for one specific culture. This concept also allows enterprises to deploy additional culture-specific satellite assemblies even after they have deployed the Silverlight application without recompiling and redeploying the whole application.
As mentioned earlier, with the hub-and-spoke model concept, the .NET Framework resource manager follows a structured pattern to load the proper resource file based on the client locale and deployed satellite assemblies for that application. Figure 6-7 demonstrates the structured execution path of the resource manager to identify and load the appropriate resource file.

Figure 6.7 The .NET Framework resource manager follows the hub-and-spoke model to identify and load the appropriate satellite assembly.
As shown in Figure 6-7, if we start from top to bottom, the first level is the hub, which is a main application assembly containing the neutral/default culture resource assembly (in this example, the default resource assembly is for the English language—en). The spoke is the next two levels. The second level contains one or more neutral language-specific resource assemblies and no region (similar to the hub resource assembly file). In this example, the second level contains neutral resource assemblies for English (en) and French (fr). The third level, which contains the culture-specific assemblies, would have resources associated with the language and region. In this example, for the English language, we have assemblies specific to the US region (en-US), UK region (en-UK), and Australia region (en-AU), and for the French language we have assemblies specific to the France region (fr-FR).
The resource management execution model follows the bottom-up approach. Based on the retrieved culture information of the client, it will start to find the appropriate satellite assembly starting from culture specific (third level) to neutral language specific (second level) to the default assembly (first level) and loads the appropriate resources. If no specific match is found, it will load the default resources. Following are three examples to help you understand the concept:
For the local culture specific to the English language (
en) and US region (US), in this example the resource manager will identify and load the culture-specific satellite assembly (third level—en-US).For the local culture specific to the French language (
fr) and Canada region (CA), in this example, the resource manager will identify and load the neutral French language–specific satellite assembly (second level—fr), since the application does not have any French language and Canada region–specific satellite assembly available.For the local culture specific to the German language (
de) and Germany region (DE), in this example, the resource manager will identify and load the default resource assembly (first level—en), since the application does not have any German culture-specific satellite assembly available.
Deploying Global Silverlight Applications
At a minimum, to enable multiple cultures for your Silverlight project, you need to first add proper resource files (default and culture specific) to your project. Second, in the AssemblyInfo.cs file, define the neutral/default culture:
[assembly: NeutralResourcesLanguage("en")]
Here we have defined English (en) as the default culture. Now you need to unload the Silverlight project and edit the project properties to define supported cultures by adding a SupportedCultures tag and comma-separated cultures. After that, you can reload the Silverlight project again. You can achieve this by following these steps:
1. Right-click the Silverlight project and select the Unload Project option. The project is unloaded.
2. Right-click the unloaded project and select the Edit <Projectname> option. You will see the project file properties in editable mode.
3. Under PropertyGroup, find the SupportedCultures tag. If not available, add it.
4. Add comma-separated cultures that need to be supported by the Silverlight project.
5. Reload the Silverlight project.
Now you are all set to deploy the Silverlight application as a global application supporting different cultures. Upon compiling the project, the default culture becomes part of the main application assembly. The main application assembly with the default resources and other added satellite assemblies will be inserted into the Silverlight XAP file. Each satellite assembly is defined under the Deployment.Parts section of the AppManifest.xml file.
The main disadvantage of this approach is that all satellite assembly files are part of the default Silverlight XAP file and thus will be downloaded at startup. A Silverlight application with many defined cultures will increase the XAP package file size and thus degrade the application startup performance.
Silverlight also allows us to develop a localized, culture-specific application package for each culture. This approach will reduce the XAP package size and thus improve the application's startup performance. The Visual Studio Configuration Manager is used to define and create localized application packages. This book does not provide details on how to create localized packages. If you are interested in getting more details on this subject, a reference to the Microsoft MSDN site is provided in the "Additional References" section.
In this chapter, you learned that it is important to coordinate efforts among the system architects, application architects, development groups, deployment groups, and support groups from the very initial phase of the project for smooth deployment. If planned, designed, and implemented properly, it is straightforward to deploy enterprise-level Silverlight RIAs. Enterprises need to consider the following strategic items during the design, implementation, and deployment processes to deploy enterprise-level Silverlight RIAs in a secured, scalable, high-performing, and supportable environment:
Define and analyze additional components (Silverlight SDK assemblies, custom class libraries, and resource files) and make a strategic decision to define in-package and on-demand files. A balanced decision considering application needs and startup download package size will help to optimize application performance and user experience.
Hosting of Silverlight applications and related application services must align with your organization vision. Aligning with the organization infrastructure landscape, implement a proper encrypted and secured communication channel with the required bandwidth for information exchange, media streaming, and business process integration. Based on the definition of the system architecture, define required cross-domain policies for successful Silverlight application deployment.
Keep in mind this well-known phrase when deploying—"Think global and act local." For any enterprise, Silverlight-based RIAs must be global applications facilitating diversified local culture-specific needs at least in terms of local language support and local number, currency, and date formats. Silverlight supports localization with a standard .NET Framework's satellite assembly approach. Proper definition of the language and region-specific culture resource files and localized deployment strategy will enable effective localization of Silverlight RIAs.
In the next chapter, you will learn basics of and key architecture considerations for the development of mobile applications and explore future capabilities of the Silverlight platform in this area of development.
Links from the Microsoft Web Site
MSBuild Team Blog, "How to: Add a Custom Build Action to Visual Studio," http://blogs.msdn.com/msbuild/archive/2005/10/06/477064.aspx
Visual Studio Integration (MSBuild), http://msdn.microsoft.com/en-us/library/ms171468.aspx
Making a Service Available Across Domain Boundaries, http://msdn.microsoft.com/en-us/library/cc197955(VS.95).aspx
How to: Add Silverlight to a Web Page by Using JavaScript, http://msdn.microsoft.com/en-us/library/cc265155(VS.95).aspx, 2008
Localizing Silverlight Applications, http://msdn.microsoft.com/en-us/library/cc838238(VS.95).aspx