Chapter 5
Introduction to SharePoint Designer
Now that you are getting excited about working with a real Microsoft Office SharePoint Server (MOSS) site, you may be asking yourself, “How do I actually edit code?” In the good old days of SharePoint 2003, you were pretty much limited to working with FrontPage to edit your sites, which often proved to be challenging as FrontPage hadn't evolved much over the years. Luckily, Microsoft has effectively ended FrontPage's lifecycle and in its place, two tools named Microsoft Expression Web and Microsoft Office SharePoint Designer 2007 (SharePoint Designer) have been created. SharePoint Designer is equivalent to Expression Web plus special tools that work specifically with MOSS servers and code. While you can edit your MOSS design code in any text editor, you will find no better way of working rapidly with MOSS than with SharePoint Designer. This chapter will discuss why SharePoint Designer is the tool of choice, as well as covering the ins and outs of using it to work effectively with MOSS. You should note that SharePoint Designer can be used with Windows SharePoint Services V3 (WSS) as well as MOSS, but some chapters will focus on MOSS specifically in order to show the full extent of what can be achieved in the latest version of SharePoint. If you are using a WSS server, some of the screens and functionality may be different in your server.
As a designer, you are most likely accustomed to a particular design tool such as Adobe's Dreamweaver or even something as simple as Notepad, and indeed those tools are most likely where you may want to start your HTML mockups before converting your designs into functioning MOSS sites. However, you may be surprised to find that SharePoint Designer can fit the bill for both working on MOSS user interfaces and for standard Web design. You might be asking, “Why can't I just use Visual Studio to edit my files?” While this is certainly possible, you will quickly find that Visual Studio, while being an excellent development tool, was not created with designers in mind.
You can download a trial of SharePoint Designer from Microsoft's SharePoint Designer site:
http://office.microsoft.com/en-us/sharepointdesigner
If you are an MSDN Subscriber, SharePoint Designer should be available for you to download from your subscription site.
Overview of Functionality
SharePoint Designer has many important features for working with MOSS; here is a list of some of its more important features:
- Native support for underlying SharePoint technologies This includes IntelliSense (code completion) for the entire SharePoint design lifecycle including: SharePoint tags, master pages, Layouts, ASP.NET 2.0 code, and all tradition Web-development elements (HTML, XHTML, Cascading Style Sheets, JavaScript, and so on). Designers are no longer limited to using developer tools such as Visual Studio in order to get Intellisense when working with ASP.NET code!
- Rich design environment An environment that is much improved over FrontPage including dedicated detachable task panes specific to all of the key areas of the SharePoint design lifecycle.
- WYSIWYG (What You See Is What You Get) editing Designers have the choice of working with code directly (Code View) or using the What You See is What You Get (WYSIWYG) features (Design View) and even the option of splitting the two (Split View).
- Can work with and format data with ease Extensible Stylesheet Language (XSL) can be edited in a visual environment when working with MOSS Web Parts such as the Data View Web Part.
- Creating and formatting views of data SharePoint Designer can present data using XSLT Data Views, Web Parts, Web Part connections, and ASP.NET controls. It can also use dynamic Data View tools such as calculated fields, conditional formatting, sorting, grouping, and filtering.
- Ability to revert designs to old versions Files under MOSS source control can have their history viewed and reverted to old versions. Pages that are based on site definitions can be easily reverted back to their original state.
- Robust reporting features Specialized reports are available for checking broken links, unused pages, cascading style sheets usage, and master page usage.
Not Using SharePoint Designer
As stated earlier, using SharePoint Designer is not a requirement of designing for MOSS. If you are extremely comfortable with the syntax, you could create your master pages and CSS with Notepad or any other editor and manually upload them to your MOSS site using the Master Page Gallery or the View All Site Content Web-based interfaces from your actual MOSS site. Sometimes this can be helpful if you are on a machine that does not already have SharePoint Designer installed.
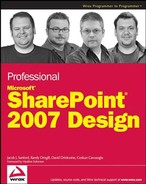
To begin customizing MOSS with SharePoint Designer, you should start by getting more familiar with the general user interface layout of the application itself. Figure 5-1 shows the basic SharePoint Designer interface with a master page open.
The resolution of all the screenshots are from a 1024 × 768 monitor for this book. You will be thankful if your resolution is larger or if you have a dual monitor setup, as working with MOSS involves a lot of screen real estate.
First make sure you have SharePoint Designer installed and open it up. (It is usually located under Start ⇒ Microsoft Office ⇒ SharePoint Designer 2007.) When first started, SharePoint Designer will have no open document and the task panes will be located in their default positions. You will tour the various aspects of the product throughout this chapter, but they may make more sense to you if you have a MOSS site open.
If you do not have a MOSS server available to you, you can follow Tony Zink's lengthy but excellent 20 step guide to creating a MOSS 2007 VPC image at: http://www.pptspaces.com/sharepointreporterblog/Lists/Posts/Post.aspx?ID=28
Opening a MOSS Site in SharePoint Designer
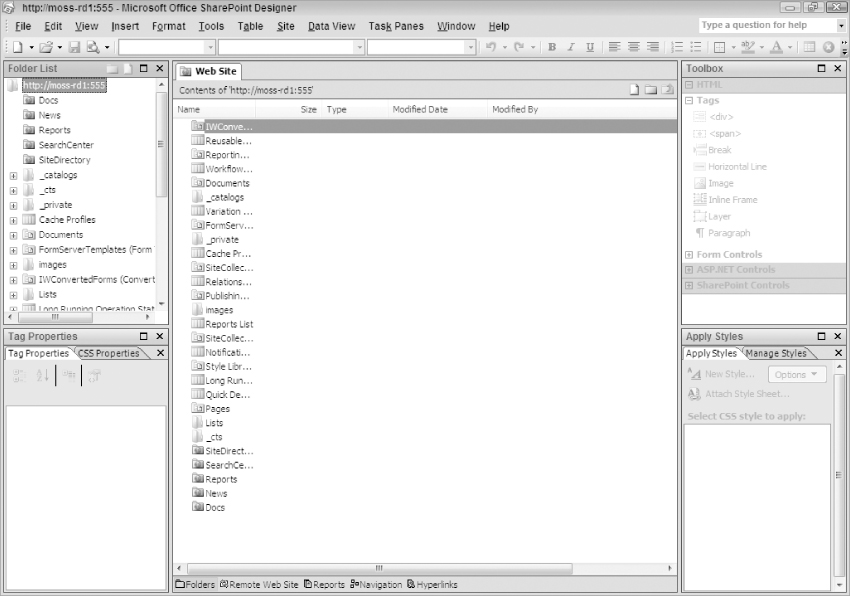
In SharePoint Designer select File ⇒ Open Site and a window opens that allows you to open a previously opened site or to enter a new one as shown in Figure 5-2.
The best thing to do here is to enter your MOSS site URL into the Site name: text box. The typical format for a MOSS Site URL is http://MossServerName:port. For example, you could enter “http://YourMossServer” if a MOSS server existed on your network with that address. Next, just click the open button and you will be challenged to enter your authentication info here. Typically this requires the name of your server to be listed before your username like: “YourMossServerRandy.Drisgill.” If you are denied access, you may have to use a different user account on the server or talk to your MOSS server administrator. Typically, your user account will need to be in the SharePoint Owners or Designers groups. Also, if you are not an Owner you may need to be in the Approvers group later when it comes time to publish your changes; this is because MOSS's publishing workflow requires an approver to finalize a published page. If you have administrative rights on your MOSS server, you can change these settings by browsing the site in your Internet browser and selecting Site Actions ⇒ Site Settings ⇒ Modify All Site Settings ⇒ Users and Permissions ⇒ People and Groups.
Once you are properly authenticated into the MOSS server, after a few seconds (depending on if you are local to the server and how slow your connection is), you should see the site open in SharePoint Designer. The Folder List pane (located in the top left of SharePoint Designer) will be populated with filenames from your site. Next time you use the Open Site menu item, you can select this site (or any other recently opened sites) from the list that is provided in the Open Site window.
It is worth noting at this point that if you chose to open another MOSS site, SharePoint Designer will open another instance of itself. This can get very confusing if you are editing two similar sites as it is easy to be on the wrong tab in the Task Bar and be editing the wrong site. (MOSS sites tend to look similar in the editor.)
The Folder List Pane
You will start the tour of SharePoint Designer with the Folder List pane. Its default position is the top left of SharePoint Designer. This is an interesting pane that can be confusing to beginners. The files listed here may or may not exist on the actual file system of the Web server. The MOSS server is actually showing you how it sees your site. Typically this is a combination of customized and uncustomized (more on that topic in the section “Customized vs. Un-customized”) pages that may live in the SharePoint Content Database or in the physical directory of the IIS Web Application. As a new user, sometimes there is a temptation to search the server's hard drive to find these files, and many times they will not show up, or worse yet you may confuse yourself by finding something in an incorrect directory. It is best to work with this pane as though it is your actual folder structure, despite the fact that some files may live in other places physically. (MOSS handles placing the files in the appropriate areas of the site via behind-the-scenes Web service calls.) The pane begins with the name of your site, followed by a list of sub-sites beneath it. They are preceded by an icon of a folder with a globe on it. Double-clicking these sub-sites will start a new instance of SharePoint Designer with that particular subsite opened. Beneath that, you will most likely see a series of folders, lists, document libraries, master pages, and pages. Some important areas to explore in the folder list are as follows:
- _catalogs ⇒ masterpage (Master Page Gallery) This is where all of your master pages and page layouts live; you will spend a lot of time here.
- Images This is a good place to add images that you would like site content authors to have access to when they are editing pages. The actual images that make up your MOSS site's custom design should instead be stored in Style Library ⇒ Images.
- Pages This is where actual created pages will reside. They are standard .aspx pages but often have page layouts associated with them (this will be discussed more in the section “Working with Page Layouts”). You can add custom .aspx pages here. A default page named “default.aspx” (appropriately enough) is automatically created here for new sites. (This is typically the welcome page for your MOSS site.)
- Style Library Many styles that MOSS uses are located in this directory structure. Several important ones live in the following subdirectories:
- Style Library ⇒ en-us ⇒ Core Styles This is where MOSS's core styles live. The en-us refers to the United States English locale folder (multilingual sites could make use of other locale folders). You will create a subdirectory sibling of the Core Styles directory named “Custom Styles” in Chapter 8, “Master Pages.”
- Style Library ⇒ XSL Style Sheets This is where many of the MOSS out-of-the-box Extensible Stylesheet Language (XSL) files live. They control styling on many XML lists and list headers throughout MOSS.
- Style Library ⇒ Images As stated earlier, this is where you should place any custom images that make up the actual design layout of your MOSS site.
If you ever lose the ability to expand the _catalogs directory (or any other area you are certain you have access to), you may have been logged out of an authenticated MOSS server. If this happens, you may need to close and reopen the site with your credentials before the folders come back.
Several task panes are available in SharePoint Designer and are discussed in this chapter. It is important to note that they may be minimized, removed, attached to other task panes, torn off, and floated in the editor or even moved outside of SharePoint Designer altogether in order to free up the maximum amount of screen real estate. If you ever lose one or feel the need to start over, you can select Task Panes ⇒ Reset Workspace Layout to return them all to their default positions.
File Check-In/Check-Out
Now you can take a look at what happens when a file is edited. Navigate to the _catalogs ⇒ masterpages folder and double click on default.master. A message box pops up asking you “The file is under source control. Do you want to check it out?” This is because MOSS 2007 is setup to have source control turned on by default. If you select “No” SharePoint Designer will open the file and you can view the contents.
SharePoint Designer defaults to Design View, which is the WYSIWYG editor. Many people prefer the Code View. You may switch the mode easily by selecting it at the bottom of the editor window. (See Figure 5-3.)

One thing that may surprise you is that SharePoint Designer will let you edit the file, but when you click Save, you will be prompted with a message indicating that it is not currently Checked Out. If you plan to edit the file, it is best to check it out when opening, because your changes can be lost otherwise. Go ahead and check the file out (if you have already opened it, just close and reopen it). You will notice that the icons beside the file change to a check mark (to indicate check out) and a page with a pencil (to indicate you are editing it). Now you can edit the file to your heart's content. (Working with master pages is covered in detail in Chapter 8.) As you edit the file, you will notice that the tab with the name of the file, at the top of the editor pane, has an asterisk next to it. This means that the file is “dirty” and needs to be saved before your changes will be stored. If you have been following along with this text and have made some edits, it is best not to save and check in your changes as you may have broken your MOSS site badly with random edits. Right-click on default.master in the Folder List pane and select Undo Check Out. A warning message appears, telling you that you will be restoring your old version of the file and that all changes will be lost, which is exactly what you want right now, so click Yes. Notice that the check mark icon has gone away, indicating you are not checked out. You will learn a lot more about properly editing master pages later in Chapter 8.
You can also revert to old versions of your source controlled documents. Right-clicking on the file name of files with history shows an option for “Version History.” From there you can restore old versions of your files with ease.
Adding Content to a MOSS Site
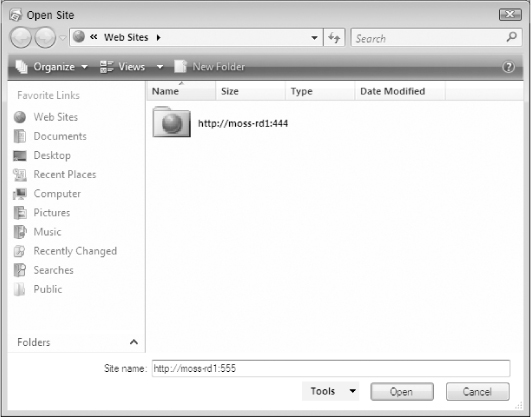
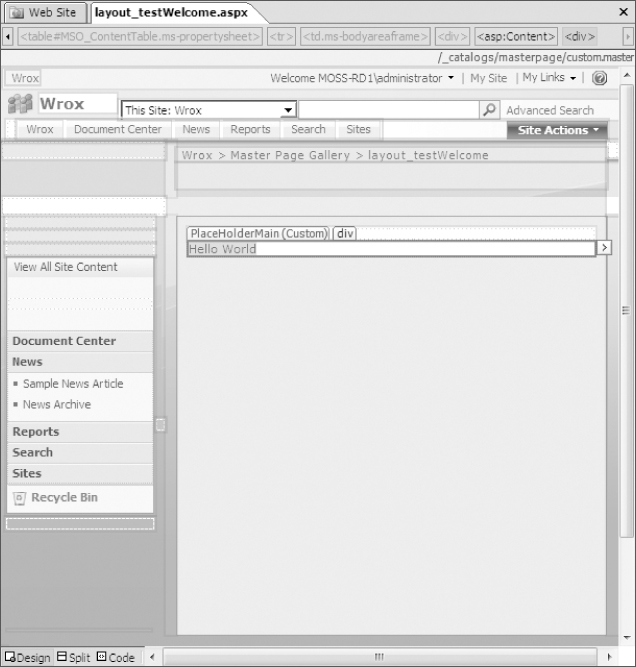
You can explore the check-in process even further by adding something to your MOSS site. A good place to start would be adding a new page layout to the MOSS site. To do this, right click the site name in the Folder List pane and select New ⇒ SharePoint Content (see Figure 5-4). (You can accomplish the same thing from the File menu.)
From here select SharePoint Content ⇒ SharePoint Publishing ⇒ Page Layout and make the following entries in the Options:
- Content Type Group Page Layout Content Types
- Content Type Name Welcome Page
- URL Name layout_testWelcome
- Title Test Welcome Layout
Select OK and MOSS will create your page layout in the _catalogs/masterpages folder called layout_testWelcome.aspx. The page layout automatically opens in SharePoint Designer. Don't get too worried right now about the contents of the layout (which is covered in Chapter 9).
Now is a good time to talk about the Toolbox pane (located in the top right-hand of the screen), which contains easily draggable HTML tags, ASP.NET Controls, and SharePoint Controls. See Figure 5-5.
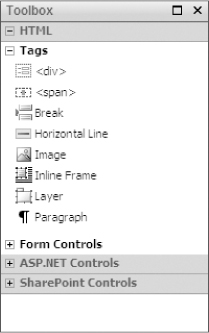
The SharePoint Controls communicate with the MOSS server to decide which controls are available to be selected based on what type of content you are editing. For now, just select HTML ⇒ Tags ⇒ <div> and drag it into the editor between <asp:Content ContentPlaceholderID=“PlaceHolderMain” runat=“server”> and </asp:Content>. The editor pane should look like this:
<asp:Content ContentPlaceholderID=“PlaceHolderMain” runat=“server”>
<div></div>
</asp:Content>
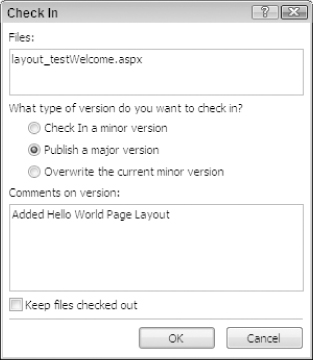
Now add the phrase Hello World between the <div> and </div> tags and save the file by either pressing Control-S or selecting File ⇒ Save. Now you need to ensure the file is checked in. Right-click on the filename in the Folder List pane and select Check In. Select “Publish a major version” because a major version will allow non-authenticated users to see the change. You can also add comments to the Comments box; they can be used later when viewing a history of a saved version. See Figure 5-6.
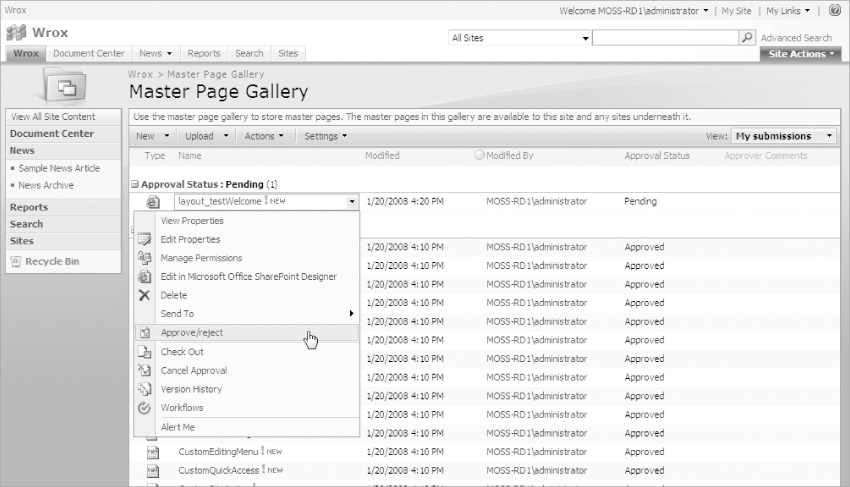
SharePoint Designer brings up a warning that says, “This document requires content approval. Do you want to view or modify its approval status?” This is due to the Approval Workflow being turned on by default in MOSS. This is discussed more in the section titled “Approval Workflow”; for now just select Yes. Interesting enough, this process cannot be achieved in SharePoint Designer, and as such a browser window immediately appears attempting to connect to your MOSS site. Authenticate if required and you will be presented with the Master Page Gallery in a mode that shows you all of the documents grouped by approval status. Find the page layout under the Pending category. (See Figure 5-7.) When you hover over the filename, an orange box appears around it.

Click the box and select Approve/reject, select Approved, and click OK. See Figure 5-8.
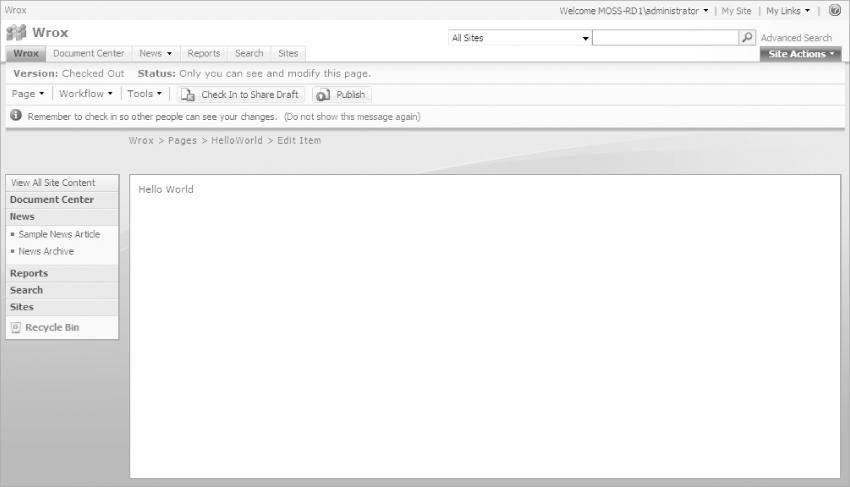
It's not much of a page layout, but you might as well take a look at it. To see your handiwork you must use the MOSS Web UI and create a new page that uses the page layout. Start by creating the page layout by selecting Site Actions ⇒ Create Page. From there you add a Title, Description, and URL Name (which pre-populates from the title you entered). In the page layout select box, look for “(Welcome Page) Test Welcome Layout.” This is your page layout that was created. Click Create and you will be taken to a new page using the new page layout. (See Figure 5-9.)
Adding Other Types of Content
You can add pretty much any type of typical Web content to a MOSS site, one method for doing so is by simply dragging a file from your desktop to the Folder List pane. For example if you have a JPEG image on your desktop named helloworld.jpg, you can drag the image from your desktop to the images folder of your MOSS site in the SharePoint Designer Folder List pane.
A quick word of warning: For this example, be sure you are using the images directory off the root of your site, not the one in the Style Library (nothing bad will happen if you do, but it is easy to confuse yourself for a while about why your image is not showing).
Once your image is dragged to the images folder, you should be able to preview it from your MOSS site's URL by browsing to the images directory. If your MOSS site's URL was http://YourMossServer, you would want to browse to http://YourMossServer/images/helloworld.jpg.
If you are wondering why you were able to view the new image right away, it is because the images directory does not have source control or the Approval Workflow turned on in MOSS.
Approval Workflow
As mentioned earlier, adding or editing content in a MOSS Publishing site requires approval. This is a result of the approval workflow. This workflow is turned on by default with a MOSS Publishing site and will affect who can see your changes to things like master pages. While this is a great feature in MOSS, for you the designer, this will drive you crazy at some point. The scenario will go as follows: You make a really awesome sweeping change to the UI of the MOSS site and are excited to show it off to your customer or team. You send them the URL and they send back an email saying nothing has changed. Before you have a heart attack, ask yourself this: Did you remember to check in, publish, and approve your changes? If you did not, only you and the other administrators of the site will be able to see any changes you make. This can be particularly surprising because you will always see your changes to the file (since you can always see pending changes to your own files). Because of this, sometimes it's a good idea to test your customizations while logged out; this can be achieved easily by using a different browser than the one you are currently using. (Firefox is helpful for this, as it initially browses a MOSS site as an anonymous user.)
Customized Vs. Un-customized
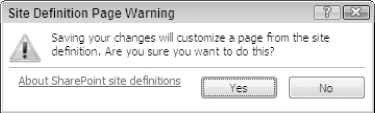
If you were to edit one of the out-of-the-box master pages (like default.master) or one that has been deployed from a custom Site Definition (this is discussed more later in this section), SharePoint Designer will warn you that you are about to customize a page from the site definition (see Figure 5-10). What does this mean?
This topic has been around throughout previous versions of SharePoint under the terms unghosted (the same as customized) and ghosted (the same as un-customized). Microsoft has changed the name in this version (though you may still see references to ghosting in the Microsoft documentation), but confusingly the “un” prefix has now reversed from the old definition.
In basic terms, an un-customized file exists on the file system of your MOSS site, typically in the 12 Hive (a popular name for the folder where MOSS's files physically live on the Web server). Alternatively, customized files have been changed (typically with SharePoint Designer), and MOSS therefore stores them not on the file system but instead in the SharePoint Content Database. To the end user (and maybe even to you, the designer, thanks to how SharePoint Designer shows things in the Folder List pane) this may not be readily obvious as MOSS seamlessly takes care of displaying the file regardless of whether it is in the content database or the file system. The downside to this is two-fold. First, customized pages may have a slight performance impact (though Microsoft has said the impact is too minimal to consider). Second, you may have issues propagating your custom design throughout MOSS Sites and Site Collections if it has been customized. This topic is discussed further in Appendix A. For now, the important distinction is that Solutions are easily deployable throughout an entire MOSS 2007 hierarchy, while customized pages are not. In fact, there is a chance that at some point customized pages could be overwritten by the default Site Definition either by another designer or an administrator, either purposefully or even by accident.
After reading this you may be wondering what good it is to edit with SharePoint Designer then. The answer to this is immediate gratification and iterative changes. The solution is to not customize the actual final master page that your site is using but instead to customize a staging or development version of the master page. (This version can even live on the same server as your final deployed master page if you so desire.) Once you are finished with your master page, you or a developer on your team can convert your customized master page into a deployable solution. (You can find more information on this topic in Appendix A.)
You can always tell when a file has been customized by the icon that SharePoint Designer places next to it, a blue circle with the letter “i” in it. If you ever need to revert one of these files back to the original site definition, right-click on the file and select Reset to Site Definition. Also, if you want to see a report of all the customized pages in your site, just click on Site ⇒ Reports ⇒ Shared Content ⇒ Customized Pages, and SharePoint Designer will provide a list of all your site pages with the customized ones at the top.
One of the key features of SharePoint Designer is the Design View that is available from the bottom of the editing screen. In many ways, this is a WYSIWYG interface that shows how your pages, page layouts, and master pages will look in real time. It is worth noting that some designers prefer to use this, while others feel that working in the Code View is a more pure way of designing both HTML and MOSS sites.
Take a look at the default.master page in Design View by double clicking on _catalogs ⇒ masterpage ⇒ default.master. Check to make sure you have selected Design View by examining the indicator at the bottom of the editor pane. What you see in Figure 5-11 is a fairly close approximation of what the master page would look like in your browser. Light purplish lines surround the various Placeholders that are being used on the page. If you hover over one, you can see (in very light text) the name of the Placeholder, and if you click inside the purple box, the Placeholder will be selected and get darker. You can switch back to Code View (or check out Split View to see both at the same time) and see that the Placeholder that you selected is also highlighted in the Code View. (Note: Some Placeholders work better than others when it comes to highlighting in Code View.)
While you are in the Design View, you may find that the purplish lines that highlight the Placeholders are distracting from a true WYSIWYG experience. To turn them off you can select View ⇒ Visual Aids ⇒ Show to toggle these lines (along with all the other Visual Aides) on and off. Alternatively, you can pick and choose which Visual Aids to show or not show.
Another interesting feature of the Design View is that the elements of the page are aware of the HTML hierarchy they live in. When you select an element that is deeply nested in other elements, you can press the Escape key and the selection will move to its parent element. If you keep pressing the Escape key, you will eventually have the entire HTML document selected.
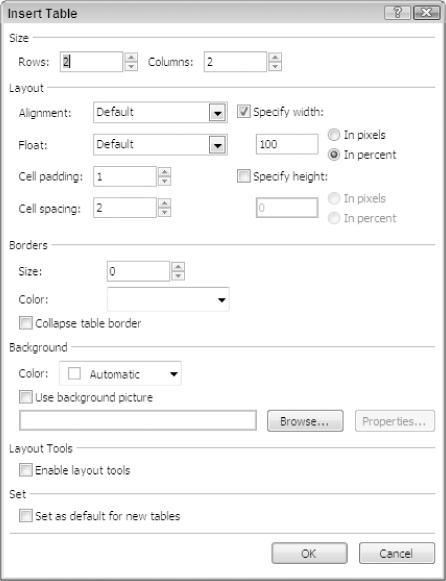
You can insert various HTML and ASP.NET elements simply by dragging them from the Toolbox pane or by selecting them from the Insert menu at the top toolbar. You can also insert HTML tables by selecting Table ⇒ Insert Table from the top toolbar. This opens a table wizard that allows you to tweak various settings of the table. See Figure 5-12.
You can drag elements such as images from the Folder List pane and drop them right onto the Design View. When doing so, SharePoint Designer prompts you to enter the Alternate text to be placed in the Alt tag of the image.
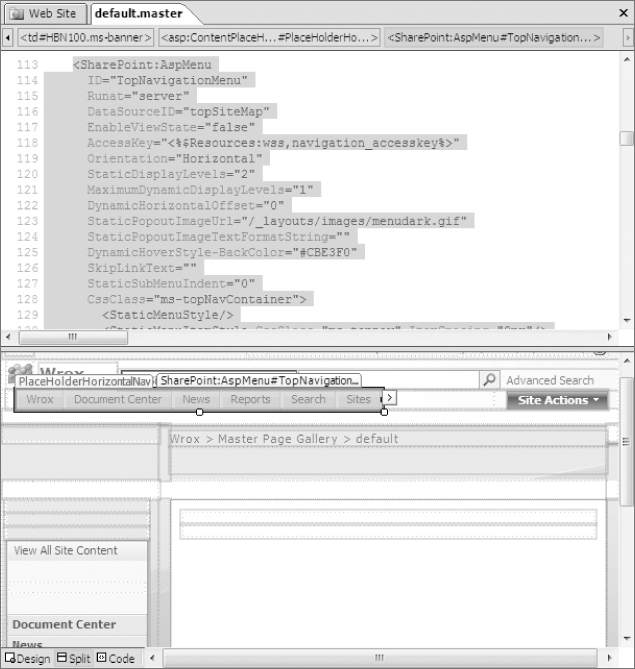
One other really interesting feature of SharePoint Designer is the On-object User Interface (OOUI) that appears when you select certain ASP.NET and SharePoint controls. You can see one if you click the horizontal top menu navigation control of the default.master. The OOUI will appear to the right of the placeholder box and will look like a small box with an arrow. See Figure 5-13.

The OOUI will display related information for the control you have selected. In this case it will show Data Sources that can be used to populate the navigation control. (This topic is discussed further in Chapter 11.)
There are many other aspects to Design View. You can explore them more thoroughly yourself or watch the training videos supplied from Microsoft's SharePoint Designer Web site.
Master pages are one of the key file types that you as a designer will be working with in SharePoint Designer. For the most part though, you will likely not be starting a master page for MOSS from scratch. This is due to the fact that unlike a traditional ASP.NET application, MOSS master pages have very specific needs (including mandatory sections that if omitted will break your site). Because of this, you should start with either a minimal master page (which is covered in Chapter 8) or simply use a copy of one of the out-of-the-box master pages that are included with your site.
For this example, you will make a copy of the default.master and make a minor change to see the results. To do this, just open SharePoint Designer and use the Folder List pane to navigate to the _catalogs ⇒ masterpage and open default.master. You can choose not to check it out if you would like, as you will not be changing it. Once it is open, simply select File ⇒ Save As and in the Save As window leave the location the same (_catalogs ⇒ masterpage) and in the File name box enter “custom.master.”
You will now be editing your new master page file and will most likely realize that it's quite complex (over 400 lines of ASP.NET and not a single comment to help you decipher it!). One thing Microsoft did do for designers was provide a special toolbar for working with master pages. To enable it, select View ⇒ Toolbars ⇒ master page. This toolbar is a small floating toolbar, so small you could miss it, so look carefully. See Figure 5-14.
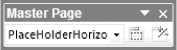
This toolbar allows you to select a placeholder and SharePoint Designer will highlight it in the editor. This can be helpful for finding the key areas of the master page. A quick warning though: The toolbar unfortunately sometimes does not work as nicely in Code View as it does in Design View. Using whichever View you prefer, find the PlaceHolderMain, which should be somewhere near line 395 of your master page. PlaceHolderMain is the placeholder that displays all of the actual page content from the page layout. For this example, make a very simple change that will make the PlaceHolderMain stand out from the rest of the page. Put a <div> with a lime green border around the PlaceHolderMain like this:
<div style=“border: 1px solid lime;”>
<asp:ContentPlaceHolder id=“PlaceHolderMain” runat=“server”>
</asp:ContentPlaceHolder>
</div>
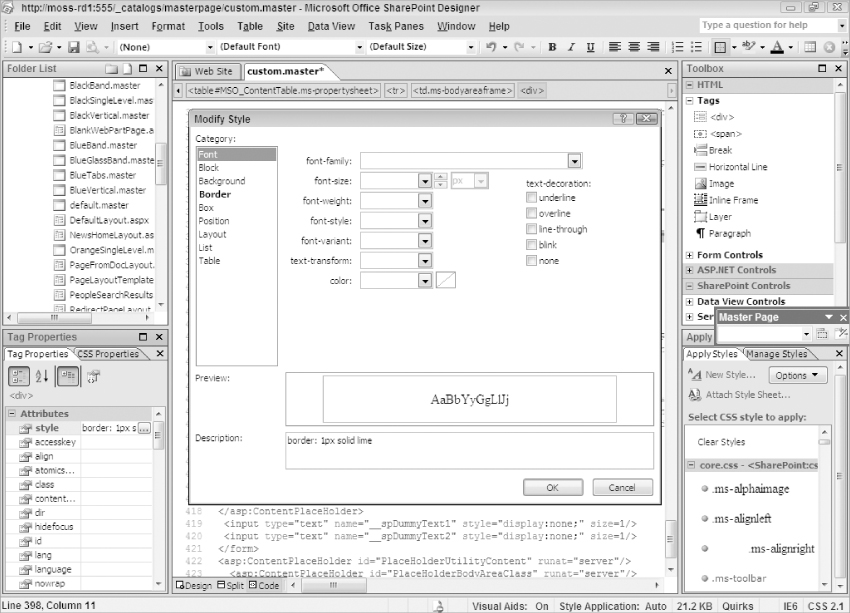
While you are editing this, you should take note of the Tag Properties pane in the lower left-hand corner of SharePoint Designer. The Tag Properties pane will always show you the properties that apply to the currently selected tag or component in the editor. In your case, the only property that applies to the <div> tag is its style. If you click next to the word style, you can see its attribute is “border: 1px solid lime.” If you click the attribute and then the “…” button, you can use a wizard-style interface to manage the attributes of this property. See Figure 5-15. You can use this pane throughout many types of files in SharePoint Designer.
After saving the file, you must check it in and publish it or you will run into major problems activating the master page. (MOSS will warn you if you try to activate a master page that has never been published, but after that first publish, it will not warn you anymore.)
If you manage to activate a master page that is not published, users that are not authenticated will see a 401 or 404 error. This can be confusing the first time you run into it, but typically, if you see something vastly different only when you are not logged in, it is almost always caused by a non-published asset.
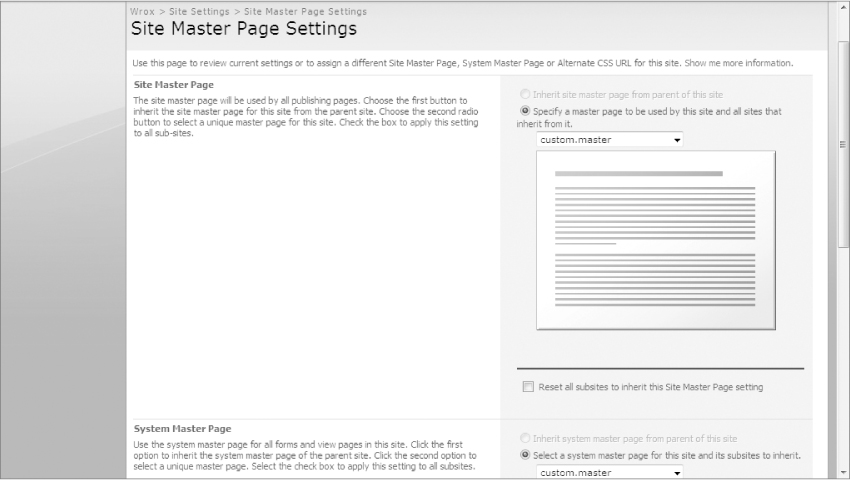
Right-click the custom.master in the Folder View pane and select “Check in” and then “Publish a major version” and lastly say “Yes” to modify the approval process. Once you have accepted the pending approval on custom.master, you need to apply the master page to your site from the MOSS Web interface. Log in to your MOSS site and select Site Actions ⇒ Site Settings ⇒ Modify All Site Settings ⇒ Look and Feel ⇒ Master page to bring up the Site master page Settings screen. This screen allows you to select a master page for the main areas of the site (the Site master page), the master page for the system forms and view pages (the System master page), and also an Alternate CSS URL for adding additional CSS. For now, change both the Site master page and the System master page to custom.master and select OK. See Figure 5-16.
Now return to your site MOSS homepage and you should notice that the middle section of the screen has a bright green border around it. While you would never use a style like this in an actual design, it does illustrate an important concept. It demonstrates how you can make changes to the HTML of the master page, and the green bordered section highlights the transition between the master page and the page layout.
You will quickly notice that some pages are not affected by your master page; this is an unfortunate byproduct of the MOSS administrative pages using a different master page that is not available in SharePoint Designer. It is typically not recommended that you edit this master page. To style these administrative pages, your best option is to explore SharePoint themes, which are covered in Chapter 6, “Themes.”
Working with Page Layouts
The topic of working with page layouts was touched on briefly earlier in this chapter under “Adding Content to a MOSS Site,” but it's worth discussing a bit more at this time. When you are editing a page layout, you will notice that the Toolbox pane on the right-hand top of SharePoint Designer gains two more sections under SharePoint Controls. These two sections are Page Fields and Content Fields, and they are related to the content type of the particular page layout. Content types are defined in the MOSS Web interface and will be covered in more detail in Chapter 9.
However, the fields are important to consider when discussing SharePoint Designer because they can be dragged from the Toolbox pane only to MOSS page layouts. These fields are used to store content and metadata that the MOSS Web site content authors enter into an editable page. MOSS authors can only enter information into the fields that you setup on a page layout, and you can only setup editable fields that have been assigned in the parent content type of the page layout. This idea can sometimes be difficult to understand, as you have to think carefully through all of the types of data that a page layout may need. Often as a designer, you will find yourself needing to update a content type and a page layout in order to accommodate new data that business users need to record.
Creating a Content Page
You can create a content page that is a Web page for displaying information to a user and is based on the look and feel of a master page, but does not use a page layout to control its layout. To do this, simply click on File ⇒ New ⇒ Create from master page, and SharePoint Designer brings up a window to select a master page. From this window, you can select the default master page or a custom master page (both are setup when the site is created from MOSS) or you can browse and select any of the available master pages in the site. When you select a master page from this window, a new file is created in SharePoint Designer.
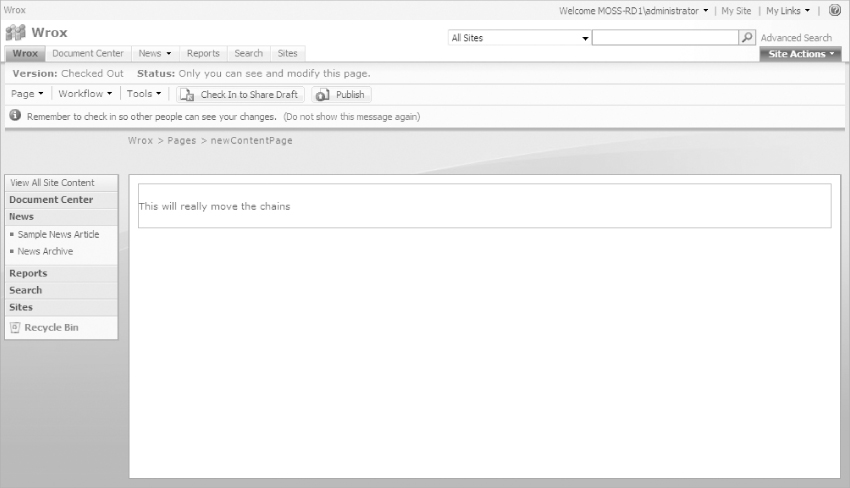
To add content to the page you first must add a content placeholder. Make sure the page is in Design View and then bring up the master page Toolbar by selecting View ⇒ Toolbars ⇒ Master Page. Select PlaceHolderMain from the toolbar and SharePoint will add the placeholder to the page. Then to add content to the placeholder, click the “on-object user interface” arrow on the right side of the box surrounding the placeholder, and select Create Custom Content. This will allow you to type content in the placeholder. For now, you can just enter some fun text like “This will really move the chains.” Save the file as “newContentPage.aspx” and place it in the Pages directory of your MOSS site. You can see the new content page from your MOSS site. If your MOSS site's URL was http://YourMossServer, the new content page would be located at http://YourMossServer/Pages/newContentPage.aspx. As you can see in Figure 5-17, the content page displays the text and it is styled with the standard master page.
Editing Pages
Another way of having a page that is not dictated by a page layout is to take a normal page that was created from the MOSS Web interface and detach it from its page layout with SharePoint Designer. Typically, when you open a page that was created with the MOSS Web interface, SharePoint Designer prompts you with a message saying, “This page cannot be edited in SharePoint Designer. You can edit the content in the browser, or edit the corresponding page layout in SharePoint Designer.” Essentially this is SharePoint Designer warning you that this page's display is dictated from a page layout. One option that SharePoint Designer doesn't make readily obvious is that you can hit Cancel and then right-click on the filename in the Folder List pane and select Detach from Page Layout. This will bring up a warning that says, among other things, that “Changes to the page layout will no longer affect this page”; since this is what you are trying to do, you can click Yes. Now, when you open your page, you will be able to change the layout however you like, without it being affected by a page layout. This option can be useful for handling special cases, such as making a one-off page that does not conform to the rest of the MOSS site's layout.
Cascading Style Sheets (CSS) are a key component to designing user interfaces for MOSS. This is due to the fact that Microsoft has relied heavily on the cascading part of CSS to allow you to override the out-of-the-box styles with your own styles. You will learn more about working with CSS and how the cascading nature of CSS affects the master pages and Layouts of a MOSS site in Chapters 7, 8, and 9. For now, you can explore what SharePoint Designer brings to the table for editing CSS.
To open out-of-the-box MOSS style sheets, you will typically want to look in either the root of “Style Library” or its subfolder Style Library ⇒ en-us ⇒ Core Styles in the Folder List pane. If you want to create your own custom style sheets, it is recommended that you create a sibling directory of the Core Styles directory such as Style Library ⇒ en-us ⇒ Custom Styles. (In fact, you will create such a Custom Styles subdirectory in Chapter 8, “Master Pages.”) This will help segregate your own CSS from those that came with MOSS out-of-the-box.
SharePoint Designer provides many of the typical features you would expect in a modern designer tool. One very helpful feature in SharePoint Designer is tag completion for your CSS (known as Intellisense). SharePoint Designer also has three specific task panes for working with CSS; these are the Manage Styles pane, the Apply Styles pane, and the CSS Properties pane.
The Manage Styles Pane
The Manage Styles pane shows the styles that apply to a rendered page, including those applied from a page's page layout and master page. The pane uses various icons before the style name to denote the type of style that is being applied. There are five different icons to represent the styles:
- Styles based on IDs have a red dot.
- Styles based on classes have a green dot.
- Styles based on elements have a blue dot.
- Styles that are used in the current page have a circle around their dot.
- External style sheets have an @ symbol.
The Manage Styles pane does not show inline styles that apply to a page.
Styles can be moved between internal and external style sheets by dragging them up and down between the sections of the pane. Styles can also be dragged higher or lower in the cascading hierarchy. You can also hover over styles to get a preview of the code of that style or even click the style to see a graphical preview. See Figure 5-18.

Double-clicking a style will open its corresponding style sheet for editing in the editor pane. The Manage Styles pane can also be used to apply existing style sheets to the current page or even to create new individual styles that can be added to a style sheet.
When using the Manage Styles pane, double-clicking an external style causes SharePoint Designer to open that file for editing. After a while of working with one style sheet, you can easily end up editing another one without noticing. Because of this, you should pay special attention to what file you are actively editing while working with the Manage Styles pane.
The Apply Styles Pane
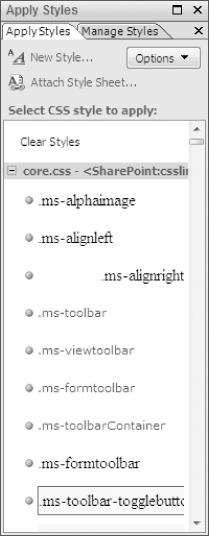
The Apply Styles pane is closely related to the Manage Styles pane. As the name suggests this pane is for actually applying (or removing) style elements of the page you are editing. Just like the Manage Styles pane, all styles that affect the selected page will be shown, including those inherited from a page's page layout or master page. Unlike the Manage Styles pane, the Apply Styles pane also shows styles that affect inline elements. This is beneficial in that you can see all the styles that affect a given element and it allows you to change or clear them with ease. The Apply Styles pane uses the following icons to indicate different types of styles:
- Styles based on IDs have a red dot.
- Styles based on classes have a green dot.
- Styles based on elements have a blue dot.
- Inline styles have a yellow dot.
- Styles that are used in the current page have a circle around their dot.
- External style sheets have an @ symbol.
To apply a style to a given page element, simply select the element in the page editor and then click a style in the Apply Styles pane. Lastly, the Clear Styles button at the top can be used to clear all the currently selected styles. See Figure 5-19.
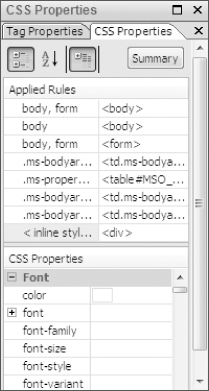
The CSS Properties Pane
The CSS Properties pane can be used on individual pages, CSS files, or along with the Manage Styles pane to view and change styles. This pane allows you to examine all of the styles that the currently selected element has applied to it, as well as help you understand the cascading priority of the style. The Applied Rules section at the top of the pane lists the name of the style elements (or selectors) that is affecting the file being currently edited. See Figure 5-20. Clicking on one of the selectors will display its properties under the CSS Properties section. You can also double-click a selector to open its corresponding style sheet and be taken directly to the correct line of code.
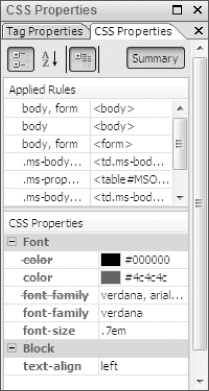
By default, the CSS Properties section shows all of the possible properties that can be assigned to a selector, but by clicking the Summary button at the top of the pane, it will show only the properties that affect the current selection. This can be helpful because there are many possible properties to look through. To the right of each CSS Property is a box that contains the value assigned to that property. You may click the box and type a value (or select one from a dropdown when available). Properties will have a red line through them if they are being overridden by a style lower in the style cascade. This feature is extremely handy since the corner stone of MOSS design is overriding out-of-the-box CSS. You will probably see this red line a lot while working with a MOSS design. See Figure 5-21.
Working with Web Parts and Web Part Zones
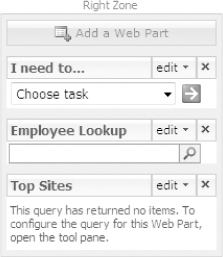
Web Parts are an essential part of the MOSS experience. While master pages and page layouts do a good job of painting the shell of a Web site, the Web Parts perform many of the secondary data delivery tasks of a MOSS Web site. Much of your involvement with the actual styling of Web Parts will take place with XSL and CSS (more on this in Chapter 10). However, in order for your site's content authors to work with Web Parts, you first have to give them access by providing Web Part Zones in pages or page layouts. Web Part Zones are the areas of a layout that are designated to allow zero-to-many Web Parts to be added by the content authors. Figure 5-22 shows Web Parts stacked in a Web Part Zone. Web Parts are selected by content authors from the gallery of Web Parts chosen by the MOSS Administrator, and are dragged into Web Part Zones, stacking next to each other either horizontally or vertically.
You may be tempted to add a Web Part Zone to a Master Page so that every page in a site will have access to it. Unfortunately, Microsoft does not allow Web Part Zones to be placed in a Master Page. You can place a Web Part without a Web Part Zone on a Master Page, but content authors will have no access to editing its properties from the MOSS Web interface.
To try out working with Web Parts, you need a page layout, so you might as well reuse the page layout that was created earlier named “layout_testWelcome.aspx” located in _catalogs ⇒ masterpages. After opening this file, ensure you are in Design View and select and remove the “Hello World” text that you added before. See Figure 5-23. In its place, you are going to add a Web Part Zone and a Content Editor Web Part. This Web Part will allow your content authors to add custom HTML content.
While the Content Editor Web Part may look a lot like a standard editable field in MOSS, it varies in some ways, including having more flexibility to add JavaScript and Flash content. This could be a good or bad thing, depending on how much control you want to assert on your content authors.
To add the Web Part Zone and Web Part, you will use the Web Parts pane, which is disabled by default in SharePoint Designer. Activate this pane by selecting Task Panes ⇒ Web Parts, and SharePoint Designer will add it to the top right-hand pane. If your screen resolution is limited, you may find it easier to work with the Web Parts pane while it is detached from the other panes. This is because the Web Part pane adds double-nested scrollbars when it is too small. This can be very confusing and often hides the Next and Previous buttons (needed for scrolling through the Web Part Gallery). See Figure 5-24.
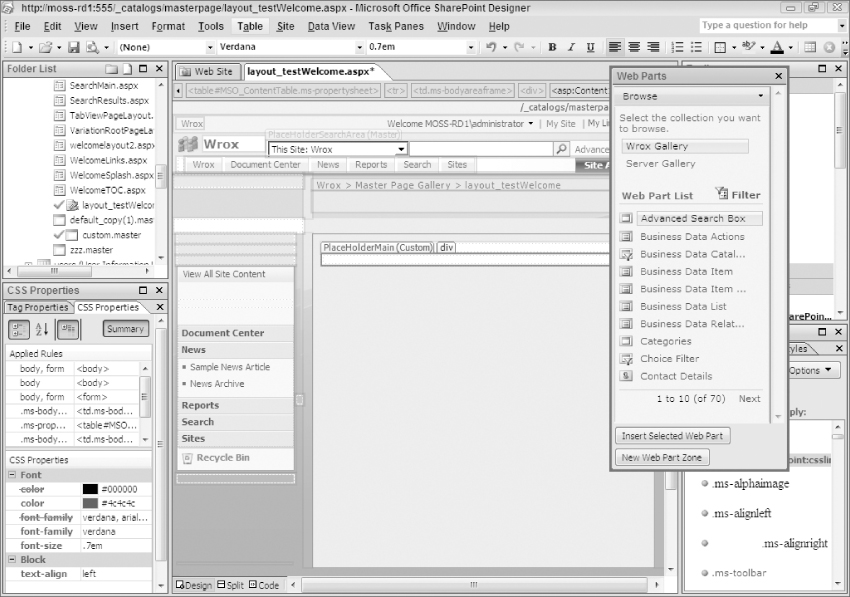
You should still have the “div” in the PlaceHolderMain selected after removing the “Hello World.” Now on the Web Parts pane, press the New Web Part Zone button. This will create an empty Web Part Zone in your page layout.
Many people have difficulty using the Web Part pane when using the Code View. If you are having trouble, you may have better luck using the Design View.
Right-clicking on the Web Part Zone and selecting Web Part Zone Properties will allow you to change the Zone Title and other properties. For this example you can leave the properties as they are.
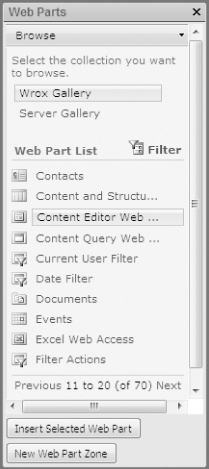
Next, you want to find the Content Editor Web Part in the Web Parts pane. Press the Next and Previous buttons until you locate a Web Part titled “Content Editor Web…,” an abbreviation for the Content Editor Web Part. This list of Web Parts is populated from your particular MOSS Web server. If you cannot find the Content Editor Web Part, there is a chance that your server administrator chose to remove it. (If this is the case, you may have to plead with them to add it back as the Content Editor Web Part is a powerful tool.) Select the Content Editor Web Part and then press the Insert Selected Web Part button. See Figure 5-25. This will cause SharePoint Designer to create a new Content Editor Web Part and add it to the selected Web Part Zone.
Just as with the Web Part Zone, right-clicking the Web Part and selecting Web Part Properties will allow you to edit various properties of the Web Part. For now, you can leave them set to their defaults. If you switch to Code View, you will see that MOSS has injected about 30 lines of code that represent all of the default settings for the Content Editor Web Part. Your page will look somewhat like the following code listing (various IDs and spacing may be different, but this is okay as long as your page looks similar):
<%@ Page language=“C#” Inherits=“Microsoft.SharePoint.Publishing.
PublishingLayoutPage,Microsoft.SharePoint.Publishing,Version=12.0.0.0,
Culture=neutral,PublicKeyToken=71e9bce111e9429c” meta:Webpartpageexpansion=
“full” meta:progid=“SharePoint.WebPartPage.Document” %>
<%@ Register Tagprefix=“SharePointWebControls” Namespace=“Microsoft.SharePoint.
WebControls“ Assembly=“Microsoft.SharePoint, Version=12.0.0.0,
Culture=neutral, PublicKeyToken=71e9bce111e9429c” %> <%@ Register
Tagprefix=“WebPartPages” Namespace=“Microsoft.SharePoint.WebPartPages”
Assembly=“Microsoft.SharePoint, Version=12.0.0.0, Culture=neutral,
PublicKeyToken=71e9bce111e9429c” %> <%@ Register Tagprefix=
“PublishingWebControls” Namespace=“Microsoft.SharePoint.
Publishing.WebControls“ Assembly=“Microsoft.SharePoint.Publishing,
Version=12.0.0.0, Culture=neutral, PublicKeyToken=71e9bce111e9429c” %>
<%@ Register Tagprefix=“PublishingNavigation” Namespace=
“Microsoft.SharePoint.Publishing.Navigation” Assembly=
“Microsoft.SharePoint.Publishing, Version=12.0.0.0, Culture=neutral,
PublicKeyToken=71e9bce111e9429c” %>
<asp:Content ContentPlaceholderID=“PlaceHolderPageTitle” runat=“server”>
<SharePointWebControls:FieldValue id=“PageTitle” FieldName=“Title”
runat=“server”/>
</asp:Content>
<asp:Content ContentPlaceholderID=“PlaceHolderMain” runat=“server”>
<div>
<WebPartPages:ContentEditorWebPart Webpart=“true” runat=“server”
__WebPartId=“{D5EB1B85-D875-4D71-851B-519F6985120A}”>
<WebPart xmlns:xsi=“http://www.w3.org/2001/XMLSchema-instance”
xmlns:xsd=“http://www.w3.org/2001/XMLSchema”
xmlns=“http://schemas.microsoft.com/WebPart/v2”>
<Title>Content Editor Web Part</Title>
<FrameType>Default</FrameType>
<Description>Use for formatted text, tables, and images.</Description>
<IsIncluded>true</IsIncluded>
<PartOrder>0</PartOrder>
<FrameState>Normal</FrameState>
<Height />
<Width />
<AllowRemove>true</AllowRemove>
<AllowZoneChange>true</AllowZoneChange>
<AllowMinimize>true</AllowMinimize>
<AllowConnect>true</AllowConnect>
<AllowEdit>true</AllowEdit>
<AllowHide>true</AllowHide>
<IsVisible>true</IsVisible>
<DetailLink />
<HelpLink />
<HelpMode>Modeless</HelpMode>
<Dir>Default</Dir>
<PartImageSmall />
<MissingAssembly>Cannot import this Web Part.</MissingAssembly>
<PartImageLarge>/_layouts/images/mscontl.gif</PartImageLarge>
<IsIncludedFilter />
<ExportControlledProperties>true</ExportControlledProperties>
<ContentLink xmlns=“http://schemas.microsoft.com/WebPart/v2/ContentEditor” />
<Content xmlns=“http://schemas.microsoft.com/WebPart/v2/ContentEditor”>
<![CDATA[]]></Content>
<PartStorage xmlns=“http://schemas.microsoft.com/WebPart/v2/ContentEditor” />
<ID>g_d5eb1b85_d875_4d71_851b_519f6985120a</ID>
</WebPart></WebPartPages:ContentEditorWebPart>
</div>
</asp:Content>
Now you can save, check-in, and publish your page layout and then browse to your MOSS site and create a new page from the page layout.
In some cases you can test an updated page layout by refreshing a page that was previously created from it. However, when adding a Web Part to the page layout, you will need to create a new page in order to see the change.
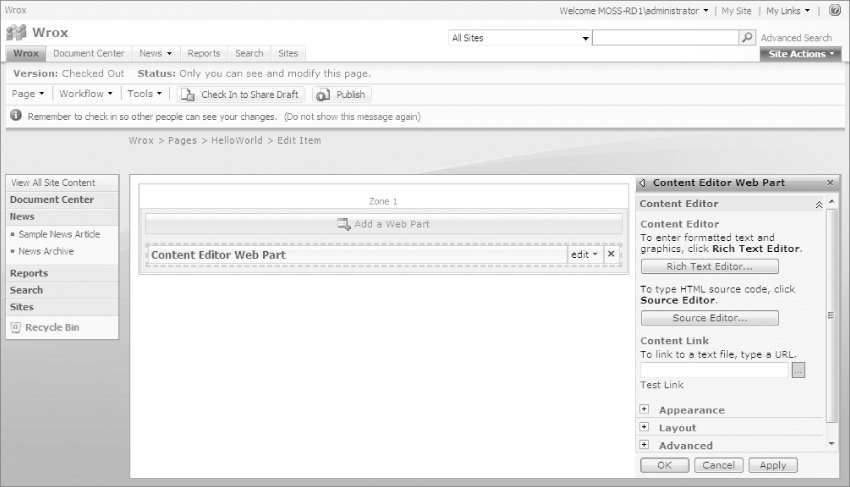
To do this, click Site Actions ⇒ Create Page, add a meaningful title and URL name, select your page layout named “Test Welcome Layout,” and lastly click Create. MOSS will create the new page and open it in edit mode. You should see a light blue box with a large yellow button that says “Add a Web Part” (this is your Web Part Zone) and an inner box that says “Content Editor Web Part.” On the right side of the inner box, you will see an “edit” dropdown. Select it, and click Modify Shared Web Part. This will open the Web Part Editor, from which you can click either the Rich Text Editor or the Source Editor button. See Figure 5-26.
After entering and saving some content of your choice, the page will refresh, and you can see your custom content inside the Content Editor Web Part. Lastly, you should Publish and Approve your page by clicking the Publish button on the Page Editing Toolbar above your page layout. The MOSS page will refresh one last time and show you how end users will see the new content.
As with most sections in this chapter, you have only scratched the surface of what can be done with Web Parts. Chapter 10 will review more of the out-of-the-box MOSS Web Parts.
If you would like to have a Web Part on a page or page layout that the users cannot interact with (one that you have already fully configured to your liking), you would place the Web Part directly on the page and not in a Web Part Zone. Web Parts that are not in Web Part Zones are not editable in the MOSS Web interface.
XSL (Extensible Stylesheet Language) is a transformation markup language used to style XML data and transform it into HTML for display in a browser. MOSS relies heavily on XML and XSL to display various aspects of its content. The most common areas that utilize XSL are in the display of lists and in the styling of both the Content Query Web Part and the Data View Web Part (more on these in Chapter 10).
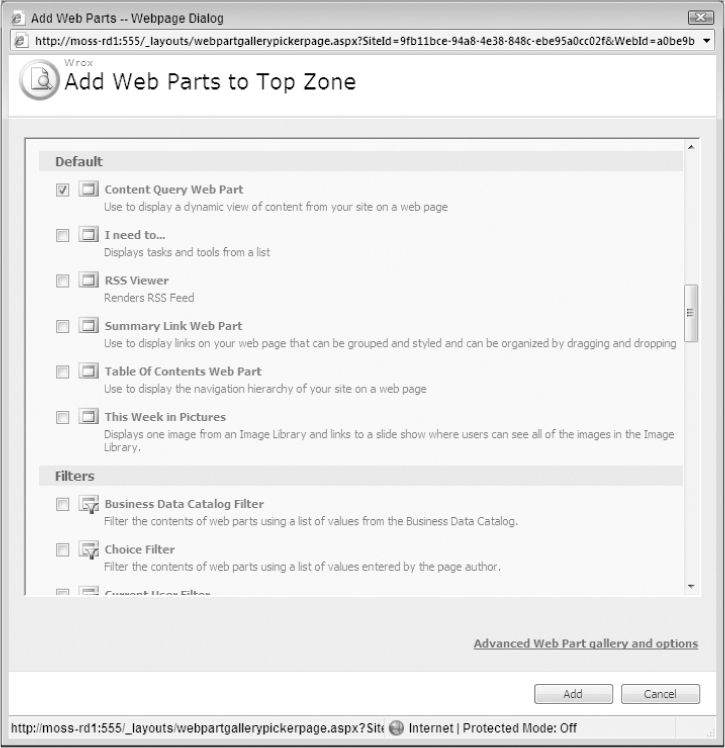
To explore XSL briefly, you can look at styling the results of the Content Query Web Part. This Web Part is used frequently to “roll-up” content from MOSS lists and allows a lot of freedom to explore XSL. To do this you first have to add a Content Query Web Part to a Web Part Zone in your MOSS site. Open your MOSS site in your browser and select Site Actions ⇒ Edit Page. Then in one of the Web Part Zones click Add a Web Part. See Figure 5-27.

Find and select the Content Query Web Part from the Add Web Parts window and click Add. See Figure 5-28.
After the Web Part appears on the page, click “edit” on the right hand top of the Web Part and then select Modify Shared Web Part. This will open the Web Part Editor for this Web Part. Expand the Presentation tab in the Web Part Editor and under the Styles heading, look at the Item Styles. You will now add your own style to this dropdown. To do this, open SharePoint Designer and open Style Library ⇒ XSL Style Sheets. This directory holds many of the key XSLs that MOSS uses. Open ItemStyle.xsl in Code View. This file is made up of all the styles listed in the dropdown you looked at before. Each line that looks like: <xsl:template name=“StyleName” match=“Row[@Style=‘StyleName’]” mode=“itemstyle”> is the start of one of these styles. You will add one to the list at the bottom of the file. Add the following code right before the final </xsl:stylesheet> tag:
<xsl:template name=“CustomItemStyle” match=“Row[@Style=‘CustomItemStyle’]”
mode=“itemstyle”>
<div style=“font-weight: bold;”>
<xsl:value-of select=“@Title” />
</div>
<div style=“color: gray;”>
<xsl:value-of select=“@Description” />
</div>
<br/>
</xsl:template>
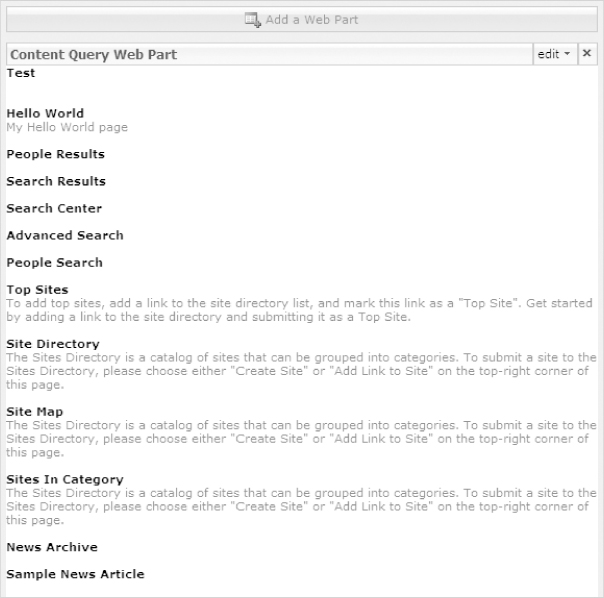
This style performs a simple styling of the items in the Content Query Web Part, just showing the Title in bold and the Description in a gray color below it. Figure 5-29 shows the newly styled Content Query Web Part. You can see that the XSL code is simply a mix of XSL tags and standard HTML. Save, check-in, and publish the file and revisit your MOSS Web site. Refresh your browser and look again at the Item style dropdown. If all went as planned, you should see CustomItemStyle as the last item in the dropdown. Select your new style and click OK, and you should see your Content Query Web Part styled as described. This is a simple example of what can be done with XSL and the Content Query Web Part.
For more information on working with XSL check out XSLT: Programmer's Reference, 2nd Edition by Michael Kay.
Using SharePoint Designer Reports
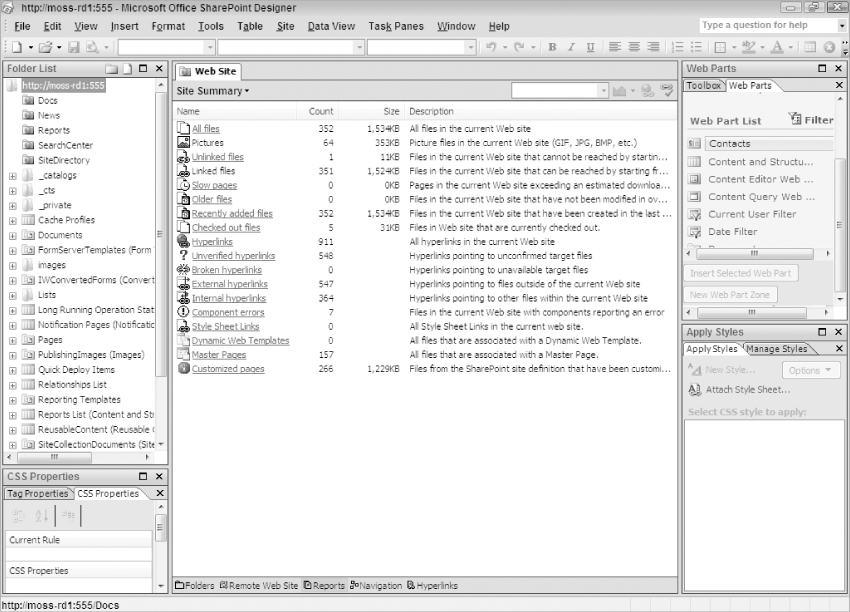
One of the benefits of using SharePoint Designer is that it comes with usage reports that are not readily accessible otherwise. All of the SharePoint Designer reports are located under the Site menu on the top tool bar, under Reports. The first report in the list Site Summary is actually a jumping off point for all the other reports, so you should probably start there. See Figure 5-30.
Here are some of the more useful reports available in SharePoint Designer and from the Site Summary Report:
- Unlinked Files Files that cannot be reached from your homepage.
- Broken Hyperlinks A list of all the hyperlinks that are not functioning.
- Style Sheet Links A list of all the style sheets referenced on your site and which pages refer to them.
- Customized Pages A list of all the pages that have been customized from the original site definition.
In this chapter, you have explored many aspects of SharePoint Designer, which will surely be an essential tool for rapidly designing and maintaining highly stylized MOSS sites. You learned about many of the task panes that are available as well as the Code and Design Views. In many ways you have just scratched the surface on topics such as master pages, page layouts, Web Parts, and CSS in MOSS. These topics will be covered in depth in the coming chapters. The chapter shows many of the most useful aspects of SharePoint Designer that designers will need to understand going forward. At the end of the day, the best way to get comfortable with this new and powerful tool is to get your hands dirty and start playing with it yourself as much as possible.