
8.2. Membership and User Profiles
User profiles are a collection of information that can be imported from a database or manually entered. The data in a user profile can then also be further customized by the user. Profiles store personal information about the users in your company or organization. All of the user profiles are stored in Profile Services, which is part of the Shared Service Provider for the site collection. User profiles can be helpful when you need to determine some type of personal information about another user. Also, user profiles help by pointing out the connections, or relationships, that a user has with other users. For example, a manager would be able to see other managers in the organization, and use them as a resource when help is needed.
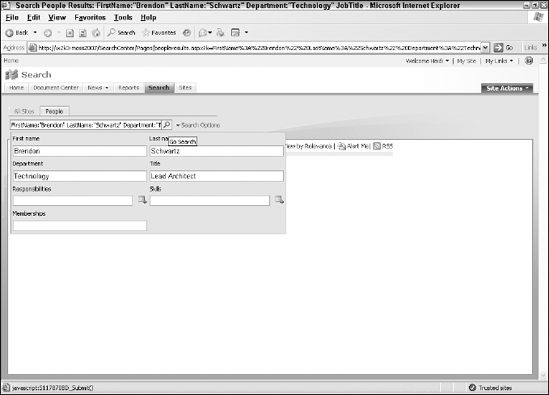
You can use user profiles through the user interface or through the APIs provided by the object model. There are many ways that user profiles can be helpful to an organization. For example, if a department is trying to use an unfamiliar program, they could search all of the user profiles to find someone who lists using that product as one of their skills. If there are only a handful of people in the organization who have experience using that product, the user profiles would provide a way to find them quickly and get the help needed. Figure 8-1 shows an advanced search of user profiles.
Figure 8.1. Figure 8-1
8.2.1. Managing a User Profile
To update the user profile, end users will use their My Site page, the administrator will use the Shared Service Provider, and you as the developer can access web services or the object model. When users set up a My Site page, there are five links provided in the Get Started with My Site section to help them personalize their site. The first link allows the user to describe themselves, and it takes the user to a personal profile form. The personal profile is where users can view and modify available user profile fields about themselves. Filling in the information is part of the process of creating memberships and helps other people find them through enterprise search, and also give colleagues some information about each other. This type of information can be very useful in large organizations, where many people don't know what others do or how to find them.
User profile data can be imported from many different connections such as Active Directory or another third-party data store. The administrator can manage the user profiles through the Shared Service Provider User Profiles and Properties screen. From this screen you can add, view, and create new imports for the user profile as well as manage the profile properties of each user. (See Figure 8-2.)
Although the administrator may already have some information set up to be displayed, each user should fill out all of the optional information to create a more robust site and user profile system. It is helpful for users to provide as much information as possible in their profiles, to increase the effectiveness of searches within your organization.
Figure 8.2. Figure 8-2

8.2.2. Setting Up Connections
To pull user profile information into SharePoint's user profile system, SharePoint sets up a connection to a data store that provides user information. This can include Active Directory, a Lightweight Directory Access Protocol (LDAP) server, or Business Data Catalog. There are two connection types used to bring the profile data into SharePoint.
Master Connection
Sub Connection
A master connection is used as the primary source of the profile data. The master connection is set up to use either Active Directory or LDAP. Sub connections are used to provide supplemental information to the user profile system of SharePoint. The Business Data Catalog can be used as a supplemental store.
8.2.3. User Profile API
The SharePoint Administration Site enables administrators to create and update user profiles as well as manage them from a central location. There are many times when more functionality is required, and custom code can be used to easily extend the user profiles. The primary namespace that was used in SharePoint 2003 for profiles was Microsoft.SharePoint.Portal.UserProfiles. This namespace has now been replaced by the Microsoft.Office.Server.UserProfiles namespace.
Each SharePoint web application uses a Shared Service Provider to manage the user profile data store. Because web applications can use the same Shared Service Provider, more than one SharePoint web application can use the same set of users stored in the User Profile section.
If you want to import a set of users from another application, SharePoint provides you with a few options. You can use the Business Data Catalog or the built-in APIs from the SharePoint object model, or even the user profile web services. If you are importing users on a regular basis and want to keep two systems synchronized, then the Business Data Catalog is probably the right solution. But if you are creating Web Parts or simple management tools, then the API or web services will provide you with the ability to create those.
To set up users in your SharePoint web application, you can either use the user interface that is provided or you can programmatically create users in custom code. You will look at how to create the users in code shortly. The two major classes that are used are:
UserProfile class
UserProfileManager class
Let's take a look at the classes that are used and how to work with the User Profile API in code.
8.2.3.1. Managing Users in the User Profile
UserProfileManager is the main object for accessing the user profile data stored on the web application's shared service. This class can be used to create users, delete users, and provide information about the profile service.
NOTE
When working with the object model classes make sure to add a reference to the Windows SharePoint Services DLL as well as the required Microsoft Office SharePoint Server components' DLLs. If you don't have a reference to System.Web.dll, then you will need to add that also.
Creating a UserProfileManager is straightforward and can be done with the new syntax for SharePoint 2007. The following simple console application creates a UserProfileManager that is connected to the ServerContext of a SharePoint site. Then it displays the number of user profiles in the console window.
To create your own console application that displays the number of users in a site follow these steps:
Open Visual Studio, and create a new console application called UserProfileManagerApp.
Make sure to add the SharePoint references:
using Microsoft.SharePoint;
using Microsoft.Office.Server;
using Microsoft.Office.Server.UserProfiles;
Then in the main function, add the following code:
using System;
using Microsoft.SharePoint;
using Microsoft.Office.Server;
using Microsoft.Office.Server.UserProfiles;
namespace UserProfileManagerApp
{
    class Program
    {
        static void Main(string[] args)
        {
            try
            {
                using (SPSite spSite = new SPSite(@"http://localhost"))
                {
                    ServerContext siteContext = ServerContext.GetContext(spSite);
                    UserProfileManager pmManager =
                              new UserProfileManager(siteContext);
                    Console.WriteLine("Number of users: " + pmManager.Count);
                }
            }
            catch (Exception exp)
            {
Console.WriteLine(exp.Message);
            }
        }
    }
}
In addition to the Count property, the UserProfileManager class contains methods to manage user profile data, including the following:
| Name | Description |
|---|---|
| CreateUserProfile | Creates a user profile with the provided values. If the profile already exists, an exception is thrown. |
| GetUserProfile | Returns a reference to the user profile specified. |
| RemoveUserProfile | Removes user profiles. The method has multiple overrides to provide options when deleting users. |
| UserExists | Returns a value indicating whether the user for a specified account name has a profile. |
8.2.3.1.1. Creating New User Profiles
Creating a new user in the user profile system only requires that the user name match an existing user in the current SharePoint site.
A good policy when creating user profiles is to check to make sure that the profile does not exist already. Although the profile system doesn't let you add a new profile if one already exists, it is much better practice to use the built-in methods for checking for the user, than to try to manage the exceptions that occur when trying to add the user a second time. In some cases, there are no built-in methods for performing a check and you must use the try/catch method. This is true when looking for a specific list in the object model.
The following code adds a new profile after checking to make sure that the user doesn't already have one:
Using the console application above, add the new code to check if a user exists before you create a new user and profile:
using System;
using Microsoft.SharePoint;
using Microsoft.Office.Server;
using Microsoft.Office.Server.UserProfiles;
namespace UserProfileManagerApp
{
    class Program
    {
static void Main(string[] args)
        {
            try
            {
                using (SPSite spSite = new SPSite(@"http://localhost"))
                {
                    ServerContext siteContext = ServerContext.GetContext(spSite);
                    UserProfileManager pmManager =
                              new UserProfileManager(siteContext);
                    Console.WriteLine("Number of users: " + pmManager.Count);
                    string strUserName = "wrox\brendon";
                    UserProfile newUser = null;
                    if (!pmManager.UserExists(strUserName))
                    {
                        newUser = pmManager.CreateUserProfile(strUserName);
                    }
                }
            }
            catch (Exception exp)
            {
                Console.WriteLine(exp.Message);
            }
        }
    }
}
8.2.3.1.2. Deleting User Profiles
The code for deleting profiles is very similar to the code for adding them, except that the method RemoveUserProfile is used. This method accepts either the user's name or the GUID that is the unique key for the user.
The following code removes the profile that was created in the preceding example. This process does not delete the user from the main connection such as Active Directory. Deleting the user from Active Directory will still have to be done from outside SharePoint.
Remember that you are also checking to see if the user profile exists before you can delete it. If the user profile does not exist, then you do not have to take any action.
using System;
using Microsoft.SharePoint;
using Microsoft.Office.Server;
using Microsoft.Office.Server.UserProfiles;
namespace DeleteUser
{
    class Program
    {
        static void Main(string[] args)
        {
            try
            {
                using (SPSite spSite = new SPSite(@"http://localhost"))
{
ServerContext siteContext = ServerContext.GetContext(spSite);
UserProfileManager pmManager =
new UserProfileManager(siteContext);
Console.WriteLine("Number of users: " + pmManager.Count);
string strUserName = "wrox\brendon";
if (pmManager.UserExists(strUserName))
{
pmManager.RemoveUserProfile(strUserName);
}
}
}
catch (Exception exp)
{
Console.WriteLine(exp.Message);
}
Console.ReadLine();
}
}
}8.2.3.2. Working with User Profiles
At the core of the user profile objects is the UserProfile class, which represents a single instance of a user profile. Once you have an object of this type, you can read and change the profile properties, assuming that the code is running with appropriate privileges.
To retrieve a profile, you just provide the user's name or GUID, as shown here:
Open Visual Studio and create a new console application called RetrieveUser.
Make sure to add the SharePoint references:
using System.Collections.Generic;
using Microsoft.SharePoint;
using Microsoft.Office.Server;
using Microsoft.Office.Server.UserProfiles;
Now get a reference to the correct SharePoint site and UserProfileManager associated with that site:
using System;
using System.Collections.Generic;
using Microsoft.SharePoint;
using Microsoft.Office.Server;
using Microsoft.Office.Server.UserProfiles;

namespace RetrieveUser
{
    class Program
    {
        static void Main(string[] args)
        {
try
            {
                using (SPSite spSite = new SPSite(@"http://localhost"))
                {
                    ServerContext siteContext = ServerContext.GetContext(spSite);
                    UserProfileManager pmManager =
                             new UserProfileManager(siteContext);
                }
            }
            catch (Exception exp)
            {
                Console.WriteLine(exp.Message);
            }
        }
    }
}
Check if the user exists, and get the user profile if the user is available:
using System;
using System.Collections.Generic;
using Microsoft.SharePoint;
using Microsoft.Office.Server;
using Microsoft.Office.Server.UserProfiles;

namespace RetrieveUser
{
    class Program
    {
        static void Main(string[] args)
        {
            try
            {
                using (SPSite spSite = new SPSite(@"http://localhost"))
                {
                    ServerContext siteContext = ServerContext.GetContext(spSite);
                    UserProfileManager pmManager =
                             new UserProfileManager(siteContext);
                    string strUserName = "devcow\brendon";
                    UserProfile userProfile = null; [Author: Why is this variable
called "newUser" when it actually holds the profile for an existing user? In fact,
why isn't it called something like "userProfile" since that's what it is?i have
updated the variable,thanks,brendon]
                    if (pmManager.UserExists(strUserName))
                    {
                        userProfile = pmManager.GetUserProfile(strUserName);
                    }
                }
            }
            catch (Exception exp)
            {
Console.WriteLine(exp.Message);
            }
        }
    }
}
The UserProfile class contains many useful properties that can be leveraged when programming with the User Profile services of SharePoint 2007. The following table describes two properties used to identify the user profile and to return information about a given user profile.
The UserProfileManager contains the list of user profile properties that are stored in the user profile data store. These properties are stored in the Shared Service Provider of the web site related to the UserProfileManager. To determine which properties are needed in the user profile store, use the UserProfileManager class. It is important to remember the difference between the name and the DisplayName when dealing with properties in SharePoint. The name is the value used when getting and setting the values, and the DisplayName is what is shown on the user interface. Sometimes these can be the same, but they are usually different. The IsRequired field shows which properties need to have values entered when the profile is updated in the user interface.
The following code sample demonstrates some of the default property values of the UserProfileManager. The code loops through all of the properties that have been created for the user profiles in the Shared Service. This will display the Name, Display Name, Description, and if the field is required in the console application you just created above.
//Get the properties of the Property Manager
foreach (Property property in pmManager.Properties)
{
   Console.WriteLine("Name: " + property.Name);
   Console.WriteLine("DisplayName: " + property.DisplayName);
   Console.WriteLine("Description: " + property.Description);
   Console.WriteLine("Required: " + property.IsRequired);
}
8.2.3.2.1. Setting User Profile Value Properties
User profile value properties can be entered and edited through the administrative screen, the user's My Site, or through code. The site administrator is also able to add properties to a user profile. These properties provide metadata that describes the user such as email, manager, and skills. You can have as many properties on a user to provide information about that user as needed. These properties can be set through an import from another system such as Active Directory or the Business Data Catalog.
NOTE
Only the properties that have been created for the user have values, and the rest of the properties will not contain any value. It is good to check to make sure that the property exists for the user before trying to use the value.
The collection returned from the UserProfile class is a set of Name/Value pairs. Name is simply set as a string value that can be shown to the user, but Value is now a collection called UserProfileValueCollection. Value is a collection in SharePoint 2007 because the properties now have the ability to contain multivalues, which is something you will look at shortly. For now, just return the values as the value field.
The following code shows how you can loop through each value and display the results to the command window:
Using the RetrieveUser console application above, add the following lines to the main method:
foreach (KeyValuePair<string,UserProfileValueCollection> NameValues in userProfile)
{
   // Displays all of the name value pairs
   Console.WriteLine(NameValues.Key + ": " + NameValues.Value);
}
Now that you have seen what the values are for the properties of your user, you can add the correct values for the fields that are missing but required. You can also update the properties that are already set in the user profile.
8.2.3.2.2. Setting Single Value Properties
The standard type of property contained in the UserProfile class is a single value property. This property contains a Name/Value pair that has the information entered about the user.
To update the properties through the SharePoint object model follow these steps:
Create a console application called UserProfileProperties.
Add the references to SharePoint:
using System;
using System.Collections.Generic;
using Microsoft.SharePoint;
using Microsoft.Office.Server;
using Microsoft.Office.Server.UserProfiles;
Connect to the user profile store and then retrieve a user from the data store. Once you have the user, you can use the indexer method to get the property that is expected. Add the following code to the main method to perform these actions:
try
            {
using (SPSite spSite = new SPSite(@"http://localhost"))
                {
                    ServerContext siteContext = ServerContext.GetContext(spSite);
                    UserProfileManager pmManager =
                             new UserProfileManager(siteContext);
                    string strUserName = "devcow\brendon";
                    UserProfile userProfile = null;
                    if (pmManager.UserExists(strUserName))
                    {
                        userProfile = pmManager.GetUserProfile(strUserName);
                    }
                }
            }
            catch (Exception exp)
            {
                Console.WriteLine(exp.Message);
            }
Update a value such as Department. To persist the values back to the user profile system, you must call the Commit() method on the UserProfile that has new changes. This allows you to make many changes in memory and then commit all of the changes at once.
using System;
using System.Collections.Generic;
using Microsoft.SharePoint;
using Microsoft.Office.Server;
using Microsoft.Office.Server.UserProfiles;

namespace UserProfileProperties
{
    class Program
    {
        static void Main(string[] args)
        {
            try
            {
                using (SPSite spSite = new SPSite(@"http://localhost"))
                {
                    ServerContext siteContext = ServerContext.GetContext(spSite);
                    UserProfileManager pmManager =
                             new UserProfileManager(siteContext);
                    string strUserName = "devcow\brendon";
                    UserProfile userProfile = null;
                    if (pmManager.UserExists(strUserName))
                    {
                        userProfile = pmManager.GetUserProfile(strUserName);
                        userProfile["Department"].
Value = "Information Technology";
                        userProfile.Commit();
                    }
                }
            }
            catch (Exception exp)
            {
Console.WriteLine(exp.Message);
            }
        }
    }
}
Setting the value requires knowing the string name of the field. SharePoint helps provide a base set of values used in the user profile system. These values are in a class called PropertyConstants. The PropertyConstants class only contains a set of constants that return the correct string value that is used for the name of the user profile property it refers to.
For example the value of PropertyConstants.WorkPhone is WorkPhone, whereas the value for UserGuid is UserProfile_GUID.
As you can see, some of the values are the same, but some can be different. The PropertyConstants class will help you retrieve and set all of the common properties in the user profile.
Look at how the following code uses the PropertyConstants, as well as a string, to set the value of each property.
Update another property, this time using the PropertyConstants class:
userProfile = pmManager.GetUserProfile(strUserName);
userProfile [PropertyConstants.WorkPhone].Value = "555-555-5555";
userProfile.Commit();
8.2.3.2.3. Multivalue Properties
A big improvement in SharePoint 2007 is the use of properties called multivalue properties. Sometimes you want the ability to store more than one value for a given field. This can come in very handy for multiple value properties such as sales area if you cover more than one area. Microsoft has some standard fields that are already set up for multivalue use such as Responsibilities, Skills, Past Projects, Interests, and Schools.
To determine whether the property is a multivalued property, the property IsMultiValued is provided. This value is a read-only property and can only be set by creating the user profile property as a multivalue property.
As you saw earlier, the multiple values have to be returned as a collection, and these values are returned as an ArrayList object. However, if you just display the properties value, the first element of the collection is the value that is displayed.
To add multiple values to the property, just call the Add method on the returned ArrayList property collection of the user:
Property skillProperty =
          pmManager.Properties.GetPropertyByName(PropertyConstants.Skills);
if (skillProperty.IsMultivalued)
{
   if (pmManager.UserExists(strUserName))
   {
      newUser = pmManager.GetUserProfile(strUserName);
newUser[PropertyConstants.Skills].Add("ASP.NET");
newUser[PropertyConstants.Skills].Add("SQL Server");
newUser.Commit();
}
}Each value in the user interface will be separated by a single character. The default character that is used is the comma. Some values might contain a comma, so SharePoint 2007 allows you to modify the separator character of a multivalue property. Use the MultiValueSeparator enumeration to select a different value for the property's Separator value. There are four values to choose from in the MultiValueSeparator class. The most common separator values are provided for you, as well as an Unknown value.
Comma
Semicolon
Newline
Unknown
When using the multivalue properties, you will need to pick which type of separator you will use. If the property type is a multivalue, set the separator:
property.Separator = MultiValueSeparator.Semicolon;
8.2.3.2.4. Providing Properties in Choice Lists
In addition to having the ability to add multiple values to a property, you can also allow your users to select from a list of possible values known as a choice list. There are three different values that can be set for the ChoiceList property as follows:
None—The property is not currently using a choice list.
Closed—The choices have been added to the property and the users cannot edit the choices
Open—Users and administrators can add new choices to the list.
8.2.3.2.5. User Profile Relationships
Some of the most common methods return information about the user or provide the application with more information about a user, such as relationships to other profiles. The UserProfile class is full of information about the user— such as lists of Managers and Peers—and provides the ability to create the user's personal site. The user will have access to this site by using the My Site link in the user interface of SharePoint.
The following table lists the UserProfile methods:
| Name | Description |
|---|---|
| Colleagues | Returns a ColleagueManager to work with the current colleagues |
| GetCommonManager | Gets the user profile of the common managers of the current user |
| GetDirectReports | Returns a list of UserProfiles that contains the users that report to the current user |
| GetManager | Gets the current user's immediate manager |
| GetManagers | Returns a list of all the managers that the current user reports to |
| GetPeers | Gets a list of user profiles of all users that are the current user's peers |
| Memberships | Returns a list of the current user's memberships |
| RefreshManagers | Updates the list of managers the user has as associations |
8.2.3.3. Adding the SharePoint People Picker to the Web Site
The people pickers in SharePoint make it easy to work with any of the users from the data source locations. To work with the control in the user interface, add the PeopleEditor control, as shown in the following code, to a Web Part or web page, and then you will have full control over how the people picker control is displayed and interacts with the user. You will be able to set properties of the PeoplePicker to modify how it is displayed. This is the same control that is used in a list or profile. The following code adds the PeoplePicker to a Web Part, but it could just as easily be added to a web page.
Start off by creating a new Web Part called PeoplePickerWebPart.
Add the required references:
using System;
using System.Runtime.InteropServices;
using System.Web.UI;
using System.Web.UI.WebControls.WebParts;
using System.Xml.Serialization;

using Microsoft.SharePoint;
using Microsoft.SharePoint.WebControls;
using Microsoft.SharePoint.WebPartPages;
using System.Web.UI.WebControls;
In the CreateChildControls method create a new instance of the PeopleEditor control:
PeopleEditor PeoplePickerControl = new PeopleEditor();
this.Controls.Add(PeoplePickerControl);
base.CreateChildControls();
Update some of the properties of the control, such as allowing the control so that they are empty, allowing the end user to type in information, and changing the look and feel by changing the button names:
using System;
using System.Runtime.InteropServices;
using System.Web.UI;
using System.Web.UI.WebControls.WebParts;
using System.Xml.Serialization;

using Microsoft.SharePoint;
using Microsoft.SharePoint.WebControls;
using Microsoft.SharePoint.WebPartPages;
using System.Web.UI.WebControls;

namespace PeoplePickerWebPart
{
    public class AgentPicker : System.Web.UI.WebControls.WebParts.WebPart
    {
        protected override void CreateChildControls()
        {
            try
            {
                PeopleEditor PeoplePickerControl = new PeopleEditor();
                PeoplePickerControl.AllowEmpty = true;
                PeoplePickerControl.AllowTypeIn = true;
                PeoplePickerControl.BrowseButtonImageName = "browse";
                PeoplePickerControl.BrowseButtonToolTip = "Pick an Agent";
                PeoplePickerControl.CheckButtonImageName = "Validate user";
                PeoplePickerControl.ErrorMessage = "No Agent Found";

                this.Controls.Add(PeoplePickerControl);
                base.CreateChildControls();
            }
            catch (Exception ex)
            {
                Literal _ErrorMessageLiteral = new Literal();
                _ErrorMessageLiteral.Text = "Custom Error: " + ex.Message;
                this.Controls.Clear();
                this.Controls.Add(_ErrorMessageLiteral);
            }
        }

    }
}
8.2.3.4. Developing Using the User Profile Change Log
When working with changes to used profiles, the UserProfileChangeQuery class provides the ability to filter based on the following types:
Add
Anniversary
Colleague
Delete
DistributionListMembership
MultiValueProperty
PersonalizationSite
QuickLink
SingleValueProperty
SiteMembership
Update
UpdateMetadata
UserProfile
Weblog
To filter, set one of these values to true once you have created an instance of the class. Multiple filter values can be set to true. The anniversary value will return all profile values that have dates in them. SharePoint considers each date field an anniversary and will create an anniversary event when the date reaches the machine date.
Each change type has a class that is associated with it that contains specific information for that type of change.
The UserProfile class contains methods to get changes about the user or the user's colleagues.
| Name | Description |
|---|---|
| CurrentChangeToken | Represents a timestamp of the last time the current user was modified |
| GetChanges | Returns a collection of the changes that have happened to the current user |
| GetColleagueChanges | Returns a collection of changes that have happened to all of the colleagues associated with the current user |
To get the change information, you must get the user profile and call the method GetChanges as follows:
Create a new console application named ProfileChanges.
Add the required SharePoint references:
using System;
using System.Collections.Generic;
using Microsoft.SharePoint;
using Microsoft.Office.Server;
using Microsoft.Office.Server.UserProfiles;
Get a reference to the Site and User Profile Manager.
try
{
   using (SPSite spSite = new SPSite(@"http://localhost"))
   {
      ServerContext siteContext = ServerContext.GetContext(spSite);
      UserProfileManager pmManager = new UserProfileManager(siteContext);
   }
}
catch (Exception exp)
{
   Console.WriteLine(exp.Message);
}
Determine and set the range for the number of days you want to look at in changes, then set the change token that will be used with that amount of time. This example uses the last 30 days.
// Display the changes that have occurred in the last month
DateTime dtNumberDays = DateTime.UtcNow.Subtract(TimeSpan.FromDays(30));
// Create a change token to compare the number of days
UserProfileChangeToken upChangeToken = new
        UserProfileChangeToken(dtNumberDays);
Now create a query object to determine which changes will be returned. For this example, set the Anniversary and Colleague changes to true, and set the ChangeTokenStart value from the change token created above.
// Create a query object to determine which changes are displayed
UserProfileChangeQuery QueryAnniversayAndColleagues = new
              UserProfileChangeQuery(false,true);
QueryAnniversayAndColleagues.ChangeTokenStart = upChangeToken;
QueryAnniversayAndColleagues.Anniversary = true;
QueryAnniversayAndColleagues.Colleague = true;
Now perform the standard steps to get a user profile, and this time call the method GetChanges with the query object you just created.
string strUserName = "heididev\brendon";
if (pmManager.UserExists(strUserName))
{
    UserProfile spMyUser = pmManager.GetUserProfile(strUserName);

    UserProfileChangeCollection MyUserProfileChanges =
                spMyUser.GetChanges(QueryAnniversayAndColleagues);
}
Loop through each change in the returned collection of user profile changes, determine what type of change it is, and display information about that type of change:
try
{
   using (SPSite spSite = new SPSite(@"http://localhost"))
{
      ServerContext siteContext = ServerContext.GetContext(spSite);
      UserProfileManager pmManager = new UserProfileManager(siteContext);

      // Gets some subset of changes from a user profile.

      // Display the changes that have occurred in the last month
      DateTime dtNumberDays = DateTime.UtcNow.Subtract(TimeSpan.FromDays(30));
      // Create a change token to compare the number of days
      UserProfileChangeToken upChangeToken = new
                    UserProfileChangeToken(dtNumberDays);

      // Create a query object to determine which changes are displayed
      UserProfileChangeQuery QueryAnniversayAndColleagues = new
                    UserProfileChangeQuery(false,true);
      QueryAnniversayAndColleagues.ChangeTokenStart = upChangeToken;
      QueryAnniversayAndColleagues.Anniversary = true;
      QueryAnniversayAndColleagues.Colleague = true;

      string strUserName = "heididev\brendon";
      if (pmManager.UserExists(strUserName))
      {
         UserProfile spMyUser = pmManager.GetUserProfile(strUserName);

         UserProfileChangeCollection MyUserProfileChanges =
                     spMyUser.GetChanges(QueryAnniversayAndColleagues);

         foreach (UserProfileChange MyUserChange in MyUserProfileChanges)
         {
            Console.WriteLine(MyUserChange.EventTime.ToString());
            if (MyUserChange is UserProfileAnniversaryChange)
            {
               UserProfileAnniversaryChange AnniversryEvent =
                     (UserProfileAnniversaryChange)MyUserChange;
               Console.WriteLine(AnniversryEvent.Anniversary);
               Console.WriteLine(AnniversryEvent.ProfileProperty);
            }
            else if (MyUserChange is UserProfileColleagueChange)
            {
               UserProfileColleagueChange ColleagueEvent =
                      (UserProfileColleagueChange)MyUserChange;
            }
         }
      }
   }
}
catch (Exception exp)
{
   Console.WriteLine(exp.Message);
}
8.2.4. Building My Sites
My Sites are personalized sites that can be set up in SharePoint for and by each user individually. Each site can be provisioned on an as-needed basis to save disk space. It's similar to having self-serving Windows SharePoint Services sites, each set up for a different user. Although it is similar, SharePoint has added some features of My Site that make it useful for individual portals. Every site is different, based on the personalized settings that each user sets up for their own site. My Sites are central locations where users can store and manage information and documents that are specific to the user, such as Excel workbooks used to maintain sales for that person's region. Types of information that can be stored and managed on a user's My Site include: documents, tasks, calendars, links, and contacts. It is also a good way for other users in your organization to look up information about a user, including his responsibilities, skills, interests, and even current projects that he is working on.
My Sites have three basic pages that can be used for different purposes throughout the site:
Public Profile Page
Personal Site Page
Personalization Page
Basic templates are provided for each type of page to give users a place to start. Also, each My Site page has a bar of links at the top of the page that can be used for easy navigation between these three different types of sites.
8.2.4.1. The Public Profile Page
The first page is the public profile page, called My Profile, which can be viewed by anyone in the organization. The administrator gets to decide how the page will look, but the users can add as much or as little information as they want. Privacy groups can be set up to let users decide who can view some of the information on their public site. Items such as skills, interests, distribution list memberships, a list of all colleagues, and other information can be set to only be seen by certain groups, such as a user's manager or workgroup members. This places some of the control of sensitive data in the user's hands and gives each user the ability to show only the information about themselves that they feel comfortable sharing.
8.2.4.2. The Personal Site Page
The second page that can be used is a personal site, and it is called My Home. Naturally, users access this site by clicking on My Home on the top link bar of My Site. The users are their own administrators for their personal site, and they are provided with a home page that only they can view. Since this page can only be viewed by the user, he or she is able to choose the look and layout of the site. Also, as administrators, users can create and manage as many pages as they want to for their site. With the exception of the private home page, personal site pages are set up to be shared with other selected people in the organization. Personal sites allow many users to work together on projects and store documents that can be shared by setting up list, document library, and workspace pages in their personal site.
8.2.4.3. The Personalization Page
The third page that is used is the personalization site, which is managed by the site administrator. It has the look and feel of the main site, except that changes have been made to identify it as another My Site page. There are also navigation sections at the top, and then four Web Part zones below. The zones, made up of the top, middle left, middle right, and bottom can be personalized. The content in each of them can be moved, deleted, or have new items added. However, these personalization sites can only be provided and changed by administrators or by content providers. The personalization site stores information that is personalized for each user, and allows special targeting to the user. Different groups in the organization can use this information to create sites that are personalized for each user, depending on their needs. This is discussed in more detail later in this chapter under "SharePoint Audiences."
This type of page is very useful for presenting content that is personal to each user, and could not be posted publicly. For example, a manager could set up a personalization site that keeps track of annual reviews. When a user clicks on the site, all of her previous reviews can be seen, but she would only be able to view her own reviews. All of the personalization sites for each person are linked together to create a collection of sites, and there is a personalized navigation bar that gives the user easy access to their information.
8.2.4.4. Creating Your First My Site
To create your first My Site page, follow these steps:
On the top right of the main screen, click My Site to create your My Site as the logged-in user. The very first time that a logged-in user clicks on the My Site link, SharePoint will create the site. You have to wait a few seconds while SharePoint sets up your personal site for the first time and creates the default document libraries and lists.
The first prompt that appears asks if you would like to have a quick link icon added to your personal site. This quick link icon will appear on the left of the Open and Save As dialog boxes inside of your windows applications. If you click Yes, then your personal site will be the first to appear in the drop-down list of locations when you create Meeting and Document Workspace sites. This also sets your My Site page to the default personal site. After SharePoint has set up your My Site, it is up to you to personalize it. Figure 8-3 shows the setup page you access to begin creating your own My Site page.
NOTE
When personalizing My Site, information from the user profile will be displayed in the Public profile page when set to a visible Privacy setting. This allows for personalization based on the preferences of the user.
You can also keep a list of all of your favorite web sites so that you can access them from any computer where you have access to the network and are able to open My Site. At the top right of all pages on My Site, there is a link to the My Links page (this page can also be accessed by clicking on Links under My Profile on the Quick Launch). The My Links page lets you manage all of your links, as well as allowing access to sites where you are a member.
Figure 8.3. Figure 8-3

Once the profile has been imported or created a logged-in user can navigate to their My Site. Click on the link to "describe yourself," and there each available profile can be filled in with details such as a brief personal description, a photo, and the skills and responsibilities that you possess. As you can see in Figure 8-4, some properties can be edited and some cannot. These properties can also be modified using the object model.
Depending on how many user profile properties are configured on the site, there could be a lot of information that can be filled in, to give other people an inside look into each user. These profile properties can be modified or extended through the Shared Service Provider. This type of information sharing can also create an integrated organization, where people can see information about other users and relationships they have to others users with a customized set of data for each user. In fact SharePoint will monitor this data and make connections to other users such as colleagues.
To the right of the fields is a drop-down box to select who the field will be shown to. Each field can be set to its own different value—such as Only Me, My Manager, My Workgroup, My Colleagues, and Everyone. This way, when logged in, you can fill something out but choose to only show it to certain groups. There are also a few fields that are set to Everyone and cannot be changed. When all changes have been made, click Save and Close at the top of the page.
Figure 8.4. Figure 8-4

These security settings for visibility are known as the policy settings. In the Shared Service Provider, each field can be set to a default privacy setting as well as have a value set indicating if the policy is Required, Optional, or Disabled. In addition to this setting, the site administrator can determine if the user can change the default privacy setting or not.
8.2.4.4.1. Identifying People You Know
The second link, Identify the people you know, lets the logged-in user identify people they know and work with. This creates a membership in SharePoint known as Colleagues. This helps you organize and manage your relationships to other users in the site. When users click Identify the people you know or the Colleagues link under the My Profile in My Site, a page where you can add colleagues and organize them into groups will be displayed. The users that are added will appear in the Colleague Tracker Web Part as well as any changes that a user has performed. Because the Colleagues are part of the PrivacyPolicy items, you have the option to set the visibility of the colleagues added to a profile.
8.2.4.4.2. Uploading Your Picture
To visually help identify a user, each profile has an associated picture. Clicking the Upload your picture link allows end users to modify their profile by displaying the Edit Details page used for the rest of the profile details. The profile property Picture allows end users to add a picture of themselves. This property is set to a field type of image and can be viewed by everyone. Fields can be of different types and can even be custom fields created through code.
Using a picture can be useful in large and small organizations, so that people can identify other people. In a large organization that may have many branches in different geographic locations, it could help someone put a face with a name of someone they talk to on the phone. In a small organization, it could help out new employees that have to meet a lot of new people all at once. If you add a picture to your profile, it will be shown on the upper-left corner of your My Site, and the file will also be listed in the Documents section.
NOTE
Each My Site is just a site that is created for each user. All information and data is stored in a list on each site, so make sure to monitor the size of the My Site collection
8.2.4.4.3. Customizing Your My Site Page
Just like any site page, the My Site portal page can be customized with the user interface and Web Parts. Click the Customize this page link, and the page is shown in Edit Mode. The screen is split into zones, and My Site can be arranged in any way that is best for the user. The Get Started editing links can be taken away or moved to the bottom of the screen after setup, when they won't be used as much anymore. If you frequently use the My Calendar feature, it can be moved to the very top, so that it is the first thing you see on My Site. If there is a feature that is never used, for example if there are no RSS feeds set up, then that feature can be deleted from the page. Later on, if the user wants to add an RSS feed, they can add the Web Part back in by coming to this page and clicking on one of the Add a Web Part links in whatever zone they want it to show up in.
8.2.4.4.4. Using Help For End Users
SharePoint makes it easy to find out more information about the topic you are working with, and My Site is no different.
Click the Learn more about My Site link, which offers helpful tips. You can direct the end users to this location so that they can spend some time reviewing the information, as it can help them better understand My Site and how to use it. It will also introduce them to new uses for My Site, which will make it a more powerful tool for you and the organization.
8.2.4.5. Maintaining a Secure My Site
Privacy policies are built into SharePoint to protect the user from displaying information to users who should not be able to the view the data. When selecting data, there are many options that can be used as listed in the following Privacy enumerations. The end user can modify these settings on the profile page, while you as the developer will programmatically update these settings via the Profile property.
Public—Everyone
Contacts—Colleagues
Organization—Workgroup members
Manager—Manager
Private—Only the user
NotSet—Provides a default privacy setting
These restrictions apply to most of the My Site functionality.
The UserProfileManager class uses the method GetPrivacyPolicy to return the PrivacyPolicyManager for the current user. This manager will allow you to update these profile properties through code. To see how the PrivacyPolicyManger works, take a look at the following example:
Start by creating a console application named PrivacyPolicyApp.
Add the required SharePoint references:
using System;
using System.Collections.Generic;
using Microsoft.SharePoint;
using Microsoft.Office.Server;
using Microsoft.Office.Server.UserProfiles;
Get the site and UserProfileManager references:
try
{
   using (SPSite spSite = new SPSite(@"http://localhost"))
   {
      ServerContext siteContext = ServerContext.GetContext(spSite);
      UserProfileManager pmManager = new UserProfileManager(siteContext);
   }
}
catch (Exception exp)
{
   Console.WriteLine(exp.Message);
}
Return the PrivacyPolicyManager, and loop through each PolicyItem in the site displaying relevant information about each item:
try
{
   using (SPSite spSite = new SPSite(@"http://localhost"))
   {
      ServerContext siteContext = ServerContext.GetContext(spSite);
      UserProfileManager pmManager = new UserProfileManager(siteContext);
      string strUserName = "wrox\brendon";

      PrivacyPolicyManager ppmPolicyManager = pmManager.GetPrivacyPolicy();

      foreach(PrivacyPolicyItem tempItem in ppmPolicyManager.GetAllItems())
      {
         Console.WriteLine(tempItem.DisplayName);
         Console.WriteLine(tempItem.DefaultPrivacy);
         Console.WriteLine(tempItem.PrivacyPolicy);
         Console.WriteLine(tempItem.Group);
      }
}
}
catch (Exception exp)
{
   Console.WriteLine(exp.Message);
}
The following code looks at the actual properties of a user and sets some of the privacy profile settings:
Start by creating a console application named UserPrivacyPolicyApp.
Add the required SharePoint references:
using System;
using System.Collections.Generic;
using Microsoft.SharePoint;
using Microsoft.Office.Server;
using Microsoft.Office.Server.UserProfiles;
Get the site and UserProfileManager references:
try
{
   using (SPSite spSite = new SPSite(@"http://localhost"))
   {
      ServerContext siteContext = ServerContext.GetContext(spSite);
      UserProfileManager pmManager = new UserProfileManager(siteContext);
   }
}
catch (Exception exp)
{
   Console.WriteLine(exp.Message);
}
Get the reference to the user set in code and get the collection of properties:
string strUserName = "heididev\brendon";

if (pmManager.UserExists(strUserName))
{
    UserProfile spUser = pmManager.GetUserProfile(strUserName);
    PropertyCollection pcCollection = pmManager.Properties;
}
From the properties collection get a property named MLSNumber. You will want to add this property from the Shared Service Provider if it does not exist.
Property property = pcCollection.GetPropertyByName("MLSNumber");
Set the privacy setting for the field to only be seen by you, the Manager:
property.DefaultPrivacy = Privacy.Manager;
Set the field to be a mandatory field that must be entered:
property.PrivacyPolicy = PrivacyPolicy.Mandatory;
Remember to always call the Commit function to save your changes in SharePoint:
try
{
   using (SPSite spSite = new SPSite(@"http://localhost"))
   {
      ServerContext siteContext = ServerContext.GetContext(spSite);
      UserProfileManager pmManager = new UserProfileManager(siteContext);
      string strUserName = "heididev\brendon";

      if (pmManager.UserExists(strUserName))
      {
         UserProfile spUser = pmManager.GetUserProfile(strUserName);
         PropertyCollection pcCollection = pmManager.Properties;
         Property property = pcCollection.GetPropertyByName("MLSNumber");
         property.DefaultPrivacy = Privacy.Manager;
         property.PrivacyPolicy = PrivacyPolicy.Mandatory;
         property.Commit();
      }
   }
}
catch (Exception exp)
{
   Console.WriteLine(exp.Message);
}
8.2.4.6. Programmatically Using My Site
My Site is full of information about a user, and most of the relevant information is available through the SharePoint object model. Common actions that you can perform are to get My Site links as well as the user's My Site location. The next section looks at how to programmatically get this information.
8.2.4.6.1. Creating A My Site for Users
Some users in your system may need to have a My Site set up for them before they click on the My Site link themselves. This could happen when you are setting up users who store documents securely on their My Site page but mainly save those documents through rich client tools like Microsoft Office 2007 or a third-party application that can communicate with SharePoint 2007. When creating a My Site for a user, SharePoint provides a method called CreatePersonalSite, which is part of the UserProfile class. Most of the methods and properties used for creating My Site functionality are based on a single user created from the UserProfile class. This is due to the fact that the information is created from the user's profile and relationships.
To create the site, start by getting a reference to a new user or an already existing user, then call the CreatePersonalSite() method to create the My Site. These two steps are shown in the following code, where you perform the basic steps to get the profile manager and then make a call to the CreatePersonalSite() for the provided user.
try
{
   using (SPSite spSite = new SPSite(@"http://localhost"))
   {
      ServerContext siteContext = ServerContext.GetContext(spSite);
      UserProfileManager pmManager = new UserProfileManager(siteContext);
      string strUserName = "wrox\brendon";
      if (pmManager.UserExists(strUserName))
      {
         UserProfile spUser = pmManager.GetUserProfile(strUserName);
         Console.WriteLine("This may take a few minutes...");
         spUser.CreatePersonalSite();
      }
   }
}
catch (Exception exp)
{
   Console.WriteLine(exp.Message);
}
Creating a new site can take up to a few minutes, depending on how fast the server is and how much load the server is under at the moment. Make sure that you let the user know that his My Site is being provisioned and that it could take a few minutes.
Remember that if the My Site has already been created, it will not overwrite the My Site that is available. Instead, an exception will be thrown stating that the user already has a personal site created, and it will show the personal site's address.
8.2.4.6.2. Getting My Site Personal Information
In addition to providing methods for working with the My Site, the UserProfile class can also return information about the user's personalized data that makes up the My Site. In fact, with the object model that the Microsoft SharePoint team provides, you could create your own My Site or even add to the existing one.
The My Site that is provisioned is just a regular SharePoint site and can be modified with the SharePoint object model once you get a reference to the current site.
The following table shows some of the common personalized information provided in the UserProfile class that helps you view or update data:
| Name | Description |
|---|---|
| PersonalizationLinks | Returns the set of links used for the Personalization links bar. |
| PersonalSite | Returns an object of type SPSite that represents the My Site of the current user. |
| PersonalUrl | Gets the URL for the My Site of the user that can be modified when logged in as the current user. |
| PublicUrl | Gets the URL of the current users My Site that can be viewed by any user. The sections marked as being viewable in the public profile are available. |
| QuickLinks | Gets the QuickLinkManager object for this user profile. |
The PersonalSite property can be used to prevent the users My Site from being created twice. This property uses the user profile information to determine whether the My Site has been created already. The following code demonstrates how you might check to see if the user already has a My Site:
try
{
   using (SPSite spSite = new SPSite(@"http://localhost"))
   {
      ServerContext siteContext = ServerContext.GetContext(spSite);
      UserProfileManager pmManager = new UserProfileManager(siteContext);
      string strUserName = "wrox\brendon";
      if (pmManager.UserExists(strUserName))
      {
         UserProfile spUser = pmManager.GetUserProfile(strUserName);
         if (spUser.PersonalSite == null)
         {
            Console.WriteLine("This may take a few minutes...");
            spUser.CreatePersonalSite();
         }
         else
         {
            SPSite personalSite = spUser.PersonalSite;
            Console.WriteLine("personalSite.Url: " + personalSite.Url);
         }
      }
   }
}
catch (Exception exp)
{
   Console.WriteLine(exp.Message);
}
To view the locations of the My Site for a user, locate or type the name of the user that you need the information for, and then display either the PersonalUrl or the PublicUrl. The personal URL displays the location of the site that the user can log in to and edit. If the site is not associated with the currently logged-in user, the page will redirect the user to the View All Content page, but if it is the personal My Site of the logged-in user, My Site will appear and can be edited by the user.
When the user has a My Site already created, the PersonalUrl and the URL of the SPSite returned in the PersonalSite will be the same. If the user has not already set up a My Site, the personal and public URLs that are returned are also the same. This is due to the fact that the personal URL is updated when the My Site is actually created.
Sometimes, you will want to provide a link to the My Site of a user for other users to view. In that case, use the PublicUrl of the user's My Site to display the URL that any user can see. This page can show information that has been correctly set up in the privacy policies and will display information according to which user you are logged in as. The following code displays the URL information of the current user to the console application. The URLs that are displayed are the PersonalUrl and PublicUrl of the current user.
try
{
   using (SPSite spSite = new SPSite(@"http://localhost"))
   {
      ServerContext siteContext = ServerContext.GetContext(spSite);
      UserProfileManager pmManager = new UserProfileManager(siteContext);
      string strUserName = "wrox\brendon";
      if (pmManager.UserExists(strUserName))
      {
         UserProfile spUser = pmManager.GetUserProfile(strUserName);
         Console.WriteLine("spUser.PersonalUrl");
         Console.WriteLine(spUser.PersonalUrl);
         Console.WriteLine("spUser.PublicUrl");
         Console.WriteLine(spUser.PublicUrl);
      }
   }
}
catch (Exception exp)
{
   Console.WriteLine(exp.Message);
}
In addition to retrieving the URL properties and SharePoint site of the My Site, you can also work with the user's links. You can use either the QuickLinks or the PersonalizationLinks from the user's profile. If you select GetItems() without providing a privacy policy enumeration, then the default will be Privacy.Private. You may want to add a link to every user's profile or just display the user's link on another Web Part. The following code shows how to get a user's links and display them in the console window:
try
{
   using (SPSite spSite = new SPSite(@"http://localhost"))
   {
      ServerContext siteContext = ServerContext.GetContext(spSite);
      UserProfileManager pmManager = new UserProfileManager(siteContext);
      string strUserName = "heididev\sam";
      if (pmManager.UserExists(strUserName))
      {
         UserProfile spMyUser = pmManager.GetUserProfile(strUserName);
         QuickLinkManager linkManager = spMyUser.QuickLinks;
         foreach (QuickLink link in linkManager.GetItems())
         {
            Console.WriteLine(link.Title + " : " + link.Url);
         }
      }
   }
}
catch (Exception exp)
{
Console.WriteLine(exp.Message);
}8.2.4.7. Colleagues
You can use Colleagues to gather information about related contacts in SharePoint. Colleagues are other users in the system that are your managers, peers, or direct reports. These users are automatically added as colleagues by SharePoint 2007. You might have colleagues that are part of your organization that do not fit into one of these categories. This could be a person in another department, who is not part of your reporting structure. You can add these users as colleagues who will appear in the My Site page. Figure 8-5 shows the Colleagues page. Here you can add, and manage colleagues and view the relationships among colleagues.
Once the colleagues have been added, you can display them with the Colleague Tracker Web Part, which is loaded with Microsoft Office SharePoint Server 2007. By default, each user's My Site page contains a Colleague Tracker Web Part to easily view the colleagues each user has. Colleagues can also be used to narrow the searches that are performed on the site.
Figure 8.5. Figure 8-5

The UserProfile class contains a property named Colleagues that returns the colleague's manager for the current user, who can be used to work with the colleagues of the user. Once you have a reference to the ColleagueManager you can add, remove, or list the colleagues of the user. There are even built-in methods to list the common colleagues as well as colleagues of colleagues. The following table lists the ColleagueManager methods for managing a user's colleagues:
| Name | Description |
|---|---|
| Create | Creates a Colleague object with the specified type and privacy level |
| DeleteAll | Removes all of the colleagues associated with the user |
| GetColleaguesOfColleagues | Gets the set of colleague's colleagues |
| GetCommonColleagues | Gets the colleagues that the user and the colleague have in common or share |
| GetItems | Returns the set of all colleagues based on the privacy settings |
| IsColleague | Determines whether the specified user is a colleague of this colleague |
To add a new colleague, use the built-in method, IsColleague, to check whether the user is already a colleague. If the user is not a colleague, then make a call to the Create method, as follows:
Start by creating a console application named ColleagueManagerApp.
Add the required SharePoint references:
using System; using System.Collections.Generic; using Microsoft.SharePoint; using Microsoft.Office.Server; using Microsoft.Office.Server.UserProfiles;
Get a reference to the ColleagueManager from the UserProfile object:
spMyUser = pmManager.GetUserProfile(strUserName); ColleagueManager cmColleagues = spMyUser.Colleagues;
Display the number of colleagues that have a privacy setting of Public:
int NumColleages = cmColleagues.GetItems(Privacy.Public).GetLength(0); Console.WriteLine(NumColleages);
Check to see if the provided user is a colleague of the first user. If the user is not a colleague, add the user as a colleague:
string strNewColleague = "heididev\sam"; UserProfile spMyColleague = pmManager.GetUserProfile(strNewColleague);
if (!cmColleagues.IsColleague(spMyColleague.ID)) { cmColleagues.Create(spMyColleague, ColleagueGroupType.Peer, "Peers", false, Privacy.Public); }
Loop through each colleague and display them to the console window:
try { using (SPSite spSite = new SPSite(@"http://localhost")) { ServerContext siteContext = ServerContext.GetContext(spSite); UserProfileManager pmManager = new UserProfileManager(siteContext); string strUserName = "heididev\brendon"; if (pmManager.UserExists(strUserName)) { UserProfile spMyUser = pmManager.GetUserProfile(strUserName); ColleagueManager cmColleagues = spMyUser.Colleagues; int NumColleages = cmColleagues.GetItems(Privacy.Public).GetLength(0); Console.WriteLine(NumColleages); string strNewColleague = "heididev\sam"; UserProfile spMyColleague = pmManager.GetUserProfile(strNewColleague); if (!cmColleagues.IsColleague(spMyColleague.ID)) { cmColleagues.Create(spMyColleague, ColleagueGroupType.Peer, "Peers", false, Privacy.Public); } foreach (Colleague tempColleague in cmColleagues.GetItems(Privacy.Public)) { Console.WriteLine(tempColleague.Title); Console.WriteLine(tempColleague.GroupType); Console.WriteLine(tempColleague.IsAssistant); Console.WriteLine(tempColleague.IsInWorkGroup); } } } } catch (Exception exp) { Console.WriteLine(exp.Message); }
By using the ColleagueManager class, you can remove all of the colleagues of a single user. However, if you want to delete just one colleague, you need to get a reference to that colleague and then call the Delete method from the Colleague class.
8.2.4.8. Membership
Similarly to colleagues, memberships provide relationships between the user and content. Content can be related to the user through automatic association or you can use the object model. Standard functionality includes such things as determining memberships, providing the ability to create new memberships, and displaying information about current memberships.
There are two types of membership:
Distribution List (DL) memberships
Microsoft Windows SharePoint Services 3.0 site memberships
The difference between the two types of memberships is that one is created from the Active Directory directory service and the other is created from SharePoint sites.
Again, just like the colleagues, the memberships that a user has are displayed on the My Site. When another user views the common page, also known as the Profile page, the common memberships with that user will also be shown.
There are two sets of classes to use when programming with the membership relationships that allow you to work with the membership groups and the memberships themselves. The classes are:
MembershipGroup
Membership
Both of these classes have a manager class that is associated with them to manage the collections of these items. The manager class allows you to add, display or change the membership objects that they contain.
8.2.4.8.1. Working with Membership Groups
You will use the membership groups to add users as a member of a distribution list or to a SharePoint site membership. The membership groups use a number of public properties to describe the membership group itself. The following table lists some useful properties of the class:
| Name | Description |
|---|---|
| CreateMemberGroup | Allows developers to create members groups from the object model |
| Count | Returns the number of member groups that are associated with the user |
| GetMemberGroupBySourceAndSourceReference | Returns a specific MemberGroup based on the source and name of the source reference |
The following code uses the UserProfile class to get the membership groups that the user has and then display the number of memberships the user has. In addition to showing the values of the Membership class, the MembershipGroupManager is used to get the list of groups:
try
{
using (SPSite spSite = new SPSite(@"http://localhost"))
{
ServerContext siteContext = ServerContext.GetContext(spSite);
UserProfileManager pmManager = new UserProfileManager(siteContext);
string strUserName = "wrox\brendon";
if (pmManager.UserExists(strUserName))
{
UserProfile spMyUser = pmManager.GetUserProfile(strUserName);
MemberGroupManager mgmMemberGroups = pmManager.GetMemberGroups();
int NumMemberships = mgmMemberGroups.Count;
Console.WriteLine("Number of Memberships: " + NumMemberships);
}
}
}
catch (Exception exp)
{
   Console.WriteLine(exp.Message);
}If the installation of SharePoint is new, no membership groups may have been created yet. To add a new group, use the MemberGroupManager and create a new group with the Create method. Now that you have a MemberGroup, you can display the group with the properties of the MemberGroup class, which are discussed in the following table:
| Name | Description |
|---|---|
| Count | Returns the number of members associated the member group |
| Description | A description of the text describing the member group |
| DisplayName | Name used when the member group is displayed in the user interface |
| Source | The GUID of the source member group |
| SourceReference | The value that makes the member group unique in the source |
| Url | The location of the membership group's URL |
When creating new groups, the sourceReference string must be different for each MembershipGroup you add, or they must have a different source location. An error will be displayed if you try to add the same source more than once. You can however have the same sourceReference name if it's from different source. A source must be a valid GUID that can be user created, or it can be one of the predefined types. The following sources are part of the PrivacyPolicyIDConstants enumeration class:
MembershipsFromDistributionLists
MembershipsFromSharePointSites
MyColleaguesOnMySite
MyColleaguesRecommendations
MyPersonalizationLinksOnMySite
Add the required SharePoint references:
using System;
using System.Collections.Generic;
using Microsoft.SharePoint;
using Microsoft.Office.Server;
using Microsoft.Office.Server.UserProfiles;
Get the site and UserProfileManger reference.
Get the list of MemberGroups for the user; if there are zero groups create a new one. Make this new list a DistributionList.
if (mgmMemberGroups.Count == 0) { // Create new member group MemberGroup newGroup = mgmMemberGroups.CreateMemberGroup( PrivacyPolicyIdConstants.MembershipsFromDistributionLists, "Wrox SP Reviewers List", "Wrox Review", "Reviewers list", "http://localhost", "Wrox"); }
Display the number of groups that are in the list:
int NumMemberships = mgmMemberGroups.Count; Console.WriteLine("Number of Memberships: " + NumMemberships);
Loop through each member group and display it to the console window:
try { using (SPSite spSite = new SPSite(@"http://localhost")) { ServerContext siteContext = ServerContext.GetContext(spSite); UserProfileManager pmManager = new UserProfileManager(siteContext);
string strUserName = "wrox\brendon"; if (pmManager.UserExists(strUserName)) { UserProfile spMyUser = pmManager.GetUserProfile(strUserName); MemberGroupManager mgmMemberGroups = pmManager.GetMemberGroups(); if (mgmMemberGroups.Count == 0) { // Create new member group MemberGroup newGroup = mgmMemberGroups.CreateMemberGroup( PrivacyPolicyIdConstants.MembershipsFromDistributionLists, "Wrox SP Reviewers List", "Wrox Review", "Reviewers list", "http://localhost", "Wrox"); } int NumMemberships = mgmMemberGroups.Count; Console.WriteLine("Number of Memberships: " + NumMemberships); foreach (MemberGroup tempMemberGroup in mgmMemberGroups) { Console.WriteLine(tempMemberGroup.DisplayName); Console.WriteLine(tempMemberGroup.Description); Console.WriteLine(tempMemberGroup.MailNickName); Console.WriteLine(tempMemberGroup.Source); Console.WriteLine(tempMemberGroup.SourceReference); } } } } catch (Exception exp) { Console.WriteLine(exp.Message); }
Now that you have membership groups, you can create a membership relation to one of the users in your SharePoint system. Use the GetMemberGroupBySourceAndSourceReference() method of the MemberGroupManager class to get a reference to the MemberGroup. Make sure to use the correct source and sourceReference to return the right group. If you create your own source, make sure to store it in a permanent location such as a database to be able to retrieve it for use with the Get statements. You can also iterate through each of the items until you find the right one. Once you have the reference to the user and the membership groups, call the Create method of the MembershipManager class.
The membership item has the same privacy policy as other items in the My Site. When you set the membership relationship, be sure to provide the right level of privacy. This also applies to the GetItems method of the membership manager, which is used to retrieve the Membership objects. The default privacy policy is Private, so make sure to specify a different level if required. The following code shows how to get the membership groups of a user and then check for a specific group:
Start by creating a console application named MembershipManagerApp.
Add the required SharePoint references:
using System;
using System.Collections.Generic;
using Microsoft.SharePoint;
using Microsoft.Office.Server;
using Microsoft.Office.Server.UserProfiles;
Get the site and UserProfileManger reference.
Return the DistributionLists with a reference of Wrox for the current user.
MemberGroup mgMemberGroup = mgmMemberGroups.GetMemberGroupBySourceAndSourceReference( PrivacyPolicyIdConstants.MembershipsFromDistributionLists, "Wrox");
Check to see if the user already has a membership; if the user doesn't, create a new membership to the group:
MembershipManager mmMemberships = spMyUser.Memberships; //Create a new membership with the current user if (mmMemberships[mgMemberGroup] == null) { mmMemberships.Create(mgMemberGroup, MembershipGroupType.UserSpecified, "Wrox Reviewers", Privacy.Public); }
Display all the memberships the user has to the console window:
try
{
   using (SPSite spSite = new SPSite(@"http://localhost"))
   {
      ServerContext siteContext = ServerContext.GetContext(spSite);
      UserProfileManager pmManager = new UserProfileManager(siteContext);
string strUserName = "wrox\brendon"; if (pmManager.UserExists(strUserName)) { UserProfile spMyUser = pmManager.GetUserProfile(strUserName); MemberGroupManager mgmMemberGroups = pmManager.GetMemberGroups(); MemberGroup mgMemberGroup = mgmMemberGroups.GetMemberGroupBySourceAndSourceReference( PrivacyPolicyIdConstants.MembershipsFromDistributionLists, "Wrox"); MembershipManager mmMemberships = spMyUser.Memberships; //Create a new membership with the current user
if (mmMemberships[mgMemberGroup] == null)
         {
           mmMemberships.Create(mgMemberGroup,
                                MembershipGroupType.UserSpecified,
                                "Wrox Reviewers",
                                Privacy.Public);
        }

        foreach (Membership tempMembership in mmMemberships.GetItems(Privacy.Public))
        {
           Console.WriteLine(tempMembership.GroupType);
           Console.WriteLine(tempMembership.Title);
           Console.WriteLine(tempMembership.Url);
           Console.WriteLine(tempMembership.MembershipGroup.MailNickName);
        }
     }
  }
}
catch (Exception exp)
{
   Console.WriteLine(exp.Message);
}