
15.3. Workflow Development
The first step in developing custom workflows is to decide which tools you want to use. Each tool has different capabilities, strengths, and weaknesses. SharePoint Designer 2007 (SPD) presents a declarative workflow design experience and includes a wizard to create workflows that is similar to the Outlook Rules Wizard. Visual Studio 2005, on the other hand, presents a graphical design experience with its integrated workflow designer as well as a low-level code-based design experience with the Visual Studio extensions for WF. Visual Studio gives you more power, but is more complex than SharePoint Designer.
The tool that you decide to use depends on a number of factors. First, you should decide whether you really need to develop a custom workflow at all. The default workflows included with SharePoint resolve a number of business scenarios and are somewhat customizable through various configuration options. If you need something more powerful or customizable, then you should compare the features and capabilities of SharePoint Designer with those of Visual Studio 2005. The following table presents key points of comparison between the two development environments:
| Category | SharePoint Designer | Visual Studio |
|---|---|---|
| Supported WF Hosts | WSS/MOSS | WSS/MOSS/Others |
| Development Model | Wizard based | Graphical Designer |
| Supported Workflows | Sequential Only | Sequential and State Machine |
| Workflow type | Markup only. The markup file, rules and supporting files are not compiled. | Markup with code-beside compiled into an assembly. |
| Code Beside | No | Yes |
| Activities | Built-in and use custom activities developed separately. | Built-in; use and develop custom activities. |
| Forms Technology | Autogenerated, customizable ASP.NET forms | Design forms in any forms technology such as ASP.NET or InfoPath. |
| Association | Associated automatically with a single list at design time. No other associations are possible. | Can be associated with multiple content types, lists, and document libraries. |
| Initiation | Initiation forms are supported. | Initiation forms are supported. |
| Modification | Cannot modify workflow through modification forms. | Modification supported. |
| Tasks | Supports custom task forms. | Supports custom task forms. |
| Deployment | Automatically deployed to the associated list. | Must create a separate package and deploy the workflow using SharePoint feature technology. |
| Debugging | No debugging available. | Debug directly within Visual Studio. |
Admittedly, there is a lot to get your head around before you can develop workflows in MOSS. It is a gradual process of becoming familiar with all the moving parts, and then it just starts to click. According to the SharePoint Enterprise Content Management (ECM) team (the ones who developed the SharePoint workflow components), you can make the process easier by taking the time to plan and model the workflow before attempting to implement it. You then create the required forms and activities, implement the workflow, deploy it to the server, and test it.
15.3.1. Plan the Workflow
SharePoint workflows are constrained by two factors: they involve human beings and they are tied to SharePoint content. You can take advantage of these constraints when planning your workflow to stay focused on the requirements and not get distracted by the complexities involved in its design and construction.
15.3.1.1. What Does It Do?
The first thing to consider is what you want the workflow to do. Remembering that SharePoint workflows are tied to content, an appropriate question might be whether the workflow will manipulate that content. If not, then a declarative approach might suffice or you might be able to develop and debug the workflow outside of the SharePoint environment.
If the workflow needs to manipulate content, then a second question might be what kind of content? If you are developing a custom content type in conjunction with the workflow, then you need to consider how best to incorporate the required metadata. If the metadata that the workflow needs to manipulate is large and complex, then you might consider implementing helper methods in a separate assembly that you can call easily from within the workflow.
15.3.1.2. Where Does The Data Come From?
Another thing to consider is where the data for the workflow will come from. If coming from the document library or list item to which the workflow instance is attached, then the workflow host created by SharePoint will provide you with the data you need. If, on the other hand, the data comes from another document library or list item, you will need to use the SharePoint object model to retrieve it. This may introduce dependencies and performance constraints you need to consider before getting into the workflow design. The same holds true for data that you retrieve from external data sources. For more information, see the later section about how workflow activities are processed by the SharePoint host.
15.3.1.3. Where Does The Data Go?
During workflow processing, new data may be created that needs to be stored. If it needs to be written to a SharePoint list item, then you need to consider when and how the data will be committed to the item. This is especially true when developing custom activities that may be reused and incorporated into new workflows, perhaps in novel ways you did not consider when designing the activity. In general, the best way to ensure consistency is to use the interfaces provided by the Microsoft.SharePoint.Workflow namespace, namely the ISharePointService, IListItemService, ITaskService, and IWorkflowModificationService interfaces.
15.3.1.4. Who Are the Actors?
It is important to consider who will be performing actions over the life of the workflow. With any workflow, there is at least one actor, namely the workflow itself. SharePoint workflows run as the System Account and therefore have administrator privileges. This means that the workflow can perform actions that other users cannot, including the person who started the workflow. You can take advantage of this when designing workflows that need built-in administrative, logging, or auditing features.
Perhaps no human interaction is necessary at all and the workflow can run to completion on its own. Perhaps you need to take prescriptive action if a user fails to complete a task within a given time limit, or you need to provide a way for list administrators to ignore unresponsive users. Understanding the primary and secondary actors can provide a great deal of clarity when designing workflows, especially when developing workflow models.
15.3.2. Model the Workflow
After planning the workflow, it is very helpful to create a model that captures the overall flow of information. This also helps highlight hidden data dependencies and environmental requirements that would be more difficult to resolve at a later stage in the development process. The model does not have to be complete or even precisely correct. Its main purpose at this stage is to act as a map for the actual workflow design and to pinpoint additional resources which may be required for implementation.
Microsoft Office Visio is a great tool for workflow modeling, because it helps you keep the entire workflow in perspective without getting distracted by low-level design details. For instance, when modeling in Visio, there is no need to decide which activities to use for what purpose or to think about parameter validation, correlation tokens, and the like. By contrast, modeling the same workflow in the Visual Studio graphical designer introduces all these concepts and quickly pulls you away from the high level perspective you want at this stage.
Choose a Visio stencil that best matches the type of workflow you are building. For simple sequential workflows, the basic flowchart stencil should suffice. For more complex sequential workflows where many actors are involved, the cross-functional flowchart stencil works well. Figure 15-9 shows a Visio model of an expense reporting workflow using this approach.
A good rule of thumb is that if you can't capture a sequential workflow in one or two pages, then consider switching to a state machine. The Visio data-flow stencil works well for modeling state-machine workflows. Figure 15-10 shows an example of a state-machine workflow for sending reminders about tasks that are in danger of running behind schedule.
Figure 15.9. Figure 15-9
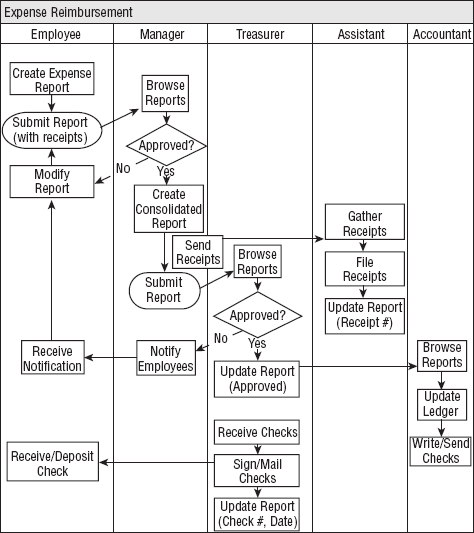
Figure 15.10. Figure 15-10

15.3.3. Create and Bind Forms
From the model, you should be able to determine what data will be needed at each stage of the workflow. With this information, you can proceed to decide what types of forms will be required and implement prototypes for them. There are four types of forms you can use with a SharePoint workflow: association, initiation, task edit, and workflow modification. You typically create these forms using InfoPath. This is the easiest method for two reasons. First, InfoPath takes care of the low-level details required to publish the form and make it accessible from within your workflow. Second, the default ASPX forms are already implemented and are prewired to store and retrieve data from InfoPath forms, which they host using the XMLFormView control. If you decide to replace the default ASPX pages with your own custom forms, then you must implement the required logic yourself. The following sections explain how this is done.
15.3.3.1. The Association Form
Association forms are used to gather data needed before the workflow starts. This information might include decisions for the workflow administrator, such as who should receive notifications for certain workflow events or where to store workflow tracking information. It is the responsibility of the association form to create an SPWorkflowAssociation object that binds the workflow to a given list or content type.
The default association form is implemented in CstWrkflIP.aspx, which uses the XmlFormView control to host an InfoPath form. If you wish to use simple web controls instead of an InfoPath form, you could use code similar to the following, replacing the code in boldface type with your own custom code that constructs the XML data string:
using System;
using System.Web;
using System.Web.UI;
using System.Web.UI.WebControls;
using Microsoft.SharePoint;
using Microsoft.SharePoint.Workflow;
using Microsoft.SharePoint.WebControls;

namespace ProSharePoint2007
{
    class CustomAssociationPage : Page
    {
        protected Button m_btnSubmit;
        protected TextBox m_editText;
        protected SPWeb m_web;
        protected SPList m_list;
        protected SPList m_taskList;
        protected SPList m_historyList;
        protected string m_taskListName;
        protected string m_historyListName;
        protected SPWorkflowAssociation m_assocTemplate;
        protected SPWorkflowTemplate m_baseTemplate;
        protected string m_workflowName;

        protected override void OnInit(EventArgs e)
        {
            base.OnInit(e);
            m_btnSubmit.Click += new EventHandler(m_btnSubmit_Click);
        }

        protected override void OnLoad(EventArgs e)
        {
            base.OnLoad(e);
            m_web = SPControl.GetContextWeb(this.Context);
            m_taskListName = Request.Params["TaskList"];
            m_historyListName = Request.Params["HistoryList"];
            m_worfklowName = Request.Params["WorkflowName"];
            m_list = m_web.Lists[new Guid(Request.QueryString["List"])];
            m_taskList = m_web.Lists[m_taskListName];
            m_historyList = m_web.Lists[m_historyListName];
            m_baseTemplate = m_web.WorkflowTemplates[
                new Guid(Request.Params["WorkflowDefinition"])];
            m_assocTemplate = null;
        }

        void m_btnSubmit_Click(object sender, EventArgs e)
        {
            DoAssociation(GetFormData());
        }

        protected string GetFormData()
        {
            string xmlData;
            // code to construct an xml string
            // from your web controls
            // for example...
xmlData = String.Format(
"<MyCustomData>{0}</MyCustomData>",m_editText.Text);
return xmlData;
}
protected void DoAssociation(string xmlFormData)
{
if (m_assocTemplate != null)
{
m_assocTemplate.Name = m_workflowName;
m_assocTemplate.SetTaskList(m_taskList);
m_assocTemplate.SetHistoryList(m_historyList);
m_assocTemplate.AssociationData = xmlFormData;
m_list.AddWorkflowAssociation(m_assocTemplate);
}
}
}
}15.3.3.2. The Initiation Form
Initiation forms are used to gather information needed when the workflow starts, such as who shall be assigned a given task or where to place the finished document. Another way to think of the difference between association forms and initiation forms is that association forms apply to the workflow class or type, whereas initiation forms apply to workflow instances. It is the responsibility of the initiation form to actually start the workflow instance.
The default workflow initiation form calls the SPWorkflowManager.StartWorkflow method to create a workflow instance, passing the current list item, the SPWorkflowAssociation object bound to the list and the XML string containing the data entered into the form. When the workflow instance is created, the StartWorkflow method passes the association data and initiation data to the workflow in the SPWorkflowProperties parameter of the OnWorkflowActivated activity.
If you wish to use a web form instead of InfoPath, you could use code similar to the following, replacing the code in boldface type with your own custom code that retrieves the initiation form data from your web controls:
using System;
using System.Web;
using System.Web.UI;
using System.Web.UI.WebControls;
using System.Globalization;
using Microsoft.SharePoint;
using Microsoft.SharePoint.Workflow;
using Microsoft.SharePoint.WebControls;
using Microsoft.SharePoint.Utilities;

namespace ProSharePoint2007
{
    class CustomInitiationPage : Page
    {
        protected Button m_btnSubmit;
        protected SPWorkflowAssociation m_assocTemplate;
protected SPWorkflowTemplate m_baseTemplate;
protected SPWeb m_web;
protected SPList m_list;
protected SPListItem m_listItem;
protected string m_listItemName;
protected string m_listItemUrl;
protected string m_workflowName;
protected override void OnInit(EventArgs e)
{
base.OnInit(e);
m_btnSubmit.Click
+= new EventHandler(m_btnSubmit_Click);
}
protected override void OnLoad(EventArgs e)
{
base.OnLoad(e);
m_web = SPControl.GetContextWeb(this.Context);
m_list = m_web.Lists[
new Guid(Request.QueryString["List"])];
m_listItem = m_list.GetItemById(
Convert.ToInt32(Request.Params["ID"],
CultureInfo.InvariantCulture));
Guid associationId =
new Guid(Request.Params["TemplateID"]);
m_assocTemplate =
SPWorkflowAssociationCollection
.GetAssociationForListItemById(
m_listItem, associationId);
if (m_assocTemplate == null)
{
throw new SPException(
"Missing Association Template");
}
m_baseTemplate = m_assocTemplate.BaseTemplate;
m_workflowName = m_assocTemplate.Name;
m_formData = m_assocTemplate.AssociationData;
if (m_listItem.File != null)
{
m_listItemUrl = m_web.Url + "/"
+ m_listItem.File.Url;
}
else
{
m_listItemUrl = m_web.Url
+ m_listItem.ParentList
.Forms[PAGETYPE.PAGE_DISPLAYFORM]
.ServerRelativeUrl + "?ID="
+
m_listItem.ID.ToString(
CultureInfo.InvariantCulture);
}if (m_list.BaseType
!= SPBaseType.DocumentLibrary)
{
m_listItemName = m_listItem.Title;
}
else
{
m_listItemName = m_listItem.Name;
int length = m_listItemName
.LastIndexOf(".'),
if (length > 0)
{
m_listItemName
= m_listItemName.Substring(0, length);
}
}
}
/// <summary>
/// Returns a formatted XML string
/// containing the form data.
/// </summary>
protected string GetInitiationFormData()
{
// Pull the data from embedded web controls
// and format as an XML string.
return
"<MyCustomData>Custom Data Goes Here</MyCustomData>";
}
void m_btnSubmit_Click(object sender, EventArgs e)
{
string urlRedirect = m_list.DefaultViewUrl;
SPLongOperation operation =
new SPLongOperation(this);
try
{
operation.Begin();
try
{
// Start the workflow using
// the custom form data.
m_web.Site.WorkflowManager
.StartWorkflow(
m_listItem, m_assocTemplate,
GetInitiationFormData());
}
catch (UnauthorizedAccessException uex)
{
SPUtility.HandleAccessDenied(uex);
}
catch (Exception ex)
{
SPUtility.TransferToErrorPage(ex.Message);
}
operation.End(urlRedirect,
SPRedirectFlags.Static,
this.Context, null);
}
finally
{
if (operation != null)
{
operation.Dispose();
}
}
}
}
}15.3.3.3. The Task Edit Form
Task edit forms are specialized forms used for interacting with users while the workflow is being processed. It is easy to confuse workflow task edit forms with the standard edit forms used for SharePoint task list items. Task edit forms work with SPWorkflowTask objects, not task list items. SPWorkflowTask is a special derived SPListItem that includes additional fields and methods for working with workflows, such as the workflow identifier and the AlterTask method used to modify task properties.
If you want to use a web form instead of InfoPath, you can use the following code to obtain the underlying task item, and then add your own custom controls to enable the end user to manipulate the task properties. When the user is ready to submit the changes, you can call the AlterTask method as illustrated by the code shown in boldface type.
using System;
using System.Collections;
using System.IO;
using System.Web;
using System.Web.UI;
using System.Web.UI.WebControls;
using System.Globalization;
using System.Xml;
using Microsoft.SharePoint;
using Microsoft.SharePoint.Workflow;
using Microsoft.SharePoint.WebControls;
using Microsoft.SharePoint.Utilities;

namespace ProSharePoint2007
{
    class CustomTaskEditPage : Page
    {
        protected Button m_btnSubmit;
        protected SPWeb m_web;
        protected SPList m_list;
        protected SPListItem m_task;
        protected string m_taskName;
        protected string m_workflowName;
        protected string m_formData;
protected override void OnInit(EventArgs e)
{
base.OnInit(e);
m_btnSubmit.Click +=
new EventHandler(m_btnSubmit_Click);
}
protected override void OnLoad(EventArgs e)
{
base.OnLoad(e);
m_web = SPControl.GetContextWeb(this.Context);
m_list = m_web.Lists[
new Guid(Request.QueryString["List"])];
m_task = m_list.GetItemById(
Convert.ToInt32(Request.Params["ID"],
CultureInfo.InvariantCulture));
m_task.CheckPermissions(
SPBasePermissions.EditListItems);
Guid workflowInstanceId =
new Guid((string)m_task[
SPBuiltInFieldId.WorkflowInstanceID]);
SPWorkflow workflow =
new SPWorkflow(m_web, workflowInstanceId);
SPList parentList = null;
try
{
parentList = workflow.ParentList;
}
catch
{
}
if (parentList != null
&& workflow.VisibleParentItem)
{
SPWorkflowAssociation parentAssociation
= workflow.ParentAssociation;
SPWorkflowTemplate baseTemplate
= parentAssociation.BaseTemplate;
m_workflowName = parentAssociation.Name;
m_taskName = (string)m_task[
SPBuiltInFieldId.Title];
m_formData = (string)m_task[
SPBuiltInFieldId.FormData];
}
}
static Hashtable XmlToHashtable(string xml)
{
Hashtable hashtable = new Hashtable();
XmlTextReader reader = new XmlTextReader(
new StringReader(xml));
if (!reader.IsEmptyElement)
{
reader.ReadStartElement();while (reader.IsStartElement())
{
string text = XmlConvert.DecodeName(
reader.LocalName);
string text2 = reader.ReadInnerXml();
hashtable[text] = text2;
}
if (reader.NodeType != XmlNodeType.None)
{
reader.ReadEndElement();
return hashtable;
}
return hashtable;
}
return hashtable;
}
void m_btnSubmit_Click(object sender, EventArgs e)
{
Hashtable formData =
XmlToHashtable(m_formData);
using (SPLongOperation operation =
new SPLongOperation(this))
{
string url = null;
if (!SPUtility.DetermineRedirectUrl(
m_list.DefaultViewUrl,
SPRedirectFlags.DoNotEncodeUrl
| SPRedirectFlags.UseSource,
this.Context, null, out url))
{
url = m_list.DefaultViewUrl;
}
try
{
operation.Begin();
if (!SPWorkflowTask.AlterTask(m_task,
formData, true))
{
SPUtility.TransferToErrorPage(
"Rolling back:
{0}",
SPResource.GetString(
"WorkflowTaskRollbackPageLinkText",
new object[0]),
url);
}
operation.End(url,
SPRedirectFlags.Static,
this.Context, null);
}
catch
{
}}
}
}
}15.3.3.4. The Workflow Modification Form
Workflow modification forms are used to modify running workflows. When presented to an end user, this form calls the SPWorkflowManager.ModifyWorkflow method, passing its data as an XML string. This string is then passed along to the OnWorkflowModified activity in the ContextData parameter. Listing 15-2 implements a custom web form that can be used instead of an InfoPath form.
Example 15.2. listing 15-2
using System;
using System.Collections;
using System.IO;
using System.Web;
using System.Web.UI;
using System.Web.UI.WebControls;
using System.Globalization;
using System.Xml;
using Microsoft.SharePoint;
using Microsoft.SharePoint.Workflow;
using Microsoft.SharePoint.WebControls;
using Microsoft.SharePoint.Utilities;
namespace ProSharePoint2007
{
class CustomWorkflowModificationPage : Page
{
protected Button m_btnSubmit;
protected SPWeb m_web;
protected SPList m_list;
protected SPListItem m_listItem;
protected SPWorkflow m_workflow;
protected SPWorkflowModification m_modification;
protected Guid m_modificationId;
protected Guid m_workflowId;
protected string m_workflowName;
protected string m_formData;
protected override void OnInit(EventArgs e)
{
base.OnInit(e);
m_btnSubmit.Click += new EventHandler(m_btnSubmit_Click);
}
protected override void OnLoad(EventArgs e)
{
base.OnLoad(e);
m_web = SPControl.GetContextWeb(this.Context);
m_list = m_web.Lists[new Guid(Request.QueryString["List"])];m_workflowId = new Guid(base.Request.Params["WorkflowInstanceID"]);
m_modificationId = new Guid(Request.Params["ModificationID"]);
m_workflow = new SPWorkflow(m_web, m_workflowId);
SPWorkflowTemplate baseTemplate
= m_workflow.ParentAssociation.BaseTemplate;
m_modification = m_workflow.Modifications[ m_modificationId ];
m_workflowName = m_workflow.ParentAssociation.Name;
m_listItem = m_workflow.ParentItem;
string modificationFormat
= (string)baseTemplate["Modification_Format"];
if (m_modification == null)
{
throw new SPException("Invalid Workflow State");
}
m_formData = m_modification.ContextData;
if (m_workflow.Author != m_workflow.ParentWeb.CurrentUser.ID)
{
m_workflow.ParentList.CheckPermissions(
SPBasePermissions.EmptyMask
| SPBasePermissions.ManageLists);
}
if (!string.IsNullOrEmpty(modificationFormat))
{
m_formData = string.Format(modificationFormat, m_formData);
}
}
void m_btnSubmit_Click(object sender, EventArgs e)
{
using (SPLongOperation operation = new SPLongOperation(this))
{
string url = null;
if (!SPUtility.DetermineRedirectUrl(m_list.DefaultViewUrl,
SPRedirectFlags.DoNotEncodeUrl | SPRedirectFlags.UseSource,
this.Context, null, out url))
{
url = m_list.DefaultViewUrl;
}
try
{
operation.Begin();
m_web.Site.WorkflowManager.ModifyWorkflow(
m_workflow, m_modification, m_formData);
operation.End(url, SPRedirectFlags.Static,
this.Context, null);
}
catch
{
}
        }
    }
}
} |
15.3.4. Identify/Create Activities
Using the model and the forms as a guide, you can begin to identify the workflow activities that satisfy your requirements. Ideally, there will already be a library of suitable activities to choose from. Even if that is the case, you should consider creating your own composite activities and an associated set of service interfaces that encapsulate your solution. Whether you decide to do so or not, this stage in the workflow development process—just prior to implementation—is the ideal time to start thinking about how this workflow can be reused. Packaging existing activities into a reusable set can greatly simplify the development of future workflows that require similar functionality.
15.3.5. Implement the Workflow
After you have identified and/or created the required activities, you are ready to implement the workflow. This can be a quick process or it can take longer, depending on the tool you are using and the development strategy you have chosen. If your development strategy focuses more on reusability, then you will spend more time developing activities than the workflows that use them. In that case, you may elect to add your custom activities to the SharePoint Designer toolbox to enable the creation of workflows using a declarative model. This approach has the advantage of supporting rapid prototyping of your workflows.
15.3.6. Deploy to the Server
Deploying a SharePoint workflow requires the activation of a feature that exposes the workflow and makes it available for association with one or more SharePoint lists. To create a workflow feature, you use the ElementManifest element in a feature.xml file to reference your workflow.xml definition file. You can either configure the file manually or deploy it as part of a SharePoint Solution package.
The steps to deploy a workflow feature manually are:
Add a reference to the workflow.xml file to the element manifest.
Add references to the default workflow feature receiver assembly and class.
Copy the workflow assembly to the GAC.
Create a new FEATURES subfolder under the 12 hive.
Copy the feature.xml and supporting files to the new folder.
After copying the required files, recycle the SharePoint application pool and activate the feature using STSADM or via the SharePoint UI. At this point, the workflow is available for association with a list.
When you deploy WSS in a farm configuration, the WF runtime is hosted in the WSS process on all front-end machines. Since your workflows are stateful and are persisted to the back-end WSS database, workflows can run on any front-end machine. However, once they are activated, they cannot be distributed across front-end servers but instead must run to completion on the front-end server that initiated the workflow.
The following code shows a feature definition for a simple workflow:
<?xml version="1.0" encoding="utf-8"?>
<!-- _lcid="1033" _version="12.0.3111" _dal="1" -->
<!-- _LocalBinding -->
<Feature  Id="432CE9D0-5CFB-4765-B8E2-DFDEC25B4DD8"
          Title="Simple Workflow"
          Description="Creates a task and waits for the user to complete it."
          Version="12.0.0.0"
          Scope="Site"
          ReceiverAssembly="Microsoft.Office.Workflow.Feature, Version=12.0.0.0,
Culture=neutral, PublicKeyToken=71e9bce111e9429c"
          ReceiverClass="Microsoft.Office.Workflow.Feature.WorkflowFeatureReceiver"
          xmlns="http://schemas.microsoft.com/sharepoint/">
  <ElementManifests>
    <ElementManifest Location="workflow.xml" />
  </ElementManifests>
  <Properties>
    <Property Key="GloballyAvailable" Value="true" />
    <!-- Value for RegisterForms key indicates the path to the forms relative to
feature file location -->
    <!-- if you don't have forms, use *.xsn -->
    <Property Key="RegisterForms" Value="*.xsn" />
  </Properties>
</Feature>
The following code shows the corresponding workflow definition file:
<?xml version="1.0" encoding="utf-8" ?>
<!-- _lcid="1033" _version="12.0.3015" _dal="1"   -->
<!-- _LocalBinding   -->
<Elements xmlns="http://schemas.microsoft.com/sharepoint/">
  <Workflow
       Name="Simple Workflow"
       Description="Workflow that waits for the user to complete a task."
       Id="37672D19-6909-451e-BDD6-404A9ED2376C"
       CodeBesideClass="ProSharePoint2007.Chapter15.SimpleWorkflow"
       CodeBesideAssembly="ProSharePoint2007.Chapter15., Version=1.0.0.0,
Culture=neutral, PublicKeyToken=ec457ebe7d96977c"
       TaskListContentTypeId="0x01080100C9C9515DE4E24001905074F980F93160"
       AssociationUrl="_layouts/CustomAssociationPage.aspx"
       InstantiationUrl="_layouts/CustomInitiationPage.aspx"
       ModificationUrl="_layouts/CustomModificationPage.aspx">

    <Categories/>
    <!-- Tags to specify InfoPath forms for the workflow; delete tags for forms
that you do not have -->
    <MetaData>
      <StatusPageUrl>_layouts/WrkStat.aspx</StatusPageUrl>
    </MetaData>
  </Workflow>
</Elements>
15.3.7. Test and Debug
WSS loads the WF runtime in its own process so debugging a WF workflow is very similar to debugging Web Parts or other applications that are part of the WSS process. Once the debugger is attached to the process, you can set breakpoints in your workflow code.
NOTE
It is important to remember while debugging that the SharePoint workflow service APIs do not commit changes to the content database immediately. Instead, they wait until the workflow ends or is suspended waiting for input. Thus, you may not be able to verify those changes from within the debugger until after the workflow runs.