
15.4. Building Declarative Workflows Using SharePoint Designer 2007
SharePoint Designer (SPD) provides a workflow design experience similar to the Outlook Rules Wizard. You create your linear workflow by specifying conditions and the actions to take based on those conditions. SPD does not use code to create its workflows but instead uses a workflow markup file that includes rules and conditions that WF executes. One thing to realize about SPD is that the target for SPD designed workflows is to allow you to code up business logic for your lists that require you not to write event handlers or other types of code. If you are looking to use SPD to write very complex, intricate workflows, you will find yourself quickly yearning for Visual Studio and the WF designer or you will write custom activities in Visual Studio that you will plug into SharePoint Designer.
The easiest way to understand how to build workflows with SPD is to build a workflow with SPD. There are some concepts you need to wrap your head around when working with SPD workflows before you get started. First, SPD workflows are sequential so modeling complex workflows will be, well, complex. There are probably ways you could build very complex workflows in SPD by using multiple workflows in different lists to mimic state-machine-style workflows, but it's probably easier to just use Visual Studio at that point. Second, debugging is nonexistent in SPD workflows. The closest thing to debugging is writing to the workflow history log. You will find at one point or another, when using the designer, your hands pulling hairs out of your head wondering why your conditions are not being met or your actions being triggered. The rest of this section will step you through the process of building SPD workflows and some of the pitfalls to watch out for.
15.4.1. Creating a Workflow
The following example creates a simple document approval workflow. The workflow will use a number of the built-in activities in SPD. Later, some additional activities written in Visual Studio will be added to further customize the workflow.
To get started, the first thing to do is point SPD at a SharePoint site. In the File menu, under the New menu, there is the Workflow option. There is also an Open Workflow item on the File menu, which makes it easier to go back and open workflows quickly in SPD.
When you create your new workflow, you will need to name the workflow, select the list you want to associate the workflow with, and select the appropriate options. As part of these options, you can have the workflow start manually when a new item is created or when an item is changed. Since SPD workflows are interpreted, SPD has the ability to check the workflow for errors by running the workflow through the compiler. You will also notice that along the bottom of the workflow designer, as shown in Figure 15-11, you can set the initiation variables and general variables for the workflow.
Figure 15.11. Figure 15-11

SPD stores its workflows in a hidden list called "workflows" under the root of the site. You will find that you cannot open this folder in the browser, since it does not have the standard list files such as AllItems.aspx or EditForm.aspx. The tasks you create as part of your workflows are always created in the Tasks folder as part of your site's list folders. SPD creates a special content type and task form for your workflow tasks and associates them with the tasks list. If you go to the list settings, you will see your task content types as part of the content types supported by the list. You can view the tasks list through the browser to see the task data.
When you use the logging feature in SPD, SPD places the log entries into the Workflow History list. Some of the columns that you see in this list track the GUID for the parent instance ID, workflow association ID, list ID, dates and times and the description of the event that you either specified or that the workflow infrastructure created. Try previewing this list in the browser from SPD by selecting it and hitting F12 to understand all the columns this list contains.
Workflows can be associated with any list type. The document approval workflow in this example is associated with a document library and started manually. When it is started, the user is prompted to provide a semicolon-delimited list of email addresses for the people who will approve the document. SPD allows you to create initiation variables and will generate an ASP.NET form automatically for you to prompt the user for those variables. Even if you do not need to collect initiation parameters, SPD still generates an ASP.NET form for you to allow users to manually start the workflows you create. The ASP.NET forms that SPD creates are editable in SPD, so you can customize the forms.
The workflow will use a single-line text field to retrieve the email addresses. Any combination of fields could be used, including multiline text fields, numbers, date and time, choice (drop-down or radio button), and yes/no (check box) fields. You can set default values for the different type of initiation parameters. You will see in the ASP.NET page a tag added for a SPWorkflowDataSource. This datasource will contain a dataset that contains a row that in turn contains the fields defined in the initiation form. Figure 15-12 shows the user interface for creating the initation form.
As for workflow variables, you can think of these as temporary, workflow-instance-specific variables you can use in your workflows to store dynamic, volatile data. One common usage that you will see for workflow variables is generating dynamic, runtime data in your workflow that you need to stuff into a workflow variable, so you can use it in another step in your workflow.
Figure 15.12. Figure 15-12

15.4.2. Adding Steps, Conditions and Actions
After setting up the list and initiation variables, you can add steps which contain conditions and actions to the workflow. With SPD, you can make an action always occur just by leaving out any conditions in your step but including an action. Since the document approval workflow will always want to take the email addresses, assign to-do items, log to the workflow history, and send email to the approvers, the condition is omitted in this example.
SPD includes a number of predefined conditions which are useful for many scenarios. You can also build your own conditions that allow you to compare any datasource value as part of the condition. You can also use lookups as part of the compared value. For example, you could compare the name of a contact to the name of the approver of the workflow or you could compare the task status to a custom field in your application. Even though SPD allows you to add datasources such as databases, XML files, and other external datasources, the workflow designer itself cannot use or compare to these datasources.
The following table shows the available set of conditions you can use.
| Condition Name | Description |
|---|---|
| Title contains specific keywords | This condition allows you to check to see if the title of the item contains specific keywords. |
| Modified in a specific date span | You can check to see if the item was modified between two dates. You can either type in a date, use the date value dialog, or specific a lookup. The date value dialog allows you to specify the current date, so you could create a time span from the current date through some future date. |
| Modified by a specific person | Allows you to specify the modifier to check for. This can be a specific person selected from the address book, a variable, a lookup, or the current user who created the item. |
| Created in a specific date span | Similar to the modified condition, this condition instead checks the creation date rather than the modified date. |
| Created by a specific person | Same as the modified by a specific person condition except that this condition checks the creator not the modifier. |
| Compare "list" field | The "list" part of this condition refers to the current list that you have the workflow associated with. This condition lets you quickly select a field in the current list and compare it to a static value, a lookup or even a regular expression that you specify. An example of a regular expression would be http://(www.)?([^.]+).com, which would match URLs that pointed to .com sites. |
| Compare any data source | This condition allows you compare any two datasources via lookups or static values. |
| Action Name | Description. |
| Add time to date | This action allows you to add a certain amount of time such as seconds, minutes, hours, days, months, or years to a value and have the output placed into a workflow variable. |
| Assign a form to a group | If you need to assign a custom form to a set of users, this action allows you to do that. You will need to use a secondary workflow to set properties on the custom form, since the default property you can set is the description. You can add custom fields as part of the new form. This action does not return an ID for the responses like the Collect data from user action. |
| Assign a to-do item | This action allows you to set a workflow task for a user or a group, or by using a lookup. |
| Build dynamic string | When you need to build a string on the fly as part of your workflow, you should use this action. Your dynamic string can use lookups as part of the string. You assign the new string to a variable in your workflow. |
| Check in item | Allows you to check in an item in a list that has versioning enabled. You can specify a comment as part of the check-in. |
| Check out item | With this action you can check out an item from a list. You will have to specify a matching value to find the item you want to check out. |
| Collect data from user | Use this action to pause your workflow while you collect data from the user. You cannot use this with multiple users. SPD will prompt you for fields that you want in your form and who you want to assign the collection to. When the task is assigned to the user, SPD will then output the ID of the task into a variable you specify, so you can use that ID within the workflow. |
| Copy list item | Copies a list item from one list to another. |
| Create list item | Allows you to create a new item in the list. SPD will look at the content types associated with the list and pull out the required fields for you to set. You can set optional fields as well with statics or lookup values. |
| Delete item | Deletes the item. |
| Discard check out item | Discards the check out of the item. |
| Do calculation | Performs a calculation on numeric values and then outputs the result to a variable you specify. You can add, subtract, multiply, divide, or mod the values. |
| Log to history list | Logs the message you specify to the workflow history list. This message can be static or be generated via a lookup. You can also make the value dynamic by using the Build dynamic string action and then placing the output variable of that action in the log. |
| Pause for duration | Pauses the workflow for the specified number of days, hours, or minutes. You can set the values either statically or via lookup. |
| Pause until date | Pauses the workflow until the specified date, which could be the current date or a future date and time. |
| Send an email | Sends an email. You can dynamically look up the recipients on the to and cc lines. In addition, on the subject line you can type in the subject or look it up. In the email body, you can also type in values or add dynamic lookups. |
| Set content approval status | Sets the content approval status and allows you to specify comments as part of setting the status. |
| Set field in current item | Sets the field you specify in the current item. SPD will display the possible values for the field or allow you to type in values, or you can look up values. |
| Set time portion of date/time field | Allows you to set the time for a date field and output the value into a variable. |
| Set workflow variable | Sets the value for a workflow variable that you specify either with a static value or lookup. |
| Stop workflow | Stops the workflow and allows you to log a message. This action is useful if your workflow encounters an error condition that you have predefined. |
| Update list item | Allows you to update the fields in a list item. You can update multiple fields at once. |
| Wait for field change in current item | Pauses the workflow until a field changes in the current item. Depending on the type of field you specify, you can perform different comparison operations. Once the field meets the conditions you specify, the workflow continues. |
15.4.3. Branching and Parallelism
In SharePoint Designer, you can create IfElse constructs in the designer within a single workflow step. This is useful if you want to test conditions in an if...else construct. Using the else part of the branching is also useful, for example, if you want to log whether the item meets your conditions. You could stop the workflow and write a message to the history log, for instance.
Similarly to the branching within a single step, you can also add parallelism to your workflow by allowing the engine to run actions in parallel rather than serially. This is useful if you want to have a delayed action but do not have the workflow block on the delay. Unfortunately, you cannot interleave serial and parallel activities in a single branch. It's either all serial or all parallel. A good example of using parallel activities is executing a delay or some other type of pause, while you still want to execute other activities such as logging history or changing fields within an item.
A Note about MultithreadingWF does not use multithreading in a single workflow instance. While this may not affect your SPD workflows, you should be aware of this design principle. The reason for this architecture is to simplify your development. You may be wondering how this affects scale or performance. With the types of workflows you are building with SharePoint, namely human-centric workflows, the human delay factor is much larger than the machine delay caused by not having multithreading in WF. The thing to remember is that it is a single thread per workflow instance, so if you have 20 instances of a workflow running, they will execute on multiple threads. It's just that any single instance at any given time will only have a single thread of execution to make sure that you do not have other threads running steps in your workflow. |
15.4.4. Putting It All Together
The document approval workflow presents an initiation form to get the reason for the approval from the user. For each approver, it will create a to-do item, log an event, and send an email to that person. The next step is to wait for the approver to approve the task assigned to them and then log an event. Figure 15-13 shows the initiation form for the workflow when a user starts the workflow on an item.
To illustrate the conditions and the actions in the Designer, Figure 15-14 shows the first step in the workflow.
Figure 15.13. Figure 15-13

Figure 15.14. Figure 15-14
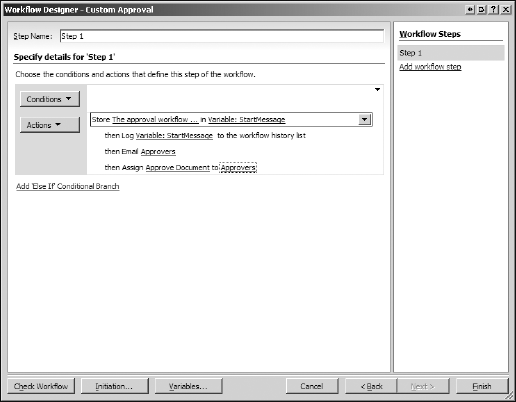
To log the name of the approver into the workflow history list, the workflow generates a dynamic string that includes both a static message and the value in the initiation variable collected from the user. This is what the first action does. The second action takes the new dynamic string in the variable and writes it out to the workflow history. Then, the approver is sent an email message containing a link to the document through a workflow lookup. Finally, a to-do item is assigned to the approver to approve the document.
The assign to-do action is at the bottom of the action list. The reason for this is that you will want to be careful in the sequencing of your actions in your workflow. If you had assigned the to-do item anywhere else, the workflow would have assigned the item and then waited for the completion of the item before continuing through the rest of the actions. Parallel actions would not have worked because parallel execution does not guarantee the order in which actions are performed. In this case, the dynamic string needs to be generated before it is written to the workflow history log.
The second step of the workflow looks for the completion status of the to-do item and when it is completed, it logs in the workflow history that the document has been approved and emails the person who created the item that the document has been approved. The way to ensure that the task is complete is to look for the value 1 in the % Complete field. Because this is a number field, the value will range from 0 for not completed to 1 for 100% complete. In order to ensure the correct task item is referenced, a filter is applied that matches the task's workflow item ID to the ID of the item that is being routed. This is critical, since it will make sure that the correct task is associated with the correct item and that the workflow does not get a false positive on the completion if there are multiple workflow tasks running in parallel on multiple items.
15.4.5. Things to Watch Out For
Although it's a powerful tool for workflow development, there are some limitations when building workflows in SharePoint Designer. This section will give you some helpful hints on things to watch out for so that you don't run into these pitfalls when building your own workflows.
15.4.5.1. Data Types and Data Values
Be careful when comparing data values. Make sure that you know the underlying data type of the items you are comparing and their possible values. For example, the user interface lets you display Number data types as percentages. But the values actually range from 0 to 1. So, if you enter values like 100 or 75, your conditions will not be met.
15.4.5.2. Circular Workflows
Be careful not to create circular workflows. SPD protects you from creating actions that trigger the same workflow in the same list but may not catch all declarations that result in circular logic. For example, you can't tell a workflow to fire automatically on item change and then have a workflow that changes the saved item in the same list. You would get stuck in an infinite loop as part of the workflow, and SPD will warn you.
SPD will even protect you from circular workflows if you have a workflow in two lists that trigger each other. It does this by using a token. Say that you have a workflow on List A that creates an item in List B. You also have a workflow on List B that creates an item in List A. If these were allowed to run, you would see both lists filling up with items as each in the workflows triggered each other ad infinitum. SPD prevents this by using a token that references each workflow. Even if you manually try to start the workflow on the new item in List A, the item that was created in List B will not trigger the workflow in List B that would have created another item in List A.
15.4.5.3. Debugging
SPD does not support debugging, so you will have to get used to writing lots of messages to the workflow history log when building your workflows. With the built-in actions, not having debugging is okay. However, when working with complex workflows or with complex conditions, debugging gets very messy. If your workflow starts to get too complex, or you find that debugging is a chore, it's probably time to consider building some custom activities to which you can delegate the complexity. Once you have those activities installed, you can develop more and more complex workflows using the declarative style for which SPD was intended.
15.4.5.4. Initiation Data
It can be tricky to control the initialization of workflows that start automatically. You can create initiation variables, but be sure to initialize them to default values. Also, if you need to collect and store initiation data from the user, a good way to store it is to use custom fields in the associated list item. The custom fields are available as a hashtable on the list item.
15.4.5.5. Caching
The final gotcha is workflow timing and caching. Both will affect your workflow in interesting ways and are interrelated.
The SharePoint WF host aggressively caches data and will not make changes to an item until the workflow is completed or dehydrated. SPD addresses the scenario where you create a new item and try to use the new information in that item. However, the scenario you have to watch out for is the one where you modify a field in an item and then try to use the new value later in the same workflow step. You will find that the workflow will end in an error, since it will not be able to find the item yet. This is because the new value has not yet been updated in the content database.
This is especially true for calculated fields because they need to be saved in order to be calculated. The easiest way to resolve this issue is to suspend the workflow for a time interval, which will dehydrate the workflow and save the changes. Then, your workflow will work as you expect.