
WHAT'S IN THIS CHAPTER?
Getting started with Windows Azure platform AppFabric
Service Bus Integration
Access Control Integration
The Windows Azure platform represents a radical change in the way applications can be built and managed. This platform provides an Internet-based cloud computing environment that anyone can use for hosting applications and storing the associated data. The platform in general comprises two core services that any cloud-based application can use: compute (e.g., executing an application) and storage (e.g., storing data on disk).
The compute service enables any application to run in the cloud. In essence, the applications are deployed in a highly scalable environment where they share computer processor time available in different virtual machines with Windows Server. These virtual machine instances are spread around the world in different Microsoft data centers.
The storage service, as its name clearly states, provides simple storage capabilities using different schemas such as BLOBs (binary objects), queues, or simple tables through a very easy-to-use REST API based on Http calls. In case an application requires richer querying capabilities for the storage (e.g., relational databases), an additional service, SQL Azure, is also provided by Microsoft in this platform.
In both cases, Windows Azure assures the availability and high scalability that any cloud-based application requires.
AppFabric extends the Windows Azure platform by providing two common building blocks, the Service Bus and Access Control, to make it easier to extend the reach of any .NET applications in this platform. They currently provide key functionality to support bi-directional connectivity and federated claims-based access control in any application trying to migrate to Windows Azure.
The primary feature of the Service Bus is to "route" messages from clients through the Windows Azure cloud to your software running on-premise, bypassing any NAT, firewalls, or other network obstacles that might be in the way. In addition to routing messages, the Service Bus can also help negotiate direct connections between applications. (See Figure 10-1.)
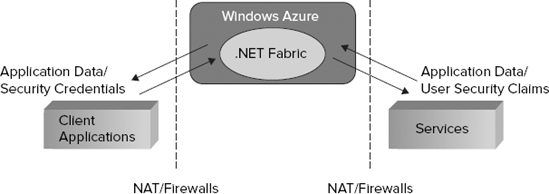
The primary feature of Access Control is to provide a claims-based access control mechanism for applications running on-premises or on the cloud. This makes federated authentication and authorization much easier to achieve, allowing third-party applications to trust identities provided by other systems.
Although each of these building blocks is available using open protocols and standards such as REST, Atom/AtomPub, and SOAP, Microsoft has also provided a SDK that simplifies the work for .NET developers by hiding many of the wire protocol complexities that they would otherwise experience when working with them directly. As part of this SDK, you can take advantage of some of the new WCF extensions. These include the relay bindings, to talk to the Service Bus, or custom authorization managers for parsing the security tokens generated by the Access Control.
In this chapter, introductory theory behind the AppFabric building blocks is discussed, as well as many of the available WCF extensions that you can use to integrate with your WCF services.
The first step to get started with the Service Bus and Access Control is to go to the Windows Azure platform portal at http://www.microsoft.com/windowsazure/ to open a new account and download available tools and SDKs.
Note
The SDK components can also be downloaded from the page opened on the Internet when any of the Visual Studio templates that target Windows Azure are opened.
The SDK for Service Bus and Access Control is available as a separate link, just in case you are only interested in integrating your applications with these two services.
After you install the SDK, new assemblies will be available for taking advantage of the various Service Bus and Access Control features.
Note
Users leveraging any of services in the Windows Azure platform have to pay for them. There are, however, sometimes exceptions to this rule, and which will ultimately benefit developers. Microsoft sometimes runs deals for MSDN subscribers, for example offering MSDN Premium subscribers Windows Azure for a total of eight months for free.
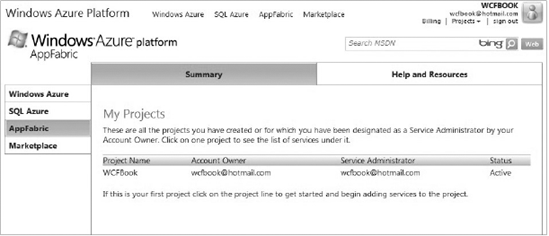
An account is required to use the services, so you will probably have to register first. To create an account, log in to the portal using your Windows Live ID account. When you have successfully logged in, you can register for an account by creating a new project. A "project" in this context represents a container for all "service namespaces" that the Service Bus and Access Control services will use.
Note
A service namespace is a container for a particular set of Service Bus endpoints and Access Control rules. For example, if you choose "WCFBook" as a service namespace for your Service Bus endpoints, the final address for getting access to them will be "sb://WCFBook.servicebus.windows.net". A service namespace must be globally unique across all accounts and it must be at least six characters long.
In the future, all created projects will be associated with your Windows Live account. Figure 10-2 illustrates how the list of the projects looks in the Azure portal.
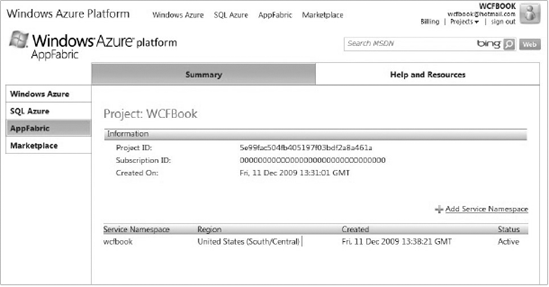
When you click one of the projects in the list, you will be redirected to a project-specific page that displays the project details and allows you to add new service namespaces. Figure 10-3 shows the details of a project "WCFBook" that already contains an associated service namespace with the same name.
As a service namespace must be globally unique across all existing accounts, the screen for creating new namespaces provides a button for validating that the entered name is not in use by another account. After you create and associate a namespace to one of your projects, the Windows Azure infrastructure will execute the necessary steps to reserve and activate that address.
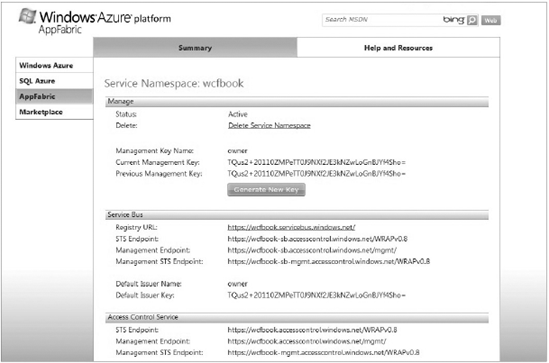
You can go to the service namespace details page by clicking on it. In that page, you can basically delete it or view all the important details around the service namespace such as the management key, the Service Bus endpoints, or the issuer name and key to name a few. Figure 10-4 shows the details of the "WCFBook" namespace.
At this point, you should have the SDK installed. A new Service Bus and Access Control account with projects and service namespaces should also be added to start taking advantage of many of the Service Bus and Access Control features in your applications or services.
The Service Bus in the Windows Azure platform AppFabric is a service running in Microsoft data centers. Its only purpose is to relay messages through the cloud to services running on-premises behind network obstacles of any kind, such as firewalls or NAT devices. The Service Bus secures all its endpoints by using the claim-based security model provided by the Access Control service.
Microsoft has decided to call this a Service Bus for all the similarities that can be found in its architecture compared to the architecture of many of the available products that try to address the famous Enterprise Service Bus (ESB) architectural pattern.
The ESB pattern in the real world refers to a model that integrates enterprise applications through a common messaging "bus." Figure 10-5 illustrates a possible architecture of an application that uses the ESB pattern for integrating several applications in different platforms. As you can see in this figure as well, the bus usually introduces a level of indirection between the client applications and the different services or applications through a publisher/subscriber architecture. That is, some applications subscribe to different events or messages in the bus, while others publish those events or messages into the bus. Other ESB environments also provide a service orchestration layer that provides a process flow engine for orchestrating the messaging interactions that make up a business process or workflow.
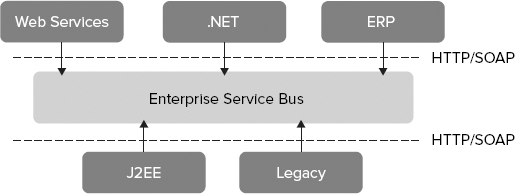
Today, there are a great number of technologies or products that can be used to implement an ESB, such as Active Directory, UDDI, MSQM, BizTalk, or WCF in the Windows platforms or many of the equivalent technologies available on other platforms too.
Going back to the Service Bus available as part of the Windows Azure platform AppFabric, this service provides different mechanisms such as a federated authentication and access control, a common service-naming mechanism, a common messaging fabric with a great variety of communication options, and a discoverable service registry that the applications trying to integrate with it can use. The main difference perhaps between this Service Bus and any other traditional enterprise Service Bus is that it makes it possible to integrate on-premises applications with services running in the cloud, or a variety of third-party services provided by Microsoft or other vendors.
The most important challenges that the Service Bus tries to address are the support for bidirectional communication at Internet scope and a centralized or federated schema for authentication and authorization.
The first one, a bidirectional communication, is not something trivial or easy to accomplish due to the reality we live today. The first and more important problem is the shortage of IPv4 addresses. The truth is that it is almost impossible to acquire a public IPv4 address anymore. For that reason, most Internet service providers (ISP), corporate networks, and wireless networks use dynamic IP address allocation and network address translation (NAT) techniques. A dynamic IP address is private within those networks and not publicly reachable from the outside.
The second challenge is also very important. In the way most enterprise environments work today, the on-premises software is completely shielded from the outside world by layers of firewalls and other protective network devices to keep everything secure. In most cases, the firewalls are configured to restrict the number of inbound connections, and only ports 80 and 443 are open for Http and Https connections. This aspect represents a big impediment for achieving a bidirectional communication between applications, which is a common scenario nowadays (e.g., instant messaging, file sharing, and online multiplayer games).
As previously discussed, you need to have a Service Bus account and some projects created within the Service Bus portal to start using this service.
Let's say you already have a project — the first step for hosting services in the Service Bus is to associate them to a service namespace. The service namespace is a unique name across all Service Bus accounts, and it acts as a container for a set of Service Bus endpoints. For example, if you created a service namespace "WCFBook," the base URI for all your endpoints within that namespace would be http://WCFBook.servicebus.windows.net. If you browse to that address, you will get an ATOM feed representing the Service Bus registry. The registry will basically contain an entry for each service hosted within that namespace.
Assuming that you already created the service namespace WCFBook, you use that for this first example. The service contract and implementation for the service to be exposed in the Service Bus is something simple that implements a classic HelloWorld operation. (See Listing 10-1.)
Example 10.1. Hello World Service Implementation
[ServiceContract]
public interface IHelloWorld
{
    [OperationContract]
    string Hello(string name);
}

public class HelloWorldService : IHelloWorld
{
    public string Hello(string name)
    {
        string message = string.Format("Hello {0}!", name);
        return message;
    }
}
This service can be hosted as any other regular WCF service. For the sake of simplicity, create a new instance of the ServiceHost class within a console application that reads all the service configuration details from the application configuration file. (See Listing 10-2.)
Example 10.2. Service Host Implementation
class Program
{
    static void Main(string[] args)
    {
        Console.WriteLine("Starting...");
        ServiceHost host = new ServiceHost(typeof(HelloWorldService));
        host.Open();
        Console.WriteLine("Press [Enter] to exit");
        Console.ReadLine();

        host.Close();
    }
}
Now it is time to configure the service host to listen on the Service Bus. To do that, the SDK already provides a set of built-in bindings that extends the underlying WCF infrastructure to listen on the cloud. For example, a NetTcpRelayBinding would be equivalent to the NetTcpBinding, but with a different transport channel for listening on the Service Bus. Relay bindings are discussed in more detail in the next section.
When using some of these bindings, you will also need to specify a valid Service Bus address for the endpoint. That address will reference one of the service namespaces already created in the Service Bus web portal. For instance, the final address for the namespace WCFBook and the endpoint helloWorld would be sb://WCFBook.servicebus.windows.net/helloWorld.
As you might notice, the protocol scheme was changed to use sb, which represents a special TCP-based protocol scheme used by the Service Bus. All the Service Bus endpoints, with exception of the HTTP endpoints, must use the sb protocol scheme.
The Service Bus somehow verifies that the application is allowed to listen within the chosen service namespace (e.g., WCFBook). This is accomplished through the Access Control Service. The application hosting the services needs to provide credentials to Access Control. This last one authenticates those credentials and issues a token that is presented to the Service Bus. The token indicates if the application is allowed to either "listen" on, "send" messages to, or "manage" the service namespace. In case you own the service namespace, the issue token will prove that you have full control over that namespace.
The client credentials can be supplied to Access Control through the use of the <transportClientEndpointBehavior> in configuration, or the equivalent class TransportClientEndpointBehavior in code. This behavior supports different types of client credentials today. Table 10-1 enumerates some of them.
Table 10.1. Client Credential Types
CREDENTIAL TYPE | DESCRIPTION |
|---|---|
| Represents a shared secret automatically assigned to a service namespace when it is created. |
| A SAML token is used to authenticate the client. Access Control must trust the issuer of the SAML token to authenticate successfully. |
| A Simple Web Token is used to authenticate the client. A Simple Web Token is a specific type of client credentials, which is more suitable for consuming RESTful services than SAML. |
| No client credentials provided. |
The service configuration for this example uses a "SharedSecret", which was automatically assigned to the namespace when it was created. It is available in the service namespace page in the web portal, under the Default Issuer Name and Default Issuer Key columns. You need to use those values in issuerName and issuerSecret attributes of the service configuration (see Listing 10-3).
Example 10.3. Service Configuration
<configuration>
  <system.serviceModel>
    <services>
      <service name="HelloWorld">
        <endpoint address=
           "sb://WCFBook.servicebus.windows.net/helloWorld"
           behaviorConfiguration="clientCredentials"
           binding="netTcpRelayBinding"
           contract="IHelloWorld" />
      </service>
    </services>
    <behaviors>
      <endpointBehaviors>
        <behavior name="clientCredentials">
          <transportClientEndpointBehavior credentialType="SharedSecret">
            <clientCredentials>
              <sharedSecret issuerName="issuer" issuerSecret="secret" />
            </clientCredentials>
          </transportClientEndpointBehavior>
        </behavior>
      </endpointBehaviors>
    </behaviors>
  </system.serviceModel>
</configuration>
The "SharedSecret" is sent to Access Control the first time the service host is opened in the console application to acquire a token for listening on the Service Bus.
After that, the application hosting the service tries to establish a TCP connection with the relay service by passing the recently acquired token. If the token does not contain the necessary claims for listening on the Service Bus, the application will of course receive a security exception. Otherwise, the Service Bus will create a listener for relaying messages to the service just created. In this way, the service will somehow be connected to the cloud.
Next, you can write a client application that invokes the service (see Listing 10-4). The code for this application is as straightforward as any other client application that consumes a WCF service. All the details about the Service Bus have been completely hidden by the relay binding.
Example 10.4. Client Application
class Program
{
    static void Main(string[] args)
    {
        ChannelFactory<IHelloServiceBus> channelFactory =
            new ChannelFactory<IHelloWord>();
        IHelloWorld channel = channelFactory.CreateChannel();

        string response = channel.Hello("The WCF Book");
Console.WriteLine(response);
channelFactory.Close();
}
}The configuration for this application is very similar to the service one. You need to change the endpoint to use the NetTcpRelayBinding and the same Service Bus address that you configured our service to listen on. You also need to configure the client with credentials. As happens with services, Clients must also prove that they are allowed to send messages to a particular address on the Service Bus. They can prove that by acquiring a token from Access Control.
You will use the same "SharedSecret" used to configure the service application. Listing 10-5 shows the complete client-side configuration.
Example 10.5. Client Configuration
<configuration>
  <system.serviceModel>
    <client>
      <endpoint address=
         "sb://WCFBook.servicebus.windows.net/helloWorld"
         binding="netTcpRelayBinding"
         contract="IHelloWorld"
         behaviorConfiguration="clientCredentials"
         name="helloWorld" />
    </client>
    <behaviors>
      <endpointBehaviors>
        <behavior name="clientCredentials">
          <transportClientEndpointBehavior credentialType="SharedSecret">
            <clientCredentials>
              <sharedSecret issuerName="issuer" issuerSecret="secret" />
            </clientCredentials>
          </transportClientEndpointBehavior>
        </behavior>
      </endpointBehaviors>
    </behaviors>
  </system.serviceModel>
</configuration>
You are now ready to run the service host application followed by the client application to see how the communication is relayed through the Service Bus, making it possible to traverse different kinds of network obstacles in the way.
The following sections explore the relay service, which represents the core system of the Service Bus, and some of the built-in bindings that any application can use to connect to this service.
The relay service represents the core system that makes it possible to build applications capable of communicating through firewalls and other network obstacles using a variety of different messaging patterns.
This service supports traditional one-way, peer-to-peer, and request/response messaging patterns. It also supports two other interesting features, event distribution across Internet with a publisher/subscriber architecture, and bidirectional communication between applications when possible.
An application that uses the relay service is basically delegating the transport-level listening responsibility to the relay service in the cloud. That means that any service that the application is hosting relies on the relay service for handling the specific transport communication details. This service will forward any incoming message to the on-premises services.
By using the SDK, you are connecting your on-premises services and the relay service via any of the built-in relay bindings. Those relay bindings make all the work of replacing the transport binding elements by some new ones that integrate with the Service Bus on the cloud. The transport binding elements that shipped as part of the SDK (that are integrated with the relay bindings) establish a bidirectional communication with the relay service. In that process, it also authenticates the application, specifies a name to listen on, and specifies what type of listener to establish.
Regarding the addresses you chose for the Service Bus endpoints in the relay service, you must be aware that only a single on-premises service can listen on a particular endpoint address, except when using the NetEventRelayBinding. It allows multiple services to listen on the same endpoint address.
However, in all other cases, you will get an exception when trying to use an address that is already being used by another service. What's more, if that address is within the URI scope of an address already used, it will also fail. For example, if your endpoint uses an address of /WCFBook/MyService/HelloWorld and there is another service listening on /WCFBook/MyService, the attempt to use that address will fail. The only valid point here is when you share the same base address for all the endpoints (e.g., /WCFBook).
The relay service routes messages using a specific algorithm that matches prefixes in the addresses, which is not necessarily an exact match. This makes it possible for the on-premises service to directly inspect the URI path segments and the query string to do custom processing, which is very useful for RESTful services.
The machine trying to connect to the relay service only requires a few outbound ports open in the firewall, which are ports 808, 818, 819, and 828. Port 808 is used for one-way TCP connections; port 828 for one-way TCP with SSL connections. Ports 818 and 819 are used for bidirectional TCP connections and some other advanced scenarios. The good thing is that the relay service does not require any inbound port open in the firewall or performing any kind of port mapping on any existing NAT/router devices that the machine uses.
There is also a special HTTP-based connectivity option that uses ports 80 (HTTP) and 443 (HTTPS) when the machine is operating in an environment where all the outbound socket connections are blocked.
It's time now to discuss all the details about the WCF relay bindings and show some examples of how to use them.
As previously discussed, WCF represents the primary programming model that works with the Service Bus on the .NET platform. The SDK provides a set of built-in bindings that facilitates the integration between WCF services and the service consumers through the relay service that is part of the Service Bus.
In most scenarios, you only need to replace the current WCF binding with one of the Service Bus relay bindings. As you can see in Table 10-2, most Relay bindings correspond to a built-in binding in WCF.
Table 10.2. Relay Bindings
RELAY BINDING | BUILT-IN WCF BINDING |
|---|---|
WebHttpRelayBinding | WebHttpBinding |
BasicHttpRelayBinding | BasicHttpBinding |
Ws2007HttpRelayBinding | Ws2007HttpBinding |
NetTcpRelayBinding | NetTcpBinding |
NetOneWayRelayBinding | N/A |
NetEventRelayBinding | N/A |
As the table shows, only a few bindings do not have an equivalent WCF binding: NetOneWayRelayBinding and NetEventRelayBinding.
All these bindings work in the same way as built-in WCF bindings in most cases. They all support the same standard WCF features such as message versions, the different message security scenarios, reliable messaging, or the web programming model, to name a few.
They simply replace the WCF transport binding elements with a set of new binding elements to connect to the relay service. These new transport binding elements are RelayedHttpBindingElement and RelayedHttpsBindingElement for all Http-based bindings (WebHttpRelayBinding, BasicHttpBinding, and Ws2008HttpRelayBinding); TcpRelayTransportBindingElement for TCP-based bindings (NetTcpRelayBinding); and RelayedOneWayTransportBindingElement for the rest of the bindings (NetOneWayRelayBinding and NetEventRelayBinding).
In the following sections, the details of the main WCF relay bindings and some examples of how to use them are detailed.
As its name states, this binding only supports one-way messaging, which means the client does not expect a reply message from the service. The default configuration for this binding is SOAP 1.2 over TCP with a binary encoder. All these settings can be customized through the standard binding configuration techniques. Only the sb protocol scheme can be used with this binding.
In the way this binding works with the default configuration, the WCF service tries to establish an outbound and secure connection (TCP/SSL) with the relay service through port 828. While the process for connecting to the relay service is performed, the WCF service also authenticates itself through the Access Control, specifies a name to listen on within the relay service, and establishes a type of service listener to create.
On the other hand, when the client uses the default configuration, it connects to the relay service through ports 808 (TCP) or 828 (TCP/SSL) depending on the binding configuration. The client also needs to authenticate against the Access Control first, and after it does, it can start sending one-way messages to the Service Bus that are later "relayed" to the on-premises service to listen on the Service Bus as well.
The architecture of the Service Bus is made up of two layers. In the top layer, you can find a farm of front-end nodes with a load-balancing schema that provides the necessary scalability required for this type of service. In the layer below, there is a backend system with the naming and routing fabric that basically forwards the messages from the front-end node that receives messages from the client to the front-end node where the service is attached. This means that clients and services are usually connected to different front-end nodes.
In case the client or service is using transport security, only the messages interchanged between the client or service and the relay service will be protected with SSL. The same messages will travel as plain text through the nodes in the relay service, so you need to use message security if you want to protect them all the way through the relay service.
As this binding works only to support one-way messaging, all the operations on the service contract must be marked as one-way with the IsOneWay attribute. The following code snippet illustrates the contract of service that can be used with this binding:
[ServiceContract()]
public interface IHelloWorld
{
    [OperationContract(IsOneWay = true)]
    void Hello(string name);
}
The implementation of this service can be configured in the host to use the NetOneWayRelayBinding with the following configuration:
<system.serviceModel>
    <behaviors>
      <endpointBehaviors>
        <behavior name="clientCredentials">
          <transportClientEndpointBehavior credentialType="SharedSecret">
            <clientCredentials>
<sharedSecret issuerName="ISSUER_NAME"
issuerSecret="ISSUER_SECRET" />
</clientCredentials>
</transportClientEndpointBehavior>
</behavior>
</endpointBehaviors>
</behaviors>
<bindings>
<netOnewayRelayBinding>
<binding name="default" />
</netOnewayRelayBinding>
</bindings>
<services>
<service name="HelloWorldService">
<endpoint address="" behaviorConfiguration="clientCredentials"
binding="netOnewayRelayBinding" bindingConfiguration="default"
name="RelayEndpoint" contract="IHelloWorld" />
</service>
</services>
</system.serviceModel>A single endpoint has been specified that uses a shared secret to authenticate against Access Control.
The client application for consuming this service should be configured with an equivalent endpoint configuration (also based on NetOneWayRelayBinding).
As discussed before, this binding always tries to connect to the relay service over TCP by default. When the service is hosted in a constrained environment where this connection cannot be made, you can opt for an alternative mode that uses the traditional Http and Https ports. The SDK provides a specific setting for changing this connectivity mode, which uses a very evident name, ConnectivityMode. This setting can basically take one of the following values: TCP, Http, or AutoDetect.
TCPalways tries to connect to the relay service via TCP through port 828.Httptries to connect to the relay service via Http to overcome any issue you would have to open the 828 port.AutoDetectis the default connectivity mode. It basically determines which is the best connectivity option based on a mechanism that probes whether either connectivity option is available for the current network environment.
You can change the connectivity mode through the static ServiceBusEnvironment class, which means that it is scoped at Application Domain level. This class contains a SystemConnectivity property that can be set with any of the values already discussed.
The following code snippet illustrates how to modify an application to use TCP connectivity mode:
ServiceBusEnvironment.SystemConnectivity.Mode = ConnectivityMode.Tcp;
ServiceHost host = new ServiceHost(typeof(HelloWorldService), address);
Although this setting has been discussed, it is valid for any of the other relay bindings as well.
The NetEventRelayBinding is almost identical to the NetOneWayRelayBinding from the perspective of the implementation. They both support the same configuration defaults and security options and essentially have the same interaction with the relay service.
However, the scenario that this binding addresses is completely different allows multiple WCF services to register within the same Service Bus address. In this way, a type of subscriber/publisher architecture is generated, where the client is the publisher that sends a message to a specific service address in the Service Bus, and the relay service multicasts the message to all the WCF services currently subscribed to that address.
One thing to keep in mind is that this binding does not provide any assurances around message deliver or order, so it would be something equivalent to UDP multicasting with better error-handling support as the relay service relies on TCP for communication.
The following example shows an application that registers one WCF service for receiving messages using the NetEventRelayBinding, and a simple client application for consuming it.
Note
Multiple instances of this application can be run at the same time because they all share the same address.
Listing 10-6 shows the service contract and implementation of the WCF service. It actually does not do anything with the message; it only prints it in the Console output.
Example 10.6. Service Contract and Implementation
[ServiceContract()]
public interface ISubscriber
{
    [OperationContract(IsOneWay = true)]
    void ReceiveMessage(string message);
}

[ServiceBehavior()]
class SubscriberService : ISubscriber
{
    void ISubscriber.ReceiveMessage(string message)
    {
        Console.WriteLine("Receive " + message);
    }
}
For sake of simplicity, the client and service are both running on the same Console application. The Run method creates a new host for the SubscriberService, and after that, a client channel for consuming it. (See Listing 10-7.)
Example 10.7. Application Implementation
static void Main(string[] args)
{
  ServiceBusEnvironment.SystemConnectivity.Mode = ConnectivityMode.Tcp;

  Program programInstance = new Program();
  programInstance.Run();
}

private void Run()
{
  ServiceHost host = new ServiceHost(typeof(SubscriberService));
  host.Open();

  ChannelFactory<ISubscriberChannel> channelFactory =
new ChannelFactory<ISubscriberChannel>("RelayEndpoint");

  ISubscriberChannel channel = channelFactory.CreateChannel();
  channel.Open();

  Console.WriteLine("
Press [Enter] to exit
");

  channel.ReceiveMessage("This is a message!!!");

  channel.Close();
  channelFactory.Close();
  host.Close();
}
As the client and service run on the same application, the WCF configuration contains the configuration of both of them. As you can see, the NetEventRelayBinding has been configured for the client and service, and the authentication against Access Control is performed through a shared secret (see Listing 10-8).
Example 10.8. Client and Service Configuration
<system.serviceModel>

    <bindings>

      <netEventRelayBinding>
        <binding name="default" />
      </netEventRelayBinding>
    </bindings>
<client>
<endpoint name="RelayEndpoint"
contract="ISubscriber"
binding="netEventRelayBinding"
bindingConfiguration="default"
behaviorConfiguration="sharedSecret"
address="sb://WCFBook.servicebus.windows.net/Subscriber" />
</client>
<services>
<service name="SubscriberService">
<endpoint name="RelayEndpoint"
contract="ISubscriber"
binding="netEventRelayBinding"
bindingConfiguration="default"
behaviorConfiguration="sharedSecret"
address="sb://WCFBook.servicebus.windows.net/Subscriber" />
</service>
</services>
<behaviors>
<endpointBehaviors>
<behavior name="sharedSecret">
<transportClientEndpointBehavior credentialType="SharedSecret">
<clientCredentials>
<sharedSecret issuerName="[ISSUER]" issuerSecret="[SECRET]" />
</clientCredentials>
</transportClientEndpointBehavior>
</behavior>
</endpointBehaviors>
</behaviors>
</system.serviceModel>The NetTcpRelayBinding is the binding Microsoft recommends you use when possible, because it provides two-way messaging semantics and it is closely aligned with the standard NetTcpBinding (the main difference is that the NetTcpRelayBinding creates a public address in the relay service).
This binding uses SOAP 1.2 over TCP by default, with a binary encoder for being more efficient with the network usage.
In addition, it supports two connection modes (see Table 10-3) that control how the client/service communicate with one another through the relay service.
Table 10.3. NetTcpRelayBinding Connectivity Modes
MODE | DESCRIPTION |
|---|---|
| This is the default mode. All communication is relayed through the relay service. When the connection is established the relay service acts like a socket forwarder proxy relaying a bi-directional byte stream. |
| The initial communication is relayed through the relay service while the client and service tries to negotiate a direct socket connection between each other. All this negotiation is governed by the relay service. After a direct connection can be established, the existing connection is automatically upgraded to a direct connection without message or data loss. If the direct connection cannot be established, data will continue to flow through the relay service as usual. |
When Relayed mode–the default mode — is enabled, any incoming message arriving on one of the front-end nodes generates a control message that is routed down to the on-premises WCF service with instructions to create a rendezvous connection back with the client's front-end node. When that happens, a direct socket-to-socket forwarder is established for relaying TCP messages.
On the other hand, the Hybrid mode instructs the relay service to do everything possible to establish a direct connection between the client and service applications, so the data no longer needs to go through the relay service. The name "hybrid" represents exactly how this binding works when the mode is enabled. It starts by relaying information through the relay while it attempts to upgrade to a direct connection. If the direct connection can be established, it will switch to this connection without any data loss. Otherwise, it will continue to use the relay service. This mode uses a special port prediction algorithm based on probing information from the client and service. The relay service looks at this probing information and tries to guess what ports are going to be open on their respective NAT devices. It can then provide that information to the client/service so that they can establish a direct connection with one another. If the information is correct, the connection will succeed; otherwise it will try again until it decides to give up and to stick with the relayed connection.
The following configuration shows how a WCF service is configured with a single NetTcpRelayBinding endpoint and the Hybrid mode:
<system.serviceModel>
    <behaviors>
      <endpointBehaviors>
        <behavior name="clientCredentials">
          <transportClientEndpointBehavior credentialType="SharedSecret">
            <clientCredentials>
              <sharedSecret issuerName="ISSUER_NAME"
issuerSecret="ISSUER_SECRET" />
            </clientCredentials>
          </transportClientEndpointBehavior>
        </behavior>
      </endpointBehaviors>
    </behaviors>
<bindings>
<netTcpRelayBinding>
<binding name="default" connectionMode="Hybrid">
<security mode="None" />
</binding>
</netTcpRelayBinding>
</bindings>
<services>
<service name="HelloWorldService">
<endpoint address="sb://WCFBook.servicebus.windows.net/HelloWorld"
behaviorConfiguration="clientCredentials"
binding="netTcpRelayBinding" bindingConfiguration="default"
name="RelayEndpoint" contract="IHelloWorld" />
</service>
</services>
</system.serviceModel>The Hybrid mode also provides a property in the WCF client channel that the client application can use to subscribe events about connection status changes at runtime. The property is implemented in the type IHybridConnectionStatus, and it exposes a ConnectionStateChanged event where the client application can register an event handler. The following code snippet shows how a client application can subscribe to this event:
ChannelFactory<IHelloWorld> channelFactory = new
ChannelFactory<IHelloWorld>("RelayEndpoint");
IHelloWorld channel = channelFactory.CreateChannel();
channel.Open();

IHybridConnectionStatus hybridConnectionStatus =
    channel.GetProperty<IHybridConnectionStatus>();

hybridConnectionStatus.ConnectionStateChanged += ( o,e ) =>
{
  Console.WriteLine("Connection Upgraded!!!!");
};
You might also want to consider employing WS-ReliableMessaging with the NetTcpRelayBinding, as that will guarantee that the connections are reestablished on your behalf when any problem arises with the direct socket connections. This will give the impression that the direction connections are "reliable."
All the relay bindings discussed so far require clients to use WCF for consuming the on-premises services exposed on the Service Bus.
The Service Bus also comes with several HTTP bindings — WebHttpRelayBinding, BasicHttpRelayBinding, and WS2007HttpRelayBinding — to support scenarios where you need to integrate non-WCF clients. These bindings provide wider reach and more interoperability because they can support any client that knows how to use the standard protocols supported by each of these bindings.
Although WS2007HttpRelayBinding provides richer functionality through the support of the WS-* protocols, it requires the client to understand those protocols for the client and service to interoperate well. On the other hand, WebHttpRelayBinding and BasicHttpRelayBinding are based on simple Http/Rest and basic SOAP respectively, so interoperability is easier to accomplish.
No matter which Http relay binding you use, all of them work pretty much the same. The on-premises WCF service first connects to the relay service using either a TCP or Http connection depending on the chosen SystemConnectivityMode.
After that, clients start sending messages to the Http endpoint exposed by the relay service. They only need a simple Http or SOAP client library to consume the services.
The relay service can route any SOAP 1.1, SOAP 1.2, or plain Http messages. You only need to configure which message style or WS-* protocols you can to use for the services by employing one of the Http relay bindings. Let's go through the implementation of a simple RESTful Http service that is exposed in the Service Bus.
The on-premises WCF service exposes a simple RESTful service contract using the WCF 3.5 web programming model as shown in Listing 10-9.
Example 10.9. RESTful Service Implementation
[ServiceContract()]
public interface ICustomerManagement
{
    [OperationContract]
    [WebGet]
    string GetCustomerName(int customerId);
}

public class CustomerManagement : ICustomerManagement
{
    public string GetCustomerName(int customerId)
    {
        if (customerId > 5)
        {
            return "Foo";
        }

        return "Bar";
    }

}
The implementation of the GetCustomerName simply returns "Foo" or "Bar" according to the value received in the customerId argument.
The host application is configured with a single WebHttpRelayBinding endpoint (see Listing 10-10). The service endpoint is configured with a "SharedSecret" credential and the WebHttpRelayBinding has been configured to not require authentication from incoming clients. This means that clients will not have to authenticate with Access Control to use your endpoint.
Example 10.10. Service Configuration
<system.serviceModel>
    <bindings>
      <webHttpRelayBinding>
        <binding name="default">
          <security relayClientAuthenticationType="None" />
        </binding>
      </webHttpRelayBinding>
    </bindings>

    <services>
      <service name="CustomerManagement"
               behaviorConfiguration="default">
        <endpoint name="RelayEndpoint"
                  contract="ICustomerManagement"
                  binding="webHttpRelayBinding"
                  bindingConfiguration="default"
                  behaviorConfiguration="sharedSecretClientCredentials"
                  address="http://WCFBook.servicebus.windows.net/Customer" />
      </service>
    </services>

    <behaviors>
      <endpointBehaviors>
        <behavior name="sharedSecretClientCredentials">
          <transportClientEndpointBehavior credentialType="SharedSecret">
            <clientCredentials>
              <sharedSecret issuerName="ISSUER_NAME"
issuerSecret="ISSUER_SECRET" />
            </clientCredentials>
          </transportClientEndpointBehavior>
        </behavior>
      </endpointBehaviors>
      <serviceBehaviors>
        <behavior name="default">
          <serviceDebug httpHelpPageEnabled="false" httpsHelpPageEnabled="false" />
        </behavior>
      </serviceBehaviors>
    </behaviors>

  </system.serviceModel>
When the WCF service application is up and running, anyone can browse to http://WCFBook.servicebus.windows.net/CustomerManagement/GetCustomerName with a customerId in the query string (for example, GetCustomerName?customerId=3) to retrieve a customer name.
Access Control Service (ACS) is a cloud-based service that provides centralized authentication and authorization for your application and on-premises services through a claim-based identity model. You do not need to provide a custom code or have a user database for using it. ACS takes care of all that. You can authorize access to both enterprise clients as well as simple clients with only a few lines of code. As more users start adopting ACS over time, more users of your applications will be able to authenticate or authorize without having to touch any code.
In the way ACS works, the user must obtain a security token (think SAML or Simple Web Token) from ACS to log into your service or application. This token is signed by ACS and contains a set of claims about the user's identity. ACS will not issue a token unless the user first authenticates successfully by presenting one of the supported client credentials (already discussed in Table 10-1, "Client Credential Types").
Note
The current ACS version only issues Simple Web Tokens, and the main reason is that Microsoft has decided to target this first version to RESTful services only. At the same time, this kind of service has become popular in both web and enterprise developers. They believe a gap is emerging in the market for identity and access control technology. Developers are facing a lack of common patterns for managing identity and access control in a way that is compatible with the REST focus on simplicity. The main goal for ACS at this point is to fill in those gaps.
You can find today three main pieces in ACS: a security token service, which issues security tokens; the administration portal; and an administration RESTful API for configuring the way generated tokens are constructed. The SDK also includes a command-line tool Access Control Management Tool (Acm.exe) that you can use to perform management operations (CREATE, GET, UPDATE, and DELETE) on the AppFabric Access Control entities (scopes, issuers, token policies, and rules). The Access Control entities are discussed in more detail in the next sections.
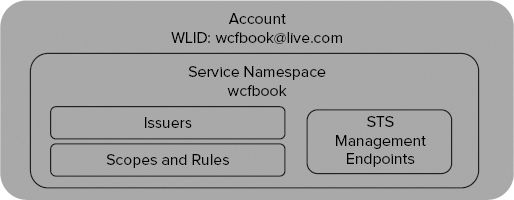
A service namespace in the context of ACS is nothing more than a container for the ACS entities. Basically the same thing seen in the Service Bus, but with entities specific to the ACS. A service namespace also has its own private STS and management endpoints.
Some of the entities found under a service namespace in Access Control are the rules. A ruledetermines what claims will be added in the tokens issued by the ACS STS. Each service namespace can have a completely different set of rules. The rules play a very important role because most applications are probably going to need different types of claims. One application might need to verify the user's full name, and would therefore expect a claim with the user's full name be included in the token issued by ACS. Another might need some other personal information. It is pretty clear that any application needs its own claims, and therefore its own set of rules so that ACS can generate those claims. This idea is so important that the request messages for getting a token from ACS must include an AppliesTo field, which is a URI identifying the logical destination for the token. ACS makes use of this by allowing you to assign a URI to each of your applications.
Figure 10-6 illustrates the structure of a service namespace in ACS. A service namespace WCFBook belongs to the Live ID account [email protected] and contains issuers, scopes, and rules.
Each application or service within an ACS service namespace must be assigned a unique URI. This represents the AppliesTo URI that was previously discussed. Although this can be technically any string representing a valid URI, most people find it convenient to use a URL associated with the application, for example, http://localhost/MyService. There are two obvious benefits to using an application URL as AppliesTo: it becomes immediately obvious what application the name refers to, and it is also hard to accidentally give the same URI to two different applications.
Each ACS service namespace can drive several applications, so each application should have its own scope with the settings and claims that make sense for that application.
A scope includes a set of rules that determine how ACS generates claims for the application, but also includes other important settings such as the key that ACS should use to sign the security tokens, and the lifetime for them (how long they will be valid).
The lifetime for a token is very important from the point of view of scalability and performance. After a token has been issued by ACS, it can be reused by the client until it expires, which reduces the number of times a client has to request a new token from an issuer, reducing latency for the client and load on the issuer.
As discussed in Chapter 9, this signature also plays an important role as it allows the services to verify that the token comes from a trusted party, and it has not been changed in transit.
These two settings can be found in ACS as part of a token policy. A token policy can be associated to multiple scopes.
A service namespace also supports one or more issuers. An issuer in ACS basically represents a client that will be requesting tokens for consuming a service. Each issuer also includes a set of credentials including a key. You can simply use the issuer name and key to authenticate to that issuer and request a token, or you can go with other more complex alternatives that use existing tokens.
Rules play an important role in AC as they drive the token-issuing behavior. A rule is always associated with a scope and basically maps input claims to output claims. The input claims are generally created during the authentication process, and what a rule does is transform them to some other output claims that the service or application receiving the token is expecting.
Table 10-4 discusses all the properties you can find as part of a rule.
Table 10.4. Rule Properties
PROPERTY | DESCRIPTION |
|---|---|
| A friendly name to identify a rule within a scope. |
| Specifies the type of transformation the rule will apply over the input claims. The two possible values are |
| Specifies the issuer of the input claim. The rule will only apply for input claims generated by this issuer. |
| A string that represents the claim type. For example, |
| A string representing the claim value. For example, for an |
| A string that represents the output claim type. |
| A string representing the output claim value. |
The ACS will execute all the rules for a given scope that matches the Issuer, Type, and Value in the input claims. The result will be a completely different set of output rules.
Let's say a service is expecting a set of claim of the type "action" that specifies all the actions the consumer is allowed to do on the service side. A rule can create all those claims based on the way the client was authenticated in ACS. For example, Table 10-5 illustrates a possible rule for this service.
Table 10.5. Rule Example
PROPERTY | VALUE |
|---|---|
|
|
|
|
|
|
|
|
|
|
|
|
|
|
When the client application authenticates against the ACS using the name and password associated to the issuer MyClientApplication, ACS will automatically generate an input claim Issuer with that issuer name as value. That input claim will match the properties of this rule, and therefore an output claim Action with value DeleteCustomer will be added to the issue token. The claim type Issuer in this case is a built-in claim type that the ACS generates when the client authenticates with the issuer name and password.
An introductory theory about what ACS, and how you can use it to secure your services, has so far been discussed. It is time now to see how this service works in action with a more concrete example.
For this first example, use the same namespace you created before for the Service Bus examples (for example, a service namespace WCFBook).
The service contract and implementation for the RESTful service you are going to expose in the Service Bus is something simple that implements a classic SayHello operation that returns a fixed string "Hello" (see Listing 10-11).
Example 10.11. Hello World Service Implementation
[ServiceContract]
public interface ISampleService
{
  [OperationContract]
  [WebGet(UriTemplate = "sayHello")]
  string SayHello();
}

public class SampleService : ISampleService
{
  public string SayHello()
  {
    return "Hello";
  }
}
As this service will rely on the ACS for receiving claims about the authenticated user, you will use a custom authorization manager that verifies the user permissions based on that evidence. The authorization manager will evaluate any of the received claims, and the client will execute the operation only when one of those claims matches of one of the expected claims. The expected claims are previously configured in the host when the authorization manager is initialized.
Therefore, the code you find in the console application, used as host, basically initializes the WCF service host with a WebHttpBinding for RESTful services, the custom authorization manager previously discussed, and a cryptographic key to verify the token signature.
Listing 10-12 shows the code required for hosting the service, and expecting some claims from ACS. As you can see, the authorization manager expects a token issued by ACS for the service "http://localhost/SampleService" (AppliesTo) that should contain at least one claim of type "action" with value "sayHello".
Example 10.12. Service Host Implementation
class Service
{
  static void Main(string[] args)
  {
    string acsHostName = "accesscontrol.windows.net";

    string trustedAudience = "http://localhost/SampleService";
    string requiredClaimType = "action";
    string requiredClaimValue = "sayHello";

    Console.WriteLine("Enter your service namespace, then press <ENTER>");
    string serviceNamespace = Console.ReadLine();

    Console.WriteLine("
Enter your issuer key, then press <ENTER>");
    string trustedTokenPolicyKey = Console.ReadLine();

    WebHttpBinding binding = new WebHttpBinding(WebHttpSecurityMode.None);

    Uri address = new Uri("http://localhost/SampleService");

    WebServiceHost host = new WebServiceHost(typeof(SampleService));
    host.AddServiceEndpoint(typeof(ISampleService), binding, address);

    host.Authorization.ServiceAuthorizationManager = new ACSAuthorizationManager(
                acsHostName,
                serviceNamespace,
                trustedAudience,
                Convert.FromBase64String(trustedTokenPolicyKey),
                requiredClaimType,
                requiredClaimValue);

    host.Open();

    Console.WriteLine("The Sample Service is listening");
Console.WriteLine("Press <ENTER> to exit");
Console.ReadLine();
}
}The next step is to configure the rules and scopes within ACS so the claims expected for the service are generated. As part of the example, there is a batch file, setup.cmd, that automatically does all this for you using the command-line tool ACS.exe. There is also a cleanup.cmd file that does the opposite by removing all the previously created entities.
To see the results of this command execution in ACS, the SDK includes a very useful Windows application, AcmBrowser, that uses the administration API in the background to give you a visual representation of all the entities configured for a specific namespace. The sample can be found under the folder [SDK Folder]SamplesAccessControlExploringFeaturesManagement created during the SDK installation.
If you run this application, you need to provide a service namespace name and its management key (available in the web portal under the service namespace page) to get access to all the information stored in that namespace.
Figure 10-7 illustrates how the AcmBrowser shows all the entities the command batch created.
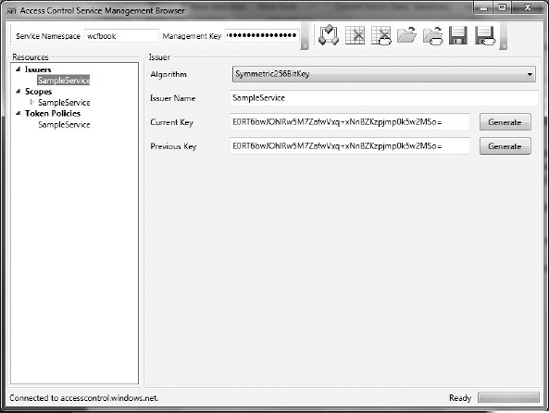
The batch file generated a new issuer, SampleService, with a key expressed in Base64 for requesting tokens, a new scope SampleService that applies to http://localhost/SampleService (the URI for identifying the service), and contains a simple rule to generate an output claim with the client permissions in the form of an "action" claim type. That scope is also associated with a token policy with the same name that provides the token lifetime and signing key.
You can generate all those entities manually by either using the command-line tool Acs.exe or the AcmBrowser, but that represents much more work on your side for preparing this example.
The authorization manager discussed previously implements all the logic for validating the Simple Web Token issued by ACS, and verifying that the token contains the claim expected by the service. In this example, the configured service expects a claim of type "action" and value "sayHello".
This authorization manager is mainly implemented in the ACSAuthorizationManager class (see Listing 10-13).
Example 10.13. WCF Authorization Manager Implementation
protected override bool CheckAccessCore(OperationContext operationContext)
{
  string authorizationHeader = WebOperationContext.Current.IncomingRequest.
Headers[HttpRequestHeader.Authorization];

  if (string.IsNullOrEmpty(authorizationHeader))
  {
    return false;
  }

  if (!authorizationHeader.StartsWith("WRAP "))
  {
    return false;
  }

  string[] nameValuePair = authorizationHeader.Substring("WRAP ".Length)
.Split(new char[] {'='}, 2);

  if (nameValuePair.Length != 2 ||
    nameValuePair[0] != "access_token" ||
    !nameValuePair[1].StartsWith(""") ||
    !nameValuePair[1].EndsWith("""))
  {
    return false;
   }

   string token = nameValuePair[1].Substring(1, nameValuePair[1].Length - 2);

   if (!this.validator.Validate(token))
   {
     return false;
   }
Dictionary<string, string> claims = this.validator.GetNameValues(token);
string actionClaimValue;
if (!claims.TryGetValue(this.requiredClaimType, out actionClaimValue))
{
return false;
}
if (!actionClaimValue.Equals(this.requiredClaimValue))
{
return false;
}
return true;
}It basically gets the token from the Http Authorization headers, and performs a couple of validations to verify that it is a valid Simple Web Token using a helper class TokenValidator, which is also included as part of the example. In the last part of this method implementation, the claims are extracted from the token and compared against the claim expected by the service.
Finally, after you have all the service implementation and ACS configuration in place, it is time to implement a client application for consuming the service.
The implementation of the client application involves two main steps: the token negotiation with ACS, and the final execution of the service with the expected data and negotiated token.
To get a token from ACS, the client application needs to make an Http POST to the service including the following information:
A
wrap_namefield representing the name of a configured issuer in ACSA
wrap_passwordfield representing the key assigned to the issuerA
wrap_scopefield representing theAppliesTofor a given scope in ACS
These three fields are only valid when the client is authenticated with the issuer name and password. The required fields vary according to the authentication method used against ACS.
Listing 10-14 shows how the token negotiation with ACS is handled.
Example 10.14. Token Negotiation with ACS
private static string GetTokenFromACS()
{
  WebClient client = new WebClient();
  client.BaseAddress = string.Format("https://{0}.{1}", serviceNamespace,
acsBaseAddress);

  NameValueCollection values = new NameValueCollection();
  values.Add("wrap_name", "SampleService");
  values.Add("wrap_password", issuerKey);
  values.Add("wrap_scope", "http://localhost/SampleService");
byte[] responseBytes = client.UploadValues("WRAPv0.9", "POST", values);
string response = Encoding.UTF8.GetString(responseBytes);
Console.WriteLine("
received token from ACS: {0}
", response);
return response
.Split('&')
.Single(value => value.StartsWith("wrap_access_token=",
StringComparison.OrdinalIgnoreCase))
.Split('=')[1];
}After the token is received, the client application can include it as part of the request message to the service as an HTTP Authorization header (the header that the authorization manager is expecting).
Listing 10-15 shows how service consumption is handled.
Example 10.15. Service Consumption
private static string SendMessageToService(string token)
{
  string message = null;

  WebHttpBinding binding = new WebHttpBinding(WebHttpSecurityMode.None);
  Uri address = new Uri(@"http://localhost/SampleService");

  WebChannelFactory<ISampleService> channelFactory = new
WebChannelFactory<ISampleService>(binding, address);

  ISampleService proxy = channelFactory.CreateChannel();

  using (new OperationContextScope(proxy as IContextChannel))
  {
    string authHeaderValue = string.Format("WRAP access_token="{0}"",
    HttpUtility.UrlDecode(token));

    WebOperationContext.Current.OutgoingRequest.Headers.Add("authorization",
    authHeaderValue);

    message = proxy.SayHello();
 }

 ((IClientChannel)proxy).Close();

 channelFactory.Close();

 return message;
}
This method uses a WebChannelFactory for consuming the RESTful service, and therefore the authorization header can only be added through the OperationContextScope. This code might look different if you use a different Http client library.