
WHAT'S IN THIS CHAPTER?
Understanding authentication in WCF
Getting started with claim-based security
Authorizing service consumers in WCF
In the previous chapter we discussed fundamental aspects needed to choose the right security schema for your WCF services.
In this chapter, the focus is on applying those concepts in real scenarios, using examples that will guide you step by step. We also discuss alternatives that WCF provides for authenticating and authorizing clients when the client credentials reach the service, giving emphasis to the claims-based security model.
The right choice for your services authentication schema is typically based on several factors, such as the location of clients on the intranet or Internet, facility to deploy credentials in the clients, or the number of potential clients that will consume the services.
As previously discussed, authentication in the context of WCF typically refers to mutual authentication.
Mutual authentication is a bidirectional process where the clients and services authenticate each other. This kind of authentication is extremely important for services exposed on the Internet. An attacker might be able to spoof one of the services and intercept the client calls to get access to sensitive data.
The service credentials depend on the client authentication schema and the security mode you choose. Usually, if you use client authentication schemas such as username or certificate authentication with message security, a service certificate is needed for both service authentication and message protection. If you use Windows authentication, the Windows credentials of the service process can be used for service authentication and message protection.
Because the number of possible authentication schemas that a service should handle is the result of any possible combination between client credential types and security modes, WCF introduced a new way to represent the client identity through a uniform authentication model based on claims. In that way, the services get decoupled from the implementation details of every supported authentication mechanism, and only rely on claims to know more about the client's identities.
A claim in terms of WCF describes a piece of information about the identity of a subject (the service client) in a specific context, or an individual right or action applicable to a particular resource.
A claim is made of four main parts:
The type of claim
Information or content specific to the claim
Information about the issuer of the claim
Whether the claim describes the identity or capability of the subject.
The information about the issuer also plays a role in this model because the service can trust or not in the information provided by the claim based on the claim issuer.
Here's an example in the real world: when you present a driver's license in a winery to prove that you are of legal age to buy alcohol, you are giving evidence about your identity to a third party in the form of claims. Every claim in the license matches with a specific piece of information about you or the license itself, such as the legal name, birthday, or expiration date.
In that example, the person selling you the wine would probably only be interested in the claim that represents your age, which can be inferred from your birthday. That person would also verify that the license is valid, and was issued by a trusted party (authentication). The situation would be different if you present a card issued by a non-trusted source, such as a fake card. The seller would surely reject it.
In WCF, every credential type or security token successfully authenticated is mapped to a set of claims and passed to the service through the security context associated with the operation being executed.
These claims not only contain information about the client identity, but information that the service can use to take authorization decisions in the execution of the operation.
In WCF, a claim is represented by a class known as System.IdentityModel.Claims.Claim, which is part of the System.IdentityModel assembly. Most of the classes for handling different authentication aspects in WCF are located in that assembly:
[DataContract(Namespace = "http://schemas.xmlsoap.org/ws/2005/05/identity")]
public class Claim
{
  [DataMember(Name = "ClaimType")]
public string ClaimType { get; set; }
[DataMember(Name = "Resource")]
public object Resource { get; set; }
[DataMember(Name = "Right")]
public string Right { get; set; }
}As you might notice, this class is also decorated with the DataContract/DataMember attributes, so it can be transmitted over the wire to cross service boundaries.
The ClaimType property is a unique string identifier typically associated with a pre-defined URI that represents the kind of information contained within the claim. For example, the type http://schemas.xmlsoap.org/ws/2005/05/identity/claims/name would represent the claim that contains the username.
WCF already provides a set of predefined claim types in the System.IdentityModel.Claims.ClaimTypes class, but you are still free to use any schema to represent a type. The idea is that you can reuse most of them, and create new ones as you need them for representing types specific to the service business domain.
Some of the predefined claim types that you can find in that class are enumerated in Table 8-1.
Table 8.1. Claim Types
TYPE | VALUE |
|---|---|
Name |
|
Surname |
|
| |
Country |
|
The Resource property references the actual claim value. As this property is an object, you can associate any kind of information to claim, from simple values such as strings to more complex object graphs. If you are planning to serialize the claims, make sure that the values assigned to them can be serialized as well.
The last but not least property, Right, specifies whether the claim represents identity information about the authenticated subject such as the name, or some additional information for taking authorization decisions such as user e-mail, phone number, and so on. These two possible values for the Right property are available as properties in the System.IdentityModel.Rights class. (See Table 8-2.)
Table 8.2. Right Types
TYPE | VALUE | PURPOSE |
|---|---|---|
|
| A claim with this right uniquely identifies the subject it describes. |
|
| A claim with this right provides additional information about the subject. |
As happens with the claim types, the value for this property is also a simple string, so again you are open to providing your own schema for claim rights.
WCF by default generates a new set of claims for every authenticated security token or client credential. Clients usually send one security token per message, which receives the name of the primary token and can be any of the available credential types in WCF or a custom one. However, the client is not limited to send just one token: in some circumstances it might send more than one. These additional security tokens receive the name of supporting tokens, and typically provide additional information about the client.
A set of claims in WCF is represented by the abstract class System.IdentityModel.Claims.ClaimSet, which holds the list of claims as well as a reference to the issuer of those claims:
[DataContract(Namespace = "http://schemas.xmlsoap.org/ws/2005/05/identity")]
    public abstract class ClaimSet : IEnumerable<Claim>
    {
        public abstract IEnumerable<Claim>
             FindClaims(string claimType, string right);
        public abstract IEnumerator<Claim> GetEnumerator();
        public abstract int Count { get; }
        public abstract ClaimSet Issuer { get; }
        public abstract Claim this[int index] { get; }
}
Three specific implementations of this class are shipped as part of WCF. A generic one, System.IdentityModel.Claims.DefaultClaimSet, is for storing any kind of claim used to add or send additional claims to the service. The other two are for converting X509 certificates and Windows tokens to claims. These are System.IdentityModel.Claims.X509CertificateClaimSet and System.IdentityModel.Claims.WindowsClaimSet respectively.
As you can see, a basic implementation of this class involves different methods to enumerate or find existing claims in the claim set, or provide additional information about the issue of the claims.
All the claim sets generated by WCF can be accessed at runtime in the operation through the System.ServiceModel.ServiceSecurityContext class, which is available in the current OperationContext:
ServiceSecurityContext securityContext
= OperationContext.Current.ServiceSecurityContext;
The security context is available for any authorization code involved in the execution of the operation, and we discuss it more in detail later on in the section about authorization. For now, let's focus only on how to use this class to query some of the claims generated by WCF after the authentication:
ServiceSecurityContext securityContext =
OperationContext.Current.ServiceSecurityContext;

IEnumerable<Claim> claims = securityContext.
AuthorizationContext.ClaimSets[0].FindClaims
               (ClaimTypes.Name, Rights.Identity);
foreach (Claim claim in claims)
{
  string name = claim.Resource as string;
  Console.WriteLine("Your name is {0}", name);
}You have seen so far how WCF authenticates clients, and transforms the information provided in the security tokens into claims that can be consumed by the service. It is now time to walk through more concrete examples and end-to-end scenarios using some of the authentication schemas that WCF provides out of the box. Some of the schemas in this section are username authentication over message and/or transport security, Windows authentication over message security, Mutual X509 authentication over message security, and finally an authentication scenario that combines username and certificate authentication over message security using the supporting tokens feature.
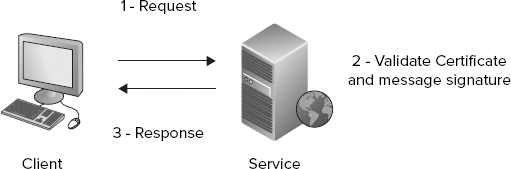
Username authentication often receives the name direct authentication, as the client provides authentication credentials in the form of a username and password during the request to the service, and the service can validate or authenticate the credentials itself against an identity store without going to a third party or authentication broker. (See Figure 8-1.)
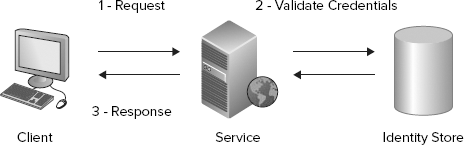
The main characteristics of username authentication are summarized in the following list:
The credentials presented to the service by the client are based on a combination of username and password. This means that the client and the service must exchange the passwords securely before the first interaction using an out-of-band mechanism.
The service can validate the client credentials (username and password) against an identity store. Different strategies can be used to implement the identity store, ranging from a simple solution such as a file to more complex ones using the Windows user account, a database, or a LDAP directory.
The service is relatively simple, and does not require support for capabilities such as single sign-on (SSO). Without single sign-on, the client might be forced to authenticate prior to every service call or cache the user's credentials within the application.
The client and the service trust each other to manage the credentials securely. If one of the parties manages the credentials in an insecure manner, there is no guarantee that the mishandled credentials will prove the identity of the client.
In the WCF implementation of username authentication over message security, the client passes the credentials to the service as part of a secure message exchange. The messages in this case are protected using an X509 certificate provided by the service. This certificate also works as a mechanism for the client to authenticate the service as part of the mutual authentication process.
The service credentials (the X509 certificate) can be transmitted to the client during the first message exchange or using an out-of-band mechanism according to the value of the negotiateServiceCredential setting.
The mechanism for authenticating the user credentials against an identity store is implemented through the abstract class System.IdentityModel.Selectors.UsernamePasswordValidator in the System.IdentityModel.Selectors assembly:
public abstract class UserNamePasswordValidator
{
  public abstract void Validate(string userName, string password);
}
The signature of the only method available in this class is quite evident. The username and password received as part of the client credentials is passed by WCF to this class for validation. In case the credentials cannot be validated, it is the responsibility of this class to throw an exception.
WCF ships with two internal implementations of this class, System.IdentityModel.Selectors.MembershipProviderValidator for validating the credentials against an existing ASP.NET Membership provider, and System.IdentityModel.Selectors.NoneUsernamePasswordValidator for not validating anything. These two implementations can be accessed through public members in the base UsernamePasswordValidator class:
public abstract class UserNamePasswordValidator
{
  public static UserNamePasswordValidator
CreateMembershipProviderValidator(MembershipProvider provider);
public static UserNamePasswordValidator None { get; }
}The static method CreateMembershipProviderValidator returns an instance of the MembershipProviderValidator that wraps the MembershipProvider passed as an argument. The static property None returns an instance of the NonUsernamePasswordValidator class.
The following code snippet shows a simple implementation of this class that validates the username and password against hardcoded strings:
public class MyUserNamePasswordValidator : UserNamePasswordValidator
{
  public override void Validate(string userName, string password)
  {
    if (userName != "joe" || password != "bar")
      throw new
  SecurityTokenValidationException("The user could not be authenticated");

  }
}
If the username is different from "Joe," or the password is not "bar," it throws an exception so WCF will assume the client could not be authenticated.
However, the default behavior for authenticating username and password credentials in WCF is to validate them against the Windows account store. Unless you do not override this setting through a specific element <usernameAuthentication> under the service behavior <serviceCredentials> to use a UsernamePasswordValidator, WCF will always use the Windows account store:
<bindings>
      <wsHttpBinding>
        <binding name="HelloWorld">
          <security mode="Message">
            <message clientCredentialType="UserName"
                     negotiateServiceCredential="true"/>
          </security>
        </binding>
      </wsHttpBinding>
    </bindings>
    <behaviors>
      <serviceBehaviors>
        <behavior name="HelloWorld">
          <serviceCredentials>
            <userNameAuthentication userNamePasswordValidationMode=
"Windows|MembershipProvider|Custom"/>
          </serviceCredentials>
        </behavior>
      </serviceBehaviors>
    </behaviors>
The setting usernamePasswordValidationMode in the <usernameAuthentication> element allows changing the mode that WCF uses to authenticate the username credentials. Windows is the default value, but also supports MembershipProvider for using a ASP.NET membership provider (internally uses the already discussed MembershipProviderValidator) or Custom to specify a custom implementation of UsernamePasswordValidator in case you want to provide something not supported by the other options. (The MyUsernamePasswordValidation implementation is an example of a custom implementation.)
Based on the value you chose for this setting, you need to provide additional values for other related settings.
In validation mode, Windows supports three optional settings:
CacheLogonTokens: Specifies whether the Windows tokens are cached and reused for the same username/password pair. Authenticating and creating a Windows logon token can be an expensive operation, so WCF caches the logon tokens returned by Win32'sLogonUserfunction when this setting is turned on.CachedLogonTokenLifetime: Specifies the maximum length of time that the Windows tokens are cached when theCacheLogonTokensetting is on.MaxCachedLogonTokens: Specifies the maximum number of Windows tokens to cache when theCacheLogonTokensetting is on.
<serviceCredentials>
            <userNameAuthentication userNamePasswordValidationMode="Windows"
                                    cacheLogonTokens="true"
                                    cachedLogonTokenLifetime="00:01:00"
                                    maxCachedLogonTokens="10"/>
 </serviceCredentials>
The validation mode MembershipProvider requires an additional setting membershipProviderName to provide the name of an already configured ASP.NET membership provider. (That name should exist in the configured membership providers.)
<behavior name="HelloWorld">
      <serviceCredentials>
            <userNameAuthentication userNamePasswordValidationMode=
                 "MembershipProvider"
                 membershipProviderName="MyProvider"/>
     </serviceCredentials>
   </behavior>
 </serviceBehaviors>
<system.web>
    <membership>
      <providers>
        <add name="MyProvider" type="..."/>
      </providers>
    </membership>
</system.web>
Finally, the validation mode Custom requires the setting customUsernamePasswordValidatorType to specify the .NET type of the custom implementation:
<behavior name="HelloWorld">
  <serviceCredentials>
    <userNameAuthentication userNamePasswordValidationMode="Custom"
  customUserNamePasswordValidatorType=
"MyCustomUsernamePasswordValidator, MyAssembly"/>
   </serviceCredentials>
</behavior>
The X509 certificate used to protect the communication must be configured by using the <serviceCertificate> element within the <serviceCredentials> behavior as shown in this configuration fragment:
<behavior name="HelloWorld">
  <serviceCredentials>
    <serviceCertificate findValue="CN=WCFServer" storeLocation="LocalMachine"
storeName="My" x509FindType="FindBySubjectDistinguishedName"/>
    <userNameAuthentication userNamePasswordValidationMode="Windows"/>
  </serviceCredentials>
</behavior>
When you reference a X509 certificate either in the configuration section or the object model, you often need to specify different settings that WCF will use to resolve the certificate location in the Windows certificate store. These settings are summarized in Table 8-3.
Table 8.3. Certificate Resolution Settings
SETTING | DESCRIPTION |
|---|---|
| Specifies the location of the certificate store. Possible values for this setting are |
| Specifies the name of the certificate store. The most common values for this setting are |
| Specifies the way WCF finds the certificate using the |
| Specifies the value that WCF uses to search the certificate. |
Now that you have a basic understanding of the different settings required to run an end-to-end scenario with a username authentication schema, let's walk through a complete example for a service that returns the claims of the authenticated user.
Your service implementation is quite simple: it basically returns the claims passed by WCF in the security context as a list of strings. (See Listing 8-1.)
Example 8.1. Service Implementation
namespace WCFBook.Samples
{
  [ServiceContract()]
  public interface IEchoClaims
  {
    [OperationContract]
    List<string> Echo();
  }
}
public class EchoClaims : IEchoClaims
{
  public List<string> Echo()
  {
    List<string> claims = new List<string>();

    foreach (ClaimSet set in
          OperationContext.Current
            .ServiceSecurityContext
            .AuthorizationContext
            .ClaimSets)
    {
      foreach (Claim claim in set)
      {
        claims.Add(string.Format("{0} - {1} - {2}",
                  claim.ClaimType,
                  claim.Resource.ToString(),
                  claim.Right));
     }
   }

   return claims;
  }

}
The service is hosted in a console application using the http transport (see Listing 8-2).
Example 8.2. Service Host
class Program
{
  static void Main(string[] args)
  {
    ServiceHost host = new ServiceHost(typeof(EchoClaims),
                    new Uri("http://localhost:8000"));
try
{
host.Open();
Console.WriteLine("Service running....");
Console.WriteLine("Press a key to quit");
Console.ReadKey();
}
finally
{
host.Close();
}
}
}In this step you need to configure the service host to expose the EchoService service using a WsHttpBinding (as the service uses Http) with username authentication over message security.
Add the service description with the corresponding endpoint to the
system.ServiceModelconfiguration section:<system.serviceModel> <services> <service name="WCFBook.Samples.EchoClaims" behaviorConfiguration="echoClaimsBehavior"> <endpoint address="EchoClaims" contract="WCFBook.Samples.IEchoClaims" binding="wsHttpBinding" bindingConfiguration="echoClaimsBinding"></endpoint> </service> </services>Configure the
WsHttpBindingto use message security with username authentication:<bindings> <wsHttpBinding> <binding name="echoClaimsBinding"> <security mode="Message"> <message clientCredentialType="UserName" negotiateServiceCredential="true"/> </security> </binding> </wsHttpBinding> </bindings>The service credentials will automatically be negotiated, so the client application does not need to install it using an out-of-band mechanism.
Configure the
serviceBehaviorwith the service certificate and the username authentication mode:<behaviors> <serviceBehaviors> <behavior name="echoClaimsBehavior"> <serviceCredentials> <serviceCertificate findValue="CN=WCFServer" storeLocation="LocalMachine" storeName="My" x509FindType="FindBySubjectDistinguishedName"/> <userNameAuthentication userNamePasswordValidationMode="Windows"/> </serviceCredentials> <serviceMetadata httpGetEnabled="true"/> </behavior> </serviceBehaviors> </behaviors>
For the purpose of the first sample, you configure the service to authenticate the users against the Windows account store (a valid Windows account and password must be provided by the client application).
The X509 certificate CN=WCFServer is a test certificate created for this sample using the makecert.exe tool. A script SetupCerts.bat has been included with the samples to automatically create and register the X509 certificates in the Windows certificate store. Make sure to run this script before playing with the samples.
The client application is a basic console application that collects the username and password from the standard input, and calls the service to obtain the user claims (see Listing 8-3).
Example 8.3. Service Implementation
static void Main(string[] args)
{
Console.WriteLine("Enter a valid username");
string username = Console.ReadLine();
Console.WriteLine("Enter the password");
string password = Console.ReadLine();
EchoClaimsReference.EchoClaimsClient client = new
Client.EchoClaimsReference.EchoClaimsClient();
client.ClientCredentials.UserName.UserName = username;
client.ClientCredentials.UserName.Password = password;
try{
string[] claims = client.Echo();
foreach (string claim in claims)
{
Console.WriteLine(claim);
}
}
catch (TimeoutException exception)
{
Console.WriteLine("Got {0}", exception.GetType());
client.Abort();
}
catch (CommunicationException exception)
{
Console.WriteLine("Got {0}", exception.GetType());
client.Abort();
}
}ClientCredentials is a property of the type System.ServiceModel.ClientCredentials exposed by System.ServiceModel.ClientBase<T>, a class that any WCF channel inherits from.
That class contains different properties that the client application can use to set the right credentials to consume the service. In this example, the username credentials are used.
The last step is to configure the client application to use the same security settings as you configure on the service side. That is, a client endpoint that uses WsHttpBinding with message authentication over message security.
Add the client endpoint to the
system.ServiceModelconfiguration section:<client> <endpoint address="http://localhost:8000/EchoClaims" binding="wsHttpBinding" bindingConfiguration="echoClaimsBinding" contract="EchoClaimsReference.IEchoClaims" name="WSHttpBinding_IEchoClaims" behaviorConfiguration="echoClaimsBehavior"> <identity> <dns value="WCFServer"/> </identity> </endpoint> </client>The endpoint identity must match the certificate configured on the service side; otherwise WCF will throw an exception at the moment of authenticating the service.
Configure the
WsHttpBindingto use message security with username authentication:<bindings> <wsHttpBinding> <binding name="echoClaimsBinding"> <security mode="Message"> <message clientCredentialType="UserName" negotiateServiceCredential="true"/> </security> </binding> </wsHttpBinding> </bindings>As you use test certificates, you need to skip the X509 certificate validations performed by WCF at the moment of authenticating the service credentials. This step is optional if you are using X509 certificates obtained from a trusted certificate authority:
<behaviors> <endpointBehaviors> <behavior name="echoClaimsBehavior"> <clientCredentials> <serviceCertificate> <authentication certificateValidationMode="None" revocationMode="NoCheck"/> </serviceCertificate> </clientCredentials> </behavior> </endpointBehaviors> </behaviors>
Instead of validating the user credentials with the Windows account store, this variant describes how to configure the service to a custom membership provider as the identity store.
For the purpose of this example, you implement a basic ASP.NET membership provider. For more complex scenarios, you can reuse some of the built-in providers such as SqlMembershipProvider for validating credentials against a SQL database.
Any membership provider must derive from the base class System.Web.MembershipProvider and implement different methods to authenticate and manage the users in an application. In the case of WCF, only the method ValidateUser is used to validate the user credentials, and the rest of the implementation can be omitted:
public class MyMembershipProvider : MembershipProvider
{
public override bool ValidateUser(string username, string password){
if (username != "joe" ||
password != "bar")
{
return false;
}
return true;
}
}This implementation is quite simple as it only validates the credentials when the username is equal to "Joe" and the password is equal to "bar." It returns false for any other credential and therefore WCF sends an exception back to the client.
Two additional steps are required to configure the membership provider for the service. The custom membership implementation must be registered as a valid provider under the system.web configuration section:
<system.web>
<membership>
<providers>
<add name="MyMembershipProvider" type="Common.MyMembershipProvider, Common"/>
</providers>
</membership>
</system.web>The service must reference this membership provider in the <usernameAuthentication> element:
<serviceBehaviors>
<behavior name="echoClaimsBehavior">
<serviceCredentials>
<serviceCertificate
findValue="CN=WCFServer"
storeLocation="LocalMachine"
storeName="My"
x509FindType="FindBySubjectDistinguishedName"/>
<userNameAuthentication
userNamePasswordValidationMode="MembershipProvider"
membershipProviderName="MyMembershipProvider"/>
</serviceCredentials>
<serviceMetadata httpGetEnabled="true"/>
</behavior>
</serviceBehaviors>The last variant involves the implementation of a custom UsernamePasswordValidator class for validating the user credentials against a custom identity store.
As you already saw, a custom username validator must derive from the base class UserNamePasswordValidator and provide the implementation for the method Validate as is shown in Listing 8-4.
Example 8.4. Custom UserNamePasswordValidator Implementation
public class MyUserNamePasswordValidator : UserNamePasswordValidator
{
public override void Validate(string userName, string password)
{
if (userName != "joe" || password != "bar")
throw new SecurityTokenValidationException("The user could not
be authenticated");
}
}The implementation of the custom validator used here is the same one used for the MembershipProvider, except it validates the credentials when the username is equal to "joe" and the password is equal to "bar". It throws an exception for any other credential.
The configuration for the custom validator in the <system.ServiceModel> section is quite straightforward. The service configuration must reference this implementation type in the <usernameAuthentication> element, and the userNamePasswordValidationMode must be set to "Custom":
<serviceBehaviors>
<behavior name="echoClaimsBehavior">
<serviceCredentials>
<serviceCertificate
findValue="CN=WCFServer"
storeLocation="LocalMachine"
storeName="My"
x509FindType="FindBySubjectDistinguishedName"/>
<userNameAuthentication
userNamePasswordValidationMode="Custom"
customUserNamePasswordValidatorType=
"Common.MyCustomUsernamePasswordValidator, Common"/>
</serviceCredentials>
<serviceMetadata httpGetEnabled="true"/>
</behavior>Username authentication over transport security is another classic example of direct authentication. The client provides credentials in the form of a username and password during the request to the service using any built-in transport authentication mechanism, such as basic authentication. The service can then validate or authenticate the credentials against an identity store without using a third party or authentication broker. In addition, all the messages and credentials exchanged between the client and service are protected with security mechanisms provided by the transport, such as SSL/TLS.
In case of SSL, the service credentials (the X509 certificate) are always transmitted to the client during the SSL handshake when the connection is established, and before any message is sent by the client to service.
The first WCF version did not include a way to validate the user credentials against a custom identity store — the credentials were always validated against the Windows account store. Version 3.5 introduced improvements in this aspect, allowing the configuration of the custom userNamePasswordValidator to change this default behavior when the services are not hosted in IIS.
Plugging a custom extension to validate the credentials against a custom identity store for IIS-hosted services can be accomplished by means of an extension at IIS level — such as a custom ASP.NET module or a WCF custom channel that emulates Basic Authentication. These alternatives are not addressed in detail in this book.
The next example is based on a service hosted in IIS that uses SSL for transport security and Basic Authentication to authenticate the clients. The client and service implementations are the same as for message authentication.
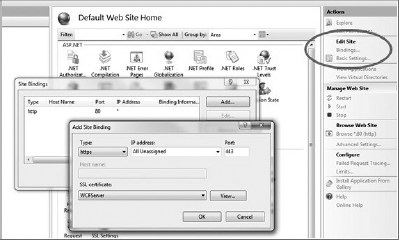
Go to the Internet Information Services (IIS) Manager and configure a server certificate under the Bindings configuration of the default web site, as shown in Figure 8-2. (You can use the certificate created by the script included with the samples, WCFServer.)
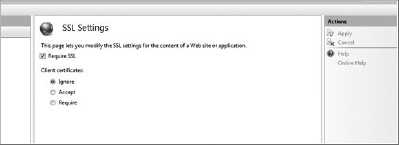
Then configure the default web site to require SSL under the SSL settings properties. (See Figure 8-3.)
After SSL is configured for the default web site, you are ready to create a virtual directory to host the services. The virtual directory must also be configured for Basic Authentication as it will be the authentication mechanism that you use for authenticating the clients in the service. (See Figure 8-4.)
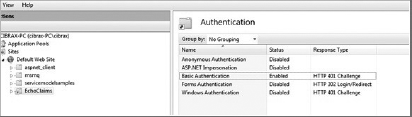
That can be accomplished in the authentication options of the virtual directory properties. (You also need to disable anonymous authentication for the virtual directory, which is the default option when a new virtual directory is created.)
In this step you configure the service host to expose the EchoService service using a wsHttpBinding (as the service uses Http) with basic authentication over transport security.
Add the service description with the corresponding endpoint to the
system.ServiceModelconfiguration section:<system.serviceModel> <services> <service name="WCFBook.Samples.EchoClaims" behaviorConfiguration="echoClaimsBehavior"> <endpoint address="EchoClaims" contract="WCFBook.Samples.IEchoClaims" binding="wsHttpBinding" bindingConfiguration="echoClaimsBinding"></endpoint> </service> </services>Configure the
WsHttpBindingto use transport security with Basic Authentication:<bindings> <wsHttpBinding> <binding name="echoClaimsBinding"> <security mode="Transport"> <transport clientCredentialType="Basic"/> </security> </binding> </wsHttpBinding> </bindings>
The last step is to configure the client application to use the same security settings as you configured on the service side. That is, a client endpoint that uses WsHttpBinding with basic authentication over transport security.
Add the client endpoint to the
system.ServiceModelconfiguration section:<client> <endpoint address="http://localhost:8000/EchoClaims" binding="wsHttpBinding" bindingConfiguration="echoClaimsBinding" contract="EchoClaimsReference.IEchoClaims" name="WSHttpBinding_IEchoClaims" behaviorConfiguration="echoClaimsBehavior"> <identity> <dns value="WCFServer"/> </identity> </endpoint> </client>The endpoint identity must match the certificate configured on the service side; otherwise WCF throws an exception at the moment of authenticating the service.
Configure the
WsHttpBindingto use transport security with Basic Authentication:<bindings> <wsHttpBinding> <binding name="echoClaimsBinding"> <security mode="Transport"> <transport clientCredentialType="Basic"/> </security> </binding> </wsHttpBinding> </bindings>As you use test certificates, skip the X509 certificate validations performed by WCF at the moment of authenticating the service credentials. This step is optional if you are using X509 certificates obtained from a trusted certificate authority:
<behaviors> <endpointBehaviors> <behavior name="echoClaimsBehavior"> <clientCredentials> <serviceCertificate> <authentication certificateValidationMode="None" revocationMode="NoCheck"/> </serviceCertificate> </clientCredentials> </behavior> </endpointBehaviors> </behaviors>
Mutual X509 certificate authentication is typical of what is called brokered authentication, as the service trusts the client based on credentials issued by a third party — the authentication broker.
In this scenario, the client provides authentication credentials in the form of X509 certificates issued by a certificate authority (CA) in a public key infrastructure (PKI). The client application attaches the public key of the client's X509 certificate to the request message (or a reference to that certificate), and digitally signs the message with the client's private key. When the service receives the message, it verifies that the message signature is valid using the attached public key, and optionally performs additional validations to ensure that the X509 certificate provided by the client has not expired and was issued by a CA it trusts. The client is authenticated when all these validations pass successfully. (See Figure 8-5.)
The main characteristics of X509 mutual authentication are summarized in the following list:
The credentials presented to the service by the client are based on X509 certificates. This means that a PKI infrastructure is required to issue certificates for any service client.
The trust relationship between clients and services is established by means of an intermediary, the certificate issuer authority.
As it happens with any authentication mechanism based on message security, the client passes the credentials to the service as part of a secure message exchange. The messages in this case are protected using an X509 certificate provided by the service. This certificate also works as a mechanism for the client to authenticate the service as part of the mutual authentication process. The service credentials (the X509 certificate) can be transmitted to the client during the first message exchange or by using an out-of-band mechanism according to the value of the negotiateServiceCredential setting.
The strategy for authenticating X509 certificates is implemented in WCF through the abstract class System.IdentityModel.Selectors.X509CertificateValidator in the System.IdentityModel.Selectors assembly:
public abstract class X509CertificateValidator
{
public abstract void Validate(X509Certificate2 certificate);
}The X509 certificate received as part of the client credentials are passed by WCF to this class for validation. In case the credentials cannot be validated, it is the responsibility of this class to throw an exception.
WCF ships with four internal implementations of this class:
System.IdentityModel.Selectors.PeerValidatorvalidates the incoming certificates against the certificates installed in the Trusted People certificate folder.System.IdentityModel.Selectors.ChainTrustValidatorvalidates that the incoming certificates were used by a CA with a certificate installed in the CA Trusted certificate folder.System.IdentityModel.Selectors.PerOrChainTrustValidatoris a combination of the first two validators.System.IdentityModel.Selectors.NoneX509CertificateValidatordoesn't validate anything. These four implementations can be accessed through public properties in the baseX509CertificateValidatorclass.
public abstract class X509CertificateValidator
{
public static X509CertificateValidator ChainTrust { get; }
public static X509CertificateValidator None { get; }
public static X509CertificateValidator PeerOrChainTrust { get; }
public static X509CertificateValidator PeerTrust { get; }
}The following code shows a simple implementation of this class that validates the certificate subject name against hardcoded strings:
public class MyX509CertificateValidator : X509CertificateValidator
{
public override void Validate(X509Certificate2 certificate)
{
if (certificate.Subject != "CN=WCFClient")
{
throw new SecurityTokenValidationException(
"The X509 client certificate can not be authenticated");
}
}
}If the certificate subject name is different from CN=WCFClient, it throws an exception so WCF assumes the client could not be authenticated.
The settings for changing the X509 client credentials validation mode WCF are available through the configuration element <clientCertificate/authentication> under the service behavior <serviceCredentials>:
<behaviors>
<serviceBehaviors>
<behavior name="echoClaimsBehavior">
<serviceCredentials>
<clientCertificate><authentication certificateValidationMode=
"None|PerTrust|ChainTrust|PerOrChainTrust|Custom"
revocationMode="NoCheck|Online|Offline"
/>
</clientCertificate>
</serviceCredentials>
</behavior>
</serviceBehaviors>
</behaviors>The setting certificateValidatorMode in the <authentication> element allows changing the mode that WCF uses to authenticate the certificate credentials. None, PerTrust, ChainTrust, or PerChainTrust maps with the internal implementations of the validators that were already discussed. The value Custom allows configuring a custom implementation of X509CertificateValidator in case you want to provide something not supported by the other options. (The MyX509CertificatePasswordValidation implementation is an example of a custom implementation.)
Based on the value you chose for this setting, you will need to provide additional values for other related settings.
The validation modes PerTrust, ChainTrust, and PerChainTrust support two optional settings:
TrustedStoreLocation:Specifies the location of a trusted certificate folder. The only two possible values for this setting areCurrentUser, for the store used by the current user orLocalMachine, for the store assigned to the machine.RevocationMode:Specifies how the validators will check that the certificates are not revoked. This validation is performed by checking that the certificate is not in the certificate revocation list. The possible values for settings areOnline, for checking against the online certificate revocation list,Offline, for using a cached revocation list, orNoCheck, for turning off this validation:<serviceCredentials> <clientCertificate> <authentication certificateValidationMode="PerTrust" trustedStoreLocation="LocalMachine|CurrentUser" revocationMode="NoCheck|Online|Offline"/> </clientCertificate> </serviceCredentials>
And finally, the validation mode Custom requires the setting customCertificateValidatorType to specify the .NET type of the custom validator implementation:
<serviceBehaviors>
<behavior name="echoClaimsBehavior">
<serviceCredentials>
<clientCertificate>
<authentication certificateValidationMode="Custom"
customCertificateValidatorType=
"WCFBook.Samples.MyX509CertificateValidator, MyAssembly"
/>
</clientCertificate></serviceCredentials>
</behavior>
</serviceBehaviors>The X509 certificate used to protect the communication must be configured by using the <serviceCertificate> element within the <serviceCredentials> behavior as is shown in this configuration fragment:
<serviceBehaviors>
<behavior name="echoClaimsBehavior">
<serviceCredentials>
<serviceCertificate
findValue="CN=WCFServer"
storeLocation="LocalMachine"
storeName="My"
x509FindType="FindBySubjectDistinguishedName"/>
<clientCertificate>
<authentication certificateValidationMode="None"/>
</clientCertificate>
</serviceCredentials>
<serviceMetadata httpGetEnabled="true"/>
</behavior>
</serviceBehaviors>The instructions for referencing a certificate in this section are the same as seen in the username authentication scenario.
If you decide to buy certificates from a well-known certificate authority such as Verisign, Thawte, or Comodo, make sure that the certificates contain the following attributes:
KeyUsage: Digital Signature, Non-Repudiation, Key Encipherment, Data Encipherment (f0) Enhanced Key Usage: Client Authentication (1.3.6.1.5.5.7.3.2)
Most SSL certificates meet these requirements, so it might be a good idea to stick to a SSL in case you are not sure.
It is time now to walk through a complete example for a service that authenticates the certificates using a custom validator, and returns the claims of the authenticated certificate.
The service implementation for this sample is quite simple: it basically returns the claims passed by WCF in the security context as a list of strings. (See Listing 8-5.)
Example 8.5. Service Implementation
namespace WCFBook.Samples
{
[ServiceContract()]
public interface IEchoClaims{
[OperationContract]
List<string> Echo();
}
}
public class EchoClaims : IEchoClaims
{
public List<string> Echo()
{
List<string> claims = new List<string>();
foreach (ClaimSet set in
OperationContext.Current
.ServiceSecurityContext
.AuthorizationContext
.ClaimSets)
{
foreach (Claim claim in set)
{
claims.Add(string.Format("{0} - {1} - {2}",
claim.ClaimType,
claim.Resource.ToString(),
claim.Right));
}
}
return claims;
}
}The service is hosted in a console application using the http transport (see Listing 8-6).
Example 8.6. Service Host Implementation
class Program
{
static void Main(string[] args)
{
ServiceHost host = new ServiceHost(typeof(EchoClaims),
new Uri("http://localhost:8000"));
try
{
host.Open();
Console.WriteLine("Service running....");
Console.WriteLine("Press a key to quit");
Console.ReadKey();
}finally
{
host.Close();
}
}
}In this step you need to configure the service host to expose the EchoService service using a wsHttpBinding (as the service uses http) with certificate authentication over message security.
Add the service description with the corresponding endpoint to the
system.ServiceModelconfiguration section:<system.serviceModel> <services> <service name="WCFBook.Samples.EchoClaims" behaviorConfiguration="echoClaimsBehavior"> <endpoint address="EchoClaims" contract="WCFBook.Samples.IEchoClaims" binding="wsHttpBinding" bindingConfiguration="echoClaimsBinding"></endpoint> </service> </services>Configure the
wsHttpBindingto use message security with certificate authentication:<bindings> <wsHttpBinding> <binding name="echoClaimsBinding"> <security mode="Message"> <message clientCredentialType="Certificate" negotiateServiceCredential="true"/> </security> </binding> </wsHttpBinding> </bindings>The service credentials are automatically negotiated, so the client application does not need to install it using an out-of-band mechanism.
Configure the
serviceBehaviorwith the service certificate and the certificate authentication mode:<behavior name="echoClaimsBehavior"> <serviceCredentials> <serviceCertificate findValue="CN=WCFServer" storeLocation="LocalMachine" storeName="My" x509FindType="FindBySubjectDistinguishedName"/><clientCertificate> <authentication certificateValidationMode="Custom" customCertificateValidatorType= "WCFBook.Samples.MyX509CertificateValidator, Common" /> </clientCertificate> </serviceCredentials> <serviceMetadata httpGetEnabled="true"/> </behavior>
The service authenticates the client certificates using a custom validator implementation provided in the type WCFBook.Samples.MyX509CertificateValidator.
The X509 certificate CN=WCFServer is a test certificate created for this sample using the makecert.exe tool. A script SetupCerts.bat has been included with the samples to automatically create and register the X509 certificates in the Windows certificate store. Make sure to run this script before playing with the samples.
As already seen, a custom certificate validator must derive from the base class X509CertificateValidator and provide the implementation for the method Validate as shown in Listing 8-7.
Example 8.7. Custom X509CertificateValidator Implementation
public override void Validate(X509Certificate2 certificate)
{
if (certificate.Subject != "CN=WCFClient")
{
throw new SecurityTokenValidationException(
"The X509 client certificate can not be authenticated");
}
}The implementation of the custom validator only checks the certificate subject name. It throws an exception for any certificate that does not match the subject name CN=WCFClient.
The client application is a basic console application that calls the service to obtain the user claims. The client credentials in this case are specified through the configuration file (see Listing 8-8).
Example 8.8. Client Application Implementation
static void Main(string[] args)
{
EchoClaimsReference.EchoClaimsClient client = newClient.EchoClaimsReference.EchoClaimsClient();
try
{
string[] claims = client.Echo();
foreach (string claim in claims)
{
Console.WriteLine(claim);
}
}
catch (TimeoutException exception)
{
Console.WriteLine("Got {0}", exception.GetType());
client.Abort();
}
catch (CommunicationException exception)
{
Console.WriteLine("Got {0}", exception.GetType());
client.Abort();
}
}In case you decide to initialize the client credentials through code, the ClientCredentials property of the channel contains a method SetCertificate that becomes handy for this purpose:
client.ClientCredentials.ClientCertificate.SetCertificate(
StoreLocation.LocalMachine,
StoreName.My,
X509FindType.FindBySubjectDistinguishedName,
"CN=WCFClient");The last step is to configure the client application to use the same security settings configured on the service side. That is, a client endpoint that uses wsHttpBinding with certificate authentication over message security.
Add the client endpoint to the
system.ServiceModelconfiguration section:<client> <endpoint address="http://localhost:8000/EchoClaims" binding="wsHttpBinding" bindingConfiguration="echoClaimsBinding" contract="EchoClaimsReference.IEchoClaims" name="WSHttpBinding_IEchoClaims" behaviorConfiguration="echoClaimsBehavior"> <identity> <dns value="WCFServer"/> </identity> </endpoint> </client>The endpoint identity must match the certificate configured on the service side; otherwise WCF will throw an exception at the moment of authenticating the service.
Configure
WsHttpBindingto use message security with certificate authentication:<bindings> <wsHttpBinding> <binding name="echoClaimsBinding"> <security mode="Message"> <message clientCredentialType="Certificate" negotiateServiceCredential="true"/> </security> </binding> </wsHttpBinding> </bindings>As you use test certificates, you need to skip the X509 certificate validations performed by WCF at the moment of authenticating the service credentials. This step is optional if you are using X509 certificates obtained from a trusted certificate authority:
<behaviors> <endpointBehaviors> <behavior name="echoClaimsBehavior"> <clientCredentials> <serviceCertificate> <authentication certificateValidationMode="None" revocationMode="NoCheck"/> </serviceCertificate> </clientCredentials> </behavior> </endpointBehaviors> </behaviors>
Kerberos authentication is another example of brokered authentication, where the service trusts the client based on certain credentials (a Kerberos ticket) issued by a third party.
In this scenario, the client provides authentication credentials in the form of a Kerberos ticket issued by a Kerberos Key Distribution Center (KDC).
Describing how Kerberos works in detail is beyond the scope of this book. However, it is important to understand that the client must be first authenticated against the broker, the KDC, and have access to a Kerberos ticket before it can request access to a service.
When Kerberos authentication is used, the client application requests a service ticket from a KDC for communicating with a specific service. The KDC creates a new session key and service ticket on behalf of the client's request. The ticket is encrypted with a key that is only known by the service (the service's master key). After the client receives the ticket and the session key, it uses both to create a Kerberos security token that will be included as the client credentials in the request message to the service. The session key is not included in the token, it is only included in the service ticket, which is what the service uses to validate the token.
The client protects the request message (signs and optionally encrypts the message) for the service using the session key, and includes the Kerberos token as client credentials. The service receives the request message, uses its master key to decrypt the service ticket found in the security token, and retrieves the session key. The session key is used to verify the message signature and optionally decrypts the message. Optionally, the service returns a response to the client. To provide mutual authentication in this scenario, the response should contain information that is encrypted with the session key to prove to the client that the service knows the session key.
The main characteristics of Kerberos authentication are summarized in the following list:
Kerberos provides SSO capabilities, which allow a client to authenticate only once per logon session.
As Kerberos is closely integrated with the Windows operating system, this enables the operating system to provide additional capabilities, such as impersonation and delegation.
Kerberos supports mutual authentication without needing X509 certificates. The service only needs to send a response that contains data encrypted with the shared session key to prove its identity to the client.
The client and the service must both be in the same Active Directory forest to use Kerberos, which is typically only valid for intranet scenarios.
Kerberos requires that the KDC be available at all times. If the KDC fails, the clients will not be able to establish a trust relationship with the services.
The negotiateServiceCredential setting works slightly differently in Kerberos compared to the rest of authentication schemas that use X509 certificates as service credentials. When this setting is set to false, the account running the service process must be associated with a Kerberos service principal name (SPN). To accomplish this, the service should run under the network service account or local system account. Alternatively, a SPN should be associated to the account using the SetSpn.exe tool. In either case, the client must specify the correct SPN in the endpoint identity as in the next sample:
<client>
<endpoint address="http://localhost:8000/EchoClaims"
binding="wsHttpBinding"
bindingConfiguration="echoClaimsBinding"
contract="EchoClaimsReference.IEchoClaims"
name="WSHttpBinding_IEchoClaims"
behaviorConfiguration="echoClaimsBehavior">
<identity>
<servicePrincipalName value="HOST/MyMachine"/>
</identity>
</endpoint>
</client>Kerberos authentication does not provide any kind of high-level class to validate the received credentials you have with Username and Certificate. The validation can be done, but at a much deeper level in the WCF stack with a custom SecurityTokenAuthenticator — this kind of extensibility point is not discussed in this chapter.
Let's walk through a complete example for a service that authenticates clients using Kerberos, and returns after the claims are extracted from the WCF security context.
The service implementation for this sample is quite simple: it basically returns the claims passed by WCF in the security context as a list of strings. (See Listing 8-9.)
Example 8.9. Service Implementation
namespace WCFBook.Samples
{
[ServiceContract()]
public interface IEchoClaims
{
[OperationContract]
List<string> Echo();
}
}
public class EchoClaims : IEchoClaims
{
public List<string> Echo()
{
List<string> claims = new List<string>();
foreach (ClaimSet set in
OperationContext.Current
.ServiceSecurityContext
.AuthorizationContext
.ClaimSets)
{
foreach (Claim claim in set)
{
claims.Add(string.Format("{0} - {1} - {2}",
claim.ClaimType,
claim.Resource.ToString(),
claim.Right));
}
}
return claims;
}
}The service is hosted in a console application using the http transport. (See Listing 8-10.)
Example 8.10. Service Host Implementation
class Program
{
static void Main(string[] args)
{
ServiceHost host = new ServiceHost(typeof(EchoClaims),
new Uri("http://localhost:8000"));
try
    {
      host.Open();

      Console.WriteLine("Service running....");
      Console.WriteLine("Press a key to quit");
      Console.ReadKey();
    }
    finally
    {
      host.Close();
    }
  }
}In this step you need to configure the service host to expose the EchoService service using a wsHttpBinding (as the service uses Http) with Windows authentication over message security.
Add the service description with the corresponding endpoint to the
system.ServiceModelconfiguration section:<system.serviceModel> <services> <service name="WCFBook.Samples.EchoClaims" behaviorConfiguration="echoClaimsBehavior"> <endpoint address="EchoClaims" contract="WCFBook.Samples.IEchoClaims" binding="wsHttpBinding" bindingConfiguration="echoClaimsBinding"></endpoint> </service> </services>Configure the
wsHttpBindingto use message security with Windows authentication:<bindings> <wsHttpBinding> <binding name="echoClaimsBinding"> <security mode="Message"> <message clientCredentialType="Windows" negotiateServiceCredential="true"/></security> </binding> </wsHttpBinding> </bindings>
The service credentials are automatically negotiated, so the client application does not need to manually configure the service SPN.
The client application is a basic console application that calls the service to obtain user claims. The client credentials are automatically negotiated from the current Windows logon session. (See Listing 8-11.)
Example 8.11. Client Application Implementation
static void Main(string[] args)
{
EchoClaimsReference.EchoClaimsClient client = new
Client.EchoClaimsReference.EchoClaimsClient();
try
{
        string[] claims = client.Echo();

        foreach (string claim in claims)
        {
            Console.WriteLine(claim);
        }
    }
    catch (TimeoutException exception)
    {
        Console.WriteLine("Got {0}", exception.GetType());
        client.Abort();
    }
    catch (CommunicationException exception)
    {
        Console.WriteLine("Got {0}", exception.GetType());
        client.Abort();
    }
}The last step is to configure the client application to use the same security settings you configure on the service side. That is, a client endpoint that uses wsHttpBinding with Windows authentication over message security.
Add the client endpoint to the
system.ServiceModelconfiguration section:<client> <endpoint address="http://localhost:8000/EchoClaims" binding="wsHttpBinding"bindingConfiguration="echoClaimsBinding" contract="EchoClaimsReference.IEchoClaims" name="WSHttpBinding_IEchoClaims" behaviorConfiguration="echoClaimsBehavior"> </endpoint> </client>The endpoint identity is not required as it is automatically negotiated.
Configure the
wsHttpBindingto use message security with Windows authentication:<bindings> <wsHttpBinding> <binding name="echoClaimsBinding"> <security mode="Message"> <message clientCredentialType="Windows" negotiateServiceCredential="true"/> </security> </binding> </wsHttpBinding> </bindings>
As discussed in the previous "Claims-Based Identity Model" section, WCF converts every successfully authenticated security token into a set of claims that are passed to the service through the security context.
One of the problems with this approach is that services often require domain-specific claims about the business context where they are running — such as the user's e-mail address, purchase limits, and user's aliases. Technical claims about the authenticated security tokens are also included, such as the user's SID or the certificate's subject name.
The process of converting existing claims or creating new ones according to the service requirements often receive the name claims transformation. As the WCF operation should deal with claims only, it is easy enough to create new claim sets with the new information using the ClaimSet class. The only thing you need is some kind of extensibility point to perform that transformation before the claims are attached to the operation security context.
Fortunately, WCF provides an extensibility point for that purpose, which receives the name of authorization policies.
The authorization policies are executed by WCF after the internal claims generation is completed (based on the authenticated security tokens), and right before the service operation is executed. Therefore, all the claims associated with the client's credentials are also available in this extension.
A custom authorization policy can be created in WCF by implementing the interface System.IdentityModel.Policy.IAuthorizationPolicy:
public interface IAuthorizationPolicy
{
  string Id { get; }
ClaimSet Issuer { get; }
bool Evaluate(EvaluationContext evaluationContext, ref object state);
}The Id property returns a unique identifier for the policy, which is usually a GUID. Issuer returns a claim set describing the issuer of the claims that the policy creates. The method Evaluate is where the concrete implementation of the policy goes. This last one receives an authorization context while it is still in the process of being built:
public class CustomAuthorizationPolicy : IAuthorizationPolicy
{
  string id = "Custom_" + Guid.NewGuid().ToString();

  public bool Evaluate(EvaluationContext evaluationContext, ref object state)
  {
    bool isFound = false;

    foreach (ClaimSet cs in evaluationContext.ClaimSets)
    {
      foreach (Claim claim in
cs.FindClaims(ClaimTypes.Name, Rights.PossessProperty))
      {
        if (claim.Resource.ToString()
.Equals("joe", StringComparison.InvariantCultureIgnoreCase))
        {
          isFound = true;
          break;
        }
      }
    }

    if (isFound)
    {
      evaluationContext.AddClaimSet(this,
         new DefaultClaimSet(this.Issuer,
              new Claim[] { new Claim("http://myClaimType", "I am joe",
Rights.PossessProperty)     }));
    }

    return true;
  }

  public ClaimSet Issuer
  {
    get { return ClaimSet.System; }
  }

  public string Id
  {
    get { return id; }
  }

}
The previous code shows a common implementation of an authorization policy. That authorization policy basically inspects the received evaluation context to find a specific claim that represents a username equal to "Joe." If the claim is found, a new claim set is added to the context with an application-specific claim http://myClaimType.
An authorization policy is also the right place to plug code into the service security context initialization. Setting a custom security principal in the security context is a good example of things that can be done in an authorization policy:
public class CustomAuthorizationPolicy : IAuthorizationPolicy
{
    string id = "Custom_" + Guid.NewGuid().ToString();

    public bool Evaluate(EvaluationContext evaluationContext, ref object state)
    {
        object obj;
        if (!evaluationContext.Properties.TryGetValue("Identities", out obj))
            return false;

        IList<IIdentity> identities = obj as IList<IIdentity>;
        if (obj == null || identities.Count <= 0)
            return false;

        evaluationContext.Properties["Principal"] =
new GenericPrincipal(identities[0], new string[]{});
        return true;

    }

    public ClaimSet Issuer
    {
        get { return ClaimSet.System; }
    }

    public string Id
    {
        get { return id; }
    }

}
The last thing you need to do is configure the authorization policies in the WCF configuration as part of the <serviceAuthorization> behavior so they are invoked when new requests arrive to the service. You can add one or more policies, and they are invoked in the same order as you add them:
<behaviors>
      <serviceBehaviors>
        <behavior name="echoClaimsBehavior">
          <serviceAuthorization>
            <authorizationPolicies>
              <add policyType="Common.CustomAuthorizationPolicy, Common"/>
            </authorizationPolicies>
</serviceAuthorization>
</behavior>
</serviceBehaviors>
</behaviors>Now that you know how authentication works in WCF, and how the claims are transformed before they get to the service operation, it is a good moment to discuss another interesting aspect about security in WCF — authorization.
WCF provides two mechanisms for implementing authorization in services, a simple and easy-to-use schema based on user roles, and a more complex and powerful schema based on claims. As part of this section, we discuss both schemas in detail and how they can be used to implement robust service authorization.
Role-based authorization is not something new that WCF brings to the scene; it has been available since the beginning in the .NET platform. The idea is that you associate a list of roles with a user, and then at runtime, the service implementation can use that list to take authorization-related decisions. An application can get the roles assigned to the user from different places or stores (such as a database or Azman), or they can be inferred from the Windows groups where the user is a member.
In the .NET world, the user identity and the roles assigned to that identity in a specific context are represented by the interfaces System.Security.IIdentity and System.Security.IPrincipal respectively.
A System.Security.IIdentity implementation class provides information about the name of the user (Name), whether he was authenticated (IsAuthenticated), and how he was authenticated (AuthenticationType):
public interface IIdentity
{
string AuthenticationType { get; }
bool IsAuthenticated { get; }
string Name { get; }
}On the other hand, an implementation of the System.Security.IPrincipal class contains a reference to the user identity (IIdentity) and must provide a method to verify whether the user belongs to a specific role:
public interface IPrincipal
{
bool IsInRole(string role);
IIdentity Identity { get; }
}Some implementations are provided out of the box in the .NET Framework; for example, you can find the System.Security.WindowsIdentity and System.Security.WindowsPrincipal implementations for representing a Windows user, or a more generic implementation for any purpose in the classes System.Security.GenericIdentity and System.Security.GenericPrincipal.
A security principal is typically attached to the currently executing thread in your application. This is through the static property CurrentPrincipal in the System.Threading.Thread class. One part of the application is responsible for initializing that property, so the rest of the application can grab it from there and use it to perform any authorization code.
WCF works in the same way — the <serviceAuthorization> behavior controls the creation of a System.Security.IPrincipal instance and associates it to the thread handling the current request. When the clients have been Windows authenticated, WCF tries to populate the Thread.CurrentPrincipal with a Windows principal. With other authentication types, you have a choice between getting the roles from an ASP.NET role provider and implementing a custom authorization policy to provide a principal implementation (a generic principal in most cases).
In addition to the method IsInRole available in the user principal to perform role-based security checks, there is an attribute PermissionAttribute that allows you to annotate your service operations with role requirements. When this attribute is set for a specific operation, the security subsystem in the .NET CLR checks whether the principal attached to the current thread meets the requirements specified in the attribute. If the requirements are not met, a SecurityException is thrown prior to executing the service operation. WCF catches and converts this exception into an Access Denied fault before returning a response to the client.
The following code snippets show authorization code using the PrincipalPermission attribute, and the equivalent version using the Principal.IsInRole method:
public class Service : IService
{
[PrincipalPermission(SecurityAction.Demand, Role = "Administrators")]
public string DoOperation() {
{
return ...;
}
}
public class Service : IService
{
public string DoOperation() {
{
if (Thread.CurrentPrincipal.IsInRole("Administrators"))
{
return ...
}
else
{
throw new SecurityException();
}
}
}As you can see, the use of the System.Security.PrincipalPermission attribute requires that you hardcode any possible group names when the service operation is being developed.
WCF provides the flexibility of using an existing ASP.NET role provider to retrieve the roles for a user when the principal instance is created. The strategy for using an ASP.NET role provider is very similar to what we saw for ASP.NET membership in authentication. You can use one of the built-in providers such as the role provider for SQL server (System.Web.Security.SqlRoleProvider), the role provider for Azman (System.Web.Security.AuthorizationStoreRoleProvider) or the Windows role provider (System.Web.Security.WindowsTokenRoleProvider), or develop your own provider by deriving from the base class System.Web.Security.RoleProvider.
When WCF is configured to use a role provider, the <serviceAuthorization> behavior attaches an instance of the class System.ServiceModel.Security.RoleProviderPrincipal to the executing thread. This class basically wraps an instance of the configured role provider, and forwards any call to the method IsInRole to the method IsUserInRole of the inner role provider.
Therefore, any role provider that you want to use with WCF must implement the method IsUserInRole:
public class MyCustomRoleProvider : RoleProvider
{
public override string[] GetRolesForUser(string username)
{
if (username == "joe")
{
return new string[] { "administrators" };
}
else
{
return new string[] { "users" };
}
}
public override bool IsUserInRole(string username, string roleName)
{
return GetRolesForUser(username).Contains(roleName);
}
#region Omitted
#endregion
}And the corresponding WCF configuration for using that custom role provider is shown here:
<behaviors>
<serviceBehaviors>
<behavior name="echoClaimsBehavior">
<serviceAuthorization
principalPermissionMode="UseAspNetRoles"roleProviderName="MyRoleProvider"/>
</behavior>
</serviceBehaviors>
</behaviors>
<system.web>
<roleManager enabled="true">
<providers>
<add name="MyRoleProvider" type="Common.MyCustomRoleProvider, Common"/>
</providers>
</roleManager>
</system.web>In case you decide to use a custom principal implementation, WCF gives you the chance to attach a custom principal in an authorization policy when the security context is initialized, as discussed in the "Claims Transformation and Security Context Initialization" section.
After you implement a custom authorization policy to attach the principal to the security context, the principalPermissionMode in the serviceAuthorization behavior has to be set to Custom to instruct WCF to load the principal into the Thread.CurrentPrincipal property as well:
<behaviors>
<serviceBehaviors>
<behavior name="echoClaimsBehavior">
<serviceAuthorization
principalPermissionMode="Custom">
<authorizationPolicies>
<add policyType="Common.CustomAuthorizationPolicy, Common"/>
</authorizationPolicies>
</serviceAuthorization>
        </behavior>
      </serviceBehaviors>

</behaviors>You know that WCF passes the claims associated to the authenticated credentials, and the claims created in the custom authorization policies as part of the security context to the operation. Therefore, you can use all the flexibility that claims provide to represent identity information or individual rights to implement authorization code in the service operations.
All the claim sets that were generated prior to the service operation execution are available in WCF through the authorization context.
WCF provides access to the authorization context via the thread-static ServiceSecurityContext, which represents a container for claim sets, authorization policies, and current user identities:
public class ServiceSecurityContext
{
    public AuthorizationContext AuthorizationContext { get; }
public ReadOnlyCollection<IAuthorizationPolicy> AuthorizationPolicies { get; }
public static ServiceSecurityContext Current { get; }
public bool IsAnonymous { get; }
public IIdentity PrimaryIdentity { get; }
public WindowsIdentity WindowsIdentity { get; }
}The service operation can simply enumerate the claim sets received as part of the authorization context to verify whether the user has permissions to execute an action or not:
public class Service : IService
{
    public void DoAction()
    {
        bool isFound = false;

        foreach (ClaimSet cs in OperationContext
            .Current
            .ServiceSecurityContext
            .AuthorizationContext
            .ClaimSets)
        {
            foreach (Claim claim in cs.FindClaims("urn:Group",
Rights.PossessProperty))
            {
                if (claim.Resource.ToString().Equals("administrator",
StringComparison.InvariantCultureIgnoreCase))
                {
                    isFound = true;
                    break;
                }
            }
        }

        if (!isFound)
        {
            throw new SecurityException("You are not authorized");
        }

    }

}
In the previous example, the service operation looks for an specific claim "urn:Group" with a resource value equal to "administrator". If that claim is not found, an exception is thrown as the user does not have permission to execute the operation.
You have seen so far how to use the user roles or claims in the service operation to implement authorization logic. However, in some cases, you might want to centralize all that authorization logic into one place and use it for every incoming request — without spreading it over all the service operations.
For that purpose, WCF provides a specific extensibility point known as the authorization manager. A service authorization manager is a class that derives from System.ServiceModel.ServiceAuthorizationManager and overrides the protected method CheckAccessCore to run custom authorization code for each request:
public class ServiceAuthorizationManager
{
    public virtual bool CheckAccess(OperationContext operationContext);
    public virtual bool CheckAccess(OperationContext operationContext,
ref Message message);

    protected virtual bool CheckAccessCore(OperationContext operationContext);

    protected virtual ReadOnlyCollection<IAuthorizationPolicy>
GetAuthorizationPolicies(OperationContext operationContext);
}
You can override any of the virtual methods in this class; however, WCF always calls the CheckAccessCore method.
That method receives the WCF operation context as an argument, so your authorization logic can either inspect the incoming message or the user authentication claims for enforcing authorization logic (or roles if you want to use role-based authorization logic). The result of the authorization logic is returned in that method, "true" when access is granted and "false" when it is denied.
The following code example uses the authentication claims to make an authorization decision:
public class MyAuthorizationManager : ServiceAuthorizationManager
{
    protected override bool CheckAccessCore(OperationContext operationContext)
    {
        bool isFound = false;

        foreach (ClaimSet cs in OperationContext
            .Current
            .ServiceSecurityContext
            .AuthorizationContext
            .ClaimSets)
        {
            foreach (Claim claim in
cs.FindClaims("urn:Group", Rights.PossessProperty))
            {
                if (claim.Resource.ToString().Equals("administrators",
StringComparison.InvariantCultureIgnoreCase))
                {
                    isFound = true;
                    break;
                }
            }
        }

        if (!isFound)
        {
return false;
}
return true;
}
}A custom authorization manager implementation can be configured in WCF using the serviceAuthorizationManagerType attribute in the <serviceAuthorization> behavior:
<behaviors>
  <serviceBehaviors>
    <behavior name="serviceBehavior">
      <serviceAuthorization
            serviceAuthorizationManagerType=
"Common.MyAuthorizationManager, Common"/>
    </behavior>
  </serviceBehaviors>

</behaviors>
Although using some information in the message content (SOAP body) is not recommended for performance reasons, you should keep in mind that messages in WCF are always read once. That means that you have to create a copy first before reading the content. That can be accomplished using the following code (not recommended for large or streamed messages):
MessageBuffer buffer = operationContext
                .RequestContext
                .RequestMessage
                .CreateBufferedCopy(int.MaxValue);