
WHAT'S IN THIS CHAPTER?
Understanding bindings
Defining addresses
Applying behaviors
Creating your own bindings
Windows Communication Foundation (WCF) provides a programming framework that abstracts out the complexities of creating services. It does this for nearly every element of the service and bindings is probably one of the most important areas. This allows you as the programmer to concentrate on the problem at hand, and not worry about how to create architecture that allows your system to work. The foundation is there already.
To define a service endpoint (as described in previous chapters), you must implement the ABCs of WCF. This stands for Address, Binding, and Contract — or the Where, How, and What of a service.
The Address is where the service is hosted, either for the service as a reference, or so the client knows where to send the message.
The Binding is the how of the services, and defines how the messages are sent and received.
The Contract is the definition of what the message contains. There are many types of contracts described in depth in Chapter 2.
The ABCs make up an endpoint in WCF. They need to be set for both the client and the service.
Bindings incorporate three main areas:
Transport protocol — The protocol to use. Examples are Http and TCP.
Encoding format — The details of how to encode the message as it goes down the wire, such as plain text, binary, and so on.
Other messaging protocol details — Used for the communication channel. This could be reliable messaging requirements or security requirements such as SOAP message.
A binding is actually a group of binding elements; each element is responsible for different things, such as message encoding or security (see later in this chapter for a full list of WCF binding elements). The WCF pre-configured bindings bring groups of binding elements together to address common scenarios that developers need, which abstract out the common scenarios to bring together defined standards. Each channel within the binding is part of the overall communication. This allows for re-use within WCF and allows you to create your own binding using pre-configured elements that already exist. You can use one of the many pre-defined bindings provided for you by the WCF framework, which try to address many different scenarios that are commonly used at the time. If the binding that is provided by the framework doesn't quite address your specific needs, you have a few options.
First you can tweak one of the pre-defined bindings that closely match your needs by setting one of the many binding properties. You can also define your own binding by selecting existing binding elements and creating a group of binding elements.
For the most part, you will be able to use one of the default WCF bindings. This speeds up development time immensely, as you don't have to write code to transport messages over the wire. You are able to define the ABCs and then everything is taken care of for you. Due to having these binding implementations set for you by WCF, you can have multiple endpoints with different bindings. This is a fundamental part of WCF — interoperability. So your same service method could implement several different protocols and transport options. This allows you to quickly expose your service to any kind of client that needs to access it. You could use a .NET-specific binding to communicate with .NET clients to take advantage of the built-in WCF security and performance capabilities. However, you can also expose your service using WS-* standards for Java, PHP, or any compatible clients that implement the specifications. Otherwise you can use a binding that allows web clients to connect to your service with a simplified interface already known as a REST (Representational State Transfer) interface. This also allows you to quickly swap a binding out, or change a binding to test performance.
Note
With respect to SOA, REST provides an alternative way to allow operations on a remote resource. Working with REST is treated in more detail in Chapter 4.
When choosing the best binding and properties for a solution you can create multiple endpoints with a range of different endpoint and configuration options. This means you can run performance tests for the response time of each binding. The logic/contract and business logic are all the same, only the binding config differs. This means you are literally just changing the transport. Doing this without WCF would mean learning .NET remoting and ASMX web services and all the things in between. Then you'd have to implement each of them and host them all in different ways before testing them. If you want a range of these implemented on your production servers, you would again need it to be deployed differently depending on the technology. It's easy to see the benefits of WCF for all the SOA scenarios.
As previously described, WCF allows sending and receiving messages by using different kinds of transport protocols. To establish how your service communicates with the external world, you can also decide the message encoding (text, binary, or Mtom) or the standards protocols to enable interoperable, secure, and reliable communication. The binding is the key element of the WCF architecture. It allows you to specify how the message is handled before the specific service implementation on the service provider side, or after the client implementation on the consumer side.
A binding is composed of a set of binding elements. This is explained in more depth next in this chapter. Here it is sufficient to know that each binding element corresponds to the transport and to the protocol channels located in something known as the channel stack. The channel stack is the sequence of channels that a message passes through to the runtime execution.
The type and order of binding elements are important. They determine the execution of the channels within the service runtime, as shown in Figure 3-1.

Note that the transport element and the encoding element have to be the first and second element specified because they enable the correct communication between the channels. In fact, when a message arrives, it is received by a transport channel (e.g., a TCP channel that listens on a predefined port), and is then passed to the encoding channel. Finally it is passed to all other protocol channels defined in the binding via binding elements. This is an important thing to keep in mind when configuring and using a binding.
It is also possible to implement custom channels to achieve an unsupported scenario, but rarely do you need to create, for example, your custom transport in place of Http or TCP protocol. You do need to know that you can do it and that WCF offers you this great level of flexibility.
All these things are addressed in this chapter, but first, a concept should be clarified — what the address and the behaviors are and how they can be used in the WCF architecture.
The address is the first of the ABCs. Each endpoint must have a unique address; this is the location of the service. It can be any type of address, IP address, server name, URL, etc. You need an address to know where the service is hosted, similar to the URL of a web site. It contains a lot of the necessary information needed to connect to the service within the address itself. An address is composed of the following parts:
Transport scheme — Beginning part of the address that sets the protocol the service uses.
Server location — Actual address or location of the server where the service is hosted. This can be local to your network (
http://localserver/), or across the Web (http://www.webserver.comorhttp://216.239.59.104).Port — Can be specified if you are not using the default port for that protocol.
Path — The relative location of the resource on the server; if the resource filename is not specified, the server could return the default file.
The format of the address would be this:
scheme://SERVERLOCATION[:port]/path/subpath
A simple example would be this:
http://myserver.com/service
From this address you can see that the transport scheme is Http; the server location is myserver.com; and no port was specified, meaning that it would use the default port for Http, which is 80; and the path is /service. Table 3-1 shows a set of examples for each available transport protocol.
Table 3.1. WCF Address Examples per Transport Protocol
TRANSPORT PROTOCOL | EXAMPLE ADDRESS |
|---|---|
Http |
|
Http (Secure) |
|
TCP Peer network |
|
IPC (Inter-process communication over named pipes) |
|
MSMQ (Microsoft Message Queue) |
|
WCF allows you to communicate with clients over any protocol you wish. Unlike ASMX web services, which were just over Http, you now have a choice depending on your client.
Http: This is the chosen protocol for communication over the Web, and allows you to integrate your service with open standards, allowing you to serve clients on many different architectures.
TCP: A fast binary format protocol. It allows for high-performance communication in WCF-to-WCF, where it is the best choice in intranet scenarios.
Named pipes: This transport allows a fast, reliable communication between the client and the service when run on the same machine. It works only WCF-to-WCF by using a section of shared memory used by the processes.
MSMQ: Microsoft Message Queue allows the queuing of messages and it is very useful in disconnected communications between a client and a service. The net.msmq transport is used when a client wants to enqueue a message that a service can then consume later.
Custom protocol: WCF allows you to communicate over the wire with all previous protocols. On very rare occasions, you may need to define your own protocol.
By applying behaviors to different parts of your system you are able to influence WCF service in regard to things such as Session Management, Concurrency, Throttling, and Transactions. Some of these things can only be applied at certain levels: Service, Endpoint, Operation, and Contract.
Depending on the level, there are different ways you can set up the behaviors. A lot can be done within configuration or within attributes that are provided. But some will have to be implemented within your code itself, although a lot can be done within the configuration.
Behaviors are applied locally on either the clients or services, so they are not exposed in the WSDL for the service.
The [ServiceBehavior] attribute allows you to apply rules and behavior on a service-wide level. At design time, this allows you to control things such as Concurrency, Instancing, Throttling, Transaction, Session Management, and Thread behavior by setting its properties:
AddressFilterMode:This allows you to change the Message Filter. TheAddressFilterModeproperty has three values:Any, Exact, andPrefix. This setting is used by the dispatcher to identify the correct endpoint responsible to handle incoming messages.AutomaticSessionShutdown:This is a Boolean field that stops the server from closing the session when all messages have been processed. By default this istrue;by setting it tofalse, you are able to have control of session lifetime.ConcurrencyMode:This sets if the service can run on one thread or on multiple threads. By default it is set toSingle. Setting to multiple means you must implement thread safety into your service.IgnoreExtensionDataObject:This is a Boolean with afalsedefault. If set totrue, any extra unknown serialization data is not sent with the message.IncludeExceptionDetailInFaults:You have to set this property totrueif you want to get an unhandled exception sent to the client as SOAP fault. This produces a big SOAP message with some internal information (e.g., the stack trace) that a client usually doesn't have to know. Set totrueif you are in a development environment, but set tofalsein a production environment.InstanceContextMode:This property is used to set the lifetime of the service instance. The allowed values arePerSession, PerCall, andSingle. The instance management is treated in more depth in Chapter 4.MaxItemsInObjectGraph:This sets the maximum allowed items in the serialized/deserialized object graph. Sometimes you receive an exception if your objects exceed the maximum number of items that can be serialized or deserialized. Increase this property to match your case.ReleaseServiceInstanceOnTransactionComplete:If this property is set totrue, the service object is released when the active transaction is complete.TransactionAutoCompleteOnSessionClose:Set this property totrueif you want to mark as complete the active transaction when the session is closed by the client without an error.TransactionIsolationLevel:Specify the isolation level enabled on the current object when a transaction is active. The possible values areSerializable, RepeatableRead, ReadCommitted, ReadUncommitted, Snapshot, Chaos, andUnspecified.TransactionTimeout:Sometimes a transaction can take a long time to complete. You can set a timeout after which the transaction is considered aborted and the rollback process is activated.UseSynchronizationContext:This property can be used to specify whether the affinity between the user interface thread and the service is required.ValidateMustUnderstand:This is used to turn off the validation of SOAP Headers that have been marked asMustUnderstand. This is a Boolean field and by default isfalse.
To use the [ServiceBehavior], as with any other attribute in .NET, you can mark the service class and set the appropriate properties — as seen in Listing 3-1.
Example 3.1. Usage of Service Behavior
using System;
using Wrox.CarRentalService.Contracts;

namespace Wrox.CarRentalService.Implementations.Europe
{
    [ServiceBehavior(InstanceContextMode = InstanceContextMode.PerCall)]
    public class CarRentalService : ICarRentalService
    {
        // service operations
    }
}
In this sample code the [ServiceBehaviorAttribute] is used to establish the service instance lifetime by using the PerCall mode. The ServiceBehaviorAttribute is only a special case of service behavior. Indeed, any ServiceBehavior implements a specific interface called IServiceBehavior with the following methods:
AddBindingParameters:Use this method, called only one time for each endpoint, to inspect the current service description and modify the binding parameters according to service behavior needs.ApplyDispatchBehavior:This is the most important method of the interface. You could use it to apply the service behavior logic to the runtime. An example is to set aMessageInspectorto log the incoming and outgoing messages.Validate:As the name implies, this method should be used to check the service description and optionally throw an exception if it doesn't meet the service behavior needs.
Besides the ServiceBehaviorAttribute, there are many other behaviors implementing the IServiceBehavior interface configurable by using both the config file and the programmatic approach. One of the most used behaviors is the ServiceMetadataBehavior that allows you to publish the service metadata.
As demonstrated in the Listing 3-2, in the config file, under the <system.serviceModel> <behaviors> section, you can set the service behaviors you would like to use.
Example 3.2. Enable Metadata Publishing on the Service in Config
<?xml version="1.0" encoding="utf-8" ?>
<configuration>
  <system.serviceModel>
    <services>
      <service name="Wrox.CarRentalService.Implementations.Europe.CarRentalService"
      behaviorConfiguration="CarRentalServiceBehavior">
        <host>
          <baseAddresses>
            <add baseAddress="http://localhost:8000/CarRentalService"/>
          </baseAddresses>
        </host>
        <endpoint address=""
                  contract="Wrox.CarRentalService.Contracts.ICarRentalService"
                  binding="basicHttpBinding">
        </endpoint>
      </service>
    </services>
    <behaviors>
      <serviceBehaviors>
        <behavior name="CarRentalServiceBehavior">
          <serviceMetadata httpGetEnabled="true"/>
        </behavior>
      </serviceBehaviors>
    </behaviors>
  </system.serviceModel>
</configuration>
This sample config enables the publishing of the metadata information about your service by using the ServiceMetadataBehavior. This allows a client to make a request and get a set of information that describes your service in a standard format based on a WSDL (Web Services Description Language) standard specification or a WS-Metadata Exchange. Alternatively you could also use the programmatic approach to set the behaviors, as in Listing 3-3.
Example 3.3. Enable Metadata Publishing on the Service in Code
using Wrox.CarRentalService.Implementations.Europe;
using Wrox.CarRentalService.Contracts;
...

ServiceHost host = new ServiceHost(typeof(CarRentalService));

ServiceMetadataBehavior serviceMetadata =
host.Description.Behaviors.Find<ServiceMetadataBehavior>();
if (serviceMetadata == null)
{
    serviceMetadata = new ServiceMetadataBehavior();
    host.Description.Behaviors.Add(serviceMetadata);
}
serviceMetadata.HttpGetEnabled = true;

BasicHttpBinding binding = new BasicHttpBinding();
host.AddServiceEndpoint(typeof(ICarRentalService),
                        binding,
                        "http://localhost:8080/CarRentalService");
This code checks whether the current ServiceHost instance already has an instance of the ServiceMetadataBehavior. It creates a new one if it does not exist and then sets to true the HttpGetEnabled property, as in the configuration file. Only one instance of the same ServiceBehavior type can exist at the same time for each ServiceDescription.
Note
The ServiceHost is treated in depth in Chapter 14. For now just know that it is used to host and manage the service instance in a .NET application, such as a Windows Service, a WindowsForms, or a Console application.
Using the OperationBehavior attribute you are able to control class methods, which allow you to be more specific with certain areas of your service. The things you are able to control at this level are Transactional, Caller Identity, and Object recycling.
AutoDisposeParameters:This property enables the auto dispose of input, output, and reference parameters. The default value istrue.TransactionAutoComplete:When the transaction is enabled, this property sets the transaction as completed if no errors occur in the current method. Otherwise the transaction is aborted. When this property is set tofalse, you must manually set the transaction as completed or as aborted.TransactionScopeRequired:This property is used to set if a transaction is required for the current method.Impersonation:Sometimes you have the need to execute operations with the caller's identity. Set this property to Required or Allowed, the default value, to meet your requirements.ReleaseInstanceMode:This property allows overriding the value ofInstanceContextModerecycle settings for the service object. The possible values areNone, BeforeCall, AfterCall, andBeforeAndAfterCall.
The OperationBehaviorAttribute allows managing settings that are strictly related with the service operations. You can simply apply the attribute on the operation you want to manage and then set the appropriate properties to obtain the desired behavior, based on the specific needs. See Listing 3-4.
Example 3.4. Define the OperationBehavior on Service Implementation
using System;
using Wrox.CarRentalService.Contracts;

namespace Wrox.CarRentalService.Implementations.Europe
{
    public class CarRentalService : ICarRentalService
    {
        [OperationBehavior(
            AutoDisposeParameters = true,
            Impersonation = ImpersonationOption.NotAllowed,
            ReleaseInstanceMode = ReleaseInstanceMode.None,
            TransactionAutoComplete = true,
            TransactionScopeRequired = false)]
        double CalculatePrice(DateTime pickupDate, DateTime returnDate,
   string pickupLocation, string vehiclePreference)
        {
            // method code here
        }
    }
}
In this sample code, all the properties of the OperationBehaviorAttribute are set with the default values.
Although the service behavior is only usable on the service side, the endpoint behaviors could be used both in services and client side. Some things, such as client credential usage or serializer settings, can be managed by applying the specific behavior to the endpoint. WCF provides a predefined set of behaviors, each of which implements the IEndpointBehavior interface:
AddBindingParameters:Use this method, called only one time for each endpoint, to inspect the current service description and modify the binding parameters according to endpoint behavior needs.ApplyDispatchBehavior:This is the most important method of the interface. You could use it to apply the endpoint behavior logic at the service side.ApplyClientBehavior:On the client side you can use this method to apply the endpoint behavior logic at runtime.Validate:As the name implies, this method should be used to check the service description and optionally throw an exception if it doesn't meet the endpoint behavior needs.
You are able to set the various endpoint behaviors by using the config file, the programmatic approach, or a combination. Unlike ServiceBehaviorAttribute, an Endpoint Behavior can be used on both the client and the service. Another big difference, on the service side, is that the endpoint behavior settings are valid only at endpoint level, while the service behavior settings are valid at service level. By the way, some special implementation may allow only client usage, as in the ClientCredential behavior.
By using the config file, you can specify and configure the endpoint behaviors. For example, on the client side, if you want to indicate the credentials that a client must use when calling the relative endpoint, you can use the ClientCredential behavior. See Listing 3-5.
Example 3.5. Set the ClientCredentials on the Config File
<?xml version="1.0" encoding="utf-8" ?>
<configuration>
  <system.serviceModel>
    <client>
      <endpoint address="http://localhost:8080/CarRentalService"
                binding="basicHttpBinding"
                bindingConfiguration="carRentalServiceBinding"
                contract="Wrox.CarRentalService.Implementations.Europe.ICarRentalService"
                behaviorConfiguration="carRentalEndpointBehavior">
        <identity>
          <dns value="service_cert"/>
        </identity>
      </endpoint>
    </client>
    <bindings>
      <basicHttpBinding>
        <binding name="carRentalServiceBinding">
          <security mode="Message">
            <message clientCredentialType="Certificate"/>
          </security>
        </binding>
      </basicHttpBinding>
    </bindings>
    <behaviors>
      <endpointBehaviors>
        <behavior name="carRentalEndpointBehavior">
          <clientCredentials>
            <clientCertificate findValue="CN=client_cert"
              storeLocation="CurrentUser"
              storeName="My"
              x509FindType="FindBySubjectDistinguishedName"/>
            <serviceCertificate>
              <authentication certificateValidationMode="None"/>
<defaultCertificate findValue="CN=service_cert"storeLocation="CurrentUser"storeName="My"x509FindType="FindBySubjectDistinguishedName"/></serviceCertificate></clientCredentials></behavior></endpointBehaviors></behaviors> </system.serviceModel> </configuration>
If the config file is not the right solution, it is also possible to set the behavior programmatically on the client side. See Listing 3-6.
Example 3.6. Set the ClientCredentials on the Client in Code
CarRentalServiceClient client = new CarRentalServiceClient();

try
{
    client.ClientCredentials.ClientCertificate.SetCertificate(
        StoreLocation.CurrentUser,
        StoreName.My,
        X509FindType.FindBySubjectDistinguishedName,
        "CN=client_cert");

    // other code

    client.Close();
}
catch (Exception ex)
{
    client.Abort();
    throw;
}
The code is different if you want to set an endpoint behavior on the server side (see Listing 3-7). As seen for service behavior, if you don't use the config file, the ServiceHost class helps us.
Example 3.7. Set the ServiceCredentials on the Service in Code
using Wrox.CarRentalService.Implementations.Europe;
...

ServiceHost host = new ServiceHost(typeof(CarRentalService));

try
{
    BasicHttpBinding binding = new BasicHttpBinding();
    ServiceEndpoint serviceEndpoint =
        host.AddServiceEndpoint(typeof(ICarRentalService),
binding,
"http://localhost:8080/CarRentalService");
ServiceCredentials credentials = new ServiceCredentials();
credentials.ServiceCertificate.SetCertificate(
StoreLocation.CurrentUser,
StoreName.My,
X509FindType.FindBySubjectDistinguishedName,
"CN=service_cert");
host.Open();
// other code here ...
host.Close();
}
catch (Exception)
{
host.Abort();
}The ClientCredentials behavior is not usable on the service side. In this sample code you see how to set the service certificate by using the ServiceCredentials behavior. Security settings and the other WCF security topics are addressed Chapters 7, 8, and 9.
The IContractBehavior interface can be implemented to extend or modify any aspect of your contracts. This is applied throughout the use of your contract. This interface has four methods which you can implement to modify contracts. You cannot apply contract behaviors in configuration so you must do it in code or by attributes. The four methods are shown here:
AddBindingParameters:This method allows you to add custom parameters useful to execute the behavior. This method is called once for each endpoint.ApplyClientBehavior:Use this method to apply the behavior logic on the client side.ApplyDispatchBehavior:Implement this method by applying the behavior logic on the service client.Validate:This is useful if you want to validate the runtime context for behavior execution.
As for the IEndpointBehavior, the IContractBehavior can be applied both on client and service side to the contract interface. But otherwise, an IContractBehavior implementation cannot be added at runtime with the configuration file. It can be added only at design time by using attributes or programmatically.
There is only one predefined IContractBehavior implementation: the DeliveryRequirementsAttribute. This behavior acts as a validator versus a feature that is loaded at runtime from a configuration file. See Listing 3-8.
Example 3.8. Usage of a Contract Behavior
using System;

namespace Wrox.CarRentalService.Contracts
{
    [DeliveryRequirements(
    QueuedDeliveryRequirements = QueuedDeliveryRequirementsMode.NotAllowed,
    RequireOrderedDelivery = true)]
    public class ICarRentalService
    {
        // service operations
    }
}
The DeliveryRequirements, in this example, indicates that this contract does not allow the queued contracts but requires the message ordered delivery. You can also set the behavior programmatically (see Listing 3-9).
Example 3.9. Usage of a Contract Behavior Programmatically on the Client Side
DeliveryRequirementsAttribute deliveryRequirements =
    new DeliveryRequirementsAttribute();
deliveryRequirements.RequireOrderedDelivery = true;
deliveryRequirements.QueuedDeliveryRequirements =
    QueuedDeliveryRequirementsMode.NotAllowed;

CarRentalServiceClient client = new CarRentalServiceClient();
client.Endpoint.Contract.Behaviors.Add(deliveryRequirements);
On the server side, instead, you can do it by using the ServiceHost, as shown in Listing 3-10.
Example 3.10. Usage of a Contract Behavior Programmatically on the Server Side
using Wrox.CarRentalService.Implementations.Europe;
...

ServiceHost host = new ServiceHost(typeof(CarRentalService));

WSHttpBinding binding = new WSHttpBinding();
binding.ReliableSession.Enabled = true;
binding.ReliableSession.Ordered = true;

ServiceEndpoint serviceEndpoint =
    host.AddServiceEndpoint(typeof(ICarRentalService),
    binding,
    "http://localhost:8080/CarRentalService");

DeliveryRequirementsAttribute deliveryRequirements = new
DeliveryRequirementsAttribute();
deliveryRequirements.RequireOrderedDelivery = true;
deliveryRequirements.QueuedDeliveryRequirements = QueuedDeliveryRequirementsMode.NotAllowed; serviceEndpoint.Contract.Behaviors.Add(deliveryRequirements); host.Open();
WCF provides a bunch of different bindings which will hopefully allow you to develop your service without having to go through much code. Patterns and commands used over and over by other developers have been brought together, which allows you to get the "standard" services into production fast. If you have different needs, you can still develop a custom binding with minimal fuss, but you need to know what is out there to see if there is already a binding that will fit your needs.
Bindings that are prefixed with "net" mean they were designed to take advantage of .NET and perform many performance-enhancing operations. Bindings that are prefixed with "ws" are to be used with all systems and conform to set web standards. A brief discussion of the currently available standard bindings is available in Table 3-2.
Table 3.2. Standard Bindings Found in the System.ServiceModel Namespace
BINDING NAME | DESCRIPTION |
|---|---|
| This uses WS-I Basic Profile 1.1 |
| This allows you to expose your services as Http requests, as used for REST-based services to output XML or JSON. |
| This uses advanced WS-* based profiles to create web services. This is for many profiles such as WS-Security, WS-Transactions, WS-BusinessActivity, etc. |
| This uses the same profiles as the wsHttpBinding but for duplex contracts. This means that services and clients can both send and receive messages. |
| To be used for advanced WS-* based web services using federated identity. |
| Use this binding to communicate over TCP across two machines within your network. This requires both the service and the client to use WCF. Features include transactions and security optimized for WCF. |
| This is optimized for on-machine communication. |
| This binding still communicates over TCP but it uses a peer-to-peer (P2P) network. Each participant (node) acts as a client and a server to the other nodes in the network. This relies on name resolution systems to resolve each other's network locations from names. The Peer Name Resolution Protocol (PNRP) is used and specified within the binding. P2P is used heavily in file sharing such as torrent, which has been made famous during the last few years. |
| Binding for asynchronous communication using MSMQ (Microsoft Message Queue). |
| This binding allows WCF developers to communicate with existing systems that communicate via MSMQ. |
In a scenario with a lot of heterogeneous clients that should have access to your service, the use of interoperable protocols is a prerequisite that must be respected. WCF provides the BasicHttpBinding and the WSHttpBinding as two kinds of bindings that use Http (HyperText Transfer Protocol) as transport protocol. These are the most interoperable bindings that are useable.
The BasicHttpBinding provides a high level of interoperability between WCF and the other framework for building services such as ASP.NET ASMX. In terms of standards, it is the implementation of the WS-I Basic Profile 1.1 specification. It supports SOAP 1.1 as a messaging protocol. The security is based on the underlying transport protocol (Http) for authentication and encryption, or on WS-Security 1.0 for message security. Because the usage of BasicHttpBinding is useful only for backward interoperability with ASP.NET ASMX, because the ASMX ASP.NET doesn't support WS-Security, and the entire payload is sent in plain text, there aren't many reasons to use it.
Though it offers a great level of interoperability, there are many scenarios where it is unusable. The WSHttpBinding, as the name suggests, allows you to use various WS-* specifications such as WS-Security 1.1, WS-Reliable Messaging (for reliable and ordered message delivery), WS-Atomic Transaction, WS-Trust, and so on. This allows you to create a great and robust service infrastructure.
Obviously, using all these specifications could generate a lot of message exchanges between the client and the services. Definitively, the support of standards make WSHttpBinding more secure and reliable than BasicHttpBinding. Finally, if compatibility is not required, WSHttpBinding is the choice.
NetTcpBinding allows using the TCP protocol with the message binary encoding. By default, all the binding settings are turned off. If you want to use the security, you have to set it. If you want to use the reliable and ordered delivery with WS-ReliableMessaging or if you want to make atomic your communication, you have to enable it.
NetTcpBinding is a faster and more reliable protocol, compared with the Http protocol bindings. However, it is only usable when communication is WCF-to-WCF. This scenario represents the best applicable solution.
BasicHttpBinding, WSHttpBinding, and NetTcpBinding are solutions for connected scenarios. Sometimes you want or have the need to decouple the service provider and consumer. This usually happens if the service processes the message at a different time than the client. The client, in turn, doesn't know the exact endpoint of the services that consume and process the message.
NetMsmqBinding allows using a MSMQ to enqueue and dequeue messages. A typical scenario uses a service to receive messages from clients, enqueue the messages, then dequeue the message and process it at the backend. This allows decoupling the client and service, while the queue is the duty free zone where messages are exchanged.
In the .NET Framework you can find another binding that uses MSMQ as a message transport protocol: the MsmqIntegrationBinding. This binding differs from the NetMsmqBinding because it allows communication with the existing applications that use the System.Messaging or COM API. You cannot use NetMsmqBinding to read messages written with MsmqIntegrationBinding or vice versa because of their totally different message formatting.
WCF provides a special set of context management–enabled bindings for a range of different standard bindings. Context-enabled bindings allow you to send extra parameters to the service to exchange context by using the HttpCookies or the SOAP Header. These bindings are inherited from their main binding, and are utilized in the same way as that binding.
The following context bindings are provided for you by WCF:
BasicHttpContextBindingNetTcpContextBindingWSHttpContextBinding
These bindings allow the implementation of durable services. A WCF durable service is a service in which the state is maintained during the different calls. The following SOAP message demonstrates the usage of a SOAP Header to transfer the context between client and services. See Listing 3-11.
Example 3.11. SOAP Message Sent When the Binding Has Context Exchange Enabled
<s:Envelope xmlns:s="http://www.w3.org/2003/05/soap-envelope"
    xmlns:a="http://www.w3.org/2005/08/addressing">
    <s:Header>
        <a:Action s:mustUnderstand="1">
            http://tempuri.org/IService1/GetData
        </a:Action>
<a:MessageID>
urn:uuid:32186d9f-573f-4252-989f-ad94a469271b
</a:MessageID>
<a:ReplyTo>
<a:Address>
http://www.w3.org/2005/08/addressing/anonymous
</a:Address>
</a:ReplyTo>
<Context xmlns="http://schemas.microsoft.com/ws/2006/05/context">
<Property name="instanceId">
1507fdf6-a27b-40f2-b339-f331baa937f1
</Property>
</Context>
<a:To s:mustUnderstand="1">http://fabio-nb:10101/IService</a:To>
</s:Header>
<s:Body>
<GetData xmlns="http://tempuri.org/">
<value>1</value>
</GetData>
</s:Body>
</s:Envelope>The Context SOAP Header has a child element named Context that maintains the service instance ID in an element property. This is used on server side to retrieve the instance and resume the persisted durable service.
All these built-in bindings are built on standards that work for specific scenarios, but will also work if you choose the wrong or less-efficient one. So how do you choose which one is right for your situation?
The most obvious decision is if you need to interact with non-WCF applications. If your service is to communicate with WCF clients, then you can use one of the bindings prefixed with "net." Remember you can define several endpoints for the same service which would use different bindings. This allows you to take advantage of performance optimizations for WCF clients, but still provide support for ASMX services and WS-* standards. These provide further security and other features which many clients take advantage of.
For example, if you want to establish a WCF-to-WCF communication, choosing a NetTcpBinding with a binary encoding makes the communication four or five time faster than a BasicHttpBinding with text encoding.
These WCF-provided bindings should cover most cases that you need: however, if you need to change or create an entirely new binding, WCF allows you do this very simply. This will be discussed later in this chapter.
You can define your binding along with your endpoint either in configuration or in code. It is generally accepted to set your endpoints in configuration, as you won't usually know where the address of your service will be hosted while you're in development. Even if you do have a good idea where it will be, by defining it in configuration you are able to change the location at a later date without having to re-build the code and deploy. Your service may be in place for many years and its location may be moved as network infrastructure changes within your company or organization. This allows administrators to make this change without you by editing the XML. Other developers can also easily make this change without digging through your code.
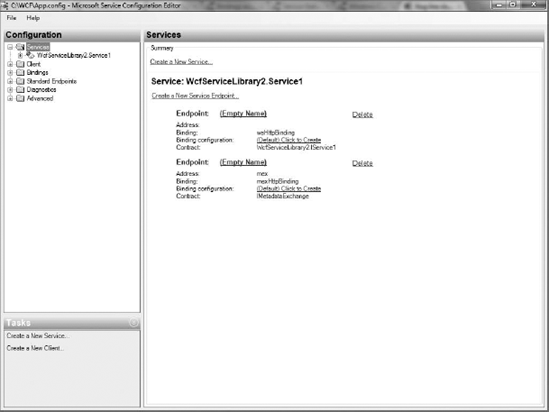
Your configuration resides inside your App.config (or Web.config) file. You can edit this directly (as in the examples provided) or you can use the WCF Configuration Editor (see Figure 3-2) by right-clicking your App.config/Web.config file and selecting Edit WCF Configuration. This is a great tool. For these examples, however, the XML that is produced is shown. The tool speaks for itself and knowing the code will help you in both learning the code and doing difficult configuration without the editor at a later date.
In the config file there is a special configuration section called system.serviceModel. In this section you can define all the settings for your service or client implementation: the endpoints, the binding, the behaviors, the diagnostics, and so on. Listing 3-12 shows you how to create an endpoint in the configuration file by using the wsHttpBinding with the contract IMyService service contract.
Example 3.12. Configuring a Binding Declaratively
<?xml version="1.0" encoding="utf-8" ?>
<configuration>
  <system.serviceModel>
<services>
      <service name="HelloWorldService" >
        <endpoint
          address="http://localhost:8080/HelloWorldService"
          binding="wsHttpBinding"
          contract="IMyService" />
      </service>
    </services>
    <bindings>
      <wsHttpBinding>
      </wsHttpBinding>
   </bindings>
  </system.serviceModel>
</configuration>
As shown in Listing 3-13, you can obtain the exact same result by configuring the service with the programmatic approach.
Example 3.13. Configuring a Binding Programmatically
ServiceHost host = new ServiceHost(typeof(HelloWorldService));

wsHttpBinding binding = new wsHttpBinding();

host.AddServiceEndpoint(typeof(HelloWorldService),
                        binding,
"http://localhost:8731/HelloWorldService");You don't have to explicitly set your address in each endpoint. You can set a base address in your configuration, and then use a relative address inside each of your endpoints. This allows you to have multiple endpoints which all use the same base address, meaning that if you change the URL of the service location, you can do it in one place instead of having to do it in multiple places for each endpoint. This might not sound like a big issue when you have only one or two endpoints, but if you have a whole library of endpoints it quickly becomes a chore. This also leaves you less prone to spelling mistakes of each address and allows for more reuse.
Listing 3-14 appends the relative address set inside the endpoint with the base address. So essentially it is the same as the previous configuration.
Example 3.14. Configuring Base Address in Config
<?xml version="1.0" encoding="utf-8" ?>
<configuration>
  <system.serviceModel>
    <services>
      <service name="HelloWorldService" >
        <endpoint
          address="HelloWorldService"
binding="wsHttpBinding"
contract="IMyService" />
<host>
<baseAddresses>
<add baseAddress="http://localhost:8080/" />
</baseAddresses>
</host>
</service>
</services>
<bindings>
<wsHttpBinding>
</wsHttpBinding>
</bindings>
</system.serviceModel>
</configuration>You can have multiple base addresses for each service, but only one for each protocol. WCF will then automatically map the correct address based on the binding configuration of the endpoint.
Listing 3-15 defines two endpoints, one which has no address using the basicHttpBinding. This means it will be mapped to the base address path for the base address defined with Http. And the second, which has TCP as the address using the netTcpBinding, has the full address as net.tcp://localhost:9090/tcp.
Example 3.15. Multiple Base Addresses
<?xml version="1.0" encoding="utf-8" ?>
<configuration>
  <system.serviceModel>
    <services>
      <service name="HelloWorldService" >

        <endpoint
          address=""
          binding="basicHttpBinding"
          contract="IMyService" />
        <endpoint
          address="tcp"
          binding="netTcpBinding"
          contract="IMyService" />
<host>
      <baseAddresses>
            <add baseAddress="http://localhost:8080/" />
            <add baseAddress="net.tcp://localhost:9090/" />
      </baseAddresses>
</host>
      </service>
    </services>
  </system.serviceModel>
</configuration>A new group of features to WCF 4.0 tries to simplify configurations by defining default configurations for several aspects of WCF. As a whole this allows for much smaller (or nonexistent) configuration files. The WCF configuration schema is very large and difficult to configure features. Mistakes also happen and services are deployed with missing configuration information. (This is especially useful for development purposes.) Although it may not be apparent with very simple services, when you have large-scale enterprise services with many endpoints and many different configuration settings for each, you can see where editing these settings becomes a difficult prospect for developers and administrators alike. (This is especially true for administrators who won't necessarily know the implications of changing these configuration files, but are responsible for them on production servers.)
The following changes are new to WCF 4.0 and will generate runtime exceptions if using these configurations in pre-4.0. However, when you upgrade your WCF 3/3.5 app to WCF 4.0, it still works with the WCF 3.x configuration. But you are able to re-factor your configuration files to take advantage of this increased simplicity if you wish.
If you do not configure any <service> attributes inside your configuration file (or if no configuration file is present), and no service endpoint is programmatically added to the host, then endpoints will automatically be added to your service. One will be configured for each service and each contract, and the endpoint address will be appended to the base address.
When you host your service in IIS, the list of base addresses is automatically retrieved from the hosting settings. If the web site allows the usage of both Http and Https protocols, you'll find two addresses. With the usage of Windows Activation Services (WAS) on IIS, you can use protocols other than Http. Also in this case, if the web site is configured to support a NET.TCP protocol, you'll find your service exposed with the relative endpoint.
The different hosting options are discussed in Chapter 14.
Default bindings allow you to create a service that automatically sets the correct binding by working it out from the protocol schema that you specified in the address of your service (or the base address). This is done by using protocol mapping.
WCF has pre-defined protocol mapping, which maps protocol schema to a WCF binding. The defaults are shown in Table 3-3.
Table 3.3. Default WCF Protocol Mapping
SCHEMA | WCF BINDING |
|---|---|
Http |
|
net.tcp |
|
net.msmq |
|
net.pipe |
|
You can override the default mappings provided to you by WCF 4.0 by inserting the following into your configuration file of your service and changing the defaults. This makes the changes to your applications specifically. Alternatively, if you know that you want to do this machine-wide, you can do the same in your machine.config. See Listing 3-16.
Note
There will be a performance hit when services with bindings set in configuration need to run the protocol mapping in your machine.config. Do this in each configuration or add a new configuration further up which each of your service configuration files can use.
Example 3.16. Default Protocol Mapping Provided by WCF 4.0
<system.serviceModel>
    <protocolMapping>
        <add scheme="http" binding="basicHttpBinding"/>
        <add scheme="net.tcp" binding="netTcpBinding"/>
        <add scheme="net.pipe" binding="netNamedPipeBinding"/>
        <add scheme="net.msmq" binding="netMsmqBinding"/>
    </protocolMapping>
</system.serviceModel>
You can change any of these settings, or add your own. As shown in Listing 3-17, if you know that all your services will use the webHttpBinding, you can change the default protocol mapping for Http (basicHttpBinding by default) to wsHttpBinding.
Example 3.17. Changing Protocol Mapping for the Http Transport Protocol
<system.serviceModel>
  <protocolMapping>
    <add scheme="http" binding="wsHttpBinding"/>
  </protocolMapping>
</system.serviceModel>
Listing 3-18 creates a mapping between Https and webHttpBinding.
Default behaviors allow you to not have to explicitly set the behaviors you want to apply using the behaviorConfiguration attribute in your configuration file.
Listing 3-19 shows the differences made to configuration files.
Example 3.19. Configuration without Default Behavior
<?xml version="1.0" encoding="utf-8" ?>
<configuration>
  <system.serviceModel>
    <services>
      <service name="MyService"
               behaviorConfiguration="MyServiceBehavior">

        <endpoint address="http://localhost/MyService/"
                  binding="wsHttpBinding"
                  contract="IMyService" />
      </service>
    </services>
    <behaviors>
      <serviceBehaviors>
        <behavior name="MyServiceBehavior">
          <serviceMetadata httpGetEnabled="True" />
       </behavior>
     </serviceBehaviors>
    </behaviors>
  </system.serviceModel>
</configuration>
Note the explicit declaration of the behavior name. Listing 3-20, instead, shows how to write a default behavior without specifying the name.
Example 3.20. Configuration with Default Behavior
<?xml version="1.0" encoding="utf-8" ?>
<configuration>
 <system.serviceModel>
    <behaviors>
    <behaviors>
      <serviceBehaviors>
        <behavior>
          <serviceMetadata httpGetEnabled ="true"/>
        </behavior>
      </serviceBehaviors>
    </behaviors>
 </system.serviceModel>
</configuration>
Standard endpoints allow for a pre-defined set of endpoints and WCF provides some of these for you. Some of these endpoints have things that will be the same for all services — MEX, for example, will have the same contract and binding. You can also define your own standard endpoints.
Following are the standard endpoints:
mexEndpointwebHttpEndpointwebScriptEndpointworkflowControlEndpointannouncementEndpointdiscoveryEndpointudpAnnouncementEndpointudpDiscoveryEndpoint
To use these standard endpoints, you can use the kind attribute within a normal endpoint, as shown in Listing 3-21.
You will often have clients connecting to your service from many different types of systems and applications, i.e., WCF, ASMX, and JSON. You can specify multiple endpoints with different bindings allowing different clients to connect to your service using whichever transport they support.
Listing 3-22 adds two endpoints with different bindings: wsHttpBinding and basicHttpBinding.
Example 3.22. Configuring Multiple Bindings Declaratively
<?xml version="1.0" encoding="utf-8" ?>
<configuration>
  <system.serviceModel>
    <services>
      <service name="HelloWorldService" >
        <endpoint
          address="http://localhost:8080/HelloWorldService"
          binding="wsHttpBinding"
          contract="IMyService" />
<endpoint
address="http://localhost:8080/HelloWorldService/basic"
binding="basicHttpBinding"
contract="IMyService" />
</service>
</services>
<bindings>
<wsHttpBinding>
</wsHttpBinding>
</bindings>
</system.serviceModel>
</configuration>Notice the two differences in declaring these endpoints: the first is obviously the binding, which is exactly as it should be. Also, the addresses are different. Remember that addresses must be unique. You have to create a new address for the basicHttpBinding to use. If you add a netTcpBinding, it would have a unique address, as the protocol scheme at the beginning would no longer be http:// and would be replaced by net.tcp://. Also, if you are using a different contract, your endpoint can have the same address and also the same binding. If the address is not unique, and the contracts are the same, then an exception will be thrown.
Even though WCF has a large range of bindings provided for you, which hopefully will meet your needs most of the time, there will be times when you need to define your own for scenarios that weren't provided for you. You can do this by either tweaking the provided bindings using the properties that the bindings expose, or by creating your own custom binding. If you can use the provided bindings with some small changes to the properties, then this is the simplest and most ideal. However, WCF provides a very easy way to create your own bindings using the built-in binding elements which are the building blocks for each provided binding.
The WCF-provided bindings all have default properties which you are able to modify to suit your own scenarios. Each binding has similar properties but differ from binding to binding.
For this example, the basicHttpBinding is used, which is the binding you would use to communicate with ASMX web services. Table 3-4 shows the basicHttpBinding properties, a brief description, and the default value for each of them.
Table 3.4. basicHttpBinding Properties
PROPERTY NAME | DESCRIPTION | DEFAULT VALUE |
|---|---|---|
| Sets if the client accepts cookies. | False |
| Set to | False |
| Value of time that a connection will wait upon closing before it times out. | One minute |
| Whether the hostname is used to match to the service. | "StrongWildCard" (ignores the hostname) |
| Sets the maximum memory to be used by the message buffers. | 524,288 bytes |
| Sets the maximum size for each buffer to receive a message. | 65,536 bytes |
| Sets the maximum message size that can be received for this binding. | 65,536 bytes |
| Sets the type of encoding used. | Text |
| Sets the name of the binding. | null |
| Sets the XML namespace. |
|
| Sets the maximum time that the opening of the binding has before timing out. | One minute |
| Sets the address for the proxy. | Null |
| Sets the maximum time that the message receive operation has before timing out | 00:10:00 |
| Sets the maximum time that the message send operation has before timing out | 00:01:00 |
| Sets the text encoding used for the messages | UTF8 |
| Sets the message transfer mode (buffered or streamed) | Buffered |
| Sets if the system proxy should be used | true |
You modify the MessageEncoding property from its default Text to Mtom. Mtom (Message Transmission Optimization Mechanism) allows for smaller messages when sending large amounts of data by sending SOAP messages as raw bytes. You should see a big performance difference in changing this.
To change this property, first create a new config section inside your basicHttpBinding section. This includes a name to reference, and then set the property (or multiple properties) that you want to change. You can then reference that in your endpoint configuration by the name created (in the following example, the name is Encode). You do this by using the bindingConfiguration property in the endpoint configuration. You can then re-use this configuration for other endpoints in your configuration, or maybe more importantly, choose to not use this configuration for other endpoints. This gives you complete flexibility with the configuration, but minimizes duplicating the configuration of properties by allowing this re-use. Listing 3-23 shows how you can change the default property values in app.config.
Example 3.23. Modifying Default Property Values in App.config
<system.serviceModel>
    <services>
      <service name="MyService1">
        <endpoint address="http://localhost:8080/MyService1"
                  contract="Service1"
                  binding="basicHttpBinding"
                  bindingConfiguration="Encode">
        </endpoint>
      </service>
    </services>
    <bindings>
      <basicHttpBinding>
        <binding name="Encode" messageEncoding="Mtom"></binding>
      </basicHttpBinding>
    </bindings>
  </system.serviceModel>
The same can be done programmatically when you create the new basicHttpBinding object. As shown in Listing 3-24, you can then change the properties of that object just as any other object's property. This also gives you the beauty of Visual Studio's Intellisense so you can see all the options for the binding you are configuring.
Example 3.24. Modifying Default Property Values Programmatically
ServiceHost host = new ServiceHost(typeof(MyService1.Service1));

BasicHttpBinding binding = new BasicHttpBinding();
binding.MessageEncoding = WSMessageEncoding.Mtom;

host.AddServiceEndpoint(
    typeof(MyService1.IService1),
    binding,
    "http://localhost:8080/MyService1");
When editing the App.config, you need to explicitly set the bindingConfiguration to use, but within the code you just modified the actual instance of the BasicHttpBinding class that you created.
There are times when you must create your own binding; a couple of examples would be custom security and additional transport protocols. This can be done within your configuration or in code.
To create your own custom binding, build up a collection of binding elements. You need to be familiar with the binding elements that are defined within WCF. This allows you to define the specifics of your custom binding.
Binding elements inherit from System.ServiceModel.Channels.BindingElement. When adding your binding elements you need to keep them in the correct order. Table 3-5 shows the binding elements provided to you in the order that they must be added to your binding collection.
Table 3.5. Protocol Elements
PROTOCOL BINDING ELEMENTS | CLASS NAME |
|---|---|
Transaction Flow |
|
Reliable Messaging |
|
Security |
|
Duplex Communication Element | |
Composite Duplex |
|
Message Encoding Elements | |
Message Encoding | Class Name |
Text |
|
Mtom |
|
Binary |
|
Transport Security Elements | |
Security | Class Name |
Windows |
|
SSL |
|
Transport Elements | |
Protocol | Class Name |
Http |
|
Https |
|
TCP |
|
Named pipes |
|
MSMQ |
|
MSMQ |
|
P2P |
|
To create your custom binding, you need to choose which binding elements you want to include and then add them to the custom binding in the correct order as previously listed. As shown in Listing 3-25, a custom binding needs to have a transport binding element and a message encoding element (although if you don't specify message encoding, WCF will automatically add Text for Http and binary for all other transports).
Example 3.25. Custom Binding Using Http as Transport and Binary Encoding
<customBinding>
  <binding name="binHttp">
      <binaryMessageEncoder />
      <httpTransport />
  </binding>
</customBinding>
As explained at the start of this chapter, the order of the binding elements is much more important. Starting from the bottom, the first binding element must define the transport. The second binding element must define the encoding to use. The order of the other binding elements, however, is not as important as the first two.
If you don't want to use the configuration file, you can also create your custom binding programmatically, as shown in Listing 3-26.
Example 3.26. Configuring a Custom Binding Programmatically
using Wrox.CarRentalService.Implementations.Europe;
...

CustomBinding binding = new CustomBinding();
binding.Elements.Add(new BinaryMessageEncodingBindingElement());
binding.Elements.Add(new HttpTransportBindingElement());

ServiceHost host = new ServiceHost(typeof(CarRentalService));

ServiceEndpoint serviceEndpoint =
host.AddServiceEndpoint(typeof(ICarRentalService),
                        binding,
                        "http://localhost:8080/CarRentalService");

host.Open();
In this code, you can simply add the binding elements to the elements collection of custom binding. This determines how the custom binding works.
Sometimes you may need to create a custom binding and reuse it in various solutions. Because each binding inherits from the base abstract class System.ServiceModel.Channels.Binding, you can simply create your own binding class and implement the CreateBindingElements to achieve this requirement. Listing 3-27 shows how you can extend the Binding base class to create and reuse your own implementation.
Example 3.27. Creating a Custom Reusable Binding
public class NetTcpTextBinding : Binding
{
    private TcpTransportBindingElement transport;
    private TextMessageEncodingBindingElement encoding;

    public NetTcpTextBinding()
        : base()
    {
        this.Initialize();
    }

    public override BindingElementCollection CreateBindingElements()
    {
        BindingElementCollection elements = new BindingElementCollection();
        elements.Add(this.encoding);
        elements.Add(this.transport);
        return elements;
    }

    public override string Scheme
    {
        get { return this.transport.Scheme; }
    }

    private void Initialize()
    {
        this.transport = new TcpTransportBindingElement();
        this.encoding = new TextMessageEncodingBindingElement();
    }
}
In the sample NetTcpTextBinding shown in Listing 3-28, a custom binding is set that encodes messages using text encoding protocol on a TCP transport. It is a very simple implementation that demonstrates how you can customize WCF to achieve every need.
As with every other binding, you can use it with ServiceHost or ChannelFactory to configure the service endpoint.
Example 3.28. Using the NetTcpTextBinding
NetTcpTextBinding binding = new NetTcpTextBinding();

ServiceHost host = new ServiceHost(typeof(Service1));
host.AddServiceEndpoint(typeof(IService1),
                        binding,
                        "net.tcp://localhost:10101/IService");

host.Open();
One step over allows developers to use the custom binding via configuration file. As shown in Listing 3-29, you must extend the BindingCollectionElement abstract base class and then implement the required methods.
Example 3.29. Implement the NetTcpTextBindingCollectionElement
using System.Configuration;
...

public class NetTcpTextBindingCollectionElement : BindingCollectionElement
{
    public override Type BindingType
    {
        get { return typeof(NetTcpTextBinding); }
    }

    public override ReadOnlyCollection<IBindingConfigurationElement>
    ConfiguredBindings
    {
        get
        {
            return new ReadOnlyCollection<IBindingConfigurationElement>(
                        new List<IBindingConfigurationElement>());
        }
    }

    public override bool ContainsKey(string name)
    {
        throw new NotImplementedException();
    }

    protected override Binding GetDefault()
    {
        return new NetTcpTextBinding();
    }

    protected override bool TryAdd(
        string name, Binding binding, Configuration config)
    {
        throw new NotImplementedException();
    }
}
The property that you must implement is BindingType. It allows defining the binding type target of the current configuration. The other important property is the ConfiguredBindings that retrieves all the binding configuration elements.
The code shown in Listing 3-29 is a really simple implementation that could be extended, for example, with the definition of custom binding elements. You should implement the IBindingConfigurationElement interface to permit a great level of customization at runtime.
Now, if you want to use the NetTcpTextBinding in the configuration file, you have to configure the NetTcpTextBindingCollectionElement by using the binding extensions (see Listing 3-30). Indeed, if you want to use your custom binding implementation, you have to define it.
Example 3.30. Using the NetTcpTextBinding in the Configuration File
<system.serviceModel>
  <services>
    <service name="WcfServiceLibrary2.Service1">
      <endpoint address="net.tcp://localhost:10101/IService"
                binding="netTcpTextBinding"
                contract="WcfServiceLibrary2.IService1">

      </endpoint>
    </service>
  </services>
  <extensions>
    <bindingExtensions>
      <add name="netTcpTextBinding"
           type="ConsoleApplication1.NetTcpTextBindingCollectionElement,
           ConsoleApplication1,
           Version=1.0.0.0, Culture=neutral, PublicKeyToken=null" />
    </bindingExtensions>
  </extensions>
</system.serviceModel>
The value of the name attribute defined in the binding extensions section corresponds to the name usable in the service element. Finally, you can use the binding in the endpoint element of the service section.
Earlier in this chapter, context bindings were discussed. Introduced in .NET Framework 3.5, context bindings enable the exchange of a property called instance id that is used to identify persisted services. That feature allows a service to remember its status by using a durable and reliable storage that handles unexpected scenarios such as host or service restart. This is the important difference between durable services versus session, available since .NET Framework 3.0.
It is most common to have a scenario when processes can hold on for a long time. Windows workflow provides support for long-running scenarios by persisting its state in a database such as SQL Server. Durable service allows you to store the current state of services in the same manner as you can persist a running workflow. Though the context bindings could be used without a workflow, they are designed with the previous scenario in mind.
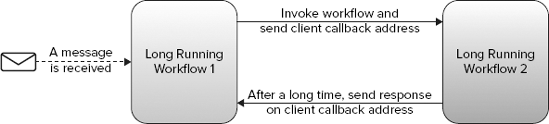
With the .NET Framework 4.0, the WSHttpContextBinding and the NetTcpContextBinding have a new property called ClientCallbackAddress. This property accepts a URI that represents the client address usable to receive the callback message from the invoked service. As shown in Figure 3-3, if the first workflow calls the second workflow, and the second workflow takes a long time to complete its work, the first workflow is persisted. Now, the ClientCallbackAddress with the context binding allows waking up the first workflow.
How the durable duplex binding works differs from the already known duplex binding because it works on context property and storage rather than channel level.
Not all context bindings support the duplex durable correlation services. In effect, the BasicHttpContextBinding doesn't support the ClientCallbackAddress property — it instead supports both in the WSHttpContextBinding and NetTcpContextBinding.
To enable the correlation, you have to set ClientCallbackAddress in your context binding configuration, as shown in Listing 3-31.
Example 3.31. Configure Binding to Enable Duplex Durable Correlation
<system.serviceModel>
    <client>
      <endpoint address="http://localhost/BackEndDurableDuplex/WorkflowService2.xamlx"
        binding="wsHttpContextBinding" bindingConfiguration="contextCorrelationBinding"
        contract="IWorkflowService2" name="WSHttpContextBinding_IWorkflowService2">
      </endpoint>
    </client>
    <services>
      <service name="WorkflowService1">
        <endpoint address=""
                  binding="wsHttpContextBinding"
                  contract="IWorkflowService"
                  bindingConfiguration="contextCorrelationBinding">
        </endpoint>
        <endpoint address=""
                  binding="wsHttpContextBinding"
                  contract="IWorkflowServiceCallback"
                  bindingConfiguration="contextCorrelationBinding">
        </endpoint>
      </service>
    </services>

    <bindings>
      <wsHttpContextBinding>
<binding name="contextCorrelationBinding" clientCallbackAddress="http://localhost/DurableDuplex/WorkflowService1.xamlx" /></wsHttpContextBinding></bindings> <behaviors> <serviceBehaviors> <behavior> <serviceDebug includeExceptionDetailInFaults="true"/> <serviceMetadata httpGetEnabled="true"/> </behavior> </serviceBehaviors> </behaviors> </system.serviceModel>
In the previous configuration section, two endpoints were defined: one for the service and the other for the callback calls. Both endpoints use the WSHttpContextBinding and the value of the clientCallbackAddress property in the relative section named contextCorrelationBinding. This is the only setting you need to create the correlation.
It is also possible to create your custom binding and define the context binding element, as shown in Listing 3-32.
Example 3.32. Create Custom Binding with Context Correlation Enabled
<bindings>
    <customBinding>
        <binding name="netMsmqContextBinding">
            <context clientCallbackAddress="net.msmq://localhost/private/
WorkflowService1.xamlx"/>
            <msmqTransport />
        </binding>
    </customBinding>
</bindings>
The context bindings and the correlation system is an implementation of the Microsoft Context Exchange Protocol (http://msdn.microsoft.com/en-us/library/bb924468.aspx).
The changing needs of users have led to the creation of web sites being increasingly interactive. In this context, Silverlight offers a powerful development platform to create rich, interactive applications. Silverlight runtime runs as a client in the user's browser process. As with any clients, it needs to access data remotely, often exposed as service. The more convenient and obvious platform to develop this service is WCF.
The most common scenario enables a request-reply message exchange pattern where the Silverlight client sends a request and receives a reply from the service. But sometimes, the service needs to inform or notify the client when something happens on the other side. The service needs to push data to the client. PollingDuplexHttpBinding, available since Silverlight v3 in the System.ServiceModel.PollingDuplex.dll, is designed to accomplish this communication protocol.
PollingDuplexHttpBinding is the implementation of the WS-MakeConnection v1.1 OASIS Specification (http://docs.oasis-open.org/ws-rx/wsmc/v1.1/wsmc.html). In practice, when a session is established, the client sends the request to the service and the service replies with an Http response only when it needs to push data to the client — meaning only when there are data for the client. This is done with a mechanism already known as long polling. If there aren't data for the client, the service holds on to the latest Http request until there are available data or a timeout is reached. If the client wants to get more information after receiving one, it re-sends a new Http request. The communication goes on until an active Http request is alive.
On client side you have to reference the client version of the PollingDuplexHttpBinding from the System.ServiceModel.PollingDuplex.dll in the Silverlight v3 SDK Libraries path. Then configure the binding as shown in Listing 3-33.
Example 3.33. Configure PollingDuplexBinding in the Client Environment
PollingDuplexHttpBinding binding = new PollingDuplexHttpBinding()
{
    InactivityTimeout = TimeSpan.FromMinutes(10),
    ReceiveTimeout = TimeSpan.FromMinutes(30),
    SendTimeout = TimeSpan.FromSeconds(30)
};

DuplexChannelFactory<IService> factory =
new DuplexChannelFactory<IService>(new InstanceContext(this), binding,
new EndpointAddress("http://localhost:10101/IService"));
Also, on the service side, you can simply use the PollingDuplexHttpBinding to enable the communication, as shown in Listing 3-34.
Example 3.34. Configure PollingDuplexBinding on the Service
PollingDuplexHttpBinding binding = new PollingDuplexHttpBinding();
ServiceHost host = new ServiceHost(typeof(Service1));
host.AddServiceEndpoint(typeof(IService),
                        binding,
                        "http://localhost:10101/IService");
host.Open();
PollingDuplexHttpBinding is able to manage the communication problem and doesn't require further configurations settings to work well. As you can see, the Http long polling is different from the traditional polling system, where typically a client sends messages to inquire the service state at predefined time intervals. This produces a lot of traffic and sometimes causes network congestion. To limit this problem, many browsers, such as Internet Explorer 8, allow a max of six connections to a specific host.
You have to pay attention to this usage limit, although the long polling technique may be a big advantage. It may easily exceed the browser connection limit if the usage in the Silverlight client is too massive.
With Silverlight 4 you are able to handle a duplex connection between a Silverlight client and a WCF Service by also using a net.tcp transport protocol.
Compared with the PollingDuplexHttpBinding, the net.tcp in Silverlight 4 dramatically affects the performance, and it should be the preferred solution only when you are in an intranet environment. Indeed, the net.tcp protocol is subject to some restrictions. You can use only ports 4502–4534, and in intranet environments you can control the firewall settings to meet the requirements. Finally, the transport security settings (SSL) with the net.tcp transport protocol in Silverlight are not supported. If you don't need to use transport security, then this limit is not as important.
The net.tcp protocol in Silverlight is a great improvement and a good alternative to the Http protocol, although it has a limited usage due to the above-mentioned constraints.
Note
At the time of this writing, Silverlight 4 is in Release Candidate and what is discussed in this section may change in the final version.