
WHAT'S IN THIS CHAPTER?
Defining requirements for the case
Developing the complete solution
Testing the solution
This chapter is an interactive walkthrough of how to create a solution in SOA architecture with Visual Studio 2010 using WCF. It starts by defining requirements for a case and shows you how to develop the solution, step by step. At the end of this chapter you will have developed a number of services, hosts, and clients as part of the solution. This is a complete example — you can test the process and see it working in action.
You need to create services for a car rental company. The company needs a service for managing their fleet of cars, a service to register their customers, and a service to register the rentals.
These three services are considered internal and will be used by their own applications.
Besides these services, they also need an external service accessible by partners of the company that can insert a customer and register a rental with one call.
Operations for the CarManagementService:
InsertNewCar: Receives the data for a car and inserts it into a database.RemoveCar: Receives the ID of a car and deletes it from the database.UpdateMileage: Receives the data for a car and updates the mileage for the car in the database.ListCars: Returns all cars with their data.GetCarPicture: Returns a picture for the car with a specified ID.
Operations in the CustomerService:
RegisterCustomer: Receives the data for a customer and inserts it into a database.
Operations in the RentalService:
RegisterCarRental: Receives all information to register the data for a rental.RegisterCarRentalAsPaid: Receives an ID of the rental and marks the rental as paid in the database.StartRental: Calls the method to indicate that the car was picked up at a given location where the rental starts.StopCarRental: Calls the method to indicate that the car was dropped off at a given location where the rental stops.GetRentalRegistration: Returns all data about the rental.
Operations for the ExternalService:
SubmitRentalContract: Receives all the information for a new customer and all the information for the rental. It inserts the new customer and the rental data into a database.
Additional requirements for the CarManagementService:
There is an enumerated field type for defining whether the car has a manual transmission or an automatic transmission.
A number of car types are recognized by the company. Besides regular cars there are luxury cars and sports cars. Luxury cars have all the data elements of a car and a list of luxury items. Sports cars have all the data elements of a car and a horsepower value.
Additional requirements for the RentalService:
Errors occurring in this service should be handled carefully. The data should be validated and when the data is not correctly filled in, the client must receive a well-structured message with a functional description of the validation rule.
The code for the
RegisterCarRentalAsPaidoperation should be executed under the credentials of the client using the service.
Additional requirement for the ExternalService:
The
SubmitRentalContractcalls operations in two other services (CustomerServiceandRentalService) in sequence to register the customer and to register the rental. It's clear that this has to happen in one transaction. The customer is not allowed to be inserted into the database without the rental being registered.
You start by creating an empty Visual Studio solution. You will be creating every project needed in one solution. This makes it easy to test all applications at once and to have it checked in to the source control environment (see Figure 11-1).
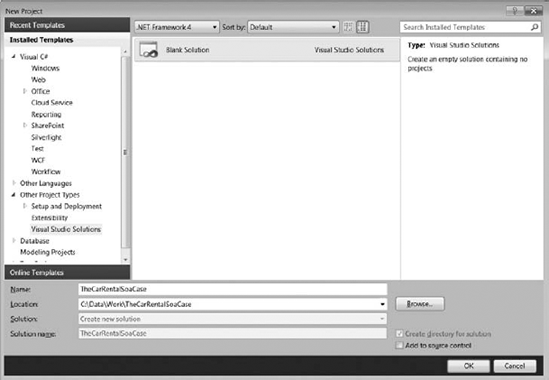
Name the solution TheCarRentalSOACase and place it in the directory C:DataWorkTheCarRentalSOACase.
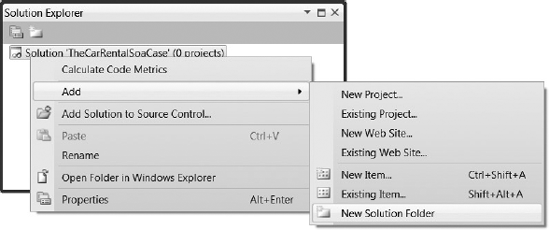
Create a structure of solution folders to group projects together. Each folder will contain one or more projects. You can add a solution folder by right-clicking the solution and selecting Add Ø New Solution Folder. See Figure 11-2.
These solution folders are needed:
Clients (foldername : Clients)
Hosts (foldername : Hosts)
Interfaces (foldername : Interfaces)
Services (foldername : Services)
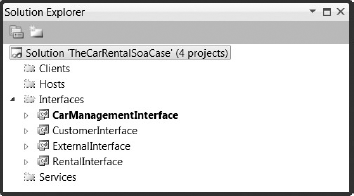
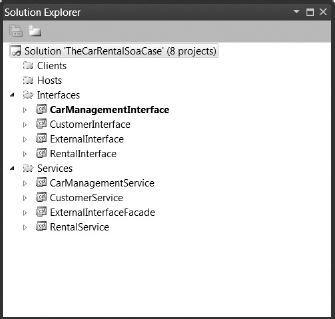
After adding the four solution folders, your solution should look like Figure 11-3.

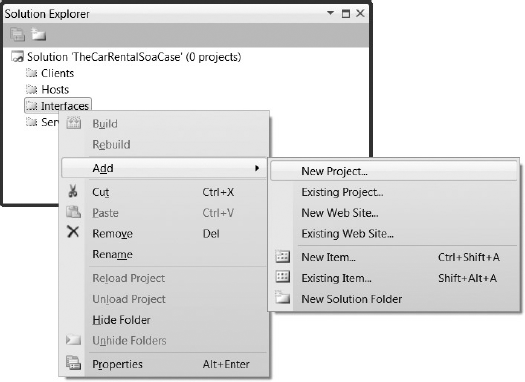
Creating the interfaces first is the best approach and is typical for a SOA project. Start by creating the libraries to contain the interfaces. You need four libraries:
CarManagementInterfaceCustomerInterfaceRentalInterfaceExternalInterface
Do this by adding the four Class Libraries projects to the Interfaces folder in the solution. See Figure 11-4.
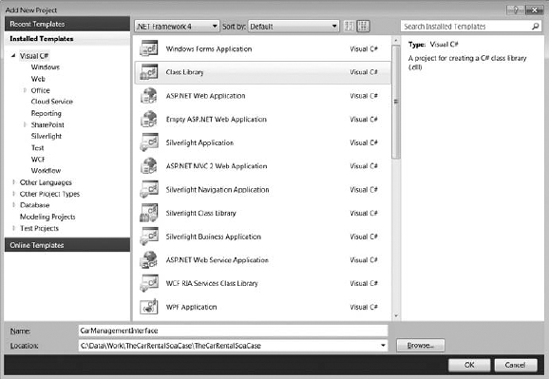
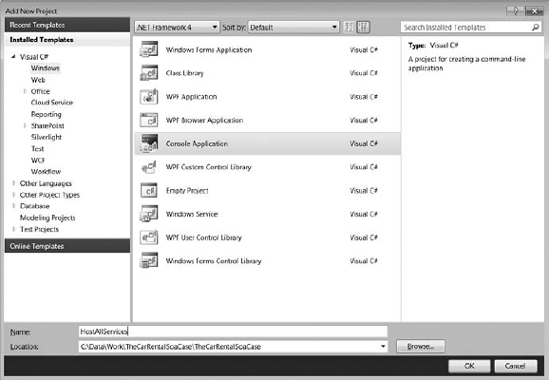
In the Add New Project dialog box, select Class Library from the list of templates. See Figure 11-5.
Do this for each of the four interfaces. Your solution should look like Figure 11-6.
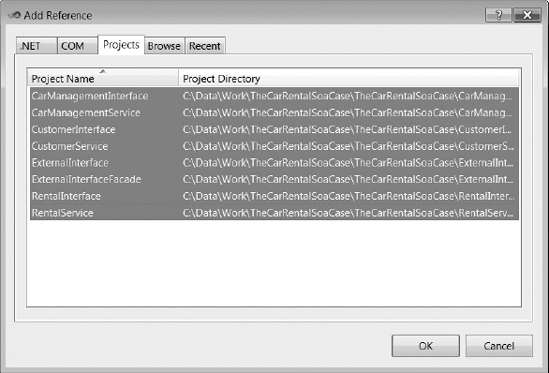
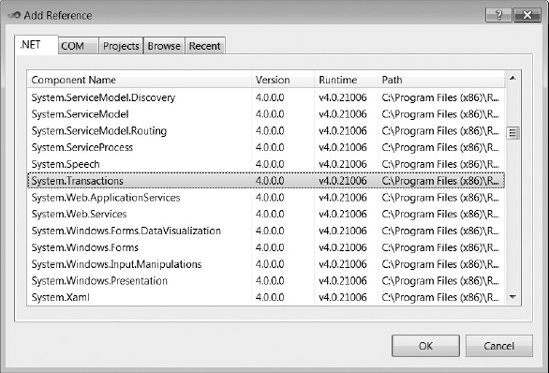
Now you need to add references to the WCF libraries, System.ServiceModel and System.Runtime.Serialization. They contain the attributes needed for the contracts. Adding references is done by right-clicking References in a project in Solution Explorer. See Figure 11-7.

This opens the Add Reference dialog box. Select System.ServiceModel and System.Runtime.Serialization and click OK. See Figure 11-8.
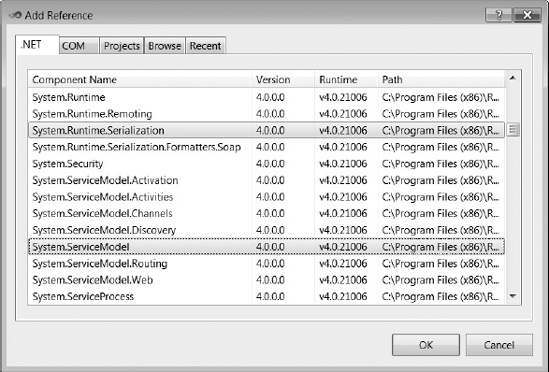
Repeat this step for the other three projects.
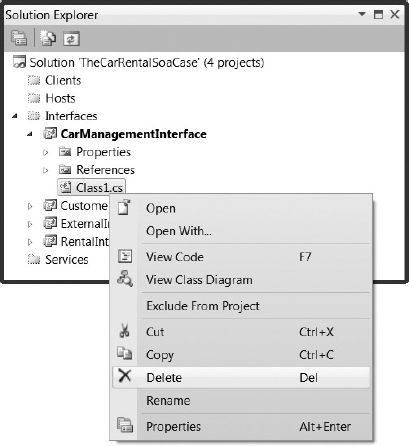
Because you selected Class Library as the template, Visual Studio has created a file called Class1.cs containing an empty class in the project. You don't need this file as you're creating interfaces. So you can delete the Class1.cs file in each of the four projects. See Figure 11-9.
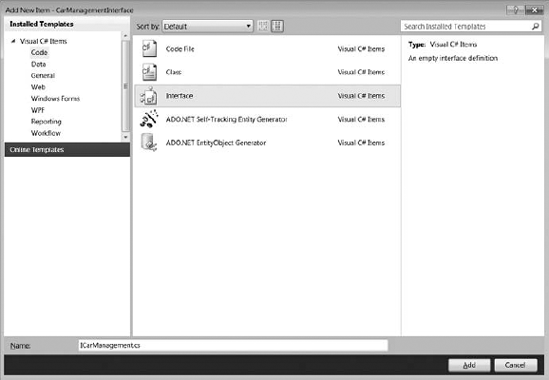
Add an Interface file to each project (see Figure 11-10). The Interfaces are ICarManagement, ICustomer, IRental, and IExternalInterface.
Open the interface and add the needed using statements to access the System.ServiceModel and System.Runtime.Serialization namespaces:
using System.ServiceModel;
using System.Runtime.Serialization;
Make the interface public by adding the public keyword to the interface declaration:
public interface ICarManagement
Repeat this for each of the interface projects.
To support the requirement needed, an enumerated field type for the car transmission, add the following code:
[DataContract]
public enum TransmissionTypeEnum
{
  [EnumMember]
  Manual,
  [EnumMember]
  Automatic
}
This is a public enum called TransmissionTypeEnum. The enum must be attributed with the DataContract attribute and each choice in the enum must be attributed with the EnumMember attribute.
Now add code for the Car class:
[DataContract]
public class Car
{
  [DataMember]
  public string BrandName { get; set; }
  [DataMember]
  public string TypeName { get; set; }
  [DataMember]
  public TransmissionTypeEnum Transmission { get; set; }
  [DataMember]
  public int NumberOfDoors { get; set; }
  [DataMember]
  public int MaxNumberOfPersons { get; set; }
  [DataMember]
  public int LitersOfLuggage { get; set; }
}
This class is attributed with the DataContract attribute and each property is attributed as DataMember.
Now you can complete the interface containing the signatures of the service methods:
[ServiceContract]
interface ICarManagement
{
  [OperationContract]
  int InsertNewCar(Car car);

  [OperationContract]
  bool RemoveCar(Car car);

  [OperationContract]
  void UpdateMilage(Car car);

  [OperationContract]
  List<Car> ListCars();

  [OperationContract]
  byte[] GetCarPicture(string carID);
}
Fix any errors and then finish by compiling this class library.
Add code to the ICustomer interface. This is the code for the Customer class and the signatures for the operation in the CustomerService:
[ServiceContract]
public interface ICustomer
{
  [OperationContract]
  int RegisterCustomer(Customer customer);
}

[DataContract]
public class Customer
{
  [DataMember]
  public string CustomerName { get; set; }
  [DataMember]
  public string CustomerFirstName { get; set; }
  [DataMember]
  public string CustomerMiddleLetter { get; set; }
  [DataMember]
  public DateTime CustomerBirthDate { get; set; }
}Add code to the IRental interface. This is the code for the RentalRegistration DataContract and the signatures for the operations in the RentalService:
[ServiceContract]
public interface IRental
{
  [OperationContract]
  string RegisterCarRental(RentalRegistration rentalRegistration);

  [OperationContract]
  void RegisterCarRentalAsPaid(string rentalID);

  [OperationContract]
  void StartCarRental(string rentalID);

  [OperationContract]
  void StopCarRental(string rentalID);

  [OperationContract]
  RentalRegistration GetRentalRegistration(string rentalID);
}

[DataContract]
public class RentalRegistration
{
  [DataMember]
  public int CustomerID { get; set; }
  [DataMember]
  public string CarID { get; set; }
  [DataMember]
  public int PickUpLocation { get; set; }
  [DataMember]
  public int DropOffLocation { get; set; }
  [DataMember]
  public DateTime PickUpDateTime { get; set; }
  [DataMember]
  public DateTime DropOffDateTime { get; set; }
  [DataMember]
  public PaymentStatusEnum PaymentStatus { get; set; }
  [DataMember]
  public string Comments { get; set; }
}

[DataContract]
public enum PaymentStatusEnum
{
  [EnumMember(Value = "PUV")]
  PaidUpFrontByVoucher,
  [EnumMember(Value = "PUC")]
  PaidUpFrontByCreditCard,
  [EnumMember(Value = "TPP")]
  ToBePaidAtPickUp,
[EnumMember(Value = "INV")]
ToBePaidByInvoice
}
[DataContract]
public enum IncludedInsurance
{
[EnumMember]
LiabilityInsurance = 1,
[EnumMember]
FireInsurance = 2,
[EnumMember]
TheftProtection = 4,
[EnumMember]
AllRiskInsurance = 1 + 2 + 4
}Code snippet CreatingaSOACase.zip
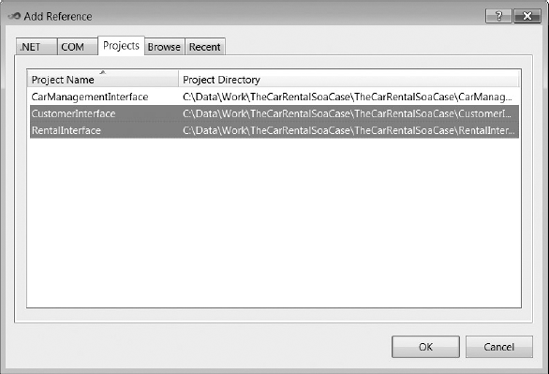
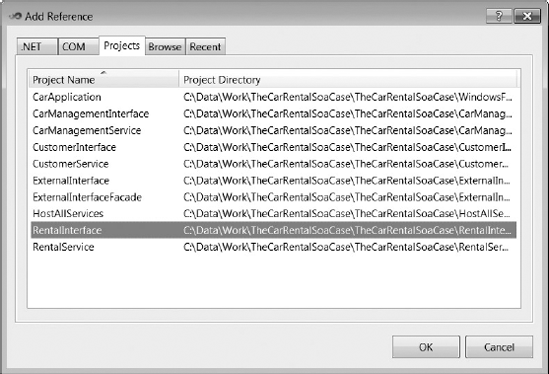
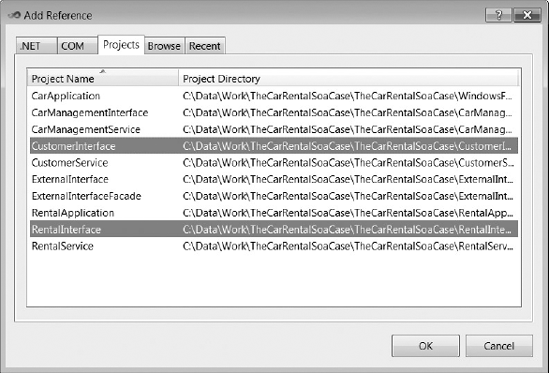
The External Interface project reuses the Customer contract and the Rental contract and thus needs a reference to both libraries. Open the Add Reference dialog box and switch to the Projects tab. Select both CustomerInterface and RentalInterface. See Figure 11-11.
Besides adding using statements for the two system libraries, add using statements for RentalInterface and CustomerInterface:
using RentalInterface;
using CustomerInterface;
The following is code for the ExternalInterface:
[ServiceContract]
public interface IExternalInterface
{
  [OperationContract]
  void SubmitRentalContract(RentalContract rentalContract);
}

[DataContract]
public class RentalContract
{
  [DataMember]
  public string Company { get; set; }
  [DataMember]
  public string CompanyReferenceID { get; set; }
  [DataMember]
  public RentalRegistration RentalRegistration { get; set; }
  [DataMember]
  public Customer Customer { get; set; }
}
The ExternalInterface has one method that receives a parameter. It is structured by a DataContract which has properties for a RentalRegistration and a Customer.
In the solution, add four projects as a class library, one for each service. These projects reference the interface projects and contain the implementation of the logic. Name them CarManagementService, CustomerService, ExternalInterfaceFacade, and RentalService. Your solution should now look like Figure 11-12.
Add the assemblies, System.ServiceModel and System.Runtime.Serialization, to each of the projects.
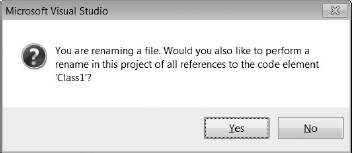
Rename the Class1.cs file in each project to the appropriate name. The names of the files are CarManagementImplementation.cs, CustomerServiceImplementation.cs, RentalServiceImplementation.cs, and ExternalInterfaceFacadeImplementation.cs.
Visual Studio asks you if you would like to rename the code element 'Class1'. Click Yes. See Figure 11-13.
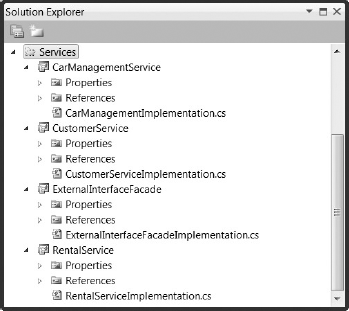
The result is seen in Figure 11-14.
Add the using statements needed to each of the files:
using System.Runtime.Serialization;
using System.ServiceModel;
For each project, add a reference to the corresponding project containing the interface. Then add a corresponding using statement in each class to access its interface:
using CarManagementInterface;
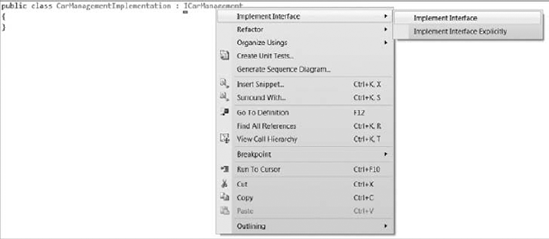
Implement the interface in the class by adding a column and the name of the interface after the class declarations:
public class CarManagementImplementation : ICarManagement
{
}
Implementing all methods in an interface can be done quickly by right-clicking the name of the interface you just typed in the source code editor and selecting Implement Interface. See Figure 11-15.
For the CarManagement Interface, the result should look like this:
public int InsertNewCar(Car car)
{
  throw new NotImplementedException();
}

public bool RemoveCar(Car car)
{
  throw new NotImplementedException();
}

public void UpdateMilage(Car car)
{
  throw new NotImplementedException();
}

public List<Car> ListCars()
{
  throw new NotImplementedException();
}

public byte[] GetCarPicture(string carID)
{
  throw new NotImplementedException();
}
Do this for the other three services, making sure to use the corresponding interface for each implementation library, and then build the solution.
Start by creating a console application as host. This is more convenient for testing and debugging. Later you can create a Windows service which will host the services.
Add a Console application to the solution in the host solution folder. See Figure 11-16.
Next you add the needed WCF libraries and all the interface and implementation libraries. Add the System.ServiceModel and System.Runtime.Serialization assemblies. Then add all four Interface Projects together with the Implementation Projects. See Figure 11-17.
To the code of program.cs, add the needed using statements. Both the system namespaces and the four namespaces of the implementation projects are needed:
using System.ServiceModel;
using System.Runtime.Serialization;
using CarManagementService;
using RentalService;
using CustomerService;
using ExternalInterfaceFacade;
Add code to the main method for an exception handler together with statements that write the status of the service to the console. The last line is a console.readkey operation. It is there to make sure the host application keeps running after the services are opened so clients can access them:
Console.WriteLine("ServiceHost");
try
{

  //Open hosts here

}
catch (Exception ex)
{
  Console.WriteLine(ex.Message);
}
Console.WriteLine("Started");
Console.ReadKey();
You need four service hosts. Declare a reference variable for each of the hosts in the program class:
static ServiceHost CarManagementServiceHost;
static ServiceHost CustomerServiceHost;
static ServiceHost RentalServiceHost;
static ServiceHost ExternalServiceHost;
Write the code to instantiate and open each host in the try-catch block of the main method:
CarManagementServiceHost = new ServiceHost(typeof(CarManagementService.
 CarManagementImplementation));
CarManagementServiceHost.Open();

CustomerServiceHost = new ServiceHost(typeof(CustomerService.
 CustomerServiceImplementation));
CustomerServiceHost.Open();

RentalServiceHost = new ServiceHost(typeof(RentalService.
RentalServiceImplementation));
RentalServiceHost.Open();

ExternalServiceHost = new ServiceHost(typeof(ExternalInterfaceFacade.
 ExternalInterfaceFacadeImplementation));
ExternalServiceHost.Open();
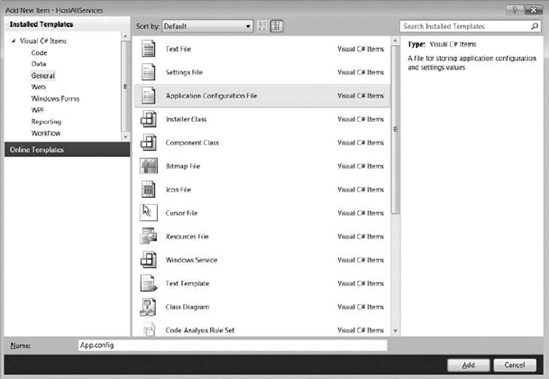
Add an application configuration file to the project. Do this by using the Add New Item dialog box. Select Application Configuration File and use the default name, which is App.config. See Figure 11-18.
Build all solutions. It's important that the host is built correctly. The build will copy the assemblies for the interfaces and the implementations to the bin directory of this project. The binaries are needed as the WCF Configuration Editor needs to have access to them while configuring them.
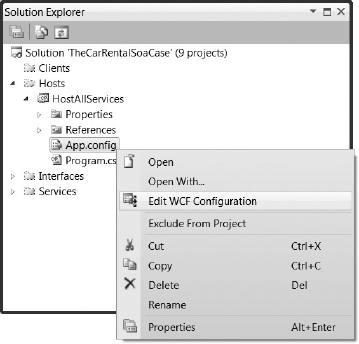
Right-click the App.config file and select Edit WCF Configuration. See Figures 11-9 and 11-20.
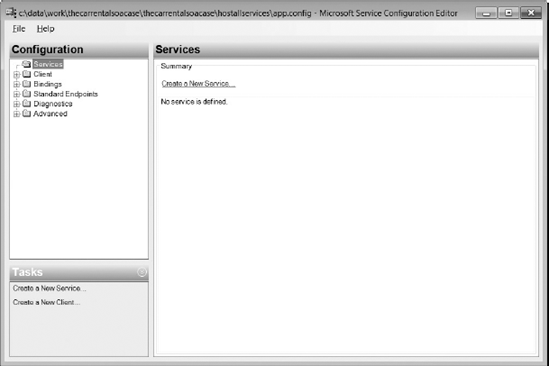
In the WCF Configuration Editor, click Create a New Service. See Figure 11-21.
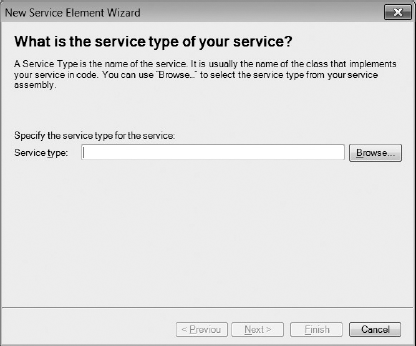
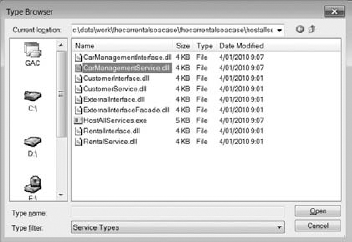
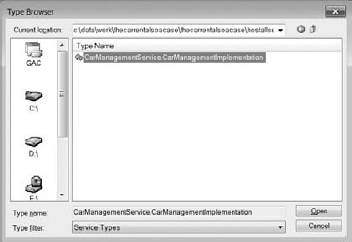
Click Browse to open the Type Browser dialog box. Navigate into the bin directory and then into the debug directory. The dialog box shows a number of assemblies. Select the CarManagamentService.dll assembly and click Open. See Figure 11-22.
This will show you the implementation class in this assembly. Click CarManagamentService.CarManagementImplementation and click Open. See Figure 11-23.
The Add Service wizard proposes the name of the implementation in the dialog box. Click Next.
The wizard decides what the name of the contract is. Do not change this. Click Next.
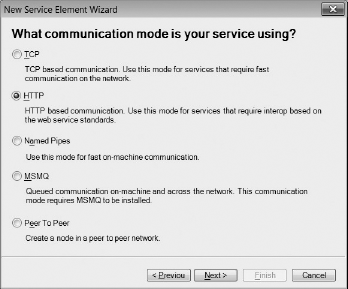
The wizard now asks you for the communication mode the service is using. Leave the selection on HTTP (see Figure 11-24). Click Next.
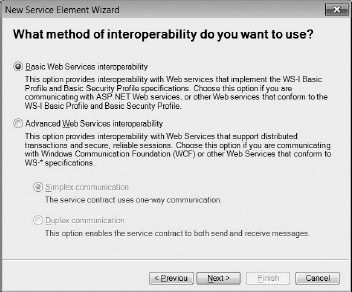
The wizard now asks for the method of interoperability, as shown in Figure 11-25. Select Advanced Web Services interoperability and leave the Simplex Communication button selected. Click Next.
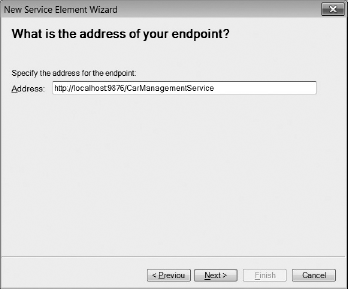
The wizard asks for the address of your endpoint: http://localhost:9876/CarManagementService. See Figure 11-26.
Click Next and Finish. Save the configuration (File, Save) and exit the WCF Configuration Editor.
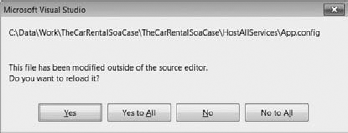
If the App.config file was open in an editor, Visual Studio will detect that the App.config file has changed and will show you this dialog box (see Figure 11-27). Click Yes.
Check the configuration created. The wizard has configured ws2007HttpBinding as binding for the endpoint. Change this to wsHttpBinding. Be careful, this value is case sensitive. The result should look like this:
<system.serviceModel>
 <services>
  <service name="CarManagementService.CarManagementImplementation">
   <endpoint
     address="http://localhost:9876/CarManagementService"
     binding="wsHttpBinding"
     bindingConfiguration=""
     contract="CarManagementInterface.ICarManagement" />
  </service>
 </services>
</system.serviceModel>
Instead of doing the configuration one by one for the three other services using the WCF Configuration Editor, you can now copy and paste the service tag and change the values by hand. Use the following addresses for the other services:
http://localhost:9876/CustomerServicehttp://localhost:9876/RentalServicehttp://localhost:9876/ExternalInterfaceService
Make sure you change the name and the contract correctly. The result should look like this:
<system.serviceModel>
    <services>
      <service name="CarManagementService.CarManagementImplementation">
        <endpoint
          address="http://localhost:9876/CarManagementService"
          binding="wsHttpBinding"
          bindingConfiguration=""
          contract="CarManagementInterface.ICarManagement" />
      </service>
      <service name="CustomerService.CustomerServiceImplementation">
        <endpoint
          address="http://localhost:9876/CustomerService"
          binding="wsHttpBinding"
          bindingConfiguration=""
          contract="CustomerInterface.ICustomer" />
      </service>
      <service name="RentalService.RentalServiceImplementation">
        <endpoint
          address="http://localhost:9876/RentalService"
          binding="wsHttpBinding"
          bindingConfiguration=""
          contract="RentalInterface.IRental" />
      </service>
      <service
       name="ExternalInterfaceFacade.ExternalInterfaceFacadeImplementation">
        <endpoint
          address="http://localhost:9876/ExternalInterfaceService"
          binding="wsHttpBinding"
          bindingConfiguration=""
          contract="ExternalInterface.IExternalInterface" />
      </service>
    </services>
  </system.serviceModel>
Code snippet CreatingaSOACase.zip
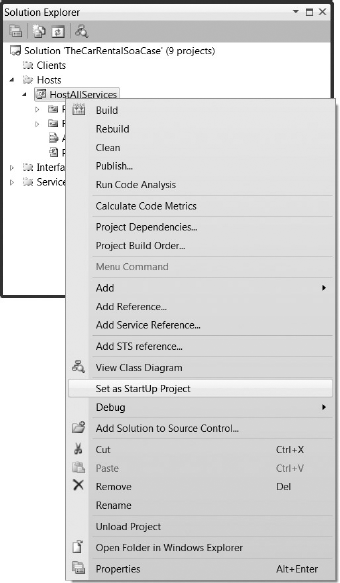
Set HostAllServices as the startup project. Do this by right-clicking the HostAllServices project and selecting Set as StartUp Project. See Figure 11-28.
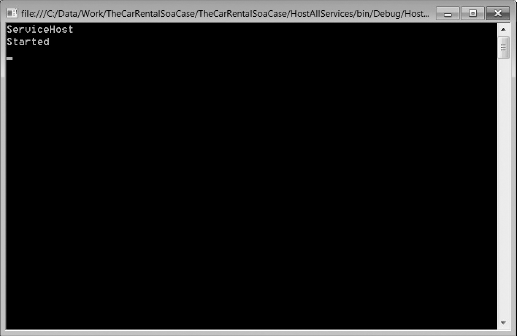
Now you can run the application. This application exposes the services you created. See Figure 11-29.
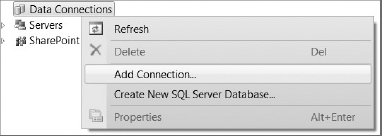
Open Server Explorer in Visual Studio and create a new SQL Server Database (see Figure 11-30). Name the database RentalCarCaseDB.
Add two tables to the database. You can do this by executing this SQL statement or by adding the tables manually:
CREATE DATABASE [CarRentalCaseDB]
GO
USE [CarRentalCaseDB]
GO
CREATE TABLE [dbo].[Rental]
(
  [RentalID] [int] IDENTITY(1,1) NOT NULL,
  [CustomerID] [int] NULL,
  [CarID] [nvarchar](50) NULL,
  [PickUpLocation] [int] NULL,
  [DropOffLocation] [int] NULL,
  [PickUpDateTime] [datetime] NULL,
  [DropOffDateTime] [datetime] NULL,
  [PaymentStatus] [char](3) NULL,
  [Comments] [nvarchar](1000) NULL,
 CONSTRAINT [PK_Rental] PRIMARY KEY CLUSTERED
 ([RentalID] ASC))
GO
CREATE TABLE [dbo].[Customer](
  [CustomerID] [int] IDENTITY(1,1) NOT NULL,
  [CustomerName] [nvarchar](50) NULL,
  [CustomerFirstName] [nvarchar](50) NULL,
 CONSTRAINT [PK_Customer] PRIMARY KEY CLUSTERED
([CustomerID] ASC))
GO
Now you'll add code to the implementation to make your services work.
This is not the complete business logic behind the services as this book is focusing on WCF only. Instead you'll write temporary code so the operations can return meaningful answers to clients. For the implementation of InsertCustomer and RegisterCarRental, use a LINQ to SQL model to insert the data into a database.
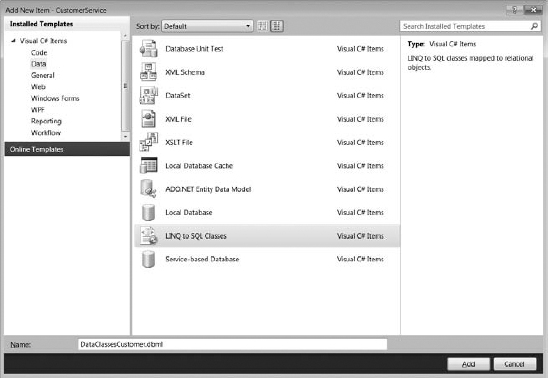
Add a LINQ to SQL Classes file to both the CustomerService and the RentalService (see Figure 11-31). Both CustomerService and RentalService access the same database in this case.
In a real production environment these would probably be two different databases, but using one database is more convenient for this walkthrough. At CustomerService, add a LINQ to SQL Classes and name it DataClassesCustomer.dbml (see Figure 11-32).
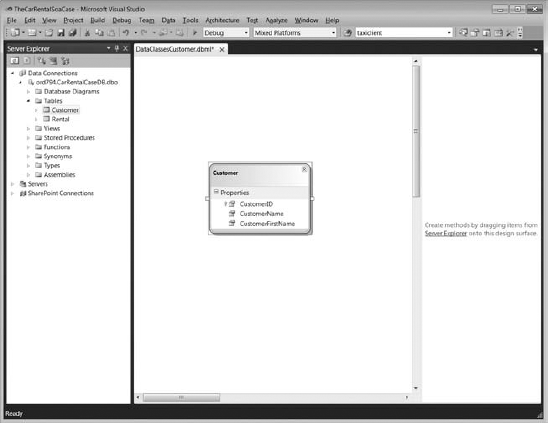
Drag and drop the Customer table into the designer.
Do this also for the RentalService. Create a LINQ to SQL model named DataClassesRental.dbml and drag and drop the Rental Table into it.
Now you can add the implementation code to the CustomerService. Open the CustomerServiceImplementation.cs file. In the code for the RegisterCustomer method, delete the throw statement and replace it with the following code:
using (DataClassesCustomerDataContext ctx = new DataClassesCustomerDataContext())
{
  Customer customerToInsert;
  customerToInsert = new Customer();
  customerToInsert.CustomerName = customer.CustomerName;
  customerToInsert.CustomerFirstName = customer.CustomerFirstName;
  ctx.Customers.InsertOnSubmit(customerToInsert);
  ctx.SubmitChanges();
  return customerToInsert.CustomerID;
}
This code opens the LINQ to SQL DataContext, creates a new customer, and inserts and submits the customer to the database.
Add similar code to insert a rental into the database in the implementation of the RentalService. Open RentalServiceImplementation.cs and replace the throw statement with the following code:
Console.WriteLine("RegisterCarRental");
using (DataClassesRentalDataContext ctx = new DataClassesRentalDataContext())
{
  Rental rentalToInsert;
  rentalToInsert = new Rental();
  rentalToInsert.CustomerID = rentalRegistration.CustomerID;
  rentalToInsert.CarID = rentalRegistration.CarID;
  rentalToInsert.Comments = rentalRegistration.Comments;
  ctx.Rentals.InsertOnSubmit(rentalToInsert);
  ctx.SubmitChanges();
}

return "OK";Here you add code to the CarManagementService. Start by adding a using statement for the system.IO namespace. You need this namespace to read an image from a file:
using System.IO;
Implement the operations with the following code. Make sure you use a path that refers to a file that exists in the GetCarPicture operation:
public int InsertNewCar(Car car)
{
  Console.WriteLine("InsertNewCar " + car.BrandName + " " + car.TypeName);
  return 1;
}

public bool RemoveCar(Car car)
{
  Console.WriteLine("RemoveCar " + car.BrandName + " " + car.TypeName);
  return true;
}

public void UpdateMilage(Car car)
{
  Console.WriteLine("UpdateMilage " + car.BrandName + " " + car.TypeName);
}

public List<Car> ListCars()
{
  Console.WriteLine("ListCars");
  List<Car> listCars;
  listCars = new List<Car>();
  listCars.Add(new Car {
       BrandName = "XXX",
       Transmission = TransmissionTypeEnum.Automatic,
       TypeName = "YYY" });
  listCars.Add(new Car {
       BrandName = "XXX",
       Transmission = TransmissionTypeEnum.Automatic,
       TypeName = "YYY" });

  return listCars;
}

public byte[] GetCarPicture(string carID)
{
  Console.WriteLine("GetCarPicture");

  byte[] buff;

  string pathToPicture;
  pathToPicture = @"C:DataWCFBookCodeSOACasePicsCarExample.jpg";

  FileStream fileStream =
   new FileStream(pathToPicture, FileMode.Open,FileAccess.Read);
  BinaryReader binaryReader = new BinaryReader(fileStream);

  buff = binaryReader.ReadBytes((int)fileStream.Length);
  return buff;
}
In this implementation the InsertCar, RemoveCar, and UpdateMileage operations do not interact with a database. They just write a status line to the console. The ListCars operation creates and returns a hardcoded list of cars. The GetCarPicture operation reads the image in a file and returns this as an array of bytes. It's up to the client to transform these bytes to an image again.
Now you're able to host the service by adding configuration to expose the metadata. Exposing metadata allows Visual Studio to download the WSDL file to create the needed proxies. Allowing a service to expose its metadata can be done by configuration.
You'll do this for the CarManagementService only. You'll see other ways to create proxies for the other services in this chapter.
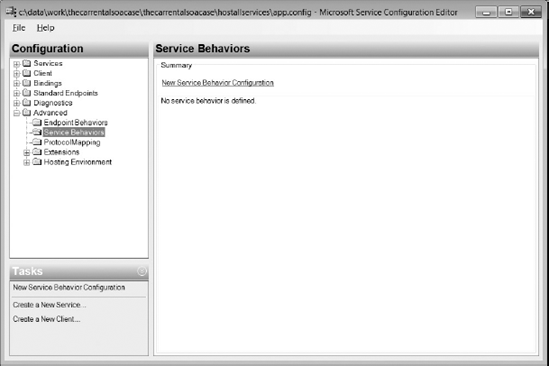
Open the App.config of the HostAllServices applications with the WCF Configuration Editor. Look for the Service Behaviors node and click the New Service Behavior Configuration link. See Figure 11-33.
Name the behavior ExposeMetaDataBehavior. See Figure 11-34.
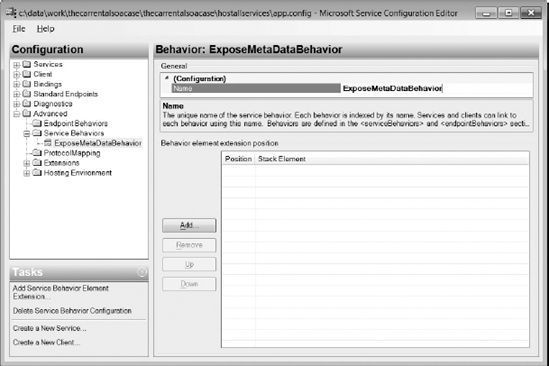
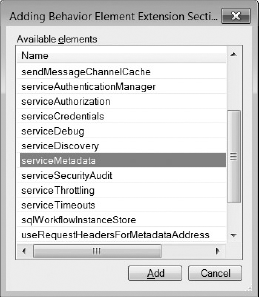
Add a behavior element by clicking the Add button. This opens a list of behavior elements. See Figure 11-35.
Select the serviceMetadata element and click Add. Notice the element is now added to the ExposeMetaDataBehavior node in the treeview on the right.
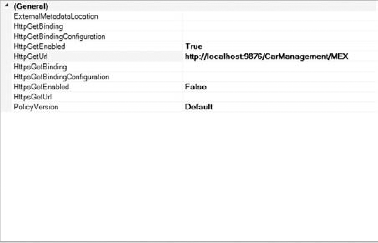
Click this new node and edit the serviceMetadata attributes. Enter http://localhost:9876/CarManagement/MEX as the HttpGetUrl and set the HttpGetEnabled property to True. See Figure 11-36.
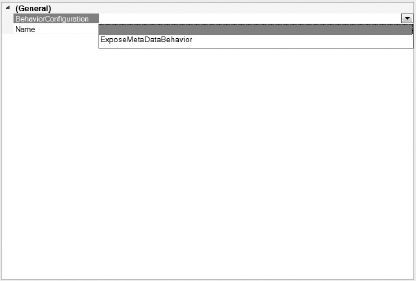
Now refer CarManagementService to this new behavior. Click CarManagementService in the tree and set the BehaviorConfiguration to ExposeMetaDataBehavior. See Figure 11-37.
Save the configuration, close the WCF Configuration Editor, and reload the App.config file.
The configuration in the App.config should now include a serviceBehavior tag like this:
<behaviors>
  <serviceBehaviors>
    <behavior name="ExposeMetaDataBehavior">
      <serviceMetadata
        httpGetEnabled="true"
        httpGetUrl="http://localhost:9876/CarManagement/MEX" />
    </behavior>
  </serviceBehaviors>
</behaviors>
The configuration of the CarManagementService should now look like the following — notice the behaviorConfiguration attribute of the service tag:
<service
 behaviorConfiguration="ExposeMetaDataBehavior"
 name="CarManagementService.CarManagementImplementation">
  <endpoint
   address="http://localhost:9876/CarManagementService"
   binding="wsHttpBinding"
   bindingConfiguration=""
   contract="CarManagementInterface.ICarManagement" />
</service>
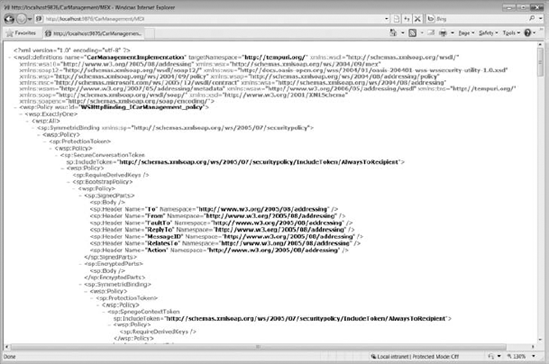
Now you can test the metadata endpoint. Start the HostAllServices application and start a browser. After the HostAllServices application is up, browse to http://localhost:9876/CarManagement/MEX. The browser should show you the WSDL file, as in Figure 11-38.
Add a WindowsForms application to the Client solution folder called CarApplication. This application uses the CarService.
Start the HostAllServices application outside Visual Studio instead of running it from within Visual Studio. You can do this by navigating to the bindebug directory of the project and starting HostAllServices.exe.
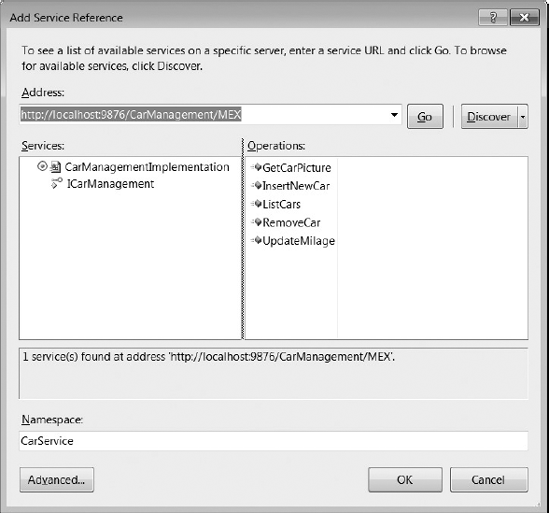
In Visual Studio, click Add Service Reference in the CarManagementClient application. Type the address of the metadata endpoint in the Add Service Reference dialog box: http://localhost:9876/CarManagement/MEX.
Set the namespace of the service reference to CarService and click the Go button. Visual Studio downloads the WSDL and shows the available operations. See Figure 11-39.
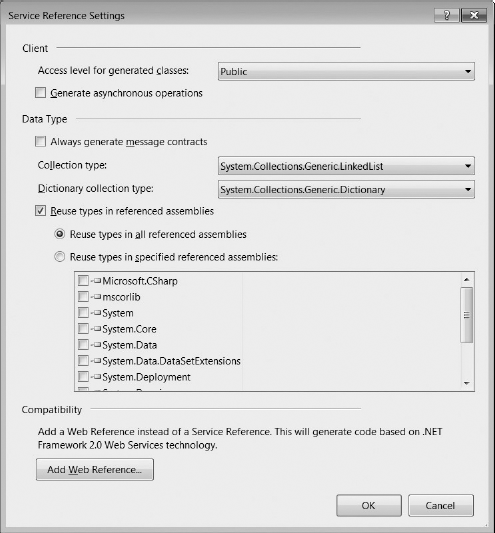
Click the Advanced button to access the Service Reference Settings dialog box. Set the Collection type to System.Collections.Generic.LinkedList. See Figure 11-40. This is needed for Visual Studio to generate generic lists instead of arrays in the proxies for all collection types found in the contract.
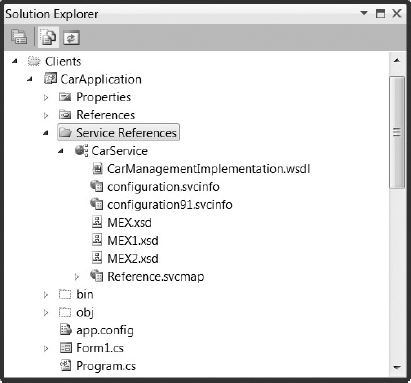
Click OK twice. The code for the proxies and the configuration for the client endpoints are now generated. You can check this by clicking the Show All Files button in Solution Explorer. See Figure 11-41.
Now you can close the HostAllServices application and check the result in Visual Studio. Open the App.config file and look up the configuration for the client endpoint. For testing purposes, remark the <identity> tag for the generated client endpoint. The result should look like this:
<client>
    <endpoint address="http://localhost:9876/CarManagementService"
        binding="wsHttpBinding" bindingConfiguration="WSHttpBinding_ICarManagement"
        contract="CarService.ICarManagement" name="WSHttpBinding_ICarManagement">
        <!--<identity>
            <userPrincipalName value="XXXYYY" />
        </identity>-->
    </endpoint>
</client>
Continue creating the application by adding user interface components to the form. For this walkthrough you need to add three buttons: a listbox, a textbox with the multiline property set to true, and a picturebox. It should look like Figure 11-42.
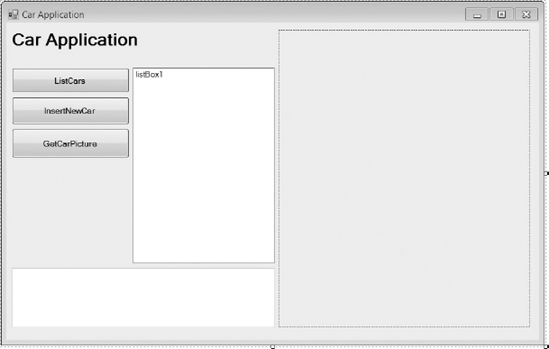
The three buttons will call the ListCars operation, the InsertNewCar operation, and the GetCarPicture operation. The listbox is used to show the results; the picturebox is there to show the picture of the car; and the textbox is there to show error messages, should they occur.
Add the following code for the ListCars button:
try
{
  CarService.CarManagementClient client;
client = new CarService.CarManagementClient();
List<CarService.Car> listCars;
listCars = client.ListCars();
foreach (CarService.Car car in listCars)
{
listBox1.Items.Add(car.BrandName + " " + car.TypeName);
}
}
catch (Exception ex)
{
textBox1.Text = ex.Message;
}This code instantiates the proxy called CarManagementClient, calls the ListCars operation, and adds all cars returned to the listbox.
Add code for the InsertNewCar button:
try
{
  CarService.CarManagementClient client;
  client = new CarService.CarManagementClient();
  CarService.Car car;
  car = new CarApplication.CarService.Car();
  car.BrandName = "BMW";
  car.TypeName = "320d"
  int newCarID;
  newCarID = client.InsertNewCar(car);
}
catch (Exception ex)
{
  textBox1.Text = ex.Message;
}
This code creates a new car, specifies the content of its properties, and calls the InsertNewCar operation in the service.
Add code for the GetCarPicture button:
try
{
  CarService.CarManagementClient client;
  client = new CarService.CarManagementClient();
  byte[] buff;
  buff = client.GetCarPicture("C67872");
  TypeConverter typeConverter;
  typeConverter = TypeDescriptor.GetConverter(typeof(Bitmap));
  Bitmap bitmap = (Bitmap)typeConverter.ConvertFrom(buff);
  pictureBox1.Image = bitmap;
}
catch (Exception ex)
{
textBox1.Text = ex.Message;
}This code calls the GetCarPicture operation, receives the array of bytes, converts them to a bitmap, and shows the bitmap in the picturebox.
You need to make changes to the configuration of the host to allow receiving the pictures correctly. To get a picture from the service with a size bigger than the default, you need to add a binding specification in the App.config file of the HostAllServices application and specify the maxReceivedMessageSize property for the binding.
Open the App.config file and add the following code in the system.serviceModel tag:
<system.serviceModel>
    <bindings>
      <wsHttpBinding>
        <binding name="AllowBigMessageSize" maxReceivedMessageSize="999999">
        </binding>
      </wsHttpBinding>
    </bindings>

  </system.serviceModel>
This adds a binding configuration called AllowBigMessageSize. Use this binding configuration in the endpoint configuration of the CarManagementService. See the configuration code here:
<service
   behaviorConfiguration="ExposeMetaDataBehavior"
   name=
    "CarManagementService.CarManagementImplementation">
  <endpoint
    address="http://localhost:9876/CarManagementService"
    binding="wsHttpBinding"
    bindingConfiguration="AllowBigMessageSize"
    contract="CarManagementInterface.ICarManagement" />
</service>
Also change the configuration of the client so it accepts large messages. Open the App.config of the CarApplication and set the maxReceivedMessageSize of the WsHttpBinding to 999999 and also set the maxArrayLength of the readerQuotas to 999999. This should be enough for all images:
<wsHttpBinding>
    <binding name="WSHttpBinding_ICarManagement" closeTimeout="00:01:00"
        openTimeout="00:01:00" receiveTimeout="00:10:00" sendTimeout="00:01:00"
        bypassProxyOnLocal="false" transactionFlow="false"
        hostNameComparisonMode="StrongWildcard"
        maxBufferPoolSize="524288" maxReceivedMessageSize="999999"
messageEncoding="Text" textEncoding="utf-8" useDefaultWebProxy="true"
allowCookies="false">
<readerQuotas maxDepth="32" maxStringContentLength="8192"
maxArrayLength="999999"
maxBytesPerRead="4096"
maxNameTableCharCount="16384" />
<reliableSession ordered="true" inactivityTimeout="00:10:00"
enabled="false" />
<security mode="Message">
<transport clientCredentialType="Windows" proxyCredentialType="None"
realm="" />
<message clientCredentialType="Windows"
negotiateServiceCredential="true"
algorithmSuite="Default" establishSecurityContext="true" />
</security>
</binding>
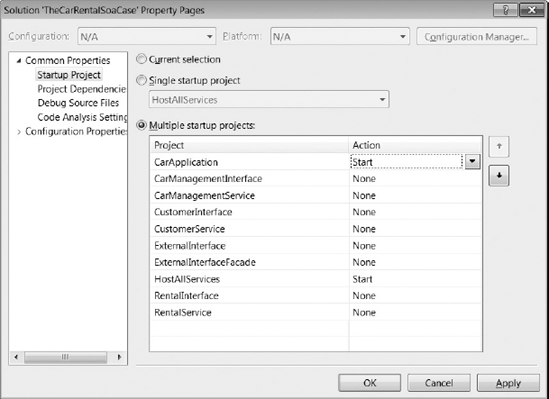
</wsHttpBinding>Now you can test both client and service. To make sure Visual Studio starts both projects, change the properties of the solution so it has multiple startup projects. Right-click the solution and select Properties. See Figure 11-43. Select Multiple startup projects and set the Actions of the CarApplication and the HostAllServices to Start.
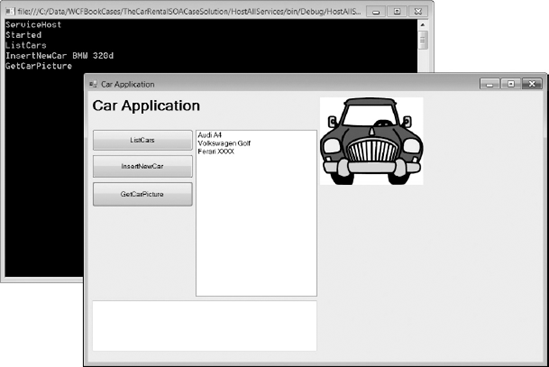
Start the application by running the solution and executing the operations by clicking the buttons. See Figure 11-44. Watch the console of the ServiceHost to see if the operations are called correctly.
In the client solution folder, add a Windows form application called RentalApplication. Add the System.ServiceModel and System.Runtime.Serialization assemblies to this application.
For this client you will not create the proxies by adding a service reference referring to a WSDL. Instead you'll refer to the RentalInterface project itself as this project also has all the necessary metadata in the form of WCF attributes. This approach is easier and more flexible but only valid if the client is also a .NET environment. With non-.NET clients you need the WSDL file.
Add a reference to the RentalInterface to the application. See Figure 11-45.
Because the proxies are being created manually, you need to add a class to the application called RentalProxy. This class is the proxy to be created manually instead of generating it by Visual Studio.
Add the using statements to the class like this:
using System.ServiceModel;
using System.Runtime.Serialization;
Also add a using statement to the namespace of the referenced RentalInterface:
using RentalInterface;
Make the class public, make it inherit from ClientBase<RentalInterface.IRental>, and let it implement the IRental interface. The code should look like this:
public class RentalProxy : ClientBase<IRental>,IRental
{
  #region IRental Members

  public string RegisterCarRental(RentalRegistration rentalRegistration)
  {
    throw new NotImplementedException();
  }

  public void RegisterCarRentalAsPaid(string rentalID)
  {
    throw new NotImplementedException();
  }

  public void StartCarRental(string rentalID)
{
throw new NotImplementedException();
}
public void StopCarRental(string rentalID)
{
throw new NotImplementedException();
}
public RentalInterface.RentalRegistration GetRentalRegistration(string rentalID)
{
throw new NotImplementedException();
}
#endregion
}Now create a constructor for the class that calls the constructor of the base class with a string as parameter. This string is the name of an endpoint in the configuration file. You will create this endpoint later.
public RentalProxy()
  : base("RentalServiceEndpoint")
{

}
Implement each method with code that calls the corresponding method on the channel property. The channel property is a protected member in the ClientBase<T> class with a generic type used in the class declaration. As it is protected, it is only accessible in classes that inherit from the class where it is declared. In your case, it is the IRental interface. This results in the channel having the same methods as the implementation class. As you see, a proxy is simply a class at the client side with the same methods as the class at the service side. Therefore it implements the interface. The proxy's responsibility is simply to pass the parameters it gets from its caller to the channel and return the output from the channel back to the caller.
After implementing the interface, delete the throw statement for each method and replace it as follows:
public string RegisterCarRental(RentalRegistration rental)
{
  return Channel.RegisterCarRental(rental);
}

public void RegisterCarRentalAsPaid(string rentalID)
{
  Channel.RegisterCarRentalAsPaid(rentalID);
}

public void StartCarRental(string rentalID)

{
  Channel.StartCarRental(rentalID);
}

public void StopCarRental(string rentalID)
{
Channel.StopCarRental(rentalID);
}
public RentalRegistration GetRentalRegistration(string rentalID)
{
return Channel.GetRentalRegistration(rentalID);
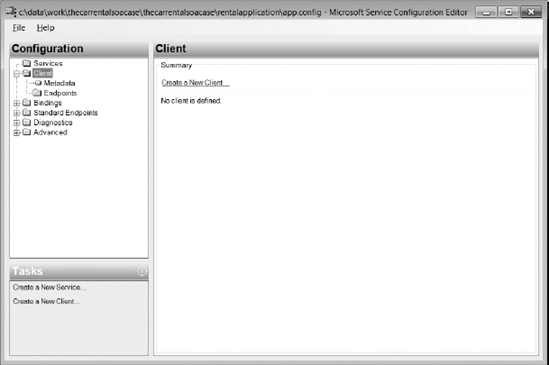
}As you're not taking the add service reference approach, you need to add and configure the App.config file yourself. Add an App.config file to the application and edit the file with the WCF Configuration Editor. See Figure 11-46.
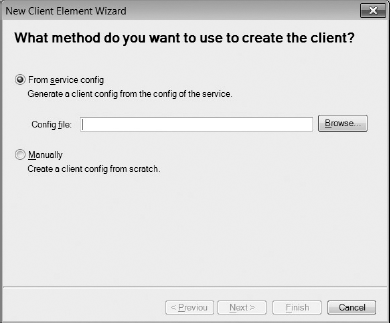
Add the client configuration by clicking the Create a New Client link. A wizard starts up asking how to create the configuration. See Figure 11-47.
Select the From Service Config option and browse to the App.config file of the HostAllServices application. This is C:DataWorkTheCarRentalSOACaseTheCarRentalSOACaseHostAllServicesapp.config.
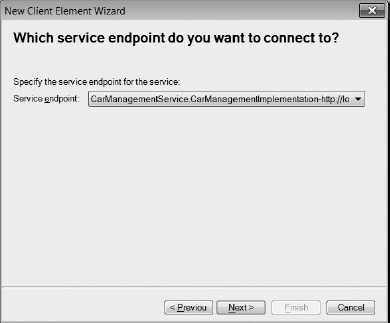
Select the endpoint to which the client will talk. In the drop-down you'll find all four endpoints. See Figure 11-48. Select the RentalService endpoint.
The wizard now asks you for a name to identify your client configuration. This name is RentalServiceEnpoint. See Figure 11-49. This is the string you specified in the constructor of the proxy. This is how WCF knows where to look for the configuration when the proxy is instantiated.

Click Next, click Finish, save the configuration, and close the WCF Configuration Editor. Reload the App.config file in Visual Studio.
For testing purposes, delete the <identity> tag in the generated configuration. The configuration should look like this:
<system.serviceModel>
<client>
<endpoint
address="http://localhost:9876/RentalService" binding="wsHttpBinding"
bindingConfiguration=""
contract="RentalInterface.IRental"
name="RentalServiceEndpoint">
</endpoint>
</client>
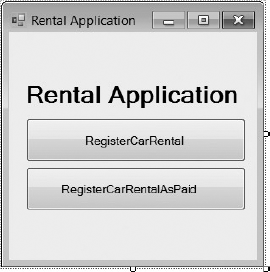
</system.serviceModel>For the user interface of the application, add two buttons to the form. See Figure 11-50. These buttons will execute the code to call to the proxy.
Following is the code for the RegisterCarRental application:
try
{
  RentalProxy rentalProxy;
rentalProxy = new RentalProxy();
RentalInterface.RentalRegistration rentalRegistration;
rentalRegistration = new RentalInterface.RentalRegistration();
rentalRegistration.CustomerID = 1;
rentalRegistration.CarID = "123767";
rentalRegistration.DropOffLocation = 1327;
rentalRegistration.DropOffDateTime = System.DateTime.Now;
rentalRegistration.PickUpLocation = 7633;
rentalRegistration.PickUpDateTime = System.DateTime.Now;
rentalProxy.RegisterCarRental(rentalRegistration);
}
catch (Exception ex)
{
MessageBox.Show(ex.Message);
}Here is the code for the RegisterCarRentalAsPaid button:
try
{
  RentalProxy rentalProxy;
  rentalProxy = new RentalProxy();

  rentalProxy.RegisterCarRentalAsPaid("1876893");
}
catch (Exception ex)
{
  MessageBox.Show(ex.Message);
}
To test this, change the solution properties, and set the RentalApplication and the HostAllServices as startup. Run the applications, call the operations by clicking the buttons, and check the database to verify records are correctly inserted.
At this moment the applications have no correct error handling. A good error-handling strategy starts with defining fault contracts in the interfaces.
Open the IRental.cs file and add a DataContract for the faults:
[DataContract(Name = "RentalRegisterFault",
              Namespace = "FaultContracts/RentalRegisterFault")]
public class RentalRegisterFault
{
  [DataMember]
  public string FaultDescription { get; set; }
[DataMember]
public int FaultID { get; set; }
}Now add the FaultContract attribute to every method in the IRental interface. The interface now looks like this:
[ServiceContract]
public interface IRental
{
  [OperationContract]
  [FaultContract(typeof(RentalRegisterFault))]
  string RegisterCarRental(RentalRegistration rentalRegistration);

  [OperationContract]
  [FaultContract(typeof(RentalRegisterFault))]
  void RegisterCarRentalAsPaid(string rentalID);

  [OperationContract]
  [FaultContract(typeof(RentalRegisterFault))]
  void StartCarRental(string rentalID);

  [OperationContract]
  [FaultContract(typeof(RentalRegisterFault))]
  void StopCarRental(string rentalID);

  [OperationContract]
  [FaultContract(typeof(RentalRegisterFault))]
  RentalRegistration GetRentalRegistration(string rentalID);
}
The next step is to add the logic to detect exceptions in the service implementation. This is done at two levels. The first level is checking the incoming parameter to determine whether it's a null value or not. In case of a null value, you're throwing a FaultException of type RentalRegisterFault. Then you surround the code to insert the rental registration with a try...catch. When an error occurs, you're also throwing a FaultException of type RentalRegisterFault in the catch handler.
The changed code for the implementation is as follows:
public string RegisterCarRental(RentalRegistration rentalRegistration)
{
  Console.WriteLine("RegisterCarRental");

  if (rentalRegistration == null)
  {
    RentalRegisterFault fault;
    fault = new RentalRegisterFault();
    fault.FaultID = 1;
    fault.FaultDescription = "Input is not valid, got null value";
    throw new FaultException<RentalRegisterFault>(fault, "");
  }

  try
{
using (DataClassesRentalDataContext ctx = new DataClassesRentalDataContext())
{
Rental rentalToInsert;
rentalToInsert = new Rental();
rentalToInsert.CustomerID = rentalRegistration.CustomerID;
rentalToInsert.CarID = rentalRegistration.CarID;
rentalToInsert.Comments = rentalRegistration.Comments;
ctx.Rentals.InsertOnSubmit(rentalToInsert);
ctx.SubmitChanges();
return "OK";
}
}
catch (Exception ex)
{
RentalRegisterFault fault;
fault = new RentalRegisterFault();
fault.FaultID = 123;
fault.FaultDescription = "An error occurred while inserting the registration";
throw new FaultException<RentalRegisterFault>(fault, "");
}
}Code snippet CreatingaSOACase.zip
At the client side, it's advisable to catch on four types of exceptions:
A
FaultExceptionof typeRentalRegisterFaultThe generic
FaultExceptionThe
EndpointNotFoundExceptionThe
CommunicationException
The changed code for the button in the client application is shown here:
try
{
  RentalProxy rentalProxy;
  rentalProxy = new RentalProxy();

  RentalInterface.RentalRegistration rentalRegistration;
  rentalRegistration = new RentalInterface.RentalRegistration();
  rentalRegistration.CustomerID = 1;
  rentalRegistration.CarID = "123767";

  rentalRegistration.DropOffLocation = 1327;
  rentalRegistration.DropOffDateTime = System.DateTime.Now;

  rentalRegistration.PickUpLocation = 7633;
  rentalRegistration.PickUpDateTime = System.DateTime.Now;

  rentalProxy.RegisterCarRental(rentalRegistration);

}
catch (FaultException<RentalInterface.RentalRegisterFault> rentalRegisterFault)
{
MessageBox.Show("rentalRegisterFault " + rentalRegisterFault.Message);
}
catch (FaultException faultException)
{
MessageBox.Show("faultException " + faultException.Message);
}
catch (EndpointNotFoundException endpointNotFoundException)
{
MessageBox.Show("endpointNotFoundExc " + endpointNotFoundException.Message);
}
catch (CommunicationException communicationException)
{
MessageBox.Show("communicationException" + communicationException.Message);
}Code snippet CreatingaSOACase.zip
Another requirement was that the call to the RegisterCarRentalAsPaid method in the RentalService needs to be impersonated. This means the implementation code in the service should run under the credentials of the user behind the client application.
To do this, open the RentalServiceImplementation.cs file. Add a using statement to the System.Security.Principal namespace. This makes the WindowsIdentity class available. The WindowsIdentity class is useful to get the name of the user running the code. In this way you can test if the impersonation is really happening:
using System.Security.Principal;
You need to add an OperationBehavior attribute at the RegisterCarRentalAsPaid method in the implementation and set the impersonation parameter of the attribute to Required:
[OperationBehavior(Impersonation = ImpersonationOption.Required)]
The complete method becomes this:
[OperationBehavior(Impersonation = ImpersonationOption.Required)]
public void RegisterCarRentalAsPaid(string rentalID)
{
  Console.WriteLine("RegisterCarRentalAsPaid " + rentalID);
  Console.WriteLine("  WindowsIdentity : {0} ", WindowsIdentity.GetCurrent().Name);
}
Testing this can be done by starting the RentalApplication at the command prompt with the runas tool. With the runas tool you can specify that another user besides the one logged in is running the application. Open a command prompt and navigate to the directory where the RentalApplication is present. Execute the following command:
runas /user:UserX RentalApplication.exe
Here you specify that RentalApplication.exe runs under the credentials of a user called UserX. You can use any username in your domain for which you know the password. The runas tool asks you for this password and then starts the application.
Another requirement allows that operations can exchange subclasses of the car class. Add two classes that inherit from car to the ICarManagement interface like this:
[DataContract]
public class LuxuryCar : Car
{
  [DataMember]
  List<LuxuryItems> LuxuryItemsList { get; set; }
}

[DataContract]
public class LuxuryItems
{
  [DataMember]
  public string ItemName { get; set; }
  [DataMember]
  public string ItemDescription { get; set; }
}

[DataContract]
public class SportsCar : Car
{
  [DataMember]
  public int HorsePower { get; set; }
}
Specify the KnownType attribute at the Car class for each possible subclass. Using this attribute allows that the returnvalues for the ListCars method can be of types that inherit from the class Car. In our case these are types LuxuryCar and SportsCar:
[DataContract]
[KnownType(typeof(LuxuryCar))]
[KnownType(typeof(SportsCar))]
public class Car
{
  [DataMember]
  public string BrandName { get; set; }
  [DataMember]
public string TypeName { get; set; }
[DataMember]
public TransmissionTypeEnum Transmission { get; set; }
[DataMember]
public int NumberOfDoors { get; set; }
[DataMember]
public int MaxNumberOfPersons { get; set; }
[DataMember]
public int LitersOfLuggage { get; set; }
}You can now change the implementation of the ListCars method so it also includes a SportsCar in the list as return, like here:
public List<Car> ListCars()
{
  Console.WriteLine("ListCars");
  List<Car> listCars;
  listCars = new List<Car>();
  listCars.Add(new Car {
                BrandName = "Audi",
                Transmission = TransmissionTypeEnum.Automatic,
                TypeName = "A4" });
  listCars.Add(new Car {
                BrandName = "Volkswagen",
                Transmission = TransmissionTypeEnum.Automatic,
                TypeName = "Golf" });
  listCars.Add(new SportsCar {
                BrandName = "Ferrari",
                Transmission = TransmissionTypeEnum.Automatic,
                TypeName = "XXXX", HorsePower= 600 });

  return listCars;
}
Using the KnownType attribute results in a new version of the contract, so there is a new version of the WSDL file. This new WSDL file now also includes the structure of the two types inheriting from the Car type. You need to update the clients using this contract.
To update the service reference in the CarApplication, start the HostAllServices application outside Visual Studio again. Right-click the existing CarService service reference and select Update Service Reference. See Figure 11-51.
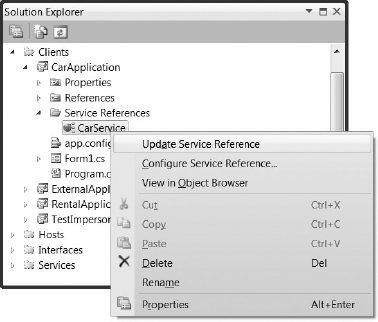
This generates the proxies again and the two subtypes will now be known in the client.
To test this, close the HostAllServices application and change the startup projects in the solution to the CarApplication and the HostAllServices applications. Try to get the list of cars again. The result should now also include cars of one of the subtypes.
The implementation of the ExternalInterface has one method. This method is called SubmitRentalContract and receives a parameter that has the data for a new customer and the rental registration. The purpose of the SubmitRentalContract method is to insert the new customer and register a rental for it in one single transaction. The method calls the RegisterCustomer method in the CustomerService and the RegisterCarRental method in the RentalService.
The ExternalInterfaceFacade calls to these two services by using the named pipes binding. This can be done by creating a channel to the services with a ChannelFactory and specifying the type of binding and its address in code instead of configuration. This is yet another way of creating proxies. Instead of adding a service reference or creating a proxy inheriting from the ClientBase class manually, you're now using the ChannelFactory which can create proxies dynamically at runtime based on an interface.
Defining the scope of the transaction is done by a using block in which you instantiate a TransactionScope. After calling both methods you flag the scope as being complete.
In the ExternalInterfaceFacade project, add a reference to System.Transactions. See Figure 11-52.
Open the ExternalInterfaceFacadeImplementation.cs file and add a using statement to the System.Transactions namespace:
using System.Transactions;
Add a reference to both the CustomerInterface and the RentalInterface libraries in the ExternalInterfaceFacade project. See Figure 11-53.
Add this code to the implementation of the SubmitRentalContract method:
using (TransactionScope scope =
        new TransactionScope(TransactionScopeOption.RequiresNew))
{

 NetNamedPipeBinding netNamedPipeBinding;
 netNamedPipeBinding = new NetNamedPipeBinding();
 netNamedPipeBinding.TransactionFlow = true;

 CustomerInterface.ICustomer customerServiceChannel;
 customerServiceChannel = ChannelFactory<CustomerInterface.ICustomer>.
  CreateChannel(netNamedPipeBinding, new
  EndpointAddress("net.pipe://localhost/customerservice"));

 int newCustomerID;
 newCustomerID =
 customerServiceChannel.RegisterCustomer(rentalContract.Customer);
rentalContract.RentalRegistration.CustomerID = newCustomerID;
RentalInterface.IRental rentalServiceChannel;
rentalServiceChannel = ChannelFactory<RentalInterface.IRental>.
CreateChannel(netNamedPipeBinding, new
EndpointAddress("net.pipe://localhost/rentalservice"));
rentalServiceChannel.RegisterCarRental(rentalContract.RentalRegistration);
scope.Complete();
}In this code you start a transaction in a using block. In the using block you're instantiating a netNamedPipeBinding with the transactionFlow flag set to true and using this binding to create two channels, one for the CustomerService and one for the RentalService. First the RegisterCustomer operation in the CustomerService is called. After this the RegisterCarRental operation in the RentalService is called. When both operations are called you complete the transaction.
Now you need to indicate at the two operations that they require a transaction and that they can complete the transaction automatically.
Add a OperationBehavior attribute to the RegisterCustomer method in the implementation of the CustomerService. Set both TransactionAutoComplete and TransactionScopeRequired to true:
[OperationBehavior( TransactionAutoComplete = true,
                    TransactionScopeRequired = true)]
public int RegisterCustomer(CustomerInterface.Customer customer)
{
  //...
}
Add an OperationBehavior attribute to the RegisterCustomer method in the implementation of the CustomerService. Set both TransactionAutoComplete and TransactionScopeRequired to true:
[OperationBehavior( TransactionAutoComplete = true,
                    TransactionScopeRequired = true)]
public string RegisterCarRental(RentalRegistration rentalRegistration)
{
  //...
}Add a netNamedPipeBinding endpoint to the CustomerService in the App.config of the HostAllServices application:
<service name="CustomerService.CustomerServiceImplementation">
...
  <endpoint
    address="net.pipe://localhost/customerservice"
    binding="netNamedPipeBinding"
    bindingConfiguration=" SupportTransactionsNetNamedBinding"
    contract="CustomerInterface.ICustomer" />
</service>
Do this also for the RentalService:
<service name="RentalService.RentalServiceImplementation">
...
  <endpoint
    address="net.pipe://localhost/rentalservice"
    binding="netNamedPipeBinding"
    bindingConfiguration="SupportTransactionsNetNamedBinding"
    contract="RentalInterface.IRental" />
</service>
These endpoints refer to a bindingConfiguration called SupportTransactionsNetNamedBinding. You need to configure the binding as follows:
<bindings>
  <netNamedPipeBinding>
    <binding name="supportTransactionsNetNamedBinding" transactionFlow="true">
    </binding>
  </netNamedPipeBinding>
</bindings>
Back in the code, add a TransactionFlow attribute on the RegisterCarRental operation of the IRental interface with the transactionFlowOption set to Allowed:
[OperationContract]
[FaultContract(typeof(RentalRegisterFault))]
[TransactionFlow(TransactionFlowOption.Allowed)]
string RegisterCarRental(RentalRegistration rentalRegistration);
Do this also for the RegisterCustomer method in the ICustomer interface:
[OperationContract]
[TransactionFlow(TransactionFlowOption.Allowed)]
int RegisterCustomer(Customer customer);