
WHAT'S IN THIS CHAPTER?
Hosting options overview
Hosting in IISWAS
Managing and tracking endpoints with Windows Server AppFabric
Forwarding services
Cloud-based hosting
WCF is a great and powerful platform to develop service. But after you have developed your service, how can you make it available to the world? You need a host process to run your service. The host process creates the various configuration settings that enable the service execution. It prepares the environment, creates the endpoints, starts the listening processes, and manages the service lifecycle.
The role of the host process is very important, and should be chosen carefully. There are two main options for hosting your service:
Self-hosting
Console application
Windows application
Windows services
IIS
IIS 6 only for Http protocol
Windows Activation Service (WAS)
Windows Server AppFabric
The self-hosting option allows you to host a service directly in your application. If you want to enable a Windows application to receive messages, or if you want to enable communication between different processes, you can use this option. This makes your application totally independent from the configuration of the machine. You don't need to install third-party software to host your services. Therefore, you have to manage the service lifetime. For example, if the host process stops unexpectedly, your service becomes unavailable.
Using IIS is a robust and efficient hosting option. This is the best choice if you are in a distribute environment and your service is deployed in dedicated servers. IIS manages for you application recycling, availability, reliability, and manageability.
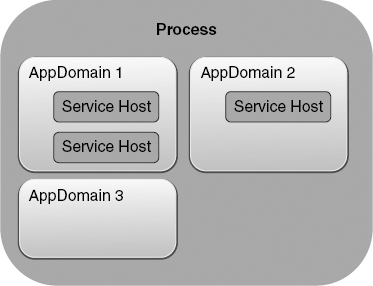
A service requires a process and at least one Application Domain to be executed. An Application Domain in .NET Framework provides a great level of isolation where the managed code is executed. As shown in Figure 14-1, a single Windows process is able to run multiple Application Domains.
As described in the previous section, you can host your service in any kind of .NET application. A typical example is an application that runs in the background and captures requests because it has to enqueue messages and process them afterward. In this scenario, the background application could implement and self-host a service, open a channel, and listen for incoming messages.
A self-host solution needs to be executed in a Windows process. It inherits all the settings, such as security, from the hosting process. It is your responsibility to manage the hosting environment. You have to control the host (and the service) lifecycle. A self-host solution is useful when you want to enable communication with the various components of your application, typically in a local environment where the number of clients or the number of transactions is very limited.
Implementing the self-host is the simplest way to host your services. Exploring how to do this is explained next.
To host your service in a .NET application you need to use a specific class: ServiceHost. The ServiceHost class allows you to set the execution environment of your services. As shown in Listing 14-1, you can set the service settings programmatically by using the configuration file or also with a combination of the two.
Example 14.1. Using the ServiceHost
using Wrox.CarRentalService.Implementations.Europe;
...

ServiceHost carRentalHost = new ServiceHost(typeof(CarRentalService));
carRentalHost.Open();
Listing 14-1 creates an instance of the ServiceHost related to the service implementation Wrox.CarRentalService.Implementations.Europe.CarRentalService. One important thing is that each ServiceHost instance can host only one service type at a time. Note that there aren't any ServiceEndpoint added to the host. In this case, when the Open method is called, the ServiceHost tries to find the settings in the current configuration file (Web.config or App.config).
Starting from WCF version 4.0, if a configuration section is not found, the ServiceHost can use the default endpoints settings, as explained in Chapter 3. In a self-hosted scenario, you need to provide the list of base endpoint addresses that the ServiceHost will use, and then explicitly call the AddDefaultEndpoints() method to create the endpoints. Listing 14-2 shows the complete code.
Example 14.2. Using the ServiceHost to Add Default Endpoints
...

Uri[] baseAddresses = new Uri[]
{
    new Uri("http://localhost:10101/CarRentalService"),
    new Uri("net.tcp://localhost:10102/CarRentalService")
};

ServiceHost host = new ServiceHost(typeof(CarRentalService), baseAddresses);
host.AddDefaultEndpoints();
try
{
    host.Open();

    Console.WriteLine("The car rental service is up and listening on the
    endpoints:");
    foreach (var endpoint in host.Description.Endpoints)
    {
        Console.WriteLine("	" + endpoint.Address.Uri.ToString());
    }
    Console.ReadLine();

    host.Close();
}
catch (CommunicationException ex)
{
    host.Abort();
}
catch (TimeoutException ex)
{
host.Abort();
}
catch (Exception ex)
{
host.Abort();
throw;
}Warning
Listing 14-2 shows how you can create an instance of ServiceHost and open the channels to start listening to receive messages. Note the usage of a try...catch block and the usage of the Close() method. This is the best way you have to manage the ServiceHost state. You have to call the Close() method only if your application flow is successfully completed. Otherwise, when an exception is thrown, you have to call the Abort() method to make sure that each channel is immediately terminated and closed. All the connected clients receive a CommunicationException. Though ServiceHost implements IDisposable, don't use the using block because it causes a call to the Dispose method and then, internally, to the Close method even when an exception is thrown. This will cause an unpredictable exception since the Close method waits for completion of current work while the ServiceHost is in an inconsistent state.
The output of this code is shown in Figure 14-2.

Although you can use one ServiceHost per service implementation, you can expose multiple interfaces and then multiple endpoints. In the same process, you can create more than one ServiceHost instance to host different service types or host the same service type.
Calling the methods Open and Close, you allow the service to listen on a preconfigured address and ready it to receive messages. As shown in Listing 14-3, you can also use the asynchronous methods BeginOpen/EndOpen and BeginClose/EndClose.
Example 14.3. ServiceHost Opened Asynchronously
using Wrox.CarRentalService.Implementations.Europe;
...

Uri[] baseAddresses = new Uri[]
{
    new Uri("http://localhost:10101/CarRentalService"),
    new Uri("net.tcp://localhost:10102/CarRentalService")
};
ServiceHost host = new ServiceHost(typeof(CarRentalService), baseAddresses);
host.AddDefaultEndpoints();
IAsyncResult result = host.BeginOpen(
new AsyncCallback(ServiceHostOpenCallback), null);The ServiceHostOpenCallback method is invoked when the BeginOpen method ends its execution. In this method, which matches the System.AsyncCallback delegate, you can place action to execute in this stage. See Listing 14-4.
Some situations may require reusing the same ServiceHost with the same settings, in a different place. For example, you could create a ServiceHost to programmatically handle service configuration or a part of the service configuration. In this case, extend the ServiceHost and write a custom implementation.
The ServiceHost inherits from an abstract base class: the ServiceHostBase. You can extend the ServiceHostBase or the ServiceHost class, which only adds four AddServiceEndpoint overloads and manages the service instance creation for singleton services.
The .NET Framework also has specific host implementations:
System.ServiceModel.Web.WebServiceHost, available in theSystem.ServiceModel.Webassembly, extends theServiceHostand automatically sets theWebHttpBindingand theWebHttpBehaviorto handle the creation of an environment to execute a REST-based service.System.ServiceModel.WorkflowServiceHost, available in theSystem.WorkflowServicesassembly, extends theServiceHostBaseclass. It initializes the workflow context and adds theWorkflowRuntimeBehaviorto the host instance.
Both host implementations are a simplified way to create a host instance. You can do the same by using the ServiceHost, but in this case you'll write a lot of code every time you use it.
As shown in Listing 14-5, inheriting from the ServiceHost only requires the explicit implementation of the ApplyConfiguration abstract method to apply the specific host logic.
Example 14.5. Create the Custom ServiceHost
public class CustomServiceHost : ServiceHost
{
    public CustomServiceHost(Type serviceType, params Uri[] baseAddresses)
        : base(serviceType, baseAddresses)
{
}
protected override void ApplyConfiguration()
{
base.ApplyConfiguration();
// custom logic here
}
}The ApplyConfiguration method is invoked from the InitializeDescription method of the ServiceHostBase class that you can also override. In most cases, the InitializeDescription is invoked from the class constructor. If you don't call the base constructor, you have to invoke the InitializeDescription directly; otherwise your custom implementation may not work correctly.
Using the ApplyConfiguration allows you to change the settings only after they have been read from the configuration file. If you want to change the configuration load logic, you don't have to call the base implementation but write your custom logic directly.
Another trick is to apply the custom host logic as late as possible and after all configurations and programmatic settings are already applied, as shown in Listing 14-6. Thus your settings cannot be changed after the host instance is created. You can do it in the Opening event, before the Open process is complete.
Example 14.6. Programmatically Configure the Custom ServiceHost
public class CustomServiceHost : ServiceHost
{
    public CustomServiceHost(Type serviceType, params Uri[] baseAddresses)
        : base(serviceType, baseAddresses)
    {
        this.Opening += new EventHandler(CustomServiceHost_Opening);
    }

    void CustomServiceHost_Opening(object sender, EventArgs e)
    {
       MyCustomBehavior behavior =
              this.Description.Behaviors.Find<MyCustomBehavior>();
       if (behavior == null)
       {
           this.Description.Behaviors.Add(new MyCustomBehavior());
       }
    }
}
Extending the ServiceHost is the easiest way to create a custom host implementation and it is valid in most scenarios. If your host differs from the "classic" WCF programming model, such as the WorkflowServiceHost, you may consider extending the ServiceHostBase. This is because the ServiceHostBase has the abstract method CreateDescription that allows creating the service description and defines the implemented contracts. The ServiceHost uses this method to create the service description based on the WCF programming model and the usage of its attributes such as the ServiceContractAttribute, the OperationContractAttribute, and the ServiceBehaviorAttribute. If you want to create your own programming model to build services, then you have to inherit from ServiceHostBase. This is done by the WorkflowServiceHost, but inheriting from ServiceHost is the right choice in the other case.
When you have to address complex scenarios where your service is exposed in a distributed environment, you need to use a very robust and efficient managed hosting. Indeed, your services need to be reliable and always running to serve the various client requests. In this case the solution is offered by the Internet Information Services (IIS) web server.
Hosting in IIS, also known as managed hosting, offers you a set of important features:
Recycling process—Limits the memory leak problem.
Application pool concept—Enables application isolation (you can also recycle the single application).
Isolated worker process—For each application pool, a separate worker process exists to provide scalability features and performance, as well as crash isolation.
Message-based activation—Allows creating the instance and opens the host when a new incoming message is received. The host is subject to a pool of instance and then reused when a new request arrives.
Process monitoring—Ensures the availability of a process to handle the incoming requests. If no worker process is available, a new one is initialized and started.
The WCF service hosting feature in IIS is built on top of the ASP.NET Http pipeline. This means that this kind of host only supports the Http/Https transport protocol. The ASP.NET Http pipeline has the concept of Http Handlers and Http Module. Although the Http Module is a special class that you can use to intercept and manipulate the incoming and outgoing messages, the Http Handler is the class responsible for processing the specific message. An Http Handler is activated by mapping an extension to a class that implements the IHttpHandler interface. In the case of WCF, .svc is the file extension used to identify services.
In Visual Studio you can select a new project and create a web site application by using the WCF Service template, as shown in Listing 14-7. The generated project contains the configuration file, a sample service contract and implementation, and a .svc file that references the service implementation.
Example 14.7. The Template-Generated .svc File
<%@ ServiceHost Language="C#" Debug="true"
Service="Service" CodeBehind="∼/App_Code/Service.cs" %>
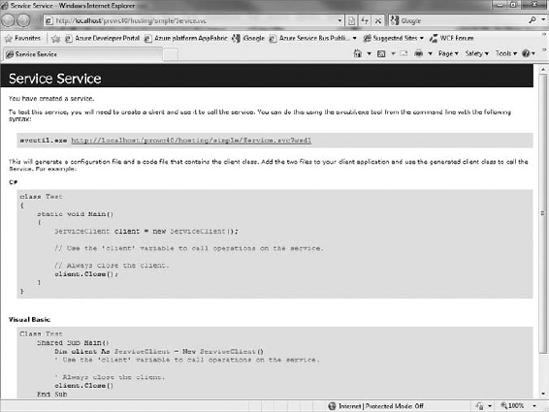
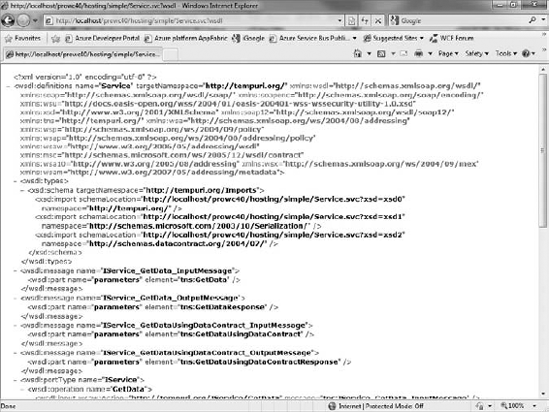
If you browse the .svc file, you can view the help page, shown in Figure 14-3. It has a link that points to the WSDL (see Figure 14-4), if the display metadata option is enabled, as in the default setting.
The ServiceHost class, described in the self-hosting section, is used even in managed hosting. But this time another component is needed to successfully create the host instance: ServiceHostFactory.
Similar to ServiceHostBase and ServiceHost classes, WCF has the ServiceHostFactoryBase and the ServiceHostFactory. These two classes provide factory methods to create the host instance in managed environments that support the dynamic activation. As you have seen, the WCF extensibility model allows you to create your own ServiceHost implementation. But in this case, different from the self-host scenario, a managed environment such as IIS doesn't know anything about your custom host. In this case, the IIS host needs to use the factory class as an entry point to create the host instance. The default factory called from the IIS is the ServiceHostFactory, but you can also create your own.
The CreateServiceHost method is the most important method you have to override. It first accepts a parameter string called constructorString that represents anything useful to retrieve the correct service to host. In the ServiceHostFactory implementation, it must to be the full name of the service type (for example, CarRentalService.Implementations.Europe.CarRentalService). The second parameter is a list of base addresses inherited from the host.
To use the ServiceHostFactory (or the ServiceHostFactoryBase) class, you have to add a reference to the System.ServiceModel.Activation assembly. Listing 14-8 shows a simple implementation for your CustomServiceHost.
Example 14.8. Create the Custom ServiceHostFactory
public class CustomServiceHostFactory : ServiceHostFactory
{
    public override ServiceHostBase CreateServiceHost(
        string constructorString, Uri[] baseAddresses)
    {
        return new CustomServiceHost(Type.GetType(constructorString),
                                     baseAddresses);
    }

    protected override ServiceHost CreateServiceHost(
        Type serviceType, Uri[] baseAddresses)
    {
        return new CustomServiceHost(serviceType, baseAddresses);
    }
}
The logic in the factory must remain simple. To grant the code reusability you have to move all the logic into the custom host. It is good practice to extend and use the ServiceHostFactoryBase when you inherit from the ServiceHostBase, and to extend and use the ServiceHostFactory when you inherit from the ServiceHost.
As previously seen, to host services in IIS you need to use a .svc file in a web site project. To use the CustomServiceHostFactory, simply specify it in the Factory property of the @ServiceHost directive in the .svc file. See Listing 14-9.
Example 14.9. Declare the Custom Factory
<%@ ServiceHost Language="C#" Service="Service"
Factory="CustomServiceHostFactory" %>
The Factory property defines the ServiceHostFactory implementation that IIS must instantiate and invoke. The value of the Service property is passed as a constructorString in the CreateServiceHost call. In your custom host/factory, the value of the constructorString could be anything useful for the recovery of the service to host—for example, a key to retrieve the service type from a shared storage like a database or an XML file.
With IIS 7.0 and WAS, explained in the next section in more depth, you are able to handle multiple site binding. The list of the base addresses that are passed to the ServiceHostFactory from IIS include all the host names that the server could accept. In most cases this means that addresses such as http://localhost and http://machinename are passed to the ServiceHost and an exception is thrown like this: System.ArgumentException: This collection already contains an address with scheme Http. There can be at most one address per scheme in this collection.
With the WCF 4.0, you can finally handle this scenario and allow the usage of multiple bindings. In the configuration file you need to add the setting in Listing 14-10.
You have seen how you can host a service in IISWAS using the .svc file. Based on the .svc extension, the runtime that handles the specific request calling is the relative HttpHandler. This is pre-configured in the base Web.config located in the .NET Framework folder with the configuration in Listing 14-11.
Example 14.11. The Configured HttpHandler for .svc
<httpHandlers>
  [...]
  <add path="*.svc" verb="*"
type="System.ServiceModel.Activation.HttpHandler,
    System.ServiceModel.Activation, Version=4.0.0.0, Culture=neutral,
    PublicKeyToken=31bf3856ad364e35" validate="False" />
  [...]
</httpHandlers>
In the new WCF 4, a combined feature with IIS allows you to create a service without the need to specify the .svc file. How? Simply by using the configuration file, as shown in Listing 14-12.
Example 14.12. File-less Activation
<system.serviceModel>
  [...]
<serviceHostingEnvironment multipleSiteBindingsEnabled="true">
    <serviceActivations>
          <add relativeAddress="CarRentalService.svc"
service="Wrox.CarRentalService.Implementations.Europe.CarRentalService"/>
    </serviceActivations>
</serviceHostingEnvironment>
 [...]
<services>
  <service name="Wrox.CarRentalService.Implementations.Europe.CarRentalService">
  <endpoint address=""
            binding="basicHttpBinding"
            contract="Wrox.CarRentalService.Contracts.ICarRentalService" />
  </service>
</services>
</system.serviceModel>
With this configuration you are able to browse to the CarRentalService.svc and see the service help page like a real .svc file.
WCF allows you to create services independently from the used transport protocol. But with IIS 6 you can only use and expose services on the Http protocol by using the ASP.NET Http Pipeline. This is a big limit when you gain advantages from the WCF architecture that, as was already described, could manage a wide range of protocols. To enable the usage of the complete list of the WCF-supported protocols, such as net.tcp, net.pipe, net.msmq, and msmq.formatname, you can use the platform named Windows Activation Services (WAS).
WAS listens in on the specific protocol and routes the received message to the worker process to handle the request. The WAS architecture defines the following components:
Listener adapter—Used to receive messages on a particular protocol and route it to the specific worker process.
Protocol-specific handler—Runs in the worker process and is responsible for receiving and sending messages from and to the listener adapter.
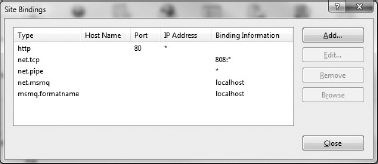
In IIS, a preconfigured set of bindings is created that defines the hostname, the port, the IP address, and some binding information that each binding has to use, as in Figure 14-5. Each website has its own configuration.
Enabling the usage of a specific protocol is very simple. First, ensure that the binding relative to the desired non-HTTP protocol is configured for the web site (for example, net.tcp in the default web site). Second, enable the usage of protocol in the virtual dir Advanced Settings by adding, for example, the net.tcp protocol to the list of enabled protocols, as in Figure 14-6.

You can also enable the use of a non-Http protocol by using the appcmd.exe command-line tool:
appcmd.exe set site "Default Web Site"
-+bindings.[protocol='net.tcp',bindingInformation='808:*']
You can still use the Http protocol, but now you are also able to use the net.tcp. Both the UI and the appcmd.exe updates the content of the applicationHost.config file located in the %windir%system32inetsrvconfig folder, as shown in Listing 14-13.
Example 14.13. The applicationHost.config
<sites>
  <site name="Default Web Site" id="1">
    <application path="/prowc40/hosting" applicationPool="DefaultAppPool">
      <virtualDirectory path="/"
                        physicalPath="C:inetpubwwwrootprowc40hosting" />
    </application>
    <bindings>
      <binding protocol="http" bindingInformation="*:80:" />
      <binding protocol="net.tcp" bindingInformation="808:*" />
      <binding protocol="net.pipe" bindingInformation="*" />
      <binding protocol="net.msmq" bindingInformation="localhost" />
      <binding protocol="msmq.formatname" bindingInformation="localhost" />
    </bindings>
  </site>
</sites>
The net.tcp protocol is now a part of the base address list provided from the IIS-managed host. In WCF 4.0, with the introduction of the default endpoints, it is not necessary to define the endpoint in the configuration file. The service is exposed with two addresses, one for each protocol: Http and net.tcp.
Now, if you check the produced WSDL, you'll see the correct net.tcp port element in the wsdl:service section. The XML in Listing 14-14 is part of the generated WSDL (the location of the service depends on your specific configuration).
Example 14.14. The wsdl:service Section with the net.tcp Endpoint
<wsdl:service name="Service">
  <wsdl:port name="BasicHttpBinding_IService"
             binding="tns:BasicHttpBinding_IService">
    <soap:address location="http://localhost/Service.svc" />
  </wsdl:port>
  <wsdl:port name="NetTcpBinding_IService" binding="tns:NetTcpBinding_IService">
    <soap12:address location="net.tcp://localhost/Service.svc" />
    <wsa10:EndpointReference>
      <wsa10:Address>net.tcp://localhost/Service.svc</wsa10:Address>
    </wsa10:EndpointReference>
  </wsdl:port>
</wsdl:service>
However, if you want to modify the default endpoint settings, you can do so, as in Listing 14-15.
Example 14.15. Setting the Custom net.tcp Configuration
<system.serviceModel>
  <services>
    <service name="Service">
      <endpoint address=""
binding="netTcpBinding"
bindingConfiguration="ServiceNetTcp"
contract="IService">
</endpoint>
</service>
</services>
<bindings>
<netTcpBinding>
<binding name="ServiceNetTcp">
<security mode="TransportWithMessageCredential"/>
</binding>
</netTcpBinding>
</bindings>
</system.serviceModel>Because the only defined endpoint is for the net.tcp protocol, the endpoint for the Http protocol is no longer available. The service listens only with the net.tcp://localhost/Service.svc address.
WAS is only the first step in making IIS a complete application server. In fact, some other features that real distributed environments need are actually missing. Deploy your services, configure them, and check the health state—monitoring and troubleshooting are not covered in IIS/WAS.
To bridge this gap, Microsoft has released Windows Server AppFabric, already known as Dublin—an extension for WAS that introduces a set of new and very important enhancements for the hosted WCF services and workflows. With AppFabric you have a very simple way of monitoring what services and workflows are running and their performance.
Windows Server AppFabric provides the following:
Deploy: A simplified approach to deploy services. You can create and deploy your package from Visual Studio 2010, but you can also export/import installer packages from existing applications.
Configuration: An integrated interface with IIS that allows you to configure application autostart, performance, the database connection for durable workflow, the service certificate, and some other features that an administrator can change without manually modifying the configuration file.
Monitoring: Windows Server AppFabric for .NET 4 introduces new monitoring tools to check the state, exceptions, and the number of completed and failed calls in end-to-end scenarios.
Hosting: A reliable hosting for workflow enabling the use of a robust, sharable state-persistent database based on SQL Server. This allows you to resume long-running workflows if a server crashes or restarts.
Distributed Cache: Already known as Microsoft Velocity, you can use this feature to cache items and reuse them from any servers in your web farm.
The powerful interface totally integrated into the IIS Manager and enabled it to configure applications in a simpler manner. With Windows Server AppFabric, an administrator could update the default services settings without change and recompile the code or, worse, manually modify the web.config file. Figure 14-7 shows how the Windows Server AppFabric Architecture is totally integrated in IIS.
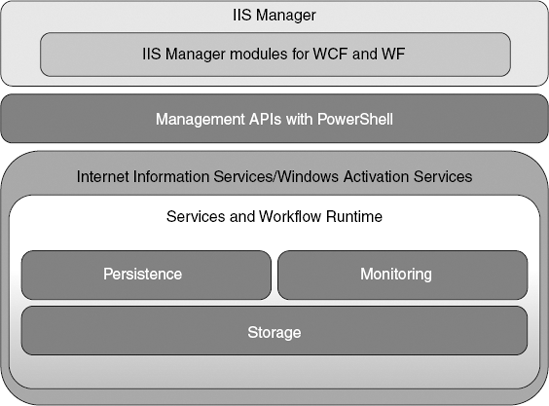
The IIS integrated set of tools, which in the past was also called Windows Application Server Extensions for .NET 4.0, allow you to do the following:
Configure monitoring, persistence, availability, and autostart; and then performance and security at the Web Application, Web Site, or Service levels.
List and configure the endpoints of a specific service.
Manage the connection and the initialization or the upgrade of a Monitoring Database Configuration.
Manage the connection and the initialization or the upgrade of a Persistence Database Configuration.
Perform a real-time check of services and workflows for health state by monitoring completed, faulted, or failed calls for services, and active, idle, or suspended instances for workflows.
In addition, a set of PowerShell commands were also released and allow you to do all the same actions of the previous extensions.
Navigating from one to another is a very simple thing because the extensions allow you, for example, to retrieve the list of endpoints for a service, or to obtain the service of a selected endpoint.
Furthermore, the Web Deployment tool, another IIS extension installed with Visual Studio 2010 but also available as a separate download, enables you to export/import application packages directly from the IIS Manager. You are then able to export your web application, including settings, and import it in another server of your server farm. Visual Studio 2010 also allows the creation of the same installer package from the Solution Explorer. Currently, the deployment process lacks the WCF and now the Web Deployment tool offers a very simple and powerful way to deploy your services.
Note
Microsoft has also released Windows Azure platform AppFabric. Windows Azure platform AppFabric allows users to easily develop solutions in the cloud while Windows Server AppFabric is for "classic" environments (also called on-premises). Windows Azure platform AppFabric, unlike Windows Server AppFabric, provides a Service Bus solution to facilitate communication between services and an Access Control Service (ACS) to create security tokens for federated authorization. Windows Azure platform AppFabric is discussed later in this chapter.
In the following sections you'll see how to configure and use the Windows Server AppFabric tools to monitor WCF and WF services.
Windows Server AppFabric is available as a different install package downloadable from the Microsoft official site: http://msdn.microsoft.com/en-us/windowsserver/ee695849.aspx. Windows Server AppFabric runs only on Windows Vista, Windows 7, or Windows Server 2008 and Windows Server 2008 R2. Some features, such as autostart, are run only in Windows 7 and in Windows Server 2008 R2. SQL Server is not a requirement to install Windows Server AppFabric, but some features like monitoring, persistence, or caching are not enabled if it is missing. You could also use SQL Server 2008, but SQL Server 2005 is not supported. It is also possible to use other databases or data stores, particularly for persistence and cache.
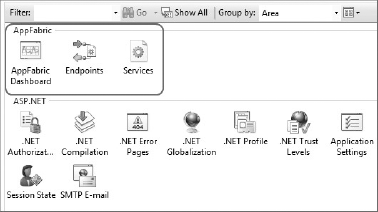
After the installer process has finished, as shown in Figure 14-8, you can start the configuration wizard to create and initialize the monitoring database and the persistence database.
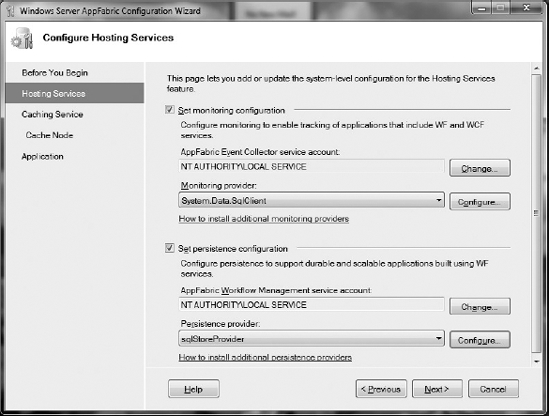
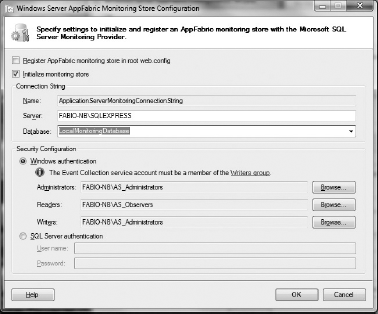
By clicking the Configure button you can initialize or simply reference the already created database (see Figure 14-9).
If you want to configure this setting later, you can execute the Windows Server AppFabric Configuration Wizard by accessing All Programs
At the end of the wizard, you'll see new sections in the IIS interface that allow you to access to the AppFabric features.
Troubleshooting in running services is not so simple. Actually, the only way to find application exception or stack trace is by enabling WCF Diagnostic Tracing and Message Logging. In much of this scenario it is not so simple to change the configuration file, and it writes a lot of settings to enable the environment. After this, you have to be able to reproduce the step that generates the service failure, get the tracing files, and then disable the tracing because it has a great impact on application performance because they append strings on a text file. After you have the tracing and logging files, you can analyze it by using the Microsoft Service Trace Viewer (SvcTraceView.exe) distributed with the Microsoft Windows SDK.
Using the tracing and message logging files is not a bad thing, but their use is not recommended in production environments due to the high impact on configuration settings and application performance, as well as on disk space when verbose is enabled.
To offer an enhanced solution, one of the most important features of Windows Server AppFabric is the ability to monitor the health of your services with a simple and integrated Dashboard that allows you to quickly check services and troubleshoot your WCF applications.
You don't need to write additional code or change configuration files because the WCF runtime in the .NET 4.0 is instrumental in using the high performance and low application impact of Event Tracing for Windows (ETW). The architecture of ETW is beyond the scope of this book. To get more info about it, read the following article: http://msdn.microsoft.com/en-us/magazine/cc163437.aspx.
When you try to find errors while your application is in production, you need to analyze different levels of messages—from simple exceptions to complex and verbose messages—including various steps occurring before and after the exception has thrown.
AppFabric handles different levels you can choose from:
Off: The monitor is completely disabled.
Errors Only: Tracks data only when an exception or a warning event occurs.
Health Monitoring: Default level that allows you to display WCF and WF service health on AppFabric tooling.
End-to-End Monitoring: Allows you to track the message flow when more than one service is involved in the calls. If the client calls a service and that service calls another service to complete the process of a message, the entire flow is reconstructed and tracked.
Troubleshooting: The most verbose level that must be enabled to diagnose issues with your WCF and WF service.
Another big difference point from the simple tracing is the capacity to track message flow in end-to-end scenarios. In distributed environments you have more services that communicate with each other. The same message might be across more than one service before it is processed. In point-to-point communications, a client sends a message to a service; in end-to-end, a client sends a message to a service that routes the message to another service, and so on. You can configure the level by using the WCF and WF Configuration tool installed with AppFabric.
The AppFabric monitoring correlates the WCF traces allowing you to see what happens to the message from the client to the final service and back. If you handle more than one server, as in a web farm, using a common and shared SQL Server database to collect the event collection enables the message correlation across servers.
To start using monitoring you don't need to change any part of your source code. By simply right-clicking your web application node in IIS, you can select the .NET WCF and WF item and then the Configure button to open the Configure WCF and WF for Application tool. As you see in Figure 14-10, the Configuration tool allows setting the Health Monitoring Level for your WCF or WF service application.
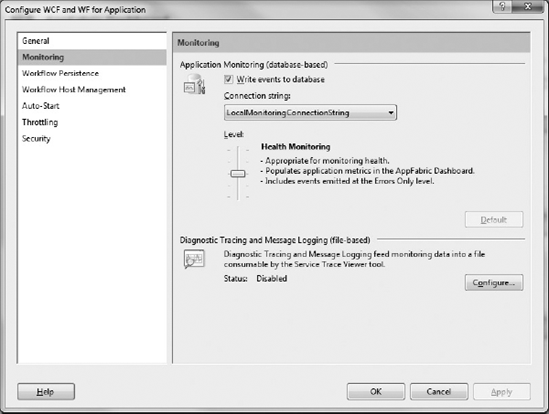
This tool also allows enabling the Diagnostic Tracing and Message Logging feature in a few simple steps, without using the WCF Service Configuration Editor that has an interface often difficult and less intuitive to use. Especially for system administrators, AppFabric simplifies the configuration process.
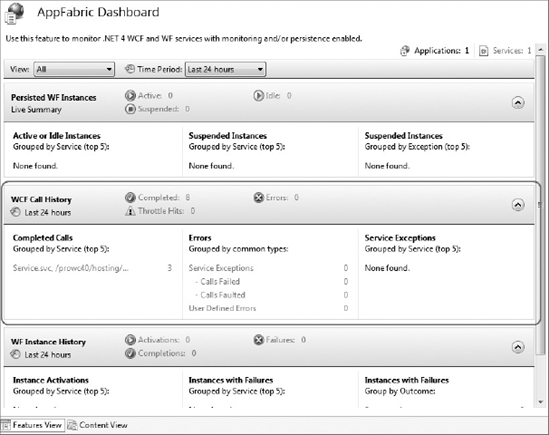
Now that your service is running, hosted in IIS, and the Health Monitoring Level is enabled, you can monitor your service by using the Fabric Dashboard, shown in Figure 14-11. A Windows service named AppFabric Event Collection Service "collects events from an ETW session and writes them to a monitoring database."
Accessing the Dashboard allows you to get info about the current running requests, the completed requests, and get details about failed requests. As you can see in Figure 14-12, there are three sections:
Completed Calls: Displays the list of successfully completed calls, with a row for each address.
Service Exceptions: This section displays the list of service exceptions thrown during execution.
Failed or Faulted Calls: Generates failed or faulted calls when an exception is thrown.
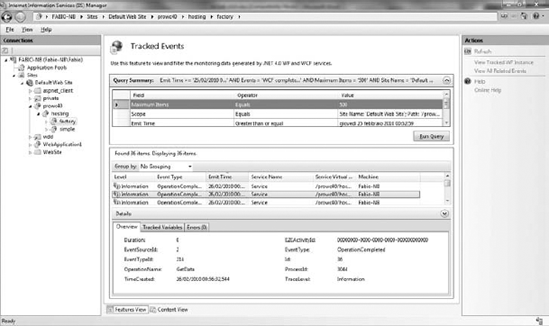
By clicking one of the rows displayed, a query on tracked data is generated and the result is a list of collected events filtered by the passed input parameters. You can also change the input parameters to restrict the resultset.
In Figure 14-13, the list of real-time collected events are displayed. You will also see, if activated, the E2EActivityId that displays the correlation event ID for end-to-end scenarios.
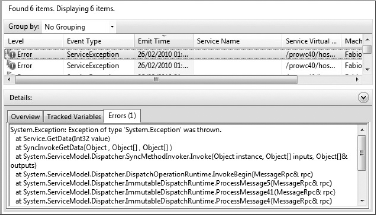
You can also display the list of service exceptions. Figure 14-14 displays the service exception and the related error details with stack trace.
Troubleshooting applications, especially service, is sometimes a very difficult activity. As previously said, until WCF 3.5 Service Pack 1, you could enable the Diagnostic Trace and Message Logging, a really valid tool but sometimes difficult to read and find problems.
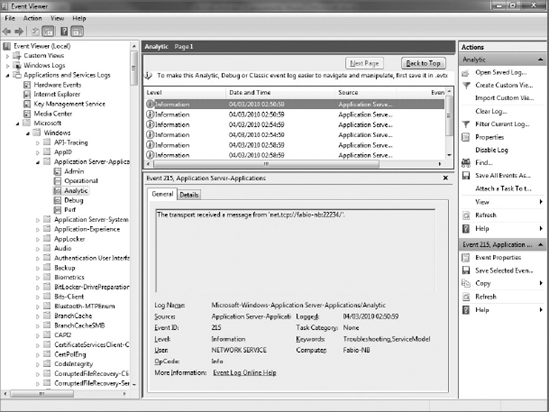
With WCF 4 and AppFabric, you can also gain advantage from the usage of ETW infrastructure. This is disabled by default. To enable, open the Event Viewer, then select Application and Services Logs, Microsoft, Windows and then right-click Application Server-Applications node. Select View, Show Analytic and Debug Logs if not already checked. Under the Application Server-Applications node, select Analytic and then click Enable Log Item in the Actions pane.
Now if you call your service, the events appear in the Analytic log, as you can see in Figure 14-15.
By developing distributed applications, you may need to create a frontend service that acts as a bridge between your internal services, such as a protected internal network. With the WCF 4.0, a new service has been released: the RoutingService. This allows you to create a front-end service that accepts the requests and routes messages to the internal set of services deployed into your private network, maybe beyond a firewall.
Some of the features include the following:
Content-based routing
Protocol and security bridging
Error handling
The RoutingService acts as an intermediate between the client and the service. It receives the message from the client and, based on the filters you have applied, routes the message to the designated service.
The principal role of a routing service is to route messages received from a client to backend services that could process it. How can it retrieve the correct service endpoint that has to be invoked? The routing service doesn't know the backend services directly, but it knows the message and applies to it a set of configured filters to individuate the endpoint services to invoke.
A set of predefined filters are already available in WCF 4.0 and ready to use. You could apply a filter based on the message's action or as a result of an applied XPath query. Table 14-1 summarizes the various filter types and describes how to use them.
Table 14.1. Routing Service Filters
FILTER TYPE | DESCRIPTION |
|---|---|
| This filter is based on the message action specified in the filterData attribute. Example: |
| This filter is used to indicate the names of two other filters, with results that have to be combined and evaluated to true. Example: |
| This filter is based on the messages To header value. Example: |
| Similar to the Example: |
| This filter matches the name of one of the service endpoints exposed on the routing service. Example: |
| This filter allows defining a custom filter type. Example: |
| This filter matches all incoming messages. Example: |
| Applies an Example: |
As seen in Table 14-1, with the type Custom you can implement your own filter simply by extending the abstract MessageFilter class.
The routing service is implemented as a WCF service that you can find in the System.ServiceModel.Routing assembly. The architecture of the service is composed of the following components:
A set of contracts:
IDuplexSessionRouter, IRequestReplyRouter, ISimplexDatagramRouter, andISimplexSessionRouter.RoutingService: A service that implements the available routing contracts.
Service behavior: Allows you to define the filter table that the routing service must use.
Routing configuration setting: Allows you to define the filters to apply to the client endpoints to calls, and the service backup list to handle exceptions.
Each defined contract allows you to process messages using different message-exchange patterns. You have to choose the correct message pattern based on what your internal services implement. In fact, different message patterns might not work properly. What does it mean if a request-reply pattern, for example Http, waits for a response message that it never receives from a one-way communication?
As shown in Listing 14-16, configuring the routing service is really simple because it is very similar to any other service in WCF. Using the configuration file, you have to create the service section.
Example 14.16. Configuring the Routing Service
<system.serviceModel>
    <services>
      <service behaviorConfiguration="routingBehavior"
          name="System.ServiceModel.Routing.RoutingService">
        <host>
          <baseAddresses>
            <add baseAddress="http://localhost:9001/routing"/>
          </baseAddresses>
        </host>

        <endpoint address=""
binding="basicHttpBinding"
name="requestReplyEndpoint"
contract="System.ServiceModel.Routing.IRequestReplyRouter" />
</service>
</services>
<system.serviceModel>As shown in Listing 14-17, the service behavior routingBehavior simply defines the name of the routing table that the service must use.
Example 14.17. Configuring the Service Behavior
<behaviors>
  <serviceBehaviors>
    <behavior name="routingBehavior">
      <routing filterTableName="routingTable" />
    </behavior>
  </serviceBehaviors>
</behaviors>
Now you have to configure the list of the endpoints that the routing service, acting as a client, should invoke. See Listing 14-18.
Example 14.18. Configuring the client endpoints
<client>
    <endpoint name="HospitalServiceEndpoint"
              address="net.tcp://localhost:9050/hospitalservice"
              binding="netTcpBinding"
              contract="*" />
    <endpoint name="LabServiceEndpoint"
              address="net.tcp://localhost:9051/labservice"
              binding="netTcpBinding"
              contract="*" />
  </client>
Finally, to allow the correct execution of the routing service, it is necessary to configure the routing rules. As shown in Listing 14-19, you can do it using the routing configuration section.
Example 14.19. Configuring the Routing Rules
<routing>

    <filters>
      <filter name="LabFilter"
              filterType="Action"
              filterData="http://healthcare/lab" />
      <filter name="HospitalFilter"
              filterType="Action"
filterData="http://healthcare/hospital" />
</filters>
<filterTables>
<filterTable name="routingTable">
<add filterName="HospitalFilter"
endpointName="HospitalServiceEndpoint"/>
<add filterName="LabFilter"
endpointName="LabServiceEndpoint" />
</filterTable>
</filterTables>
</routing>In this section, you have created and named two filters with each one based on the message action. In the filterTable you configure the endpoint that must be used when one of the filters is applied to the incoming message.
As previously said, by extending the abstract MessageFilter class, you can also use a custom filter to change the standard message filtering. See Listing 14-20.
Example 14.20. Creating the Custom Message Filter
class VersionBasedMessageFilter : MessageFilter
{
    private string MessageVersion;

    public VersionBasedMessageFilter(object filterData)
    {
        this.MessageVersion = filterData as string;
    }

    public override bool Match(System.ServiceModel.Channels.Message message)
    {
        return this.InnerMatch(message);
    }

    public override bool Match(System.ServiceModel.Channels.MessageBuffer buffer)
    {
        bool response;
        Message message = buffer.CreateMessage();
        try
        {
            response = this.InnerMatch(message);
        }
        finally
        {
            message.Close();
        }

        return (response);
}
private bool InnerMatch(System.ServiceModel.Channels.Message message)
{
return (message.Version.Envelope.ToString == this.MessageVersion);
}
}To use the custom filter, simply set up the configuration file, as shown in Listing 14-21.
This feature allows the service to receive messages from the client in any kind of protocol (e.g., Http) or message encoding (Soap 1.1) and call the internal services by using a totally different protocol (e.g., net.tcp with Soap 1.2), as shown in Figure 14-16.
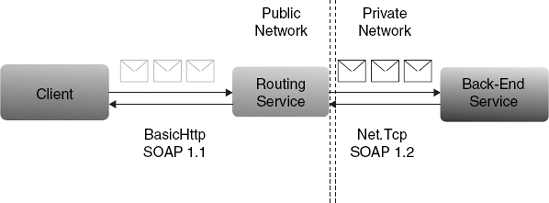
You can use different bindings for the communication between the client and the routing service, and another binding for the communication between the routing service and the backend services. This is a useful behavior when you need to enable or adapt communications with legacy clients, which could use only a simple Http version, and the new version of service that uses the high performance net.tcp protocol.
As for the protocol, you can use a kind of security mechanism for the routing service that is totally different from the backend service by separating the credentials used by the client from the internal management of the identity.
Another feature of the routing service is the ability to manage the exceptions. Sometimes, although your application runs, a service may become unreachable. In this case, you can configure the routing service to try a list of back-up services.
First, you have to configure the list of the client endpoints that the routing services use, as shown in Listing 14-22.
Example 14.22. Setting the Custom net.tcp Configuration
<client>
    <endpoint name="LabServiceEndpoint"
              address="net.tcp://localhost:9052/labservice"
              binding="netTcpBinding"
              contract="*"  />
    <endpoint name="LabServiceBackupEndpoint"
              address="http://server1/labservice"
              binding="basicHttpBinding"
              contract="*" />
    <endpoint name="LabServiceBackupEndpoint"
              address="net.tcp://server2:9052/labservice"
              binding="netTcpBinding"
              contract="*" />
  </client>
After you have configured the list of endpoints and the list of filters you want to apply, omitted in Listing 14-23, you have to configure the filterTables to define the endpoint that the routing service must use when the filter is applied. In this element, you can specify the name of the backup list to find the sequence of endpoints that the routing service must call if the first endpoint throws an exception.
Example 14.23. Define the Filter Table and the Name of the Backup List
<filterTables>
      <filterTable name="routingTable">
        <add filterName="LabFilter"
             endpointName="LabServiceEndpoint"
             backupList="labBackupList"/>
      </filterTable>
    </filterTables>
Finally, you can configure the list of the backup service endpoints that must refer to an existing client endpoint defined in the configuration file. See Listing 14-24.
In this chapter, hosting services in a "classic" distributed environment was discussed. In this scenario, most times you are the owner of the servers where the solution will be deployed or you at least directly know the hardware infrastructure. The hardware is then sized based on your solution requirements. Therefore, when you have to scale up your server farm, you need to buy new hardware.
In cloud computing, instead, the details about the hardware are totally abstracted from the user (or rather the developer) point of view. The developer doesn't need to know anything about the infrastructure. The concept is to allow scaling up or down the solutions when necessary, requiring resources on-demand with a pay-per-use mode. If your solution, during the start-up, requires fewer hardware resources to run, you'll pay only the consumed storage, the amount of data in transactions, and the hour of computing to make your application available. This dramatically reduces the cost of start-up, because you don't need to invest in hardware and the effort of IT management.
The entire infrastructure is then totally scalable and has the capacity to manage large-volume data and storage. In addition, the cloud computing also has the support for reliability that makes your solution available 24/7. Furthermore, a replication system of nodes allows starting a backup node if the first stops unexpectedly.
It is clear that the applications that take advantage of cloud computing are mainly web applications. You can deploy a web application that exposes your service and obtains all the cloud computing benefits previously discussed. An application hosted in a cloud computing infrastructure is also called in-the-cloud, while a classic application is called on-premises. Windows Azure is the Microsoft solution for the applications in-the-cloud. In the following sections the options to expose a WCF service using the cloud infrastructure are explored.
Windows Azure is a set of technologies for the cloud computing. It allows you to deploy web applications, as previously mentioned, but it also provides cloud storage to handle data such as Tables, BLOBS, or Queues, and a SQL Azure Database that is the cloud version of SQL Server. Another option offered by Azure is the support to applications and services connections across networks by providing a Service Bus, and an Access Control Service that issues tokens for federated authorization. These two options are grouped in a technology called Windows Azure platform AppFabric. It is different from the already discussed Windows Server AppFabric and should not be confused. Azure platform AppFabric is discussed in more depth in the next section.
Windows Azure Computing allows you to deploy your application in-the-cloud. You don't know anything about the hardware of the servers (or nodes) when deploying your application. You don't know its location in the web farm, its IP, and you can't access the local resource (drive C: or similar). You simply develop your solution and deploy it in-the-cloud.
With Azure, you have two application-type options, also called roles:
Web role: For frontend solutions such as a web application.
Worker role: Comparable to a Windows service. It is designed to perform background operations.
These two roles enable the decoupling between the frontend interface and the related backend operations. In a typical scenario, a web role enqueues a message that a worker role processes. It is important to note that you don't know if a worker role runs in the same node of a web role. In this way, decoupling contributes to load balance and scales up your solution.
If you want to host your WCF service in Windows Azure, using the web role is the best solution. From the developer point of view, there is no big difference between an on-premise and an in-the-cloud web application. By using Visual Studio 2010, you could create a WCF Azure Service by using the Web Cloud Service template and then add your services and endpoints like any other web project. Then finally build your solution and deploy it using the generated packages.
There are particular scenarios where your endpoints could be difficult to reach due to dynamic IP assignment, firewalls, or NAT boundaries. To accomplish this scenario, the AppFabric Service Bus provides a way to make this connection. Any service that wants to receive messages simply registers its address in the AppFabric Service Bus. Any application that wants to send messages to a registered service simply refers to the exposed and well-known Service Bus endpoint, as you can see in Figure 14-17.
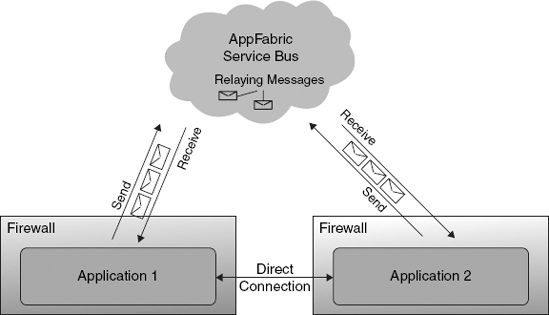
The connection between the client and service starts using the relayed mode through the relay service. The relay service tries to communicate the connection information of the service to the client and of the client to the service. If it succeeds, the connection continues using direct mode. Otherwise the connection continues using relayed mode.
To use the AppFabric Service Bus with WCF you don't need to know a different programming model. You can define contracts and create a host environment in exactly the same way as with WCF, as already seen in Chapter 2. The only difference is related to the listening address (the target address if you are on client side), and the binding used. Indeed, you need to use a specific binding that uses one of the bindings that supports the relay transport protocol. Table 14-2 describes the new bindings now available and installed with the .NET Services SDK.
Table 14.2. Bindings in .NET Services
BINDING NAME | DESCRIPTION |
|---|---|
| The |
| This binding enables the Publish&Subscribe mode. By using this binding, a message can be relayed to zero, or to one or more listening services. |
| Corresponds to the one-way mode of a |
| This binding is based to the |
| This binding is based to the |
| This binding is based to the |
| This binding is based to the |
All these bindings are available in the Microsoft.ServiceBus assembly. With the November 2009 CTP of the Microsoft .NET Services SDK, you can find the assembly in the %programfiles%Microsoft .NET Services SDK (Nov 2009 CTP)Assemblies.
As previously said, you have to create the specific address to enable communications. As shown in Listing 14-25, the ServiceBusEnvironment class helps you create the specific address by using the CreateServiceUri static method.
Example 14.25. Build the Listening Address for the Service Bus
Uri address = ServiceBusEnvironment.CreateServiceUri("sb", "carrental",
              "CarRentalRelayService");
The previous code produces the following URI: sb://carrental.servicebus.windows.net/CarRentalRelayService/. The first parameter specifies the URI schema that must be used to build the address. The second parameter specifies the name of the AppFabric solution. Finally, the third parameter defines the relative address of your service.
With one of the relaying bindings, the address is then used to build the endpoint address. Finally, you also need to authenticate your connection, providing credentials by choosing one of the options in Table 14-3.
Table 14.3. Available Credentials
MEMBER NAME | DESCRIPTION |
|---|---|
| A SAML (Security Assertion Markup Language) token is used to authenticate with the Service Bus. |
| A Shared Secret is used to authenticate with the AppFabric Service Bus. |
| A Simple Web Token is used to authenticate with the AppFabric Service Bus. |
| A client doesn't provide any kind of credential. |
A SAML token is a type of credential used in a federated scenario, as explained in Chapter 9, and in this case it enables the reuse of the existing infrastructure. The SharedSecret credential is a token based on a shared secret, such as a password or an array of bytes, known both to the client and to the service and used to secure the communication. A SimpleWebToken, instead, is a really compact key/value encrypted token secured by signature and mostly used in REST ful architectures.
In the following code you can create a new ServiceHost that handles the cloud relayed version of CarRentalService.
Example 14.26. Hosting a Cloud-Relayed Service
ServiceBusEnvironment.SystemConnectivity.Mode = ConnectivityMode.Tcp;
Uri address = ServiceBusEnvironment.CreateServiceUri("sb", "carrental",
              "CarRentalRelayService");

NetTcpRelayBinding binding = new NetTcpRelayBinding();
binding.Security.Mode = EndToEndSecurityMode.None;

ServiceHost host = new ServiceHost(typeof(CarRentalService));
ServiceEndpoint endpoint =
host.AddServiceEndpoint(typeof(ICarRentalService), binding, address);
TransportClientEndpointBehavior sharedSecretServiceBusCredential =
new TransportClientEndpointBehavior();
sharedSecretServiceBusCredential.CredentialType =
TransportClientCredentialType.SharedSecret;
sharedSecretServiceBusCredential.Credentials.SharedSecret.IssuerName = "owner";
sharedSecretServiceBusCredential.Credentials.SharedSecret.IssuerSecret =
"4+X1iL29uQ4kJiDMBTQ9Sz9n8T16RTgL9SIpyGWKryc=";
endpoint.Behaviors.Add(sharedSecretServiceBusCredential);
host.Open();
Console.WriteLine("Waiting for incoming messages...");
Console.ReadLine();
host.Close();You have used a SharedSecret credential type that needs an IssuerName and an IssuerSecret to authenticate the connection to the specified Azure AppFabric application. The TransportClientEndpointBehavior is used to hold the credentials and must be assigned to the service endpoint.
On client side, the code is similar (as shown in Listing 14-27).
Example 14.27. Call a Cloud-Relayed Service from client
ServiceBusEnvironment.SystemConnectivity.Mode = ConnectivityMode.Http;

Uri address = ServiceBusEnvironment.CreateServiceUri("sb", "carrental",
              "CarRentalRelayService");

NetTcpRelayBinding binding = new NetTcpRelayBinding();
binding.Security.Mode = EndToEndSecurityMode.None;

TransportClientEndpointBehavior sharedSecretServiceBusCredential =
              new TransportClientEndpointBehavior();
sharedSecretServiceBusCredential.CredentialType =
              TransportClientCredentialType.SharedSecret;
sharedSecretServiceBusCredential.Credentials.SharedSecret.IssuerName = "owner";
sharedSecretServiceBusCredential.Credentials.SharedSecret.IssuerSecret =
              "4+X1iL29uQ4kJiDMBTQ9Sz9n8T16RTgL9SIpyGWKryc=";

ServiceEndpoint endpoint = new ServiceEndpoint(
        ContractDescription.GetContract(typeof (ICarRentalService)),
        binding,
        new EndpointAddress(address));
endpoint.Behaviors.Add(sharedSecretServiceBusCredential);
ChannelFactory<ICarRentalService> channelFactory =
new ChannelFactory<ICarRentalService>(endpoint);
ICarRentalService ps = channelFactory.CreateChannel();You might note the usage of the ServiceBusEnvironment.SystemConnectivity.Mode = ConnectivityMode.Http setting. This is because you can set a different protocol connection for both the sender service and for the receiver service.