
WHAT'S IN THIS CHAPTER?
Implementing WCF clients
Implementing and using RESTful services
AJAX-enabling your service
Using WCF from Silverlight
Some of the other chapters have focused primarily on implementation on the server side. The main tasks involved in developing WCF services include the design of service and data contracts, the selection of a suitable InstanceContextMode and ConcurrencyMode, and last but not least, the use of a suitable binding.
In this chapter, a closer look at the client side is taken. You have probably already come across some examples where .NET has been used on the client side and communication takes place between the client application and service using a generated proxy. The proxy can be created with Add Service Reference or svcutil.exe (SLsvcutil.exe for Silverlight applications) and a reference to a WSDL file or an MEX endpoint. However, if you have absolute control of the server and client code, you can also dispense with the generated proxy and communicate directly with the service using a reference to the service assembly and make use of the ChannelFactory class.
In a service-oriented world in which components are operated on a very diverse range of platforms and with very different technologies, your services may be consumed by other technologies — such as ASP.NET AJAX, Java, PHP, and Silverlight.
Depending on the expected clients, it may also make sense, under certain circumstances, not to use the entire set of features offered by WCF. For example, an AJAX client can handle JSON-encoded messages much better than extensive SOAP messages. Other clients, in turn, may support very few WS* protocols, if indeed any at all. In these scenarios it makes sense to agree on the lowest common denominator (Basic Profile 1.1). Last but not least, REST represents an architectural alternative to the heavyweight SOA world with SOAP, as well as to extensive WS* protocols — some of which are difficult to implement. REST concentrates on addressable resources and their different characteristics; it uses an intuitive and uniform API to read and manipulate data.
Each of these aspects is described in more detail in the following sections.
With Basic Profile 1.1, the parties involved must abide by certain rules to ensure that communication between different worlds work correctly.
Numerous institutions are working on the standardization of protocols, formats, and definitions. In web services applications, Basic Profile 1.1 is the lowest common denominator when it comes to the exchange of messages, the provision of metadata, the description of services, and of security-related definitions. Basic Profile 1.1 was published by the web services Interoperability Organization (WS-I), under the URL http://www.ws-i.org/Profiles/BasicProfile-1.1.html. The standards described and recommended include the likes of SOAP 1.1, WSDL 1.1, UDDI 2.0, XML 1.0, and several more.
You only need to use the binding basicHttpBinding to make your WCF service compatible with Basic Profile 1.1.
Note
WCF 4.0 also adds support for Basic Profile 1.2.
However, should your service wish to employ and use advanced technologies such as transactions, reliability, and special security mechanisms, you should use the appropriate WS* protocol. You will also run the risk, however, that your service may only be used by very specific clients.
When it comes to implementing service clients for WCF in .NET, there are various techniques you can use. You can use the provided WSDL document to generate a proxy and use the proxy for communication with the service. Or your .NET client may share the same data contract assembly as the service. Next you will explore some of these options in more detail.
Should you wish to use a service offered by a particular service provider in a service-oriented world, you are not normally supplied with any DLLs or other binaries. Instead, the WDSL document, which is provided by the service provider, is all the client and server have in common. This document contains all the requisite details, such as service operations, structure of the data being exchanged, as well as any policies such as security and reliability about how the service deals with extended functionalities.
This variant makes sense and is recommended in a loosely coupled system. The client does not require any knowledge of the internal implementation, but relies solely on the WDSL document supplied. Because the client does not share any code with the service, it does not necessarily have to be a .NET client either. It might, for example, also be a PHP or Java application.
If you use a .NET application as a client, you generally don't program directly contrary to the service offered; you rely on the functionalities of a generated proxy. The proxy takes on such tasks as sending SOAP messages to the service, receiving the response, and making it available as an object. In addition to the service operations provided, the WCF proxy also features additional functions such as opening and closing, or other properties such as the endpoint or the inner channel to read out the session ID or endpoint-specific information.
The proxy is normally generated by using Add Service Reference, as shown in Figure 4-1, or the svcutil.exe tool. If you are in Visual Studio, it is definitely simpler and more convenient to proceed via the Add Service Reference menu. If when you create the proxy, however, you require options other than those offered by the Add Service Reference dialog box shown in Figure 4-2, or you wish to export service metadata from an assembly, you can also use svcutil.exe directly.
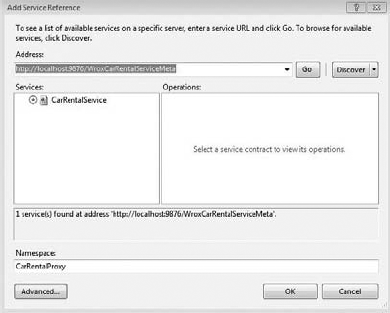
If you add a service reference, you will essentially receive two files:
The code file, which is used for communication with the service, including the service proxy, data classes, and interfaces.
A configuration file, in which the client endpoint is defined.
The code which is generated by svcutil.exe extends the base class System.ServiceModel.ClientBase<T> and implements the service interface and, thus, the service operations which are provided. The service data classes are also replicated on the client side and are assigned the attributes [DataContract] and [DataMember]. In principle, the ClientBase<T> class is nothing other than a wrapper for the ChannelFactory<T> class and is a quick and easy way of communicating with the service.
For example, the service code in Listing 4-1 would lead to the following client artifacts displayed in Listings 4-2 through 4-4.
Example 4.1. Service Contract
using System;
using System.ServiceModel;

namespace Wrox.CarRentalService.Contracts
{
    [ServiceContract(
     Namespace = "http://wrox/CarRentalService/2009/10",
     Name = "RentalService")]
    public interface ICarRentalService
    {
        [OperationContract()]
        PriceCalculationResponse CalculatePrice
            (DateTime pickupDate, DateTime returnDate,
            string pickupLocation, string returnLocation);

        [OperationContract]
        Guid  Confirm(Guid requestID);

        [OperationContract()]
        void  ReportCrash
           (DateTime date, String location, Guid  confirmationID);
    }
}
Example 4.2. Client-Side - Service Contract Interface
[System.ServiceModel.ServiceContractAttribute(
Namespace="http://wrox/CarRentalService/2009/10",
ConfigurationName="CarRentalProxy.RentalService")]
public interface RentalService {

[System.ServiceModel.OperationContractAttribute(
Action="http://wrox/CarRentalService/2009/10/RentalService/CalculatePrice",ReplyAction="http://wrox/CarRentalService/2009/10/RentalService/
CalculatePriceResponse")]
Wrox.CarRentalService.ConsoleClient.CarRentalProxy.PriceCalculationResponse
       CalculatePrice(
            System.DateTime pickupDate, System.DateTime returnDate,
            string pickupLocation, string returnLocation);

[System.ServiceModel.OperationContractAttribute(AsyncPattern=true,
Action="http://wrox/CarRentalService/2009/10/RentalService/CalculatePrice",
ReplyAction="http://wrox/CarRentalService/2009/10/RentalService/
CalculatePriceResponse")]
System.IAsyncResult BeginCalculatePrice
(System.DateTime pickupDate, System.DateTime returnDate,
string pickupLocation, string returnLocation,
System.AsyncCallback callback, object asyncState);
Wrox.CarRentalService.ConsoleClient.CarRentalProxy.PriceCalculationResponse
EndCalculatePrice(System.IAsyncResult result);Example 4.3. Client-Side - ClientBase<T>
public partial class RentalServiceClient :
          System.ServiceModel.ClientBase
             <Wrox.CarRentalService.ConsoleClient.CarRentalProxy.RentalService>,
             Wrox.CarRentalService.ConsoleClient.CarRentalProxy.RentalService
{
Example 4.4. Client-Side Configuration File
<configuration>
    <system.serviceModel>
        <client>
            <endpoint address="http://localhost:9876/WroxCarRentalService"
                binding="basicHttpBinding"
                contract="CarRentalProxy.RentalService" />
        </client>
    </system.serviceModel>
</configuration>
When you use the proxy as shown in Listing 4-5, you must remember to close it if you no longer require it. Or you may also use the proxy within a using statement to guarantee that the Dispose method is called up automatically at the end and valuable resources are released.
Example 4.5. Using the Client Proxy
namespace Wrox.CarRentalService.ConsoleClient
{
    class Program
    {
        static void Main(string[] args)
        {

            using (CarRentalProxy.RentalServiceClient
                  rentalServiceClient = new
                  CarRentalProxy.RentalServiceClient())
            {
                 CarRentalProxy.PriceCalculationResponse resp = null;
resp = rentalServiceClient.CalculatePrice
(DateTime.Now, DateTime.Now.AddDays(5),
"Graz", "Vinna");
Console.WriteLine("Price to Vienna {0}",
resp.Price);
}
Console.WriteLine("Proxy closed");
}
}
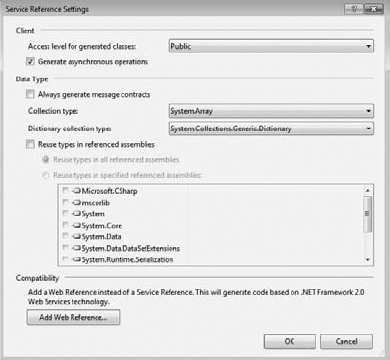
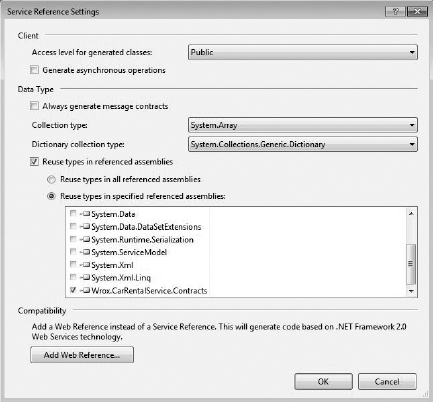
}If you are responsible both for the server and for the client implementation and have complete control of the code which is created, it may make sense under certain circumstances to prevent new data classes from being created every time the service reference is added, which would cause it to be duplicated and therefore require multiple maintenance. Shared data contracts can also be used to prevent your code from looking different on the server side and on the client side. For example, List<string> on the server side would become a string array on the client side. Some aspects could be controlled by the Add Service Reference - Advanced dialog box as well.
In these cases you can assign the parameter /r to svcutil.exe as an instruction to use data classes from a referenced DLL and not to create any new data classes. Another advantage of shared data classes is that you can use data classes of any complexity provided they can be serialized.
The service class is still supplied to your client code in the form of a proxy which is inherited by System.ServiceModel.ClientBase<T>, and which the service interface implements. However, the service data classes are no longer simulated on the client side. They are loaded directly from the shared assembly.
The narrowest form of binding between the client and server generally involves dispensing with a WSDL document and making direct reference instead to the ServiceContract or DataContract assemblies. Of course, this is only possible and worthwhile in a very closely coupled system in which you have absolute control of the client and server code. The ChannelFactory class is used for communication with the service, not the proxy which is created, as shown in Listing 4-6. ChannelFactory objects are used primarily in middle-tier scenarios, where the aim is to increase performance where there is no need to instantiate a new proxy for every client every time. The ChannelFactory object, however, is simply used to open a separate channel for each client. Furthermore, in environments in which frequent changes are made to the service contract (most notably at the start of a project), it may make perfectly good sense and be helpful not to create a new proxy code every time, but to use the server assembly directly.
Example 4.6. ChannelFactory<T>
using System;
using System.Collections.Generic;
using System.Linq;
using System.Text;
using System.ServiceModel;
using Wrox.CarRentalService.Contracts;

namespace Wrox.CarRentalService.ConsoleClient
{
    class Program
    {
        static void Main(string[] args)
        {
            ChannelFactory<ICarRentalService> factory = null;
            try
            {
                BasicHttpBinding binding = new BasicHttpBinding();
                EndpointAddress address = new
                  EndpointAddress("http://localhost:9876
                                           /WroxCarRentalService");

                factory = new
                  ChannelFactory<ICarRentalService>(binding, address);

                ICarRentalService channel = factory.CreateChannel();

                PriceCalculationResponse resp =
                     channel.CalculatePrice
                          (DateTime.Now, DateTime.Now.AddDays(5),
                           "Graz", "Wien");
                Console.WriteLine("Price to Wien {0}", resp.Price);

                factory.Close();
            }
            catch (CommunicationException)
            {
                if (factory != null)
                {
                    factory.Abort();
                }
            }
            catch (TimeoutException)
            {
                if (factory != null)
                {
                    factory.Abort();
                }
            }
            catch (Exception ex)
            {
                if (factory != null)
{
factory.Abort();
}
Console.WriteLine(ex.ToString());
}
Console.WriteLine("Proxy closed");
}
}
}In the sample displayed in Figure 4-3, the client makes direct reference to the service assembly and to the DataContract assembly.
However, there is no need for a reference to specific implementation of the service class because communication between the client and the server still takes place via the standard WCF route.
REST stands for Representational State Transfer and was looked at in the dissertation by Roy Thomas Fielding.
Some of the most important aspects of the REST environment are uniquely addressable resources, their different characteristics and formats, a uniform and easy-to-follow programming interface, and the facilitation of a highly scalable environment.
Implemented today, REST mainly entails the use of technologies which are already well established in practice on the Web and which have been used to outline the advantages of REST. HTTP or HTTPS, for example, may be used as the transfer protocol. URLs including query strings are used to address resources, and the representation formats supported range from HTML and XML to JSON and ATOM, as well as to sound and video files. The simple and intuitive programming interface previously mentioned is achieved by using HTTP verbs and status codes.
If, for example, you point your browser at the URL http://p2p.wrox.com/content/blogs, status code 200 is returned and your browser displays the returned HTML in the form of a web site. In keeping with normal web practices, the following page also contains links to other resources and topics:
http://p2p.wrox.com/content/blogs/danm/announcing-virtualdnug
In the URL above you can also see how intuitively these URLs are structured. Or use the following URL to receive an RSS feed:
http://www.wrox.com/WileyCDA/feed/RSS_WROX_ALLNEW.xml
In contrast to SOA with SOAP, REST is not concerned with the definition of messages and the design of methods; central components are resources and actions which can affect those resources. The actions which affect resources are mainly CRUD (Create, Read, Update, and Delete) methods. What should be done with a resource is determined by means of an HTTP verb, and the success of the action is ascertained by querying the HTTP status code.
In the following example, a GET at http://localhost:1234/CarPool shows all the cars in the fleet in the form of an XML document. Status code 200 indicates success.
URL: http://localhost:1234/CarPool
Verb: GET
Status-Code: 200
Response-Body:
<Cars xmlns="http://schemas.datacontract.org/2004/07/Wrox"
xmlsn:i="http://www.w3.org/2001/XMLSchema-
instance"><Car><Make>Dodge</Make><Name>Dakota</Name><Seats>8</Seats><Type>Pickup

Truck</Type></Car><Car><Make>Audi</Make><Name>TT</Name><Seats>2</Seats><Type>Sport
Car</Type></Car><Car><Make>Seat</Make><Name>Leon</Name><Seats>5</Seats><Type>Sport
Car</Type></Car></Cars>
In the following example, a GET at http://localhost:1234/CarPool/TT shows the Audi TT in the form of an XML document. Status code 200 indicates success. Status code 404, for example, would mean not found.
http://localhost:1234/CarPool/TT
Verb: GET
Status-Code: 200
Response-Body:
<Car xmlns="http://schemas.datacontract.org/2004/07/Wrox"
xmlsn:i="http://www.w3.org/2001/XMLSchema-
instance"><Make>Audi</Make><Name>TT</Name><Seats>2</Seats><Type>Sport
Car</Type></Car>
In the following example, a GET at http://localhost:1234/CarPool/TT?format=json shows the Audi TT in the form of a JSON document. Status code 200 indicates success. Status code 404, for example, would mean not found.
URL: http://localhost:1234/CarPool/TT?format=json
Verb: GET
Status-Code: 200 (OK)
Response-Body:
{"Make":"Audi","Name":"TT","Seats":2,"Type":"Sport Car"}
In the following example, a PUT at http://localhost:1234/CarPool/Leon with the requisite XML data in the request body would mean that the car is to be added to the car pool. Status code 201 means created. As a result of the POST action, the added object is normally returned, along with any further details or links to other objects.
URL: http://localhost:1234/CarPool/Leon
Verb: PUT
Request-Body:
<Car xmlns="http://schemas.datacontract.org/2004/07/Wrox"
 xmlns:i="http://www.w3.org/2001/XMLSchema-instance">
<Make>Seat</Make><Name>Leon</Name><Seats>4</Seats><Type>Sport
Car</Type></Car>
Status-Code: 201 (Created)
Response-Body:
<Car xmlns="http://schemas.datacontract.org/2004/07/Wrox"
xmlsn:i="http://www.w3.org/2001/XMLSchema-
instance"><Make>Seat</Make><Name>Leon</Name><Seats>4</Seats><Type>Sport
Car</Type></Car>
Apart from GET and PUT, which have already been seen, the verbs most commonly used also include DELETE and POST.
GET is used exclusively to retrieve data and, therefore, the result can also be buffered without any concerns. It also offers a major advantage over SOAP messages in which the actual call cannot be identified straight away as a reading call. Therefore, they are also difficult to buffer.
DELETE is used for deleting resources. It should be called up as often as you wish without any concerns about side effects. When http://localhost:1234/CarPool/Leon is called up for the first time, for example, the Leon is deleted. The next time the same URL is called up, the resource is no longer available and can, therefore, not be deleted either.
PUT is used to add or change a resource if you can define the URL yourself. For example, a PUT at http://localhost:1234/CarPool/Leon along with corresponding details in the request body means that this resource is added anew with the URL used. If you assign a PUT to this URL with other values in the request body, it would lead to an update in the resource.
POST is an exception in certain regards. First of all, POST is frequently misused as DELETE and PUT, because the use of DELETE and PUT is either not permitted or technically impossible from the browser's perspective. Secondly, POST is used to add new resources to a container without having control of the URL created. Thus, for example, a POST to http://localhost:1234/CarPool with corresponding details in the body would mean that a new car is being added to the carpool. However, in this case the POST call would have to return the URL of the newly created resource.
In any event, the REST is stateless. Therefore, whenever a call is made, all the requisite values are either transferred in the address of the resource or as additional parameters. This behavior also means that REST applications are generally much easier to scale because there is no need to be concerned about which server to send the query to in a load-balanced environment.
WCF not only provides a platform for SOAP messages, it is also a means of offering RESTful services.
The essential components that allow you to create a REST application can be found in System.ServiceModel.Web.dll. The most important elements of a REST application include the [WebGet] and [WebInvoke] attributes and the new binding webHttpBinding in connection with the webHttp endpoint behavior.
Note
If you use [WebGet] or [WebInvoke], the [OperationContract] attribute is optional.
Should you wish to create a RESTful solution from your SOAP-based solution, theoretically you would simply have to change the binding to webHttpBinding and configure the endpoint with the webHttp behavior.
This binding has the following effect: If you send a SOAP message to an endpoint in a classical SOA environment, the content of the message will normally be checked first. The correct operation will be called up depending on the content of the message.
In REST, however, the method which is called up is dependent on the URL and on the verb used. This altered dispatch behavior is made possible by the binding webHttpBinding and the webHttp endpoint behavior. Furthermore, the WebHttpBehavior class or the endpoint behavior also enables you to choose from two different serialization formats:
The service contract shown in Listing 4-7 in connection with the changed configuration displayed in Listing 4-8 would, for example, prompt you to make a POST at http://localhost:1234/HelloWorld, resulting in a receipt of an XML document with "Hello World".
Example 4.7. Service Contract
[ServiceContract()]
    public interface ICarRentalService
    {
        [OperationContract]
        string HelloWorld();
Example 4.8. Configuration File with webHttpBinding and webHttp Behavior
<configuration>
  <system.serviceModel>
      <services>
      <service name="Wrox.CarRentalService">
        <endpoint
address="http://localhost:1234/"
contract="Wrox.ICarRentalService"
binding="webHttpBinding"
behaviorConfiguration="web"/>
</service>
</services>
<behaviors>
<endpointBehaviors>
<behavior name="web">
<webHttp/>
</behavior>
</endpointBehaviors>
</behaviors>
</system.serviceModel>
</configuration>Instead of the configuration entries in the config file, you can also use the new WebServiceHost class. The WebServiceHost class inherits from ServiceHost and automatically assigns the correct binding and behavior to your endpoint. Consequently, you no longer need to be concerned about the content of your configuration file and you can host your service without a config file. Alternatively, if you are hosting your service in IIS, you can use the WebServiceHostFactory class. For example:
<% @ServiceHost Factory= "System.ServiceModel.Web.WebServiceHostFactory"
The configuration file could remain blank with the server code shown in Listing 4-9.
Example 4.9. WebServiceHost
namespace Wrox.ConsoleHost
{
    class Program
    {
        static void Main(string[] args)
        {
            WebServiceHost webHost = null;
            try
            {
                webHost = new WebServiceHost(
                       typeof(Wrox.CarRentalService),
                       new Uri("http://localhost:1234")
                       );
                webHost.Open();
                Console.ReadLine();
            }
            catch (Exception ex)
            {
                if (webHost != null)
webHost.Abort();
Console.WriteLine(ex.ToString());
}
}
}
}However, the disadvantage of this standard webHttpBinding behavior in conjunction with enableWeb is that, firstly, POST is used as a standard verb and, secondly, the URL used is simply the name of the method. However, this does not reflect the idea behind REST. In contrast to SOA, it is not the messages which are of prime importance; instead it is the resources, the URLs, and the verbs used.
You can obtain complete control of the URL being used by using the two attributes [WebGet] and [WebInvoke] in combination with your OperationContract attribute (the OperationContract attribute is obsolete).
Use [WebGet] whenever you require read-access to the resource, i.e., when you wish to use the HTTP verb GET.
Use [WebInvoke] for all other scenarios (POST, PUT, DELETE).
[WebGet] and [WebInvoke] also give you the opportunity to use a URI template with constant and variable parts. Furthermore, these two attributes also allow you to determine the serialization format (XML or JSON).
Note
The automaticFormatSelectionEnabled attribute uses the Accept Header of the incoming message to automatically choose between JSON or XML.
Listing 4-10 shows examples of how [WebGet] and [WebInvoke] are used (assumption of the base address http://localhost:1234).
Example 4.10. REST Implementation
namespace Wrox
{
    public class Car
    {
        public string Name { get; set; }
        public string Make { get; set; }
        public string Type { get; set; }
        public int Seats { get; set; }
    }

    [System.Runtime.Serialization.CollectionDataContract(Name="Cars")]
    public class CarPool: List<Car>
    {
        private CarPool()
{
this.Add(new Car() { Name = "Dakota",
Make = "Dodge", Type = "Pickup Truck", Seats = 8 });
this.Add(new Car() { Name = "TT",
Make = "Audi", Type = "Sport Car", Seats = 2 });
}
private static CarPool AllCars = null;
public static CarPool GetCarPark()
{
if (AllCars ==null)
AllCars = new CarPool();
return AllCars;
}
}
[ServiceContract()]
public interface ICarRentalService
{
[OperationContract]
string HelloWorld();
[OperationContract]
[WebGet(UriTemplate = "/CarPool")]
CarPool GetAllCars();
[OperationContract]
[WebGet(UriTemplate = "/CarPool/{carName}")]
Car GetCar(string carName);
[OperationContract]
[WebGet(UriTemplate="/CarPool/{carName}?format=xml",
ResponseFormat = WebMessageFormat.Xml)]
Car GetCarXML(string carName);
[OperationContract]
[WebGet(UriTemplate = "/CarPool/{carName}?format=json",
ResponseFormat = WebMessageFormat.Json)]
Car GetCarJSON(string carName);
[OperationContract]
[WebInvoke(UriTemplate = "CarPool/{carName}", Method = "PUT")]
Car AddCar(string carName, Car car);
[OperationContract]
[WebInvoke(UriTemplate = "/CarPool/{carName}",
Method = "DELETE")]
void DeleteCar(string carName);
}[ServiceBehavior(InstanceContextMode=InstanceContextMode.Single)]
public class CarRentalService: ICarRentalService
{
public string HelloWorld()
{
WebOperationContext.Current.OutgoingResponse.StatusCode =
System.Net.HttpStatusCode.OK ;
return "Hello World";
}
public CarPool GetAllCars()
{
return CarPool.GetCarPark();
}
public Car GetCar(string carName)
{
return CarPool.GetCarPark().Find(e => e.Name == carName);
}
public Car GetCarXML(string carName)
{
return GetCar(carName);
}
public Car GetCarJSON(string carName)
{
return GetCar(carName);
}
public void DeleteCar(string carName)
{
Car found = CarPool.GetCarPark().Find
(e => e.Name == carName);
if (found == null)
WebOperationContext.Current.OutgoingResponse
.SetStatusAsNotFound();
else
CarPool.GetCarPark().Remove(found);
}
public Car AddCar(string carName, Car car)
{
WebOperationContext.Current.OutgoingResponse
.SetStatusAsCreated
(
new Uri("http://localhost:1234/CarPool/" + car.Name)
);
CarPool.GetCarPark().Add(car);
return car;
}
}
}In the following example, the HTTP GET URL is fixed text and does not contain a variable element.
[OperationContract] [WebGet(UriTemplate = "/CarPool")] CarPool GetAllCars();
This is how the operation GetAllCards can be invoked (Sending a HTTP GET to the address below).
GET http://loalhost:1234/CarPool
[OperationContract]
[WebGet(UriTemplate = "/CarPool/{carName}")]
Car GetCar(string carName);
When the following line is invoked, Leon is passed as the variable {carName} to the operation GetCar (Sending an HTTP GET to the address below):
GET http://localhost:1234/CarPool/Leon
The following example is similar to the previous example. {carName} is written to the variable carName. Furthermore, a fixed query string is also stated, and the response format is set to JSON.
[OperationContract]
[WebGet(UriTemplate = "/CarPool/{carName}?format=json", ResponseFormat =
WebMessageFormat.Json)]
Car GetCarJSON(string carName);
As shown in the following example, in contrast to WebGet, the verb can be specified in WebInvoke. The variable carName is taken from the URL and the content of the car object is taken from the request body.
[OperationContract]
[WebInvoke(UriTemplate = "CarPool/{carName}", Method = "PUT")]
Car AddCar(string carName, Car car);
You previously saw how the new webHttpBinding is used together with webHttp and [WebGet] or [WebInvoke] to assist in creating a RESTful application. The addressable resources are defined with the aid of URI templates, and you can use the RequestFormat or ResponseFormat properties to determine whether to use XML or JSON as the format. The intuitive API is made possible by using HTTP verbs.
Use HTTP status codes and HTTP headers to determine whether an operation was successful or whether, for example, a resource has limited accessibility and can be retrieved only with a username and password. Access to these HTTP-specific elements is obtained via the WebOperationContext.
If a call was successful, for example, the status code returned would be 200, whereas 403 would be returned if a resource was not found. To help you to work with these status codes, you can either use the enum System.Net.HttpStatusCode or auxiliary methods from the OutgoingWebResponseContext class.
The following line would return a status code 200 from the service.
WebOperationContext.Current.OutgoingResponse.StatusCode =
System.Net.HttpStatusCode.OK ;
On the contrary, the following line would return a status code 403 (Resource not found):
WebOperationContext.Current.OutgoingResponse.SetStatusAsNotFound();
In contrast to WCF with SOAP, the REST variant does not provide any means of creating a WSDL document. Therefore, the quick and easy variant Add Service Reference is not available.
However, this isn't altogether disadvantageous; it also brings with it certain advantages. As the use of the REST API is limited to a few verbs and avoids the exchange of complicated SOAP messages, a separate proxy is relatively easy to create with a suitable stack which supports HTTP, verbs, and status codes.
For example, you could use System.Net.WebRequest and System.Net.WebResponse for this purpose or leverage the WebChannelFactory class from the System.ServiceModel.Web.dll. In this case you also have absolute control over communication between the server and client and do not have to worry about any hidden activities and functionalities in the proxy you create.
In contrast to SOAP, REST is also interoperable to a higher degree because it is theoretically sufficient if the client has a command of HTTP and XML or JSON. Therefore, there is no need for an extensive SOAP stack with the support of all the WS* protocols to communicate with the REST service.
Because support for REST has only been available since .NET Framework 3.5 and there is still a lack of support in some areas (error handling, hosting, client, caching), you can also revert to using the REST Starter Kit. The REST Starter Kit is available as a download in CodePlex and offers a wide range of classes and extension methods for programming with REST on the server side and for REST calls on the client side.
The server-side functionality which can be found in the Microsoft.ServiceModel.Web.dll assembly includes, for example, simplified working with status codes, intuitive error handling with throw, ASP.NET-based caching support, and a separate service host which saves you having to create a documentation page manually. The generated help page is created similar to WSDL on the basis of your service code and can be adapted further by using [WebHelp].
HttpClient is surely the most important class on the client side. This class simplifies how REST operations are called up and supports GET, PUT, DELETE, and POST. The entire client functionality is located in the Microsoft.Http.dll assembly and in Microsoft.Http.Extensions.dll.
Listing 4-11 illustrates how the HttpClient class is used to send a GET request for a readout of all available cars. Furthermore, the use of the PUT method is also demonstrated in this example.
Example 4.11. REST Client - HttpClient
namespace Wrox.RestClient
{
    class Program
    {
        static void Main(string[] args)
        {
            using (HttpClient restClient = new HttpClient())
            {
                HttpResponseMessage resp =
                restClient.Get("http://localhost:1234/CarPool");
                    resp.EnsureStatusIsSuccessful();
                Console.WriteLine(resp.Headers.ToString());

                var result = resp.Content.ReadAsString();

                Console.WriteLine(result);

                string newCar = "<Car
                xmlns="http://schemas.datacontract.org/2004/07/Wrox">
                <Make>Seat</Make><Name>Leon</Name>
                <Seats>5</Seats><Type>Sport Car</Type></Car>";

                restClient.Put("http://localhost:1234/CarPool/Leon",
                    "application/xml",
                    HttpContent.Create(newCar));
                Console.WriteLine(resp.StatusCode);

            }
        }
    }
}
Therefore, the REST Starter Kit provides you with an extensive collection of classes and methods which is worth taking a look at. However, the starter kit not only contains the assemblies, it also contains the entire code from which you can also get a wide range of ideas for implementing your REST application.
Note
In addition to the REST Starter Kit, WCF 4.0 introduces additional features to ease programming with REST, like a new Visual Studio Template, support for ASP.Net caching, automatic generated help pages, WebFaultException, JSONP, conditional GET, and ETag support.
AJAX is a popular programming model used in conjunction with web sites to avoid reloading entire pages just to change specific parts of the page. The aim is to provide a sophisticated, interactive page without having to put up with disruptive delays during rendering. This means that the gulf between simple web sites and interactive desktop applications is becoming ever smaller.
The AJAX concept is based on the fact that the browser or the code on the client side sends an asynchronous call to the server to obtain further information and changes the contents of the page with the data returned.
AJAX previously stood for Asynchronous JavaScript and XML because JavaScript was mainly used as a programming language, and XML documents were exchanged between the browser and the server. However, this has become significantly less common in recent times; nowadays, in principle, an AJAX application involves an asynchronous call from the client side which is processed further with the aid of the data received.
That said, JavaScript is still in very common usage and, therefore, JSON is much better suited as a data exchange format than XML. JSON is somewhat narrower than XML and can be deserialized more quickly by most script languages, such as JavaScript or PHP. You can call up a REST service, for example, when using JavaScript with XMLHttpRequest. The returned XML document would then have to be deconstructed bit by bit with suitable classes and methods and processed further.
However, if you use WCF and ASP.NET as a technology, you can shorten the lengthy route via an XMLHTTPRequest and issue a direct instruction to your WCF service to download JavaScript code. It can then be used as a proxy for communication with the service. This is very similar to the popular and convenient use of automatically generated proxies on the basis of a WSDL file for your .NET applications.
To enable the JavaScript proxy code to be generated, simply replace the webHttp behavior with the enableWebScript behavior. As shown in Listing 4-12, you can obtain the source code of the automatically generated JavaScript code via the endpoint with the addition of /js.
Example 4.12. AJAX Proxy
Type.registerNamespace('wrox.CarRentalService._2009._10'),
wrox.CarRentalService._2009._10.RentalService=function() {
wrox.CarRentalService._2009._10.RentalService.initializeBase(this);
this._timeout = 0;
this._userContext = null;
this._succeeded = null;
this._failed = null;
}
wrox.CarRentalService._2009._10.RentalService.prototype={
_get_path:function() {
 var p = this.get_path();
 if (p) return p;
 else return
wrox.CarRentalService._2009._10.RentalService._staticInstance.get_path();},
GetAllCars:function(succeededCallback, failedCallback, userContext) {
return this._invoke(this._get_path(), 'GetAllCars',false,{},succeededCallback,
failedCallback,userContext); },
AddCar:function(car,succeededCallback, failedCallback, userContext) {
return this._invoke(this._get_path(), 'AddCar',false,{car:car},succeededCallback,
failedCallback,userContext); }}
...
However, instead of making a change in the configuration file, you can also use a special class again which automatically configures the endpoint with the correct binding and behavior, namely WebScriptServiceHost.
But if you wish to provide your WCF service with the aid of a generated JavaScript proxy, you should be aware that the only verbs permissible are GET and POST, and that the use of URI templates is not supported.
To access the generated proxy from your ASPX side, you normally use a ScriptManager control and add the endpoint address of the service as a ServiceReference, as shown in Listing 4-13.
Example 4.13. ScriptManager
<asp:ScriptManager ID="ScriptManager1" runat="server">
        <Services>
             <asp:ServiceReference Path="http://hansAt7:1234" />
</Services>
</asp:ScriptManager>
As a result, when you download the page the JavaScript proxy code is downloaded from the server first and can then be used for communication.
Listings 4-14, 4-15, and 4-16 illustrate both the code required for this on the server side and the content of the ASPX page. Note that the proxy is accessible via the class wrox.CarRentalService._2009._10.RentalService which is derived by namespace + servicename.
Example 4.14. REST Service Contract
namespace Wrox.RestClient
{
 [ServiceContract(
    Namespace = "http://wrox/CarRentalService/2009/10",
    Name = "RentalService")]
    public interface ICarRentalService
    {
        [OperationContract]
        CarPark  GetAllCars();

        [OperationContract]
        [WebInvoke(Method = "POST",
          RequestFormat = WebMessageFormat.Xml,
          ResponseFormat  = WebMessageFormat.Xml)]
        Car AddCar(Car car);

    }
Example 4.15. AJAX-Enabled Configuration File
<services>
      <service name="Wrox.CarRentalService" >
        <endpoint
            address="http://hansat7:1234/"
            contract="Wrox.ICarRentalService"
            binding="webHttpBinding"
            behaviorConfiguration="webScript"/>
      </service>
    </services>
    <behaviors>
      <endpointBehaviors>
        <behavior name="webScript">
          <enableWebScript/>
        </behavior>
      </endpointBehaviors>
    </behaviors>
Example 4.16. Default.aspx
<%@ Page Title="Home Page" Language="C#" MasterPageFile="∼/Site.master"
AutoEventWireup="true"
    CodeBehind="Default.aspx.cs" Inherits="WebAjaxClient._Default" %>
<asp:Content ID="HeaderContent" runat="server"
ContentPlaceHolderID="HeadContent">
</asp:Content>
<asp:Content ID="BodyContent" runat="server"
ContentPlaceHolderID="MainContent">
    <asp:ScriptManager ID="ScriptManager1" runat="server">
        <Services>
            <asp:ServiceReference Path="http://hansAt7:1234" />
        </Services>
    </asp:ScriptManager>
    <script>
        function ajaxTest() {
            var myProxy =
            new wrox.CarRentalService._2009._10.RentalService();

            var myCar = new Wrox.Car();
            myCar.Make = "Mercedes";
            myCar.Name = "SLK";
            myProxy.AddCar(myCar, onSuccessAdd, onFailAdd, myProxy);
            myProxy.GetAllCars(onSuccessGetAll, onFailGetAll, myProxy);

        }
        function onSuccessAdd(result) {
            $get("divAddCar").innerText = result;
        }
function onFailAdd(result) {
alert(divAddCar);
}
function onSuccessGetAll(result) {
var allCars = "";
for (var i = 0; i < result.length; i++) {
allCars += " " + result[i].Name + " " + result[i].Make;
}
$get("divAllCars").innerText += allCars;
}
function onFailGetAll(result) {
alert(result);
}
</script>
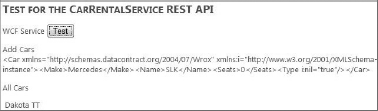
<h2>
Test for the CarRentalService REST API
</h2>
<p>
WCF Service
<input type="button" value="Test" onclick="ajaxTest()" />
</p>
Add Cars
<div id="divAddCar">
</div>
<p>
All Cars
<div id="divAllCars">
</div>
</p>
</asp:Content>The result is shown in Figure 4-4.
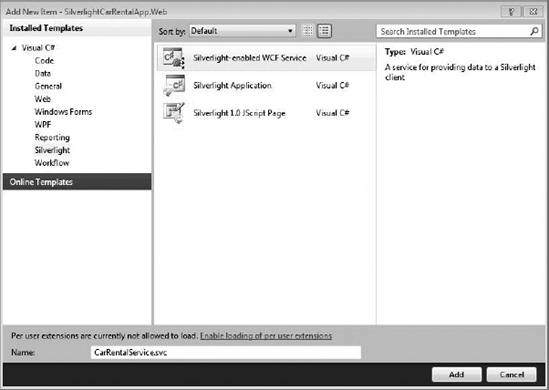
What is true for classic .NET clients and for AJAX clients also works for Silverlight. There is an easy way to use an existing WCF service by just using Add Service Reference to generate a proxy and program against the proxy. If you already have a Silverlight-Webcontainer, you can use the new Visual Studio item template called Silverlight-enabled WCF service to add a .svc file and the associated code-behind file to your project (see Figure 4-5). Note that issues such as security and threading are not discussed here.
Listing 4-17 shows the content of the CarRentalService.svc.cs which contains a test method called HelloWorld.
Example 4.17. HelloWorld for Silverlight
namespace SilverlightCarRentalApp.Web
{
[ServiceContract(Namespace = "http://WCFBook/SilverlightSamples")]
    [AspNetCompatibilityRequirements(
    RequirementsMode = AspNetCompatibilityRequirementsMode.Allowed)]
    public class CarRentalService
    {
        [OperationContract]
        public string  HelloWorld()
        {
            return "Hello Silverlight";
        }
    }
}
To create a proxy for your Silverlight-App, just add a service reference to your project. Listing 4-18 shows the markup and Listing 4-19 demonstrates the use of the generated proxy within your Silverlight-App. Note that the proxy offers only async-calls to prevent deadlocks in your main thread.
Example 4.18. MainPage.xaml
<StackPanel>
     <Button Content="Button" Height="23"
     Name="button1" Width="75" Click="button1_Click" />
     <TextBox Height="23" Name="textBox1" Width="120" />
</StackPanel>
Example 4.19. Silverlight WCF Proxy
namespace SilverlightCarRentalApp
{
    public partial class MainPage : UserControl
    {
        public MainPage()
        {
            InitializeComponent();
        }

        private void button1_Click(object sender, RoutedEventArgs e)
        {
            CarRentalProxy.CarRentalServiceClient myClient =
           new CarRentalProxy.CarRentalServiceClient();
            myClient.HelloWorldCompleted += new
              EventHandler<CarRentalProxy.HelloWorldCompletedEventArgs>
             (myClient_HelloWorldCompleted);
            myClient.HelloWorldAsync();
        }

        void myClient_HelloWorldCompleted(object sender,
                   CarRentalProxy.HelloWorldCompletedEventArgs e)
        {
            textBox1.Text = e.Result;
        }
    }
}