

ENCODING VIDEO FOR THE WEB
While you work hard to have a great-looking video, delivering uncompressed video over the Internet is just impractical. Uncompressed video formats can top out at 1 GB per minute, and even DV compression still weighs in at 200 MB per minute. This would cost a fortune to deliver and even the most motivated audience members wouldn't be willing to invest the time in getting content.
Fortunately, video compression techniques and technology have dramatically improved. It is now possible to deliver video that looks great using data rates that measure 1 to 10 MB per minute. In fact, adaptive streaming technology has allowed video viewing on smart phones to grow enormously.
However, getting video to still look great despite the task of discarding 95% or more of the information takes skill, time, and technology. We can give you two of the three, you'll have to either learn patience or just keep buying a faster computer.

Image quality is essential as consumers start to watch web video on larger screens.
Server Side Encoding
For many web video and social media sharing sites, your video is going to be recompressed (no matter what you do). This is generally referred to as server side encoding, and it can really wreak havoc with the quality of your video. This is done in order to unify all of the video on a site and ensure that it plays back smoothly. Here are some things to keep in mind.
- Be sure to look at upload limits. You'll often have a cap on runtime and file size. Be sure your video falls beneath both or it will likely be rejected. For example, Facebook requires files to be less than 20 minutes and 100 MB, whereas YouTube allows 10-minute clips that must fall below 1 GB.
- Check your options. Most sites will accept several different upload formats. You are best compressing the video to an intermediate file that meets the upload requirements. Most sites accept H.264 video files, which offer a good balance of image quality to file size.
- Test post. Before you upload several clips, be sure to test post. Try out a compressed file and see how it looks. Find the right balance of image quality to file size in order to maximize the video's appearance online.
The Challenge of Encoding
The task of encoding video faces a triple constraint. To come up with the right encoding technique, you must balance file size, ease of development, and final quality. This is not unlike the old adage of good, fast, cheap—pick two. Unfortunately, you (and the world) want all three:
- Getting a small file size with good image quality is not easy to do.
- Likewise, you can usually generate high-quality podcast files quickly using default presets with the encoding tools, but the files will be unnecessarily large.
- Of course, you can make small files quickly by just throwing away information. But these fast encode methods don't deliver great-looking files.
Before you give up and think that this quest is hopeless, don't worry, we'll get you there. With a little knowledge, common sense, and patience, your files will look great and be ready to publish to the Internet.
Determining Delivery Format
You will face some important decisions early on when you want to determine your delivery format. For example, making video files that will work in an RSS feed is a lot easier than those that work on an iPod. Picking the right format is a give and take scenario, so let's explore some of the options.

Most compression applications offer a choice of several formats. Adobe Media Encoder is included with Premiere Pro and the Adobe Creative Suite.
File Format
There are a myriad of formats available on the web. The driving factors here are the audience. If you're targeting a corporate environment, then creating files that work with the bundled Windows Media Player application is essential. On the other hand, you may be targeting mobile phone users, in which case MPEG-4 is the clear leader. Don't make the mistake of lumping online video formats together; they often have very unique properties.
MPEG-4
The MPEG-4 format is really a suite of standards with many parts. Each part offers a set of standards for aspects such as audio, video, and file formats. The standard was first introduced in 1998, but it continues to evolve with important new changes. MPEG is an acronym for the ISO/IEC Moving Picture Experts Group, which serves as the governing body for the format.
The two most common parts of MPEG-4 are part 2, which is used in codecs such as DivX and QuickTime 6, and H.264, which is part of QuickTime 7 and QuickTime X as well as Blu-ray Discs. We'll explore the newer H.264 in a moment, but let's first look at the common .mp4 file that is often used for the web.

Many compression tools offer the more plainly labeled MPEG-4 option. This generally means that the older MPEG-4 part 2 Simple Profile specs are being followed. This ensures greater compatibility with QuickTime 6. The format is also more likely to play using other web-based players such as RealPlayer and the open-source VLC media player. Some podcasters favor this format if they are targeting a user-base of running older computer operating systems. Although the format does offer broader support, it does not offer the same level of quality of the newer H.264 format.
Many encoding tools, including Telestream's Episode Pro, offer presets for different encoding jobs. Note that certain players can handle both types of MPEG-4 video, while many newer devices prefer H.264 video.
H.264 Is Future-Proof

With H.264, we seem to have a video format that most portable device and entertainment system manufacturers can agree on. The H.264 format gives excellent quality across multiple bandwidths—from 3G for mobile phones to HD television broadcasts. This is great news as it means there is a lot of support and effort being placed into tools and technology.
With H.264 being mandatory for the Bluray specification and the 3GPP (3rd Generation Partnership Project) standards, H.264 is going to be around for a long time. Additionally, major manufacturers like Apple, Sony, Nokia, SanDisk, Palm, Blackberry, and even Microsoft are onboard. If your content has an eye to the future, stick with H.264.
H.264
The H.264 format is an extension of the MPEG family and is also called MPEG-4 Part 10, or Advanced Video Coding (AVC). This format is broadly used outside of podcasting and web video including uses for broadcast television and Blu-ray Discs. The format was first drafted in 2003 and saw widespread adoption by 2005. H.264 video wrapped in an MPEG-4 container is Apple's preferred format, as it is used for both movie trailers on Apple's website and TV shows and movies available for sale in the iTunes Store.
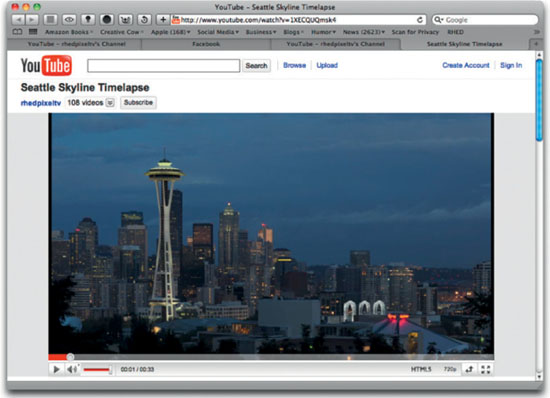
Support for H.264 extends beyond Apple. In 2005, Sony added complete support to the PlayStation Portable line. In 2006, Microsoft launched the Zune portable media player, which included both MPEG-4 and H.264 support. In 2007, YouTube began encoding all uploaded videos to both its standard player and H.264. This move was to broaden the reach of YouTube videos to the iPhone, iPod touch, and iPad models. Additionally, Adobe Media Player released in 2008 also supports H.264 in addition to Flash video.
The format was brought to life as a way to provide “DVD-quality” at half the data rate (i.e., file size) of the optical discs. Besides smaller file size, the format specs mandated that the format had to be relatively easy to use, not cost prohibitive, and work on devices from many manufacturers. The format has succeeded, and is the ideal choice for most video podcasters.
AVC: H.264 by Another Name
Don't be surprised to see yet another name for H.264 codecs, which is AVC (Advanced Video Coding). This is meant to be a more “consumer-friendly” name. You'll see this term pop-up frequently in different manufacturer's products.
HTML5
While it's not exclusively a video format, the use of HTML5 is quickly gaining ground. One of the driving factors has been a platform war that has engulfed Apple and Adobe over the widespread use of Flash. With the launch of the Apple iPad in 2010, Apple made several public statements about why they chose to not support the Flash plug-in on the device.
When used correctly, HTML5 allows for embeddable players that can be deployed across multiple browsers and platforms. A number of high-profile websites including YouTube, Vimeo, and DailyMotion have begun offering HTML5 video.
There are a few limitations with HTML5 video currently. A major drawback is that HTML5 lacks a true video standard and instead supports multiple video formats. It also currently lacks the ability to play video in a full-screen window (unless the web browser can be enlarged full-screen). Many content creators are also wary because of deficits toward content protection issues.
HTML5 Top Sites
![]()
HTML5 is a quickly evolving format; to keep up we recommend these links:
The HTML5 player from YouTube is broadly compatible with many web browsers.
Try Out HTML5
Want to give HTML5 a try? YouTube users can visit www.youtube.com/html5 and click the Join the HTML5 Beta link. YouTube is using a mixture of videos in the newer WebM format as well as the H.264 format.
QuickTime
QuickTime is a broad category of technologies created by Apple. Its presence is woven throughout Apple's software and operating system. It's also available as a stand-alone media player and plug-in for the Windows operating system running Windows XP, Vista, or Windows 7.
Many users have QuickTime installed on their computers as it is bundled with the Apple iTunes software. With Apple's dominance in the portable media player and mobile phone markets, this software is likely on the computers for a consumer audience. In fact, iTunes currently has a 70%+ market share for the digital music industry.
The native format to QuickTime is a .mov file. This is a standard authoring format used by popular video editing tools like Final Cut Pro, iMovie, and Premiere Pro. The .mov format is really a container file and can hold video that uses a variety of codecs. Some of these are suited for the web, whereas others are meant for desktop and professional editing.

Flash Video
Many web developers favor Flash video since it supports both interactivity and tight integration with a website's user interface. Flash video options work well for embedded players. These can be added easily to blogs or other websites.
Currently, the Flash plug-in has had limited support on mobile devices. The primary complaints are power consumption and stability. The Flash format is used widely, however, as a streaming format for the web, as it can easily handle different connection speeds and data rates. We'll explore Flash video in greater depth in our next chapter.

The Pros and Cons of YouTube

Now owned by Google, YouTube began in early 2005. It quickly rose to the top of video-sharing websites offering both user-generated and professionally created video content. The service uses both Flash and H.264 video as the underlying architecture and has recently started experimenting with HTML5.
Google makes web video technology essentially transparent to the end user through a relatively easy-to-use web interface. Additionally YouTube has tie-ins with both Apple and Adobe software, which offer direct publishing in their consumer lines of software.
Although YouTube is popular, many web creators avoid it. The site has a “flea market” feel to it with everything being a free-for-all approach. Your content can get grouped with other content that is off topic or a direct competitor. YouTube also does not make it easy for most creators to monetize their content through advertising. As such, YouTube views are often seen as taking away from a video's financial opportunity.
Our take is to use YouTube as a promotional tool. Therefore, place some of your content online with the site. For podcasts that target niche or professional markets, you may want to avoid the website altogether and instead harness the power of embedded Flash players that you promote and make available on your own.
If you do choose to use YouTube, be sure to carefully read the terms of service. We have seen YouTube license the works of content creators for profit, while not sharing those profits with others. Additionally, be careful when using embeddable players. Always uncheck the Show Related Content option, otherwise viewers will be encouraged to leave your video and website to explore other videos on YouTube.
Windows Media
Windows Media Player is the default media player for the Windows operating system. With that said, it does not tie in well with Microsoft's own portable media player, the Zune. As a player, it can play back several formats including 3GP, AAC, AVCHD, MPEG-4, WMV, and WMA. It can also play back many AVI, DivX, MOV, and Xvid files.
Windows Media Video is the native video format for Windows Media Player. We don't recommend spending much effort to release video files in the Windows Media format. The architecture often suffers from compatibility issues between versions of the plug-in. Because the player supports formats like MPEG-4, we usually choose that path for broader compatibility.

Silverlight
Microsoft Silverlight is a proprietary application that works with web browsers. It can be used as a way to provide animation, vector graphics, and video playback capabilities of Windows Presentation Foundation. Silverlight can also play back WMV, WMA, and MP3 media content, but it lacks support for formats like MPEG-4 and H.264.

TiVo and DVR Players
A popular make of digital video recorders is TiVo. These boxes are popular among consumers, as they allow for the recording of television programs, which can then be watched at a later time. To broaden the appeal of the devices, TiVo has implemented support for podcasting and web video on three fronts.
The first way is that a select number of programs are available as TiVoCasts. These are essentially podcasts that are released at a large size and are intended for playback on the set-top boxes. These shows can be visually browsed and recorded for viewing like any other program on TiVo. In order for it to work, you'll need a TiVo Series 2 or later DVR and a home network.
Chances are that your program is not already listed in the TiVoCast directory, which means that a user has to manually subscribe. The second method is a little difficult, as the consumer has to use a remote control to enter the RSS feed. This process is not hard; it just requires that your audience have an exact URL for the media RSS feed. You can publish this address and instructions to your show's website. You can also use shortcut URL services like tinyurl and bit.ly to simplify the process.
The third way that TiVos support web video is through the TiVoToGo software option. This software enables you to connect a TiVo to PCs on a network in order to share audio and video files. This option is acceptable, but it is not as seamless as the two previous options.
Silverlight requires much more knowledge about web programming than do other web video formats. However, like anything Microsoft, its worth keeping an eye on as the company's technology continues to evolve with a mindset of reaching and serving the enterprise-level business market.
Although Windows Media and Silverlight are two very different technologies, they have several things in common. Microsoft makes them both, they both continue to evolve quickly, and they are both easier to create on a PC, but offer some Mac and Linux support.
Display Size

MacBreak is produced by Pixel Corps in HD. The show is then distributed at three different sizes to best serve its diverse audience.
Getting the correct display size is essential if you want your files to work on noncomputer devices. If you intend your web video files to work on portable media players, you can have two standard frame sizes:
|
16:9 content |
4:3 content |
|
Portable media player |
640 × 360 |
640 × 480 |
|
Mobile phone |
320 × 180 |
320 × 240 |
|
On the other hand, video designed for high-definition playback can go larger. Devices like Apple TV, Microsoft Xbox, and Sony PlayStation can play back HD video. A variety of sizes can be used:
Input |
Output |
||
640 × 480 |
640 × 480 |
||
1280 × 720 |
1280 × 720 or 960 × 540 |
||
1920 × 1080 |
1920 × 1080, 1280 × 720, or 960 × 540 |
||
Before you decide on a delivery size, however, you'll need to analyze your target audience and its technological makeup. Keep an eye on how big your files are getting; you'll eventually reach a threshold of the customer's willingness to download. How big can the file get? Will people complain that the image quality doesn't look good, or will they complain that it takes too long to download?
Data Rate
The image quality of a web video is strongly affected by the data rate of the file. Data rate is often described in kilobits per second (kbps) or the larger Megabits per second (Mbps). These numbers are generally specified in the compression software and impact the total size of the file.
Higher data rates generally mean better image quality, but they can also increase the amount of hardware needed to play back the file. The data rate really becomes an issue when portable media players are involved. The larger data rate files won't work on most portable media players, as they don't contain the required processing power to play back higher data rates. Additionally, larger data rates can put a greater demand on power, which drains batteries quicker.
Should You Hyper-Syndicate?
We firmly believe that content creators need to explore the concept of hyper-syndication. The goal is to effectively reach the broadest audience possible. This means it's not a bad idea to try multiple delivery techniques. By releasing your content in multiple formats, you can reach more people.
Although a broad approach seems logical, there are a few risks. Using more than one format adds costs to both the compression and hosting stages. Your video's ranking on podcast or video-sharing sites can also suffer because you have your customer base spread across multiple channels.
Compression Tools
There are many video compression (or encoding) tools on the market. Knowing which one (or ones) to pick is a process of reading reviews as well as trial and error. Unfortunately, older tools like Cleaner XL and Procoder have not kept up with newer formats like H.264. On the other hand, less expensive compression tools for the price-sensitive podcasting audience have emerged.
Essential features
When selecting a tool for encoding video, we look at several aspects including speed, reliability, and price. These types of factors are somewhat subjective and vary based on the video producer's budget, operating system, and specific needs. Here are a few specific features we look for when evaluating tools:
- MPEG-4 support. Support for the more basic MPEG-4 video using the “Simple Profile” is fairly common. With that said, make sure your encoding tool of choice supports this older format.
- H.264 support. Make sure that the encoding tool can create podcast files using the modern Part 10 protocols we discussed earlier. Older versions of encoding tools may not offer this option, but the newer versions generally do.
- Flash video. The next most common format is Flash video. Finding support for the older .flv format is easier than finding support for the newer .f4v. Ideally, the tool you choose will support both.
- Apple compatible presets. You need a good starting point for your media compression settings. Look for a tool that offers podcasting or iPod presets. This is the dominant media player on the market (by far). Ignore it at your own peril.
- Customized presets. An important feature is the ability to modify presets or create your own. By storing customized presets, you can ensure consistent results that are tailored to fit your podcast's needs.
- Compression preview. Through a compression preview, you can simulate what the end file will look like before you invoke a compression pass. This is a useful way to visualize what changes to data rate and codec settings will mean for your audience.
- Batch processing. The ability to batch process files is an essential time-saver. It allows you to add multiple files to the encoding tool and then apply presets to the files. This essentially means that the time-intensive tasks of compression can be run as unsupervised jobs overnight or on weekends. This is an effective way to make money or at least save time, as it allows you to focus on other tasks.
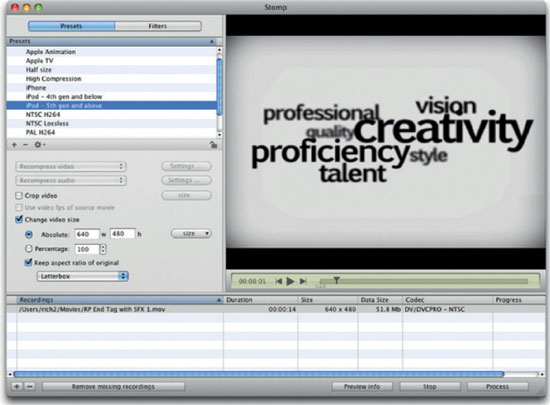
A good compression tool should offer broad support for presets, as well as the ability to filter and resize your video. Stomp from shinywhitebox.com is a powerful and affordable Mac tool.
Affordable Compression Tools
As web video becomes the dominant standard for video consumption, there are many affordable (or even free) options to create web-ready video files. The biggest difference here is that many of these tools lack batch processing and often offer minimal support for customized presets:
- QuickTime Pro (www.apple.com/quicktime/pro). This versatile tool makes it easy to convert video from one format to another. QuickTime Pro is a cross-platform solution and lets Mac and Windows users convert video files to work with Apple's portable media players. The files QuickTime produces are very compatible, but they don't offer as many options as other tools. QuickTime sells for $29.99 and is a preferred tool for most media pros toolbox.
- iTunes (www.apple.com/itunes). Although generally thought of as a podcasting client, you can use iTunes to convert incompatible media to an iPod/iPhone-ready format. Additionally, iTunes is essential for testing your files to see if they are compatible with Apple's portable media players. iTunes is a free, cross-platform solution.
- iMovie/GarageBand (www.apple.com/ilife). Apple offers a video editing and audio editing toolset as part of its iLife application suite. This software is bundled with all Mac computers and the upgrade to the latest version is $79. The tools are easy to use and offer robust support for creating web video content and then delivering compressed files. The iLife software is a Mac-only solution.
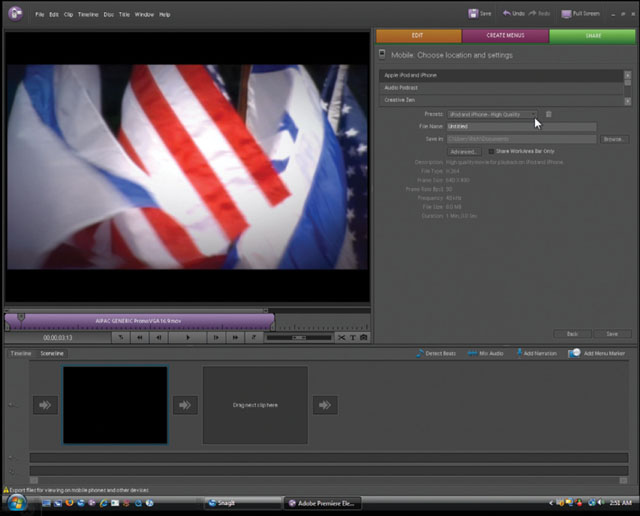
- Adobe Premiere Elements (www.adobe.com/products/premiereel). This versatile suite is well suited for Windows users. It offers an easy-to-use editing interface and robust support for podcasting, Flash video, and YouTube. This is an excellent solution priced at $99 that offers flexibility and power without being overly complex.
- MPEG Streamclip (www.squared5.com). MPEG Streamclip is a powerful video converter, player, and editor. It works on both Mac and Windows. It can encode to many formats, including podcast-compatible formats; it can also cut, trim, and join movies. The biggest benefit? It's free!
- Stomp (www.shinywhitebox.com/stomp/stomp.html). This Mac-only tool bridges the gap from consumer to professional. It offers an easy-to-use interface but also unlocks filters and customized presets. The tool produces great results and offers excellent visual feedback when changes are made to a clip. Another unique feature is that the tool offers Core Image Filters, which are fast and can perform tasks like color correction.
- Microsoft Expression Encoder and Expression Encoder Pro (www.microsoft.com/expression/products/Encoder4_Overview.aspx). This PC-only tool comes in both a free and a pro version. It replaces the Windows Media Encoder, which was retired in mid-2010. It can create both Windows Media Video and Silverlight files. The Pro version can also output H.264 and AAC files as well. The application offers screen capture abilities and can also handle captions and basic editing tasks.
Adobe Premiere Elements brings flexible editing and encoding tools to the consumer.
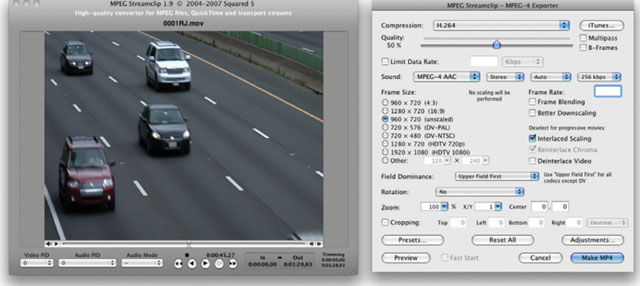
MPEG Streamclip is a free, cross-platform tool for viewing and creating MPEG-4 files.
Testing and then sticking with compression presets can ensure compatibility with portable media players.
Full-Featured Compression Tools
If you work with professional-level video editing tools, there are often professional-level encoding tools designed to match. There is nothing wrong with the affordable tools mentioned earlier. These tools just match all five criteria we identified at the start of the chapter.
- Sorenson Squeeze (www.sorensonmedia.com). Sorenson offers several variations of its Squeeze product line depending on features that you want. This is a cross-platform solution and is popular because of its ease of use. The product's price varies depending on if you need Flash video support and which platform you choose to use. This is the leading PC product on the market. Sorenson also offers a hardware option for faster compression.
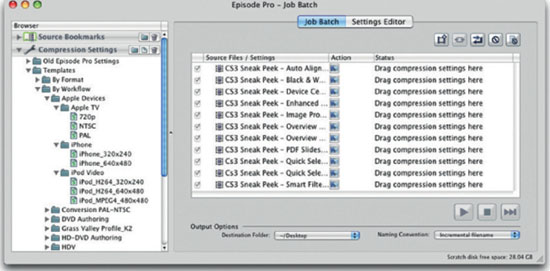
- Telestream Episode and Episode Pro (www.telestream.net). The Episode Series offers several options for encoding media to several formats. The tools are Mac only. They offer both customizable presets and a flexible filtering engine for improving video. The products are also very fast and have had frequent updates with improved features. The most common tools used by podcasters are the Episode and Episode Pro packages. These are desktop encoders that use the computer's hardware to perform the encode.
- Apple Compressor (www.apple.com/finalcutstudio/compressor). This powerful compression tool is included with Apple's Final Cut Studio bundle. It has full support for batch processing and filtering. It also offers powerful networking features that let you tie multiple computers into a compression cluster, which offers significant increases in speed. The product is only sold as part of the bundled Final Cut Studio suite, which means you likely have it if you are using Final Cut Pro or Motion. Otherwise the suite is too comprehensive to buy for just this one application.
- Adobe Media Encoder (www.adobe.com). The Adobe Media Encoder is not a standalone product. Rather, it is a core technology in the Adobe Creative Suite products that work with video. You can easily access it through products like Premiere Pro. It supports several formats besides podcasting and offers excellent control.

Apple's compressor is bundled with final cut Studio. It offers a full-featured toolset and tight integration with final cut Pro.
Encoding Advice
There are four major facets that will shape your compression or encoding approach. We call them the “illities” to make them easier to remember.
- Portability. How easy is the file to get from one device to another? Is the compressed file small enough to transfer via the Internet (and at what connection speed)?
- Compatibility. Can multiple applications, hardware players, and web browsers view the file?
- Affordability. Are the codec or hardware requirements within your budget? Are there any licensing fees involved?
- Quality. Does the image or sound quality match your audience's needs?
If you keep these four aspects of video files in mind, the following compression advice will make sense. There are a lot of easy things you can do to make your web videos look better. These things usually happen in the compression software via filters and image processing. The more of these you can fix, the better results you'll get. Every compression tool is different, but you'll usually find these options in the export dialog box or help menus.
Faster H.264 on a Mac
![]()
If you want to dramatically speed up the creation of H.264 files, be sure to take a look at Turbo .264 HD from Elgato (www.elgato.com). This accelerator plugs into a USB port and can decrease processing time by 400%. This is really a great way to quickly optimize clips with presets for iPods, Apple TV, and PSPs. Priced at $99, this is an easy way to save time when compressing podcasts.
The Language of Compression Simplified
There are several bits of lingo that will pop up when working with compression software. Here are the most common with their plain English translations:
- Architecture. This is like the global family or classification of a file. It includes things such as MPEG, QuickTime, Windows Media, and AIFF. It is the “global” picture.
- Batch processing. A benefit of many compression utilities, as it allows you to set up several files to run. This is a key benefit because it allows you to walk away and leave your computer working hard.
- Bit rate. How much data per second there is in your file. The higher the number, the larger the file.
- Channels. Most common will be the choice between stereo and mono. Stereo files use two channels of audio data and occupy twice the space as mono files.
- Codec. Stands for compressor/decompressor. The algorithm of code allows for further shrinking of the files. In some cases, compressors cost additional money to the content creator. Decompressors are usually free to improve the distribution plan and market share.
- Compress. The process of shrinking the file using mathematical algorithms. Modern compression techniques are significantly more effective than their historical counterparts.
- Pixel aspect ratio. Computer pixels are square in shape, digital video pixels can be rectangular or nonsquare. The video editing software or playback device (such as a television) usually compensates for this. Because you plan to show the video on a computer or iPod, you will need to manually resize the document to the right shape.
- Resolution. Also called sample size, it is the number of bits used by the computer to describe the analog data. Audio CDs are usually 16-bit. Bigger is higher quality.
- Sampling rate. The number of samples captured per second. Audio CDs are usually 44.1kHz, whereas digital video is usually 48 kHz. Bigger is higher quality.
- Variable bit rate (Vbr) compression. One of the most effective ways to create smaller files. The computer analyzes the video file before compressing the data. Encoding this way is far slower, but if you can choose this method for superior results.
Start Big, Finish Small
Be sure to work with original source material or low compressed sources. By sticking with DV or better quality, you'll get better compression and smaller file sizes. Recompressing a previously compressed file produces additional artifacts (think making a photocopy of a photocopy).
De-interlace Your Video

The video frame on the left shows interlacing in the fast-moving areas. The frame on the right shows the interlacing removed.
Most NTSC and PAL video files are interlaced; some HD video is interlaced. This means that half of one frame is blended with half of the next. On a television, this produces smoother motion; on a computer or portable media player, it produces junk.
Most compression software offers a de-interlace option via a checkbox or filter. If you are shrinking the video down to the smaller 320 × 240 size, the basic de-interlace filter is fine to use. If you are targeting the 640 × 480 size video, then be sure to use an advance de-interlace option (such as blend or interpolate). These generate better quality but can add significant processing time.
Lower Your Audio Standards
You can often lower the audio quality of your podcasting files. Digital video generally uses a sample rate of 48 kHz, while audio CDs are at 44.1 kHz. The audio is also usually delivered in 16-bit. If your audio is not complex (such as music), you can cut your sample rate. Different tools allow you to change to different rates depending on codec. This can produce unnoticeable audio changes but allow space saving.
Shrink the Window
Although you don't need to make video that is the size of a postage stamp, remember that reducing the window to half-size creates a file that is 25% of the file size of the original. That's a big savings in space. These files are four times faster to download or stream. Strongly evaluate the size that you use to deliver your web video.
Going to Flash?

If your podcast is going to end up in a Flash player as well, be sure to convert your audio rate. Video cameras generally record at 48 kHz, which Flash can't handle. Unless you want to hear “chipmunk sounds,” be sure to convert to 44.1, 22, or 11 kHz.
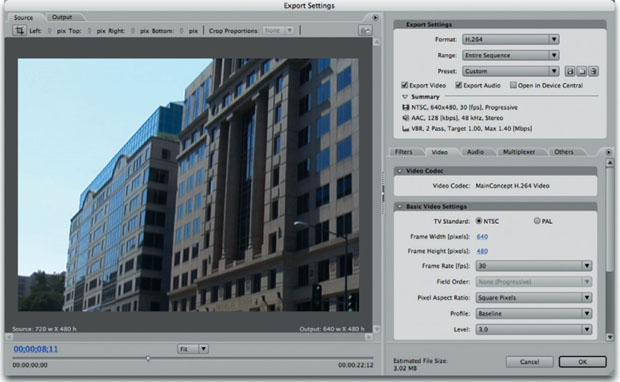
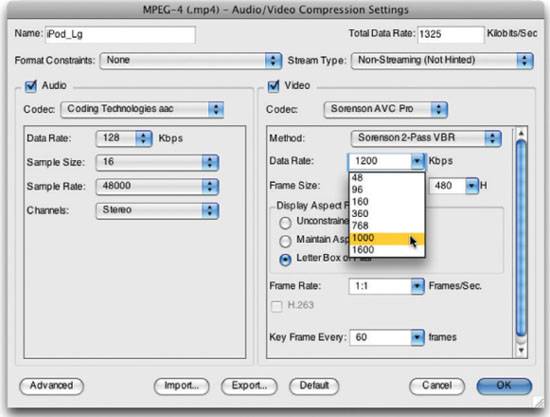
Be sure that your video is being sized to no wider than 640 pixels for use on a portable media player. The correct width is 640 × 480 for 4:3 video and 640 × 360 for 16:9 video. for half-screen video, divide these numbers in half. Like most pro-level compression tools, the Adobe Media Encoder gives you precise control over size and reshaping.
Reshape the Video
For standard definition, you're likely working with a video file that is sized 720 × 480 or 720 × 576 pixels. You need to resize this to 640 × 480 for it to properly display on the computer monitor or portable media player screen. If the video is widescreen, then use 640 × 360. You must compensate for pixel aspect ratio with your web video. Additionally, you should exceed a width of 640 or a height of 480 if you want the files to work on a portable media player.
If you're working with high-definition sources, you may still need to reshape video. Some high-definition video cameras also use nonsquare pixels. There are generally three target video sizes for HD video: 1920 × 1080, 1280 × 720, or 960 × 540. The larger two sizes are usually reserved for downloadable video (although movie trailers are often viewed in true HD by cinephiles).
The Rule of 8
Be sure that any dimension you use for a codec is divisible by 8. When a dimension can be divided by 8, it allows the codec to work most efficiently. Otherwise the codec must do additional processing before displaying the material. This results in longer encode times as well as increased challenges for the playback machine.

Restore the Washed-out Picture
Video signals usually operate between a RGB values of 16 through 235. On the other hand, computers use an RGB value of 0 through 255. You will need to restore the back-and-white point of your image. Many applications have this option built in as a filter.
The biggest concern is to restore (or crush) the blacks. This will help reduce visible noise in the file and result in a cleaner compression. Look for options called Black-White Restore or something similar. Usually the default preset will work. You can always adjust the filter until unwanted noise is removed in the shadowy areas. This is essential if your material contains shadowy or dark areas.
Improve the Saturation
A video file intended for podcast may also need the saturation turned up a bit. This is to compensate for what we call the “Wal-Mart effect.” Consumer TVs have their reds overcranked to make skin tones appear richer on their cheap tubes. As such, consumers are used to viewing rich reds and saturated images. Just be careful to not overdue it, or your talent will look like they fell asleep in a tanning bed. Many compression tools lack a saturation effect, so be sure to boost the saturation within your NLE if needed.
Frame Rate Reduction
Fortunately, web video compression is good at saving space. You can still often see a benefit in file size though by reducing frame rate. One method involves shooting the video at 24 fps, which results in less material to encode. Another technique is to try cutting the frame rate in half after you've shot (such as dropping to 15 fps for NTSC or 12 fps for PAL). These tests are worth trying in your experimentation to determine the right settings for your video.
Test Your Settings

Your quest for “perfect’ compression will involve trial and error (often a lot of trial and a little too much error). A good place to start will be the default settings your compression tool offers. Duplicate a preset setting, and rename it (such as Flash_Large_2). Then modify a few of the variables we've discussed here. Remember, the biggest impact will be the data rate of your web video. You will often make several settings that are only slightly different, and then test them. When testing, remember to use a short edited clip that contains multiple types of footage and audio to judge the impacts of compression on motion and audio.
Before you compress a lot of video, create a small test file. Try compressing 30 seconds of video with different settings. This test file should ideally include a mixture of footage and graphics that will be in your final shows. The goal is to find compression settings that work well with your material and are also compatible with the technology your audience wants to use.
Looking for a Great Source on Web Compression
![]()
One of the resources I find most useful for current information on web compression is www.proappstips.com. Here you'll find a wonderful PDF called Simple Encoding Recipes for the Web. These recipes are just that, step-by-step directions for popular tools like Compressor, Squeeze, and Episode. The information works well for podcasting and covers other delivery methods like YouTube and web pages as well. The PDF sells for $4.95 and its author, Philip Hodgetts, is a respected member of the professional video community. This is a highly recommended resource of ours. It even includes links to web pages so you can compare the results side by side.
Testing the Video on Multiple Devices
Always (and we mean always) test each web video setting by taking its files and transferring them to an intended player. Put the file on an iPod and an iPhone, put it on a PlayStation Portable, put on a laptop, look at it on a Mac and Windows box, and try a Microsoft Zune. You need to test your settings because something can go wrong with the file.
Trust us, we've been burned. A lot of factors are in play here. You don't want to alienate your audience or anger a client because of a careless mistake or change in delivery protocol. Post bad files, and the backlash can be strong. If it's any incentive, you may be able to write off the purchasing of additional technology on your taxes (be sure to discuss this with your accountant first).
Section 508 Compliance

The goal of Section 508 is to ensure equal access to information. Photo © istockphoto.
Starting in 1998, the U.S. Congress amended the Rehabi litation Act to make it easier for people with disabilities to access information through electronic means. The goal of the changes was to remove barriers to information so that “disabled employees and members of the public have access to information that is comparable to the access available to others.”
If you create content for the federal government, Section 508 compliance has become increasingly important. Many state governments also follow suit. In fact, if the project you're working on receives federal or state funding, it may also be subject to Section 508 compliance.
Understanding Section 508 Compliance
![]()
For more information on Section 508 compliance, see the following websites:
Impairment Types
Section 508 compliance attempts to assist those who face barriers to information. The standard is broad, so it applies to those who make content as well as software and even hardware devices. The groups it attempts to help can face one or more of these impairments:
- Visual. Blindness, low vision, or color-blindness.
- Hearing. Deafness or hard of hearing.
- Motor. Inability to use a mouse or limited fine-motor control.
- Cognitive. Learning disabilities or an inability to remember or focus on large amounts of information.
The Impact to Web Video
Section 508 law applies to all federal agencies when they develop, procure, maintain, or use electronic and information technology. Video is one part of that technology. The relevant requirements can be found in section 1194.24 Video and multimedia products (items c, d, and e):
(c) All training and informational video and multimedia productions which support the agency's mission, regardless of format, that contain speech or other audio information necessary for the comprehension of the content, shall be open or closed captioned.
(d) All training and informational video and multimedia productions which support the agency's mission, regardless of format, that contain visual information necessary for the comprehension of the content, shall be audio described.
(e) Display or presentation of alternate text presentation or audio descriptions shall be user- selectable unless permanent.
If you're creating content independently, there is nothing in section 508 that requires you to comply. However, many voluntarily comply. Making your content more accessible means more potential viewers.
The use of audio descriptions can provide a clearer experience for those with visual impairment.

Visual Impairment Strategies
Although many forget the potential audience, those with visual impairments want the same information as others. The most common approach is to add audio description to the video. What is added is similar to that provided by a play-by-play announcer. What's important is to highlight essential information that is needed to comprehend the content. This often includes a description of the people in the video as well as descriptions of their on-camera actions.
For those with partial visual impairment, there are ways to improve the appearance of the video. As you build your graphics, you should check them in grayscale mode for proper contrast. The same holds true for your video footage. While shooting, be sure to look at your video on a grayscale monitor. The better the contrast, the easier it is for viewers to comprehend the information on the screen.
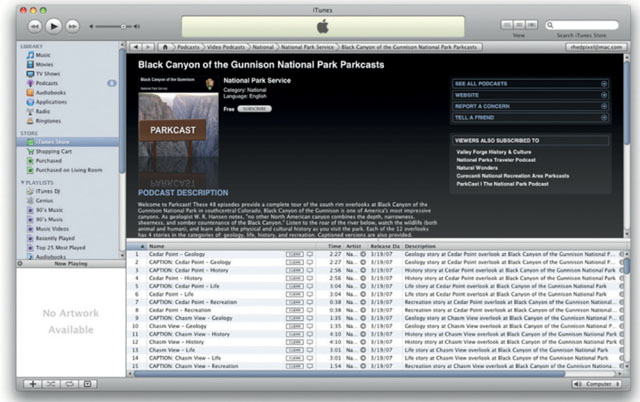
By offering both captioned and noncaptioned versions, this government-produced podcast is in compliance with Section 508 requirements.
Hearing Impairment Strategies
The types of accommodations that are most prevalent are for those with hearing impairments. The goal here is to provide an accurate transcription of the video program. Additionally, these steps can also improve the search engine optimization for your videos and make them easier to find. How you accomplish this can be done in two ways.
The first approach is to provide open captions, which place the words of the video onscreen (typically synchronized to the speaker's voice). These can be added using technology that is similar to what broadcasters use (which tends to cost between $15 to $40 per minute from most providers). There are specialized software programs such as MacCaption and CaptionMaker from www.cpcweb.com.
Searchable Video in Flash
![]()
Adobe has a whole suite of tools; audio transcription can be accomplished with Adobe Soundbooth. Flash video can also embed synchronized and searchable text. For a tutorial on the entire process, visit http://tinyurl.com/flvsearch.

When creating captions for web video, a viewer must be able to turn captions off and on or they must always be visible. here graphics are edited above the video track, so these will always be visible.
The other approach most commonly employed is the use of transcripts. By creating an accurate transcription, those with hearing impairments can read along. Transcripts can be placed on the web page that holds the video. They can also be added as a PDF to a podcasting media RSS feed. Transcription typically costs between $1 and $5 per minute. Costs vary based on turnaround time and the number of speakers. If your video is scripted, then transcription is easy to accomplish.
Captioning for QuickTime
![]()
To learn more about support for captions inside of QuickTime-based media, visit www.webaim.org/techniques/captions/quicktime.