
Advice is what we ask for when we already know the answer but wish we didn’t.
HTTP handlers and modules are truly the building blocks of the ASP.NET platform. Any requests for a resource managed by ASP.NET are always resolved by an HTTP handler and pass through a pipeline of HTTP modules. After the handler has processed the request, the request flows back through the pipeline of HTTP modules and is finally transformed into markup for the caller.
The Page class—the base class for all ASP.NET runtime pages—is ultimately an HTTP handler that implements internally the page life cycle that fires the well-known set of page events, including postbacks, Init, Load, PreRender, and the like. An HTTP handler is designed to process one or more URL extensions. Handlers can be given an application or machine scope, which means they can process the assigned extensions within the context of the current application or all applications installed on the machine. Of course, this is accomplished by making changes to either the site’s web.config file or a local web.config file, depending on the scope you desire.
HTTP modules are classes that handle runtime events. There are two types of public events that a module can deal with. They are the events raised by HttpApplication (including asynchronous events) and events raised by other HTTP modules. For example, SessionStateModule is one of the built-in modules provided by ASP.NET to supply session-state services to an application. It fires the End and Start events that other modules can handle through the familiar Session_End and Session_Start signatures.
In Internet Information Services (IIS) 7 integrated mode, modules and handlers are resolved at the IIS level; they operate, instead, inside the ASP.NET worker process in different runtime configurations, such as IIS 7 classic mode or IIS 6.
HTTP modules and handlers are related to the theme of request routing. Originally developed for ASP.NET MVC, the URL routing engine has been incorporated into the overall ASP.NET platform with the .NET Framework 3.5 Service Pack 1. The URL routing engine is a system-provided HTTP module that hooks up any incoming requests and attempts to match the requested URL to one of the user-defined rewriting rules (known as routes). If a match exists, the module locates the HTTP handler that is due to serve the route and goes with it. If no match is found, the request is processed as usual in Web Forms, as if no URL routing engine was ever in the middle. What makes the URL routing engine so beneficial to applications? It actually enables you to use free-hand and easy-to-remember URLs that are not necessarily bound to physical files in the Web server.
In this chapter, we’ll explore the syntax and semantics of HTTP handlers, HTTP modules, and the URL routing engine.
As the name suggests, an HTTP handler is a component that handles and processes a request. ASP.NET comes with a set of built-in handlers to accommodate a number of system tasks. The model, however, is highly extensible. You can write a custom HTTP handler whenever you need ASP.NET to process certain types of requests in a nonstandard way. The list of useful things you can do with HTTP handlers is limited only by your imagination.
Through a well-written handler, you can have your users invoke any sort of functionality via the Web. For example, you could implement click counters and any sort of image manipulation, including dynamic generation of images, server-side caching, or obstructing undesired linking to your images. More in general, an HTTP handler is a way for the user to send a command to the Web application instead of just requesting a particular page.
In software terms, an HTTP handler is a relatively simple class that implements the IHttpHandler interface. An HTTP handler can either work synchronously or operate in an asynchronous way. When working synchronously, a handler doesn’t return until it’s done with the HTTP request. An asynchronous handler, on the other hand, launches a potentially lengthy process and returns immediately after. A typical implementation of asynchronous handlers is asynchronous pages. An asynchronous HTTP handler is a class that implements a different interface—the IHttpAsyncHandler interface.
HTTP handlers need be registered with the application. You do that in the application’s web.config file in the <httpHandlers> section of <system.web>, in the <handlers> section of <system.webServer> as explained in Chapter 3, or in both places. If your application runs under IIS 7.x in integrated mode, you can also configure HTTP handlers via the Handler Mappings panel of the IIS Manager.
Want to take the splash and dive into HTTP handler programming? Well, your first step is getting the hang of the IHttpHandler interface. An HTTP handler is just a managed class that implements that interface. As mentioned, a synchronous HTTP handler implements the IHttpHandler interface; an asynchronous HTTP handler, on the other hand, implements the IHttpAsyncHandler interface. Let’s tackle synchronous handlers first.
The contract of the IHttpHandler interface defines the actions that a handler needs to take to process an HTTP request synchronously.
The IHttpHandler interface defines only two members: ProcessRequest and IsReusable, as shown in Table 4-1. ProcessRequest is a method, whereas IsReusable is a Boolean property.
Table 4-1. Members of the IHttpHandler Interface
Description | |
|---|---|
IsReusable | This property provides a Boolean value indicating whether the HTTP runtime can reuse the current instance of the HTTP handler while serving another request. |
ProcessRequest | This method processes the HTTP request from start to finish and is responsible for processing any input and producing any output. |
The IsReusable property on the System.Web.UI.Page class—the most common HTTP handler in ASP.NET—returns false, meaning that a new instance of the HTTP request is needed to serve each new page request. You typically make IsReusable return false in all situations where some significant processing is required that depends on the request payload. Handlers used as simple barriers to filter special requests can set IsReusable to true to save some CPU cycles. I’ll return to this subject with a concrete example in a moment.
The ProcessRequest method has the following signature:
void ProcessRequest(HttpContext context);
It takes the context of the request as the input and ensures that the request is serviced. In the case of synchronous handlers, when ProcessRequest returns, the output is ready for forwarding to the client.
The output for the request is built within the ProcessRequest method, as shown in the following code:
using System.Web;
namespace AspNetGallery.Extensions.Handlers
{
    public class SimpleHandler : IHttpHandler
    {
        public void ProcessRequest(HttpContext context)
        {
            const String htmlTemplate = "<html><head><title>{0}</title></head><body>" +
                                        "<h1>Hello I'm: " +
                                        "<span style='color:blue'>{1}</span></h1>" +
                                        "</body></html>";

            var response = String.Format(htmlTemplate,
                     "HTTP Handlers", context.Request.Path);
            context.Response.Write(response);
        }
        public Boolean IsReusable
        {
            get { return false; }
        }
    }
}
You need an entry point to be able to call the handler. In this context, an entry point into the handler’s code is nothing more than an HTTP endpoint—that is, a public URL. The URL must be a unique name that IIS and the ASP.NET runtime can map to this code. When registered, the mapping between an HTTP handler and a Web server resource is established through the web.config file:
<configuration>
<system.web>
<httpHandlers>
<add verb="*"
path="hello.axd"
type="Samples.Components.SimpleHandler" />
</httpHandlers>
</system.web>
<system.webServer>
<validation validateIntegratedModeConfiguration="false" />
<handlers>
<add name="Hello"
preCondition="integratedMode"
verb="*"
path="hello.axd"
type="Samples.Components.SimpleHandler" />
</handlers>
</system.webServer>
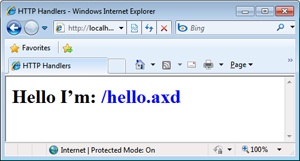
</configuration>The <httpHandlers> section lists the handlers available for the current application. These settings indicate that SimpleHandler is in charge of handling any incoming requests for an endpoint named hello.axd Note that the URL hello.axd doesn’t have to be a physical resource on the server; it’s simply a public resource identifier. The type attribute references the class and assembly that contain the handler. Its canonical format is type[,assembly]. You omit the assembly information if the component is defined in the App_Code or other reserved folders.
Important
As noted in Chapter 3, you usually don’t need both forms of an HTTP handler declaration in <system.web> and <system.webServer>. You need the former only if your application runs under IIS 6 (Windows Server 2003) or if it runs under IIS 7.x but is configured in classic mode. You need the latter only if your application runs under IIS 7.x in integrated mode. If you have both sections, you enable yourself to use a single web.config file for two distinct deployment scenarios. In this case, the <validation> element is key because it prevents IIS 7.x from strictly parsing the content of the configuration file. Furthermore, as discussed in Chapter 3, the <httpHandlers> and <httpModules> sections help in testing handlers and modules within Visual Studio if you’re using the embedded ASP.NET Development Server (also known as, Cassini).
If you invoke the hello.axd URL, you obtain the results shown in Figure 4-1.
The technique discussed here is the quickest and simplest way of putting an HTTP handler to work, but there is more to know about the registration of HTTP handlers and there are many more options to take advantage of.
An HTTP handler is a class and must be compiled to an assembly before you can use it. The assembly must be deployed to the Bin directory of the application. If you plan to make this handler available to all applications, you can copy it to the global assembly cache (GAC). The next step is registering the handler with an individual application or with all the applications running on the Web server.
You already saw the script you need to register an HTTP handler. Table 4-2 expands a bit more on the attributes you can set up.
Table 4-2. Attributes Required to Register an HTTP Handler in <system.web>
Attribute | Description |
|---|---|
path | A wildcard string, or a single URL, that indicates the resources the handler will work on—for example, *.aspx. |
type | Specifies a comma-separated class/assembly combination. ASP.NET searches for the assembly DLL first in the application’s private Bin directory and then in the system global assembly cache. |
validate | If this attribute is set to false, ASP.NET loads the assembly with the handler on demand. The default value is true. |
verb | Indicates the list of the supported HTTP verbs—for example, GET, PUT, and POST. The wildcard character (*) is an acceptable value and denotes all verbs. |
All attributes except for validate are mandatory. When validate is set to false, ASP.NET delays as much as possible loading the assembly with the HTTP handler. In other words, the assembly will be loaded only when a request for it arrives. ASP.NET will not try to preload the assembly, thus catching earlier any errors or problems with it.
Additional attributes are available if you register the handler in <system.webServer>. They are listed in Table 4-3.
Table 4-3. Attributes Required to Register an HTTP Handler in <system.webServer>
The reason why the configuration of an HTTP handler might span a larger number of attributes in IIS is that the <handlers> section serves for both managed and unmanaged handlers. If you configure a managed handler written using the ASP.NET API, you need only preCondition and name in addition to the attributes you would specify in the <httpHandlers> section.
The preCondition attribute sets prerequisites for the handler to run. Prerequisites touch on three distinct areas: bitness, ASP.NET runtime version, and type of requests to respond. Table 4-4 lists and explains the various options:
Table 4-4. Preconditions for an IIS 7.x HTTP Handler
Precondition | Description |
|---|---|
bitness32 | The handler is 32-bit code and should be loaded only in 64-bit worker processes running in 32-bit emulation. |
bitness64 | The handler is 64-bit and should be loaded only in native 64-bit worker processes. |
integratedMode | The handler should respond only to requests in application pools configured in integrated mode. |
ISAPIMode | The handler should respond only to requests in application pools configured in classic mode. |
runtimeVersionv1.1 | The handler should respond only to requests in application pools configured for version 1.1 of the ASP.NET runtime. |
runtimeVersionv2.0 | The handler should respond only to requests in application pools configured for version 2.0 of the ASP.NET runtime. |
Most of the time you use the integratedMode value only to set preconditions on a managed HTTP handler.
In ASP.NET applications, a common scenario when you want to use custom HTTP handlers is that you want to loosen yourself from the ties of ASPX files. Sometimes you want to place a request for a nonstandard ASP.NET resource (for example, a custom XML file) and expect the handler to process the content and return some markup.
More in general, you use HTTP handlers in two main situations: when you want to customize how known resources are processed and when you want to introduce new resources. In the latter case, you probably need to let IIS know about the new resource. Again, how you achieve this depends on the configuration of the application pool that hosts your ASP.NET applications.
Suppose you want your application to respond to requests for .report requests. For example, you expect your application to be able to respond to a URL like /monthly.report?year=2010. Let’s say that monthly.report is a server file that contains a description of the report your handler will then create using any input parameters you provide.
In integrated mode, you need to do nothing special for this request to go successfully. Moreover, you don’t even need to add a .report or any other analogous extension. You can specify any custom URL (much like you do in ASP.NET MVC) and as long as you have a handler properly configured, it will work.
In classic mode, instead, two distinct pipelines exist in IIS and ASP.NET. The extension, in this case, is mandatory to instruct IIS to recognize that request and map it to ASP.NET, where the HTTP handler actually lives. As an example, consider that when you deploy ASP.NET MVC in classic mode you have to tweak URLs so that each controller name has an .mvc suffix. To force IIS to recognize a new resource, you must add a new script map via the IIS Manager, as shown in Figure 4-2.
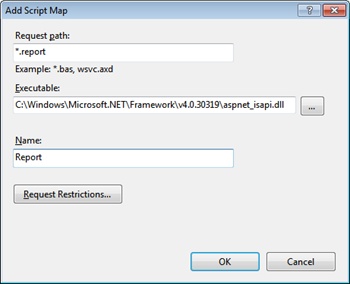
The executable is the ISAPI extension that will be bridging the request from the IIS world to the ASP.NET space. You choose the aspnet_isapi DLL from the folder that points to the version of the .NET Framework you intend to target. In Figure 4-2, you see the path for ASP.NET 4.
Note
In Microsoft Visual Studio, if you test a sample .report resource using the local embedded Web server, nothing happens that forces you to register the .report resource with IIS. This is just the point, though. You’re not using IIS! In other words, if you use the local Web server, you have no need to touch IIS; you do need to register any custom resource you plan to use with IIS before you get to production.
Why didn’t we have to do anything special for our first example, hello.axd? Because AXD is a system extension that ASP.NET registers on its own and that sometimes also can be used for registering custom HTTP handlers. (AXD is not the recommended extension for custom handlers, however.)
Now let’s consider a more complex example of an HTTP handler.
To speed up processing, IIS claims the right to personally serve some typical Web resources without going down to any particular ISAPI extensions. The list of resources served directly by IIS includes static files such as images and HTML files.
What if you request a GIF or a JPG file directly from the address bar of the browser? IIS retrieves the specified resource, sets the proper content type on the response buffer, and writes out the bytes of the file. As a result, you’ll see the image in the browser’s page. So far so good.
What if you point your browser to a virtual folder that contains images? In this case, IIS doesn’t distinguish the contents of the folder and returns a list of files, as shown in Figure 4-3.
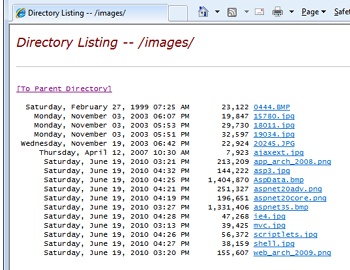
Wouldn’t it be nice if you could get a preview of the contained pictures instead?
To start out, you need to decide how to let IIS know about your wishes. You can use a particular endpoint that, when appended to a folder’s name, convinces IIS to yield to ASP.NET and provide a preview of contained images. Put another way, the idea is to bind your picture viewer handler to a particular endpoint—say, folder.axd. As mentioned earlier in the chapter, a fixed endpoint for handlers doesn’t have to be an existing, deployed resource. You make the folder.axd endpoint follow the folder name, as shown here:
http://www.contoso.com/images/folder.axd
The handler processes the URL, extracts the folder name, and selects all the contained pictures.
Note
In ASP.NET, the .axd extension is commonly used for endpoints referencing a special service. Trace.axd for tracing and WebResource.axd for script and resources injection are examples of two popular uses of the extension. In particular, the Trace.axd handler implements the same logic described here. If you append its name to the URL, it will trace all requests for pages in that application.
The picture viewer handler returns a page composed of a multirow table showing as many images as there are in the folder. Here’s the skeleton of the class:
class PictureViewerInfo
{
    public PictureViewerInfo() {
        DisplayWidth = 200;
        ColumnCount = 3;
    }
    public int DisplayWidth;
    public int ColumnCount;
    public string FolderName;
}

public class PictureViewerHandler : IHttpHandler
{
    // Override the ProcessRequest method
    public void ProcessRequest(HttpContext context)
    {
        PictureViewerInfo info = GetFolderInfo(context);
        string html = CreateOutput(info);

        // Output the data
        context.Response.Write("<html><head><title>");
        context.Response.Write("Picture Web Viewer");
        context.Response.Write("</title></head><body>");
        context.Response.Write(html);
        context.Response.Write("</body></html>");
    }

    // Override the IsReusable property
    public bool IsReusable
    {
        get { return true; }
    }
    ...
}
Retrieving the actual path of the folder is as easy as stripping off the folder.axd string from the URL and trimming any trailing slashes or backslashes. Next, the URL of the folder is mapped to a server path and processed using the .NET Framework API for files and folders to retrieve all image files:
private static IList<FileInfo> GetAllImages(DirectoryInfo di)
{
    String[] fileTypes = { "*.bmp", "*.gif", "*.jpg", "*.png" };
    var images = new List<FileInfo>();
    foreach (var files in fileTypes.Select(di.GetFiles).Where(files => files.Length > 0))
    {
        images.AddRange(files);
    }
    return images;
}
The DirectoryInfo class provides some helper functions on the specified directory; for example, the GetFiles method selects all the files that match the given pattern. Each file is wrapped by a FileInfo object. The method GetFiles doesn’t support multiple search patterns; to search for various file types, you need to iterate for each type and accumulate results in an array list or equivalent data structure.
After you get all the images in the folder, you move on to building the output for the request. The output is a table with a fixed number of cells and a variable number of rows to accommodate all selected images. For each image file, a new <img> tag is created through the Image control. The width attribute of this file is set to a fixed value (say, 200 pixels), causing browsers to automatically resize the image. Furthermore, the image is wrapped by an anchor that links to the same image URL. As a result, when the user clicks on an image, the page refreshes and shows the same image at its natural size.
private static String CreateOutputForFolder(PictureViewerInfo info, DirectoryInfo di)
{
    var images = GetAllImages(di);

    var t = new Table();
    var index = 0;
    var moreImages = true;

    while (moreImages)
    {
        var row = new TableRow();
        t.Rows.Add(row);

        for (var i = 0; i < info.ColumnCount; i++)
        {
            var cell = new TableCell();
            row.Cells.Add(cell);

            var img = new Image();
            var fi = images[index];
            img.ImageUrl = fi.Name;
            img.Width = Unit.Pixel(info.DisplayWidth);

            var a = new HtmlAnchor {HRef = fi.Name};
            a.Controls.Add(img);
            cell.Controls.Add(a);

            index++;
            moreImages = (index < images.Count);
            if (!moreImages)
                break;
        }
    }
}
You might want to make the handler accept some optional query string parameters, such as the width of images and the column count. These values are packed in an instance of the helper class PictureViewerInfo along with the name of the folder to view. Here’s the code to process the query string of the URL to extract parameters if any are present:
var info = new PictureViewerInfo();
var p1 = context.Request.Params["Width"];
var p2 = context.Request.Params["Cols"];
if (p1 != null)
    info.DisplayWidth = p1.ToInt32();
if (p2 != null)
    info.ColumnCount = p2.ToInt32();
ToInt32 is a helper extension method that attempts to convert a numeric string to the corresponding integer. I find this method quite useful and a great enhancer of code readability. Here’s the code:
public static Int32 ToInt32(this String helper, Int32 defaultValue = Int32.MinValue)
{
    Int32 number;
    var result = Int32.TryParse(helper, out number);
    return result ? number : defaultValue;
}
Figure 4-4 shows the handler in action.
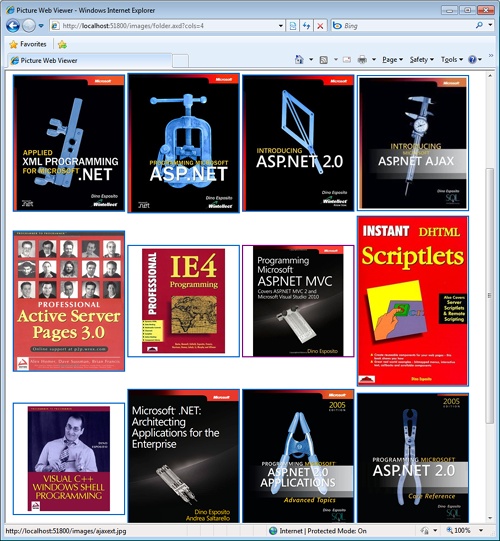
Figure 4-4. The picture viewer handler in action with a given number of columns and a specified width.
Registering the handler is easy too. You just add the following script to the <httpHandlers> section of the web.config file:
<add verb="*"
     path="folder.axd"
     type="PictureViewerHandler, AspNetGallery.Extensions" />
You place the assembly in the GAC and move the configuration script to the global web.config to extend the settings to all applications on the machine. If you’re targeting IIS 7 integrated mode, you also need the following:
<system.webServer>
   <handlers>
      <add name="PictureFolder"
           preCondition="integratedMode"
           verb="*"
           path="folder.axd"
           type="PictureViewerHandler, AspNetGallery.Extensions" />
   </handlers>
</system.webServer>
Any page you get from the Web these days is topped with so many images and is so well conceived and designed that often the overall page looks more like a magazine advertisement than an HTML page. Looking at the current pages displayed by portals, it’s rather hard to imagine there ever was a time—and it was only a decade ago—when one could create a Web site by using only a text editor and some assistance from a friend who had a bit of familiarity with Adobe PhotoShop.
In spite of the wide use of images on the Web, there is just one way in which a Web page can reference an image—by using the HTML <img> tag. By design, this tag points to a URL. As a result, to be displayable within a Web page, an image must be identifiable through a URL and its bits should be contained in the output stream returned by the Web server for that URL.
In many cases, the URL points to a static resource such as a GIF or JPEG file. In this case, the Web server takes the request upon itself and serves it without invoking external components. However, the fact that many <img> tags on the Web are bound to a static file does not mean there’s no other way to include images in Web pages.
Where else can you turn to get images aside from picking them up from the server file system? One way to do it is to load images from a database, or you can generate or modify images on the fly just before serving the bits to the browser.
The use of a database as the storage medium for images is controversial. Some people have good reasons to push it as a solution; others tell you bluntly they would never do it and that you shouldn’t either. Some people can tell you wonderful stories of how storing images in a properly equipped database was the best experience of their professional life. With no fear that facts could perhaps prove them wrong, other people will confess that they would never use a database again for such a task.
The facts say that all database management systems (DBMS) of a certain reputation and volume have supported binary large objects (BLOB) for quite some time. Sure, a BLOB field doesn’t necessarily contain an image—it can contain a multimedia file or a long text file—but overall there must be a good reason for having this BLOB supported in Microsoft SQL Server, Oracle, and similar popular DBMS systems!
To read an image from a BLOB field with ADO.NET, you execute a SELECT statement on the column and use the ExecuteScalar method to catch the result and save it in an array of bytes. Next, you send this array down to the client through a binary write to the response stream. Let’s write an HTTP handler to serve a database-stored image:
public class DbImageHandler : IHttpHandler
{
    public void ProcessRequest(HttpContext ctx)
    {
        // Ensure the URL contains an ID argument that is a number
        var id = -1;
        var p1 = context.Request.Params["id"];
        if (p1 != null)
            id = p1.ToInt32(-1);
        if (id < 0)
        {
           context.Response.End();
           return;
        }

        var connString = "...";
        const String cmdText = "SELECT photo FROM employees WHERE employeeid=@id";

        // Get an array of bytes from the BLOB field
        byte[] img = null;
        var conn = new SqlConnection(connString);
        using (conn)
        {
            var cmd = new SqlCommand(cmdText, conn);
            cmd.Parameters.AddWithValue("@id", id);
            conn.Open();
            img = (byte[])cmd.ExecuteScalar();
       }

        // Prepare the response for the browser
        if (img != null)
        {
            ctx.Response.ContentType = "image/jpeg";
            ctx.Response.BinaryWrite(img);
        }
    }

    public bool IsReusable
    {
        get { return true; }
    }
}
There are quite a few assumptions made in this code. First, we assume that the field named photo contains image bits and that the format of the image is JPEG. Second, we assume that images are to be retrieved from a fixed table of a given database through a predefined connection string. Finally, we assume that the URL to invoke this handler includes a query string parameter named id.
Notice the attempt to convert the value of the id query parameter to an integer before proceeding. This simple check significantly reduces the surface attack area for malicious users by verifying that what is going to be used as a numeric ID is really a numeric ID. Especially when you’re inoculating user input into SQL query commands, filtering out extra characters and wrong data types is a fundamental measure for preventing attacks.
The BinaryWrite method of the HttpResponse object writes an array of bytes to the output stream.
Note
If the database you’re using is Northwind, an extra step might be required to ensure that the images are correctly managed. For some reason, the SQL Server version of the Northwind database stores the images in the photo column of the Employees table as OLE objects. This is probably because of the conversion that occurred when the database was upgraded from the Microsoft Access version. As a matter fact, the array of bytes you receive contains a 78-byte prefix that has nothing to do with the image. Those bytes are just the header created when the image was added as an OLE object to the first version of Access.
Although the preceding code works like a champ with regular BLOB fields, it must undergo the following modification to work with the photo field of the Northwind.Employees database:
Response.OutputStream.Write(img, 78, img.Length-78);
Instead of using the BinaryWrite call, which doesn’t let you specify the starting position, use the code shown here.
A sample page to test BLOB field access is shown in Figure 4-5. The page lets users select an employee ID and post back. When the page renders, the ID is used to complete the URL for the ASP.NET Image control.
var url = String.Format("photo.axd?id={0}", DropDownList1.SelectedValue);
Image1.ImageUrl = url;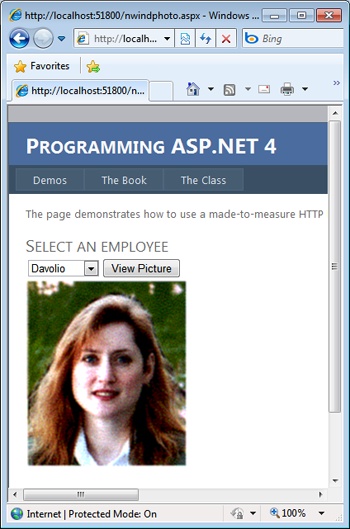
An HTTP handler must be registered in the web.config file and bound to a public endpoint. In this case, the endpoint is photo.axd and the script to enter in the configuration file is shown next (in addition to a similar script in <system.webServer>:
<httpHandlers>
    <add verb="*"
         path="photo.axd"
         type=" NorthwindPhotoImageHandler, AspNetGallery.Extensions" />
</httpHandlers>
Note
The preceding handler clearly has a weak point: it hard-codes a SQL command and the related connection string. This means that you might need a different handler for each different command or database to access. A more realistic handler would probably use an external and configurable database-specific provider. Such a provider can be as simple as a class that implements an agreed-upon interface. At a minimum, the interface will supply a method to retrieve and return an array of bytes.
Alternatively, if you want to keep the ADO.NET code in the handler itself, the interface will just supply members that specify the command text and connection string. The handler will figure out its default provider from a given entry in the web.config file.
Isn’t it true that an image is worth thousands of words? Many financial Web sites offer charts and, more often than not, these charts are dynamically generated on the server. Next, they are served to the browser as a stream of bytes and travel over the classic response output stream. But can you create and manipulate server-side images? For these tasks, Web applications normally rely on ad hoc libraries or the graphic engine of other applications (for example, Microsoft Office applications). ASP.NET applications are different and, to some extent, luckier. ASP.NET applications, in fact, can rely on a powerful and integrated graphic engine integrated in the .NET Framework.
In ASP.NET, writing images to disk might require some security adjustments. Normally, the ASP.NET runtime runs under the aegis of the NETWORK SERVICE user account. In the case of anonymous access with impersonation disabled—which are the default settings in ASP.NET—the worker process lends its own identity and security token to the thread that executes the user request of creating the file. With regard to the default scenario, an access-denied exception might be thrown if NETWORK SERVICE (or the selected application pool identity) lacks writing permissions on virtual directories—a pretty common situation.
ASP.NET provides an interesting alternative to writing files on disk without changing security settings: in-memory generation of images. In other words, the dynamically generated image is saved directly to the output stream in the needed image format or in a memory stream.
The .NET Framework graphic engine supports quite a few image formats, including JPEG, GIF, BMP, and PNG. The whole collection of image formats is in the ImageFormat structure of the System.Drawing namespace. You can save a memory-resident Bitmap object to any of the supported formats by using one of the overloads of the Save method:
Bitmap bmp = new Bitmap(file);
...
bmp.Save(outputStream, ImageFormat.Gif);
When you attempt to save an image to a stream or disk file, the system attempts to locate an encoder for the requested format. The encoder is a module that converts from the native format to the specified format. Note that the encoder is a piece of unmanaged code that lives in the underlying Win32 platform. For each save format, the Save method looks up the right encoder and proceeds.
The next example wraps up all the points we’ve touched on. This example shows how to load an existing image, add some copyright notes, and serve the modified version to the user. In doing so, we’ll load an image into a Bitmap object, obtain a Graphics for that bitmap, and use graphics primitives to write. When finished, we’ll save the result to the page’s output stream and indicate a particular MIME type.
The sample page that triggers the example is easily created, as shown in the following listing:
<html>
<body>
    <img id="picture" src="dynimage.axd?url=images/pic1.jpg" />
</body>
</html>
The page contains no ASP.NET code and displays an image through a static HTML <img> tag. The source of the image, though, is an HTTP handler that loads the image passed through the query string and then manipulates and displays it. Here’s the source code for the ProcessRequest method of the HTTP handler:
public void ProcessRequest (HttpContext context)
{
    var o = context.Request["url"];
    if (o == null)
    {
        context.Response.Write("No image found.");
        context.Response.End();
        return;
    }

    var file = context.Server.MapPath(o);
    var msg = ConfigurationManager.AppSettings["CopyrightNote"];
    if (File.Exists(file))
    {
        Bitmap bmp = AddCopyright(file, msg);
        context.Response.ContentType = "image/jpeg";
        bmp.Save(context.Response.OutputStream, ImageFormat.Jpeg);
        bmp.Dispose();
    }
    else
    {
        context.Response.Write("No image found.");
        context.Response.End();
    }
}
Note that the server-side page performs two different tasks indeed. First, it writes copyright text on the image canvas; next, it converts whatever the original format was to JPEG:
Bitmap AddCopyright(String file, String msg)
{
    // Load the file and create the graphics
    var bmp = new Bitmap(file);
    var g = Graphics.FromImage(bmp);

    // Define text alignment
    var strFmt = new StringFormat();
    strFmt.Alignment = StringAlignment.Center;

    // Create brushes for the bottom writing
    // (green text on black background)
    var btmForeColor = new SolidBrush(Color.PaleGreen);
    var btmBackColor = new SolidBrush(Color.Black);

    // To calculate writing coordinates, obtain the size of the
    // text given the font typeface and size
    var btmFont = new Font("Verdana", 7);
    var textSize = g.MeasureString(msg, btmFont);

    // Calculate the output rectangle and fill
    float x = (bmp.Width-textSize.Width-3);
    float y = (bmp.Height-textSize.Height-3);
    float w = (x + textSize.Width);
    float h = (y + textSize.Height);
    var textArea = new RectangleF(x, y, w, h);
    g.FillRectangle(btmBackColor, textArea);

    // Draw the text and free resources
    g.DrawString(msg, btmFont, btmForeColor, textArea);
    btmForeColor.Dispose();
    btmBackColor.Dispose();
    btmFont.Dispose();
    g.Dispose();

    return bmp;
}
Figure 4-6 shows the results.
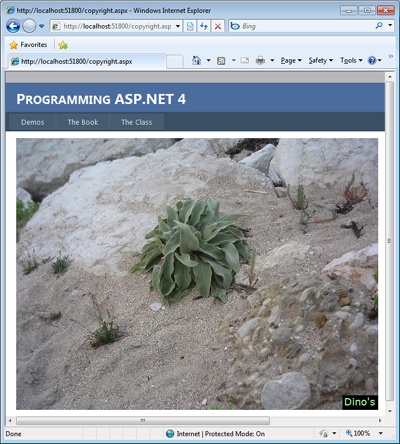
Note that the additional text is part of the image the user downloads on her client browser. If the user saves the picture by using the Save Picture As menu from the browser, the text (in this case, the copyright note) is saved along with the image.
Important
All examples demonstrating programmatic manipulation of images take advantage of the classes in the System.Drawing assembly. The use of this assembly is not recommended in ASP.NET and is explicitly not supported in ASP.NET Web services. (See http://msdn.microsoft.com/en-us/library/system.drawing.aspx.) This fact simply means that you are advised not to use classes in System.Drawing because Microsoft can’t guarantee it is always safe to use them in all possible scenarios. If your code is currently using System.Drawing—the GDI+ subsystem—and it works just fine, you’re probably OK. In any case, if you use GDI+ classes and encounter a malfunction, Microsoft will not assist you. Forewarned is forearmed.
You might be better off using an alternative to GDI+, especially for new applications. Which one? For both speed and reliability, you can consider the WPF Imaging API. Here’s an interesting post that shows how to use Windows Presentation Foundation (WPF) for resizing images: http://weblogs.asp.net/bleroy/archive/2010/01/21/server-side-resizing-with-wpf-now-with-jpg.aspx.
What if the user requests the JPG file directly from the address bar? And what if the image is linked by another Web site or referenced in a blog post? By default, the original image is served without any further modification. Why is this so?
For performance reasons, IIS serves static files, such as JPG images, directly without involving any external module, including the ASP.NET runtime. In this way, the HTTP handler that does the trick of adding a copyright note is therefore blissfully ignored when the request is made via the address bar or a hyperlink. What can you do about it?
In IIS 6, you must register the JPG extension as an ASP.NET extension for a particular application using IIS Manager. In this case, each request for JPG resources is forwarded to your application and resolved through the HTTP handler.
In IIS 7, things are even simpler for developers. All you have to do is add the following lines to the application’s web.config file:
<system.webServer>
    <handlers>
        <add name="Jpeg"
             preCondition="integratedMode"
             verb="*"
             path="*.jpg"
             type="DynImageHandler, AspNetGallery.Extensions" />
    </handlers>
</system.webServer>
You might want to add the same setting also under <httpHandlers>, which will be read in cases where IIS 7.x is configured in classic mode:
<httpHandlers>
   <add verb="*" path="*.jpg" type="DynImageHandler, AspNetGallery.Extensions"/>
</httpHandlers>
This is yet another benefit of the unified runtime pipeline we experience when the ASP.NET application runs under IIS 7 integrated mode.
Note
An HTTP handler that needs to access session-state values must implement the IRequiresSessionState interface. Like INamingContainer, it’s a marker interface and requires no method implementation. Note that the IRequiresSessionState interface indicates that the HTTP handler requires read and write access to the session state. If read-only access is needed, use the IReadOnlySessionState interface instead.
HTTP handlers are not a tool for everybody. They serve a very neat purpose: changing the way a particular resource, or set of resources, is served to the user. You can use handlers to filter out resources based on runtime conditions or to apply any form of additional logic to the retrieval of traditional resources such as pages and images. Finally, you can use HTTP handlers to serve certain pages or resources in an asynchronous manner.
For HTTP handlers, the registration step is key. Registration enables ASP.NET to know about your handler and its purpose. Registration is required for two practical reasons. First, it serves to ensure that IIS forwards the call to the correct ASP.NET application. Second, it serves to instruct your ASP.NET application on the class to load to handle the request. As mentioned, you can use handlers to override the processing of existing resources (for example, hello.aspx) or to introduce new functionalities (for example, folder.axd). In both cases, you’re invoking a resource whose extension is already known to IIS—the .axd extension is registered in the IIS metabase when you install ASP.NET. In both cases, though, you need to modify the web.config file of the application to let the application know about the handler.
By using the ASHX extension and programming model for handlers, you can also save yourself the web.config update and deploy a new HTTP handler by simply copying a new file in a new or existing application’s folder.
An alternative way to define an HTTP handler is through an .ashx file. The file contains a special directive, named @WebHandler, that expresses the association between the HTTP handler endpoint and the class used to implement the functionality. All .ashx files must begin with a directive like the following one:
<%@ WebHandler Language="C#" Class="AspNetGallery.Handlers.MyHandler" %>
When an .ashx endpoint is invoked, ASP.NET parses the source code of the file and figures out the HTTP handler class to use from the @WebHandler directive. This automation removes the need of updating the web.config file. Here’s a sample .ashx file. As you can see, it is the plain class file plus the special @WebHandler directive:
<%@ WebHandler Language="C#" Class="MyHandler" %>

using System.Web;

public class MyHandler : IHttpHandler {

    public void ProcessRequest (HttpContext context) {
        context.Response.ContentType = "text/plain";
        context.Response.Write("Hello World");
    }

    public bool IsReusable {
        get {
            return false;
        }
    }
}
Note that the source code of the class can either be specified inline or loaded from any of the assemblies referenced by the application. When .ashx resources are used to implement an HTTP handler, you just deploy the source file and you’re done. Just as for XML Web services, the source file is loaded and compiled only on demand. Because ASP.NET adds a special entry to the IIS metabase for .ashx resources, you don’t even need to enter changes to the Web server configuration.
Resources with an .ashx extension are handled by an HTTP handler class named SimpleHandleFactory. Note that SimpleHandleFactory is actually an HTTP handler factory class, not a simple HTTP handler class. We’ll discuss handler factories in a moment.
The SimpleHandleFactory class looks for the @WebHandler directive at the beginning of the file. The @WebHandler directive tells the handler factory the name of the HTTP handler class to instantiate when the source code has been compiled.
If your Web application manages resources of a type that you don’t want to make publicly available over the Web, you must instruct IIS not to display those files. A possible way to accomplish this consists of forwarding the request to aspnet_isapi and then binding the extension to one of the built-in handlers—the HttpForbiddenHandler class:
<add verb="*" path="*.xyz" type="System.Web.HttpForbiddenHandler" />
Any attempt to access an .xyz resource results in an error message being displayed. The same trick can also be applied for individual resources served by your application. If you need to deploy, say, a text file but do not want to take the risk that somebody can get to it, add the following:
<add verb="*" path="yourFile.txt" type="System.Web.HttpForbiddenHandler" />
In a conventional HTTP handler, the ProcessRequest method takes the lion’s share of the overall set of functionality. The second member of the IHttpHandler interface—the IsReusable property—is used only in particular circumstances. If you set the IsReusable property to return true, the handler is not unloaded from memory after use and is repeatedly used. Put another way, the Boolean value returned by IsReusable indicates whether the handler object can be pooled.
Frankly, most of the time it doesn’t really matter what you return—be it true or false. If you set the property to return false, you require that a new object be allocated for each request. The simple allocation of an object is not a particularly expensive operation. However, the initialization of the handler might be costly. In this case, by making the handler reusable, you save much of the overhead. If the handler doesn’t hold any state, there’s no reason for not making it reusable.
In summary, I’d say that IsReusable should be always set to true, except when you have instance properties to deal with or properties that might cause trouble if used in a concurrent environment. If you have no initialization tasks, it doesn’t really matter whether it returns true or false. As a margin note, the System.Web.UI.Page class—the most popular HTTP handler ever—sets its IsReusable property to false.
The key point to determine is the following: Who’s really using IsReusable and, subsequently, who really cares about its value?
Once the HTTP runtime knows the HTTP handler class to serve a given request, it simply instantiates it—no matter what. So when is the IsReusable property of a given handler taken into account? Only if you use an HTTP handler factory—that is, a piece of code that dynamically decides which handler should be used for a given request. An HTTP handler factory can query a handler to determine whether the same instance can be used to service multiple requests and thus optionally create and maintain a pool of handlers.
ASP.NET pages and ASHX resources are served through factories. However, none of these factories ever checks IsReusable. Of all the built-in handler factories in the whole ASP.NET platform, very few check the IsReusable property of related handlers. So what’s the bottom line?
As long as you’re creating HTTP handlers for AXD, ASHX, or perhaps ASPX resources, be aware that the IsReusable property is blissfully ignored. Do not waste your time trying to figure out the optimal configuration. Instead, if you’re creating an HTTP handler factory to serve a set of resources, whether or not to implement a pool of handlers is up to you and IsReusable is the perfect tool for the job.
But when should you employ an HTTP handler factory? You should do it in all situations in which the HTTP handler class for a request is not uniquely identified. For example, for ASPX pages, you don’t know in advance which HTTP handler type you have to use. The type might not even exist (in which case, you compile it on the fly). The HTTP handler factory is used whenever you need to apply some logic to decide which handler is the right one to use. In other words, you need an HTTP handler factory when declarative binding between endpoints and classes is not enough.
An HTTP request can be directly associated with an HTTP handler or with an HTTP handler factory object. An HTTP handler factory is a class that implements the IHttpHandlerFactory interface and is in charge of returning the actual HTTP handler to use to serve the request. The SimpleHandlerFactory class provides a good example of how a factory works. The factory is mapped to requests directed at .ashx resources. When such a request comes in, the factory determines the actual handler to use by looking at the @WebHandler directive in the source file.
In the .NET Framework, HTTP handler factories are used to perform some preliminary tasks on the requested resource prior to passing it on to the handler. Another good example of a handler factory object is an internal class named PageHandlerFactory, which is in charge of serving .aspx pages. In this case, the factory handler figures out the name of the handler to use and, if possible, loads it up from an existing assembly.
HTTP handler factories are classes that implement a couple of methods on the IHttpHandlerFactory interface—GetHandler and ReleaseHandler, as shown in Table 4-5.
The GetHandler method has the following signature:
public virtual IHttpHandler GetHandler(
                  HttpContext context,
                  String requestType,
                  String url,
                  String pathTranslated);
The requestType argument is a string that evaluates to GET or POST—the HTTP verb of the request. The last two arguments represent the raw URL of the request and the physical path behind it. The ReleaseHandler method is a mandatory override for any class that implements IHttpHandlerFactory; in most cases, it will just have an empty body.
The following listing shows a sample HTTP handler factory that returns different handlers based on the HTTP verb (GET or POST) used for the request:
class MyHandlerFactory : IHttpHandlerFactory
{
    public IHttpHandler GetHandler(HttpContext context,
        String requestType, String url, String pathTranslated)
    {
        // Feel free to create a pool of HTTP handlers here
        if(context.Request.RequestType.ToLower() == "get")
            return (IHttpHandler) new MyGetHandler();
        else if(context.Request.RequestType.ToLower() == "post")
            return (IHttpHandler) new MyPostHandler();
        return null;
    }

    public void ReleaseHandler(IHttpHandler handler)
    {
        // Nothing to do
    }
}
When you use an HTTP handler factory, it’s the factory (not the handler) that you want to register in the ASP.NET configuration file. If you register the handler, it will always be used to serve requests. If you opt for a factory, you have a chance to decide dynamically and based on runtime conditions which handler is more appropriate for a certain request. In doing so, you can use the IsReusable property of handlers to implement a pool.
An asynchronous HTTP handler is a class that implements the IHttpAsyncHandler interface. The system initiates the call by invoking the BeginProcessRequest method. Next, when the method ends, a callback function is automatically invoked to terminate the call. In the .NET Framework, the sole HttpApplication class implements the asynchronous interface. The members of the IHttpAsyncHandler interface are shown in Table 4-6.
The signature of the BeginProcessRequest method is as follows:
IAsyncResult BeginProcessRequest(
                  HttpContext context,
                  AsyncCallback cb,
                  Object extraData);
The context argument provides references to intrinsic server objects used to service HTTP requests. The second parameter is the AsyncCallback object to invoke when the asynchronous method call is complete. The third parameter is a generic cargo variable that contains any data you might want to pass to the handler.
Note
An AsyncCallback object is a delegate that defines the logic needed to finish processing the asynchronous operation. A delegate is a class that holds a reference to a method. A delegate class has a fixed signature, and it can hold references only to methods that match that signature. A delegate is equivalent to a type-safe function pointer or a callback. As a result, an AsyncCallback object is just the code that executes when the asynchronous handler has completed its job.
The AsyncCallback delegate has the following signature:
public delegate void AsyncCallback(IAsyncResult ar);
It uses the IAsyncResult interface to obtain the status of the asynchronous operation. To illustrate the plumbing of asynchronous handlers, I’ll show you what the HTTP runtime does when it deals with asynchronous handlers. The HTTP runtime invokes the BeginProcessRequest method as illustrated here:
// Sets an internal member of the HttpContext class with
// the current instance of the asynchronous handler
context.AsyncAppHandler = asyncHandler;

// Invokes the BeginProcessRequest method on the asynchronous HTTP handler
asyncHandler.BeginProcessRequest(context, OnCompletionCallback, context);
The context argument is the current instance of the HttpContext class and represents the context of the request. A reference to the HTTP context is also passed as the custom data sent to the handler to process the request. The extraData parameter in the BeginProcessRequest signature is used to represent the status of the asynchronous operation. The BeginProcessRequest method returns an object of type HttpAsyncResult—a class that implements the IAsyncResult interface. The IAsyncResult interface contains a property named AsyncState that is set with the extraData value—in this case, the HTTP context.
The OnCompletionCallback method is an internal method. It gets automatically triggered when the asynchronous processing of the request terminates. The following listing illustrates the pseudocode of the HttpRuntime private method:
// The method must have the signature of an AsyncCallback delegate
private void OnHandlerCompletion(IAsyncResult ar)
{
    // The ar parameter is an instance of HttpAsyncResult
    HttpContext context = (HttpContext) ar.AsyncState;

    // Retrieves the instance of the asynchronous HTTP handler
    // and completes the request
    IHttpAsyncHandler asyncHandler = context.AsyncAppHandler;
    asyncHandler.EndProcessRequest(ar);

    // Finalizes the request as usual
    ...
}
The completion handler retrieves the HTTP context of the request through the AsyncState property of the IAsyncResult object it gets from the system. As mentioned, the actual object passed is an instance of the HttpAsyncResult class—in any case, it is the return value of the BeginProcessRequest method. The completion routine extracts the reference to the asynchronous handler from the context and issues a call to the EndProcessRequest method:
void EndProcessRequest(IAsyncResult result);
The EndProcessRequest method takes the IAsyncResult object returned by the call to BeginProcessRequest. As implemented in the HttpApplication class, the EndProcessRequest method does nothing special and is limited to throwing an exception if an error occurred.
Asynchronous handlers essentially serve one particular scenario—a scenario in which the generation of the markup is subject to lengthy operations, such as time-consuming database stored procedures or calls to Web services. In these situations, the ASP.NET thread in charge of the request is stuck waiting for the operation to complete. Because threads are valuable resources, lengthy tasks that keep threads occupied for too long are potentially the perfect scalability killer. However, asynchronous handlers are here to help.
The idea is that the request begins on a thread-pool thread, but that thread is released as soon as the operation begins. In BeginProcessRequest, you typically create your own thread and start the lengthy operation. BeginProcessRequest doesn’t wait for the operation to complete; therefore, the thread is returned to the pool immediately.
There are a lot of tricky details that this bird’s-eye description just omitted. In the first place, you should strive to avoid a proliferation of threads. Ideally, you should use a custom thread pool. Furthermore, you must figure out a way to signal when the lengthy operation has terminated. This typically entails creating a custom class that implements IAsyncResult and returning it from BeginProcessRequest. This class embeds a synchronization object—typically a ManualResetEvent object—that the custom thread carrying the work will signal upon completion.
In the end, building asynchronous handlers is definitely tricky and not for novice developers. Very likely, you are more interested in having asynchronous pages than in generic asynchronous HTTP handlers. With asynchronous pages, the “lengthy task” is merely the ProcessRequest method of the Page class. (Obviously, you configure the page to execute asynchronously only if the page contains code that starts I/O-bound and potentially lengthy operations.)
ASP.NET offers ad hoc support for building asynchronous pages more easily and more comfortably than through HTTP handlers.
Caution
I’ve seen several ASP.NET developers use an .aspx page to serve markup other than HTML markup. This is not a good idea. An .aspx resource is served by quite a rich and sophisticated HTTP handler—the System.Web.UI.Page class. The ProcessRequest method of this class entirely provides for the page life cycle as we know it—Init, Load, and PreRender events, as well as rendering stage, view state, and postback management. Nothing of the kind is really required if you only need to retrieve and return, say, the bytes of an image. HTTP handlers are an excellent way to speed up particular requests. HTTP handlers are also a quick way to serve AJAX requests without writing (and spinning up) the whole machinery of Windows Communication Foundation (WCF) services. At the very end of the day, an HTTP handler is an endpoint and can be used to serve data to AJAX requests. In this regard, the difference between an HTTP handler and a WCF service is that the HTTP handler doesn’t have a free serialization engine for input and output values.
So you’ve learned that any incoming requests for ASP.NET resources are handed over to the worker process for the actual processing. The worker process is distinct from the Web server executable so that even if one ASP.NET application crashes, it doesn’t bring down the whole server.
On the way to the final HTTP handler, the request passes through a pipeline of special runtime modules—HTTP modules. An HTTP module is a .NET Framework class that implements the IHttpModule interface. The HTTP modules that filter the raw data within the request are configured on a per-application basis within the web.config file. All ASP.NET applications, though, inherit a bunch of system HTTP modules configured in the global web.config file. Applications hosted under IIS 7.x integrated mode can configure HTTP modules that run at the IIS level for any requests that comes in, not just for ASP.NET-related resources.
An HTTP module can pre-process and post-process a request, and it intercepts and handles system events as well as events raised by other modules.
The IHttpModule interface defines only two methods: Init and Dispose. The Init method initializes a module and prepares it to handle requests. At this time, you subscribe to receive notifications for the events of interest. The Dispose method disposes of the resources (all but memory!) used by the module. Typical tasks you perform within the Dispose method are closing database connections or file handles.
The IHttpModule methods have the following signatures:
void Init(HttpApplication app);
void Dispose();
The Init method receives a reference to the HttpApplication object that is serving the request. You can use this reference to wire up to system events. The HttpApplication object also features a property named Context that provides access to the intrinsic properties of the ASP.NET application. In this way, you gain access to Response, Request, Session, and the like.
Table 4-7 lists the events that HTTP modules can listen to and handle.
Table 4-7. HttpApplication Events in Order of Appearance
Description | |
|---|---|
BeginRequest | Occurs as soon as the HTTP pipeline begins to process the request. |
AuthenticateRequest, PostAuthenticateRequest | Occurs when a security module has established the identity of the user. |
AuthorizeRequest, PostAuthorizeRequest | Occurs when a security module has verified user authorization. |
ResolveRequestCache, PostResolveRequestCache | Occurs when the ASP.NET runtime resolves the request through the output cache. |
MapRequestHandler, PostMapRequestHandler | Occurs when the HTTP handler to serve the request has been found. It is fired only to applications running in classic mode or under IIS 6. |
AcquireRequestState, PostAcquireRequestState | Occurs when the handler that will actually serve the request acquires the state information associated with the request. |
PreRequestHandlerExecute | Occurs just before the HTTP handler of choice begins to work. |
PostRequestHandlerExecute | Occurs when the HTTP handler of choice finishes execution. The response text has been generated at this point. |
ReleaseRequestState, PostReleaseRequestState | Occurs when the handler releases the state information associated with the current request. |
UpdateRequestCache, PostUpdateRequestCache | Occurs when the ASP.NET runtime stores the response of the current request in the output cache to be used to serve subsequent requests. |
LogRequest, PostLogRequest | Occurs when the ASP.NET runtime is ready to log the results of the request. Logging is guaranteed to execute even if errors occur. It is fired only to applications running under IIS 7 integrated mode. |
EndRequest | Occurs as the last event in the HTTP pipeline chain of execution. |
Another pair of events can occur during the request, but in a nondeterministic order. They are PreSendRequestHeaders and PreSendRequestContent.
The PreSendRequestHeaders event informs the HttpApplication object in charge of the request that HTTP headers are about to be sent. The PreSendRequestContent event tells the HttpApplication object in charge of the request that the response body is about to be sent. Both these events normally fire after EndRequest, but not always. For example, if buffering is turned off, the event gets fired as soon as some content is going to be sent to the client. Speaking of nondeterministic application events, it must be said that a third nondeterministic event is, of course, Error.
All these events are exposed by the HttpApplication object that an HTTP module receives as an argument to the Init method. You can write handlers for such events in the global.asax file of the application. You can also catch these events from within a custom HTTP module.
Let’s come to grips with HTTP modules by writing a relatively simple custom module named Marker that adds a signature at the beginning and end of each page served by the application. The following code outlines the class we need to write:
using System;
using System.Web;

namespace AspNetGallery.Extensions.Modules
{
    public class MarkerModule : IHttpModule
    {
        public void Init(HttpApplication app)
        {
            // Register for pipeline events
        }

        public void Dispose()
        {
            // Nothing to do here
        }
    }
}
The Init method is invoked by the HttpApplication class to load the module. In the Init method, you normally don’t need to do more than simply register your own event handlers. The Dispose method is, more often than not, empty. The heart of the HTTP module is really in the event handlers you define.
The sample Marker module registers a couple of pipeline events. They are BeginRequest and EndRequest. BeginRequest is the first event that hits the HTTP application object when the request begins processing. EndRequest is the event that signals the request is going to be terminated, and it’s your last chance to intervene. By handling these two events, you can write custom text to the output stream before and after the regular HTTP handler—the Page-derived class.
The following listing shows the implementation of the Init and Dispose methods for the sample module:
public void Init(HttpApplication app)
{
    // Register for pipeline events
    app.BeginRequest += OnBeginRequest;
    app.EndRequest += EndRequest;
}

public void Dispose()
{
}
The BeginRequest and EndRequest event handlers have a similar structure. They obtain a reference to the current HttpApplication object from the sender and get the HTTP context from there. Next, they work with the Response object to append text or a custom header:
public void OnBeginRequest(Object sender, EventArgs e)
{
var app = (HttpApplication) sender;
var ctx = app.Context;
// More code here
...
// Add custom header to the HTTP response
ctx.Response.AppendHeader("Author", "DinoE");
// PageHeaderText is a constant string defined elsewhere
ctx.Response.Write(PageHeaderText);
}
public void OnEndRequest(Object sender, EventArgs e)
{
// Get access to the HTTP context
var app = (HttpApplication) sender;
var ctx = app.Context;
// More code here
...
// Append some custom text
// PageFooterText is a constant string defined elsewhere
ctx.Response.Write(PageFooterText);
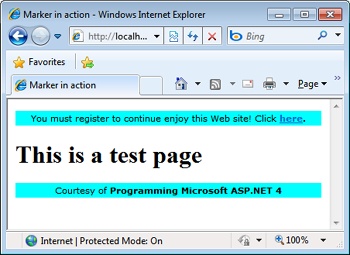
}OnBeginRequest writes standard page header text and also adds a custom HTTP header. OnEndRequest simply appends the page footer. The effect of this HTTP module is visible in Figure 4-7.
You register a new HTTP module by adding an entry to the <httpModules> section of the configuration file. The overall syntax of the <httpModules> section closely resembles that of HTTP handlers. To add a new module, you use the <add> node and specify the name and type attributes. The name attribute contains the public name of the module. This name is used to select the module within the HttpApplication’s Modules collection. If the module fires custom events, this name is also used as the prefix for building automatic event handlers in the global.asax file:
<system.web>
  <httpModules>
    <add name="Marker"
         type="MarkerModule, AspNetGallery.Extensions" />
  </httpModules>
</system.web>
The order in which modules are applied depends on the physical order of the modules in the configuration list. You can remove a system module and replace it with your own that provides a similar functionality. In this case, in the application’s web.config file you use the <remove> node to drop the default module and then use <add> to insert your own. If you want to completely redefine the order of HTTP modules for your application, you can clear all the default modules by using the <clear> node and then re-register them all in the order you prefer.
Note
HTTP modules are loaded and initialized only once, at the startup of the application. Unlike HTTP handlers, they apply to any requests. So when you plan to create a new HTTP module, you should first wonder whether its functionality should span all possible requests in the application. Is it possible to choose which requests an HTTP module should process? The Init method is called only once in the application’s lifetime, but the handlers you register are called once for each request. So to operate only on certain pages, you can do as follows:
public void OnBeginRequest(object sender, EventArgs e)
{
    HttpApplication app = (HttpApplication) sender;
    HttpContext ctx = app.Context;
    if (!ShouldHook(ctx))
         return;
    ...
}
OnBeginRequest is your handler for the BeginRequest event. The ShouldHook helper function returns a Boolean value. It is passed the context of the request—that is, any information that is available on the request. You can code it to check the URL as well as any HTTP content type and headers.
The sample just discussed demonstrates how to wire up pipeline events—that is, events fired by the HttpApplication object. But what about events fired by other modules? The HttpApplication object provides a property named Modules that gets the collection of modules for the current application.
The Modules property is of type HttpModuleCollection and contains the names of the modules for the application. The collection class inherits from the abstract class NameObjectCollectionBase, which is a collection of pairs made of a string and an object. The string indicates the public name of the module; the object is the actual instance of the module. To access the module that handles the session state, you need code like this:
var sessionModule = app.Modules["Session"];
sessionModule.Start += OnSessionStart;
As mentioned, you can also handle events raised by HTTP modules within the global.asax file and use the ModuleName_EventName convention to name the event handlers. The name of the module is just one of the settings you need to define when registering an HTTP module.
The previous example gave us the gist of an HTTP module component. It was a simple (and kind of pointless) example, but it was useful to demonstrate what you can do with HTTP modules in a real application. First and foremost, not all applications need custom HTTP modules. ASP.NET comes with a bunch of built-in modules, which are listed in Table 4-8.
Table 4-8. Native HTTP Modules
Event | Description |
|---|---|
AnonymousIdentificationModule | Manages anonymous identifiers for the ASP.NET application |
DefaultAuthenticationModule | Ensures that the User object is always bound to some identity |
FileAuthorizationModule | Verifies that the user has permission to access the given file. |
FormsAuthenticationModule | Manages Forms authentication |
OutputCacheModule | Implements output page caching |
ProfileModule | Implements the data retrieval for profile data |
RoleManagerModule | Manages the retrieval of role information |
ScriptModule | Manages script requests placed through ASP.NET AJAX |
SessionStateModule | Manages session state |
UrlAuthorizationModule | Verifies that the user has permission to access the given URL |
UrlRoutingModule | Implements URL routing |
WindowsAuthenticationModule |
All these HTTP modules perform a particular system-level operation and can be customized by application-specific code. Because an HTTP module works on any incoming request, it usually doesn’t perform application-specific tasks. From an application perspective, an HTTP module is helpful when you need to apply filters on all requests for profiling, debugging, or functional reasons.
Let’s dissect one of the system-provided HTTP modules, which will also slowly move us toward the next topic of this chapter. Enter the URL-routing HTTP module.
In ASP.NET 3.5 Service Pack 1, Microsoft introduced a new and more effective API for URL rewriting. Because of its capabilities, the new API got a better name—URL routing. URL routing is built on top of the URL rewriting API, but it offers a richer and higher level programming model. (I’ll get to URL rewriting and URL routing in a moment.)
The URL routing engine is a system-provided HTTP module that wires up the PostResolveRequestCache event. In a nutshell, the HTTP module matches the requested URL to one of the user-defined rewriting rules (known as routes) and finds the HTTP handler that is due to serve that route. If any HTTP handler is found, it becomes the actual handler for the current request. Here’s the signature of the module class:
public class UrlRoutingModule : IHttpModule
{
   public virtual void PostResolveRequestCache(HttpContextBase context)
   {
      ...
   }

   void IHttpModule.Dispose()
   {
      ...
   }

   void IHttpModule.Init(HttpApplication application)
   {
     ...
   }
}
The class implements the IHttpModule interface implicitly, and in its initialization phase it registers a handler for the system’s PostResolveRequestCache event.
The PostResolveRequestCache event fires right after the runtime environment (IIS or ASP.NET, depending on the IIS working mode) has determined whether the response for the current request can be served from the output cache or not. If the response is already cached, there’s no need to process the request and, subsequently, no need to analyze the content of the URL. Any system events that follow PostResolveRequestCache are part of the request processing cycle; therefore, hooking up PostResolveRequestCache is the optimal moment for taking control of requests that require some work on the server.
The first task accomplished by the HTTP module consists of grabbing any route data contained in the URL of the current request. The module matches the URL to one of the registered routes and figures out the handler for the route.
The route handler is not the HTTP handler yet. It is simply the object responsible for handling the route. The primary task of a route handler, however, is returning the HTTP handler to serve the request.
In the end, HTTP modules are extremely powerful tools that give you control over every little step taken by the system to process a request. For the same reason, however, HTTP modules are delicate tools—every time you write one, it will be invoked for each and every request. An HTTP module is hardly a tool for a specific application (with due exceptions), but it is often a formidable tool for implementing cross-cutting, system-level features.
The whole ASP.NET platform originally developed around the idea of serving requests for physical pages. Look at the following URL:
http://northwind.com/news.aspx?id=1234
It turns out that most URLs used within an ASP.NET application are made of two parts: the path to the physical Web page that contains the logic to apply, and some data stuffed in the query string to provide parameters. In the URL just shown, the news.aspx page incorporates the logic required to retrieve and display the data; the ID for the specific news to retrieve is provided, instead, via a parameter on the query string.
This is the essence of the Page Controller pattern for Web applications. The request targets a page whose logic and graphical layout are saved to disk. This approach has worked for a few years and still works today. The content of the news is displayed correctly, and everybody is generally happy. In addition, you have just one page to maintain, and you still have a way to identify a particular piece of news via the URL.
A possible drawback of this approach is that the real intent of the page might not be clear to users. And, more importantly, search engines usually assign higher ranks to terms contained in the URL. Therefore, an expressive URL provides search engines with an effective set of keywords that describe the page. To fix this, you need to make the entire URL friendlier and more readable. But you don’t want to add new Web pages to the application or a bunch of made-to-measure HTTP handlers. Ideally, you should try to transform the request in a command sent to the server rather than having it be simply the virtual file path name of the page to display.
Note
The advent of Content Management Systems (CMS) raised the need to have friendlier URLs. A CMS is an application not necessarily written for a single user and that likely manages several pages created using semi-automatic algorithms. For these tools, resorting to pages with an algorithmically editable URL was a great help. But, alas, it was not a great help for users and search engines. This is where the need arises to expose user-friendly URLs while managing cryptic URLs internally. A URL rewriter API attempts to bridge precisely this gap.
To provide the ability to always expose friendly URLs to users, ASP.NET has supported a feature called URL rewriting since its inception. At its core, URL rewriting consists of an HTTP module (or a global.asax event handler) that hooks up a given request, parses its original URL, and instructs the HTTP runtime environment to serve a “possibly related but different” URL.
URL rewriting is a powerful feature; however, it’s not free of issues. For this reason, Microsoft more recently introduced a new API in ASP.NET. Although it’s based on the same underlying URL rewriting, the API offers a higher level of programmability and more features overall—and the URL routing engine in particular.
Originally devised for ASP.NET MVC, URL routing gives you total freedom to organize the layout of the URL recognized by your application. In a way, the URL becomes a command for the Web application; the application is the only entity put in charge of parsing and validating the syntax of the command. The URL engine is the system-provided component that validates the URL. The URL routing engine is general enough to be usable in both ASP.NET MVC and ASP.NET Web Forms; in fact, it was taken out of the ASP.NET MVC framework and incorporated in the general ASP.NET system.web assembly a while ago.
URL routing differs in ASP.NET MVC and ASP.NET Web Forms only with regard to how you express the final destination of the request. You use a controller-action pair in ASP.NET MVC; you use an ASPX path in ASP.NET Web Forms.
URL rewriting helps you in two ways. It makes it possible for you to use a generic front-end page such as news.aspx and then redirect to a specific page whose actual URL is read from a database or any other container. In addition, it also enables you to request user-friendly URLs to be programmatically mapped to less intuitive, but easier to manage, URLs.
Here’s a quick example of how you can rewrite the requested URL as another one:
protected void Application_BeginRequest(object sender, EventArgs e)
{
   // Get the current request context
   var context = HttpContext.Current;

   // Get the URL to the handler that will physically handle the request
   var newURL = ParseOriginalUrl(context);

   // Overwrite the target URL of the current request
   context.RewritePath(newURL);
}
The RewritePath method of HttpContext lets you change the URL of the current request on the fly, thus performing a sort of internal redirect. As a result, the user is provided the content generated for the URL you set through RewritePath. At the same time, the URL shown in the address bar remains as the originally requested one.
In a nutshell, URL rewriting exists to let you decouple the URL from the physical Web form that serves the requests.
Note
The change of the final URL takes place on the server and, more importantly, within the context of the same call. RewritePath should be used carefully and mainly from within the global.asax file. In Web Forms, for example, if you use RewritePath in the context of a postback event, you can experience some view-state problems.
One drawback of the URL rewriting API is that as the API changes the target URL of the request, any postbacks are directed to the rewritten URL. For example, if you rewrite news.aspx?id=1234 to 1234.aspx, any postbacks from 1234.aspx are targeted to the same 1234.aspx instead of to the original URL.
This might or might not be a problem for you and, for sure, it doesn’t break any page behavior. However, the original URL has just been fully replaced while you likely want to use the same, original URL as the front end. If this is the case (and most of the time, this is exactly the case), URL rewriting just created a new problem.
In addition, the URL rewriting logic is intrinsically monodirectional because it doesn’t offer any built-in mechanism to go from the original URL to the rewritten URL and then back.
The URL routing module is a system component that intercepts any request and attempts to match the URL to a predefined pattern. All requested URLs that match a given pattern are processed in a distinct way; typically, they are rewritten to other URLs.
The URL patterns that you define are known as routes.
A route contains placeholders that can be filled up with values extracted from the URL. Often referred to as a route parameter, a placeholder is a name enclosed in curly brackets { }. You can have multiple placeholders in a route as long as they are separated by a constant or delimiter. The forward slash (/) character acts as a delimiter between the various parts of the route. Here’s a sample route:
Category/{action}/{categoryName}URLs that match the preceding route begin with the word “Category” followed by two segments. The first segment will be mapped to the action route parameter; the second segment will be mapped to the categoryName route parameter. As you might have guessed, action and categoryName are just arbitrary names for parameters. A URL that matches the preceding route is the following:
/Category/Edit/Beverages
The route is nothing more than a pattern and is not associated with any logic of its own. Invoked by the routing module, the component that ultimately decides how to rewrite the matching URL is another one entirely. Precisely, it is the route handler.
Technically speaking, a route handler is a class that implements the IRouteHandler interface. The interface is defined as shown here:
public interface IRouteHandler
{
   IHttpHandler GetHttpHandler(RequestContext requestContext);
}
In its GetHttpHandler method, a route handler typically looks at route parameters to figure out if any of the information available needs to be passed down to the HTTP handler (for example, an ASP.NET page) that will handle the request. If this is the case, the route handler adds this information to the Items collection of the HTTP context. Finally, the route handler obtains an instance of a class that implements the IHttpHandler interface and returns that.
For Web Forms requests, the route handler—an instance of the PageRouteHandler class—resorts to the ASP.NET build manager to identify the dynamic class for the requested page resource and creates the handler on the fly.
Important
The big difference between plain URL rewriting and ASP.NET routing is that with ASP.NET routing, the URL is not changed when the system begins processing the request. Instead, it’s changed later in the life cycle. In this way, the runtime environment can perform most of its usual tasks on the original URL, which is an approach that maintains a consistent and robust solution. In addition, a late intervention on the URL also gives developers a big chance to extract values from the URL and the request context. In this way, the routing mechanism can be driven by a set of rewriting rules or patterns. If the original URL matches a particular pattern, you rewrite it to the associated URL. URL patterns are an external resource and are kept in one place, which makes the solution more maintainable overall.
To introduce URL routing in your Web Forms application, you start by defining routes. Routes go in the global.asax file to be processed at the very beginning of the application. To define a route, you create an instance of the Route class by specifying the URL pattern, the handler, and optionally a name for the route. However, you typically use helper methods that save you a lot of details and never expose you directly to the API of the Route class. The next section shows some code that registers routes.
Note
The vast majority of examples that illustrate routing in both ASP.NET MVC and Web Forms explicitly register routes from within global.asax. Loading route information from an external file is not be a bad idea, though, and will make your application a bit more resilient to changes.
In Application_Start, you invoke a helper method inside of which new routes are created and added to a static route collection object. Here’s a sample global.asax class:
public class Global : System.Web.HttpApplication
{
    void Application_Start(object sender, EventArgs e)
    {
        RegisterRoutes(RouteTable.Routes);
    }

    public static void RegisterRoutes(RouteCollection routes)
    {
        routes.MapPageRoute("Category",
            "Category/{action}/{categoryName}",
            "~/categories.aspx",
            true,
            new RouteValueDictionary
                {
                    { "categoryName", "beverages" },
                    { "action", "edit" }
                });
    }
}
All routes for the application are stored in a global container: the static Routes property of the RouteTable class. A reference to this property is passed to the helper RegisterRoutes method invoked upon application start.
The structure of the code you just saw is optimized for testability; nothing prevents you from stuffing all the code in the body of Application_Start.
The MapPageRoute method is a helper method that creates a Route object and adds it to the Routes collection. Here’s a glimpse of its internal implementation:
public Route MapPageRoute(String routeName,
                          String routeUrl,
                          String physicalFile,
                          Boolean checkPhysicalUrlAccess,
                          RouteValueDictionary defaults,
                          RouteValueDictionary constraints,
                          RouteValueDictionary dataTokens)
{
    if (routeUrl == null)
    {
        throw new ArgumentNullException("routeUrl");
    }

    // Create the new route
    var route = new Route(routeUrl,
          defaults, constraints, dataTokens,
          new PageRouteHandler(physicalFile, checkPhysicalUrlAccess));

    // Add the new route to the global collection
    this.Add(routeName, route);
    return route;
}
The MapPageRoute method offers a simplified interface for creating a Route object. In particular, it requires you to specify the name of the route, the URL pattern for the route, and the physical ASP.NET Web Forms page the URL will map to. In addition, you can specify a Boolean flag to enforce the application of current authorization rules for the actual page. For example, imagine that the user requests a URL such as customers/edit/alfki. Imagine also that such a URL is mapped to customers.aspx and that this page is restricted to the admin role only. If the aforementioned Boolean argument is false, all users are allowed to view the page behind the URL. If the Boolean value is true, only admins will be allowed.
Finally, the MapPageRoute method can accept three dictionaries: the default values for URL parameters, additional constraints on the URL parameters, plus custom data values to pass on to the route handler.
In the previous example, we aren’t using constraints and data tokens. Instead, we are specifying default values for the categoryName and action parameters. As a result, an incoming URL such as /category will be automatically resolved as if it were /category/edit/beverages.
The MapPageRoute method just configures routes recognized by the application. Its job ends with the startup of the application. The URL routing HTTP module then kicks in for each request and attempts to match the request URL to any of the defined routes.
Routes are processed in the order in which they have been added to the Routes collection, and the search stops at the first match. For this reason, it is extremely important that you list your routes in decreasing order of importance—stricter rules must go first.
Beyond the order of appearance, other factors affect the process of matching URLs to routes. One is the set of default values that you might have provided for a route. Default values are simply values that are automatically assigned to defined placeholders in case the URL doesn’t provide specific values. Consider the following two routes:
{Orders}/{Year}/{Month}
{Orders}/{Year}
If you assign the first route’s default values for both {Year} and {Month}, the second route will never be evaluated because, thanks to the default values, the first route is always a match regardless of whether the URL specifies a year and a month.
The URL-routing HTTP module also uses constraints (which I’ll say more about in a moment) to determine whether a URL matches a given route. If a match is finally found, the routing module gets the HTTP handler from the route handler and maps it to the HTTP context of the request.
Given the previously defined route, any matching requests are mapped to the categories.aspx page. How can this page know about the route parameters? How can this page know about the action requested or the category name? There’s no need for the page to parse (again) the URL. Route parameters are available through a new property on the Page class—the RouteData property.
RouteData is a property of type RouteData and features the members listed in Table 4-9.
Table 4-9. Members of the RouteData Class
Member | Description |
|---|---|
DataTokens | List of additional custom values that are passed to the route handler |
GetRequiredString | Method that takes the name of a route parameter and returns its value |
Route | Returns the current Route object |
RouteHandler | Returns the handler for the current route |
Values | Returns the dictionary of route parameter values |
The following code snippet shows how you retrieve parameters in Page_Load:
protected void Page_Load(object sender, EventArgs e)
{
    var action = RouteData.GetRequiredString("action");
    ...
}
The only difference between using GetRequiredString and accessing the Values dictionary is that GetRequiredString throws if the requested value is not found. In addition, GetRequiredString uses protected access to the collection via TryGetValue instead of a direct reading.
A route is characterized by the five properties listed in Table 4-10.
Table 4-10. Properties of the Route Class
Constraints, DataTokens, and Defaults are all properties of type RouteValueDictionary. In spite of the fancy name, the RouteValueDictionary type is a plain <String, Object> dictionary.
Most of the time, the pattern defined by the route is sufficient to decide whether a given URL matches or not. However, this is not always the case. Consider, for example, the situation in which you are defining a route for recognizing requests for product details. You want to make sure of the following two aspects.
First, make sure the incoming URL is of the type http://server/{category}/{productId}, where {category} identifies the category of the product and {productId} indicates the ID of the product to retrieve.
Second, you also want to be sure that no invalid product ID is processed. You probably don’t want to trigger a database call right from the URL routing module, but at the very least, you want to rule out as early as possible any requests that propose a product ID in an incompatible format. For example, if product IDs are numeric, you want to rule out anything passed in as a product ID that is alphanumeric.
Regular expressions are a simple way to filter requests to see if any segment of the URL is acceptable. Here’s a sample route that keeps URLs with a string product ID off the application:
routes.MapPageRoute(
    "ProductInfo",
    "Category/{category}/{productId}/{locale}",
    "~/categories.aspx",
    true,
    new { category = "Beverages", locale="en-us" },
    new { productId = @"d{8}",
           locale = ""[a-z]{2}-[a-z]{2}" }
);
The sixth parameter to the MapPageRoute method is a dictionary object that sets regular expressions for productId and locale. In particular, the product ID must be a numeric sequence of exactly eight digits, whereas the locale must be a pair of two-letter strings separated by a dash. The filter doesn’t ensure that all invalid product IDs and locale codes are stopped at the gate, but at least it cuts off a good deal of work. An invalid URL is presented as an HTTP 404 failure and is subject to application-specific handling of HTTP errors.
More in general, a route constraint is a condition that a given URL parameter must fulfill to make the URL match the route. A constraint is defined via either regular expressions or objects that implement the IRouteConstraint interface.
The ASP.NET URL routing module gives you maximum freedom to keep certain URLs off the routing mechanism. You can prevent the routing system from handling certain URLs in two steps. First, you define a pattern for those URLs and save it to a route. Second, you link that route to a special route handler—the StopRoutingHandler class.
Any request that belongs to a route managed by a StopRoutingHandler object is processed as a plain ASP.NET Web Forms endpoint. The following code instructs the routing system to ignore any .axd requests:
// In global.asax.cs
protected void Application_Start(Object sender, EventArgs e)
{
   RegisterRoutes(RouteTable.Routes);
}

public static void RegisterRoutes(RouteCollection routes)
{
  routes.IgnoreRoute("{resource}.axd/{*pathInfo}");
   ...
}
All that IgnoreRoute does is associate a StopRoutingHandler route handler to the route built around the specified URL pattern, thus preventing all matching URLs from being processed.
A little explanation is required for the {*pathInfo} placeholder in the URL. The token pathInfo simply represents a placeholder for any content following the .axd URL. The asterisk (*), though, indicates that the last parameter should match the rest of the URL. In other words, anything that follows the .axd extension goes into the pathInfo parameter. Such parameters are referred to as catch-all parameters.
Note
Earlier in this chapter, I presented HTTP handlers as a way to define your own commands for the application through customized URLs. So what’s the difference between HTTP handlers and URL routing? In ASP.NET, HTTP handlers remain the only way to process requests; URL routing is an intermediate layer that pre-processes requests and determines the HTTP handler for them. In doing so, the routing module decides whether the URL meets the expectations of the application or not. In a nutshell, URL routing offers a more flexible and extensible API; if you just need one specially formatted URL, though, a direct HTTP handler is probably a simpler choice.
HTTP handlers and HTTP modules are the building blocks of the ASP.NET platform. ASP.NET includes several predefined handlers and HTTP modules, but developers can write handlers and modules of their own to perform a variety of tasks. HTTP handlers, in particular, are faster than ordinary Web pages and can be used in all circumstances in which you don’t need state maintenance and postback events. To generate images dynamically on the server, for example, an HTTP handler is more efficient than a page.
Everything that occurs under the hood of the ASP.NET runtime environment occurs because of HTTP handlers. When you invoke a Web page or an ASP.NET Web service method, an appropriate HTTP handler gets into the game and serves your request.
HTTP modules are good at performing a number of low-level tasks for which tight interaction and integration with the request/response mechanism is a critical factor. Modules are sort of interceptors that you can place along an HTTP packet’s path, from the Web server to the ASP.NET runtime and back. Modules have read and write capabilities, and they can filter and modify the contents of both inbound and outbound requests.
In ASP.NET 4, a special HTTP module has been introduced to simplify the management of application URLs and make the whole process more powerful. The URL routing HTTP module offers a programmer-friendly API to define URL patterns, and it automatically blocks calls for nonmatching URLs and redirects matching URLs to specific pages. It’s not much different from old-fashioned URL rewriting, but it offers a greater level of control to the programmer.
With this chapter, our exploration of the ASP.NET and IIS runtime environment terminates. With the next chapter, we’ll begin a tour of the ASP.NET page-related features.