I have never let my schooling interfere with my education.
Generally speaking, creating the user interface of an ASP.NET Web Forms application is kind of easy. Even though I’m not sure the effort it takes to create a compelling and graphically appealing user interface should be referred to as “easy,” arranging the desired functionality is usually not a big deal thanks to the full bag of server controls you can get. If there’s a reason behind the success of ASP.NET, it’s likely the ease of development—a clear offspring of the Rapid Application Development (RAD) paradigm.
For many years, it was so easy (and quite effective) to drop a control on the Microsoft Visual Studio Web page designer, double-click, and fill in the method stub created for you in the page’s code-behind class. Therefore, a plain, old T-SQL query attached to the handler of, say, a Click event did the job of retrieving data and populating a grid after a user’s click. Like it or not, it was quick and effective—the beauty of RAD.
As the complexity of the application grows, RADness loses most of its appeal and stops being an ideal companion for the presentation layer. This is the biggest change in the software industry that we’ve gone through in the past few years. The need for a more structured way of writing software doesn’t mean, of course, we don’t need Visual Studio anymore. However, we probably need to consider Visual Studio designers for what they actually are—facilities for the UI rather than an aid for software design. (Visual Studio 2010 Ultimate does have a number of interesting facilities for design and modeling, but these tools cross-cut the platform you’re using for building the presentation.)
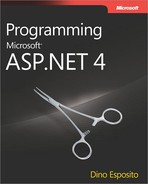
In Chapter 14, we reviewed layered applications and considered a number of patterns for the business and data access layers. In this chapter, we consider patterns for layering the presentation layer of applications with a particular eye to ASP.NET applications.
Your design of the presentation layer of any system should be driven by one fundamental principle: keep the presentation layer separated from anything else, including business and data access layers. Over the years, a few design patterns have been identified to help you with the presentation layer. We recognize three main families of patterns: Model-View-Controller (MVC), Model-View-Presenter (MVP), and Presentation Model (PM). The last one is more popularly known in the .NET space as Model-View-ViewModel (MVVM).
Not all of them can be applied to ASP.NET Web Forms with the same effectiveness. Actually, the design pattern that best applies to ASP.NET Web Forms applications is MVP, which will be the main topic of this chapter.
Before I go any further on that topic, you should note that these patterns span 30 years of computer design and programming. And many, many things have changed in the past 30 years. So, for example, what we call MVC today doesn’t exactly match the definition of MVC you find in the original paper that dates back about 30 years ago. To some extent, the same can be said for MVP. Two flavors of MVP exist—Passive View and Supervising Controller—and, in many applications, you actually use a personal mix of both. Likewise, even though PM and MVVM share the same architectural idea, MVVM is associated today with specific technologies such as Microsoft Silverlight, Windows Presentation Foundation (WPF), and Windows Phone.
This is to say that patterns like MVP and MVC give you quite a good idea of the approach behind a pattern, but details might change once the pattern is applied to a framework and a bunch of technologies. If you have a framework that gives you testability and separation of concerns (and whatever else you ask for), by all means use it and don’t get bothered by possible patterns it does or does not implement.
Note
The impact of frameworks and technologies on the presentation layer is a huge point to consider. Originally, the MVP pattern had been proposed as a way to improve MVC. So does this mean that ASP.NET MVC is a thing of the past? Of course, not. There are probably ways to further improve the design of ASP.NET MVC applications, but the ASP.NET MVC framework is highly usable and guides you toward writing well-designed code without the cost of arranging everything yourself.
In the earliest software, the whole application was made of monolithic blocks that encompassed everything—the user interface, logic, and data. The user interacted with the view and generated some input. The view captured the input, processed it internally, and updated itself or moved to another view. The MVC pattern was introduced in the late 1970s as a way to break such monoliths (called autonomous views) into distinct pieces.
According to the MVC pattern, the application is split into three distinct pieces: the model, the view, and the controller. The model refers to the data being worked on in the view. The model is represented with an active object that is updated by the controller and notifies the view of its state changes. The view refers to the generation of any graphical elements displayed to the user, and it captures and handles any user gestures. The controller responds to solicitations and executes actions against the application’s back end. Such actions produce fresh data that alter the model. The controller is also responsible for selecting the next view. Figure 15-1 provides a graphical representation of the MVC schema.
The major benefit of MVC is the application of the separation of concerns (SoC) principle. It mostly consists of taking as much code as possible out of the front end to build structured layers. As mentioned earlier, in the beginning, MVC was just a way to break up monolithic programs in which the code basically consists of a loop around some input and each command is resolved through a logical transaction. (See the Transaction Script pattern in Chapter 14.)
Let’s see what it takes to use the MVC pattern to build Web Forms applications.
According to the definition, the model in MVC is the representation of the data as the view is expected to consume it. The model is where the view copies any data posted by requests and where it gets any data to be incorporated in the response. You should have a different model (say, a class) for each view. The model should have properties for each significant piece of data the view handles.
The problem here is that in Web Forms the model is often bypassed because views are made of server controls and server controls expose input data and receive response data.
In Web Forms, the view coincides with a page. The page is made of server controls, and server controls provide input elements for the user to interact with. The view is responsible for producing the collection of visual elements displayed to users—the ASPX markup—as well as for processing user gestures—the code-behind class. In an MVC scenario, there should be some sort of event-based dependency between the view and model. When the model is updated, the view should be notified, grab up-to-date information, and refresh.
The code in the view should be as simple as possible, ideally limited to just dispatching calls to another layer—the controller.
The controller is the place where the action that the user requested is actually performed. The action might require the controller to select a new view which, in Web Forms, would be a redirect. More likely, the action will lead the controller to interact with the middle tier to obtain a response. The response obtained will then be massaged in some way and placed in the model for the view to consume.
The controller has no dependencies on the view; the controller only knows the model and how to reach the middle tier.
Heavily based on view state, code-behind, and server controls, the Web Forms programming model follows its own pattern—the Page Controller pattern. The core idea is that any request is mapped to a page and an internal component controls the request, including input processing, action, and output generation. If you stick to Web Forms, you can’t eliminate the Page Controller pattern.
If you want more SoC, you can build layers for models and controllers on a per-view basis. This means that each Web Forms page should have its own model class and its own controller class. The model will be updated with any posted data and any significant data that is read out of the view state. In the postback, the code-behind event handler will simply invoke a controller method. Finally, the controller will update the model, and these changes should walk their way to the view.
The weak point of MVC is the communication between view and model. The original MVC paper suggests you set up event-based communication between the two. Years of experience suggest a different model should be used. Enter the MVP pattern.
MVP is a derivative of MVC aimed at providing a cleaner separation between the view, the model, and the controller. The most relevant change from MVC is that view and model are physically separated and have no intimate knowledge of each other. The controller (renamed as presenter) is a mediator between the user and the application. Solicited by the view, it performs any work associated with the request and passes data back to the view. In MVP, the controller class is essentially responsible for presenting data to the view, which explains the new name of “presenter.”
As mentioned, in MVP the view and the model are neatly separated, and the view exposes a contract through which the presenter can read input values and provide results of the action. Summarizing the situation further, we can say that MVP is a refinement of MVC based on three facts:
The view doesn’t know the model.
The presenter ignores any UI technology behind the view.
Abstracted to an interface, the view is easy to mock up, which makes testing the controller far easier.
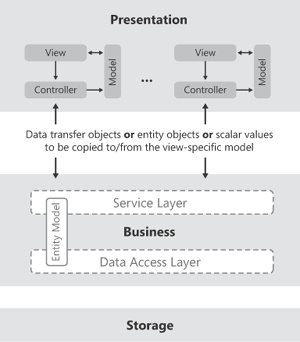
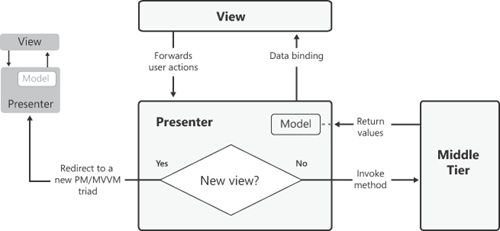
Figure 15-2 provides an overall view of the MVP pattern.
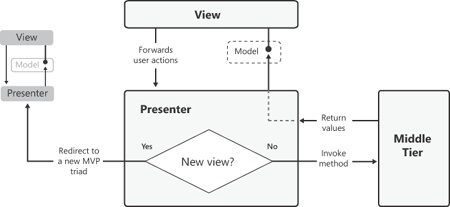
The presenter is at the center of the universe and incorporates the presentation logic behind the view. The presenter in MVP is logically bound to the view, which is another reason for emphasizing the presentation role of the component. Figure 15-3 attempts to compare MVC and MVP graphically.
Note
In addition to the change of name (controller vs. presenter), there’s a more subtle but relevant point. In MVC, the controller is a centralized class that handles multiple calls from multiple views. In MVP, the presenter is bound to a single view or to a hierarchy of views with the same characteristics. In MVP, the presenter is a controller for a specific segment of the presentation logic. Hence, the name “presenter.”
The best possible definition of the model doesn’t change in MVP. The model is the representation of the data being worked on in the view. As shown in Figure 15-2, the view exposes a contracted interface, which represents the core functionality of the view to the presenter’s eyes. In other words, the presenter should be able to work with any object that implements that contracted interface.
In theory, it could be an ASP.NET page as well as a Windows Forms window. The model in MVP, therefore, is the interface that the view object implements. Being an interface, it can include properties, but it can also include methods and events. In a Web Forms scenario, events are not required, and most of the time it will contain just properties.
The view is the Web Forms page that you build. This view is typically an instance of a class that inherits from Page or UserControl and implements the model. The view also holds a reference to an instance of the presenter. Between views and presenters, you typically have a one-to-one cardinality, even though you can still reduce the number of presenter classes by creating some sort of hierarchy and reusing a bit of code.
The presenter is just an additional layer you build on top of code-behind classes. It is a class that can be easily designed to have no hidden dependencies. The presenter requires a reference on the view, but thanks to the contracted interface of the view the reference can be injected. The presenter will use the view object to grab input values and prepare a call to the middle tier. After the response has been received, the presenter will pass data back to the view, always through the members of the interface. As mentioned, the interface that abstracts the view is logically equivalent to the model in MVC.
As you’ll see in the rest of the chapter, MVP lends itself very well to being implemented in Web Forms. The pattern can be easily outlined as a step-by-step procedure and doesn’t require you to twist the Web Forms programming model. As a developer, you only need to add a bit of abstraction to your Web Forms pages to gain the benefits of the MVP pattern—testability and maintainability.
Having said that, I also feel obliged to mention that MVP is not a pattern for everyone and for just any application. MVP provides guidance on how to manage heaps of views and, quite obviously, comes at a cost—the cost of increased complexity in the application code. As you can imagine, these costs are easier to absorb in large applications than in simple ones. MVP, therefore, is not just for any application.
In MVP, the view is defined through an interface, and this interface is the only point of contact between the system and the view. As an architect, after you’ve abstracted a view with an interface, you can give developers the green light to start developing presentation logic without waiting for designers to produce the graphics. After developers have interfaces, they can start coding and interfaces can be extracted from user stories, if not from full specifications.
MVP is an important presentation pattern that can be a bit expensive to implement in r elatively simple applications. On the other hand, MVP shines in enterprise-class applications, where you really need to reuse as much presentation logic as possible, across multiple platforms and in Software-as-a-Service (SaaS) scenarios. And many of these applications have an ASP.NET Web Forms front end.
A recently introduced pattern, Model-View-ViewModel is built around the same concepts presented years ago for the Presentation Model (PM) pattern. The PM pattern is described here: http://martinfowler.com/eaaDev/PresentationModel.html.
How does PM differ from MVP?
PM is a variation of MVP that is particularly suited to supporting a rich and complex user interface. On the Windows platforms, PM works well with user interfaces built with Windows Presentation Foundation (WPF) and Silverlight. Microsoft developed a WPF-specific version of PM and named it Model-View-ViewModel (MVVM).
MVVM, like MVP, is based on three actors—the view, the model, and the presenter—with the presenter now renamed as view-model. The difference with MVP is that the view doesn’t expose any interface, but a data model for the view is incorporated in the presenter. The view elements are directly bound to properties on the model. In summary, in MVVM the view is passive and doesn’t implement any interface. The interface is transformed into a model class and incorporated in the presenter. The resulting object gets the name “view-model.” See Figure 15-4.
The innovative point of MVVM is that the presenter doesn’t operate on the view. The presenter, instead, exposes an object model tailor-made for the view and takes care of populating it with fresh data. The view, in turn, gains access to the presenter’s object model in some way. In the .NET space, data binding is a common way in which this is achieved.
MVVM is not a pattern I recommend for Web Forms. More precisely, the inherent plusses of MVVM don’t show up in Web Forms (or ASP.NET MVC) with the same effectiveness as they do in WPF or Silverlight. Still, MVVM can give you some benefits, such as layering, SoC, and testability. However, it won’t be anything more than what you would get with MVP.
Why is MVVM particularly effective in WPF or Silverlight?
The answer is shown in Figure 15-4. Used in a platform that provides superb support for (two-way) data binding, the MVVM shines and really gives you the aforementioned benefits with a fraction of the effort it would take to do the same in MVP. Used in Web Forms, where you have only one-time binding, it loses most of its appeal.
Figure 15-5 shows the graph of a XAML-based view designed in accordance with MVVM.
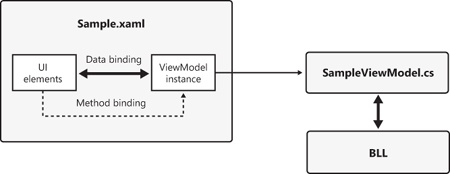
The XAML file can be a WPF, Silverlight, or even Windows Phone 7 view. It is made of markup elements bound to properties of the view-model object. The view-model object can be attached to the view in a number of equally effective ways, including programmatic access to the DataContext property of the view and a custom tag in the markup that references an external object. The view-model class exposes methods to retrieve and update data through the middle tier.
View events (for example, a user’s clicking) are bound to commands, and commands are ultimately mapped to methods on the view-model object. This can be done in a number of ways. You can, for example, use the code-behind class of the XAML view and just invoke methods on the view-model object, or perhaps you can use the XAML commanding interface to forward user events to command objects that, in turn, invoke the view-model and then the middle tier. Architecturally speaking, I don’t see relevant differences. It mostly depends on attitude and tooling. For example, if you use Microsoft Blend to create the XAML view, you’ll likely end up with codeless code-behind classes. If you stick to Visual Studio as your IDE, you will probably write classic event handlers in the code-behind class.
As it turns out, MVP is probably the most beneficial way of adding layering and testability to Web Forms applications. Let’s see how to implement the MVP pattern in a sample application.
In an MVP scenario, the first step to complete is defining the contract for each required view. Each page in the ASP.NET application will have its own interface to talk to the rest of the presentation layer. The interface identifies the data model that the page requires and supports. Two logically equivalent views will subsequently have the same interface. A view that extends an existing view will probably have its interface inherited from an existing one.
Note
What I’ll be saying for a global view such as a page applies verbatim to subviews such as user controls or, perhaps, frames.
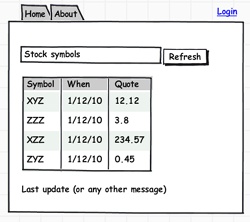
You always start development efforts from a use-case or perhaps a user story. In any case, you have a more or less defined idea of what the client expects your module to do and look like. You typically use wireframes to sketch out the final user interface of a given part of the application—commonly an individual view. After an agreement has been reached as to the information to show and templates to use (whether they are lists, tabs, collapsible panels, or data formats), you have just abstracted the view to a model. Figure 15-6 shows a possible mockup created with one of the most popular tools in this area—Balsamiq Mockups (see http://www.balsamiq.com).
With this idea in mind, getting an interface (or a base class) is usually not so hard. Here’s an example:
public interface IDefaultView
{
    IList<StockInfo> Quotes { get; set; }
    String Message { get; set; }
    String Symbols { get; set; }
}
You need to be able to read and write the content of the text box that contains the list of current symbols. Additionally, you need to read and write the content of a message, such as an error message or the time of the last update. You also need a collection of objects representing the stock information you want to display.
With the view contract defined in detail (for example, agreement is required on IDs), designers and developers can start working in parallel. The nicest thing is that it really works like this in practice—it’s not a theory or an empty platitude trying to sell a certain point of view.
The view you are creating must implement the interface. In Web Forms, a view is a Web page. So here’s the skeleton of default.aspx:
public partial class Default : Page, IDefaultView
{
    ...
}
The main responsibility of the view is hiding the details of the user interface elements. The interface exposes just a string property representing the stock symbols to retrieve, but the use-case suggests the user is expected to type names in an input field. Subsequently, the implementation of the Symbols property wraps the text box, as shown here:
public partial class Default : Page, IDefaultView
{
    ...

    #region IDefaultView Members
    public IList<StockInfo> Quotes
    {
        get { return GridView1.DataSource as IList<StockInfo>; }
        set {
            GridView1.DataSource = value;
            GridView1.DataBind();
        }
    }

    public string Message
    {
        get { return lblMessage.Text; }
        set { lblMessage.Text = value; }
    }

    public string Symbols
    {
        get { return txtSymbols.Text; }
        set { txtSymbols.Text = value; }
    }
    #endregion
}
Where does StockInfo come from? That could either be one of the entities that populate the business layer or a specific data transfer object that is returned by the service layer. (See Chapter 14.) In this case, for simplicity, you can assume that you share the domain model with the presentation layer; so StockInfo comes from an Entities assembly referenced by both the service layer and the presentation.
public class StockInfo
{
    public String Company { get; set; }
    public String CurrentQuote { get; set; }
    public String Change { get; set; }
    public String Date { get; set; }
    public String Time { get; set; }
}
The next step is adding a presenter component to the view. The presenter is a plain .NET class that must be instructed to work against any objects that implement the view interface.
Just like the controller in ASP.NET MVC, the presenter is a simple class in which all dependencies are (or at least, should be) injected explicitly. The class holds no significant state. The presenter lifetime is usually bound to the view.
A common way of implementing MVP entails that the page (for example, the view) gets a new instance of the presenter for each request. You typically create the presenter instance in Page_Load, as shown here:
public partial class Default : Page, IDefaultView
{
   private DefaultPresenter _presenter = null;
   protected void Page_Load(Object sender, EventArgs e)

   {
      _presenter = new DefaultPresenter(this);
   }

   // Implementation of the IDefaultView interface
   ...
}
An issue you might face is arranging a convenient naming convention to give each presenter class a name that is both unique and meaningful. The name of the page with a trailing string such as Presenter is a good approach; anyway, feel free to adapt it to your needs.
In summary, a Web Forms page designed around the MVP pattern is a class that implements a given view interface and holds an instance of a presenter class. What’s the purpose of the presenter instance?
The presenter is expected to expose a method for each possible action invoked by the user. Put another way, the presenter will have a unique, unambiguous, parameterless method for each event handler you need to have in the code-behind class. You still bind handlers to events fired by server controls; however, these handlers will simply forward the call to a method on the presenter instance. Here’s an example:
public partial class Default : Page, IDefaultView
{
   private DefaultPresenter _presenter = null;
   protected void Page_Load(Object sender, EventArgs e)
   {
      _presenter = new DefaultPresenter(this);
   }

   protected void btnRefresh_Click(Object sender, EventArgs e)
   {
       _presenter.Refresh();
   }

   protected void btnRedirect_Click(Object sender, EventArgs e)
   {
       _presenter.Redirect();
   }

   // Implementation of the IDefaultView interface
   ...
}
From an architectural standpoint, something in the preceding code clashes with common sense: the code-behind class is merely a pass-through layer, so either the code-behind class or the presenter might be perceived as unnecessary layers. The fact is, you can’t easily remove code-behind in ASP.NET Web Forms—not without paying some costs in terms of the decreased productivity of teams. Code-behind classes have been around and have worked for a decade; you can’t just modify the framework to get rid of them. On the other hand, the presenter is just an extra layer you add deliberately with the precise intention of increasing maintainability and testability.
Although it’s not objectively perfect, the code shown earlier is probably the best possible compromise to bring the benefits of MVP to ASP.NET Web Forms.
Let’s stop for a while and think about the type of code one would write in the Refresh method of the presenter. Given the use-case (and given the view mockup in Figure 15-6), the method is expected to connect to the application’s service layer and, from there, orchestrate a call to some service that actually provides quote information. The Refresh method needs to know the list of stocks for which you intend to run the query. Where does it get that information?
The list of symbols is typed by the user in a text box; the presenter needs to access the text box but, ideally, you want this to happen without exposing the view inner details to the presenter. (Doing so would bind the presenter to a particular view.) Here’s the code of the -presenter, including its Refresh method:
public class DefaultPresenter
{
    private readonly IDefaultView _view;
    private readonly IQuoteServices _quoteServices;

    public DefaultPresenter(IDefaultView view) : this(view, new QuoteServices())
    {
    }
    public DefaultPresenter(IDefaultView view, IQuoteServices quoteService)
    {
        _view = view;
        _quoteServices = quoteService;
    }

    public void Refresh()
    {
        // Get input from the view
        var symbols = _view.Symbols;

        // Execute the action
        var stocks = _quoteServices.GetQuotes(symbols);

        // Update the view
        _view.Quotes = stocks;
        _view.Message = String.Format("Data downloaded at: {0}", DateTime.Now);
    }
}
At a minimum, the presenter is injected with the view object (for example, a reference to the ASP.NET page) through the constructor. The presenter, however, is instructed to work only against the members of the view interface. This means that the same presenter could be reused on different client platforms. As long as you have a Web and Windows application that operates according to the same actions, the chances for you to reuse the same presenter are definitely high. (This fact might not be true if you take advantage of some platform-specific features and operate the view through a different set of actions.)
The presenter retrieves any input data it needs from the injected view. For example, it grabs any content in the txtSymbols text box via the Symbols property on the view interface. Likewise, it displays any response, such as the last update time, via the Message property. How the Message and Symbols properties actually operate on the view is transparent to the presenter. This transparency is the guarantee that the presenter is absolutely independent from the view.
The presenter is clearly part of the presentation layer. In a layered solution, the presentation layer is where you bridge the middle tier. The nearest endpoint in the middle tier land is the service layer, as discussed in Chapter 14. The service layer is a collection of classes (sometimes just WCF services) that orchestrate all the actions required by the application logic to serve a given request. The service layer should accept and retrieve data in a format that suits the presentation; if necessary, the service layer will translate from middle tier entities to presentation-only data transfer objects. If you’re lucky, you can even use the same entities on both the presentation and business layers.
Note
In this regard, your luck mostly depends on the complexity of the use-case and the complexity of the problem’s domain. In many cases, you can’t just find a match between middle tier models and view models. When this happens, using two distinct object models is the only way to go.
The presenter needs a reference to one or multiple objects in the service layer assembly. This means that, in the first place, the presentation layer needs to reference the service layer assembly. More importantly, you must inject in the presenter a reference to the specific service it will be using.
In the previous listing, I used the poor man’s dependency injection approach. It consists of an overloaded constructor that defaults to a concrete class in production. However, by using a different constructor, you can support a fake layer for the purpose of unit testing. You can use any Inversion of Control (IoC) tool of choice here if you like that best.
Hence, the presenter places a single call to the service layer to grab all it needs in the context of that use-case. The service layer returns data that the presenter will then incorporate in the view. The communication between the presenter and the service layer can be both synchronous and asynchronous, depending on your needs.
Note
The service layer typically (but not necessarily) lives in its own assembly on the same server that hosts the Web application. With this configuration, there’s no need for you to implement the service layer as real WCF services. It becomes a necessity, instead, as soon as you need to use queued or transactional calls or just to deploy the middle tier on a different machine for scalability reasons.
Wrapping up, the user is displayed a page with server controls for input as usual. The user interacts with the page and causes a postback. On the server, the request is processed as usual and results in a page call.
During the page loading, the presenter is instantiated and receives a reference to the current page object. The postback event originates a call to a method in the presenter. The method typically uses the view object to retrieve input data and places a call to the service layer.
An operation develops on the server and a response is served back to the service layer and, from there, is served to the presenter. Finally, the presenter updates the view. (See Figure 15-7.)
Admittedly, the feature I’m going to discuss is pretty cool and makes for a compelling demo. There’s no magic behind it, and I consider it to be a lucky scenario—real, but special. Under certain conditions, the presenter can be shared with the same application written for other platforms, such as Windows Forms and WPF. (See Figure 15-8.)
All that you need is a Windows form that implements the same view interface. At that point, the presenter has all it needs—a view object. What about the service layer? If you can’t reuse the same service layer you had for the Web application, the dependency injection design you adopted for the presenter class makes it easy to change to a more specific one:
public partial class DefaultForm : Form, IDefaultView
{
   private DefaultPresenter _presenter;
   public DefaultView()
   {
       InitializeComponent();

       // Initialize the presenter (for Windows)
       _presenter = new DefaultPresenter(this, new WinFormsQuoteServices());
   }
    ...
}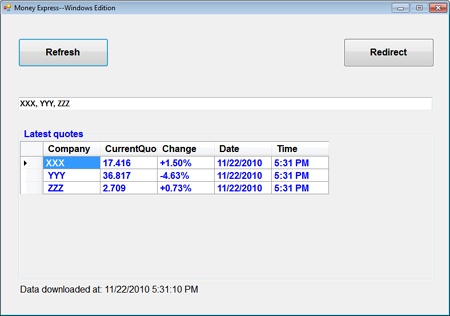
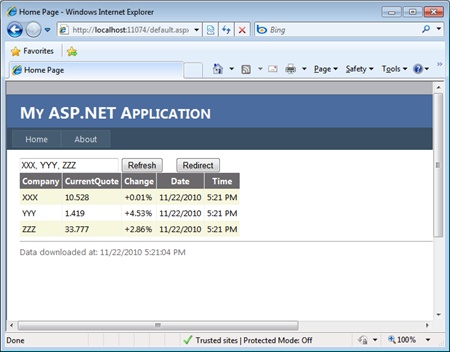
Figure 15-7 and Figure 15-8 show two different versions of the same application—one for the Web and one for the desktop. As long as the presentation logic remains the same, and the dependency on the service layer can be managed, you can (and are encouraged to) reuse the same presenter class. Be aware, however, that this might not always be the case.
Note
If one of the potential clients is based on Silverlight, you should also consider that some of the features your code relies on might not be supported in Silverlight. In addition, Silverlight 4 has binary compatibility with .NET code, but the same isn’t true for earlier versions. Also, you are still unable to reference a .NET assembly from a Silverlight project; the opposite, though, works as long as there are no code incompatibilities.
The presenter is also responsible for implementing navigation within the application. In particular, the presenter is responsible for enabling (or disabling) any subviews contained in the primary view and for selecting and reaching the next view.
To handle navigation within views, MVP goes hand in hand with another pattern—Application Controller. The pattern defines a central console that holds all the logic to determine the next view and handle the screen navigation and the flow of an application. (See Figure 15-9.)
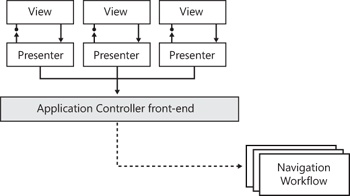
When it comes to implementation, you can proceed by creating a static class (say, you call it Navigator) that acts as the application’s front end for navigation. Here, the Navigator class is a plain container for the real navigation logic. You inject the application-specific navigation workflow through an additional component.
The extra layer represented by the navigation workflow shields the presenter from knowing the details of the platform specific navigation. For example, navigation within a Web Forms application is based on Response.Redirect, whereas navigation relies on form-based display in Windows Forms.
Here’s a possible implementation of the interface that represents the navigation workflow. The interface includes a method to navigate directly to a given view and another to navigate from the current view to the next:
public interface INavigationWorkflow
{
    void Goto(String view);
    void NextViewFrom(String currentView);
}
The Navigator class wraps an object that implements this interface and exposes a façade to the presenter:
public static class Navigator
{
    private static INavigationWorkflow _navigationWorkflow;
    private static Object _navigationArgument;

    public static void Attach(INavigationWorkflow workflow)
    {
        if (workflow != null)
            _navigationWorkflow = workflow;
    }

    public static Object Argument
    {
        get { return _navigationArgument; }
    }

    public static void Goto(String view)
    {
        if (_navigationWorkflow != null)
            _navigationWorkflow.Goto(view);
    }

    public static void Goto(String view, Object argument)
    {
        if (_navigationWorkflow != null)
        {
            _navigationArgument = argument;
            Navigator.Goto(view);
        }
    }

    public static void NextViewFrom(String currentView)
    {
        if (_navigationWorkflow != null)
            _navigationWorkflow.NextViewFrom(currentView);
    }

    public static void NextViewFrom(String currentView, Object argument)
    {
        if (_navigationWorkflow != null)
        {
            _navigationArgument = argument;
            Navigator.NextViewFrom(currentView, argument);
        }
    }
}
The Navigator class is a little more than just a wrapper for the interface. The class features an Argument property through which the presenter can specify data to be passed to the view. How navigation is implemented and how data is passed depends on the actual implementation of the navigation workflow.
In Web Forms, navigation between pages can be achieved through a redirect. The workflow interface allows you to assign a name to a view (possibly, but not necessarily, the name of the page), which is then resolved with a redirect to a given URL. Here’s an example:
public class SiteNavigationWorkflow : INavigationWorkflow
{
    public void Goto(String view)
    {
        switch (view)
        {
            case "home":
                HttpContext.Current.Response.Redirect("/default.aspx");
                break;
            case "test":
                HttpContext.Current.Response.Redirect(
                   HttpUtility.UrlEncode(String.Format("/test.aspx?x='{0}'",
                                                       Navigator.Argument)));
                break;
        }
    }

    public void NextViewFrom(String currentView)
    {
        switch (currentView)
        {
            case "home":
                // Calculate next view using logic
                break;
        }
    }
}
As an example, let’s have a look at a possible implementation of the same interface for a Windows Forms application:
public class AppNavigationWorkflow : INavigationWorkflow
{
   private Form _fooForm;
   private readonly Form _defaultView;

   public AppNavigationWorkflow(Form main)
   {
       _defaultView = main;
   }

   public void Goto(string view)
   {
       switch (view)
       {
          case "home":
             if (_fooForm != null && !_fooForm.IsDisposed)
             {
                 _fooForm.Close();
                 _fooForm = null;
              }
              break;
          case "foo":
             if (_fooForm == null || _fooForm.IsDisposed)
             {
                 _fooForm = new FooForm();
                 _fooForm.Owner = _defaultView;
             }
             _fooForm.ShowDialog();
             break;
        }
     }

     public void NextViewFrom(string currentView)
     {
        switch (currentView)
        {
           case "home":
               // Calculate next view using logic
               break;
        }
    }
}
As you can see, in Windows you might have a radically different approach to navigation, which basically consists of displaying and hiding dialog boxes and windows. Still, from the presenter’s standpoint, all you need to do is invoke the same Goto method:
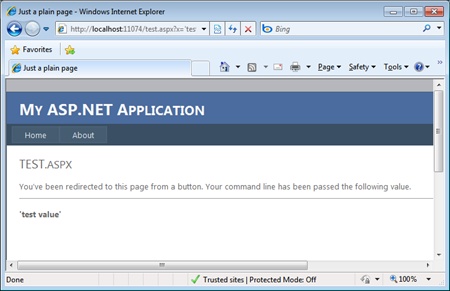
// From presenter's code
public void Redirect()
{
   Navigator.Goto("test", "test value");
}
In ASP.NET, it produces the view shown in Figure 15-10.
Finally, let’s see how you can attach a platform-specific workflow to the presentation layer. The binding takes place at the application startup—for example, in global.asax:
void Application_Start(Object sender, EventArgs e)
{
    var simpleWorkflow = new SiteNavigationWorkflow();
    Navigator.Attach(simpleWorkflow);
}
The use of the term “workflow” here is not coincidental. The method Goto in INavigationWorkflow allows you to reach a specific URL; the method NextViewFrom, which can be implemented just by using a workflow based on the current view, determines what comes next.
For many years, developers in the .NET space didn’t pay much attention to emerging patterns and practices. The deep application of the RAD paradigm led to a focus on tools and techniques to do it faster, rather than doing it right the first time. Debugging always prevailed over unit testing as the major technique to help check whether your development efforts were on track.
Web Forms has a number of merits, but it certainly doesn’t stand out for the aid it provides with regard to testability. However, using the MVP pattern makes the most relevant part of your Web Forms code—for example, the presenter—far easier to test, and especially unit-test.
If you look at the functionality, there’s nearly no difference at all between testable-code-that-works and untestable-code-that-works. So where’s the benefit of testing? Essentially, it lies in what might happen after you deploy your code to production. The customer might come back and ask you to make changes or implement new features. Or, worse yet, an unexpected bug might show up. In all these cases, you need to put your hands on the code to update it. Your goal is updating what has to be updated without breaking anything else. How do you prove that you didn’t break any existing features?
A well-written set of unit tests can give you the measure of how good your software is now compared to the stage before. If your software still passes all the tests after the updates, well, there’s a great chance that untouched features are still effective.
The beauty of tests is in the speed at which you can check whether your changes caused regression. At its core, a test is a program that invokes a software module that passes edge values to prove whether or not a particular behavior is working correctly. Note that not all code is inherently testable.
You have to keep three fundamental aspects in mind when writing a test: visibility, control, and simplicity.
Visibility indicates the degree at which the code under test allows you to observe changes in the state of the code. If changes are not observable, how can you determine whether the code works or fails?
Control indicates the degree at which the behavior of code under test can be influenced by external input. To be effective, a test must pass in selected input values. If input is hard-coded, running an effective test is much harder.
Finally, simplicity is an aspect of code that is never out of place. The simpler the code is, the simpler it is to test and the more reliable any results will be.
Unit testing verifies that individual units of code are working properly according to their software contract. A unit is the smallest part of an application that is testable—typically, a method.
Unit testing consists of writing and running a small program (referred to as a test harness) that instantiates classes and invokes methods in an automatic way. In the end, running a battery of tests is much like compiling. You click a button, you run the test harness and, at the end of it, you know what went wrong, if anything.
In its simplest form, a test harness is a manually written program that reads test-case input values and the corresponding expected results from some external files. Then the test harness calls methods using input values and compares results with expected values. Obviously, writing such a test harness entirely from scratch is, at a minimum, time consuming and error prone. But, more importantly, it is restrictive in terms of the testing capabilities you can take advantage of.
A very effective way to conduct unit testing is to use an automated test framework. An automated test framework is a developer tool that normally includes a runtime engine and a framework of classes for simplifying the creation of test programs. One of these frameworks—MSUnit—is integrated in Visual Studio. All you have to do is create a new project of type Test. (Note that other tools, both open-source and commercial, are available for unit testing, some of which are also integrated with Visual Studio.)
You can write tests at any time—before or after the method you intend to test. This is mostly a matter of preference and methodology. It can become a religious matter sometimes, but frankly nobody can claim that one approach or the other is absolutely and objectively better.
Test-driven development (TDD) is a methodology that naturally gets you to think about the expected interface and behavior of methods well before you actually start writing the code. TDD is an approach that might appear radical at first and that certainly takes time to fully digest. However, its goal is quite simple in the end: help to quickly write clean code that works.
In the traditional approach to coding, you develop a method according to the idea you have of the features the method must support. You start with a relatively simple body, and then you increase its capabilities until you reach the original goal. Along the way, you use the debugger to see how things are going and whether data is being moved around correctly. When you’ve determined that all is OK, if you’re a scrupulous developer you consider writing a bunch of unit tests to verify the behavior of the method from a few other angles to make it easier to catch regression failures later.
If you proceed this way, you eventually decide that tests are way too boring and hard to write and don’t really give you any concrete benefits. It’s your code, after all, and it works. A test won’t make the code richer and more appealing to users. So you just stop writing tests!
When the complexity of the code rises above a certain threshold, the debugger alone is no longer sufficient for testing and needs to be backed by some good unit tests. You can write unit tests before you code (as TDD suggests) or after you’re done. It doesn’t really matter when you do it, as long as you come up with an exhaustive set of tests. TDD is considered an effective methodology to achieve just this result. Some small changes in the Visual Studio 2010 refactoring tools and the Test project template also make it worth a try for Web Forms developers.
To test-run the increased testability of Web Forms with MVP let’s go through a test project aimed at ensuring an application correctly gets price quotes for a list of stock symbols.
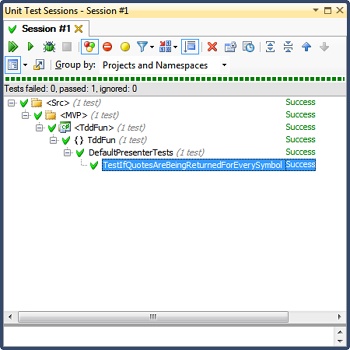
Suppose you have the test project ready and you’ve added a unit test to it. A unit test is a class that looks like the one shown here:
[TestClass]
public class DefaultPresenterTests
{
    [TestMethod]
    public void TestIfQuotesAreBeingReturnedForEverySymbol()
    {
    }
}
Note
Choosing the right name for a test method is as important as writing good code. The test name must be representative of the scenario you’re testing and include a quick explanation of the scenario. A detailed guide from an expert in the field can be found here: http://www.osherove.com/blog/2005/4/3/naming-standards-for-unit-tests.htm.
The test is expected to test the Refresh method of the presenter class we considered earlier. Figure 15-11 illustrates the first roadblock we encounter.
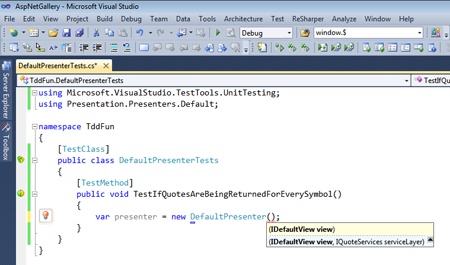
The idea is to get an instance of the presenter and invoke each method, passing some ad hoc input value (the aspect control) and observing results (the aspect visibility). As IntelliSense shows up in the figure, however, you need to provide some objects in order to instantiate the presenter.
The presenter has two dependencies—on the view and on the quote service. Your goal is to test the logic in the presenter class; you don’t want to test the view here and the service. These will possibly be the subject of other tests. On the other hand, you still need to provide a view and a service. Thankfully, you used a bit of dependency injection pattern in the design of the presenter class; therefore, you can now obtain a test double object and pass that in.
A test double is an object that looks like another one without providing the same behavior. A test double is typically coded in either of two ways—as a fake or a mock. A fake is an object with a hard-coded behavior and no state; a mock is an object with a dynamically defined behavior. You typically code the fake yourself as a custom class in the project and use ad hoc frameworks for mocks. Moq is one of these frameworks.
Important
Overall, there are four main types of test doubles: dummy objects, fakes, stubs, and mocks. A general consensus about what each test double object does exists for dummy objects and mocks only. A dummy object has no behavior and exists just to fill in a parameter list. A mock object is what I described above.
What about fakes and stubs, then? You might read subtly different definitions for each term and even find out that various authors use the term fake to indicate what another author classifies as a stub, and vice versa. My pragmatic approach is that it would be much simpler if we limit ourselves to two types of doubles: mocks and another, simpler, type of double you name the way you like. In this context, I prefer the term fake. As far as this chapter is concerned, feel free to replace fake with stub if that makes your reading easier in any way.
Here are some sample test doubles for the view and quote service:
public class FakeDefaultView : IDefaultView
{
    private readonly String _symbols;
    public FakeDefaultView(String fakeSymbols)
    {
        _symbols = fakeSymbols;
    }
    public IList<StockInfo> Quotes { get; set; }
    public String Message { get; set; }
    public String Symbols
    {
        get { return _symbols; }
        set {}
    }
}

public class FakeQuoteService : IQuoteServices
{
    public IList<StockInfo> GetQuotes(String symbols)
    {
        var stocks = symbols.Split(','),
        return stocks.Select(s => new StockInfo()
                                        {
                                            Change = "0%",
                                            Company = s,
                                            CurrentQuote = "1.1",
                                            Date = DateTime.Today.ToString(),
                                            Time = DateTime.Now.ToString()
                                        }).ToList();
    }
}
Finally, here’s the unit test:
[TestMethod]
public void TestIfQuotesAreBeingReturnedForEverySymbol()
{
    // Arrange
    const String testData = "XXX,YYY,ZZZ";
    var inputSymbols = testData.Split(',').ToList();
    var view = new FakeDefaultView(testData);
    var presenter = new DefaultPresenter(view, new FakeQuoteService());

    // Act
    presenter.Refresh();

    // Assert
    Assert.AreEqual(view.Quotes.Count, inputSymbols.Count);
    foreach(var quote in view.Quotes)
    {
        Assert.IsTrue(inputSymbols.Contains(quote.Company));
    }
}
Ideally, a unit test is articulated in three main blocks: prepare the ground for executing the method under test, execute the method, and then check results against assertions.
A relevant benefit that MVP provides is isolating the presenter code from the rest of the world. To be precise, MVP gives you guidance on how to isolate the presenter from the view, but it says nothing specific about the rest of the system. This means that keeping the presenter isolated from the middle tier is your responsibility.
When you test a method, you want to focus only on the code within that method. All that you want to know is whether that code provides the expected results in the tested scenarios. To get this, you need to get rid of all dependencies the method might have. If the method, say, invokes another class, you assume that the invoked class will always return correct results. In this way, you eliminate at the root the risk that the method fails under test because a failure occurred down the call stack. If you test method A and it fails, the reason has to be found exclusively in the source code of method A and not in any of its dependencies.
Achieving isolation is far easier if you apply dependency injection to the design of classes. For presenters, this means being injected with the view object and also any service layer component the presenter needs to work with. When this happens, testing methods on the presenter is really a piece of cake. (See Figure 15-12.)
For an ASP.NET application, you have two main options when it comes to choosing an application model. You can go with the traditional ASP.NET Web application model, which is based on the Page Controller pattern, or you can move toward ASP.NET MVC.
The traditional ASP.NET application model can be improved with a deeper separation of concerns by using a manual implementation of the MVP pattern. The MVP pattern isolates the view from the presenter and abstracts the view to an interface. In this way, the presenter can be coded against the view interface and becomes a reusable and testable piece of code. To finish with a flourish, you might also want to take out of the presenter any code that represents a dependency on the service layer. If you do, writing unit tests for the presenter becomes really easy and effective.
Even with these changes in place, however, ASP.NET Web Forms remains a hard-to-test framework. What if you need to deal with Cache or Session in your presenter? None of these objects will be available in the test project unless you spin the entire ASP.NET runtime. In other words, testing in isolation is very difficult. Options? Well, the best you can do is wrap access to Session, Cache, and other intrinsic ASP.NET objects in custom classes exposing a fixed interface. At the cost of an additional fairly thin layer, you gain the benefit of isolating presenters from ASP.NET runtime objects. And ASP.NET intrinsic objects are the subject of the next few chapters.