
Chapter 8
Delivering Your Project Management Workshop: Be a Great Facilitator
What’s in This Chapter
• Defining the facilitator’s role
• Creating an effective learning environment
• Preparing participant materials
• Using program preparation checklists
• Starting and ending on a strong note
• Managing participant behaviors
Let’s get one thing clear from the get-go: Facilitating a workshop—facilitating learning—is not lecturing. The title of ATD’s bestselling book says it all: Telling Ain’t Training (Stolovitch and Keeps 2011). A facilitator is the person who helps learners open themselves to new learning and makes the process easier. The role requires that you avoid projecting yourself as a subject matter expert (SME) and that you prepare activities that foster learning through “hands-on” experience and interaction.
Before you can help someone else learn, you must understand the roles you will embody when you deliver training: trainer, facilitator, and learner. When a workshop begins, you are the trainer, bringing to the learning event a plan, structure, experience, and objectives. This is only possible because you have a strong, repeatable logistics process. As you ask the learners to prioritize the learning objectives, you slowly release control, inviting them to become partners in their own learning. As you move from the trainer role into the facilitator role, the objectives are the contract between the learners and the facilitator. All great facilitators also have a third role in the classroom—the role of learner. If you are open, you can learn many new things when you are in class. If you believe you must be the expert as a learning facilitator, you will not be very effective.
To be most successful as a learning facilitator, consider this checklist:
![]() Identify the beliefs that limit your ability to learn and, therefore, to teach.
Identify the beliefs that limit your ability to learn and, therefore, to teach.
![]() Learning is a gift for you and from you to others.
Learning is a gift for you and from you to others.
![]() Choose carefully what you call yourself and what you call your outcomes.
Choose carefully what you call yourself and what you call your outcomes.
![]() Clarify your purpose to better honor your roles at a learning event.
Clarify your purpose to better honor your roles at a learning event.
![]() If you can’t teach with passion, don’t do it.
If you can’t teach with passion, don’t do it.
This last point is especially important. Not everyone is destined to be a great facilitator and teacher, but you can still have enormous impact if you are passionate about the topic, about the process, and about helping people improve their working lives. If you are serious about becoming a great facilitator, Chapter 12 provides a comprehensive assessment instrument to help you manage your personal development and increase the effectiveness of your training (see Assessment 4). You can use this instrument for self-assessment, end-of-course feedback, observer feedback, or as a professional growth tracker.
With these points firmly in mind—facilitating is not lecturing and passion can get you past many facilitator deficiencies—let’s look at some other important aspects of facilitating, starting with how to create an engaging and effective learning environment.
The Learning Environment
Colors, seating, tools, environmental considerations (such as temperature, ventilation, lighting), and your attitude, dress, preparation, and passion all enhance—or detract from—an effective and positive learning environment. This section describes some ways to maximize learning through environmental factors.
Color. Research has shown that bland, neutral environments are so unlike the real world that learning achieved in these “sensory deprivation chambers” cannot be transferred to the job. Color can be a powerful way to engage the limbic part of the brain and create long-term retention. It can align the right and left brains. Ways to incorporate color include artwork, plants, and pictures that help people feel comfortable and visually stimulated. Consider printing your handouts and assessments in color. The training support materials provided in this book are designed in color but can be printed in either color or grayscale (to reduce reproduction costs).
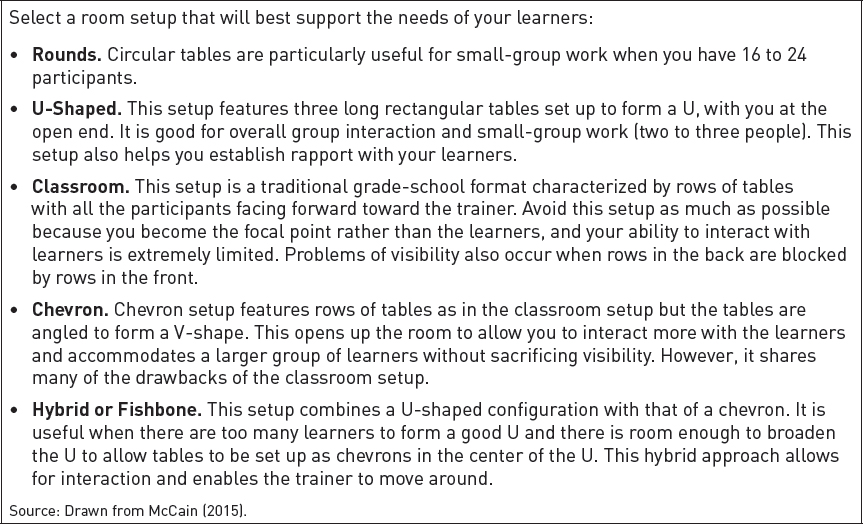
Room Setup. Because much learning requires both individual reflection and role playing, consider seating that promotes personal thought and group sharing. One way to accomplish this is to set up groups of three to five at round or square tables, with each chair positioned so the projection screen can easily be seen. Leave plenty of room for each person so that when he or she does need to reflect, there is a feeling of privacy. Keep in mind that comfortable chairs and places to write help people relax to learn. Figure 8-1 details more room configurations that you can use to accomplish specific tasks or purposes in training.
Tools of the Trade. Lots of flipcharts (one per table is optimal) with brightly colored markers create an interactive environment. Flipcharts are about as basic and low tech as tools get, but they are also low cost and do the trick. Consider putting colorful hard candy on the tables (include sugar-free options), with bright cups of markers, pencils, and pens. Gather pads of colorful sticky notes and “fidgets” (quiet toys such as chenille stems, Koosh balls, and others) to place on the table as well. For the right level of trust to exist, your learners must feel welcome.
Your Secret Weapon. Finally, the key to establishing the optimal learning environment is you. You set the tone by your attitude, the way you greet people, the clothes you wear, your passion, and your interest and care for the participants. You set the stage for learning with four conditions that only you as the facilitator can create to maximize learning:
1. Confidentiality. Establish the expectation that anything shared during the training program will remain confidential among participants and that as the facilitator you are committed to creating a safe environment. An important step in learning is first admitting ignorance, which has some inherent risk. Adult learners may resist admitting their learning needs because they fear the repercussions of showing their weaknesses. You can alleviate these concerns by assuring participants that the sole purpose of the training is to build their skills, and that no evaluations will take place. Your workshop must be a safe place to learn and take risks.
Figure 8-1. Seating Configurations
2. Freedom from distractions. Work and personal demands cannot be ignored during training, but to maximize each participant’s learning, and as a courtesy to others, outside demands should be minimized:
a. Select a training site away from the workplace to help reduce distractions.
b. Acknowledge that participants probably feel they shouldn’t be away from work; remind them that the purpose of the training is to improve their work lives.
c. Ask that mobile devices be turned off or set to silent alerts.
d. Emphasize that because they are spending this time in training, trainees should immerse themselves in the learning experience and thereby maximize the value of their time, because far from being time “away from work responsibilities,” it is a work responsibility.
3. Personal responsibility for learning. A facilitator can only create the opportunity for learning. Experiential learning requires that participants actively engage with and commit to learning—they cannot sit back and soak up information like sponges.
4. Group participation. Each participant brings relevant knowledge to the training program. Through discussion and sharing of information, a successful training session will tap into the knowledge of each participant. Encourage all participants to accept responsibility for helping others learn.
Program Preparation Checklist
Preparation is power when it comes to facilitating a successful workshop, and a checklist is a powerful tool for effective preparation. This checklist of activities will help you prepare your workshop:
![]() Write down all location and workshop details when scheduling the workshop.
Write down all location and workshop details when scheduling the workshop.
![]() Make travel reservations early (to save money, too), if applicable.
Make travel reservations early (to save money, too), if applicable.
![]() Send a contract to the client to confirm details, or if you are an internal facilitator, develop guidelines and a workshop structure in conjunction with appropriate supervisors and managers.
Send a contract to the client to confirm details, or if you are an internal facilitator, develop guidelines and a workshop structure in conjunction with appropriate supervisors and managers.
![]() Specify room and equipment details in writing and then confirm by telephone.
Specify room and equipment details in writing and then confirm by telephone.
![]() Define goals and expectations for the workshop.
Define goals and expectations for the workshop.
![]() Get a list of participants, titles, roles, and responsibilities.
Get a list of participants, titles, roles, and responsibilities.
![]() Send participants a questionnaire that requires them to confirm their goals for the workshop.
Send participants a questionnaire that requires them to confirm their goals for the workshop.
![]() Send the client (or the participants, if you are an internal facilitator) an agenda for the workshop, with times for breaks and meals.
Send the client (or the participants, if you are an internal facilitator) an agenda for the workshop, with times for breaks and meals.
![]() Recommend that lunch or dinner be offered in-house, with nutritious food provided.
Recommend that lunch or dinner be offered in-house, with nutritious food provided.
![]() Make a list of materials that you will need in the room (pads of paper, pens, pencils, markers, flipcharts, and so forth). Make sure to plan for some extras.
Make a list of materials that you will need in the room (pads of paper, pens, pencils, markers, flipcharts, and so forth). Make sure to plan for some extras.
![]() Design the room layout (for example, rounds, U-shaped, classroom, chevron, or hybrid).
Design the room layout (for example, rounds, U-shaped, classroom, chevron, or hybrid).
![]() Confirm whether you or your internal/external client will prepare copies of the workshop handouts. The workshop handouts should include all tools, training instruments, assessments, and worksheets. You may choose also to include copies of the presentation slides as part of the participant guide. All the supplemental materials you need to conduct the workshops in this book are available for download (see Chapter 14 for instructions).
Confirm whether you or your internal/external client will prepare copies of the workshop handouts. The workshop handouts should include all tools, training instruments, assessments, and worksheets. You may choose also to include copies of the presentation slides as part of the participant guide. All the supplemental materials you need to conduct the workshops in this book are available for download (see Chapter 14 for instructions).
![]() Find out if participants would like to receive pre-reading materials electronically before the session.
Find out if participants would like to receive pre-reading materials electronically before the session.
![]() Prepare assessments, tools, training instruments, and workshop materials at least one week before the workshop so that you have time to peruse and check them and assemble any equipment you may need (see the next two sections).
Prepare assessments, tools, training instruments, and workshop materials at least one week before the workshop so that you have time to peruse and check them and assemble any equipment you may need (see the next two sections).
Participant Materials
Participant materials support participant learning throughout the workshop and provide continuing references after the workshop has ended. There are several kinds of participant materials. Here are some options:
Handouts
The development and “look” of your handouts are vital to help participants understand the information they convey. To compile the handouts properly, first gather all assessments, tools, training instruments, activities, and presentation slides and arrange them in the order they appear in the workshop. Then bind them together in some fashion. There are several options for compiling your material, ranging from inexpensive to deluxe. The kind of binding is your choice—materials can be stapled, spiral bound, or gathered in a ring binder—but remember that a professional look supports success. Your choice of binding will depend on your budget for the project. Because first appearances count, provide a cover with eye-catching colors and appropriate graphics.
Using the agendas in Chapters 1–3, select the presentation slides, learning activities, handouts, tools, and assessments appropriate to your workshop (see Chapter 15). If you choose to print out the presentation slides for your participants, consider printing no more than three slides per handout page to keep your content simple with sufficient white space for the participants to write their own notes. Use the learning objectives for each workshop to provide clarity for the participants at the outset. Remember to number the pages, to add graphics for interest (and humor), and to include tabs for easy reference if the packet of materials has multiple sections.
Some participants like to receive the handouts before the workshop begins. You may want to email participants to determine if they would like to receive the handouts electronically.
Presentation Slides
This ATD Workshop Series book includes presentation slides to support the two-day, one-day, and half-day agendas. They have been crafted to adhere to presentation best practices. If you choose to reorder or otherwise modify the slides, keep in mind these important concepts.
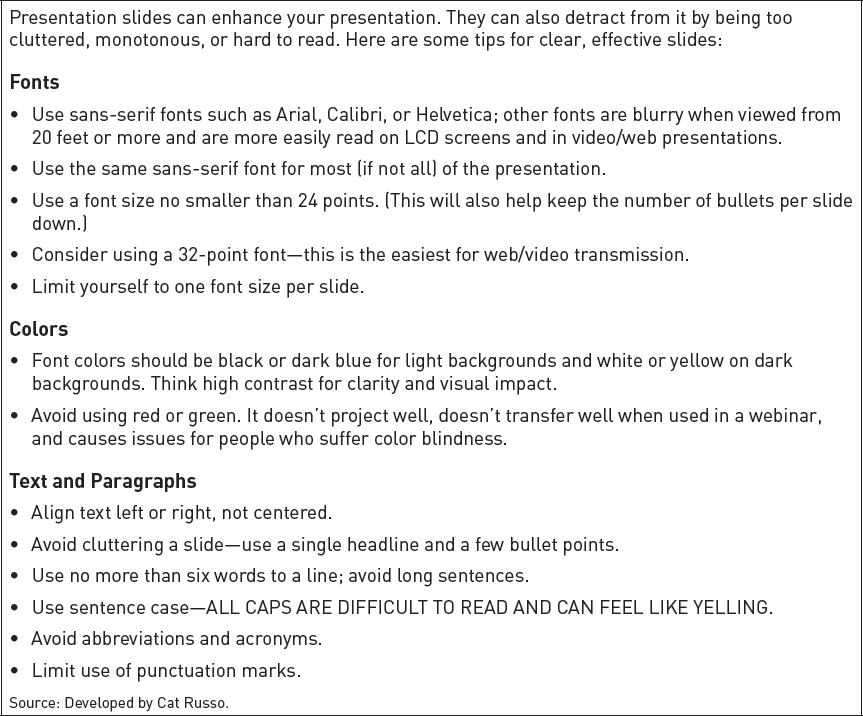
When you use PowerPoint software as a teaching tool, be judicious in the number of slides that you prepare. In a scientific lecture, slides are usually a necessity for explaining formulas or results, but a workshop relies on interaction so keep the slide information simple. Also, do not include more than five or six bullet points per slide. See more tips for effective PowerPoint slides in Figure 8-2.
A message can be conveyed quickly through the use of simple graphics. For example, an illustration of two people in conversation may highlight interpersonal communication, whereas a photo of a boardroom-style meeting may illustrate a group engaged in negotiation. Please note that any use of the images in the presentation slides provided with this book other than as part of your presentation is strictly prohibited by law.
When you use presentation slides ask yourself: What will a slide add to my presentation? Ensure that the answer that comes back is “it will enhance the message.” If slides are simply used to make the workshop look more sophisticated or technical, the process may not achieve the desired results.
It can be frustrating when a facilitator shows a slide for every page that the participants have in front of them. The dynamics of the class are likely to disconnect. If the information you are teaching is in the handouts or workbook, work from those media alone and keep the workshop personally interactive.
Workbooks and Journals
A participant journal can be included in the binder with your handouts, or it may be a separate entity. Throughout the workshop participants can assess their progress and advance their development by entering details of their personal learning in the journal. The benefit of this journal to participants is that they can separate their personal discoveries and development from the main workshop handouts and use this journal as an action plan if desired.
Videos
If you show a video in your workshop, ensure that the skills it contains are up to date and that the video is less than 20 minutes long. Provide questions that will lead to a discussion of the information viewed. Short video clips can be effective learning tools.
Toys, Noisemakers, and Other Props
Experienced facilitators understand the value of gadgets and games that advance the learning, provide a break from learning, or both.
Figure 8-2. Tips for Effective PowerPoint Slides
Adults love to play. When their minds are open they learn quickly and effectively. Something as simple as tossing a rubber ball from person to person as questions are asked about topics studied can liven up the workshop and help people remember what they’ve learned.
Case studies and lively exercises accelerate learning. Bells and whistles are forms of communication; use them when you pit two teams against each other or to indicate the end of an activity.
Facilitator Equipment and Materials
When all details for the workshop have been confirmed, it is time to prepare for the actual facilitation of the workshop at the site. You may know the site well because you are providing in-house facilitation. If, however, you are traveling off site to facilitate, important elements enter the planning. Here’s a checklist of things to consider:
![]() Pack a data-storage device that contains your handouts and all relevant workshop materials. In the event that your printed materials do not reach the workshop location, you will have the electronic files to reprint on site.
Pack a data-storage device that contains your handouts and all relevant workshop materials. In the event that your printed materials do not reach the workshop location, you will have the electronic files to reprint on site.
![]() Pack the proper power cords, a spare battery for the laptop, and a bulb for the LCD or overhead projector in the event that these items are not available at the workshop location. This requires obtaining the make and model of all audiovisual and electronic equipment from the client or the training facility during your planning process.
Pack the proper power cords, a spare battery for the laptop, and a bulb for the LCD or overhead projector in the event that these items are not available at the workshop location. This requires obtaining the make and model of all audiovisual and electronic equipment from the client or the training facility during your planning process.
![]() Bring an extension cord.
Bring an extension cord.
![]() Bring reference materials, books, article reprints, and ancillary content. Take advantage of all technology options, such as tablets or other readers to store reference materials. As a facilitator, you will occasionally need to refer to materials other than your own for additional information. Having the materials with you not only provides correct information about authors and articles, but it also positively reinforces participants’ impressions of your knowledge, training, openness to learning, and preparedness.
Bring reference materials, books, article reprints, and ancillary content. Take advantage of all technology options, such as tablets or other readers to store reference materials. As a facilitator, you will occasionally need to refer to materials other than your own for additional information. Having the materials with you not only provides correct information about authors and articles, but it also positively reinforces participants’ impressions of your knowledge, training, openness to learning, and preparedness.
![]() Bring flipcharts, painter’s tape, and sticky notes.
Bring flipcharts, painter’s tape, and sticky notes.
![]() Pack toys and games for the workshop, a timer or bell, and extra marking pens.
Pack toys and games for the workshop, a timer or bell, and extra marking pens.
![]() Bring duct tape. You may need it to tape extension cords to the floor as a safety precaution. The strength of duct tape also ensures that any flipchart pages hung on walls (with permission) will hold fast.
Bring duct tape. You may need it to tape extension cords to the floor as a safety precaution. The strength of duct tape also ensures that any flipchart pages hung on walls (with permission) will hold fast.
You can ship these items to the workshop in advance, but recognize that the shipment may not arrive in time, and that even if it does arrive on time, you may have to track it down at the venue. Also, take some time identifying backups or alternatives in case the materials, technology, and so on do not conform to plan. What are the worst-case scenarios? How could you manage such situations? Prepare to be flexible and creative.
A Strong Start: Introduction, Icebreakers, and Openers
The start of a session is a crucial time in the workshop dynamic. How the participants respond to you, the facilitator, can set the mood for the remainder of the workshop. To get things off on the right foot, get to the training room early, at least 30 to 60 minutes before the workshop. This gives you time not only to set up the room if that has not already been done, but also to test the environment, the seating plan, the equipment, and your place in the room. Find out where the restrooms are. When participants begin to arrive (and some of them come very early), be ready to welcome them. Don’t be distracted with problems or issues; be free and available to your participants.
While they are settling in, engage them with simple questions:
• How was your commute?
• Have you traveled far for this workshop?
• Was it easy to find this room?
• May I help you with anything?
When the participants have arrived and settled, introduce yourself. Write a humorous introduction, if that’s your style, because this will help you be more approachable. Talk more about what you want to accomplish in the workshop than about your accomplishments. If you have a short biographical piece included in the handouts or in the workbook, it may serve as your personal introduction.
At the conclusion of your introduction, provide an activity in which participants can meet each other (often called an icebreaker). Because participants sometimes come into a training session feeling inexperienced, skeptical, reluctant, or scared, using icebreaker activities to open training enables participants to interact in a fun and nonthreatening way and to warm up the group before approaching more serious content. Don’t limit the time on this too much unless you have an extremely tight schedule. The more time participants spend getting to know each other at the beginning of the workshop, the more all of you will benefit as the session proceeds.
Feedback
Feedback is the quickest, surest way for you, the facilitator, to learn if the messages and instruction are reaching the participants and if the participants are absorbing the content. It is also important for you to evaluate the participants’ rate of progress and learning. Answers to the questions you ask throughout the workshop will help you identify much of the progress, but these answers come from only a few of the participants at a time. They’re not a global snapshot of the entire group’s comprehension and skills mastery.
When you lead a workshop, the participants walk a fine line between retention and deflection of knowledge. Continuing evaluations ensure that learning is taking root. Three levels of questions—learning comprehension, skills mastery, and skills application—help you determine where the training may not be achieving the intended results.
• Learning comprehension checks that the participants understand and grasp the skills being taught (see Figure 8-3).
• Skills mastery means that the participants are able to demonstrate their newly acquired knowledge by some activity, such as teaching a portion of a module to their fellow participants or delivering their interpretation of topic specifics to the class (see Figure 8-4).
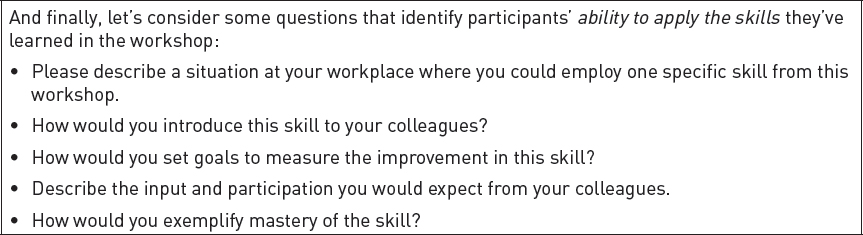
• Skills application is the real test. You may choose to substantiate this through role plays or group case studies. When the participants have the opportunity to verbally communicate the skills learned and to reach desired results through such application, then skills application is established (see Figure 8-5).
The questions in Figures 8-3 to 8-5 are designed for written answers so you can incorporate them into the takeaway workbook you create. The questions concerning skills mastery and skills application could be used as a job-based assignment if the workshop is longer than one day. Keep in mind that you will also reevaluate after each day of a multiday session.
Let’s now look at other forms of in-class learning assessments: role plays, participant presentations, ball toss, and journaling.
Role Plays
Role plays are an effective tool for assessing learning comprehension. If two or more participants conduct a role play that reveals their understanding of the information, with an outcome that reflects that understanding, then it becomes a “live feed,” instantaneous learning for all.
You must set up the role play carefully. It is often wise for you to be a part of the first role-play experience to show participants how it’s done and to make them more comfortable with the activity. Ensure that you explain all the steps of the role play and the desired outcome. It is insightful to role-play a negative version first, followed by participant discussion; then role-play a positive aspect the second time. For example, if confrontational communication is the topic and the situation under discussion involves a line manager and his or her supervisor, first enact the role play using the verbal and body language that is causing the negative result. Discuss this as a class to identify the specific language that needs improvement. Then enact the role play again, this time using positive language.
Figure 8-3. Learning Comprehension Questions
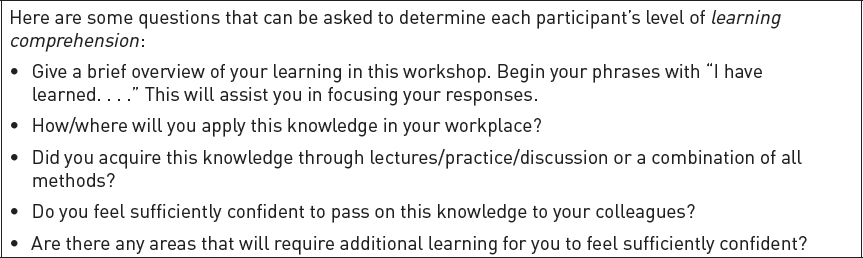
Figure 8-4. Skills Mastery Questions
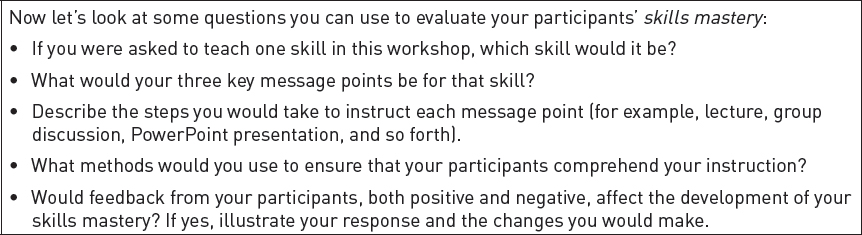
Figure 8-5. Skills Application Questions
Frequently it is helpful for a participant who has been on the receiving end of negative communication in his or her workplace to adopt the role of deliverer. Walking in the other person’s shoes leads to a quicker understanding of the transaction. This positive role play should also be followed by whole-group discussion of the elements that worked. Participants can be invited to write about the process and its results to give them a real-life example to take back to the workplace.
Participant Presentations
You might ask a participant to present a module of learning to the group. This allows you to observe the participants from a different perspective—both as a contributor to the conversation and as a presenter leading the discussion. Be ready to assist or to answer questions. For example, a participant may choose assertive communication as his or her module, and the specific issue on return to the workplace may be a request for promotion. The participant defines and delivers the steps required to ask for the promotion while the facilitator and other participants observe and evaluate the success of the approach and demonstration of confidence and assertiveness.
Ball Toss
A quick method for evaluating a class’s knowledge of the material presented is to ask the participants to form a standing circle. The facilitator throws out a soft rubber ball to an individual and asks a question about the previous learning activity. When the catcher gives the right answer, he or she throws the ball to another participant who answers another question. The facilitator can step out of this circle and let the participants ask as well as answer questions to review the skills as a group. Candy for all as a reward for contributions is always enjoyed by the participants (consider keeping some sugar-free treats on hand as well).
Journaling
Keeping a journal is a quiet, introspective way for participants to get a grip on their learning. When you complete an activity, have everyone take five minutes to write a summary of the skill just learned and then ask them to share what they’ve written with a partner. Invite the partner to correct and improve the material if necessary or appropriate.
Responding to Questions
When participants are asking questions, they are engaged and interested. Your responses to questions will augment the learning atmosphere. The way in which you respond is extremely important. Answers that are evasive can disturb a class because they cast doubts on your credibility. Glib or curt answers are insulting. Lengthy responses break the rhythm of the class and often go off track. When dealing with questions, the value of effective communication is in hearing the question, answering the question asked, and moving on. Repeat questions so that all participants hear them. In addition, this can ensure that you have heard the question correctly.
However, don’t rush to answer. Take time to let everyone absorb the information. When time is of the essence, don’t be tempted to give long, complicated answers that embrace additional topics. Be courteous and clear. Check that your answer has been understood. When a question comes up that could possibly derail the session or that is beyond the scope of the topic, you can choose to record it on a “parking lot” list and then revisit it later at an assigned time. A parking lot can be as simple as a list on a flipchart. However, whenever possible, answer a question at the time it is asked. Consider answering with analogies when they are appropriate because these often help elucidate challenging concepts.
You are likely aware that effective questions that prompt answers are open ended. Here are some that you might ask:
• What have you learned so far?
• How do you feel about this concept?
• How would you handle this situation?
Any question that begins with “what” or “how” promotes a more extensive answer. Do you also know, though, that questions that begin with “why”—as in “why do you think that way?”—can promote defensiveness? So what is a facilitator to do when asked a “why” question?
When a participant asks a confrontational or negative question, handle it with dignity and do not become aggressive. It’s helpful to ask open-ended questions of the participant to try to clarify the original question. For example, ask, “What do you mean by … ?” or “Which part of the activity do you find challenging?” This form of open-ended questioning requires additional accountability from the participant. The reason for the confrontation may have arisen from confusion about the information or the need to hear his or her own thoughts aloud. When you are calm and patient, the altercation is more likely to be resolved. If the participant persists, you may wish to ask him or her to discuss the specifics in a private setting. More ideas for dealing with difficult participants are provided later in this chapter.
Some participants enjoy being questioned because it gives them an opportunity to show their knowledge. Others are reticent for fear of looking foolish if they don’t know the answer. Because your participants have unique styles and personalities, always have a purpose for asking questions: Will these questions test the participants’ knowledge? Are these questions appropriate? Are you asking them in the style that suits the participant?
Training Room and Participant Management
When everything is in place and ready for the session, it’s time to review the “soft skills” portion of your responsibilities—that is, how you conduct the workshop and interact with participants. Here are some things to consider:
• “Respect and respond” should be a facilitator’s mantra. At all times respect the participants and respond in a timely manner.
• Learn participants’ names at the beginning of the workshop. Focus on each participant, give a firm handshake, and repeat the name in your greeting. Paying attention to the details they share during your greeting, and thereby getting to know them on a personal level, makes learning names much easier. When you have time, survey the room and write down every name without looking at nametags or name tents on the tables.
• Manage workshop program time. This is vital because it ensures that the goals will be met in the time allotted.
• Read the participants’ body language. This will help you know when to pause and ask questions or to give them a stretch break.
• Answer questions fully and effectively. If you don’t know an answer, open the question up to the participants or offer to get back to the questioner. Make a note to remind yourself to do so.
• Add a “parking lot” to the room—a large sheet of paper taped to one of the walls (use your own artistic prowess to draw a vehicle of some sort). When questions arise that are out of step with the current activity, ask the participant to write the question on a sticky note and put it in the parking lot. When the current activity is completed, you can address the questions parked there.
• Control unruly participants through assertiveness of vocal tone and message. When appropriate, invite them to help you with tasks because frequently they just need to be more physically involved. If the unruliness gets out of hand, accompany the person out of the room to discuss the situation.
• Be sure to monitor a participant who is slower to assimilate the information. If time permits, give that person some one-on-one time with you.
• Keep your energy high. Inject humor wherever possible. Ensure the learning is taking root.
A Word About Dealing With Difficult Participants
Much of the preparation you do before a training session will help you minimize disruptive behavior in your training session. But, sadly, you are still likely at some point to have difficult participants in your training room. Beyond preparation, you may need some specific strategies to help you manage disruptions and keep the learning on track. Figure 8-6, drawn from McCain’s second edition of Facilitation Basics (2015), identifies many of these behaviors and gives strategies for nipping them in the bud.
Figure 8-6. Managing Difficult Participants
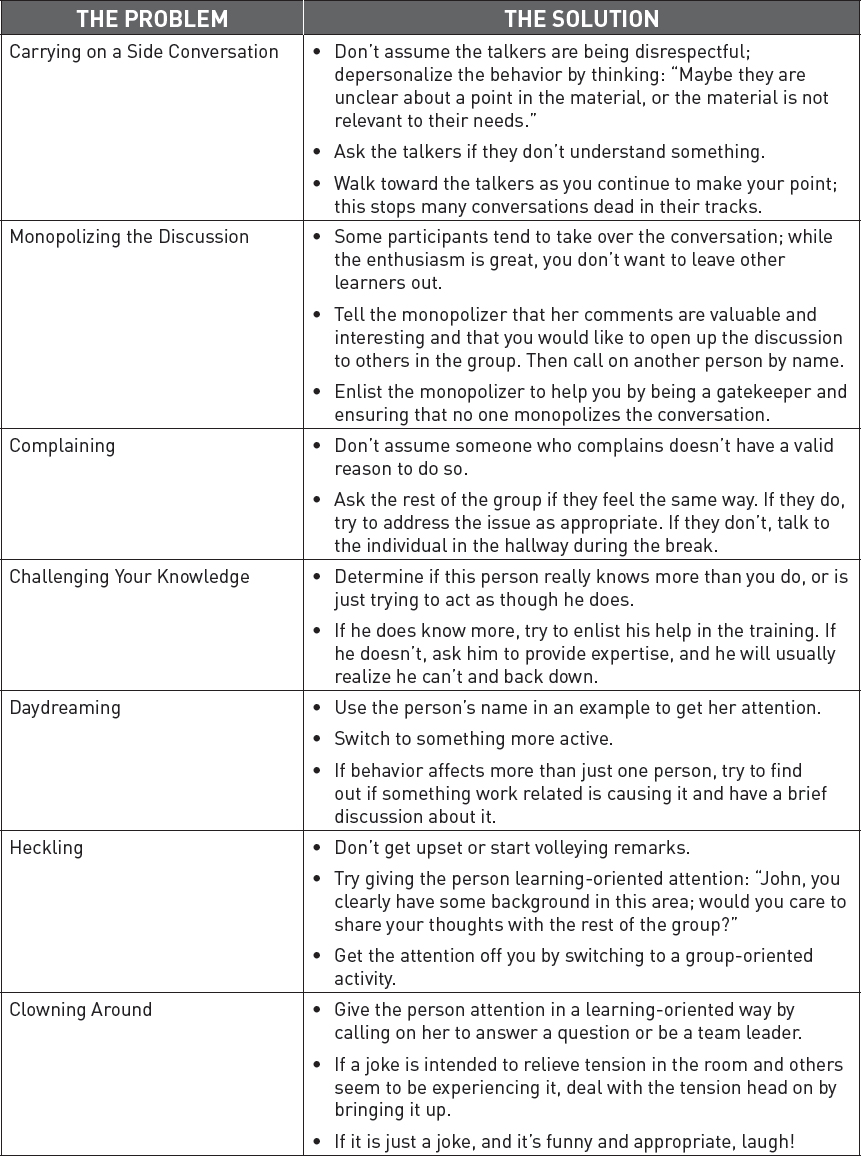

When all else fails, you have a few last resorts, although you would clearly rather not get to that point. One option is to simply pull aside the individual who is disrupting the class and talk to her privately. Dick Grote (1998) suggests in “Dealing With Miscreants, Snivelers, and Adversaries” that you can often catch someone off guard by asking: “Is it personal?” The direct question will usually cause the individual to deny that it is personal. Next, you tell the person that the behavior is unacceptable and that you will speak to a supervisor or training sponsor if it continues. This often works.
However, if it does not work, you can ask to have the person removed or cancel the program and speak to the person’s supervisor. Clearly, these options are not to be taken lightly, but realize that they are available when you are faced with truly recalcitrant behavior.
Follow up when you have faced a difficult situation. Take some time to reflect on the event and write down the details of what happened. If possible, get perspectives and feedback from participants who witnessed it. If outside perspectives are not an option, think about the event from the points of view of the disruptive individual and other participants and ask yourself: What went wrong? What went well? How could I manage the situation better next time?
An Unforgettable End
In Biech (2008), contributor Mel Silberman explains that
[m]any training programs run out of steam in the end. In some cases, participants are marking time until the close is near. In other cases, facilitators are valiantly trying to cover what they haven’t got to before time runs out. How unfortunate! What happens at the end needs to be “unforgettable.” You want participants to remember what they’ve learned. You also want participants to think what they’ve learned has been special. (p. 315)
Silberman suggests considering four areas when preparing to end your workshop:
• How will participants review what you’ve taught them?
• How will participants assess what they have learned?
• What will participants do about what they have learned?
• How will participants celebrate their accomplishments?
For example, consider what you’ve learned in this chapter. You’ve developed a well-rounded picture of what it takes to create an optimal, effective learning environment, from creating an inviting and engaging space to preparing and gathering materials that will make you feel like an organizational champ. You’re ready to get the training off to a productive start, to manage difficult participants and situations, and to pull it all together in a powerful way. Now review the bullet points that follow to determine what the next steps are and take pride in the preparation that will enable you to adapt and thrive in the training room.
The Bare Minimum
• Keep things moving. Create an engaging, interactive environment.
• Pay attention to the energy in the room. Be prepared to adjust the activities as needed. Build in content that can be delivered standing or through networking activities to get participants out of their seats when needed.
• Have fun! If you create an upbeat tone and enjoy yourself, the participants are likely to have fun as well.
Key Points
• Facilitation is not lecturing. It’s providing learning activities and support to make learning easier for the participant.
• Facilitation is not about the facilitator—it’s about the learner.
• An inviting space and a safe, collaborative environment are necessary for learning to occur.
• Good facilitation starts with passion and significant attention to preparation.
• A good start sets the tone for the whole training session.
• A strong ending helps learners to remember the training and carry lessons forward into their work.
What to Do Next
• Prepare, modify, and review the training agenda. Use one of the agendas in Section I as a starting point.
• Review the program preparation checklist and work through it step by step.
• Make a list of required participant materials and facilitator equipment and begin assembling them.
• Review all learning activities included in the agenda and start preparing for your delivery.
Additional Resources
Biech, E. (2006). 90 World-Class Activities by 90 World-Class Trainers. San Francisco: John Wiley/Pfeiffer.
Biech, E. (2008). 10 Steps to Successful Training. Alexandria, VA: ASTD Press.
Biech, E., ed. (2008). ASTD Handbook for Workplace Learning Professionals. Alexandria, VA: ASTD Press.
Biech, E., ed. (2014). ASTD Handbook: The Definitive Reference for Training & Development, 2nd edition. Alexandria, VA: ASTD Press.
Biech, E. (2015). Training and Development for Dummies. Hoboken, NJ: Wiley.
Duarte, N. (2010). Resonate: Present Visual Stories That Transform Audiences. Hoboken, NJ: Wiley.
Grote, D. (1998). “Dealing With Miscreants, Snivelers, and Adversaries,” Training & Development, 52(10), October.
McCain, D.V. (2015). Facilitation Basics, 2nd edition. Alexandria, VA: ATD Press.
Stolovitch, H.D., and E.J. Keeps. (2011). Telling Ain’t Training, 2nd edition. Alexandria, VA: ASTD Press.
Thiagarajan, S. (2005). Thiagi’s Interactive Lectures: Power Up Your Training With Interactive Games and Exercises. Alexandria, VA: ASTD Press.
Thiagarajan, S. (2006). Thiagi’s 100 Favorite Games. San Francisco: John Wiley/Pfeiffer.