
A layout can be defined as the sizing, spacing, and placement of content within a GUI window. It defines the visual structure of a user interface. Effective layout management would please users by assisting them in locating quickly what the users wants most from the application, and also helps in making out the differences between a good informative design and a confusing, puzzled designs of the application. Therefore, management of layout in a window style application is a crucial success factor for any GUI application. A good layout must have a priority focus, smooth flow, logical grouping, relative emphasis, and coordinated alignment.
In PySide, we follow two approaches to layout management. They are as follows:
- Absolute positioning: A crude way of setting the layout manually for each widget by giving them their position and size
- Layout containers: A way to handle automatic positioning and resize of widgets by the layout management classes used in Qt
Absolute positioning is the most crude and naive form of arranging widgets in the window. This is achieved by giving a hard-wired position and size to all the widgets in the window. Usually, we use the widget's move(x, y) function where x and y are the horizontal and vertical distance, respectively, from the top left corner of the form to the top left corner of the widget. We have already seen this method of layout positioning in our previous chapters in positioning the About and Quit buttons.
This method of layout management is highly discouraged and not effective due to the following disadvantages:
- Calculating the size and position for each widget manually is a really cumbersome task
- Resizing the window changes the layout
- It do not respond to style changes
- Internationalization and font changes becomes very difficult as the label text may overflow or underflow
- May appear completely different in different resolutions
Therefore, it is highly advised to use the layout containers for layout management. We have already seen examples for this type of layout management.
All widgets can use layouts to manage their children. If these are used in a proper way, the following functions are achieved:
- Sensible default size for windows
- Positioning of child widgets
- Resize handling
- Automatic updates when contents change including font size, hiding, removal of widgets, and so on
The container class alienates all the disadvantages discussed in absolute positioning and is the most widely used layout management system. They are more flexible and adjusts the layout in accordance with the style of the different platform. We will look into the commonly used layout containers inherited from the PySide.QtGui.QLayout class.
QBoxLayout: It lines up widgets horizontally or verticallyQHBoxLayout: It lines up widgets horizontallyQVBoxLayout: It lines up widgets vertically
QGridLayout: Lays out widgets in a gridQFormLayout: Manages form of input widgets and their labelQStackedLayout: Stack of widgets where only one widget is visible at a time
We will discuss each of them in little detail.
The PySide.QtGui.QBoxLayout class takes the space it gets, divides it up into row of boxes and makes each managed widgets fill one box. The orientation or direction of the box layout can be either vertical (column wise) or horizontal (row wise). The direction can take any one of the following values:
QBoxLayout.LeftToRight: It takes horizontal direction from left to rightQBoxLayout.RightToLeft: It takes horizontal direction from right to leftQBoxLayout.TopToBottom: It takes vertical direction from top to bottomQBoxLayout.BottomToTop: It takes vertical direction from bottom to top
Each of the filled widgets will get its minimum size at the least and its maximum size at the most. The extra space is shared between the widgets according to their stretch factor. The QBoxLayout class can be attached to any of the parent layout as it is not the top level layout.
The widgets can be added to the QBoxLayout function using following four functions:
The add functions can be replaced with insert functions, for example, QBoxLayout.insertWidget() to insert a box at a specified position in the layout.
This class also includes two margins. The Pyside.QtGui.QLayout.setContentsMargins() function sets the width of the outer border on each side of the widget and PySide.QtGui.QBoxLayout.setSpacing() sets the width between the neighboring boxes. The default margin spaces differ by the application style.
The most convenient and easy form to use the QBoxLayout class is to instantiate one of its inherited classes, QVBoxLayout and QHBoxLayout for vertical and horizontal direction layouts respectively. The following programs will explain the usage of QVBoxLayout and QHBoxLayout.
An example for horizontal layout is as follows:
class MainWindow(QWidget):
  """ Our Main Window class
  """
  def __init__(self):
    """ Constructor Function
    """
    QWidget.__init__(self)
    self.setWindowTitle("Horizontal Layout")
    self.setGeometry(300, 250, 400, 300)

  def SetLayout(self):
    """ Function to add buttons and set the layout
    """
    horizontalLayout = QHBoxLayout(self)
    hButton1 = QPushButton('Button 1', self)
    hButton2 = QPushButton('Button 2', self)
    hButton3 = QPushButton('Button 3', self)
    hButton4 = QPushButton('Button 4', self)
    horizontalLayout.addWidget(hButton1)
    horizontalLayout.addWidget(hButton2)
    horizontalLayout.addWidget(hButton3)
    horizontalLayout.addWidget(hButton4)

self.setLayout(horizontalLayout)An example for vertical layout is as follows:
def SetLayout(self):
    verticalLayout = QVBoxLayout(self)
    vButton1 = QPushButton('Button 1', self)
    vButton2 = QPushButton('Button 2', self)
    vButton3 = QPushButton('Button 3', self)
    vButton4 = QPushButton('Button 4', self)

    verticalLayout.addWidget(vButton1)
    verticalLayout.addWidget(vButton2)
    verticalLayout.addStretch()
    verticalLayout.addWidget(vButton3)
    verticalLayout.addWidget(vButton4)

    self.setLayout(verticalLayout)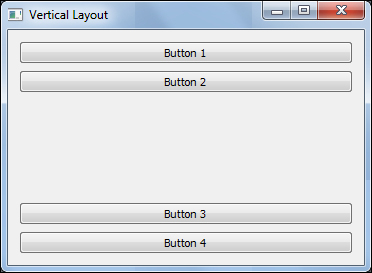
The PySide.QtGui.QGridLayout class takes the space available to it and divides up into rows and columns and puts each widget it manages into the correct cell. Each row/column has a minimum width and a stretch factor. The widgets are added into the grid layout using the addWidget() function and the layout puts it into the correct cell. It is also possible for a widget to span across multiple rows/columns. The addItem() and addLayout() methods can also be used to insert widgets or other layouts into it.
The grid layout also includes two margins as discussed in the box layout. An example program for the usage of grid layout is as follows.
def SetLayout(self):
    gridLayout = QGridLayout(self)
    gButton1 = QPushButton('Button 1', self)
    gButton2 = QPushButton('Button 2', self)
    gButton3 = QPushButton('Button 3', self)
    gButton4 = QPushButton('Button 4', self)
    gButton5 = QPushButton('Button 5', self)
    gridLayout.addWidget(gButton1, 0, 0)
    gridLayout.addWidget(gButton2, 0, 1)
    gridLayout.addWidget(gButton3, 1, 0, 1, 2)
    gridLayout.addWidget(gButton4, 2, 0)
    gridLayout.addWidget(gButton5, 2, 1)
self.setLayout(gridLayout)The PySide.QtGui.QFormLayout class is a higher level alternative to basic forms of layout classes, which lays out its widgets in a two column form. Usually, the left column consists of label and the right column consists of field widgets such as line editors, combo box, spin box, and so on.
The form layout can be achieved through grid layout but using it directly on the form like widgets have the following advantages:
- Adherence to different platform's look and feel
- Support for wrapping long rows, using RowWrapPolicy control
- API for creating label-field pairs
- Support for expanding fields, using FieldGrowthPolicy control
The spacing between the rows of forms can be set using the setHorizontalSpacing() and setVerticalSpacing() functions of this class. An example for the form layout is as follows:
def SetLayout(self):
    formLayout = QFormLayout(self)
    labelUsername = QLabel("Username")
    txtUsername = QLineEdit()
    labelPassword = QLabel("Password")
    txtPassword = QLineEdit()
    formLayout.addRow(labelUsername, txtUsername)
    formLayout.addRow(labelPassword, txtPassword)
self.setLayout(formLayout)The PySide.QtGui.QStackedLayout class lays out a set of child widgets and shows only one at a time, hiding the others from the user. The layout can be initially populated with a number of child widgets and later on any one of them can be selected to be shown to the user depending on the choice in window. There is no intrinsic way given by the layout itself for the users to select a widget from the available child widgets. This is achieved through using either QComboBox or QListWidget widgets. On populating the layout, the child widgets are added to an internal list and the index is returned by the layout to select child widgets. The widgets can be inserted and removed using the insertWidget() and removeWidget() functions respectively.
The implementation of stack layout is left as an exercise for you. The sample program can be found in the code samples that come along with this book.