
A HALLMARK FEATURE OF QUARKXPRESS IS ITS ABILITY TO HANDLE TEXT. You can start by importing text from other programs such as Word, or by typing all the text in QuarkXPress yourself. Text is primarily contained within individual text boxes or flows through a series of linked text boxes. You can also flow text along a path and enter it in table cells. Once text is in QuarkXPress, you have precise control over its placement within text boxes, including creating columns and snapping lines to a baseline grid.
Text in QuarkXPress does not need to be final—word processing features, which include the ability to checking spelling and perform search-and-replace operations, allow you to make the inevitable edits that occur in any review and proofing process. (Be sure that writers and editors know to stop editing their word processing files after handing them off to you.) For editing or repurposing, you can export text from a layout and choose among a variety of formats.
In this chapter you’ll learn how to create text boxes, import text, link boxes, modify text boxes, check spelling, and use search and replace.
Most of the text you’ll work with in QuarkXPress comes from a word processor. You can drag these files into a QuarkXPress layout or import them through File > Import. You can also type new text and paste text copied to the clipboard as necessary. It’s important to remember that in QuarkXPress, text is primarily contained by text boxes and it is always edited with the Text Content tool
![]() .
.
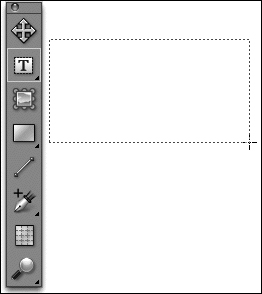
QuarkXPress offers various methods for creating boxes to contain text. First, you can click and drag the Text Content tool to create a rectangular text box (Figure 4.1). You can also a create no-content box with any of the tools in the Rectangle Box tool’s pop-out menu ![]() and then double-click the box with the Text Content tool to convert it to a text box. In fact, you can double-click any QuarkXPress item, such as a straight or curved line, with the Text Content tool and enable it to contain text.
and then double-click the box with the Text Content tool to convert it to a text box. In fact, you can double-click any QuarkXPress item, such as a straight or curved line, with the Text Content tool and enable it to contain text.
To import text into a specific box, select it with the Text Content tool and choose File > Import. To have QuarkXPress create a box for you, choose File > Import with nothing selected (Figure 4.2). The Import dialog box lets you select text files in any supported file format, including Word 6–8 (these include Word 95, 97, 98, and 2000), WordPerfect (3.1 on Mac and 5–6 on Windows), plain text files, HTML files, and XPress Tags files (Quark’s proprietary tagging format).
Figure 4.2: The Import dialog box lets you select text files to import and specify how quotation marks, dashes, and styles in the text are handled.
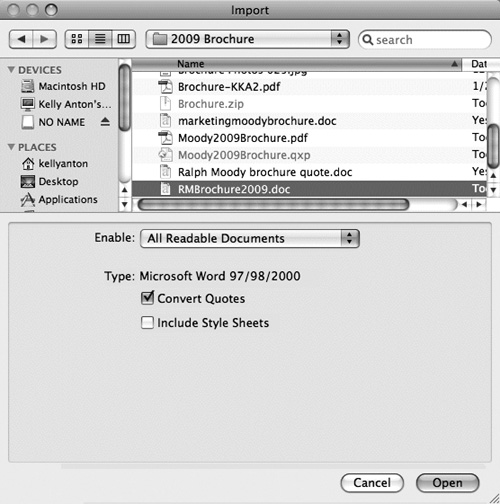
You have two options for the file you choose to import: Convert Quotes and Include Style Sheets. Check Convert Quotes to convert straight quotes (′′) to curly typographer’s quotes (“”) and to convert double hyphens (--) into em dashes (—). Check Include Style Sheets to import styles applied in the word processor with the text. (Include Style Sheets also converts Quark’s XPress Tags into actual formatting.) If the text doesn’t fit in the box, the overflow symbol ![]() displays in the lower-right corner of the text box. You can resize the box or link it to other boxes.
displays in the lower-right corner of the text box. You can resize the box or link it to other boxes.
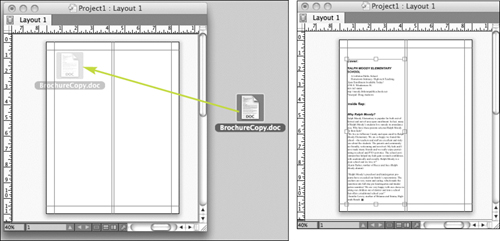
To quickly import text, you can drag a file from your desktop into a layout (Figure 4.3). The text is imported according to the last settings used in the Import dialog box for Convert Quotes and Include Style Sheets. If you release the mouse button when the pointer is over a text box, the new text is inserted into the box (within any existing text). Otherwise, QuarkXPress creates a text box to contain the text. Click within margin and column guides to create a box of those dimensions. If the text doesn’t fit in the box, the overflow symbol displays in the lower-right corner of the text box. See the “Linking and unlinking” section later in this chapter.
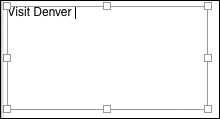
To enter text by typing or pasting, click on any box, line, or table cell with the Text Content tool ![]() . The text insertion point appears and shows where text will be inserted (Figure 4.4).
. The text insertion point appears and shows where text will be inserted (Figure 4.4).
QuarkXPress provides two ways to flow text through text boxes and pages—using the automatic text box or linking boxes manually. The text in a series of linked boxes is referred to as a story, and you can perform operations such as spell check and search and replace on a story rather than an entire layout.
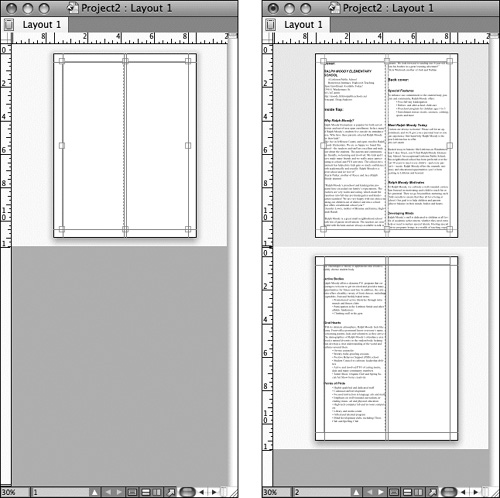
When you import or enter text into the automatic text box, QuarkXPress automatically adds enough pages to contain all the text (Figure 4.5). The automatic text box is generally used to quickly flow the text of longer publications such as books. To create one, check Automatic Text Box in the New Project or New Layout dialog box. The automatic text box is placed within the specified margin and column guides on the default master page.
Figure 4.5: At left, the automatic text box is placed within the margin and column guides specified in the New Layout or New Project dialog box. When you import or enter text, pages are automatically added to contain all the text.
You can also create an automatic text box on a master page later. Display the master page (Page > Display) and select the Linking tool ![]() . Click the broken link icon in the upper-left corner, then click a text box on the page (Figure 4.6). To flow text through a spread, do this on both pages.
. Click the broken link icon in the upper-left corner, then click a text box on the page (Figure 4.6). To flow text through a spread, do this on both pages.

Tip: Controlling Automatic Page Insertion
By default, when you use the automatic text box, pages are inserted at the end of the story. You can, however, change the location where pages are inserted—or turn this feature off to stop adding pages. For example, in a magazine, you might want all the stories that overflow to be placed on pages at the back of the magazine. In the Print Layout > General pane of the Preferences dialog box, choose an option from the Auto Page Insertion menu: Off, End of Story, End of Section, or End of Document.
To flow text from box to box, you need to link boxes with the Linking tool ![]() . The Linking tool is in a pop-out of the Text Content tool
. The Linking tool is in a pop-out of the Text Content tool ![]() on the Tools palette. You can only link boxes that are already text boxes—if you want to link boxes drawn with a no-content box tool, click on them first with the Text Content tool. In addition to linking text boxes, you can link any text container to any other text container, including linking text boxes to text paths and linking text paths to each other. You cannot link to boxes (or other text containers) that already contain text. Text in a series of linked items is referred to as a chain. To link text boxes:
on the Tools palette. You can only link boxes that are already text boxes—if you want to link boxes drawn with a no-content box tool, click on them first with the Text Content tool. In addition to linking text boxes, you can link any text container to any other text container, including linking text boxes to text paths and linking text paths to each other. You cannot link to boxes (or other text containers) that already contain text. Text in a series of linked items is referred to as a chain. To link text boxes:
1. Create the text boxes you want in the text chain.
2. Select the first box.
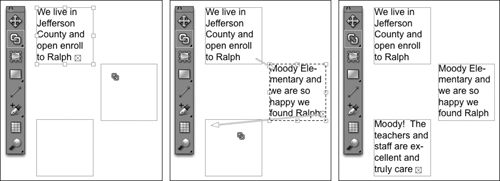
3. Using the Linking tool, click the text boxes in the order you want the text to flow (Figure 4.7).
4. If you need to reroute links—for example if you accidentally click the wrong box—Shift+click the Linking tool.
5. When you’re finished linking boxes, select another tool.
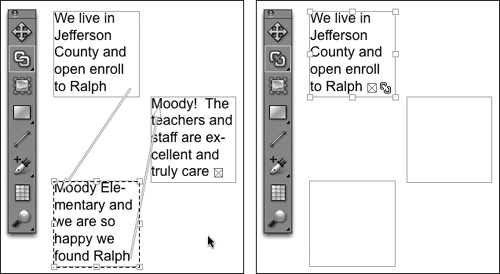
If you delete a text box in a chain, the text will flow through the remaining boxes. You can break box links using the Unlinking tool ![]() , which is next to the Linking tool in the pop-out of the Text Content tool (Figure 4.8). When you break a text box link, all subsequent links in the chain are broken as well.
, which is next to the Linking tool in the pop-out of the Text Content tool (Figure 4.8). When you break a text box link, all subsequent links in the chain are broken as well.
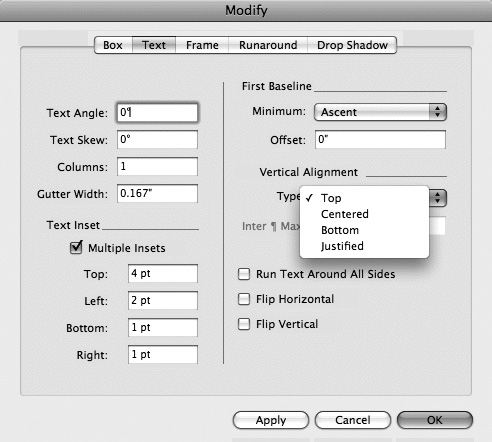
QuarkXPress gives you precise control over how text is positioned within a box, including the number of columns in the box, how far text is inset from the edges of the box, whether text is rotated within the box, and more. All the positioning controls are available in the Text tab of the Modify dialog box (Item menu) shown in Figure 4.9. Review these controls to see all the design possibilities: Text Angle, Text Skew, Flip Horizontal. Many of these commands are available in the Measurements palette for quick access as well.
Figure 4.9: The Text tab of the Modify dialog box controls how text is positioned within the selected text box.
You can specify the number of columns for a text box and the amount of space between them in the Cols. field and the Gutter field on the Text tab of the Measurements palette (Figure 4.10). If you need columns of different widths, draw separate text boxes and link them.
By default, the first line of text is placed at the top of a box, and the text flows down with line spacing controlled by leading. The placement of the first line is controlled by the First Baseline settings in the Text tab of the Modify dialog box (Item menu). You can change the positioning by clicking the Vertical Alignment icons on the Text tab of the Measurements palette (Figure 4.11). From left to right, the options are Top, Centered, Bottom, and Justified.
Figure 4.11: The Vertical Alignment icons on the Text tab control the vertical placement of text within a box.
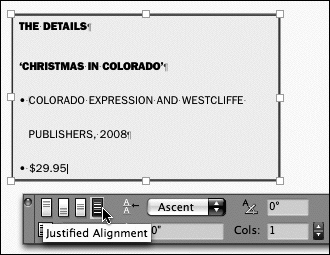
For justified vertical alignment, QuarkXPress overrides the paragraph leading and space before and after paragraphs to evenly spread the text throughout the box. You can specify the maximum amount of space added between paragraphs in the Interparagraph ¶ Maximum field on the Text tab of the Measurements palette or Modify dialog box. The Justified Alignment option works best if you remove the last paragraph return in the box.
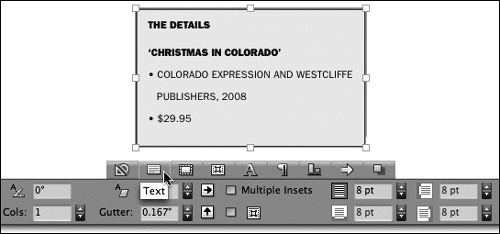
When a text box has a background color or frame, you often need to inset it from the edges of the text box. To do this, enter a value in the Inset Text on All Edges field on the Text tab of the Measurements palette (Figure 4.12). For rectangular text boxes, you can check Multiple Insets and enter values for the Top, Bottom, Left, and Right insets.
A baseline grid consists of horizontal lines that text “sits” on. Setting up a baseline grid for an entire document or an individual text frame makes it easy to align text horizontally across columns regardless of varying leading and spacing values before and after paragraphs. Generally, the distance specified between gridlines in the baseline grid is the same as the leading value for body text (around 12 points, for example). Some graphic designers swear by the baseline grid for carefully positioning text, whereas others find it too formulaic.
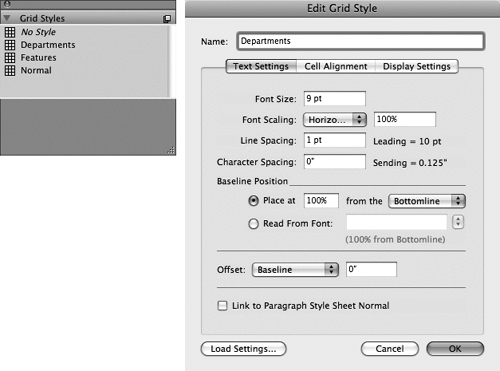
To create a baseline grid for a master page, choose Page > Master Guides & Grid when a master page is displayed. To create a grid for an individual text box, use the Grid Styles palette (Window menu) shown in Figure 4.13. Click the palette menu and choose New to open the Edit Grid Style dialog box and set up the spacing and guide colors for the baseline grid (Figure 4.14). You can then drag grid styles from the Grid Styles palette to individual text boxes. Choose View > Page Grids and View > Text Box Grids to display baseline grids onscreen. For information about creating grids, see Chapter 9.
Figure 4.13-4.14: At left, the Grid Styles palette lets you create and apply baseline grid styles. Use the Edit Grid Style dialog box to set up the spacing and display of the grid.
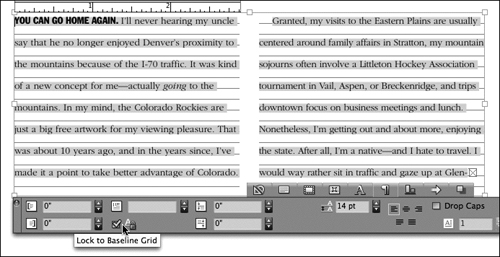
Once you set up a baseline grid for a page or text box, you still need to “snap” paragraphs to it. Select the paragraphs and click Lock to Baseline Grid in the Text tab of the Measurements palette (Figure 4.15). You can also check Lock to Grid in the Formats tab of the Paragraph Attributes dialog box (Style menu).
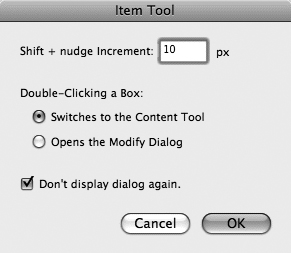
To edit text—whether it’s in a box, flowing along a path, or in a table cell—you need to use the Text Content tool ![]() . To select it, press T. (If the Text Linking or Text Unlinking tool is selected, press T until the Text Content tool is selected.) If you’re using the Item tool, double-click in text to automatically switch to the Text Content tool. If you prefer that double-clicking the Item tool opens the Modify dialog box, as it did in prior versions of QuarkXPress, you can set a preference for that behavior (Preferences > Tools > Item Tool, Figure 4.16).
. To select it, press T. (If the Text Linking or Text Unlinking tool is selected, press T until the Text Content tool is selected.) If you’re using the Item tool, double-click in text to automatically switch to the Text Content tool. If you prefer that double-clicking the Item tool opens the Modify dialog box, as it did in prior versions of QuarkXPress, you can set a preference for that behavior (Preferences > Tools > Item Tool, Figure 4.16).
Figure 4.16: Item Tool preferences let you specify whether double-clicking the Item tool switches to the Text Content tool or opens the Modify dialog box.
Tip: Show Invisible Characters
When you’re working with text, it’s helpful to see the spaces, tabs, paragraph returns, and other nonprinting characters. This helps you make accurate selections when formatting, cutting and pasting, and so on. To show invisible characters onscreen, choose View > Invisibles.
To start typing, click the Text Content tool in text or in a text box, on a line, or in a table cell. You can move the text insertion point with the mouse, but if you’re editing a significant amount of text, you may not want to move your hands off the keyboard. In that case, you can use the arrow keys on your keyboard to move the insertion point left, right, up, and down. Add the Command (Mac) or Control (Windows) key to move an entire word to the left or right, up to the top of a paragraph, or down to the bottom of the paragraph. Press Command+Option (Mac) or Control+Alt (Windows) with the arrows to move to the start or end of a line or the start or end of a story.
QuarkXPress provides various methods for selecting text for editing and formatting. You can click and drag, click the mouse, or use the arrows on the keyboard. To select text by clicking the mouse:
![]() Word: Click twice in the word.
Word: Click twice in the word.
![]() Line: Click three times in the line.
Line: Click three times in the line.
![]() Paragraph: Click four times in the paragraph.
Paragraph: Click four times in the paragraph.
![]() Story: Click five times in the story or choose Edit > Select All.
Story: Click five times in the story or choose Edit > Select All.
Selecting text with the arrow keys is similar to moving the text insertion point. Press the arrows along with modifier keys to select text to the left, right, above, and below the text insertion point:
![]() Previous or next character: Press Shift with the left or right arrow key.
Previous or next character: Press Shift with the left or right arrow key.
![]() Previous or next line: Press Shift with the up or down arrow key.
Previous or next line: Press Shift with the up or down arrow key.
![]() Previous or next word: Press Command+Shift (Mac) or Control+Shift (Windows) with the left or right arrow key.
Previous or next word: Press Command+Shift (Mac) or Control+Shift (Windows) with the left or right arrow key.
![]() Previous or next paragraph: Press Command+Shift (Mac) or Control+Shift (Windows) with the up or down arrow key.
Previous or next paragraph: Press Command+Shift (Mac) or Control+Shift (Windows) with the up or down arrow key.
![]() Start or end of line: Press Command+Option+Shift (Mac) or Control+Alt+Shift (Windows) with the left or right arrow key.
Start or end of line: Press Command+Option+Shift (Mac) or Control+Alt+Shift (Windows) with the left or right arrow key.
![]() Start or end of story: Press Command+Option+Shift (Mac) or Control+Alt+Shift (Windows) with the up or down arrow key.
Start or end of story: Press Command+Option+Shift (Mac) or Control+Alt+Shift (Windows) with the up or down arrow key.
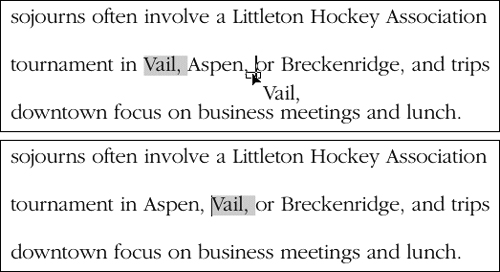
When Drag and Drop Text is enabled, you can select text and drag it to a new location with the mouse—basically another way to cut and paste text. To do this, click on the selected text, drag the text insertion point to a new location, and release the mouse button (Figure 4.17). Press the Shift key while you drag to copy the text rather than move it.
If you want to prevent yourself or others from accidentally—or purposely—editing the text in a story, choose Item > Lock > Story. When you try to edit the story, a lock icon displays. (While it’s easy to unlock a story, you at least have to think about why it was locked and whether it should be edited.) When using Find/Change and Spell Check, you can specify whether to search locked text.
If you receive text with incorrect capitalization, you can automatically change the case without retyping the text. To do this, select the text and choose Style > Change Case and then UPPERCASE, lowercase, or Title Case. In general, for all uppercase formatting, it’s better to apply the All Caps type style (Style > Type Style > ALL CAPS) because you can easily remove it and restore the previous capitalization.
QuarkXPress lets you check the spelling of a word, text selection, story, or entire layout. Words are checked against a dictionary provided by Quark and optional custom dictionaries that you create. The U.S. English dictionary provided by Quark is not particularly robust, missing many plural words and many newer words. None theless, using spell check before final output is always a good idea, especially if you augment the Quark dictionary with your own auxiliary dictionaries (see “Creating custom spelling dictionaries). If you’re working with a writer or editor, always confirm changes you make when checking spelling.
For a more accurate spell check in multilingual documents—even a cookbook—you can assign a language to words. The language is used for spell check and hyphenation. For example, if you assign Spanish to “jalapeño,” it will not be flagged as a possible misspelling. To assign a language, select the words and choose an option from the Language drop-down menu in the Character Attributes dialog box (Style > Character) or the Character tab of the Measurements palette. For words that may not appear in any dictionary, you can choose None for the language so the word is never spell checked.
To check spelling, choose an option from the Utilities > Check Spelling submenu: Word, Selection, Story, or Layout. Note that Story checks only the story (the series of linked items) containing the text insertion bar. After you choose an option from the Check Spelling submenu, the Word Count dialog box displays. The Total number of words reported is helpful for assigning stories by word count—and it gives you an idea of how much time the spell check will take. Click OK to bypass the Word Count dialog box.
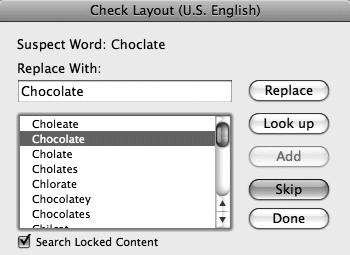
In the Check Spelling dialog box, use the Replace, Lookup, and Skip buttons to handle each suspect word listed at the top of the dialog box (Figure 4.18). If the project has an auxiliary dictionary assigned to it, you can save spelling variations in it by clicking Add. (Note that QuarkXPress has no Skip All button—it flags every instance of each suspect word. As a result, saving spelling variations in auxiliary dictionaries can significantly speed up spell check.)
Figure 4.18: The Check Layout dialog box flags suspect words—words that do not match any in the QuarkXPress spelling dictionary—and displays possible replacement words.
If any stories in the layout are locked (Item > Lock > Story), the Search Locked Content check box lets you specify whether to spell check those stories.
Tip: Ignore Numbers, Internet Addresses, and File Paths
By default, QuarkXPress will flag words containing numbers such as NUMB3RS (the name of a TV show), Internet addresses, and file paths. If you do not want these flagged as possible misspellings by spell check, you can check Ignore Words With Numbers and Ignore Internet and File Addresses in the SpellCheck pane of the Preferences dialog box.
For a quicker and more accurate spell check, you can save words specific to your work in a custom spelling dictionary called an auxiliary dictionary. Each project can have one auxiliary dictionary associated with it. Once a project has an auxiliary dictionary, you can enter words into it or add them during spell check.
To create an auxiliary dictionary, choose Utilities > Auxiliary Dictionary. Click New, then specify a name and location for the dictionary file. The new auxiliary dictionary is associated with the current project file; if no projects are open, it is associated with all new projects. To add words to a project’s auxiliary dictionary, choose Utilities > Edit Auxiliary (Figure 4.19). Type each word—such as proper names, rare food spellings, and plural words missing from the regular dictionary—in the field and click Add. Click Save when you’re finished adding words. You can also add words to the auxiliary dictionary by clicking Add during spell check.
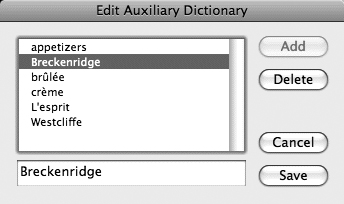
Auxiliary dictionaries are separate files that you can share with other QuarkXPress users (Figure 4.20). You can assign one auxiliary dictionary per project, and the path to the dictionary file is saved with the project. If you move the file, QuarkXPress cannot find it and displays an alert when you start a spell check. (You can click OK to bypass this alert, or use Utilities > Auxiliary Dictionary to locate and open the file.)

QuarkXPress provides a sophisticated Find/Change palette (Edit menu) that lets you search and replace any combination of text and character attributes (Figure 4.21). The Find/Change palette works as follows:
![]() You can type or paste text into the Find What and Change To fields.
You can type or paste text into the Find What and Change To fields.
![]() To enter a wildcard character to search for, press Command+Shift+? (Mac) or Control+Shift+? (Windows). You might use the wildcard character to find variations of a name spelling such as “Bobby” and “Bobbi,” then change both to “Bobbie.”
To enter a wildcard character to search for, press Command+Shift+? (Mac) or Control+Shift+? (Windows). You might use the wildcard character to find variations of a name spelling such as “Bobby” and “Bobbi,” then change both to “Bobbie.”
![]() To specify how much of the layout to search, use the Layout and Search Locked Content check boxes. Master pages and other layouts within a project need to be checked separately.
To specify how much of the layout to search, use the Layout and Search Locked Content check boxes. Master pages and other layouts within a project need to be checked separately.
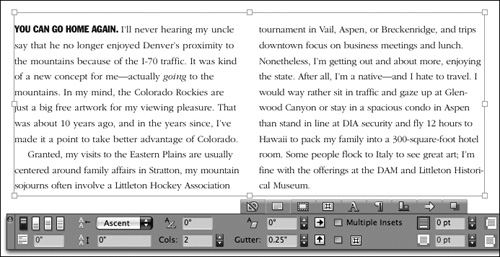
![]() Check Whole Word to find only stand-alone instances of the Find What text. When Whole Word is unchecked, a search for “color” would find “color” by itself and within the word “Colorado.”
Check Whole Word to find only stand-alone instances of the Find What text. When Whole Word is unchecked, a search for “color” would find “color” by itself and within the word “Colorado.”
![]() Check Ignore Case to find both uppercase and lowercase instances of the Find What text. When Ignore Case is unchecked, both the Find What and Change To fields are case sensitive.
Check Ignore Case to find both uppercase and lowercase instances of the Find What text. When Ignore Case is unchecked, both the Find What and Change To fields are case sensitive.
![]() Option+click (Mac) or Alt+click (Windows) the Find Next button to change it to Find First.
Option+click (Mac) or Alt+click (Windows) the Find Next button to change it to Find First.
Figure 4.21: The Find/Change palette with Ignore Attributes checked is useful for a quick search and replace of text.
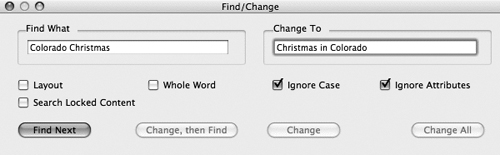
Uncheck Ignore Attributes to include character attributes in a search and replace operation. You can use this to find text and change only its formatting, find and change instances of specific formatting regardless of the text, find specific text and formatting combinations and change them entirely, and so on (Figure 4.22). Use the controls on the Find What and Change To sides to specify exactly what to find and how to change it. The Type Style buttons on both sides are three-state buttons:
Figure 4.22: In this Find/Change operation, the text “Colorado Christmas” is found and then changed to “Christmas in Colorado,” a character style is applied, and the size is changed to 20 point.

![]() On: If a type style is on (black) on the Find What side, text with that type style applied is found. If a type style is on (black) on the Change To side, that type style is applied to changed text.
On: If a type style is on (black) on the Find What side, text with that type style applied is found. If a type style is on (black) on the Change To side, that type style is applied to changed text.
![]() Indeterminate: If a type style is gray on the Find What side, that type style is not considered in the search—text with or without it applied will be found. If a type style is gray on the Change To side, that type style is left alone if applied to changed text.
Indeterminate: If a type style is gray on the Find What side, that type style is not considered in the search—text with or without it applied will be found. If a type style is gray on the Change To side, that type style is left alone if applied to changed text.
![]() Off: If a type style is off (white) on the Find What side, text with that type style applied is not found. If a type style is off (white) on the Change To side, that type style is removed from the changed text.
Off: If a type style is off (white) on the Find What side, text with that type style applied is not found. If a type style is off (white) on the Change To side, that type style is removed from the changed text.
Tip: Finding and Changing Invisible Characters
To search and replace special characters—for example, to replace two paragraph returns with one—you can paste them in the Find What and Change To fields. To see invisible characters to copy them, choose View > Invisibles. The fields display the codes for the invisible characters, which generally consist of a slash in front of a letter (/p for paragraph return, /t for tab, /n for line break, and so on). If you use these codes often, you can memorize them and enter them in the fields.
Sometimes you need to get text out of QuarkXPress—for example, for revisions, translation, backup, or use in different media. You can export selected text or all the text in a story (a series of linked boxes) in popular formats such as Microsoft Word, WordPerfect, HTML, and RTF. To export text, select the text or click in a story to export all of its text. Choose File > Save Text and choose an option from the Format menu (Figure 4.23).
Figure 4.23: The Save Text dialog box (File menu) lets you export text in commonly used formats such as Microsoft Word and HTML.
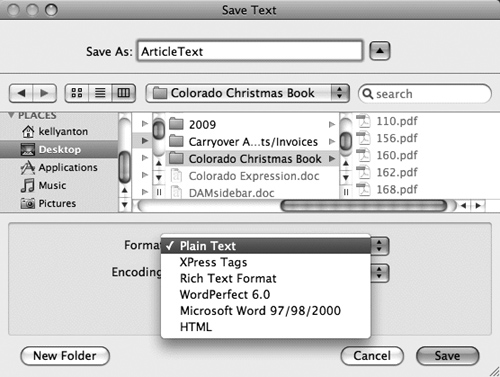
The XPress Tags format saves text with proprietary tags that indicate all QuarkXPress formatting. Publishers can save text as XPress Tags and send the text out to be edited. When the text is reimported, the XPress Tags are translated into actual QuarkXPress formatting. For more information about XPress Tags, see the XPress Tags Guide.pdf in your QuarkXPress 8 folder (Documents > English).
Note Exporting All the Text in a Layout
You can only export text in one story at a time in QuarkXPress. There is no quick way to export all the text in all the boxes throughout a layout. If you know you will need to export text—for example, if you know it will be translated—try to plan the layout with as many linked boxes as possible. More linked boxes means fewer stories to export.