
IF YOU DECONSTRUCT ANY PRINT PUBLICATION into its basic components, even the most complex ones boil down to text, photos, illustrations, and graphic embellishments such as lines and shapes. Each time you create a new QuarkXPress print project, you begin with a blank page and then build the publication by adding text and graphic elements to the page and, if you’re creating a multipage publication, by adding more pages, each of which has its own text and graphic elements.
In this chapter you’ll learn how to create several kinds of page elements— collectively referred to as items in QuarkXPress. These items are the building blocks of all the publications you’ll create. You’ll also learn how to manipulate the items you make by moving and resizing them and by modifying their appearance, and you’ll learn how to use several features that help you work efficiently with these items.
QuarkXPress has several tools that let you create different types of items. Here’s a list of the item-creation tools and what they produce:
![]() The Text Content tool
The Text Content tool
![]() lets you make rectangular boxes that hold text.
lets you make rectangular boxes that hold text.
![]() The Picture Content tool
The Picture Content tool
![]() lets you create rectangular boxes that hold imported graphics.
lets you create rectangular boxes that hold imported graphics.
![]() The Rectangle
The Rectangle
![]() , Oval
, Oval
![]() , and Starburst
, and Starburst
![]() tools (which are grouped together in the Tools palette) let you create no-content boxes, which are empty shapes that don’t initially contain anything. You can choose File > Import to place a picture or text into a no-content box, which changes it to a picture box or a text box. You can also double-click a no-content box with the Text Content tool to convert it to a text box. No-content boxes can be used as graphic elements by applying a background color or blend, a frame, or a special effect like a drop shadow.
tools (which are grouped together in the Tools palette) let you create no-content boxes, which are empty shapes that don’t initially contain anything. You can choose File > Import to place a picture or text into a no-content box, which changes it to a picture box or a text box. You can also double-click a no-content box with the Text Content tool to convert it to a text box. No-content boxes can be used as graphic elements by applying a background color or blend, a frame, or a special effect like a drop shadow.
![]() The Line tool
The Line tool
![]() lets you draw straight lines.
lets you draw straight lines.
![]() The Bézier Pen
The Bézier Pen
![]() and Freehand Drawing
and Freehand Drawing
![]() tools (also grouped together in the Tools palette) let you create complex lines and no-content boxes.
tools (also grouped together in the Tools palette) let you create complex lines and no-content boxes.
![]() The Table tool
The Table tool
![]() lets you make a rectangular box that contains a table.
lets you make a rectangular box that contains a table.
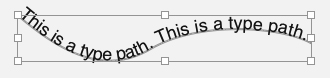
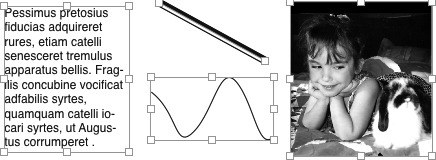
![]() Type paths (Figure 3.1) are straight or curved lines created with the Line, Bézier Pen, or Freehand Drawing tools along which text flows. (To create a text path, you must first draw a line and then double-click the line with the Text Content tool.)
Type paths (Figure 3.1) are straight or curved lines created with the Line, Bézier Pen, or Freehand Drawing tools along which text flows. (To create a text path, you must first draw a line and then double-click the line with the Text Content tool.)
Figure 3.1 A type path is a straight or curved line along which text flows. In this example, the Bézier Pen tool was used to create the curved line. Double-clicking the line with the Text Content tool converted the line into a type path.
Creating an item using any of the item-creation tools— with the exception of the Bézier Pen and Freehand Drawing tools— is a two-step process. (You’ll learn how to use the two drawing tools a little later in this chapter.)
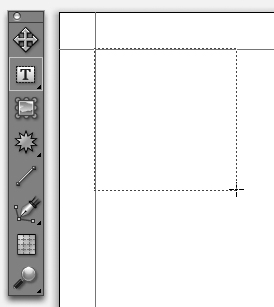
1. Click once on the tool that will produce the kind of item you want to add to your publication. For example, if you need a rectangular text box, select the Text Content tool. If the tool you need is grouped with other tools, you may have to select it from a pop-up list. When you select an item-creation tool, the crosshairs pointer is displayed.
2. Move the crosshairs pointer to the area of the page or pasteboard where you want to place the item, and then click and drag in any direction to build a rectangle. As you drag, a rectangle is displayed (Figure 3.2). Release the mouse when the rectangle is approximately the size of the item you want.
Tip: Creating Squares and Circles
If you hold down the Shift key when you click and drag to create an item, you’ll create a perfect square or circle instead of a rectangle or an oval (depending on the tool you’re using).
After you create an item, it is selected. That is, it’s displayed with resizing handles that you can drag to resize the item. At this point, you can continue clicking and dragging to create new items, or you can switch tools and move on to another task, such as modifying the item you just created. If you’ve created a text box, the flashing cursor indicates that you can begin typing to place text in the box, or you can choose File > Import to import text from a text file. (For more information about importing text, see Chapter 4.) If you’ve created a picture box, you can choose File > Import to place a picture into the box. (For more information about importing pictures, see Chapter 7.)
Tip: Creating Nonrectangular Text and Picture Boxes
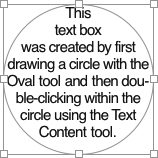
If you want to place text or a picture within a nonrectangular shape (Figure 3.3), first use any of the drawing tools that let you create nonrectangular no-content boxes (for example, the Oval Box tool or the Bézier Pen tool). With the item selected, choose Item > Content, and then choose Text or Picture from the sub-menu.
Tip: Creating Regular Polygons
Oddly, there’s no easy way to create regular polygons (triangles, pentagons, hexagons, and so on, with equal angles and equal sides) in QuarkXPress, but there’s a relatively simple workaround. Use the Starburst tool to create a shape that has twice as many spikes as the number of sides you want for your polygon. (Double-click the Starburst Tool to configure it.) Hold down the Shift key as you drag to create a starburst shape so that all sides and all angles are equal. Select the Delete Point tool (it’s grouped with the Bézier Pen tool in the Tools panel), and then delete every other point.
The Freehand Drawing tool
![]() and the Bézier Pen tool
and the Bézier Pen tool
![]() let you create freeform lines and shapes and open up all sorts of creative possibilities; however, using these tools— particularly the Bézier Pen— is a little trickier than using the other item-creation tools. Don’t worry if you don’t feel comfortable right away. The more you use these tools, the more proficient you’ll become.
let you create freeform lines and shapes and open up all sorts of creative possibilities; however, using these tools— particularly the Bézier Pen— is a little trickier than using the other item-creation tools. Don’t worry if you don’t feel comfortable right away. The more you use these tools, the more proficient you’ll become.
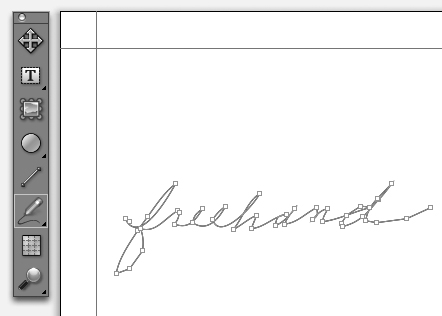
The pencil icon that represents the Freehand Drawing tool is a clue that this item-creation tool works like a pencil, but you’ll learn quickly that a mouse doesn’t mimic a pencil very well. It’s worth noting that you can create either open shapes or closed shapes (no-content boxes) with the Freehand Drawing tool.
To use the Freehand Drawing tool:
1. Select it from the Tools palette (third icon up from the bottom). It’s grouped with several other tools.
2. Move the crosshairs pointer to the area of the page or pasteboard where you want to place the new item and then click and hold the mouse button and begin dragging the mouse. As you drag, the item displayed onscreen reflects your movements.
3. To finish drawing the item, release the mouse button (Figure 3.4). If you want to create a closed shape, drag the crosshairs pointer back to the starting point (a Pen icon is displayed) and then release the mouse button.
Tip: Using A Pen Tablet With The Freehand Drawing Tool
The Freehand Drawing tool is much easier to use with a pen tablet than a mouse. If freehand illustration is a key part of your workflow and you want to create illustrations in QuarkXPress 8, consider adding a pen tablet to your hardware inventory.
The beauty of the Bézier Pen tool is that it lets you create any kind of line or shape consisting of any combination of straight and curved lines. The downside is that— especially for beginners— creating exactly the shape you want on the first attempt can be challenging, to say the least. Fortunately, you have many options for tweaking any shape you create with the Bézier Pen tool until you’re happy with the results. (For more information about modifying the shape of items, see “Transforming items” later in this chapter.)
To create straight-edged shapes:
1. Select the Bézier Pen tool from the Tools palette. It’s grouped with the Free-hand Drawing tool (third icon up from the bottom).
2. Move the crosshairs pointer to the area of the page or pasteboard where you want to place the new item, and then click to establish the first point.
3. Move the pointer to where you want to place the end of the item’s first line segment, and then click again. Continue moving the pointer and clicking to add points and segments.
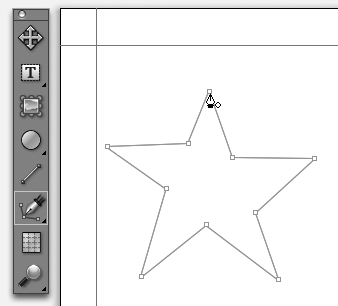
4. To create a closed shape, drag the crosshairs pointer back to the starting point (a Pen icon is displayed), and then release the mouse button (Figure 3.5). If you don’t want to close the shape, choose another tool when you’re done adding points and segments, or press Command (Mac) or Control (Windows) and click on an empty area.
Figure 3.5 Creating a five-pointed star required ten mouse clicks. The final mouse click was at the starting point.
Creating curved lines and shapes with the Bézier Pen tool is a little trickier than creating straight lines and shapes. To create shapes with curved edges:
1. Select the Bézier Pen tool.
2. Move the crosshairs pointer to the area of the page where you want to place the new item, and then click, hold down the mouse button, drag about one third of the way toward the next point, and then release the mouse button. As you drag, a teeter-totter-like line is displayed. Don’t be misled at this point. You’ve created only one point but no segments.
3. Move the crosshairs pointer to where you want to place the end of the item’s first segment and then click and drag about one third of the way toward the next point. Each time you click, you create a new point and a new segment.
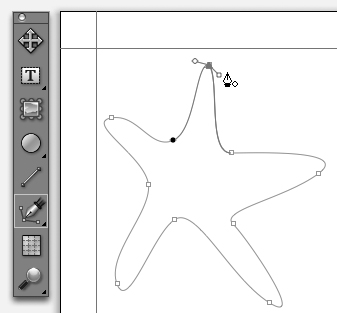
4. To create a closed shape, drag the crosshairs pointer back to the starting point (a Pen icon is displayed) and then release the mouse button (Figure 3.6). If you don’t want to close the shape, choose another tool when you’re done adding points and segments, or press Command (Mac) or Control (Windows) and click on an empty area.
Figure 3.6 Each curved segment of this shape was created by clicking and dragging toward the next point.
Once you get comfortable with the click-and-release technique that produces a straight segment and the click-and-drag technique that produces a curved segment, you can combine the two techniques to create lines and closed shapes with any combination of straight and curved segments.
In most cases, you’ll want to modify the items you create— for example, by moving or resizing them, changing their color, or adding a border. The rest of this chapter explains many features that let you change an item’s appearance; however, before you can modify any item, you must first select it. Similarly, when you’re done making your changes, you must deselect the item before moving on to other tasks.
The primary function of the Item tool
![]() is to select items. When the Item tool is selected, clicking once within any closed shape or on a straight or curved line selects the item. When an item is selected, its rectangular bounding box is displayed with eight resizing handles. (For rectangular items, the bounding box and the item shape are identical.) Straight lines are displayed with a handle at each end (Figure 3.7).
is to select items. When the Item tool is selected, clicking once within any closed shape or on a straight or curved line selects the item. When an item is selected, its rectangular bounding box is displayed with eight resizing handles. (For rectangular items, the bounding box and the item shape are identical.) Straight lines are displayed with a handle at each end (Figure 3.7).
At times you’ll want to make the same changes to several items. For example, you might want to apply a border to all of the picture boxes on a page or spread. You can select multiple items with the Item tool by holding down the Shift key and then clicking on the items. When you’re done selecting items, release the Shift key and make your modifications. You can also select multiple items by clicking on an empty portion of the page or pasteboard and then dragging a rectangle. Any items that are totally or partially within the rectangle are selected. After you’ve selected several items, you can press the Shift key and click on any item to deselect it.
Selecting an item can be a little tricky when the item is partially or completely hidden by an item that’s in front of it. To select an item that’s beneath another item, press Command+Option+Shift (Mac) or Control+Alt+Shift (Windows) and click on the item that’s in front. Your first click selects the topmost item. Continue to hold down the modified keys. Each click selects the next lowest item in the stacking order. When the backmost item is selected, the next click selects the topmost item.
Because selecting items is such a common task, the time you spend switching to the Item tool can add up. Power QuarkXPress users increase their productivity by using a keyboard shortcut. If you press the Command key (Mac) or the Control key (Windows) when any tool except the Item tool is selected, the arrow pointer is displayed (
![]() ) to indicate that you are in temporary Item tool mode, which means you can select an item, and then move or resize it. Release the modifier key to return to the selected tool.
) to indicate that you are in temporary Item tool mode, which means you can select an item, and then move or resize it. Release the modifier key to return to the selected tool.
Two of the most common modifications you’ll make to the items you create are changing their position and changing their size. The easiest way to accomplish both tasks is to use the Item tool.
To move a selected item, move the pointer within its shape, and then click and drag. If you pause a moment before you drag, the contents of a box are displayed as you drag. (If you don’t pause, only an empty rectangle is displayed.) Release the mouse button when the item is where you want it.
Tip: Moving Items Between Pages
Although it’s possible to drag items between pages, doing so can become cumbersome, especially if the pages are far apart. A better option is to choose Edit > Cut or Edit > Copy, navigate to the page on which you want to place the copy, and then choose Edit > Paste. Choose Edit > Paste In Place to place the copied item using the same page coordinates as the original.
After you’ve selected an item with the Item tool, you can drag any of its eight resizing handles (or either of the endpoints of a straight line) to change the dimensions. Drag a corner handle if you need to change both width and height; drag a midpoint handle to change only one dimension. You can also resize a text box when the Text Content tool is selected, and you can resize a picture box when the Picture Content tool is selected. If you add the Option key (Mac) or the Alt key (Windows) after you begin to drag a handle, the item is resized relative to its center. (Note: Straight lines have only two resizing handles— one at each end.)
Tip: Rotating Instead of Resizing
In addition to dragging corner handles to resize items, you can also drag corner handles to rotate items. If you move the pointer slightly outside a corner handle (to the outside of the selected box), the rotation pointer is displayed. Click and drag in the direction you want to rotate the item.
When you resize a text box or a picture box, the content within is not resized unless you add modifier keys. If you want to maintain the proportion of the content relative to the box, press Command+Shift (Mac) or Control+Shift (Windows) before you drag a resizing handle. If you add the Option key (Mac) or the Alt key (Windows), the box and its content are resized relative to the center of the item.
Controls for moving and resizing items are also available in the Classic tab of the Measurements palette. The values in the the X and Y fields determine the location of the upper left corner of an item’s bounding box; the W and H fields determine the width and height of the selected item. The same controls are available in the Box, Table, and Groups panes of the Modify dialog box.
QuarkXPress lets you modify items in more ways than this book could possibly cover. To give you an idea of the number of item attributes you can modify, the Modify dialog box (Item > Modify) has more than 75 controls for modifying text and picture boxes spread among seven different panes. Additional controls are available for other types of items (lines, text paths, and tables), and several additional commands for modifying items are available in the Item menu. The good news is that once you know how to accomplish the basic modifications that are explained in this section, you’ll be comfortable using the other controls.
The first step in modifying an item is to select it with the Item tool. You can also modify a text box when text is highlighted or the cursor is blinking (that is, when the Text Content tool is selected). If you select multiple items of the same type, you can make the same changes to all of them at once; if you select multiple items of different types, you can change whatever attributes they share, such as size, color, frame, and drop shadow.
After you select the item you want to modify, choose Item > Modify to display the Modify dialog box. The panes and controls displayed in this dialog box depend on the type of item that’s currently selected. Here’s a quick summary of all the panes:
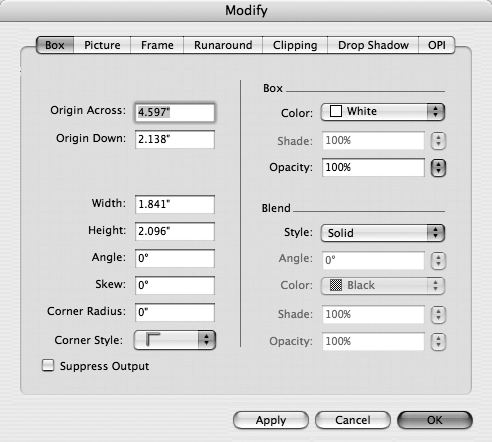
![]() Box pane: Available when a text, picture, or no-content box is selected. Contains the controls for modifying text boxes and picture boxes, including their position on the page (Origin Across and Origin Down), size, angle, background color, and opacity (Figure 3.8).
Box pane: Available when a text, picture, or no-content box is selected. Contains the controls for modifying text boxes and picture boxes, including their position on the page (Origin Across and Origin Down), size, angle, background color, and opacity (Figure 3.8).
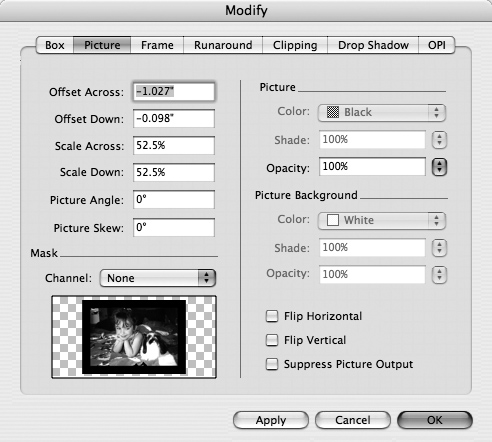
![]() Picture pane: When a picture box is selected, these controls let you modify the picture within the box, including its position within the box (Origin Across and Origin Down), scale, and, angle (Figure 3.9).
Picture pane: When a picture box is selected, these controls let you modify the picture within the box, including its position within the box (Origin Across and Origin Down), scale, and, angle (Figure 3.9).
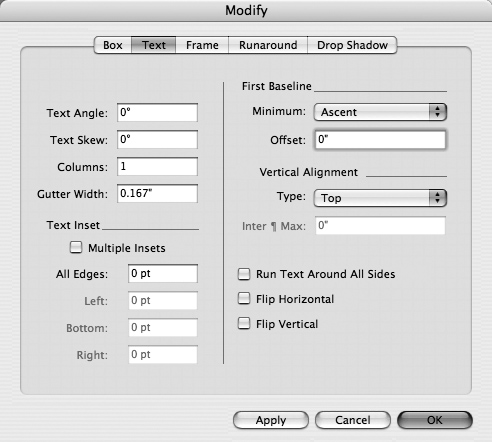
![]() Text pane: When a text box is selected, the controls in this pane let you change the way the text is placed and flows within the box. Options include rotation (Text Angle), columns, text insets (the distance between the edge of the box and the text within), and the position of the first baseline of text (Figure 3.10).
Text pane: When a text box is selected, the controls in this pane let you change the way the text is placed and flows within the box. Options include rotation (Text Angle), columns, text insets (the distance between the edge of the box and the text within), and the position of the first baseline of text (Figure 3.10).
![]() Line pane: Available when a line is selected, these controls let you change line style, width, placement, and color.
Line pane: Available when a line is selected, these controls let you change line style, width, placement, and color.
![]() Text Path pane: When a text path is selected, you can change the orientation and position of the text relative to the path.
Text Path pane: When a text path is selected, you can change the orientation and position of the text relative to the path.
![]() Table and Grid panes: Available for a selected table if the Text Content or Picture Content tool is not selected. The Table pane is similar to the Box pane with a few additional table-specific options. The grid pane lets you change the appearance (for example, style, width, and color) of the cell borders.
Table and Grid panes: Available for a selected table if the Text Content or Picture Content tool is not selected. The Table pane is similar to the Box pane with a few additional table-specific options. The grid pane lets you change the appearance (for example, style, width, and color) of the cell borders.
![]() Cell pane: Available for a selected table when the Text Content or Picture Content tool is selected. Lets you control the width of columns, the height of rows, and the color of cell backgrounds.
Cell pane: Available for a selected table when the Text Content or Picture Content tool is selected. Lets you control the width of columns, the height of rows, and the color of cell backgrounds.
![]() Group pane: Identical to the Box pane and available when multiple items are selected.
Group pane: Identical to the Box pane and available when multiple items are selected.
![]() Frame pane: Available for all closed shapes (text, picture, and no-content boxes and tables). The controls in this pane let you add borders to items and specify their appearance (style, width, color).
Frame pane: Available for all closed shapes (text, picture, and no-content boxes and tables). The controls in this pane let you add borders to items and specify their appearance (style, width, color).
![]() Runaround pane: This pane is available for all items. The settings you make in this dialog box determine how text that overlaps the item (that is, text that’s in any text boxes that are in front of the item) is handled. You can wrap the text around the item or you can ignore the item and flow the text in front of it. If a picture box is selected, you can also control how the text flows relative to the picture.
Runaround pane: This pane is available for all items. The settings you make in this dialog box determine how text that overlaps the item (that is, text that’s in any text boxes that are in front of the item) is handled. You can wrap the text around the item or you can ignore the item and flow the text in front of it. If a picture box is selected, you can also control how the text flows relative to the picture.
![]() Clipping pane: Available only for picture boxes. The controls in this pane let you mask (that is, hide) certain areas of a picture. For example, you can hide portions of a picture by selecting its clipping path or alpha channel (if it has one), or you can show and hide different areas based on the picture’s contrast.
Clipping pane: Available only for picture boxes. The controls in this pane let you mask (that is, hide) certain areas of a picture. For example, you can hide portions of a picture by selecting its clipping path or alpha channel (if it has one), or you can show and hide different areas based on the picture’s contrast.
![]() Drop Shadow pane: Available for all items. Use the controls in this pane to add a soft drop shadow to the selected item and create a 3-D effect— the appearance that the item is hovering above the page and casting a shadow. (Adding drop shadows is explained in greater detail later in this chapter.)
Drop Shadow pane: Available for all items. Use the controls in this pane to add a soft drop shadow to the selected item and create a 3-D effect— the appearance that the item is hovering above the page and casting a shadow. (Adding drop shadows is explained in greater detail later in this chapter.)
![]() OPI pane: Available only for picture boxes. An OPI (Open Prepress Interface) workflow lets QuarkXPress users import low-resolution picture files into their layouts and automatically replace them with high-resolution versions for final output. The lone control in this dialog box lets you enable or disable OPI.
OPI pane: Available only for picture boxes. An OPI (Open Prepress Interface) workflow lets QuarkXPress users import low-resolution picture files into their layouts and automatically replace them with high-resolution versions for final output. The lone control in this dialog box lets you enable or disable OPI.
Tip: Displaying Changes Made in the Modify Dialog Box
If you click the Apply button in the Modify dialog box, any changes you’ve made to the selected item are displayed. (You may have to move the dialog box to see the selected item.) Each time you click Apply after making changes, the changes are applied.
The main benefit of the Modify dialog box is that it provides access to many options for modifying items, but it also has a few drawbacks. It takes up a lot of space, you must click the Apply button to see the results of your changes, and while the dialog box is open, the page you’re working on is inaccessible.
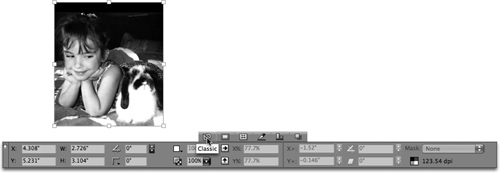
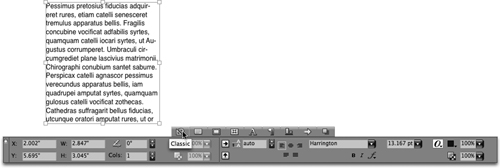
The Measurements palette provides an efficient alternative for accessing many of the most commonly used controls in the Modify dialog box. (For information about how to use the Measurements palette, see Chapter 2.) For example, the Classic controls let you modify the selected item’s position, size, and angle. If a picture box is selected, additional controls let you modify the picture (scale, rotate, and so on; see Figure 3.11). If a text box is selected and text is highlighted or the cursor is flashing (that is, if the Text Content tool is selected), the Measurements palette displays text-formatting controls (font, size, leading, alignment, and so on; Figure 3.12). The Frame, Runaround, Clipping Path, and Drop Shadow controls in the Measurements palette provide the same functionality as the corresponding panes in the Modify dialog box.
The benefit of using the Measurements palette is that the page you’re working on remains accessible as you change the settings in the palette. There’s no need to close the palette as is necessary when you’re done making changes in the Modify dialog box.
Tip: Save Time With Item Styles
If you need to apply the same formatting (background color, frame size and style, drop shadow, and so on) to numerous items, you can save time and ensure consistency by creating an item style. An item style is a collection of attributes that you can apply to any item with a single click or keystroke. The easiest way to create an item style is to first make the modifications you want to an item, and then (with the item still selected) choose New from the Item Styles palette menu. After you create an item style, you can apply it by selecting an item, and then clicking the style name in the Item Styles palette.
Tip: Make Global Changes to Items
If you’ve done much word processing, you’re familiar with find/change features that let you search for text or text formatting and replace what’s found with different text or formatting. QuarkXPress offers the same feature for items (Edit > Item Find/Change). The Item Find/Change window has several tabbed panes, each with a different set of item-related controls. After you specify Find/What and Change/To settings, you’re ready to go.
Two of the most common changes you’ll make to text boxes, picture boxes, and no-content boxes are adding a background color and a border (or a frame, to use the QuarkXPress term). You can use either the Modify dialog box (Item > Modify) or the Measurements palette to perform these tasks.
To add a background color to a box or modify the current color:
1. Select the box with the Item tool.
2. Choose Item > Modify.
3. In the Box pane of the Modify dialog box, choose a color from the Color menu. Other controls in the Box area let you adjust the shade and opacity of the background color.
The controls for adding and modifying background color, shade, and opacity are available in the Classic tab of the Measurements palette. (For more information about creating colors and working with color, see Chapter 8.)
The controls in the Blend area of the Modify dialog box’s Box pane let you fill the background of a box with a two-color blend. (A blend is a smooth transition from one color to another.) Six blend styles are available, and you can control the angle, color, shade, and opacity of the blend. Figure 3.13 shows several examples of blended backgrounds.

To add a frame to a box or modify the current frame:
1. Select the item with the Item tool.
2. Choose Item > Modify.
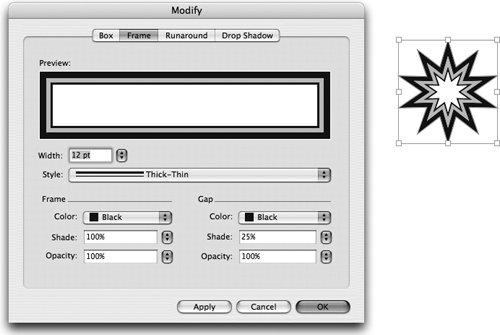
3. In the Frame pane of the Modify dialog box, specify a width and choose a style. You can use the controls in the Frame and Gap area to further modify the frame (Figure 3.14).
Figure 3.14 The Frame pane of the Modify dialog box lets you add borders around boxes and includes several controls for modifying the appearance of borders.
The controls for adding and modifying frames are available in the Classic tab of the Measurements palette.
The controls for modifying the width, style, and color of straight and curved lines are similar to those for modifying frames. To modify the appearance of a selected line, use the controls in the Line pane of the Modify dialog box. A subset of these controls is available in the Classic tab of the Measurements palette.
Adding a drop shadow to an item is only one of many possible modifications you can make, but it’s also one of the coolest, which is why it gets its own section in this book.
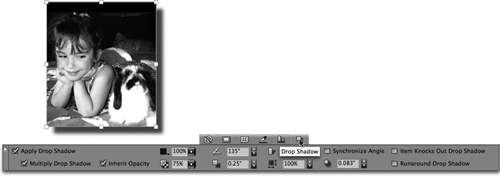
You can add a drop shadow to any item using either the Drop Shadow pane in the Modify dialog box or the Drop Shadow controls in the Measurements palette (Figure 3.15). To add a drop shadow, simply check Apply Drop Shadow at the left of the palette. The rest of the controls let you modify the placement and appearance of the shadow. For example, you can choose the color of the shadow, and you can control the length of the shadow by modifying the Drop Shadow Distance value. Other controls let you specify how the drop shadow interacts with items behind it and with text that overlaps it.
Efficient QuarkXPress users never create the same item twice. By reusing items rather than re-creating them, they save time and ensure consistency. QuarkXPress provides several ways to create and save copies of items. Here’s a quick rundown of each option:
![]() Cut/Copy and Paste commands (Edit menu): A time-honored but not particularly efficient method for creating and placing a single copy of an item. When you choose Edit > Paste, a copy of the item you cut or copied is placed in the center of the page. If you choose Edit > Paste in Place, the new item is placed in the same location as the original— particularly helpful when you’re moving an item between pages and you want to maintain its original position.
Cut/Copy and Paste commands (Edit menu): A time-honored but not particularly efficient method for creating and placing a single copy of an item. When you choose Edit > Paste, a copy of the item you cut or copied is placed in the center of the page. If you choose Edit > Paste in Place, the new item is placed in the same location as the original— particularly helpful when you’re moving an item between pages and you want to maintain its original position.
![]() Duplicate command (Item menu): The keyboard shortcut for the Duplicate command (Command+D Mac; Control+D Windows) is the quickest way to create a single copy of the selected items. The duplicate copy is slightly offset from the original item unless you’ve used the Step and Repeat command (see next bullet), in which case the Duplicate command uses the most recent values from this dialog box when placing duplicates.
Duplicate command (Item menu): The keyboard shortcut for the Duplicate command (Command+D Mac; Control+D Windows) is the quickest way to create a single copy of the selected items. The duplicate copy is slightly offset from the original item unless you’ve used the Step and Repeat command (see next bullet), in which case the Duplicate command uses the most recent values from this dialog box when placing duplicates.
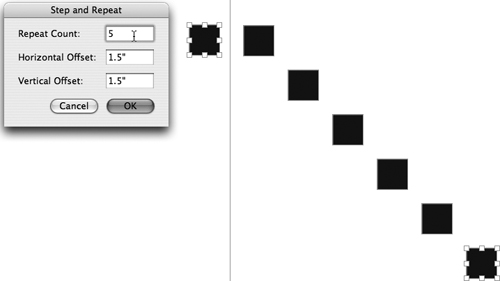
![]() Step and Repeat command (Item menu): This handy feature lets you create multiple duplicates in a single operation and control the placement of the duplicates relative to the original item (Figure 3.16).
Step and Repeat command (Item menu): This handy feature lets you create multiple duplicates in a single operation and control the placement of the duplicates relative to the original item (Figure 3.16).
Figure 3.16 The values in the Step and Repeat dialog box produced the results on the right from the single black square that was originally selected.
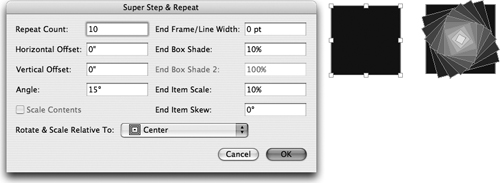
![]() Super Step and Repeat command (Item menu): This beefed-up version of Step and Repeat lets you incrementally change the angle, shade, scale, and skew of the duplicates (Figure 3.17).
Super Step and Repeat command (Item menu): This beefed-up version of Step and Repeat lets you incrementally change the angle, shade, scale, and skew of the duplicates (Figure 3.17).
Figure 3.17 The graphic on the right was created from a single black square (center) using the Super Step & Repeat dialog box.
![]() Drag-copy: This feature is new in QuarkXPress 8 and very handy. If you press the Option key (Mac) or Alt key (Windows) after you begin dragging an item with the Item tool, a copy of the item is created, leaving the original item unchanged. Add the Shift key as you drag to constrain movement to horizontal and vertical. You can drag the copy wherever you want. Be careful when drag-copying items. If you press the Option or Alt key before you begin dragging an item, the Hand pointer is displayed and you won’t be able to move or create a duplicate of the item you want to select. (This pointer allows you to scroll by dragging the mouse.) Each time you drag-copy an item, QuarkXPress stores the horizontal and vertical offset distances and uses them for the Duplicate command (Item menu).
Drag-copy: This feature is new in QuarkXPress 8 and very handy. If you press the Option key (Mac) or Alt key (Windows) after you begin dragging an item with the Item tool, a copy of the item is created, leaving the original item unchanged. Add the Shift key as you drag to constrain movement to horizontal and vertical. You can drag the copy wherever you want. Be careful when drag-copying items. If you press the Option or Alt key before you begin dragging an item, the Hand pointer is displayed and you won’t be able to move or create a duplicate of the item you want to select. (This pointer allows you to scroll by dragging the mouse.) Each time you drag-copy an item, QuarkXPress stores the horizontal and vertical offset distances and uses them for the Duplicate command (Item menu).
Tip: Use Libraries to Store Frequently Used Items
If you create an item that you intend to use repeatedly—for example, a text box with boilerplate text or a graphic you’ve created within QuarkXPress—saving it in a library is a good way to make the item readily available. To create a new library, choose File > New > Library. After you name and save the library file, an empty window library is displayed. Drag items into the library window to copy them to the library. Whenever you need a copy of an item you’ve stored in a library, drag it from the library window onto a page or the pasteboard.
Guidelines and the ability to snap item edges to guidelines (View > Snap to Guides) can be handy when you’re dragging an item to a new position, but if you want to align several items, place an equal amount of space between multiple items, or both, using the Space/Align controls in the Measurements palette can save you a lot of time and work.
To display the Space/Align controls (Figure 3.18), choose Item > Space/Align or move the pointer to the top of the Measurements palette, and then click the Space/Align icon in the row of pop-up icons. The controls are available only if multiple items are selected.
Figure 3.18 The Space/Align controls in the Measurements palette include a row of 14 buttons that runs across the top of the palette and another, smaller row of controls below.
To simplify things, the Space and Align controls are covered separately in the instructions that follow; however, once you get the hang of each task separately you can combine the Space and Align controls to accomplish both tasks at once. A word of caution is appropriate here: Becoming comfortable with the Space/Align controls can take a little time. Don’t be surprised if your first attempts produce unexpected results. Whenever that’s the case, simply choose Edit > Undo or use the keyboard shortcut (Command +Z in Mac systems or Control+Z in Windows) and try again.
The first eight buttons along the top of the Measurements palette (Figure 3.19) and the Space pop-up menu below let you control the amount of space between multiple items.
To place an equal amount of space between multiple items:
1. Select the items you want to space equally.
2. In the Measurements palette:
![]() Click the Item Relative mode button
Click the Item Relative mode button
![]() to maintain the position of the uppermost item and move the other items relative to this item.
to maintain the position of the uppermost item and move the other items relative to this item.
![]() Click the Page Relative mode button
Click the Page Relative mode button
![]() to position items relative to the page edges.
to position items relative to the page edges.
![]() Click the Spread Relative mode button
Click the Spread Relative mode button
![]() to position the items in a facing-page spread relative to the spread.
to position the items in a facing-page spread relative to the spread.
3. Enter a value in the Space field or choose Evenly from the pop-up menu. The setting you make in this field determines the value, if any, that’s used in the next step. For example, if you click Page Relative mode, choose Evenly from the Space pop-up menu, and then click the Space Horizontal Centers button, the items are spread across the page with equal distance between their horizontal centers. Figures 3.20A and 3.20B show the results of these settings.
Figure 3.20A Several items are selected. In the Measurements palette, the Page Relative Mode button is selected and the Space (between) value is set to Evenly.
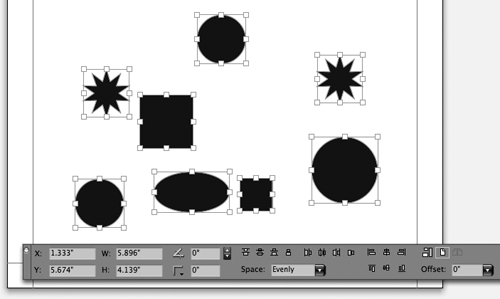
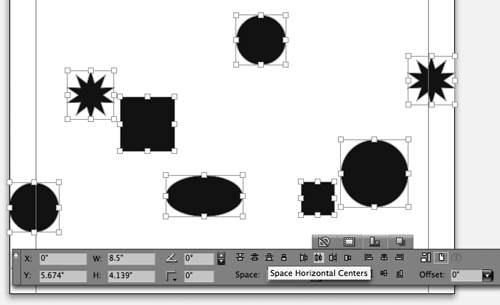
Figure 3.20B Here you see the result of clicking the Space Horizontal Centers button. The leftmost item is aligned with the left edge of the page, the rightmost item is aligned with the right edge of the page, and the distance between the horizontal centers of the items is equal.
4. Click one of the eight Space buttons. The items are repositioned based on the choices you made in steps 2 and 3.
Immediately to the right of the eight spacing buttons along the top of the Measurements palette is a set of six alignment buttons (Figure 3.21).
To align multiple items:
1. Select the items you want to space equally.
2. In the Measurements palette:
![]() Click the Item Relative mode button
Click the Item Relative mode button
![]() to maintain the position of the uppermost item and move the other items relative to this item.
to maintain the position of the uppermost item and move the other items relative to this item.
![]() Click the Page Relative mode button
Click the Page Relative mode button
![]() to position items relative to the page edges.
to position items relative to the page edges.
![]() Click the Spread Relative mode button
Click the Spread Relative mode button
![]() to position the items in a facing-page spread relative to the spread.
to position the items in a facing-page spread relative to the spread.
3. Click any of the six alignment buttons. See Figures 3.22a and 3.22b for before and after examples of aligning items.
Figure 3.22A Here you see a “before” example: Multiple items are selected and Item Relative mode is selected in the Measurements palette.
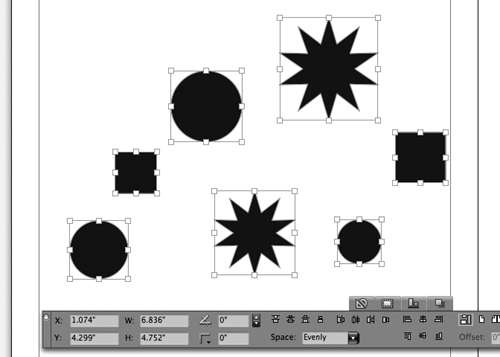
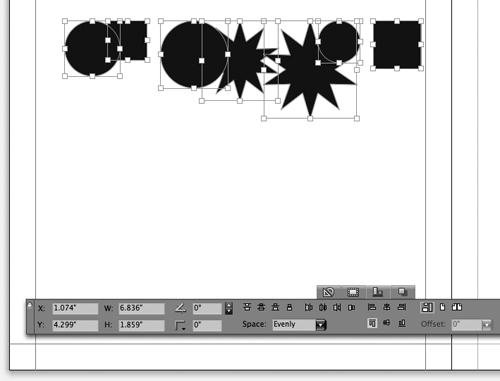
Figure 3.22B Clicking Align Top Edges produced the result above: The top edges of all items now line up.
Tip: Specifying an Offset Value
If you choose Page Relative mode or Spread Relative mode, the Offset field is available. The distance you specify in this field is added to (or subtracted from, if the value is negative) the page or spread dimensions when you subsequently use the Space and Align controls.
In addition to using the Bézier Pen tool to create irregular lines and shapes, you can also create complex boxes and difficult-to-draw boxes by combining existing boxes, and you have the option to convert the shape of any item by choosing a different shape from a list.
When multiple items are selected, the Merge command (Item menu) offers six options for creating a single box from the selected items. Here’s a brief description and example of each option:
![]() Intersection: Combining the areas where the items in front overlap the back-most item produces the resulting shape. Other areas are not included (Figure 3.23).
Intersection: Combining the areas where the items in front overlap the back-most item produces the resulting shape. Other areas are not included (Figure 3.23).
Figure 3.23 Intersection: before (left) and after (right). The square shape is the backmost; the circles are in front.

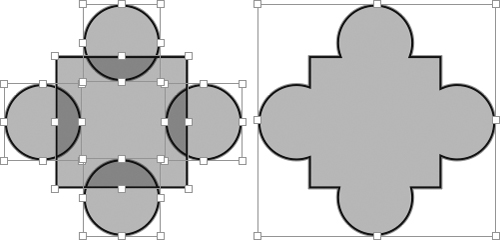
![]() Union: Combines all items into a single box (Figure 3.24).
Union: Combines all items into a single box (Figure 3.24).
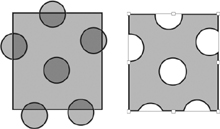
![]() Difference: Cuts out the items in front from the backmost item (Figure 3.25).
Difference: Cuts out the items in front from the backmost item (Figure 3.25).
Figure 3.25 Difference: before (left); after (right). The square shape is the backmost; the circles are in front.
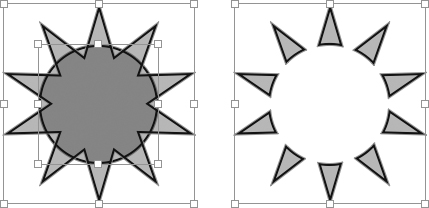
![]() Reverse Difference: Cuts out the backmost items from the frontmost item (Figure 3.26).
Reverse Difference: Cuts out the backmost items from the frontmost item (Figure 3.26).
Figure 3.26 Reverse Difference: before (left); after (right). The circle shape is behind the starburst shape (left).
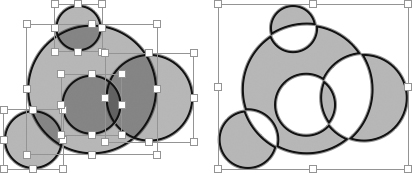
![]() Exclusive Or and Combine: All of the original shapes are left intact. Areas where two items overlap are cut out; areas where three items overlap are included, and so on. Visually, the result of choosing Exclusive Or and Combine is the same; however, when you choose Combine, the resulting item contains fewer points than the item that’s produced when you choose Exclusive Or (Figure 3.27).
Exclusive Or and Combine: All of the original shapes are left intact. Areas where two items overlap are cut out; areas where three items overlap are included, and so on. Visually, the result of choosing Exclusive Or and Combine is the same; however, when you choose Combine, the resulting item contains fewer points than the item that’s produced when you choose Exclusive Or (Figure 3.27).
Tip: Combining Two Lines
If you choose Page Relative mode or Spread Relative mode, the Offset field is available. The distance you specify in this field is added to (or subtracted from if the value is negative) the page or spread dimensions when you subsequently use the Space and Align controls.
The Split command (Item menu) splits a merged box into separate boxes. (It’s worth noting that choosing this command doesn’t produce the same items that were used to create the merged item in the first place.) You can also use the Split command on other complex boxes to deconstruct them into discrete boxes.
The Split command offers two choices:
![]() Outside Paths: Creates a single item that retains the appearance of the selection and creates a separate path for each shape.
Outside Paths: Creates a single item that retains the appearance of the selection and creates a separate path for each shape.
![]() All Paths: Creates a separate box for every shape.
All Paths: Creates a separate box for every shape.
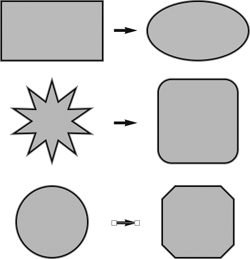
In addition to changing the shape of an item by dragging a resizing handle or by adding, deleting, or moving points, handles, or segments, you can also change the shape of any item by simply choosing any of nine default shapes. To do this, select an item, choose Item > Shape, and then choose an option from the submenu. Figure 3.28 shows some examples.
Figure 3.28 The original items are on the left. The results of choosing a different shape from the Shape submenu are on the right.
Tip: Splitting a Closed Shape
Choosing the freehand line option
![]() in the Shape submenu (Item > Shape) converts a closed box into an open path. This can be useful for modifying the shape of an item; however, if you choose this option for a picture box that contains a picture you are warned that doing so will remove the picture from the box. If you convert a text box into a freehand shape, the resulting path becomes a text path and any text that was within the box now flows along the path. After you convert an item to a freehand path, you can use the Pen tool and the tools it’s grouped with in the Tools palette (Add Point tool, Delete Point tool, Select Point tool, and Convert Point tool) to modify the path.
in the Shape submenu (Item > Shape) converts a closed box into an open path. This can be useful for modifying the shape of an item; however, if you choose this option for a picture box that contains a picture you are warned that doing so will remove the picture from the box. If you convert a text box into a freehand shape, the resulting path becomes a text path and any text that was within the box now flows along the path. After you convert an item to a freehand path, you can use the Pen tool and the tools it’s grouped with in the Tools palette (Add Point tool, Delete Point tool, Select Point tool, and Convert Point tool) to modify the path.
Earlier in this chapter you learned to change the shape of an item by dragging the resizing handles of the item’s bounding box. When you drag a resizing handle, you’re simply changing the proportions of the item. If you want to make more radical changes to the item’s shape, you can drag any of its points (corner, smooth, and symmetrical) or segments rather than drag a resizing handle. You can also add and remove points.
To reshape an item by manipulating points or segments:
1. Select the item with the Item tool.
2. Choose the freehand box shape
![]() in the Shape submenu.
in the Shape submenu.
3. Choose the Bézier Pen tool or any of the other tools grouped with it in the Tool palette that let you work with points (Add Point tool, Remove Point tool, Convert Point tool, Select Point tool). When you choose one of these drawing tools, the item’s handles are displayed along its path (Figure 3.29).
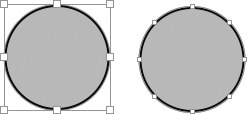
Figure 3.29 Left: The item is selected with the Item Tool. Right: The same item after converting the circle to a freehand shape, and then choosing the Select Point tool.
Use the selected tool to modify the shape.
Here’s a brief description of the four tools that let you manipulate points and segments:
![]() Add Point tool
Add Point tool
![]() : Click a path with this tool to add a handle.
: Click a path with this tool to add a handle.
![]() Remove Point tool
Remove Point tool
![]() : Click a point with this tool to remove the point.
: Click a point with this tool to remove the point.
![]() Convert Point tool
Convert Point tool
![]() : Click a point with this tool to convert it to a different kind of point. For example, click a smooth or symmetrical point to convert the point to a corner point. Click and drag a corner point to convert it to a smooth point.
: Click a point with this tool to convert it to a different kind of point. For example, click a smooth or symmetrical point to convert the point to a corner point. Click and drag a corner point to convert it to a smooth point.
![]() Select Point tool
Select Point tool
![]() : This tool lets you select and drag points, curve handles, and segments.
: This tool lets you select and drag points, curve handles, and segments.
Every time you add a new item to a page, it’s placed in front of all existing items and all master page items. (For more about master pages, see Chapter 9.) This back-to-front arrangement of items is referred to as the stacking order. If items don’t overlap, the stacking order doesn’t matter, but where items overlap, the item that’s frontmost obscures the items that are behind it (unless you make the front-most item translucent by applying an opacity value). If you want to make the underlying items visible, you have to change the stacking order. That is, you have to move the frontmost item down in the stacking order.
The Item menu offers four options for changing a selected item’s position in the stacking order:
![]() Send to Back: Sends the selected item to the bottom of the stacking order (Figure 3.30). This command is not available if the selected item is at the bottom of the stacking order.
Send to Back: Sends the selected item to the bottom of the stacking order (Figure 3.30). This command is not available if the selected item is at the bottom of the stacking order.
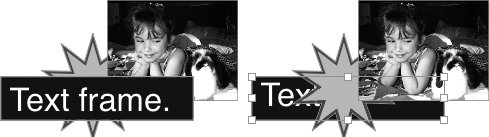
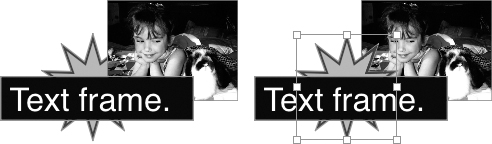
Figure 3.30 The text box on the left is in front of the picture box, and the picture box is in front of the starburst shape. Selecting the text box and choosing Item > Send to Back produced the result on the right.
![]() Send Backward: Moves the selected item one level lower in the stacking order (Figure 3.31). To display this command, press Option (Mac) or Alt (Windows) before clicking the Item menu.
Send Backward: Moves the selected item one level lower in the stacking order (Figure 3.31). To display this command, press Option (Mac) or Alt (Windows) before clicking the Item menu.

![]() Bring to Front: Moves the selected item to the top of the stacking order (Figure 3.32). This command is not available if the selected item is at the top of the stacking order.
Bring to Front: Moves the selected item to the top of the stacking order (Figure 3.32). This command is not available if the selected item is at the top of the stacking order.
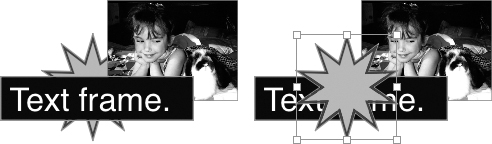
Figure 3.32 The starburst shape on the left is at the bottom of the stacking order. Choosing Bring to Front moved it to the top of the stacking order (right).
![]() Bring Forward: Moves the selected item one level higher in the stacking order (Figure 3.33). To display this command, press Option (Mac) or Alt (Windows) before clicking the Item menu.
Bring Forward: Moves the selected item one level higher in the stacking order (Figure 3.33). To display this command, press Option (Mac) or Alt (Windows) before clicking the Item menu.
Figure 3.33 Choosing Bring Forward moved the starburst shape one level higher in the stacking order.
Every QuarkXPress layout has a default layer that contains the items you create. You can add more layers if you want to be able to work with only certain items. For example, you can place all of the text boxes on one layer and all graphics on another layer. Each layer has its own stacking order, and you can rearrange the stacking order of layers in much the same way you can rearrange the stacking order of items. For more about layers, see Chapter 9.