
In This Chapter
Using the Item list to track inventory
Keeping inventory as you purchase items
Keeping inventory as you sell items
Using purchase orders to help track inventory
Adjusting inventory records to reflect what's really in stock
Dealing with multiple inventory locations
Taking the lazy person's approach to inventory
For small and growing businesses, inventory is one of the toughest assets to manage. First, of course, you need to physically care for stuff. Second, you have to make sure that you don't run out of some item or have too much of some other item.
QuickBooks (unfortunately) isn't all that sophisticated in its inventory management features, but it is easy to use. And with a little jiggering, you can probably get it to work in any simple case. (The one tricky part that I talk about a little later in the chapter is what you can do when you keep inventory in multiple locations, but I'm going to hold off on that discussion for a bit. That'd be like jumping off the deep end of the dock before you learn to swim.)
Tip
If you want to make inventory accounting really easy and don't care about a bit of imprecision, take a peek at the last section of this chapter, "The Lazy Person's Approach to Inventory."
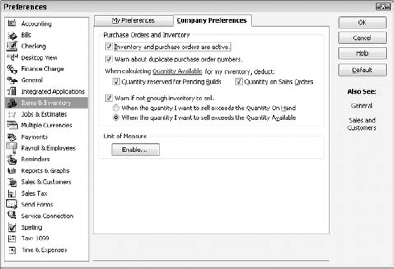
Before you can track your inventory, you need to do two things. First, you need to tell QuickBooks that you want to track inventory. To do this, choose Edit
Here's the second thing that you need to do: Create an Item list. This list is a description of all items that you might conceivably put on an invoice. In other words, all items that you order and sell belong on the Item list.
Note
You should have set up your initial Item list in the EasyStep Interview (see Chapter 2). If you need to add an item to your list, choose Lists
After you turn on the inventory stuff and set up (or update) your Item list, you can track your inventory.
As you unload items from a truck, receive them in the mail, or buy them from a street peddler, you have to record the items so that QuickBooks can track your inventory. How you record the items and pay for them depends on whether you pay cash on the barrelhead, receive a bill along with the items, or receive the items without a bill (in which case, you pay for the items later).
And you may have filled out a purchase order (PO) for the items that you're receiving. If that's the case, receiving the items gets a little easier. If you receive items for which you already filled out a PO, see the section, "How Purchase Orders Work," later in this chapter. I strongly recommend filling out a PO when you order items that you're going to receive and pay for later.
Okay, you just bought three porcelain chickens in the bazaar at Marrakech, and now you want to add them to your inventory and record the purchase. How do you record inventory you paid for over the counter? By using the Write Checks window, of course — the same way you record any other bills you pay for up-front. Just make sure that you fill out the Items column as I describe in Chapter 6.
What happens if the items come before the invoice? Lucky you — you have the stuff, and you don't have to pay for it yet. However, you do have to record the inventory you just received so that you know you have it on hand. You can't do that in the Write Checks window because you won't be writing a check to pay for the stuff — at least not for a while. How do you record items that you receive before paying for them? Read on:
Either Choose Vendors

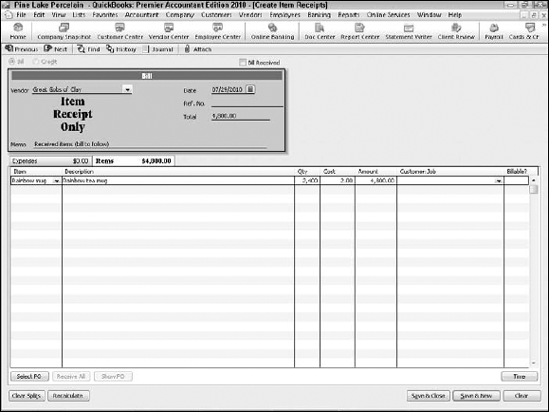
You see the Create Item Receipts window, as shown in Figure 7-2. This window is similar to the Enter Bills window that I describe in Chapter 6, but it reads Item Receipt Only. (You see the Enter Bills window again when you receive the bill for items.)
Fill in the top part of the window.
If you want to record items from a vendor who's already on the Vendor list, click the down arrow and then choose the vendor. If the vendor is a new vendor, choose Add New from the drop-down list and then, in the New Vendor dialog box that appears, click Set Up to set up information about the vendor: the address, the credit limit, payment terms, and so on. When you're done with the New Vendor dialog box, click Save & Close.
Click the Items tab.
You need to click the Items tab only if it isn't already displayed. It probably is. But the computer book writers' code of honor and a compulsive personality require me to tell you that there's another tab — the Expenses tab — and you could possibly display it instead.
Move to the Item column and type a name for the item.
Notice the down arrow in the Item column. Click it to see the Item list. Does the item that you're paying for appear on this list? If so, click it. If not, enter a new item name. You see the Item Not Found message box. Click Set Up, fill out the New Item dialog box and then click Save & Close. (See Chapter 3 for help with describing new items.)
You may just as well go down the packing slip, entering the items on the Items tab. Make sure that the Items tab accurately shows what's on the packing slip. And put a brief description of the items in the Memo field because that description might prove useful later when you want to match up your item receipt with the bill. When you finish, the Create Item Receipts window should look something like what you see in Figure 7-2 (shown earlier).
Click the Save & New button or the Save & Close button to record the items that you just received.
The items are officially part of your inventory. The item receipt has been entered on the Accounts Payable register. Not only that, but also, you're all ready for when the bill comes.
The items arrive, and you fill out an item receipt. Three weeks pass. What's this in your mailbox? Why, it's the bill, of course! Now you have to enter a bill for the items that you received three weeks ago. This job is easy:
Choose Vendors
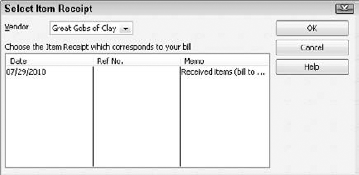
Or, from the Home screen, click the Enter Bills Against Inventory icon. If you're on the Vendor Center, click New Transactions and then Enter Bill for Received Items. The Select Item Receipt dialog box appears, as shown in Figure 7-3.
Click the Vendor drop-down list and choose the name of the vendor who sent you the bill.
You see one or more item receipts in the box, with the date you put on the receipt, its reference number, and the memo that you wrote on the receipt.
Select the item receipt for which you want to enter a bill and then click OK.
The Enter Bills window appears, as shown in Figure 7-4. Does this information look familiar? It should — it's the same information that you put in the Create Item Receipts window, only now you're working with a bill, not a receipt.
Compare the Items tab in the window with the bill.
Are you paying for what you received earlier? Shipping charges and sales tax may have been added to your bill. You may also need to adjust the price because you may have been guessing when you recorded receiving the items. If so, add to and adjust the original receipt information by using the Items tab. (You can click the Recalculate button to add the new items.)
How many days do you have to pay this bill? Is it due now? Take a look at the Terms line to see what this vendor's payment terms are. Change the payment terms if they're incorrect by selecting a different entry from the drop-down list. Remember, you want to pay your bills at the best possible time, but for you to do so, the terms in the Enter Bills window must match the vendor's payment terms.
Click Save & New or Save & Close to record the bill.
Of course, you still need to pay the vendor's bill. Fair enough. Take a look at Chapter 6 if you need help.

Suppose that you receive the bill when you receive the goods. The items are unloaded from the elephant's back, and the elephant driver takes a bow and hands you the bill. Here are the steps you follow:
Choose Vendors
Or, from the Home screen, click Receive Inventory and then select the Receive Inventory with Bill option there. Or, from the Vendor Center, click New Transactions and then Enter Bill for Received Items. You see the Enter Bills window (refer to Figure 7-4). If you've been reading this chapter from its beginning, you're familiar with this window, and you know exactly what it is and what it does. If you landed cold turkey on this page by way of the index, you need to know, for inventory purposes, how to record the items you're paying for.
Fill out the top part of the window.
This stuff is pretty basic. Choose a vendor from the drop-down list and make sure that the vendor's terms for paying this bill are shown correctly. If this vendor is new, choose Add New. QuickBooks asks you to fill in an information dialog box about the vendor. Do it. Make sure that you fill out the Bill Due line correctly.
Click the Items tab and list all the items that you're paying for.
To see the Item list, move the cursor to the Item column and click the down arrow that appears. Make sure that the quantity and cost of the items are listed correctly on the Items tab.
Click Save & New or Save & Close.
QuickBooks adds the items you listed to the Item list and makes them an official part of your inventory.
In Chapter 4, I tell you how to list the items on the invoice. Maybe you noticed the similarities between the Items tab in the Enter Bills window and the Quantity/Item Code/Description/Price Each/Amount box at the bottom of an invoice. QuickBooks uses both for keeping inventory.
When you sell stuff, QuickBooks automatically adjusts your inventory. In other words, if you buy 400 porcelain chickens and sell 350 of them, you have only 50 on hand. QuickBooks updates records for this change. No muss, no fuss. Gosh, isn't this great? No more lying awake at night, wondering whether you have enough chickens or wombats or whatever. The same thing happens when you make cash sales. When you list the items on the sales receipt, QuickBooks assumes that they're leaving your hands and subtracts them from your inventory.
Tip
One moral of this story is "Keep a good, descriptive Item list." And the other moral is "Enter items carefully on the Items tab of checks and bills and in the Item/Description/Qty/Rate/Amount box of sales receipts and invoices."
If you have to order stuff for your business, consider using POs. Create QuickBooks POs even if you order goods by phone or by telegraph or even via the World Wide Web — that is, whenever you don't request goods in writing. Filling out POs enables you to determine what items you have on order and when the items will arrive. All you'll have to do is ask QuickBooks, "What's on order, and when's it coming, anyway?" Never again will you have to rack your brain to remember whether you've ordered those thingamajigs and doohickeys.
And when the bill comes, you'll already have it itemized on the PO form. Guess what? Having written out all the items on your PO, you don't have to fill out an Items tab on your check when you pay the bill. Or, if you're paying bills with the accounts payable method, you don't have to fill out the Items tab in the Enter Bills window. (Look at Chapter 6 if you don't know what I'm talking about here.) When the items arrive, all you have to do is let QuickBooks know; the items are immediately added to your inventory list.
Tip
Use POs for items that you order — that is, for items that you'll receive and pay for in the future. If you buy items over the counter or receive items that you didn't order, you obviously don't need a PO. What you need to do is just pay the bill and inventory the items that you just bought, as I explain in the first half of this chapter.
Before you begin using PO forms, you may want to design a PO form especially for your business. To do this designing, follow these steps:
Choose Vendors
Or click the Purchase Orders icon on the Home screen; or, from the Vendor Center, select New Transactions and then Purchase Orders. QuickBooks displays the Create Purchase Orders window.
Click the Customize button, which appears at the top edge of the Create Purchase Orders window.
When QuickBooks displays the Basic Customization dialog box (see Figure 7-5), confirm that you're working with the correct form template. Typically, you want to make customizations to the Custom Purchase Order template. If you've created multiple templates, click the Manage Templates button and then choose the template you want to customize from the list that QuickBooks displays.
(Optional) Add a logo.
To add a logo to the PO form, select the Use Logo check box, click the Select Logo button, and then use the dialog box that QuickBooks displays to identify the graphic image file of your logo. (This is a neat way to personalize your POs.)
(Also optional) Color your world.
To fiddle-faddle with the colors used on your PO or to noodle around with the fonts used for the invoice text, experiment with the Select Color Scheme list or the Change Font For list and the Change Font button.
Specify PO information you want.
Use the Company & Transaction Information check boxes to select what you want in the header, footer, and fields of your PO and in what order you want the information.
Tip
Here's the most important thing you should know about this PO customization stuff. When you make your changes, the Preview area shows what the customizations look like, so go hog-wild. Be adventurous. If you make a mess, just click Cancel to abandon your customization changes. Then, if you want, restart the process — perhaps a bit wiser for the experience.
When your PO looks magnificent, click OK in the Basic Customization dialog box.
QuickBooks returns you to the Create Purchase Orders window.

If you decide that you want to change your PO templates, all you have to do is choose Customize again from the Custom Template drop-down list, click the Manage Templates button, and choose the template that you want to edit from the list that QuickBooks displays.
Perhaps you're running low on gizmos, or doohickeys, or some other item on your Item list, and you're ready to reorder these things — whatever they are. Follow these steps to fill out a PO:
Choose Vendors
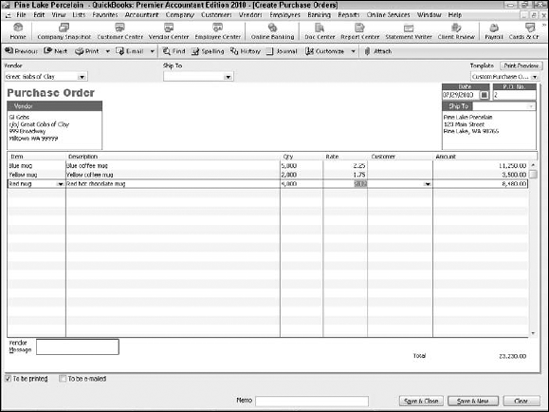
Or click the Purchase Orders icon on the Home screen. Or click the New Transactions area of the Vendor Center and then select Purchase Orders. You see the Create Purchase Orders window, which is similar to what's shown in Figure 7-6. Note that the exact details of this window depend on how you customize your PO form.
Choose a vendor from the Vendor drop-down list.
Click the down arrow to see a list of your vendors. Click a vendor to see its name and address in the Vendor box. If you can't find the name of the vendor on your list, click Add New from the list and then fill in the information about the vendor in the resulting New Vendor dialog box. Click Save & Close when you're done with the dialog box.
If you track your inventory by class, select a class from the Class drop-down list.
The Create Purchase Orders window may not have a Class drop-down list. If it doesn't and you want it to have one, you have to set up QuickBooks to track expenses by Class. To do so, open the QuickBooks file in single-user mode as the administrator. Then choose Edit
(Optional) Select a Rep, an Expected Date, and a FOB (which I describe in Chapter 4) if you're using them on your PO.
You may have to fill in other fields before you get to the item-by-item descriptions at the bottom. Again, these fields may not appear if you haven't indicated that you want them on your form.
Move to the Item column and start entering the items you're ordering.
Entering the items is the most important part of creating a PO. When you move into the Item column, it turns into a drop-down list. Click its down arrow to see the Item list. You may need to scroll to the item that you want to enter. A fast way to scroll to the item is to type the first few letters of the item name. If you type the name of an item that isn't on the Item list, QuickBooks asks whether you want to set up this item. If so, click Set Up and then fill in the New Item dialog box.
Enter as many items as you want in the Item column. QuickBooks fills in an item description for you, but you can edit whatever it puts into the Description column, if need be. In the Qty column, indicate how many of each item you need.
If you want to, fill in the Vendor Message field — and definitely fill in the Memo field.
The Vendor Message field is where you put a message to the party receiving your order. You could write, "Get me this stuff pronto!"
Tip
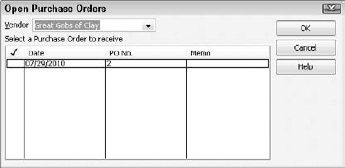
No matter what you do, be sure to fill in the Memo field. What you write in this field appears in the Open Purchase Orders dialog box and is the surest way for you to identify what this PO is for. Write something meaningful that you can understand two weeks, three weeks, or a month from now, when you pay for the items that you're ordering.
At the bottom of the Create Purchase Orders window is the To Be Printed check box, which tells you whether you printed this PO. If you want to print the PO, make sure that this check box is selected. After you print the PO, the check disappears from the box.
Click Print to print the PO.
If this PO is one of many that you've been filling out and you want to print several at once, click the arrow beside the Print button and choose Print Batch from the drop-down list. Before you print the PO, however, you may want to click the down arrow beside the Print button and choose Preview to see what the PO will look like when you print it. QuickBooks shows you an onscreen replica of the PO. I hope it looks okay.
You use the History button after you receive the items you're so carefully listing on the PO. After you receive the items and record their receipt, clicking this button tells QuickBooks to give you the entire history of an item — when you ordered it and when you received it.
As for the other buttons at the top, I think that you know what those are.
Click Save & New or Save & Close to record the PO.
QuickBooks saves the PO and displays a new, blank PO window in which you can enter another order.
You record the POs. A couple of weeks go by, and you ask yourself, "Did I order those doohickeys from Acme?" Choose Reports
After your doohickeys and gizmos have arrived by camel train, you need to record the receipt of the items and add them to your Item list.
The first two things to do are to note whether the stuff came with a bill and then decide how you want to pay for it. These decisions are the same ones that you have to make if you receive goods without having first filled out a PO.
You record PO items that you receive the same way you record other items you receive:
If you pay for PO items with a check, you use the Write Checks window.
If you receive the PO items without a bill, you use the Create Item Receipts window.
If you receive the PO items with a bill, you use the Enter Bills window.
Regardless of the window you're using, when you select the vendor who sold you the PO items, QuickBooks alerts you that open POs exist for the vendor and asks you whether you want to receive against a PO. Of course you do. (Receive against simply means to compare what you ordered with what you received.) When you click Yes, QuickBooks displays the Open Purchase Orders dialog box, as shown in Figure 7-7. Select the PO(s) that you're receiving against and then click OK. QuickBooks fills out the Items tab to show all the stuff you ordered. If what QuickBooks shows isn't what you received, you may have to make adjustments.
QuickBooks Premier and Enterprise includes a cool tool for accounting for the manufacture of items. Suppose that Pine Lake Porcelain, the example business I use in this book, mostly just buys and resells coffee mugs and other porcelain doodads. But also suppose that once a year, Pine Lake Porcelain assembles a romantic collection of red coffee mugs into a boxed St. Valentine's Day gift set. In this case, QuickBooks can record the assembly of a boxed gift set that combines, for example, six red coffee mugs, a cardboard box, and some tissue paper.
Note
Each component that makes up the assembly — in this example, the St. Valentine's Day boxed gift set — needs to be an item on your Item list. Chapter 3 describes how to add items to the Item list, so I don't repeat that information here. The weird thing about assembly items, however, is that the New Item window identifies the parts that make up the assembly. For example, the St. Valentine's Day boxed gift set assembly includes these items: six red coffee mugs, a cardboard gift box, and some tissue paper that loved ones can use when they become emotionally overwhelmed by the generosity of this thoughtful gift. These items get listed as the pieces that make up the boxed gift set.
To build an assembly, choose Vendors
While I'm on the subject, let me make a handful of observations about the Build Assemblies window and the Build Assemblies command:
In the top-middle portion of the window, QuickBooks shows the quantities of the assembly that you have on hand and for which customers have placed orders. That's pretty useful information to have, so, hey — remember that it's there.
The main part of the Build Assemblies window shows you what goes into your product. Not that you care, but this is called a bill of materials.
At the bottom of the bill of materials list, QuickBooks shows you the maximum number of assemblies you can make, given your current inventory holdings.
When you build an item, QuickBooks adjusts the inventory item counts. For example, in the case of boxed gift sets — each with six red coffee mugs, one piece of wrapping tissue, and a cardboard box — QuickBooks reduces the item counts of red coffee mugs, wrapping tissues, and boxes, and increases the item counts of the boxed gift sets when you record building the assembly.
Some of the components used in an assembly may not be inventory items. When you use non-inventory parts in an assembly, QuickBooks doesn't care about the item counts.

Note
QuickBooks does a pretty good job of tracking inventory, but you're still going to have to make that complete annual inventory of what you have in stock. What I'm saying here is that you're going to have to go over everything and count it by hand. Sorry. You just can't avoid that chore.
Tip
QuickBooks will produce a handy physical inventory worksheet that you and your minions can use to count inventory. To produce this report, choose Vendors
After you make your count, what happens if your inventory figures differ from those QuickBooks has? First, you have to decide who's right: you or a computer program. You're right, probably. Products get dropped. They break. And that means that you have to adjust the QuickBooks inventory numbers.
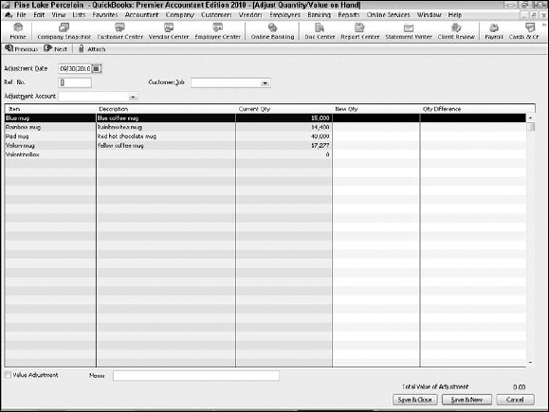
Choose Vendors
The first thing to do is choose an account for storing your inventory adjustments. Choose it from the Adjustment Account drop-down list. You also can select a class from the Class drop-down list.
Tip
For what it's worth, if it were me, I'd set up and use a special inventory adjustments expense account. (That way, I'd have an easy way to see the total inventory adjustments over the year.)
Go down the Item column, entering numbers in the New Qty column where your count differs from the QuickBooks totals. Click Save & Close when you're done.
If you've read this chapter to this point, you've seen now how QuickBooks handles your inventory. It isn't fancy, but for many businesses, it gets the job done.
Unfortunately, I've encountered a real headache when using QuickBooks for inventory. What if you store inventory in multiple locations — for example, in a Michigan warehouse and in a Chicago distribution facility? Or in a couple of retail locations — one on the right side of the tracks and the other one on the wrong side of the tracks?
Tip
The problem is that QuickBooks is set up to deal with a single inventory location. So although you can know how much inventory you have in total, if you aren't careful, you won't know how much is in Michigan and how much is in Chicago. And you can't even really check on inventory shrinkage because QuickBooks' records don't tie to location-specific inventory counts.
Now I need to tell you up-front that you don't have any good way to deal with this in QuickBooks. Throughout the following sections, though, I explain a couple of sloppy fixes that you can do.
If you have only a handful of items in your little business — say, a few dozen — it's pretty easy to keep a simple manual running tab on what you have in the Michigan warehouse and what's in the Chicago distribution facility.
Such a system is very . . . er, crude. It may just be a couple of sticky notes taped to your computer monitor. No kidding. Still, it lets you know how much inventory you've got (roughly) and where it's stored. And for some purposes, that works okay.
The embarrassingly crude approach that I describe in the preceding section doesn't work if you have a lot of items, so the approach won't work for a multiple-location retailer. Accordingly, if you're a retailer with a large number of items, I'm sorry, but I think you probably need to create sets of item numbers for each inventory location. This means a lot more work for you, of course, but it's really the only practical way to handle your inventory if you have more than a handful of items.
I have one more thought for you: I think that we should start a letter-writing campaign. I'm serious. We should all start writing letters to Intuit, asking that a multiple-stores or multiple-inventory locations feature be added to some upcoming version of the program. By the way, if you don't like writing actual letters, consider making this suggestion using the www.intuit.com Web site. The Intuit online suggestion box is available at
http://qbsupport.intuit.com/qb/suggestion.do
The inventory accounting approach that I describe in the previous paragraphs of this chapter is the textbook approach. What's more, the approach is a really good one because it lets you accurately calculate your cost of goods sold and accurately estimate the value of the inventory you're holding. To paraphrase Martha Stewart, these are Good Things.
You should know, however, that you can also use a simpler approach to inventory accounting. Specifically, rather than keeping track of individual inventory items by using a perpetual inventory system — this simply means that you track each item when it moves into your business and out into a customer's car or minivan — you can use a simple periodic system. In the sections that follow, I tell you how a periodic inventory system works in QuickBooks. Then I tell you what's bad and what's good about using a periodic inventory system.
If you use a periodic inventory system, you set up an Other Current Asset type account called Inventory. Then, whenever you purchase inventory, you categorize the inventory purchase as falling into this "fake" inventory account. (I'm calling the account a fake inventory account because it isn't a real inventory account to QuickBooks.)
To record your cost of goods sold each month, you use a journal entry to move an appropriate portion out of the fake inventory account and into your cost of goods sold account. How do you know what portion you should move? Good question. In a nutshell, you guess based on what your historical cost of goods sold percentage is.
Here's an example of how this works: Suppose that since time immemorial, your cost of goods sold has run 45 percent of your sales revenue, and that last month, you sold $10,000 of stuff. In this case, you would figure that 45 percent of $10,000 ($4,500) equals the cost of the inventory that you sold. Accordingly, you would move $4,500 out of the fake inventory account and into cost of goods sold.
Predictably, this rough-and-ready approach means that your inventory and cost of goods sold numbers are going to be wrong. So, at the end of the year, you still perform a physical inventory count to figure out exactly what you truly hold in inventory. At that point, you'd adjust the inventory and cost of goods sold balances so that they match what your physical inventory shows.
For example, it may be that over the course of the year, your rough 45 percent number has meant that you moved $5,000 too much from inventory to cost of goods sold. In this case, you'd move $5,000 out of cost of goods sold and back to inventory.
Or you may find that you moved $5,000 too little from inventory to cost of goods sold. To fix that problem, you move another $5,000 from inventory to cost of goods sold.
A final quick point about using a periodic inventory: As I note in this little discussion, you don't use inventory items if you're using a periodic inventory. So what you put on invoices or sales receipts is just a generic, non-inventory part item.
A periodic inventory system is good for some types of businesses. For example, if you have too many items to track with the QuickBooks Item list, the approach that I describe here can be a lifesaver.
Warning
However, periodic inventory systems create some problems. Here are the four biggest and baddest problems in my mind:
You won't really know which items are selling well and which aren't because you won't be tracking sales by inventory items. This means that you won't be able to stock more of the hot-selling stuff and less of stuff that's not selling.
You won't know what you really hold in your inventory except when you take that year-end physical inventory. (You won't know how many dollars of inventory you're holding, nor will you know which item quantities you're holding.)
Because you won't make item-level adjustments based on your physical inventory, you won't know which items are prone to shrinkage from problems such as theft, breakage, and spoilage.
You'll need to make the journal entries that record the dollars moving out of inventory and into cost of goods sold. These journal entries aren't terribly difficult, but they can be a little bit tricky to figure out the first few times.
You'll need to decide whether you want or need to go with a simpler periodic inventory system in spite of the problems such a system presents. The one final thought that I'll leave you with is this: Many small businesses — especially small retailers — successfully use periodic inventory systems.