
In This Chapter
Getting ready to do the big interview
Not getting discouraged about the big interview
Surviving the big interview
Telling your friends all sorts of war stories about the big interview
I know that you're eager to get started. After all, you have a business to run. But before you can start using QuickBooks, you need to do some up-front work. Specifically, you need to prepare for the QuickBooks EasyStep Interview, and then you need to walk through the EasyStep Interview. (The EasyStep Interview is just a thorough question-and-answer session that QuickBooks uses to set itself up for you.) In this chapter, I describe how you do all this stuff.
Note
I assume that you know how Windows works. If you don't, take the time to read Chapter 1 of your Windows User's Guide, or try the appropriate edition of Windows For Dummies, by Andy Rathbone (Wiley).
You need to complete three tasks to get ready for the EasyStep Interview:
Before you start fiddling with your computer or the QuickBooks software, you need to choose the date — the so-called conversion date — on which you want to begin using QuickBooks for your financial record keeping.
This decision is hugely important because the conversion date that you choose dramatically affects both the work you have to do to get QuickBooks running smoothly and the initial usefulness of the financial information that you collect and record by using QuickBooks.
You have three basic choices:
The right way: You can convert at the beginning of your accounting year (which is, in most cases, the same as the beginning of the calendar year). This way is the right way for two reasons. First, converting at the beginning of the year requires the least amount of work from you. Second, it means that you have all the current year's financial information in one system.
The slightly awkward way: You can convert at the beginning of some interim accounting period (probably the beginning of some month or quarter). This approach works, but it's slightly awkward because you have to plug your year-to-date income and expenses numbers from the old system into the new system. (If you don't know what an interim accounting period is, see Appendix B.)
The My Way or the Highway way: You can convert at some time other than what I call the right way and the slightly awkward way. Specifically, you can choose to convert whenever you jolly well feel like it. You create a bunch of unnecessary work for yourself if you take this approach, and you pull out a bunch of your hair in the process. But you also have the satisfaction of knowing that through it all, you did it your way — without any help from me.
I recommend choosing the right way. What this choice means is that if it's late in the year — say, October — you just wait until January 1 of the next year to convert. If it's still early in the year, you can also retroactively convert as of the beginning of the year. (If you do this, you need to go back and do your financial record keeping for the first part of the current year by using QuickBooks: entering sales, recording purchases, and so on.)
If it's sometime in the middle of the year — say, Memorial Day or later — you probably want to use the slightly awkward way. (I'm actually going to use the slightly awkward way in this chapter because if you see how to convert to QuickBooks by using the slightly awkward way, you know how to use both the right way and the slightly awkward way.)
After you decide when you want to convert, you need a trial balance.
"Yikes," you say. "What's a trial balance?" A trial balance simply lists all your assets, liabilities, and owner's equity account balances as well as the year-to-date income and expense numbers on a specified date (which, not coincidentally, happens to be the conversion date). You need this data for the EasyStep Interview and for some fiddling around that you need to do after you complete the EasyStep Interview.
Tip
Creating a trial balance doesn't have to be as hard as it sounds. If you've been using another small business accounting system, such as the simpler Quicken product from Intuit or the Simply Accounting program from Computer Associates, you may be able to have your old system produce a trial balance on the conversion date. In that case, you can get the balances from your old system. (Consider yourself lucky if this is the case.)
Just to split hairs, the trial balance should show account balances at the very start of the first day that you'll begin using QuickBooks for actual accounting. For example, if the conversion date is 1/1/2010, the trial balance needs to show the account balances at one minute past midnight on 1/1/2010. This is also the very same thing as showing the account balances at the very end of the last day that you'll be using the old accounting system — in other words, at exactly midnight on 12/31/2009 if you're converting to QuickBooks on 1/1/2010.
If your old system is rather informal (perhaps it's a shoebox full of receipts), or if it tracks only cash (perhaps you've been using Quicken), you need to do a bit more work:
To get your cash balance: Reconcile your bank account or bank accounts (if you have more than one bank account) as of the conversion date.
To get your accounts receivable balance: Tally the total of all your unpaid customer invoices.
To get your other asset account balances: Know what each asset originally cost. For depreciable fixed assets, you also need to provide any accumulated depreciation that has been claimed for that asset. (Accumulated depreciation is the total depreciation that you've already expensed for each asset.)
Note
By the way, check out Appendix B if you have questions about accounting or accounting terminology, such as depreciation.
To get your liability account balances: Know how much you owe on each liability. If you trust your creditors — the people to whom you owe the money — you may also be able to get this information from their statements.
You don't need to worry about the owner's equity accounts. QuickBooks can calculate your owner's equity account balances for you, based on the difference between your total assets and your total liabilities. This method is a bit sloppy, and accountants may not like it, but it's a pretty good compromise. (If you do have detailed account balances for your owner's equity accounts, use these figures — and know that you're one in a million.)
If you're using the slightly awkward way to convert to QuickBooks — in other words, if your conversion date is some date other than the beginning of the accounting year — you also need to provide year-to-date income and expense balances. To get your income, cost of goods sold, expenses, other income, and other expense account balances, you need to calculate the year-to-date amount of each account. If you can get this information from your old system, that's super. If not, you need to get it manually. (If you suddenly have images of yourself sitting at your desk late at night, tapping away on a ten-key, you're probably right. What's more, you probably also need to allocate half of another Saturday to getting QuickBooks up and running.)
Just for fun, I created the sample trial balance shown in Table 2-1. This table shows you what a trial balance looks like if you convert at some time other than at the beginning of the accounting year.
Table 2.1. A "Slightly Awkward Way" Sample Trial Balancew
Trial Balance Information | Debit | Credit |
|---|---|---|
Assets | ||
Checking | $5,000 | |
Fixed assets | $60,000 | |
Accumulated depreciation (fixed assets) | $2,000 | |
Liabilities information | ||
Loan payable | $10,000 | |
Owner's equity and income statement information | ||
Opening bal equity | $20,000 | |
Sales | $60,000 | |
Cost of goods sold | $20,000 | |
Supplies expense | $2,100 | |
Rent expense | $4,900 | |
Totals | $92,000 | $92,000 |
If you're converting at the very beginning of the accounting year, your trial balance instead looks like the one shown in Table 2-2. Notice that this trial balance doesn't have any year-to-date income or expense balances.
Table 2.2. A "Right Way" Sample Trial Balance
Trial Balance Information | Debit | Credit |
|---|---|---|
Assets | ||
Checking | $5,000 | |
Fixed assets | $60,000 | |
Accumulated depreciation (fixed assets) | $2,000 | |
Liabilities information | ||
Loan payable | $10,000 | |
Owner's equity and income statement information | ||
Opening bal equity | $53,000 | |
Totals | $65,000 | $65,000 |
Even after you decide when you want to convert to QuickBooks and you come up with a trial balance, you still need to collect a bunch of additional information. I list these items in laundry-list fashion. What you want to do is find all this stuff and then pile it up (neatly) in a big stack next to the computer:
Last year's federal tax return: QuickBooks asks which federal income tax form you use to file your tax return and also about your taxpayer identification number. Last year's federal tax return is the easiest place to find this stuff.
Copies of all your most recent state and federal payroll tax returns: If you prepare payroll for employees, QuickBooks wants to know about the federal and state payroll tax rates that you pay, as well as some other stuff.
Copies of all the unpaid invoices that your customers (or clients or patients or whatever) owe you as of the conversion date: I guess this is probably obvious, but the total accounts receivable balance shown on your trial balance needs to match the total of the unpaid customer invoices.
Tip
Copies of all unpaid bills that you owe your vendors as of the conversion date: Again, this is probably obvious, but the total accounts payable balance shown on your trial balance needs to match the total of the unpaid vendor bills.
A detailed listing of any inventory items you're holding for resale: This list should include not only inventory item descriptions and quantities but also the initial purchase prices and the anticipated sales prices. In other words, if you sell porcelain wombats and you have 1,200 of these beauties in inventory, you need to know exactly what you paid for them.
Copies of the prior year's W-2 statements, W-4 statements for anybody you've hired since the beginning of the prior year, detailed information about any payroll tax liabilities you owe as of the conversion date, and detailed information about the payroll tax deposits you've made since the beginning of the year: You need the information shown on these forms to adequately and accurately set up the QuickBooks payroll feature. I don't want to scare you, but this is probably the most tedious part of setting up QuickBooks.
If you're retroactively converting as of the beginning of the year, you need a list of all the transactions that have occurred since the beginning of the year: sales, purchases, payroll transactions, and everything and anything else: If you do the right-way conversion retroactively, you need to re-enter each of these transactions into the new system. You actually enter the information after you complete the EasyStep Interview that I describe later in this chapter, but you might as well get all this information together now, while you're searching for the rest of the items for this scavenger hunt.
Tip
If you take the slightly awkward way, you don't need to find the last item that I described in the preceding list. You can just use the year-to-date income and expense numbers from the trial balance.
After you decide when you want to convert, prepare a trial balance as of the conversion date, and collect the additional raw data that you need, you're ready to step through the EasyStep Interview.
Before you begin the interview, you have to start QuickBooks 2010. To do so, click the Windows Start button and then click the menu choice that leads to QuickBooks. (For example, I choose Start
Note
QuickBooks comes in several flavors. The most common flavors are QuickBooks Simple Start, QuickBooks Pro, and QuickBooks Premier. These three programs differ in several significant ways: QuickBooks Simple Start is a special "light" version of QuickBooks, which looks completely different. (I wrote another book, QuickBooks Simple Start For Dummies [Wiley], which you should use instead of this book if you're working with QuickBooks Simple Start.) QuickBooks Pro includes the advanced job costing and time-estimating features, which I briefly describe in Chapter 16. It also includes the ability to share a QuickBooks file over a network, as I describe in Appendix C. QuickBooks Premier has features beyond the QuickBooks Pro features for accountants and auditors who want to use QuickBooks for rather large small businesses.
Note
I actually used another very special version of QuickBooks called QuickBooks Accountants Edition to write this book. The Accountants Edition of QuickBooks will pretend to be another version of the QuickBooks software, and I told QuickBooks Accountants Edition to pretend to be QuickBooks Premier for writing this book. I mention all this not to confuse you but so that you understand why the figures you see here may look a wee bit different from what you see onscreen. Other than minor cosmetic differences, though, the various versions of QuickBooks all work the same way. You can use this book for any of these program versions.
If this is the first time you started QuickBooks, QuickBooks displays a dialog box that explains how QuickBooks wants to use your Internet connection (answer: so it can regularly update the QuickBooks software). QuickBooks then displays a welcome message box that asks you how you want to start. For example, you can click a button to indicate that you want to see an overview tutorial, explore QuickBooks, create a new company file, or open an existing company data file.
What I suggest you do, however, is jump right into the fray. If you've never used QuickBooks before — the likely case if you started reading here — click the Create a New Company File button, which starts the EasyStep Interview. (If you've already been using an earlier version of QuickBooks, you click the button labeled Open an Existing Company File.)
The real fun begins at this point. The EasyStep Interview starts automatically, displaying the dialog box shown in Figure 2-1.
Note
If you aren't starting QuickBooks for the first time but you want to step through the EasyStep Interview to set up a new company anyway, choose File
To begin the interview, click the Start Interview button.
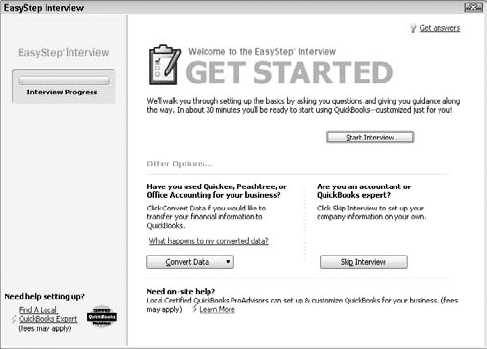
I should mention that the first EasyStep Interview dialog box identifies some other setup options you can use to get started. For example, the screen suggests that you might want to upgrade from Quicken. (Basically, that upgrade just means that you want QuickBooks to try using Quicken data as a starting point for QuickBooks — something that doesn't work, in my experience.) A simple bit of advice: Don't try to "upgrade" the Quicken data. It's just as easy and usually considerably cleaner to just start from scratch.
Tip
The one group of new QuickBooks users who should probably try upgrading their Quicken data are people who've done a really good job of keeping their books with Quicken, including complete balance sheet information. No offense, but you probably aren't in this category. Sorry.
You can also, if you're an accounting expert, just skip the EasyStep Interview. But you don't need to worry about that option either. You're going to want to take the setup process slow and easy.
For the most part, to complete the EasyStep Interview, all you do is fill in text boxes with the information that QuickBooks requests (see Figure 2-2) or answer questions by clicking buttons clearly marked Yes and No. When you finish answering a page of interview questions, click the Next button to move to the following page of the interview.
Tip
If you ever decide that you want to change some piece of information that you entered on a previous page of the EasyStep Interview dialog box, you can just click the Back button to back up. If you get partway through the interview process and decide that it isn't worth the time, just click the Leave button in the lower-left corner, and QuickBooks closes the EasyStep Interview dialog box. When you next restart QuickBooks, the EasyStep Interview begins again.

Here are two other notes to keep in mind:
Note
The EasyStep Interview dialog box appears every time you start a new company (which you do by choosing File

QuickBooks purposely makes it difficult to delete a company that you create in QuickBooks, so don't make up an imaginary company to play with unless you're familiar enough with your operating system to delete files.
At some point after QuickBooks starts, you'll see a message box that asks whether you want to register QuickBooks. If you don't register, you can use the product roughly a few times, and then — whammo! The program locks up, and you can no longer access your files. Either you register it, or you can't use it. I don't like being forced to do something, but getting worked up about having to register QuickBooks is a waste of time. The simplest option is to just register. Here's how: When QuickBooks displays the message box that asks whether you want to register, click the Online button to register online, or click the Phone button to register over the phone. If you go with the Phone option, QuickBooks displays another dialog box that gives you a telephone number to call and provides a space for you to enter your registration number.
I don't provide you a blow-by-blow account of what happens when you take the interview. Instead, I provide a handful of key tips that you can read now and use later (during the interview) to make the process as easy and as fast as possible.
As you step through the interview process, the EasyStep Interview dialog box displays a bunch of different pages with suggestions, instructions, and advice. Take the time to read this information. Click the Help button if you have questions. If the EasyStep Interview suggests that you view some related document with helpful information, do so.
Industry-specific advice is one of the handiest QuickBooks features. For example, are you a rancher or a farmer? QuickBooks includes a detailed online document that describes some of the unique accounting challenges that your business faces, provides tips for making your record keeping easier, and points out QuickBooks features that might be of particular interest to someone like you. Are you a retailer? A manufacturer? A writer? A consultant? You can get this same sort of information, too.
QuickBooks displays industry-specific tips and tidbits of information throughout the interview. Keep your eyes peeled for the green arrows that mark these little hints. Let me mention one other quick pointer about this industry-specific information stuff: You may not understand everything that you read. That's okay. You still want to read the tips and maybe jot them down on a piece of paper as you go along. As you work with QuickBooks and find out more about it, you'll find that more and more of the information provided in the industry-specific tips makes sense.
Tip
To view a document of industry-specific information at any time, click the Support link on the Navigation bar and then click the Industry-Specific Information hyperlink. Click the List of Industries hyperlink and then select your industry from the list in the Help window that QuickBooks displays. To print a copy of the information, click the Options button and choose Print Topic from the drop-down list.
Note
Some of the hyperlinks lead to resources at the www.quickbooks.com Web site, so QuickBooks may prompt you to make an Internet connection to access that information.
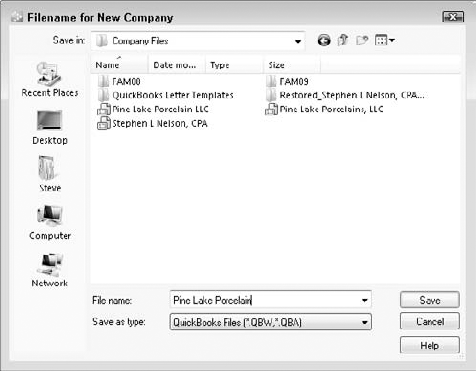
A few minutes into the EasyStep Interview, QuickBooks asks you whether you want to change its suggested name and location for the file that it uses to store your accounting information (see Figure 2-3). The suggested filename is normally your company name, anyway. I can think of no good reason why you need to fiddle with or change the suggested filename or location. Don't do it. Let QuickBooks name the file whatever it wants, and let QuickBooks store the file wherever it wants.
Immediately after you name the file that QuickBooks uses for storing your financial information, the EasyStep Interview displays a dialog box that shows a list of accounts that QuickBooks wants to use for tracking your business's financial condition. This dialog box also asks whether the list of accounts is the one that you want to use. Unless you know quite a bit about accounting and are willing to find out just as much about QuickBooks, I recommend that you accept the suggested Chart of Accounts. You make your future record keeping much easier by doing so.
You get two choices regarding how to record your expenses:
QuickBooks asks this question in the dialog box shown in Figure 2-4. I want to be careful about what I say next because the decision you make in this dialog box can really screw up your business. Here's my suggestion: Consider taking the second option — the one that says you don't want to keep track of the bills you owe.
Note
Now, before you rush off to the next EasyStep Interview question, confident and happy in my suggestion, let me tell you about the implicit trade-off that you're making. If you select the no-tracking-of-bills-owed option, you do simplify your record keeping — which is why I suggest that you take this route. The predictable catch is that you can't track your unpaid bills as closely. Until you sit down to actually write checks for your bills, you don't really know (precisely) how much money you owe vendors. What's more, you can't separate the actual incurring of some expense from the cash outflow that pays the expense. So by taking the no-tracking-of-bills-owed option, you're unable to do finely tuned accrual-basis accounting (unless you pay bills when you incur them). And you aren't able to closely monitor the money that you owe vendors.

In my business, I don't track bills I owe, and that simplifies my record keeping. My business is probably a little unusual (at least for a small business) for a couple of reasons. First, almost all my expenses get negotiated up front and then get fixed by contract. For this reason, I don't use and don't need to use QuickBooks to keep track of and remind me about my unpaid bills. In effect, the negotiations and contracts do that. Second, I've actually been in business for quite a while — 25 years, in fact. I don't have the cash-flow problems that many (most?) small businesses have, which means that if I want to produce an accurate profit and loss statement or an accurate balance sheet — one that includes all my expenses — I can just pay all my unpaid bills.
I guess the bottom line here is this: If you don't need to use QuickBooks to closely monitor your unpaid bills, and if you don't mind losing profit-calculation precision because of the lag between the time you incur an expense and the time you pay the bill by writing a check, go ahead and skip the bill tracking. This choice greatly simplifies one area of your record keeping.
As you step through the interview questions, QuickBooks asks a few times whether you want to add an account (see Figure 2-5). Go ahead and do this — and feel comfortable doing so. Adding accounts isn't hard. (You need an account for each individual asset, liability, income, or expense amount that you want to track.)
Throughout the preceding sections in this chapter, I describe how you prepare for and then step through the EasyStep Interview. When the EasyStep Interview is over, though, you need to take care of three other little jobs:
You need to describe in detail your inventory, your customer receivables, and (if you chose to ignore my earlier suggestion about not tracking vendor bills you owe) your vendor payables.
You need to describe your current business finances, including any year-to-date revenue and year-to-date expenses that aren't recorded as part of getting your customer receivables and vendor payables entered into QuickBooks.
If you want to use accrual-basis accounting, you need to make an adjustment.
These chores aren't time-consuming, but they are the three most complicated tasks that you need to do to set up QuickBooks. (If you aren't sure what the big deal is about accrual-basis accounting, I respectfully suggest that you take a break here and read Appendix B.)
To set up the inventory records, you just identify the items you hold in inventory, as described in Chapter 3.
To set up your customer receivables and (if necessary) vendor payables, you first need to identify the customers and vendors, as described in Chapter 3. After that work, you may need to enter customer invoices that were prepared prior to the conversion date but that are still uncollected at conversion, as described in Chapter 4. Similarly, you may need to enter vendor payables that were incurred prior to the conversion date but that are still unpaid at conversion.
I talk about this stuff more in the next chapter, so if you're still okay with doing some more installation and setup work, go ahead and flip to Chapter 3. However . . .
So should you get help from your accountant? Oh, shoot, I don't know. If you follow my directions carefully (both in this chapter and the next), and your business financial affairs aren't wildly complex, I think you can probably figure out all this stuff on your own.
Having said that, however, I suggest that you at least think about getting your accountant's help at this juncture. Your accountant can do a much better job of giving you advice that may be specific to your situation. In many cases, your accountant can give you beginning trial balance amounts that agree with your tax returns. The accountant probably knows your business and can keep you from making a terrible mess of things, just in case you don't follow my directions carefully.
Just so you know: One of the things that I (as a CPA) do for my clients is help them set up QuickBooks. Because I do this, I can give you a couple of pieces of useful information about getting a CPA's help in setting up. First, your CPA (assuming that he or she already knows QuickBooks) should be able to help you through the setup process in an hour or two, so your CPA can do it (or help you do it) much faster than you can on your own. Second, an hour or so of tutoring from your CPA should mean that you get enough help to record all your usual transactions. With just this help, you can find out how to pay your bills, how to invoice customers exactly the way you want, and how to produce reports. I used to pooh-pooh this kind of hand-holding, but the older (and hopefully wiser) I get, the more I see that business owners and bookkeepers benefit from this up-front help. A bit of planning and expert advice in the beginning can save you a whole lot of trouble later on.