
In This Chapter
Balancing a bank account
Troubleshooting when your account doesn't balance
I want to start this chapter with an important point: Balancing a bank account in QuickBooks is easy and quick.
I'm not just trying to get you pumped up about an otherwise painfully boring topic. I don't think that balancing a bank account is any more exciting than you do.
My point is simply this: Because bank account balancing can be tedious and boring, use QuickBooks to reduce the drudgery.
As I said, balancing a bank account is remarkably easy in QuickBooks. In fact, I'll go so far as to say that if you have any problems, they stem from . . . well, sloppy record-keeping that preceded your use of QuickBooks.
Enough of this blather; I get started by describing how you reconcile an account.
In a reconciliation, as you probably know, you compare your records of a bank account with the bank's records of the same account. You should be able to explain any difference between the two accounts — usually by pointing to checks you wrote which haven't yet cleared. (Sometimes deposits fall into the same category; you record a deposit and mail it, but the bank hasn't yet credited your account.)
The first step, then, is to supply QuickBooks the bank's account information. You get this information from your monthly statement. Supply QuickBooks the figures it needs, as follows:
Choose Banking

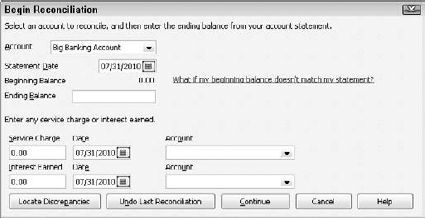
QuickBooks displays the Begin Reconciliation dialog box, as shown in Figure 14-1.
If you have several bank accounts, you may have to select which account you want to reconcile.
If the bank account shown isn't the one you want to reconcile, open the Account list and choose the correct account.
Enter the bank statement date into the Statement Date text box.
Note
You can adjust a date one day at a time by using the plus (+) and minus (–) keys. You can also click the Calendar button on the right side of the Statement Date text box to select a date from the calendar. See the online Cheat Sheet at
www.dummies.com/cheatsheet/quickbooks2010for a list of other secret date-editing tricks.Verify the bank statement opening balance.
QuickBooks displays an amount in the Beginning Balance text box (refer to Figure 14-1).
If the opening balance isn't correct, see the sidebar, "Why isn't my opening balance the same as the one in QuickBooks?", later in this chapter.
Enter the ending balance from your bank statement into the Ending Balance text box.
Enter the bank's service charge.
If the bank statement shows a service charge and you haven't already entered it, move the cursor to the Service Charge text box and type the amount. (For example, type 50 for a $50 service charge.)
Enter a transaction date for the service charge transaction.
QuickBooks adds one month to the service charge date from the last time you reconciled. If this date isn't correct, type the correct one.
Assign the bank's service charge to an account.
Enter the expense account to which you assign bank service charges in the first Account text box — the one beside the Date text box. Activate the drop-down list by clicking the down arrow, highlight the category by using the arrow keys, and then press Enter. I'll bet anything that you record these charges in the Bank Service Charges account that QuickBooks sets up by default.
Enter the account's interest income.
If the account earned interest for the month and you haven't already entered this figure, type an amount in the Interest Earned text box.
Enter a transaction date for the interest income transaction.
You already know how to enter dates. I won't bore you by explaining it again (but see Step 3 if you're having trouble).
Assign the interest to an account.
In the second Account text box, enter the account to which this account's interest should be assigned. I bet that you record this one under the Interest Income account, which is near the bottom of the Account drop-down list. To select a category from the Account list, activate the drop-down list by clicking the down arrow, highlight the category, and then press Enter.
Click the Continue button.
QuickBooks displays the Reconcile window, as shown in Figure 14-2.

From the Reconcile window, shown in Figure 14-2, you tell QuickBooks which deposits and checks have cleared at the bank. (Refer to your bank statement for this information.) Follow these steps:
Identify the first deposit that has cleared.
You know how to do this, I'm sure. Just leaf through the bank statement and find the first deposit listed.
Mark the first cleared deposit as cleared.
Scroll through the transactions listed in the Deposits and Other Credits section of the Reconcile window, find the deposit, and then click it. You also can highlight the deposit by using the Tab and arrow keys and then pressing the spacebar. QuickBooks places a check mark in front of the deposit to mark it as cleared and updates the cleared statement balance.
Tip
If you have a large number of deposits to clear and you can identify them quickly, click the Mark All button and then simply unmark the transactions that aren't on the bank statement. To unmark a transaction, click it. The check mark disappears.
Record any cleared but missing deposits.
If you can't find a deposit in the Reconcile window, you haven't entered it into the Checking register yet. I can only guess why you haven't entered it. Maybe you just forgot. Close or deactivate the Reconcile window by clicking the Leave button. Now open the Checking register and enter the deposit in the register in the usual way. To return to the Reconcile window, either reopen it or reactivate it. Or you can just choose Banking
Repeat Steps 1–3 for all deposits listed on the bank statement.
Make sure that the dates match and that the amounts of the deposits are correct. If they're not, go back to the transactions and correct them. To get to a transaction, click the Go To button. You see the Write Checks or Make Deposits window where the transaction was originally recorded. Make the corrections there and then click Save & Close. You return to the Reconcile window.
Identify the first check that has cleared.
No sweat, right? Just find the first check or withdrawal listed on the bank statement.
Tip
QuickBooks 2010 enables you to sort the transactions listed on the bank reconciliation window by clicking on the column headings in the Checks and Payments section and in the Deposits and Other Credits section. You might want to experiment a bit with this handy feature. Sorting and re-sorting transactions— particularly in high-transaction volume bank accounts— often eases the work of reconciling a bank account.
Mark the first cleared check as cleared.
Scroll through the transactions listed in the Checks and Payments section of the Reconcile window; find the first check; and then click it. You also can highlight it by pressing Tab and an arrow key. Then press the spacebar. QuickBooks inserts a check mark to label this transaction as cleared and updates the cleared statement balance.
Record any missing but cleared checks.
If you can't find a check or withdrawal in QuickBooks, guess what? You haven't entered it in the register yet. Close or deactivate the Reconcile window by clicking its Leave button or by activating another window. Then display the Checking register and enter the check or withdrawal. To return to the Reconcile window, reopen or reactivate it. Or you can just choose Banking
Repeat Steps 5–7 for all withdrawals listed on the bank statement.
Note
These steps don't take very long. Reconciling my account each month takes me about two minutes. And I'm not joking or exaggerating. By two minutes, I really mean two minutes.
After you mark all the cleared checks and deposits, the difference between the Cleared Balance for the account and the bank statement's Ending Balance should equal zero. Notice that I said should — not will. Figure 14-2, fortunately, shows a Reconcile window in which everything is hunky-dory. If the difference is small, look for small differences between the amount of the checks in the register and the actual cleared checks on the bank statement. If you find a discrepancy with a particular check, just click the Go To button to go to the check and change the amount. Click Save & Close to go right back to the Reconcile screen.
If the difference does equal zero, you're finished. Just click the Reconcile Now button. QuickBooks displays a congratulatory message box telling you that the reconciliation is complete. As a reward for being such a good boy or girl, the message box asks you whether you want to print a free, all-expenses-paid Summary or Full reconciliation report. Click Summary or Full and then click OK if you want to print the report. Otherwise, just click OK.
Tip
Can't decide whether to print the reconciliation report? Unless you're a business bookkeeper or an accountant who is reconciling a bank account for someone else — your employer or a client, for example — you don't need to print the reconciliation report. All that printing does is prove that you reconciled the account. (Basically, this proof is the reason why you should print the report if you're a bookkeeper or an accountant. The person for whom you're reconciling the account will know that you did your job and will have a piece of paper to refer to later with any questions.) Also, you can always come back and print the report later, if necessary. QuickBooks saves the Reconciliation reports under Reports, Banking, Previous Reconciliation.
Now each deposit, withdrawal, and check that you just cleared is marked with a check mark in your register. If you don't believe me, open the register and find out.
If the difference doesn't equal zero, you have a problem. If you click the Reconcile Now button, QuickBooks shows you the Reconcile Adjustment dialog box, as shown in Figure 14-3. This dialog box tells you how unbalanced your account is and asks whether you want to adjust your maladjusted account.

Click the Return to Reconcile button if you want to go back to the Reconcile window and start the search for the missing or incorrectly entered transaction.
Note
If you want to force the two amounts to agree, click OK. Forcing the two amounts to agree isn't a very good idea. To do so, QuickBooks adds a cleared transaction equal to the difference. (I talk about this transaction a little later in the chapter.)
Postponing a reconciliation (by clicking the Leave Reconcile button) and not choosing to adjust the bank account balance is usually the best approach because then you can locate and correct problems. (The next section contains some ideas that can help you determine what the problem is.) Then you can restart the reconciliation and finish your work. (You restart a reconciliation the same way that you originate one.)
Tip
I want to give you some suggestions for reconciling an account when you're having problems. If you're sitting in front of your computer, wringing your hands, try the tips in this section:
Make sure that you're working with the right account. Sounds dumb, doesn't it? If you have several bank accounts, however, ending up in the wrong account is darn easy. So go ahead and confirm, for example, that you're trying to reconcile your checking account at Mammoth International Bank by using the Mammoth International Bank checking account statement.
Look for transactions that the bank has recorded but you haven't. Go through the bank statement to make sure that you recorded every transaction that your bank has recorded. You can easily overlook cash-machine withdrawals, special fees, or service charges (such as charges for checks or your safe deposit box), automatic withdrawals, direct deposits, and so on.
Tip
If the difference is positive — that is, the bank thinks that you have less money than you think that you should have — you may be missing a withdrawal transaction. If the difference is negative, you may be missing a deposit transaction.
Look for reversed transactions. Here's a tricky one: If you accidentally enter a transaction backward — a deposit as a withdrawal or a withdrawal as a deposit — your account doesn't balance. And the error can be difficult to find. The Reconcile window shows all the correct transactions, but a transaction amount appears in the wrong list. (The amount appears in the Deposits and Other Credits list when it belongs in the Checks and Payments list, or vice versa.) The check that you wrote to Acme Housewreckers for the demolition of your carport appears in the Deposits and Other Credits list, for example.
Look for a transaction that's equal to half the difference. One handy way to find the transaction that you entered backward — if you have only one — is to look for a transaction that's equal to half the irreconcilable difference. If the difference is $200, for example, you may have entered a $100 deposit as a withdrawal or a $100 withdrawal as a deposit.
Look for a transaction that's equal to the difference. While I'm on the subject of explaining the difference by looking at individual transactions, I'll make an obvious point: If the difference between the bank's records and yours equals one of the transactions listed in your register, you may have incorrectly marked the transaction as cleared or incorrectly left the transaction unmarked (shown as uncleared). I don't know. Maybe that was too obvious. Naaaah.
Check for transposed numbers. Transposed numbers are flip-flopped digits. For example, you enter $45.89 as $48.59. These turkeys always cause headaches for accountants and bookkeepers. If you look at the numbers, detecting an error is often difficult because the digits are the same. For example, when you compare a check amount of $45.89 in your register with a check for $48.59 shown on your bank statement, both check amounts show the same digits: 4, 5, 8, and 9. They just show them in a different order.
Tip
Transposed numbers are tough to find, but here's a trick that you can try: Divide the difference shown in the Reconcile window by 9. If the result is an even number of dollars or cents, chances are good that you have a transposed number somewhere.
Use the Locate Discrepancies button. Would you mind, terribly, taking a peek back at Figure 14-1? The dialog box shown in that figure includes a Locate Discrepancies button, which you can click to display another dialog box that prints reports that may help you reconcile your account. In particular, the dialog box lets you view a report of changes made to previously cleared transactions (which would be pretty suspicious bookkeeping activity and would definitely foul up your reconciliation). It also shows a report that lists transactions marked as cleared during previous reconciliations, which might be interesting because maybe you erroneously marked a transaction as cleared before it really was cleared.
Have someone else look over your work. This idea may seem pretty obvious, but I'm amazed by how often a second pair of eyes can find something that I overlooked. Ask one of your co-workers or employees (preferably that one person who always seems to have way too much free time) to look over everything for you.
Be on the lookout for multiple errors. If you find an error by using this laundry list, and you still have a difference, start checking at the top of the list again. You may discover, for example, after you find a transposed number that you entered another transaction backward, or incorrectly cleared or uncleared a transaction.
Try again next month (and maybe the month after that). If the difference isn't huge in relation to the size of your bank account, you may want to wait until next month and attempt to reconcile your account again.
Before my carefree attitude puts you in a panic, consider the following example: In January, you reconcile your account, and the difference is $24.02. Then you reconcile the account in February, and the difference is $24.02. You reconcile the account in March, and — surprise, surprise — the difference is still $24.02. What's going on here? Well, your starting account balance was probably off by $24.02. (The more months you try to reconcile your account and find that you're always mysteriously $24.02 off, the more likely that this type of error is to blame.) After the second or third month, I think that having QuickBooks enter an adjusting transaction of $24.02 is pretty reasonable so that your account balances. (In my opinion, this circumstance is the only one that merits your adjusting an account to match the bank's figure.)
If you successfully reconciled your account with QuickBooks before, your work may not be at fault. The mistake may be (drum roll, please) the bank's! And in this case, you should do something else. . . .
Get in your car, drive to the bank, and beg for help. As an alternative to the preceding idea — which supposes that the bank's statement is correct and that your records are incorrect — I propose this idea: Ask the bank to help you reconcile the account. Hint that you think the mistake is probably the bank's, but in a very nice, cordial way. Smile a lot. And one other thing: Be sure to ask about whatever product the bank is currently advertising in the lobby (which encourages the staff to think that you're interested in that 180-month certificate of deposit, causing them to be extra-nice to you).
In general, the bank's record-keeping is usually pretty darn good. I've never had a problem either with my business or personal accounts. (I've also been lucky enough to deal with big, well-run banks.) Nevertheless, your bank quite possibly has made a mistake, so ask for help. Be sure to ask for an explanation of any transactions that you discover only by seeing them on your bank statement. By the way, you'll probably pay for this help.