
In This Chapter
Backing up QuickBooks data
Deciding when and how often to back up your data
Restoring your QuickBooks data (if you lose it)
Using Accountant's Review
Creating and using portable files
Using the Audit Trail
Setting a closing date and password
Okay, you don't need to worry about the data files that QuickBooks stores your financial information in. Pretty much, QuickBooks does all the dirty work. But that said, you do have a few housekeeping tasks to take care of. In this chapter, I describe these chores and how to do them correctly with minimal hassle.
Sure, I can give you some tricky, technical examples of fancy backup strategies, but they have no point here. You want to know the basics, right?
Tip
The guiding rule is that you back up anytime you work on something that you wouldn't want to redo. Some people think that a week's worth of work is negligible, and others think that a month's worth of work is negligible.
So here's what I do to back up my files. I back up every week after I enter my data for the week. Then I stick the disk (you might use any removable disk, such as a USB flash drive, a Zip disk, or a writable CD) in my briefcase so that if something terrible happens (like a meteor hitting my office building), I don't lose both my computer and the backup disk with the data. (I carry my briefcase around with me — a sort of middle-age security blanket — so that it won't get destroyed in some after-hours disaster.)
Sounds like a pretty good system, huh? Actually, I admit that my strategy has its problems:
Because I back up weekly, I might have to re-enter as much as a week's worth of data if the computer crashes toward the end of the week. In my case, I wouldn't lose all that much work. However, if you're someone with heavy transaction volumes — if you prepare hundreds of invoices or write hundreds of checks each week, for example — you probably want to back up more frequently, perhaps every day.
A second problem with my strategy is only remotely possible but still worth mentioning: If something bad does happen to the QuickBooks files stored on my computer's hard drive as well as the files stored on the backup floppy disk, CD-R, CD-RW, or Zip disk, I'll be up the proverbial creek without a paddle. (I should also note that a removable disk — especially a floppy — is far more likely to fail than a hard drive.) If this worst-case scenario actually occurs, I'll need to start over from scratch from the beginning of the year.
Some people, who are religiously careful, circulate three sets of backup disks to reduce the chance of this mishap. They also regularly move one copy off-site, such as to a safe deposit box. In this scenario, whenever you back up your data, you overwrite the oldest set of backup disks.
Say you back up your data every week, and your hard drive not only crashes, but also bursts into a ball of flames rising high into the night. To restore your files, you use the most recent set of backups — one-week old, max. If something is wrong with those, you use the next–most-recent set — two weeks old. If something is wrong with those, you use the last set — three weeks old. This way, you have three chances to get a set that works — a nice bit of security for the cost of a few extra disks or storage devices.
Note
If you can't fit your backup QuickBooks file on a single floppy and you want to use floppy disks, you can back up across multiple floppies. The program asks for additional floppies because it needs them to complete the Backup process.
You're busy. You don't have time to fool around. You just want to do a passable job of backing up, and you decided how often you plan to do it. Sound like your situation? Then follow these steps:
Insert a blank disk/disc into the appropriate drive.
You can back up to any removable disk, including flash memory devices, floppy disks, Zip disks, and writable CDs. However, note that Intuit (the maker of QuickBooks) now recommends that you not use the QuickBooks backup command to move a backup file onto a CD. Instead, Intuit recommends you back up the file onto your hard drive and then use the Windows File Copy command to burn the file onto the disc. This workaround approach tends to solve some of the CD-writing problems people experience when backing up directly to a CD.
Tip
Heck, I should admit that you can back up to any fixed disk, such as your hard drive or a network disk, but the advantage of a removable disk is that you can store it in some other location. As a compromise, you can also use a network disk. You typically don't want to use your hard drive (although this is better than nothing) because one of the disasters that might befall your QuickBooks data is a hard drive failure.
You can also back up your QuickBooks files to an online storage area. See the sidebar "Backing up files online" for more information.
If you store data for more than one company, make sure that the company whose data you want to back up is the active company.
Yes, I know that all your companies are active; I'm hoping they're not dead in the water. My point is that you want to back up the correct company. To find out whether the correct company is active, just look at the QuickBooks application window title bar, which names the active company. (If you don't remember setting up multiple files, don't worry. You probably have only one file — the usual case.)
Choose File

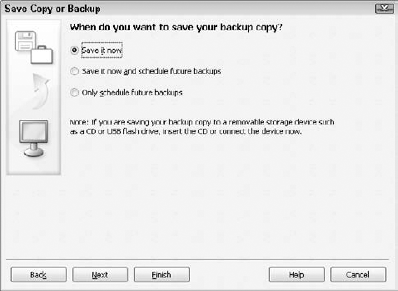
QuickBooks displays the first Backup Wizard dialog box, as shown in Figure 17-1.
Note
If you use QuickBooks in multi-user mode, you need to switch to single-user mode before you back up your file. For more information on how to make this switch, see Appendix C.
Tell QuickBooks that you want to back up the QuickBooks data file.
When QuickBooks displays the first Save Copy or Backup wizard dialog box — the one shown in Figure 17-1 — select the Backup Copy radio button and then click Next. QuickBooks displays the second Backup Wizard dialog box (not shown) that asks you to specify the location for the backup.
Indicate whether you want to back up on a local storage device or online.
To back up your QuickBooks file locally — this is my recommendation, but do see the upcoming sidebar on backing up files online — select the Local Backup option.
Describe how QuickBooks should back up your data file.
With the second Save Copy or Backup wizard dialog box displayed, click the Options button. QuickBooks displays the Backup Options dialog box (see Figure 17-2), from which you specify how and when QuickBooks backs up your data file:
Pick a default location. Specify where the backup file should be located. You can do this either by entering the pathname of the backup folder in the Tell Us Where to Save Your Backup Copies box (the hard way) or by clicking the Browse button and then using the Browse for Folder dialog box that Windows displays to pick a default backup location.
Fine-tune the backup operation. The Backup Options dialog box provides a couple of check boxes that you can use to fine-tune the old QuickBooks backup operation. The Add the Date and Time of Backup to the File Name check box, if selected, does just what it says. The Limit the Number of Backup Copies in this Folder To [X] check box tells QuickBooks to limit the number of backup copies of your QuickBooks file it stores in the backup folder. The default number of backup copies kept on hand is 3; that should be fine.
Specify the backup reminder rule. You can select the Remind Me to Back Up When I Close My Company File Every [X] Times check box to tell QuickBooks it should remind you every so often to back up. By default, QuickBooks reminds you every fourth time you close a data file, but you can replace the value in the text box to specify some other backup reminder frequency.
Select a data verification option. QuickBooks provides three data verification options, which appear as radio buttons on the Backup Options dialog box (shown in Figure 17-2). You can select the button that corresponds to the data verification method you want: Complete Verification (safe but slow), Quicker Verification (fast but not as thorough), and No Verification (saves you a bit of time now at the risk of huge problems later). The Complete Verification option is what QuickBooks and I both recommend.
When you finish with the Backup Options dialog box, click OK. QuickBooks returns to the second Backup Wizard dialog box.
Determine when QuickBooks should back up your data file.
To continue, click Next. QuickBooks displays the third Backup Wizard dialog box (see Figure 17-3). The third Backup Wizard dialog box provides radio buttons that you use to schedule when you want to back up. For example, to indicate that you want to back up on the spot, select the Save It Now radio button.
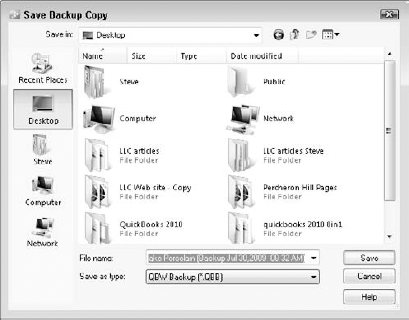
Confirm the backup file location and name.
With the third Backup Wizard dialog box displayed (refer to Figure 17-3), click Next. QuickBooks displays the Save Backup Copy dialog box (see Figure 17-4). If you successfully completed Step 6, you already specified the appropriate folder location for the backup file. Just to be on the safe side, confirm that the filename and folder location shown in the Save Backup Copy dialog box are correct. If the folder location isn't correct, select a new folder location from the Save In drop-down list. If the filename isn't correct, edit the name shown in the File Name text box.
Click Save.
QuickBooks backs up your data file and displays a message box that tells you it has backed up your file. The message also gives the backup filename and folder location.


Tip
Backing up files online
You can quickly and easily back up your data online. If you do so, you no longer need to remember to make backups and take them offsite. To find out more about online backup, choose File
The Online Backup service is a pretty darn good idea if you have a fast Internet connection, but the service does cost a little bit of money. You pay at least $50 yearly and as much as $150 yearly, depending on the level of service, but you can set up the service so that QuickBooks automatically backs up your data and even other important files on a regular basis. I think this is pretty cool.
Two final points about using the QuickBooks online backup option. First, and just for the record, I don't think you need to worry about security. (You can read more about the security measures at the QuickBooks Web site, but your data is as secure online as it is in your office.) Second, I think most folks should use the service. I'm using it. Online offsite backup at the prices that Intuit offers seems like a really excellent deal for any business where the QuickBooks data file is important.
What happens if you lose all your QuickBooks data? First of all, I encourage you to feel smug. Get a cup of coffee. Lean back in your chair. Gloat for a couple of minutes. You, my friend, have no problem. You have followed instructions.
Note
Okay, you may have one or two problems, but you can probably blame PC gremlins for those. If the disaster that caused you to lose your data also trashed other parts of your computer, you may need to reinstall QuickBooks. You also may need to reinstall all your other software.
After you gloat sufficiently (and piece your computer back together again if it was the cause of the disaster), carefully do the following to reinstate your QuickBooks data:
Get your backup disk.
Find the backup disk you created and carefully insert it into the appropriate disk drive.
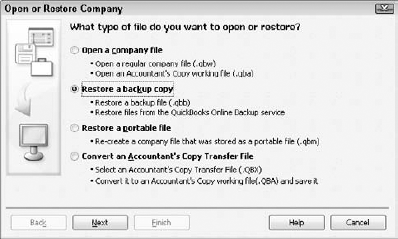
Start QuickBooks and choose File
QuickBooks displays the Open or Restore Company dialog box (see Figure 17-5).
Indicate that you want to restore a backup copy of your QuickBooks data file.
How you do this is probably obvious, right? Select the option button labeled Restore a Backup Copy.
Tell QuickBooks whether you backed up locally or online.
Click Next to continue. QuickBooks displays the Restore Backup: Method dialog box (not shown). Select the Local Backup radio button to indicate that you made a local backup.
Identify the backup file that you want to use.
Click Next to continue. QuickBooks displays the Open Backup Copy dialog box (see Figure 17-6). If you know the company filename and location, you can enter this information in the boxes provided. If you don't know this information, use the Look In drop-down list to identify the drive that contains the file you want to back up. Then choose the backup file you want to restore and click Open. QuickBooks displays the Restore Backup: To Location dialog box (not shown).
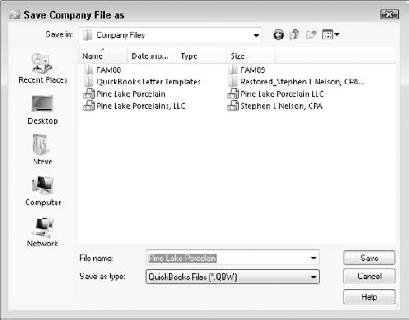
Specify where the restored file will be located.
Click Next again. QuickBooks displays the Save Company File As dialog box (see Figure 17-7). Use the File Name text box and Save In drop-down list in the Save Company File As dialog box to identify the file you want to replace.
If you know the company filename and location, you can enter this information in the text boxes provided. If you don't know this information, use the Save In drop-down list to make sure that you place the restored file in the correct folder on the correct drive.
Click Save.
If the file you're trying to restore already exists, you see a message box telling you so. Click Yes to overwrite and replace the file with the one stored on the backup disk, or click No to keep the original copy.

QuickBooks may ask you for your password to verify that you have administrative permission to restore the file. Then, if everything goes okay, you see a message box that says so. Breathe a deep sigh of relief and give thanks.
Note
Oops. I almost forgot:
When you restore a file, you replace the current version of the file with the backup version stored on the floppy disk. Don't restore a file for fun. Restore a file only if the current version is trashed and you want to start over by using the version stored on the backup disk.
You need to re-enter everything you entered since you made the backup copy. I know. You're bummed out. Hopefully, it hasn't been all that long since you backed up.
Hey. While I'm on the subject of the housecleaning stuff that you can do with your QuickBooks files, let me mention the Accountant's Review feature.
Accountant's Review allows your accountant to make adjustments in a special copy of your QuickBooks data file while you continue to enter your daily transactions in the master file. When your accountant returns the updated file, you can merge the changes back into the master file.
To use Accountant's Review, choose File
Warning
You should never upgrade to a newer version of QuickBooks while your accountant is still working with the accountant's copy. Or at least you shouldn't do this if you plan on using the accountant's changes. If an active accountant's copy is in use, your screen will state that at the very top, next to the company name.
QuickBooks includes a portable-files feature. A portable file is a smaller, condensed version of the QuickBooks data file. The portable file is small enough, in fact, that you can probably e-mail it to your accountant, your sister in Portland, or me.
To create a portable file, choose File
To open a portable file, a person (this could be your accountant, your sister in Portland, or me) should choose File
For some curious reason, in the post-Enron world of accounting, people are much more interested in the QuickBooks Audit Trail feature. In fact, some readers of past editions of this book have tracked me down as though I were a wounded animal so that they could ask about audit trails in QuickBooks. Because of this renewed interest, let me share the three things you need to know about using the QuickBooks Audit Trail feature:
An audit trail is simply a list of changes. The QuickBooks Audit Trail — which is a simple report that lists the changes to the QuickBooks data file — lets you see who changed what.
To turn on the Audit Trail feature in old versions of QuickBooks, you had to choose Edit
You can print the Audit Trail report by choosing Reports
QuickBooks doesn't require you to or even let you "close" months and years, the way old manual accounting systems did. (When you "closed" an old accounting period, you actually zeroed-out the revenue and expense accounts and transferred the net amount to the owner's equity accounts.)
However, QuickBooks does let you use a closing date and password. The closing date sort of prevents someone from entering transactions earlier than the specified date. If you set a closing password, for example, someone needs to supply that password before entering a transaction or changing a transaction dated before the closing date. If you don't set a closing password, someone trying to enter or change a transaction dated before the closing date is warned, but he or she can still create or change the entry.
To set a closing date, choose Edit