Chapter 20. Budgeting and Planning
As you’ve no doubt noticed in business and in life, the activities that cost money almost always seem to outnumber those that bring money in. If you run your own business for a hobby, you may not need to plan ahead or use a budget. But most companies want to make money and most nonprofits want to do the most with the funds they have, so budgeting and planning are essential business activities.
Like any kind of plan, a budget is an estimate of what’s going to happen. You’ll never produce exactly the numbers you estimate in your budget. (If you do, someone’s playing games with your books.) But comparing your actual performance to your budget can tell you that it’s time to crack the whip on the sales team, rein in your spending, or both.
Budgeting in QuickBooks is both simple and simplistic. QuickBooks handles basic budgets and even provides some handy shortcuts for entering numbers quickly. On the other hand, you can’t see whether your budget is working as you build it, and playing what-if games with budgets requires some fancy footwork.
QuickBooks also lets you create forecasts of future performance, although forecasts look just like budgets and have all the same data entry tools—and the same limitations. The bottom line: if you gather budget numbers from dozens of divisions and perform statistical analysis on the results to build your final budget or you chafe at QuickBooks’ limited budgeting features, you’ll need a program other than QuickBooks (like Excel) to massage the numbers. Then you can import your budgetary masterpiece into QuickBooks to compare your performance to the budget.
QuickBooks also includes a couple of planning tools, the Cash Flow Projector (Company → Planning & Budgeting → Cash Flow Projector) and the Business Plan Tool (Company → Planning & Budgeting → Use Business Plan Tool). These wizards ask a bunch of questions, but are often short on the in-depth answers that businesses need.
Types of Budgets
To most people, the word “budget” means a profit and loss budget—one that estimates what your income and expenses will be over a period of time. QuickBooks provides profit and loss budgets that are based on the income and expense accounts in your chart of accounts (see Chapter 3) and typically span the fiscal year for your company. See the box above to learn how forecasts differ from budgets.
Balance sheet budgets aren’t as common, but you can create them in QuickBooks as well. Balance sheets are snapshots of your assets and liabilities, and balance sheet budgets follow the same format by showing the ending balance for your asset, liability, and other balance sheet accounts.
Note
Most companies plan for major purchases and their accompanying loans outside of the budgeting process. If a company needs an asset to operate, executives usually analyze costs, benefits, payback periods, internal rates of return, and so on before making purchase decisions. They evaluate cash flow to decide whether to borrow money or to use cash generated by operations. But after that, the additional income generated by the assets and the additional interest expense for the loans show up in the profit and loss budget.
QuickBooks’ profit and loss reports come in three flavors, each helpful in its own way:
Company profit and loss. The most common type of budget includes all the income and expenses for your entire company. This is the budget that management struggles to meet or strives to exceed—whether that’s to produce the net profit that keeps shareholders happy or to generate the cash needed to run the company. With a QuickBooks “Budget vs. Actual” report (Budget vs. Actual Report), you can compare your actual results to your budget.
Customer or job budget. A customer or job-based profit and loss budget forecasts the income and expenses for a single customer or job. Projects that come with a lot of risk have to offer the potential for lots of profit to be worthwhile. By generating a profit and loss budget for a customer or job, you can make sure that the profitability meets your needs.
Class budget. If you use classes to track income and expenses—for different regions of the country, say—you can create profit and loss budgets for each class. Class budgets work particularly well when you track income and expenses for independent sections of your company: regions, business units, branches, and so on. If most of the company expenses are pooled and classes track only income and reimbursable expenses, you can still create class-based budgets. In those budgets, you just ignore all the accounts that don’t apply to your classtracking scheme.
Ways to Build Budgets
If you’ve just started your business, you may have a business plan that includes estimates of your income and expenses. But you don’t have any existing financial data to use as a basis for a budget. Either way, there’s a method for building a QuickBooks budget. And, if you’re willing to import and export data, QuickBooks gives you two additional ways to build budgets. Here are your options and what each has to offer:
From scratch. This method is the most tedious, but it’s your only option when you don’t have budget numbers or existing data to use. You have to type all the numbers, but fortunately you only have to use this approach for your first budget.
From previous year’s budget. If you created a budget for the previous year, you can use it as the basis for next year’s budget. Although playing with multiple budgets might seem like Business 101 to you, copying budgets requires some exporting and importing games in QuickBooks (Copying Budgets and Creating What-if Budgets).
From previous year’s actual results. Building a new budget from a previous budget usually requires less editing than building one from actual results. However, if this is your first budget and you have at least a year’s worth of data in QuickBooks, it’s much easier to use existing data as a starting point and edit only the values that change.
From data in another program. If you’re a wiz at building budgets in another program or export QuickBooks budgets to work out what-if scenarios, you can import budget data into QuickBooks.
Creating Budgets in QuickBooks
If you want to build a budget directly in QuickBooks, the Set Up Budgets wizard is all you need. Profit and loss budgets; balance sheet budgets; budgets for customers, jobs, and classes; and budgets built from scratch or from previous year’s data—the Set Up Budgets wizard does it all.
Before you dive into building a budget, you have to perform two setup steps outside of budgeting if you want your budgets to work properly:
Fiscal year. QuickBooks uses the first month of your fiscal year as the first month in the budget. To check that you defined your fiscal year correctly, choose Company → Company Information. In the Company Information dialog box, head to the Report Information section and make sure that the month in the “First month in your Fiscal Year” box is indeed the first month of your fiscal year.
Active accounts. QuickBooks budgets cover only the accounts that are active in your chart of accounts. To activate any accounts you want to budget, press Ctrl+A to open the Chart of Accounts window. Then, turn on the “Include inactive” checkbox. (If no accounts are inactive, the “Include inactive” checkbox is grayed out.) For any inactive account that you want in your budget, click the X to the left of the account name to reactivate the account.
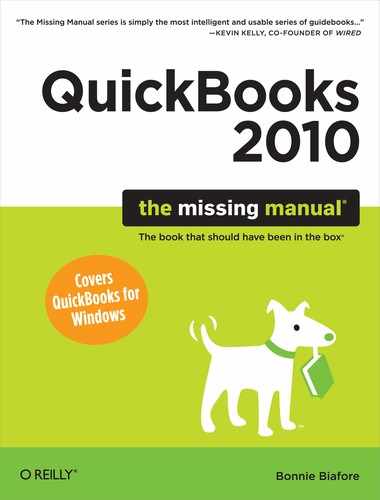
To start the budget wizard, choose Company → Planning & Budgeting → Set Up Budgets. Depending on whether you already have a budget in QuickBooks, the program displays one of two different wizards. The Create New Budget wizard, shown in Figure 20-1, appears if this is your first budget in this company file.
The steps for setting up a new budget are the same whether QuickBooks displays the Create New Budget wizard automatically or you click the Create New Budget button:
In the first “Create a New Budget” screen (Figure 20-1), choose the fiscal year for the budget, and then click Next.
QuickBooks automatically fills in the next calendar year (perhaps assuming that you’re done budgeting for the current year). Click the up and down arrows to the right of the year box to choose the fiscal year you’re budgeting for.
The program automatically selects the Profit and Loss option, because most budgets cover income and expenses for a year. If you want to create a balance sheet budget, select the Balance Sheet option instead.
Tip
If you create a balance sheet budget, there are no additional criteria to set before you build the budget for your balance sheet accounts. In the Create New Budget wizard, clicking Next displays a screen that tells you to click Finish. When you do, a table containing your balance sheet accounts appears in the Set Up Budgets window, and you can begin to type ending balances.
In the “Additional Profit and Loss Budget Criteria” screen, select the option for the flavor of profit and loss budget you want, and then click Next.
QuickBooks automatically selects the “No additional criteria” option, which creates the most common type of budget: a profit and loss budget for the entire company. Choose the Customer:Job option to build a budget for a specific customer or job. If you have QuickBooks classes turned on (Accounting), you can also choose the Class option to build a class-based budget.
In the “Choose how you want to create a budget” screen, select the “Create budget from previous year’s actual data” if you have actual data and want to use it for your budget.
This option transfers the monthly income and expense account totals from the previous year into the budget. Although QuickBooks selects the “Create budget from scratch” option initially, the data entry it requires is necessary only when you don’t have any other numbers to use.
Tip
You’re probably looking for the one option that the “Choose how you want to create a budget” screen doesn’t have—one that creates a new budget based on an existing budget. See Copying Budgets and Creating What-if Budgets to learn how to create a budget in this way.
Click Finish.
QuickBooks opens the Set Up Budgets wizard, which shows a monstrous table. The rows represent each active account in your chart of accounts. Each column is one month of the fiscal year. If you opted to create a budget for a customer, job, or class, the Set Up Budgets window includes either the Current Customer:Job drop-down list containing all your active customer and jobs, or the Class drop-down list containing all your active classes. Before you start entering values for a customer, job, or class budget, choose the customer, job, or class.
Note
If your screen resolution is less than 1024 x 768, the Set Up Budgets window also includes the Show Next 6 Months button, because the screen can’t display the entire year. QuickBooks initially displays January through June. Click Show Next 6 Months to display July through December, which also changes the button’s label to Show Previous 6 Months.
Filling in Budget Values
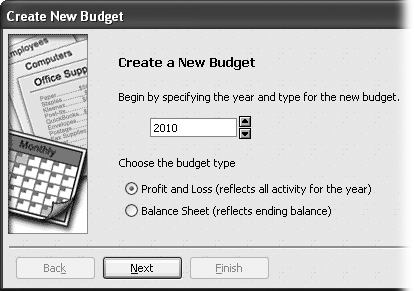
Regardless of which type of budget you create, filling in and editing values is the same. To add budget values to an account, in the Account column, click the account. QuickBooks automatically selects the cell in the first month column in that row. If you’re filling in the entire year’s worth of numbers, type the value for the first month, press Tab to move to the next month, and continue until you’ve entered values in all 12 months. As you add values to each month, the Annual Total column displays the total for all months, as shown in Figure 20-2.
Filling in a few budget cells is usually enough to convince you that data entry shortcuts are in order. Because budgets are estimates, you don’t need extraordinarily detailed or precise values. QuickBooks gives you two ways to enter values faster, described next.
Copy Across Columns
In the Set Up Budgets window (Company → Planning & Budgeting → Set Up Budgets), you can copy a number from one cell in a row to all the cells to the right in the same row, as demonstrated in Figure 20-3.
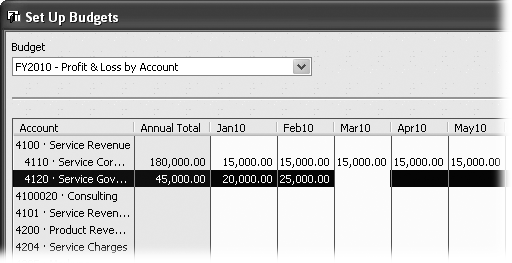
This shortcut is fabulous when a monthly expense remains the same throughout the year, like office rent, for example. But it also works if a price changes mid-year. For example, suppose the corporate concierge you’ve hired to run errands for your employees announces that his rates are going up in May. If your budget contains the old rate in every month, click the cell for May and type the new rate. Then, when you click Copy Across, the new rate appears from May through December.
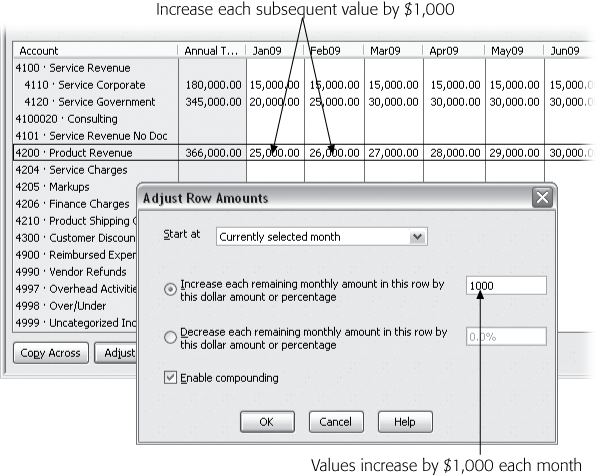
Adjust Row Amounts
In the Set Up Budgets window (Company → Planning & Budgeting → Set Up Budgets), the Adjust Row Amounts button lets you increase or decrease monthly values by a dollar amount or a percentage, which has zillions of useful applications. Say you created a budget from previous year’s data, but you want to increase this year’s values by 10 percent. Or maybe your company is growing quickly and you want to apply some heat to your sales force by increasing the income you aim to pull in each month.
Changing all the cells in a row by a fixed dollar amount isn’t as useful as you might think, because Copy Across basically does the same thing in most cases. But when you change budget amounts by percentages, QuickBooks takes care of the percentage calculations for you. Here’s what you do:
Click the row you want to adjust.
If you want to start the adjustment with a specific month, click the cell for the starting month.
Click Adjust Row Amounts.
QuickBooks opens the Adjust Row Amounts dialog box and automatically selects your previous choice in the “Start at” box. “1st month” starts adjustments in the first month of the fiscal year. To start at the month you selected, from the “Start at” drop-down list, choose “Currently selected month”.
QuickBooks automatically selects the “Increase each remaining monthly amount in this row by this dollar amount or percentage” option because prices usually go up. If prices are decreasing, select the option that begins with “Decrease each remaining monthly amount”. In the corresponding value box, type the dollar amount or the percentage, and then click OK.
If the landlord tells you that rent is going up five percent, in the box for the “Increase” option, type 5%. QuickBooks increases the value in all the remaining cells by five percent. So if your rent was $5,000 a month, the values in all the remaining months change to $5,250.
To add a dollar amount to the remaining cells, type that dollar value. For example, to add $1,000 a month to the Rent cells, in the box for this option, type 1000. Each subsequent cell in the Rent row increases by 1,000. Of course, you can do the same thing by typing the new rent amount in the cell for the first month to which it applies, and then clicking Copy Across.
Note
The Adjust Row Amounts command is for adjusting existing budget values, not filling in blank cells. For example, when you select the “Increase each remaining monthly amount in this row by this dollar amount or percentage” option and type 100 in the text box, QuickBooks adds 100 to the values in the month cells. If the January cell is set to 1,000, it increases to 1,100. However, if the remaining months’ cells are zero (0), they increase to 100.
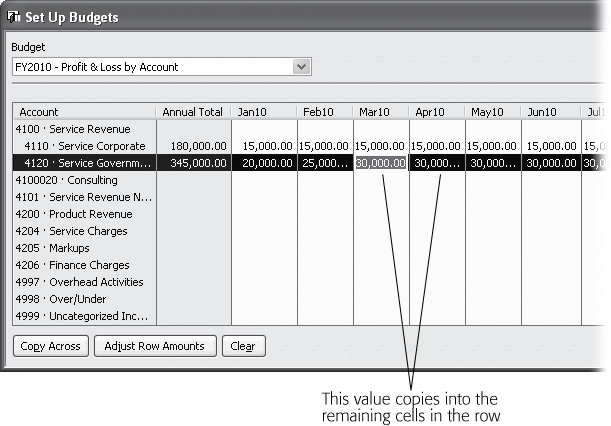
If you set the “Start at” box to “Currently selected month”, the “Enable compounding” checkbox appears. If you want to adjust each month’s value based on the previous month’s value, turn on this checkbox.
When you compound dollar amounts, QuickBooks adds the dollar amount you specify to the next month’s value. If January’s value is 25,000 and you change the value by 1,000, February’s value is 26,000, as shown in Figure 20-4. Then, March’s value increases by another 1,000 to 27,000.
Creating Additional Customer:Job or Class Budgets
In QuickBooks, there’s no way to store several versions of a fiscal year budget that covers your entire operation. But you can create additional budgets for the same fiscal year, for different customers, jobs, or classes.
After you create your first budget, the Set Up Budgets dialog box opens with the most recent fiscal year budget in the budget table. But if you’ve created at least one budget for a customer or job, the Budget drop-down list includes an entry like “FY2010-Profit & Loss By Account and Customer:Job”. Class budgets show up in the Budget drop-down list looking something like “FY2010-Profit & Loss By Account and Class”.
Class budgets work the way Customer:Job budgets do. In fact, if you replace every instance of “Customer:Job” in the following procedure with “Class”, you’ll have the instructions for creating Class budgets. Here’s how you create and save additional Customer:Job or Class budgets:
In the Budget drop-down list, choose the customer and job budget for the fiscal year you want to budget.
QuickBooks adds the Current Customer:Job box to the Set Up Budgets window in between the Budget box and the table of budget values.
In the Current Customer:Job drop-down list, choose the customer or job that you want to budget.
Any budgetary numbers you’ve previously entered for the customer or job for the selected fiscal year appear in the budget table.
In the budget table, fill in values for the Customer:Job budget using any of the techniques you learned in the previous section.
Unlike a budget for your entire operation, customer or job budgets may have values for only a few accounts. For example, for a job that includes products, services, and reimbursable expenses, your budget may have values only for income accounts and the expense accounts for reimbursable expenses.
Save the budget by clicking Save.
If you choose another customer or job without clicking Save, QuickBooks asks if you want to record the budget. In the Recording Budget message box, click Yes.
Copying Budgets and Creating What-if Budgets
If next year’s budget is almost identical to this year’s, you’d expect that copying your current budget and changing a few numbers would be quick and easy. But QuickBooks lacks a built-in mechanism for copying an existing budget to a new budget! Similarly, because QuickBooks allows only one budget of each type for the same fiscal year, you can’t create what-if budgets within the program to see which one is the best.
To do any kind of budget modification beyond typing in values or using Copy Across and Adjust Row Amounts, you have to export your budgets to a spreadsheet program and make modifications or what-if copies there. Then, when you’ve got the budget you want, you can import the file back into QuickBooks to use the new budget. For example, you can export your QuickBooks budget into Microsoft Excel and copy the budget into several worksheets. One worksheet could be a bare-bones budget in case a client with shaky finances disappears. A second worksheet could represent your happy-dance budget if you snag that big new client. And a third worksheet could be your most likely results, somewhere between the two extremes.
A command that copies a budget would be convenient—even Quicken, Intuit’s software for personal finances, has one. Exported budget files list entries for fiscal years and accounts in no particular order. For that reason, the easiest way to create budgets or play budget what-if games is in Excel and then import the final budget into QuickBooks.
Note
You can’t export only the budget you want to copy or play with. When you export the Budgets list in QuickBooks, the export file includes entries for every budget for every fiscal year. If you created budgets for customers, jobs, and classes, you’ll get entries for those, too. When you work on the budgets in a spreadsheet, you can ignore the entries for those other budgets—or you can delete those rows in the spreadsheet to prevent inadvertent changes to budgets you’re happy with.
Here’s how you export QuickBooks budgets and import your changes:
Choose File → Utilities → Export → “Lists to IIF Files”.
QuickBooks opens an Export dialog box with checkboxes for each type of list you can export.
In this first Export dialog box, turn on the Budgets checkbox, and then click OK.
QuickBooks opens a second Export dialog box, which looks like a Save As dialog box. However, the “Save as type” box is automatically filled in with IIF Files (*.IIF).
In the second Export dialog box, navigate to the folder where you want to save the export file and in the “File name” box, replace *.IIF with the name for your export file.
To keep your files organized, save all your export files in the same folder, called something like QBExport_Files. Name the export file something like QBBudgets.iif.
Click Save to export the budgets from QuickBooks.
When a QuickBooks Information box appears telling you that the export was successful, click OK to dismiss it.
In a spreadsheet program like Excel, open the budget export file.
IIF files are tab-delimited text files (see Exporting lists to a text file). To open one in Excel 2007, click the Office button and then choose Open (in Excel 2003, choose File → Open). In the Open dialog box, head to the “Files of type” box, and then choose All Files so you can see every file in your folders. Navigate to the folder that contains the IIF export file and double-click its filename. The Excel Text Import Wizard appears. You don’t have to specify any special formats to tell Excel how to read the file; you can just click Finish to import the file into Excel.
At first, rows for different year’s budgets and account names are in no particular order. To change the order of the budget rows, select all the rows below the one that begins with !BUD (Figure 20-5). Then choose Data → Sort and sort the workbook first by start date (STARTDATE) and then by account (ACCNT).
This sorting method intersperses income and expense accounts, but the good thing is it groups all the entries for each fiscal year together. Because companies typically have fewer income accounts, it’s quicker to move the rows for income accounts above the expense accounts.
While you’re still in Excel, if you want to use an existing budget to create next year’s budget, all you do is change the year in the STARTDATE column.
The Excel worksheet includes a column labeled STARTDATE, which contains the date that the fiscal year for the budget begins. Use Excel’s Replace command (press Ctrl+H) to change the year to the new budget (Figure 20-5). In Excel 2007, you can also choose the Home tab and then click Find & Select → Replace (at the right end of the ribbon); in Excel 2003, choose Edit → Replace. Ctrl+H opens the “Find and Replace” dialog box in both Excel 2003 and 2007.
To modify budget numbers, edit the budget values in the Excel worksheet.
Note
If you create several what-if budgets in Excel, be sure to copy the data for only your final budget into a file for importing into QuickBooks. Compare the keywords and column headings in the Budget list export file to those in the file you plan to import to make sure that the data imports the way you want. For example, a row that begins with !BUD lists the keywords that identify columns, such as ACCNT for your accounts and AMOUNT for your budget values. (Rows for budget entries have to begin with a cell containing the keyword BUD. For more information on importing and exporting data, see Chapter 24.)
In Excel 2007, click the Office button and then choose Save As → Other Formats. (In Excel 2003, choose File → Save As.) In the Save As dialog box, save the modified file with a new file name.
In the Save As dialog box, Excel chooses Text (tab delimited) as the file type.
To import the modified IIF file, back in QuickBooks, choose File → Utilities → Import → IIF Files.
QuickBooks opens the Import dialog box and automatically chooses IIF Files (*.IIF) in the “Files of type” box. If you don’t see your file, in the “Files of type” box, choose All Files (*.*).
Figure 20-5. The budget entries for 2009 budgets include “1/1/2009” in the STARTDATE column. To create a budget for 2010, change the contents of these cells to “1/1/2010”. Budget entries for customer, job, or class budgets include the customer and job name in the CUSTOMER column or the class name in the CLASS column. If you leave all the rows for budgets that you aren’t changing in the spreadsheet, QuickBooks imports those budgets, too. However, if you didn’t change any values, the newly imported budgets look the same in QuickBooks as they did before the import.Double-click the name of the IIF file that contains your edited budget.
When a QuickBooks Information box appears telling you that the import was successful, click OK to dismiss it.
Choose Company → Planning & Budgeting → Set Up Budgets.
If you created a budget for a new fiscal year, in the Set Up Budgets window, the Budget drop-down list now contains an entry for the budget for the new year. If you used a spreadsheet to edit an existing budget, in the Budget drop-down list, choose the entry for that budget to see your updated values in the budget table.

Running Budget Reports
A budget gives you a target to aim for. The Set Up Budgets window lets you type values for income and expense accounts, but it doesn’t show you whether your budget results in a net profit or loss. For that, you need a budget report (or your budget exported to a spreadsheet, as described on Copying Budgets and Creating What-if Budgets). And to see how your business is doing compared to your budget, you need a budget report that shows budget and actual numbers side by side. QuickBooks provides four types of budget reports, one to review budgets you’ve created and the other three to compare your performance to your plan. This section describes the types of budget reports, what they’re useful for, and how to create and format them.
Note
To learn about all the options for customizing any kind of report, see Chapter 21.
The Budget Overview Report
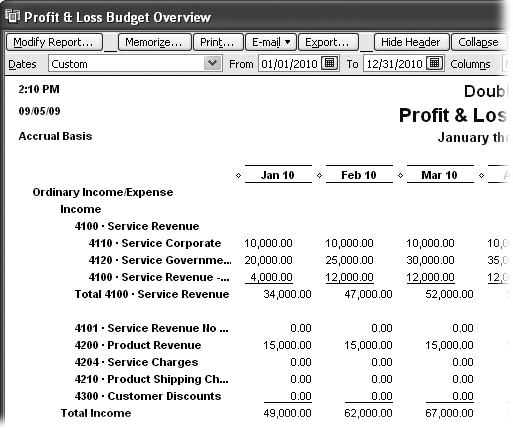
Because the Set Up Budgets window shows your accounts and the values you enter for each month, you can’t see whether your budget actually works. The Budget Overview Report shows budget numbers for each account and month, but it also subtotals values if you use top-level accounts and subaccounts in your chart of accounts, as shown in Figure 20-6.
To view the Budget Overview Report, choose Reports → Budgets & Forecasts → Budget Overview. In the Budget Report dialog box, first choose the budget you want to view and then the layout you want. When you click Finish, QuickBooks opens the Budget Overview Report window.
Note
The Budget Overview Report includes only accounts that have budget values; accounts without budget values stay out of view.
Report layouts
If you create a report for a profit and loss budget for your entire company, the only layout option in the Budget Report dialog box is Account By Month, which lists the accounts in the first column with each subsequent column showing one month of the fiscal year. You can change the columns to different durations in the Budget Overview window (Figure 20-6).
If you choose a Customer:Job budget in the Budget Report dialog box and then click Next, the Budget Overview Report includes these layout options:
Account By Month. This layout lists accounts in the first column with months of the fiscal year in the subsequent columns. The values in the monthly columns represent the totals for all the Customer:Job budgets you’ve created.
Account By Customer:Job. This layout lists accounts in the first column and includes additional columns for each customer or job you’ve budgeted. Each customer and job column shows its annual totals.
Customer:Job by Month. This layout adds a row for each customer and additional rows for each job that customer has. The columns are for each month of the fiscal year. The value for a job and month represents the total budgeted value for all accounts.
Budget vs. Actual Report
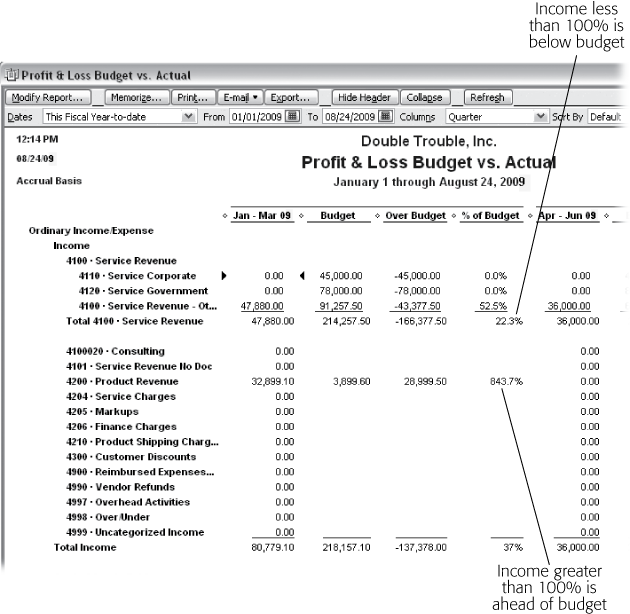
The “Budget vs. Actual” report compares the budget you created to the actual income and expenses your business achieved. Run this report monthly for early warnings should your performance veer off track. For example, if your income is short of your target, the “% of Budget” column shows percentages less than 100 percent, as is painfully apparent in Figure 20-7. Income percentages greater than 100 percent mean you’re making more than you planned. On the other hand, costs greater than 100 percent indicate that expenses are ballooning beyond your budget.
To view the "Budget vs. Actual” report, choose Reports → Budgets & Forecasts → “Budget vs. Actual”. Choose the budget you want to view and the layout you want. When you click Finish, QuickBooks opens the “Budget vs. Actual” report window.
Tip
If the numbers in your report don’t seem right, the culprit could be the wrong choice of Accrual or Cash reporting. Click Modify Report and click the Accrual or Cash option to match your reporting style. Accounting Basics—The Important Stuff explains the difference between cash basis and accrual reporting.
Profit & Loss Budget Performance Report
The Profit & Loss Budget Performance report also compares budgeted versus actual values, but initially shows the actual values for the current month with the budgeted values for the entire month in the Budget column. Two additional columns show the actual and budgeted values for the year to date.
Use this report to check your performance before the end of the month. Because the budget numbers represent the entire month, you shouldn’t expect a perfect match between actual and budgeted values. But if your income or expenses are way off the mark, you can take corrective action.
Budget vs. Actual Graph
To have QuickBooks automatically generate a graph comparing your budget to actual performance, choose Reports → Budgets & Forecasts → Budget vs. Actual Graph. This graph displays the differences between your budgeted and actual values in two ways:
The upper bar graph shows the difference between your actual net income and budgeted net income for each month. When your actual net income exceeds the budgeted value, you’ve made more money than you planned. The bar is blue and appears above the horizontal axis. If the actual net income is less than the budget, the bar is red and drops below the horizontal axis.
The lower bar graph sorts accounts, customers, or classes (depending on the report you chose) that are the furthest from your budgeted values (either above or below). For example, if you display a “P&L by Accounts and Jobs” graph, you can see the customers and jobs that exceeded your budget by the largest amount or fell the furthest short.