Chapter 24. Integrating QuickBooks with Other Programs
Most businesses use other programs in addition to QuickBooks to keep things running smoothly. You can put QuickBooks to use in many other programs studying your company’s financial ratios, calculating employee bonuses based on hours worked and services sold, sending special sales letters to customers on their birthdays, and so on. Similarly, other programs may contain data that would be useful to pull into QuickBooks. For example, if you use an estimating program that has all the products and services you sell in its database, there’s no reason to manually enter those in QuickBooks.
QuickBooks doesn’t share its most intimate details with just any program. It reserves its data for a few select programs—or the ones you tell it to play nicely with—but then it gets really chummy. For example, you can set up letters in QuickBooks to send to customers, and the program automatically opens Microsoft Word with your customer data merged into form letters and envelopes. If you use Outlook (not Outlook Express) as your contact-management tool, keeping records up-to-date is easy. By synchronizing your QuickBooks company file and your contact database, you enter changes in one place and the programs automatically copy data from one file to the other.
Programs that can read a QuickBooks company file still have to ask permission to grab QuickBooks data. The QuickBooks administrator (or other QuickBooks users that the administrator anoints) can say whether another program can have access and how much. For software that can’t read a company file directly but can provide valuable assistance processing your financial data (such as an Excel spreadsheet that calculates financial ratios that QuickBooks doesn’t), you can export and import data between programs (Exporting QuickBooks Data).
This chapter describes how to integrate QuickBooks at whatever level of trust you prefer. It also tells you about add-on services that Intuit provides and how to find third-party programs that work with QuickBooks.
Mail Merge to a Word Document
Business communications are the perfect marriage of QuickBooks data and word processing. You can generate your letters and envelopes in no time by combining QuickBooks customer contact info and other data with Microsoft Word mail merge documents. QuickBooks includes dozens of ready-to-mail letters as Word documents that cover the most common business communications, from customer thank-you notes to less friendly denials of requests for credit. If nothing less than Pulitzer Prize quality will do for your business letters, you can modify the built-in letters and envelopes in Word or write your own.
The best place to start when you want to prepare letters in QuickBooks is Company → Prepare Letters with Envelopes, which displays a submenu with the following entries:
Collection Letters include the invoices or statements that are overdue, and they remind customers to pay up. QuickBooks automatically pulls the overdue balance and overdue invoices from your company file.
Customer Letters pull only the customer contact and address information from QuickBooks to address the letter and envelope. The rest of the letter is boilerplate for situations such as thanking customers for their business, apologizing for a mistake, or sending a contract.
Vendor Letters include credit requests, disputed charges, payments on your account, and two blank templates for mailing or faxing a vendor.
Employee Letters cover birthdays, sick time, vacation, and general communications.
Letters to Other Names cover a hodge-podge of different recipients, so QuickBooks doesn’t even try to guess what you need. The only template in this category is a blank letter with basic mail merge fields.
Customize Letter Templates is a command that helps you create a brand new template, convert a Word document into a template, edit an existing template, or organize the templates you already have, as described in the box on Creating Letters and Envelopes in QuickBooks.
Creating Letters and Envelopes in QuickBooks
Though preparing any kind of letter with the QuickBooks letter wizard takes no more than a few clicks, the collection letter wizard has some extra smarts. For most letters, you can tell QuickBooks whether you want to include active and inactive names and then select the names you want to receive letters. The collection letter wizard can also filter the customer list by how late payments are.
Here are the steps for creating letters and envelopes using a collection letter as an example:
Choose Company → “Prepare Letters with Envelopes” → Collection Letters.
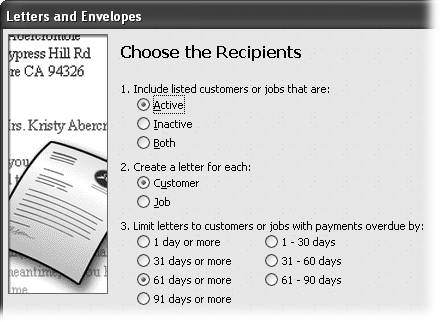
QuickBooks opens the “Letters and Envelopes” wizard and shows the recipient options for collection letters, as shown in Figure 24-2.
Figure 24-2. On the “Choose the Recipients” page, QuickBooks automatically selects the option to include active customers. If you want to send letters to active and inactive customers alike, for a recall notice, for example, choose the Both option. Item 2 on the page lets you choose whether to send a letter to each customer or to the contact person for each job a customer hires you to do. For collection letters, item 3 asks you to specify how late the payment has to be before you send a letter.Note
For non-collection letters, you still choose active or inactive customers and whether to send letters to each customer or each job, but those are your only choices. (The first screen you see for letters to vendors, employees, and people on the Other Names list combines the list of selected names and the options for filtering names.)
After you choose the filters you want to apply for your letter recipients, click Next.
For collection letters, QuickBooks displays a message if any customers have unapplied credits or payments. Rather than embarrassing yourself by sending a collection letter to a customer whose payments are up-to-date, you’re better off canceling the wizard and applying credits and payments before preparing collection letters.
Tip
The Open Invoices report shows unapplied credits and payments (along with open invoices). To run the report, choose Reports → Customers & Receivables → Open Invoices. To see only unapplied credits and payments, in the report window toolbar, click Modify Report, and then click the Filter tab. In the Filter list, choose Transaction Type. In the Transaction Type drop-down list, choose Multiple Transaction Types. In the Select Transaction Types dialog box, click “Credit Memo and Payment”, and then click OK. Click OK once more to update the report to show only unapplied credit memos and payments.
For a quick view of one customer’s transactions, open the Customer Center (on the Home page, click Customers) and select the customer on the Customers & Jobs tab. At the top right of the Customer Information panel, click the Quick Report link.
The next screen is “Review and Edit Recipients”. QuickBooks automatically selects all the names that passed your filters.
If you’ve already talked to some customers and want to remove them from the list, click the checkmarks in front of their names to turn them off.
You can click Mark All or Unmark All to select or clear every name, respectively. If you want only a few names, it’s faster to click Unmark All and then click each name you want. The recipient list is sorted by name initially, but you can select the Amount option to sort by the amount that’s overdue, for instance, if you want to send letters only to customers whose balances are greater than $10,000.
When you’ve selected the customers you want to send letters to, click Next.
QuickBooks moves you to the “Choose a Letter Template” screen.
Select the collection letter template that you want to send, and then click Next.
QuickBooks includes three types of collection letters. The formal collection letter is a straightforward request for payment. The friendly collection letter assumes the customer simply forgot. The harsh collection letter includes the threat of turning the account over to a collection agency. The friendly and formal letters can’t do any harm, but if you’re considering sending harsh letters, you might want to create your own template for that communication.
To use a different template entirely, select the “Create or Edit a letter template” option. When you click Next, you can choose one of the options described in the box on Creating Letters and Envelopes in QuickBooks (create a new template, convert a Word document, or edit an existing template).
On the “Enter a Name and Title” screen, in the Name box, type the name you want to include in the letter signature block. In the Title box, type the signer’s title.
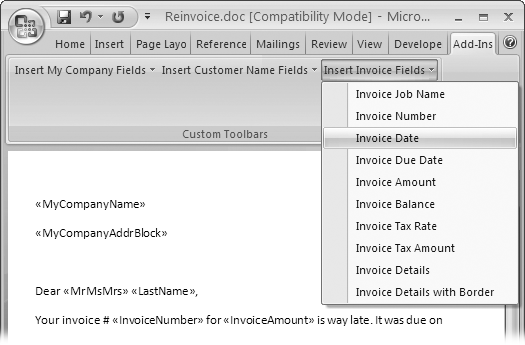
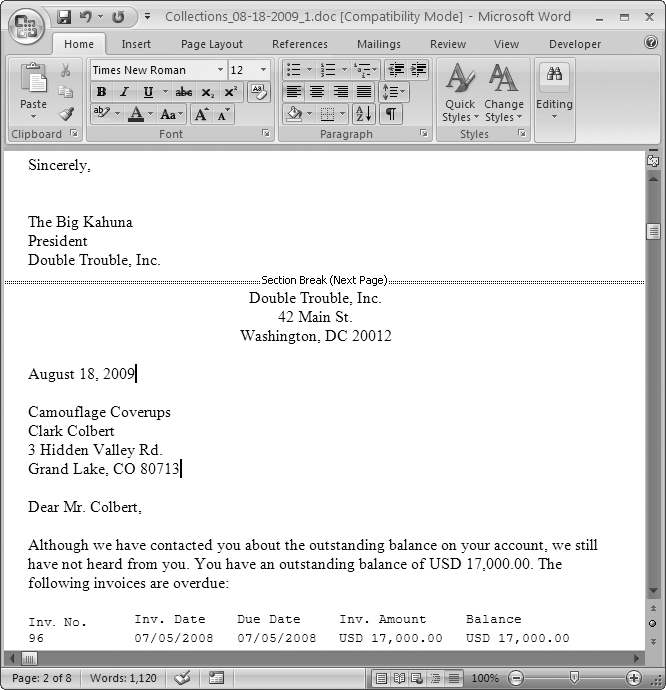
When you click Next, QuickBooks sends the information to Microsoft Word, as shown in Figure 24-3. Depending on how many letters you’re sending, you might have to wait a few minutes before Word launches with your letters.
After you print the letters from within Word, back in QuickBooks, the Print Letters and Envelopes screen appears. Click Next if you want to print envelopes that go with the letters you just printed in Word.
If you don’t want to print envelopes, click Cancel. The wizard closes and you’re done.
If you choose to print envelopes, QuickBooks opens the Envelope Options dialog box. In the Envelope Size drop-down list, choose the type of envelope you use.
If your envelopes already include your return address, turn off the “Print return address” box. Turn on the Delivery Point Barcode if you’re mailing letters in the US and want the post office bar code printed on the envelopes. When you click OK, you’ll see a preview of the envelopes in Word.
Figure 24-3. All the letters you create are in one Microsoft Word document, with each letter starting on a new page. You can edit the letters in the Word document to make small changes, but you have to make the changes in each letter individually. (Editing the Word document doesn’t alter the template in QuickBooks.) Word names the file automatically with the type of letter and the date. To print the letters, in Word 2007, choose Office → Print. In Word 2003, choose File → Print.When you’ve got envelopes in your printer, click OK.
The envelope print job runs right away.
Synchronizing Contacts
If you keep information about contacts in Microsoft Outlook (2000 through 2007)—not Outlook Express—you can synchronize those records with your QuickBooks contact data. In addition to saving time by not duplicating data entry, synchronizing your contact info helps reduce errors. As long as you enter an update correctly in the one program, you’re sure to get the right info in your other contact database. Regardless of which program you update contact information in, you can transfer any changes to the other database.
Note
The only time synchronizing doesn’t apply is when you delete names. If you delete names in Outlook, QuickBooks doesn’t delete them in your company file. If you really want those names gone, you have to make them inactive or delete them in QuickBooks. (Making them inactive is the best course, because deleting names can create problems, as Hiding and Restoring Customers explains.) On the other hand, if you delete a name in QuickBooks but don’t delete it in Outlook, it’ll reappear in QuickBooks unless you tell Contact Sync to ignore it (Using QuickBooks Contact Sync for Outlook).
Using QuickBooks Contact Sync for Outlook
If you use QuickBooks 2005 or later (and Outlook 2000 or later), you use “QuickBooks Contact Sync for Outlook” to synchronize your contact data. Although the command to synchronize is already on the File → Utilities menu, you have to install Contact Sync before you get started. Here’s how to download this tool and put it to work:
Choose File → Utilities → Synchronize Contacts.
If Contact Sync isn’t installed, a message box tells you that you have to download and install it. Click OK to do just that. QuickBooks opens a Web browser to the QuickBooks Contact Sync for Outlook page (http://support.quickbooks.intuit.com/support/tools/contact_sync). Type the email address you used when you registered QuickBooks (Registering QuickBooks), and then click “Continue to Download”. You can save the installation file (click Save) or run it immediately (click Run) to install the software.
Installing is easy. First, be sure to close Outlook. Then, run the installation wizard as you do for other programs. Accept the license agreement, choose a destination folder, and then click Next or Install, and the installation begins.
After you install Contact Sync, launch both Outlook and QuickBooks.
Log into QuickBooks as the administrator and open the company file you want to synchronize.
In Outlook, the Contact Sync Setup Assistant appears, offering to help you import your contacts from QuickBooks into Outlook. After you click Get Started, a “Connecting to QuickBooks” message box appears while Outlook and QuickBooks introduce themselves to each other. Eventually, the QuickBooks Contact Sync dialog box opens and selects the company file that’s open in QuickBooks.
Click Setup to begin the setup in earnest.
The Select An Outlook Folder screen appears. If you’re like most people, you have only one folder for contacts, \Personal FoldersContacts, which the wizard selects automatically.
If you want to synchronize to a different Outlook folder, choose it. Click Next.
The Select QuickBooks List Types To Synchronize screen appears.
To synchronize all contacts, turn on the Customer, Include Customer Jobs, and Vendor checkboxes, and then click Next.
For each checkbox you turn on, the Setup Assistant creates a subfolder in the Outlook Contacts folder.
In the “Exclude Contacts From Synchronization” screen, turn on the checkboxes for types of names you don’t want to transfer back and forth, and then click Next.
When you turn on these checkboxes, names assigned to Outlook’s Personal category or marked as Private won’t transfer to QuickBooks.
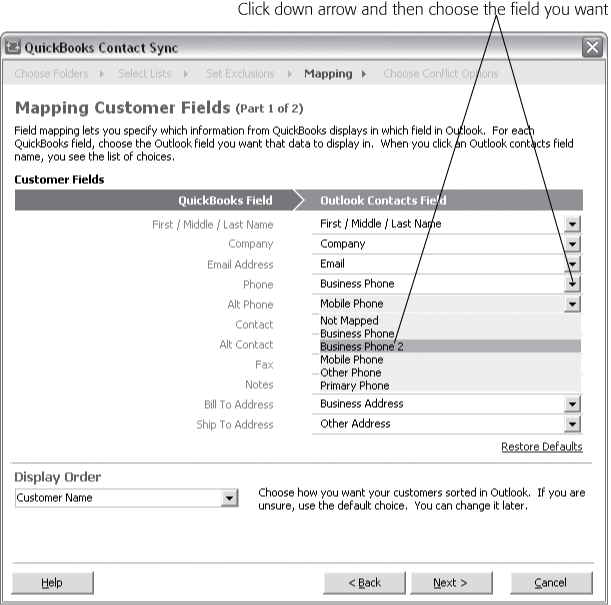
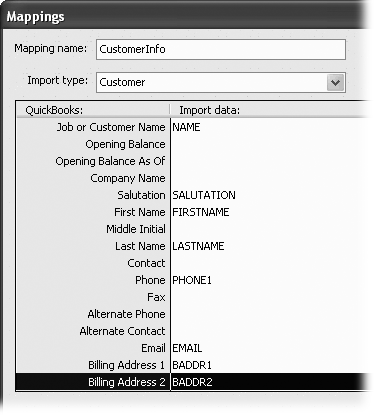
In the Mapping Customer Fields (Part 1 of 2) screen, change the field mapping for any QuickBooks field that doesn’t point to the right Outlook field, as shown in Figure 24-4. Click Next when the mappings are the way you want them.
The Mapping Customer Fields screen displays the QuickBooks contact fields on the left side, along with its guesses about what Outlook fields to map to.
If you turned on the checkboxes to import jobs and vendors, repeat step 7 to map job and vendor fields to the corresponding Outlook fields.
Chances are you’ll make the same changes for jobs and vendors as you did for customer fields.
In the Set Conflict Action screen, select the option for how you want Contact Sync to resolve discrepancies between Outlook and QuickBooks, and then click Save.
Contact Sync automatically selects the “Let me decide each case” option, which means you get to tell QuickBooks what to do if the contact in Outlook differs from the data you have in QuickBooks. If you usually update contacts in Outlook, select the Outlook Data Wins option. Select the QuickBooks Data Wins option if you usually update contacts in QuickBooks.
In the “Change Settings or Synchronize Now” screen, click Setup to change any settings (you retrace your steps until you’re back in the “Change Settings or Synchronize Now” screen). When you’re ready to synchronize, click the Sync Now button.
The Contact Sync screen keeps you updated on the progress it’s making. When the synchronization is done, the Contact Overview Complete screen appears, showing you how many customers and vendors it found and either matched or added to Outlook.
When the Contact Overview Complete screen appears, click Next.
If contacts that already existed in Outlook don’t match up to a QuickBooks list (like Customer or Vendor), the “Select Categories for QuickBooks” screen appears. You can add an Outlook contact to a QuickBooks list by selecting the contact, choosing the QuickBooks list in the “Select list for contact” drop-down menu, and then clicking Apply.
If the contacts don’t match up to a QuickBooks list because they aren’t business contacts, you can tell Contact Sync to ignore them. Click the first contact and Shift+click the last contact to select them all. Then, in the “Select list for contact” drop-down menu, choose Ignore, and then click Apply.
After you’ve selected categories for Outlook contacts, click Next.
In the Accept Changes screen, you can review the changes that will occur in Outlook and QuickBooks. If the changes are OK, click Accept. If you don’t want to make the changes, click Cancel. If you click Accept, a progress box shows you where Contact Sync is in transferring data. The Synchronization Complete message box appears when your info is synchronized. Click OK and you’re done.
From now on, you can update contact information with just one click. In Outlook, in the Contact Sync toolbar, click Synchronize Contacts. Contact Sync analyzes the changes in the two programs and updates both as necessary.
Setting Up an Integrated Application
Integrated applications don’t read data from exported text files; they actually access your company file to get info. To protect your data from programs that shouldn’t read your company file, you have to tell QuickBooks which programs you do want digging into your financial data.
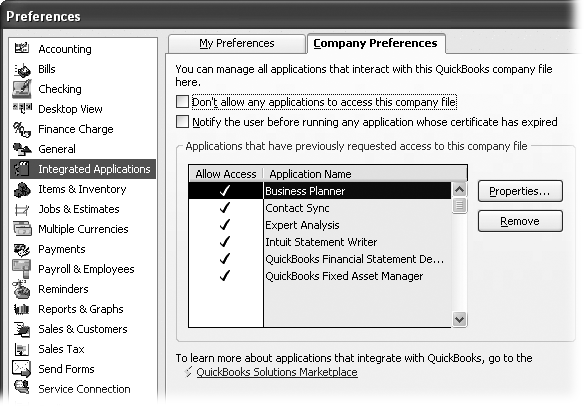
Letting programs access your data is something you set up with preferences. Choose Edit → Preferences, click the Integrated Applications icon, and then click the Company Preferences tab, shown in Figure 24-5. Here, you can turn on the “Don’t allow any applications to access this company file” checkbox to keep all programs out. But if you’re reading this section, you probably want at least one program to access your QuickBooks data.
As long as the “Don’t allow any applications to access this company file” checkbox is turned off, when a program tries to access your company file, QuickBooks displays an Application Certificate dialog box. If you’re the QuickBooks administrator or someone else with the permission to dole out file access, choose one of the options to set the program’s access to the company file. Obviously, choosing No keeps the program out. But you have three options when you want to let the program in:
Yes, prompt each time. When you’re letting another program access your data, this is the safest option. The program can get in only when someone with the rights to approve access says so—a small obstacle that prevents the wrong person from running the program after breaking in after hours. If someone who can approve access isn’t available to say yes, the integrated application (or the person who’s running it) is out of luck.
Yes, whenever this QuickBooks company file is open. This option is a bit more trusting. As long as someone is working on the company file, the integrated application can access the file without asking permission.
Yes, always; allow access even if QuickBooks is not running. This is by far the most lenient choice. The integrated program can help itself to your financial data even if no one with a QuickBooks login is working on the file. This option is exactly what you need if the integrated application is a resource hog that you run at night.
When you choose this option, you can specify the QuickBooks user for the login. Rather than use the login for one of your employees, you can create a QuickBooks user (Creating QuickBooks Users) specifically for an integrated application, which lets you control the type of data the program can access without affecting someone else’s login.
After a program has accessed your company file, you can change its access rights in the Properties dialog box, as shown in Figure 24-6.

Warning
Sometimes third-party programs alter QuickBooks features, like your chart of accounts. So before you integrate a new program, back up your QuickBooks file. After you integrate a program, check your QuickBooks file for unauthorized changes, like new accounts you don’t want to use. If the program made changes you don’t like, you can restore your backup or modify your lists manually in QuickBooks (see Chapter 4, 5, 6, or 7, depending on the list).
Exporting QuickBooks Data
Programs that don’t integrate with QuickBooks can still do things that QuickBooks can’t. For example, you can export a report to Excel and take advantage of a wider range of formatting options and calculations. To get data out of your QuickBooks company file and into another program, you have three choices:
Export file. You can create a delimited text file (that is, a file that separates each field with a delimiter like a comma or tab) that contains data from your QuickBooks file. For example, you can generate export files for QuickBooks lists, such as your Item List or Sales Tax Code List. For the named records in QuickBooks like your Customer:Job and Vendor Lists, you can produce export files that contain all your contact information or only address information.
Report file. Create any report in QuickBooks and you can then export it to a file that you can use in another program. Compared to exporting an entire list, a report gives you more control over the exported information. If you want to export data from several lists or from transactions, exporting reports is your only choice.
Excel file. Throughout QuickBooks, you can get to the same Export dialog box that you see when you export reports. For example, at the bottom of the Item List window, click Excel, and then choose Export All Items. In the Customer Center’s menu bar, click Excel, and then choose either Export Customer List or Export Transactions. (The Vendor Center and the Employee Center have similar commands.)
Exporting Lists and Addresses
When you export lists to QuickBooks delimited text files, the export file (called an IIF file because of its .iif file extension) contains all the fields associated with those QuickBooks lists. Creating export files is easy, and the only choice you have to make is which lists to export. If you export several lists, the IIF file that QuickBooks creates contains every field for every list you chose.
Exporting lists to a text file
Exporting one or more lists to a delimited text file takes only a few quick steps:
Choose File → Utilities → Export → “Lists to IIF Files”.
QuickBooks opens an Export dialog box, which contains checkboxes for each list in QuickBooks from the Chart of Accounts to Customer List to Sales Tax Code List, as shown in Figure 24-7.
Turn on the checkbox for every list you want to export into the same file, and then click OK.
If you want to export lists into separate files, you have to repeat all the steps in this procedure for each export file you want to create. For example, if you want to export your Customer List and your Item List to two different files, repeat these steps twice through.
In the second Export dialog box (which is basically a Save As dialog box), navigate to the folder where you want to save the export file and, in the “File name” box, type the name of the file.
Your export files are easier to find if you create a folder specifically for them. For example, you could create a subfolder called Export_Files within the folder that holds your company files.
Click Save to create the file.
When the QuickBooks Information message box tells you that your data was exported successfully, click OK to close the message box. Now, you’re ready to import the file into Microsoft Excel or another program, as described later in this chapter.

Tip
Exporting QuickBooks data can help you learn the format you need to import data into your company file. For instance, once you’ve entered a sales tax code or two (using the laborious process described on Setting Up Sales Tax), you can export them. Then, in the export file, create the rest of your codes using the same format and then import that file back into QuickBooks.
Exporting addresses
With QuickBooks features to generate mail merge letters, export contact list reports, and synchronize your company file with Outlook, there isn’t much reason to use the tab-delimited address files that QuickBooks produces. However, if you need a text file of names and addresses to import into another program, here’s what you do:
Choose File → Utilities → Export → “Addresses to Text File“.
If an Export Addresses message box appears and suggests that you try Write Letters, turn on the “Do not display this message in the future” checkbox, and then click OK to close the message box.
In the “Select Names for Export Addresses” dialog box, choose the category of names you want to export, and then click OK.
Initially, QuickBooks chooses “All names” to export all names in your company file. You can also choose categories of names, like “All vendors”. To select individual names, choose “Multiple names”, and then pick the names you want.
In the Save Address Data File dialog box, select a folder where you want to save the exported file, type a file name in the “File name” box, and then click Save.
QuickBooks automatically assigns a .txt extension to the file. You can now import it into any program that likes tab-delimited addresses.
Exporting Reports
If you remember all the way back to Chapter 21, you know that you can customize reports to contain just the information you want, presented just the way you want. When you want to export only some of your QuickBooks data or export it in a specific way, your best bet is customizing a report before you export it.
You can export a report to a comma-delimited file if that’s what another program needs. If the other program is as fussy about data as QuickBooks is, making those changes in Excel is easier than trying to do the same in a text editing tool such as Windows Notepad. You can also export reports to extract some QuickBooks lists like the Item List, Customer List, Vendor List, and Employee List. Here are the different ways you can use this technique:
Running a report. Start by running the report you want to export as you normally would just to view or print it (Running Reports). In the report window button bar, click Export. The Export Report dialog box lets you choose the file and options for the export, as shown in Figure 24-8.
From the Item List window. Open the Item List window (on the Home page, click the Items & Services icon). At the bottom of the window, click the Excel button and then choose Export All Items. QuickBooks opens the same Export dialog box you see when you export a report (Figure 24-8).
From a QuickBooks Center. In the Customer Center’s menu bar, click Excel, and then choose Export Customer List or Export Transactions. In the Vendor Center and Employee Center, choose Export Vendor List or Export Employee List, respectively.
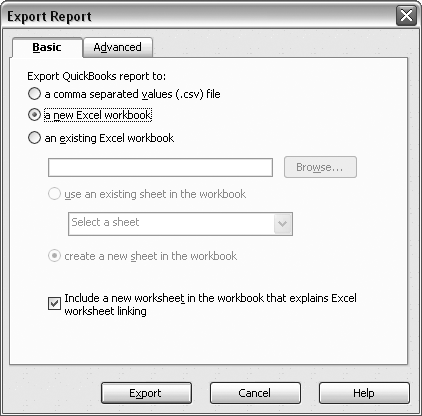
The Basic tab has options for where you want to save the exported report:
The "a new Excel workbook" option is selected initially, which creates a brand-new Excel file for the report.
The "an existing Excel workbook" option exports the report to an existing file. This option is ideal if you’re planning to calculate ratios and want your most recent financial statements in the same workbook as statements for previous periods. If you export to an existing file, you can also choose options to create a new worksheet for the report or add the report to a sheet already in the workbook.
Turning on the “Include a new worksheet in the workbook that explains Excel worksheet linking” checkbox tells QuickBooks to create a worksheet of tips. At the bottom of the Excel window, click the QuickBooks Export Tips tab and read about how to customize, update, and manage the exported reports.
The Advanced tab of the Export Report dialog box lets you set the formatting you want to transfer from QuickBooks to Excel, which Excel features you want the workbook to turn on (like AutoFit to size the columns to display all the data), and where you want the report header information stored. The “Send header to Page Setup in Excel” option copies the report header into the Excel page header. The “Send header to screen in Excel” option copies the report header into cells in the worksheet. Unless you have special requirements for your workbook, you won’t go wrong keeping the choices that QuickBooks makes.
After you’ve selected the export file and options, click Export. QuickBooks launches Excel and copies the data in the report to the Excel workbook you specified, placing the data in the report columns into columns in a worksheet, as shown in Figure 24-9.
Importing Data from Other Programs
Importing data from other programs comes in handy mostly for generating lists in QuickBooks. However, you can also import data to generate your chart of accounts (Using a QuickBooks Chart of Accounts) or to load different versions of your company budget (Copying Budgets and Creating What-if Budgets).
The biggest requirement for importing data is that the files be either Excel workbooks (.xls file) or delimited text files, which separate each piece of information with commas or tabs.
Importing an Excel Spreadsheet
If you’re familiar with importing Excel spreadsheets into other programs, importing them into QuickBooks is a snap. In fact, QuickBooks includes several Excel import templates that walk you through getting your Excel data for customers, vendors, and items into the format that QuickBooks requires. If you have a file that’s already formatted to work with QuickBooks, choose File → Utilities → Import → Excel Files and then click Advanced Import. The box on the previous page tells you how to import a pre-formatted file. Here’s how to use the Excel import templates:
Choose File → Utilities → Import → Excel Files.
QuickBooks opens the Add Your Excel Data to QuickBooks wizard.
Click the button for the type of data you want to import: Customers, Vendors, or Products I Sell.
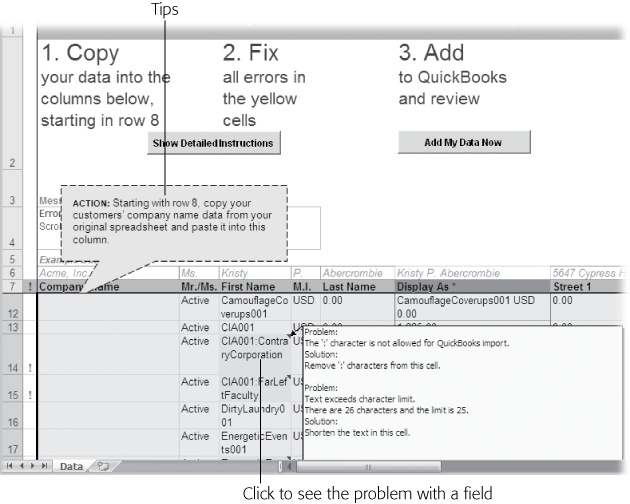
QuickBooks opens an Excel template for the type of data you’re importing, as shown in Figure 24-10.
Figure 24-10. The Excel import templates not only get your data into the right fields, they also help you with every step. For example, the blue box (identified by the Tips callout here) gives you tips about how to copy data from your Excel spreadsheet into the template. If a cell turns yellow, it means there’s a problem with the data. Point to the small red triangle in the upper-right corner of the cell to see what the problem is and how to fix it.After you’ve copied all the data from your spreadsheet into the Excel template and none of the data cells are yellow, save the spreadsheet.
In Excel 2007, click the Office button, and then choose Save As → Excel 97 - 2003 Workbook. In Excel 2003, choose File → Save As.
In the Excel template, click Add My Data Now.
QuickBooks resumes control. The “Add Your Excel Data to QuickBooks” wizard shows the progress of the import. When it’s done, it places green checkmarks to the left of all three steps and shows you how many records were imported. You can click the button (it says View Customer List, for example) to see the list you imported. Or, simply click Close and view your lists as you usually do. For example, to see your customer list, click Customer Center on the Home page.
Importing a Delimited File
If you’re importing a Customer List, Vendor List, or Item List, don’t even think about importing a delimited file. It’s much easier to open that file in Excel and use the wizard described in the previous section. But if you want to import other kinds of lists or a budget, using a delimited file works just fine. QuickBooks needs to know the kind of data you’re importing—and it learns that from special keywords for row and column headers. Keywords are strings of characters in a delimited text file that identify QuickBooks’ records and fields. Before you import data from another program into a QuickBooks list, you need to know the correct keywords for the fields you’re importing. The easiest way to see the keywords for a list is to export that list from QuickBooks and examine the keywords at the beginning of the rows and at the tops of the columns.
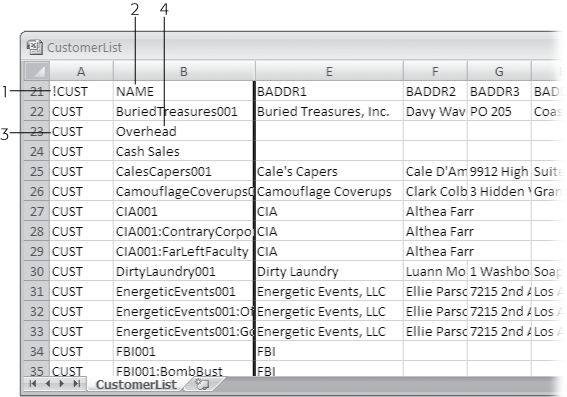
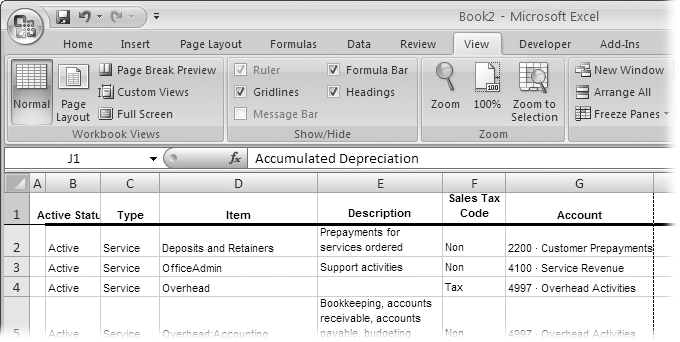
Deciphering keywords requires a smattering of computerese. For example, when you see the column heading Billing Address, you know instantly what kind of information you’re looking at. But the only way QuickBooks recognizes the first line of a billing address is from the keyword BADDR1. Figure 24-12 explains all (showing the delimited file in an Excel spreadsheet to make the fields easier to read).
When you have an IIF file with the correct keywords, here’s how you import it into QuickBooks:
Choose File → Utilities → Import → IIF Files.
QuickBooks opens the Import dialog box with the file type set to IIF Files (*.IIF).
Figure 24-12. 1: In the first cell in the first row of a list, an exclamation point in front of the keyword tells QuickBooks that the data in the rows that follow are for that list. !CUST represents data for the Customer List. 2: Keywords in the other cells of the same row specify the QuickBooks field names. In cell B21, the keyword NAME identifies the values in that column as the name of each customer. In cell G21, BADDR3 identifies the third part of the billing address. 3: A keyword is the first text in the row. Each row that begins with CUST in the first cell represents another customer record. 4: The other cells in a row contain the values that QuickBooks imports into the designated fields.Navigate to the folder where the file you want to import is saved, and then double-click the filename.
QuickBooks displays a message box that tells you that it imported the data successfully. If you didn’t set up the keywords correctly or QuickBooks ran into other problems with the data in your IIF file, it tells you that it didn’t import the data successfully.