Chapter 22. Online Banking Services
In the 20th century, you had to wait until your bank statement arrived (by snail mail) to find out what your account balances were and which transactions had cleared. But in the brave new world of online banking, you can view those balances and transactions any time, and even download them into your company file.
By synchronizing your real bank accounts with the bank accounts in QuickBooks, you’ll always know how much cash you have on hand. Before repaying your aunt the start-up money she loaned you, you can hop online and check your balance—and avoid an embarrassing family blowout by giving her a check that bounces.
Besides managing your cash flow, online banking services are much more convenient than the old methods. Although you have a lot of transaction information in your account register already (from receiving payments against invoices or making payments to your vendors), matching these transactions to the ones you download from the bank tells you how much money you have in the bank—and whether someone is helping themselves to the money in your account without your permission. Or you can transfer money between your money market account and the checking account when you find yourself awake at two in the morning.
If you use online billing, you can pay bills without having to write checks, lick stamps, or walk to the mailbox. After you submit payment transactions online, the billing service either transfers funds from your bank account to the vendors or generates and mails paper checks. Online billing also lets you set up recurring bills so you can go about your business without worrying about missing a payment.
All this convenience requires some setup. QuickBooks needs to know how to connect to your bank, and your bank needs to know that you want to use online services. This chapter explains how to apply for and set up online services. With your accounts set up and your online services activated, you’ll learn how to download transactions from your bank and make online payments. If you enter transactions in QuickBooks, you’ll learn about matching them with the ones you download—and correcting any discrepancies.
Note
QuickBooks’ Merchant Services and Billing Solutions transmit deposits and payments electronically. To find out where to learn about and sign up for these services, see the box on Activating Online Services for Your QuickBooks Account.
Setting Up Your Internet Connection
QuickBooks uses an Internet connection for more than online banking, so chances are you’ve already told the program how you get online. If not, start by choosing Help → Internet Connection Setup. QuickBooks opens the Internet Connection Setup wizard. The first screen has three options, which cover the three possibilities for the state of your Internet access, as shown in Figure 22-1.

Note
In addition to online banking, QuickBooks connects to the Internet to update your version of QuickBooks, access support and other information on the Intuit website, and run any of QuickBooks’ Add-On Services (Importing a Delimited File).
If you don’t have Internet access, don’t bother choosing the third option. The additional information it promises doesn’t give you anything concrete. Instead, click Cancel. Do your own homework to find an Internet Service Provider and get Internet service. When you have a connection, return to this wizard and choose the appropriate option.
Setting Up Your Accounts for Online Services
Connecting your bank accounts to your accounts in QuickBooks is a lot like running a dating service: You have to prepare each participant for the relationship and then get them together.
The services you can subscribe to and the price you pay depends on your financial institution, but the services fall into one of these three categories:
Online account access. This service is often free. Your bank won’t admit it, but letting you check your account balance and transaction status online is cheaper than having you chat on the phone with customer service representatives.
Online credit card access. You can download credit card transactions as you do checking transactions, as long as you set up your credit card in QuickBooks as a liability account (Creating a Transaction in an Account Register) and enter individual credit card charges. Setting up a credit card as a vendor and entering only the monthly bill payment won’t work.
Online bill paying. This service usually comes with a fee, which is often a good deal when you consider the price of stamps and printed checks.
Note
QuickBooks’ online banking works only with U.S. dollar–based accounts. If you have a bank account that uses a foreign currency, you have to handle your transactions the old-fashioned way.
Applying for Online Services
The first step in linking QuickBooks to your bank accounts is to apply for online banking services with your financial institution. If you use more than one bank, you have to apply to each one separately. If you’ve already started the application ball rolling, you can skip this section. If you haven’t, QuickBooks helps you apply for the services your bank offers.
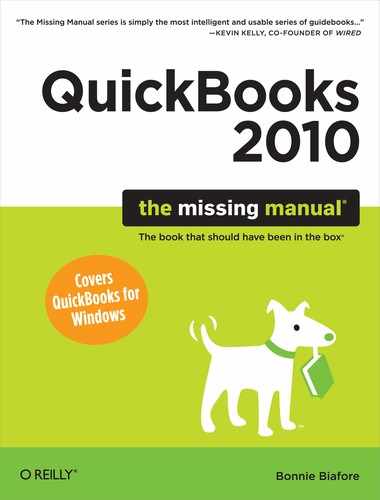
Choose Banking → Online Banking → Participating Financial Institutions. Peruse the Financial Institution Directory to find your bank and apply for its online services, as shown in Figure 22-2. In the Online Financial Services section, click one of the four buttons to limit the list to institutions providing that service. QuickBooks automatically selects “Any services,” so you see every financial institution that the program works with. Scroll through the directory to find your financial institution. If your financial institution doesn’t off the online services you want, check out Intuit’s online banking services, described in the box below.
When your financial institution processes your application and sends you a confirmation and a PIN (personal identification number) or password, check that the information you received is correct, like the account number. Now you’re ready to set up your account for online services.
Activating Online Services for Your QuickBooks Account
When you receive a letter from your bank confirming that your online services are ready to go, you have your customer ID and your password (or PIN). Now all you have to do is set your corresponding account in QuickBooks to use these online services. The Online Banking Setup Interview wizard walks you through the steps:
Choose Banking → Online Banking → “Set Up Account for Online Services”.
In the message box that opens, click Yes to give QuickBooks permission to close any open windows. QuickBooks launches the “Set Up Account for Online Services” wizard.
You can also start online setup in the New Account dialog box. If you create a new account and type the account number, when you save the account, the Set Up Online Services message box asks if you want to set up online services. Click Yes if you want to set it up immediately or No to do it later. In the Edit Account dialog box, click the Online Services tab to set up the service.
In the “Select your QuickBooks account” drop-down list, choose the account you want to activate, and then click Next.
The “Select the Financial Institution for this account” screen shown in Figure 22-3 appears.
In the “Enter the name of your Financial Institution” drop-down list, choose your bank, and then click Next.
QuickBooks connects to the Internet to download info about your bank. If the program needs more information, the Account Activation Required screen appears. Select the “Yes, my account has been activated for QuickBooks online services” option, and then click Next.
Fill in the Customer ID, Password, and Confirm Password boxes, and then click Sign In.
The Customer ID is the ID that the bank assigned to you for online services and should be on the confirmation letter from your bank.
If you don’t have your customer ID and password, click Cancel. You can repeat this process after you receive your ID and password.
The next screen asks you to select the account at your financial institution. In the table, click the account you want to activate, and then click Next.
If you have more than one account, repeat this process to activate your other accounts at the same financial institution.
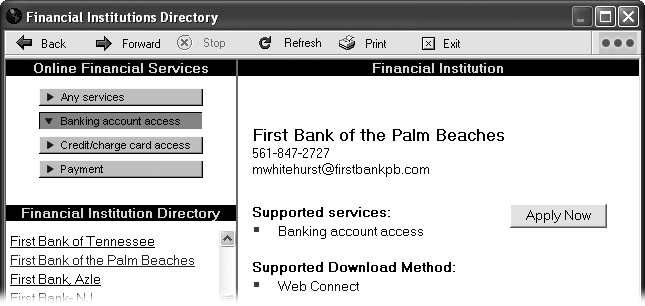
QuickBooks and your financial institution start talking. When they’re done, you’ll see a screen telling you that the account is set up for online services and how many transactions it downloaded, as shown in Figure 22-4.
Figure 22-4. The “Set Up Account for Online Services” dialog box shows how many transactions it downloaded during setup. When you click Finish, the Online Banking Center window (QuickBooks Online Banking Modes) opens, showing the transactions you just downloaded.Click Finish.
That’s it—you’re ready to bank electronically.

An Introduction to Exchanging Data with Your Bank
Your financial institution takes the lead in controlling how QuickBooks can communicate with it. Your bank can set up this pipeline in two ways:
Direct connection uses a secure Internet connection that links directly to your bank’s computers. With this type of connection and a financial institution that provides the services, you can download your bank statements and transactions, transfer funds between accounts, pay bills online, and email your bank. When your financial institution uses a direct connection, you set up your fund transfers, requests for downloads, online bill payments, and emails before you connect.
WebConnect uses a secure connection to your bank’s website to download your statement information. With WebConnect, you then have to import the downloaded information into QuickBooks.
Note
Regardless of the method you use, the online balance usually isn’t a true picture of your cash balance, because it doesn’t show all transactions, such as checks you’ve written that the bank hasn’t received.
The first step in QuickBooks online banking is exchanging data with your bank. You send any online banking items you’ve created, like online bill payments or transactions that have cleared at your financial institution. Connecting to your financial institution begins in the Online Banking Center (choose Banking → Online Banking → Online Banking Center), regardless of which type of connection you use.
Once you’ve exchanged data, QuickBooks tries to match the transactions it has with the ones you’ve downloaded. If it can’t match some of the transactions, you step in and tell it what to do.
QuickBooks Online Banking Modes
The Online Banking Center introduced in QuickBooks 2009 had some glitches. Intuit fixed them in QuickBooks 2010, but to be on the safe side, Intuit lets you choose between the 2010- and 2008-style versions of the Online Banking Center.
Tip
You can switch between online banking modes, but you’re more likely to pick the mode you prefer and stick with it. To switch modes, choose Banking → Online Banking → Change Online Baking Mode. QuickBooks opens the Preferences dialog box to the Checking section and the Company Preferences tab, so you can choose the Side-by-Side Mode or Register Mode option. When you click OK, QuickBooks closes all open windows to switch modes and discourteously doesn’t reopen them when it’s done.
Here’s what each Online Banking Center Mode does:
Side-by-side mode. The best feature of Side-by-side mode (instructions begin on Online Banking Using Side-by-side Mode) is that you can match downloaded transactions to any transaction in your company file without leaving the Online Banking Center. For example, you can match a downloaded deposit to an open invoice or a paid invoice where the money is sitting in the Undeposited Funds account (Starting a Reconciliation). Or you can simply add the downloaded transaction to QuickBooks. You can add multiple unmatched transactions to your register (something that QuickBooks 2009 online banking left out) or delete downloaded items that you’ve already taken care of in QuickBooks.
Side-by-side mode also automatically creates renaming rules to rename the often inscrutable names that banks give payees. For example, if the payee for a downloaded credit card charge shows up as Conoco #123-63?#^$&*, you can edit a renaming rule so that the new name in the Payee field is, say, Conoco. From then on, QuickBooks replaces Conoco #123-63?#^$&* with Conoco.
Register mode. If you thought that QuickBooks 2008’s Online Banking Center was just fine, you can continue to use it. The Register mode lets you see your full account register when you’re matching transactions, which is helpful if QuickBooks doesn’t find a matching transaction. You can scroll through the register and correct a discrepancy that prevented the program from finding a match. In Register mode, you can create aliases to rename payees, similar to the Side-by-side renaming rules.
Downloading Statements with WebConnect
If your bank communicates via WebConnect, your first steps are the same as the ones for a direct connection. In the Online Banking Center, you choose the financial institution to connect to, and then click Send/Receive Transactions (or Send/Receive for register mode). A browser window opens and displays your bank’s website; use your customer ID and PIN or password to log in. On the website, click the “Download to QuickBooks” button (or one that creates a file of your transactions). Then, you can import that file (Choose Banking → Online Banking → Import Web Connect File) to load the recent transactions into your company file.
Creating Online Items for Direct Connections
Banks that work with direct connections can do more than those using WebConnect. Depending on which services your bank provides, you can do some or all of these tasks online:
Receive transactions that cleared in your account
Pay bills
Exchange messages with your bank
Transfer funds between accounts
You don’t have to take any action to receive transactions from your accounts. QuickBooks automatically sets up a request for cleared transactions from your bank accounts every time you open the Online Banking Center. This section describes the steps in QuickBooks to set up electronic bill payments, messages you want to send to your bank, and online transfers between accounts.
Note
If you use the Online Banking Center Side-by-side mode, in the Items Ready To Send section, QuickBooks displays links (see Figure 22-5) to create online items (for the online services you’ve signed up for with your financial institution or Intuit).
Paying bills online
Whether you use the bill paying service that your bank provides or subscribe to QuickBooks Bill Pay service, you don’t have to use any special dialog boxes to make electronic payments. Here’s how you turn the three ways you make payments into electronic transactions:
Pay Bills. In the Pay Bills window (Selecting Bills to Pay), in the Payment Method drop-down list, choose Online Bank Pmt.
Write Checks. In the Write Checks window (Using the Write Checks Window), turn on the Online Bank Pmt checkbox.
Account register window. If you “write” checks by entering a transaction in your checking account register window (Adding Checks to an Account Register), you can turn a transaction into an online payment by right-clicking it and then choosing Edit Check. When the Write Checks window opens, turn on the Online Bank Pmt checkbox and save the transaction.
When you set up a payment as an online transaction, QuickBooks adds the payments to your list of items to send. When you open the Online Banking Center window, you’ll see these online bill payments in the Items Ready To Send section (Items to Send for register mode).
When you tell QuickBooks to send transactions (Online Banking Using Side-by-side Mode), the program sends these electronic payments along with any of your other requests. Once the bill payment service receives your online payment information, it transfers money from your account to the vendor’s account—providing the vendor accepts electronic payments. Otherwise, the bill payment service generates a paper check and mails it to the vendor.
Sending a message to your bank
If you have an email address for your bank, you can send messages from outside QuickBooks (that is, from your regular old email program). But when you use online banking services, your bank sends you messages that you receive in the Online Banking Center. By sending messages back through the Online Banking Center, you can see all the messages that you’ve exchanged (until you decide to delete them).
Choose Banking → Online Banking → Create Online Banking Message. QuickBooks opens the Online Banking Message dialog box. If you’re addicted to email, you shouldn’t have any trouble figuring out what to do with the following fields in the Create Online Banking Message window:
In the “Message to” drop-down list, choose the bank you want to send a message to. QuickBooks automatically timestamps the message with the current date and time and adds your company name to the From box.
In the Subject box, type a short but informative subject.
If you have more than one account enabled for online services, in the Regarding Account drop-down list, choose the account.
In the Message box, type your message or question.
If you want to save a copy of the message, click Print before you click OK to send it.
Transferring funds between accounts
When you have two accounts at the same financial institution and they’re both set up for online banking services, you can set up online funds transfers in QuickBooks.
Choose Banking → Transfer Funds as you would for a non-electronic transfer (Transferring Funds). But in the Transfer Funds dialog box, in addition to filling in the fields, be sure to turn on the Online Funds Transfer checkbox. When you save the transaction, QuickBooks adds the transfer as an item to send to your bank.
Note
Online fund transfers using QuickBooks work only with two Web-enabled accounts at the same bank. You can’t transfer funds electronically using QuickBooks if the accounts are at different financial institutions. You also can’t transfer funds electronically using QuickBooks if one of the accounts at your bank is set up for online services but the other isn’t.
Online Banking Using Side-by-side Mode
Side-by-side mode makes it easy to see what’s going on with your accounts at financial institutions. You can see online balances, downloaded transactions, and the work you have to do to match them to transactions in your company file. You can do everything to match downloaded transactions to the ones you have in QuickBooks without leaving the Online Banking Center.
Sending and Receiving
Every time you go online, QuickBooks automatically requests newly cleared transactions from your financial institution. If you’ve set up items to send to your bank, going online pushes those along, too. Here’s what you do to send requests and receive replies in Side-by-side mode:
To open the Online Banking Center, choose Banking → Online Banking → Online Banking Center.
The Online Banking Center opens.
If you have online services with more than one bank (say, a checking account with one bank and a credit card with another), in the Financial Institution drop-down list, choose the one you want to connect to.
To the right of the Financial Institution heading, you’ll see all the accounts you have at the institution you selected. QuickBooks automatically turns on all the Download checkboxes to grab transactions from all your accounts at that financial institution. If you don’t want to download transactions for an account, turn off its checkbox.
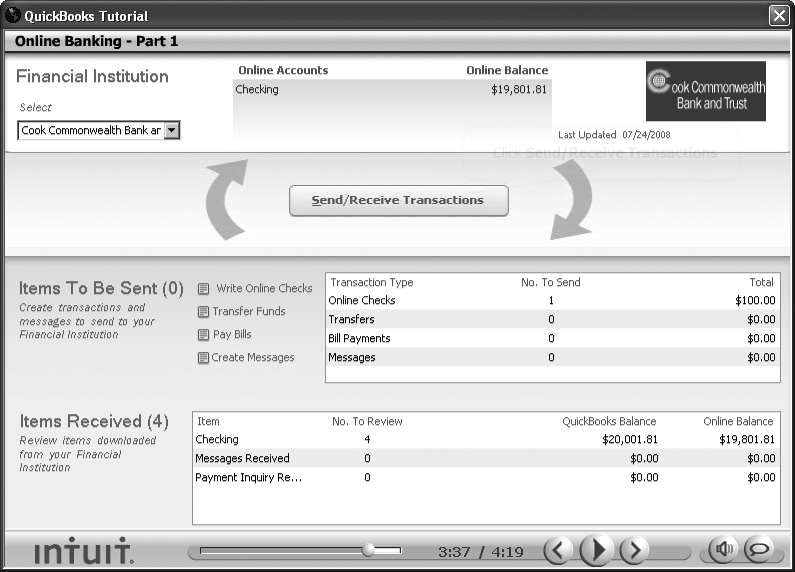
As Figure 22-5 shows, the Online Balance column shows your balance according to your financial institution as of the last update. The Last Update column shows the date of that last update.
If you have any items to send to your bank (like messages you’ve written or online transfers you’ve created as described on Sending a message to your bank), they appear in the Items Ready To Send section. QuickBooks selects all the requests you have set up to send to your bank.
Figure 22-5. Side-by-side mode shows the online accounts and balances you have at the institution you connected to. The transactions, messages, and other items you’ve downloaded appear in the Items Received section of the window. If you’ve signed up for the corresponding online service with your financial institution or Intuit, you can create online transactions and messages by clicking Write Online Checks, Transfer Funds, Pay Bills, or Create Messages.If you want to edit or delete any items you have to send, do that now—before you go online. Once you’re connected, it’s too late.
To edit an item like a funds transfer or bill payment you’re sending, select the item in the Items Ready to Send section, and then click Edit. Make the changes you want, and then click OK. If you want to remove an item like a fund transfer you no longer need, in the Items Ready To Send section, select the item, and then click Delete.
When the items you want to send are ready, click Send/Receive Transactions.
If you don’t have any items to send, the button label says Receive Transactions.
In the Access to <institution name> dialog box that appears, type your password or PIN, and then click OK.
You type your password or PIN so QuickBooks can communicate with your financial institution. The Online Status dialog box shows the progress QuickBooks is making communicating with your bank. When the two are done talking, the Online Transmission Summary dialog box tells you how many accounts it updated and how many transactions it downloaded.
In the Online Transmission Summary dialog box, click Close.
The Items Received section shows the number of items received and the balances for your online accounts (see Figure 22-5).
Matching Transactions
Every time you connect to your financial institution (see Online Banking Using Side-by-side Mode), QuickBooks downloads all the transactions that cleared since the last time you went online. This section describes how you match downloaded transactions using Side-by-side mode.
Note
The first time you download transactions for an online account, QuickBooks looks at transactions marked as cleared in your account register. For all subsequent downloads, the program tries to match only transactions that haven’t already cleared.
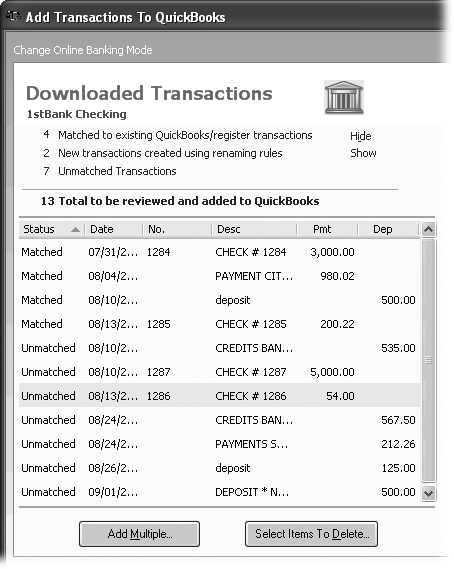
After you connect, the Items Received section displays information about the transactions QuickBooks retrieved, as shown in Figure 22-5. You’ll see the number of items received and your current online balances. Here’s how you process the items that QuickBooks received:
At the bottom of the Online Banking Center, click Add Transactions To QuickBooks and choose the account you want to work on from the drop-down menu.
QuickBooks opens the Add Transactions To QuickBooks window and tries to match the downloaded transactions to the ones you’ve already entered in QuickBooks.
The top of the Downloaded Transactions section summarizes how many transactions the program matched on its own, how many new transactions it created, and how many transactions you have to help with. Initially, only unmatched transactions appear in the list, because those are the ones you have to work on.
If you want to see matched or new transactions in the list, click the Show link to the right of the Matched or New lines.
In the downloaded transactions list, the status for matched transactions is set to Matched, as shown in Figure 22-6, and you don’t have to do anything to them. QuickBooks automatically marks them as cleared in the bank account register (Matching Transactions).
Transactions that the program can’t match have a status of Unmatched, as you can see in Figure 22-6. The next section tells you how to handle unmatched transactions.
Note
For transactions without check numbers, QuickBooks matches a downloaded transaction with the oldest transaction of a matching amount. For example, suppose you withdrew $200 from your checking account twice last month. When you download a $200 withdrawal transaction, QuickBooks matches it to the oldest matching transaction in your register.
If QuickBooks matches every transaction, your work is done. If you open the account register (Opening a Register Window) in the Cleared column, you’ll see a lightning bolt for every matched transaction. If you’re not so lucky, read the next section.
Matching Unmatched Transactions
Unsuccessful attempts to match transactions can happen for several reasons, but the source of the problem is almost always a mistake or omission in your QuickBooks account register. If you forgot to record a transaction in QuickBooks before you downloaded transactions, this section tells you how to make everything match up. The box on Sending and Receiving describes other problems you might see and the steps to take to correct them.
Matching deposits
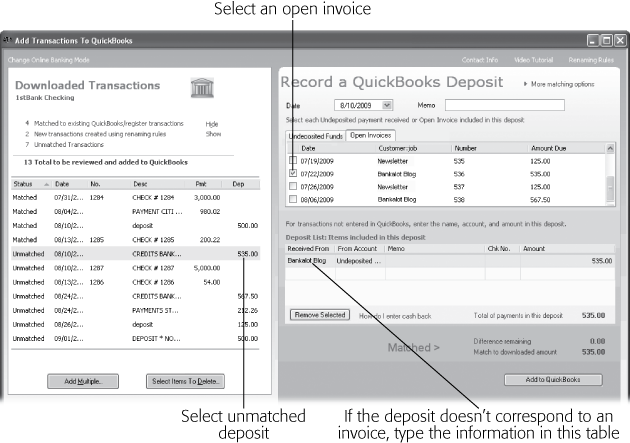
When you use the Receive Payments window to record check or credit card payments you receive, you might place the payment in your Undeposited Funds account and forget to make the deposit to your bank account using the Make Deposits window (Recording Deposits). As shown in Figure 22-7, QuickBooks can match these deposits to payments in your Undeposited Funds account or even to open invoices.
In the Downloaded Transactions list, select the unmatched deposit that you want to match (the amount is in the Dep column). The “Record a QuickBooks Deposit” pane appears on the right side of the window, as you can see in Figure 22-7. In QuickBooks, there are three ways to handle deposits. Here’s what you do for each:
Note
If your bank deposit represents several checks from several customers, you can select more than one open invoice or undeposited funds entry, and add more than one item directly in the Deposit List table. Below the Deposit List, the “Difference remaining” value shows the difference between the deposit amount and the items you’ve selected. When the difference equals 0.00, you’re ready to click “Add to QuickBooks”.
Payments in the Undeposited Funds account. If you used the Receive Payments window to record a customer payment you received and the money is sitting in the Undeposited Funds account (Starting a Reconciliation), click the Undeposited Funds tab. Turn on the checkbox for the received payment that corresponds to the deposit. Click “Add to QuickBooks”. If you look at your bank account register, you’ll see the deposit with a lightning bolt in the Cleared cell to indicate that it’s matched with a transaction downloaded from the bank.
Deposits for open invoices. If you haven’t recorded the received payment in QuickBooks, the money is still tied up in an open invoice, which means the money is setting in the Accounts Receivable account. To match a deposit to an open invoice, click the Open Invoices tab, shown in Figure 22-7. Turn on the checkbox for the invoice that corresponds to the deposit, and click “Add to QuickBooks”.
Figure 22-7. The fields that appear on the right side of the Add Transactions To QuickBooks window depend on the type of downloaded transaction you select. If you don’t see the deposit you want to match on the Undeposited Funds tab, click the Open Invoices tab to look for the invoice that goes with the downloaded deposit. When you record the deposit, QuickBooks links the invoice and payment to show that the invoice was paid.Other deposits. If you receive some other type of deposit that you haven’t recorded in any way in QuickBooks, an insurance claim refund, say, you can record the deposit information on the right side of the window directly in the “Deposit List: Items included in this deposit” table. In the Received From drop-down list, choose the customer or vendor who sent the money. In the account drop-down list, choose the account to which you want to assign the deposit. QuickBooks automatically fills in the Amount cell with the value from the downloaded deposit. Type a memo and check number if you want and then click “Add to QuickBooks”.
Matching checks and expenses
When there’s no sign of a check transaction in QuickBooks for the one you downloaded, you may have forgotten to enter the transaction (or someone’s stealing from your account). Or you created a bill, but forgot to record that you paid it. Even with online banking, you don’t know what your bank charges are until you download them.
In the Downloaded Transactions list, the amount of a check or payment appears in the Pmt column. A value in the No. column tells you the payment is a check. Otherwise, the payment is a bank charge or bank transaction.
In the Downloaded Transactions list, select the unmatched check or payment that you want to match. The “Record an Expense” screen appears on the right side of the window. Here’s how you match checks and payments:
Checks or charges that aren’t bill payments. These payments include any checks you wrote, or electronic payments you made without recording a bill in QuickBooks, or bank charges like monthly service fees and bounced check charges. To record one of these expenses, in the “Record an Expense” pane, choose the name of the payee in the Payee drop-down list (or type the payee’s name if it isn’t in the list). Then choose the account for the expense in the Account drop-down list. Click Add To QuickBooks.
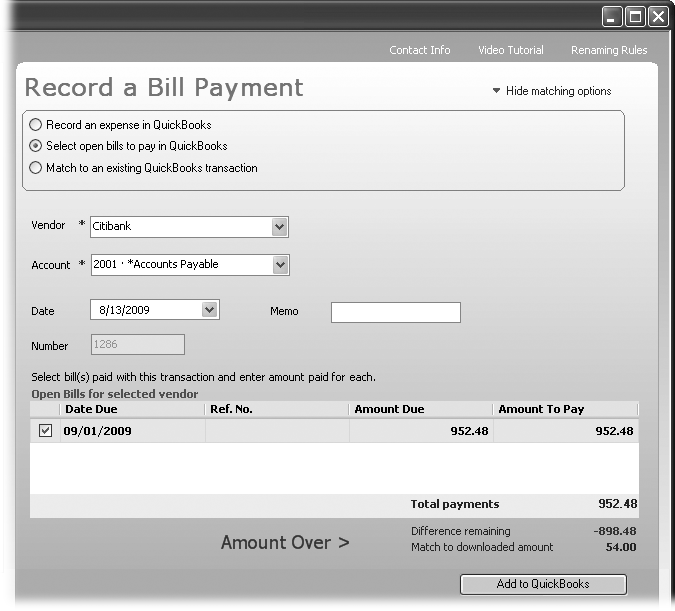
Bill payments. For downloaded transactions that correspond to QuickBooks bill payments, you need to link the payment and the bill so that the bill shows up as paid in QuickBooks. If you didn’t record the bill payment in QuickBooks (Selecting Bills to Pay), at the top-right of the Add Transactions To QuickBooks window, click the “More matching options” link. QuickBooks displays three options, shown in Figure 22-8. The link changes to “Hide matching options”. Select the “Select open bills to pay in QuickBooks” option. In the Vendor drop-down list, choose the vendor you paid. The “Open Bills for selected vendor” table displays all the open bills for that vendor. Turn on the checkbox for the open bill and click “Add to QuickBooks”.
Figure 22-8. If you wrote one check to pay several of a vendor’s bills, turn on all the checkboxes for all the bills that the check covers. As you turn on checkboxes, QuickBooks updates the “Difference remaining” value to show the difference between the downloaded transaction amount and the total of the bills you selected. When “Difference remaining” equals 0.00, you can click “Add to QuickBooks” to save the match.Match an expense manually. The “Match to an existing QuickBooks transaction” option (click the “More matching options” link at top right) covers all the other bases. Say QuickBooks doesn’t match an ATM withdrawal correctly. When you choose this option, QuickBooks displays the “Match to a Register Transaction” panel on the right side of the window. The values for the downloaded transaction appear in the panel. The "Unmatched transactions in QuickBooks” table shows register transactions that haven’t yet been matched. For example, if you have two ATM withdrawals, you can pick the one that goes with the downloaded transaction. Then click Confirm Manual Match.
Adding Multiple Transactions
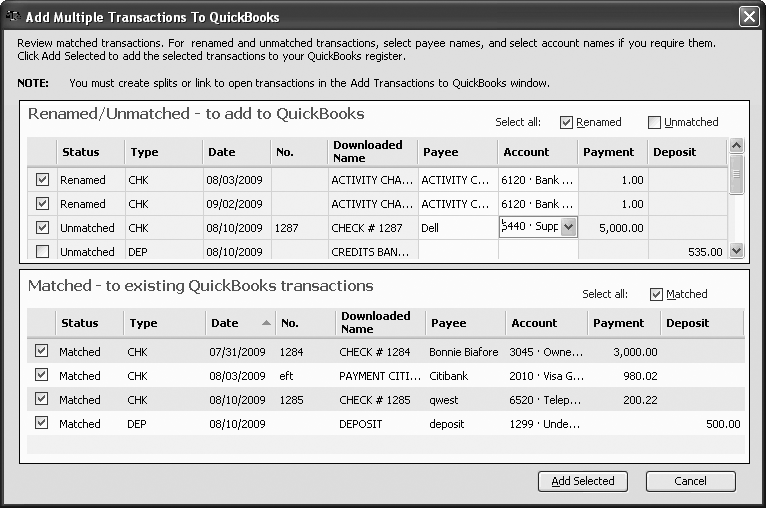
If you write only a few checks and receive a few payments each month, matching each one individually isn’t too painful. But you have better things to do than match hundreds of transactions one by one. As long as you don’t need to match downloaded transactions to open transactions in QuickBooks or do anything fancy like create splits, you can add multiple transactions with the Add Multiple Transactions dialog box.
In the Add Transactions To QuickBooks window, click Add Multiple. The Add Multiple Transactions to QuickBooks (Figure 22-9) opens and shows renamed, unmatched, and matched transactions. See the box on Online Banking Using Register Mode for the scoop on renaming rules.
To add unmatched transactions to QuickBooks, you just fill in the Payee and Account cells (they have a white background to indicate that they’re editable) and turn on the transaction checkboxes.
When you’re ready to add the transactions to QuickBooks and you’ve turned on all their checkboxes, click Add Selected.
Deleting Downloaded Transactions
Say you’ve reconciled your credit card account to your statement. You go online and download transactions only to find that you’ve downloaded transactions you’ve already reconciled. You don’t have to match the downloaded transactions because your account is already matched up with your bank’s records, so you want to delete the downloaded transactions. In the Downloaded Transactions list, click Select Items To Delete; the Select Items To Delete dialog box opens. Here’s how you can select transactions to delete:
Select individual transactions. QuickBooks selects this option automatically. To select a transaction to delete, turn on its checkbox.
Select all downloaded transactions older than. This option is perfect if you want to delete transactions that you’ve already reconciled. Type the cutoff date in the box and QuickBooks automatically turns on the checkboxes for transactions that occurred before that date.
When the transaction checkboxes are turned on, click Delete Selected.
Note
If you’re sure that the check amount you recorded is correct, change the check amount anyway. Your bank won’t go back and edit that transaction. Contact your bank and work out the discrepancy. If the bank was at fault, it will issue a separate transaction to correct the error, and you can then download the corrected version.
QuickBooks can’t match other types of transactions like ATM withdrawals or debit card purchases if the amounts don’t match or you haven’t recorded the transactions in QuickBooks.
Online Banking Using Register Mode
With Register mode, you can see your full account register, which makes it easy for you to find a matching transaction that QuickBooks doesn’t recognize. You can edit transactions in the register, for example, to correct a typo that prevented the program from making a match.
Sending and Receiving
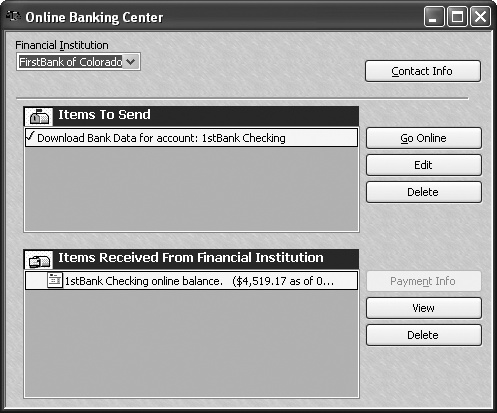
In Register mode, choose Banking → Online Banking → Online Banking Center to begin connecting to your financial institution. The Register mode Online Banking Center window is more compact than its Side-by-side sibling, as you can see in Figure 22-10.
After you send your requests, the Online Transmission Summary dialog box tells you how many transactions downloaded from your bank. Click Close. The Items Received From Financial Institution box shows the balances for your online accounts and any messages that your bank sent you.
Working with Online Items
In the Online Banking Center window (choose Banking → Online Banking → Online Banking Center), you can make changes to items to send before you go online. After you receive items from your bank, you can view them or delete them. Here’s how you use the buttons in the Online Banking Center window:
Edit. Before you go online, you can edit any items other than a request for a statement, for example, a funds transfer or bill payment you’re sending. Select the item and click Edit. Make the changes you want and then click OK.
Figure 22-10. If you have online services with more than one bank (say, your checking account with one bank and a credit card with another), in the Financial Institution drop-down list, choose one to connect to. QuickBooks automatically selects all requests (like downloading your transactions) in the Items To Send box. If you don’t want to send an item, uncheck it. Click Send/Receive to send the selected requests and connect to the bank’s website. In the “Access to <your bank>” dialog box, type your password or PIN, and then click OK.Delete. If you set up a fund transfer between accounts that you no longer need or want to remove another type of item, in the Items To Send list, select the item and then click Delete.
You’ll find that your bank is fond of sending you messages about new services or holidays. There’s no reason to clutter the Items Received From Financial Institution with these messages. In the Items Received From Financial Institution box, select an item and then click the Delete button (at right).
View. In the Items Received From Financial Institution box, select an item and click View to see it. When you want to match the transactions in a statement to your QuickBooks bank account transactions, select the statement and then click View.
Matching Transactions
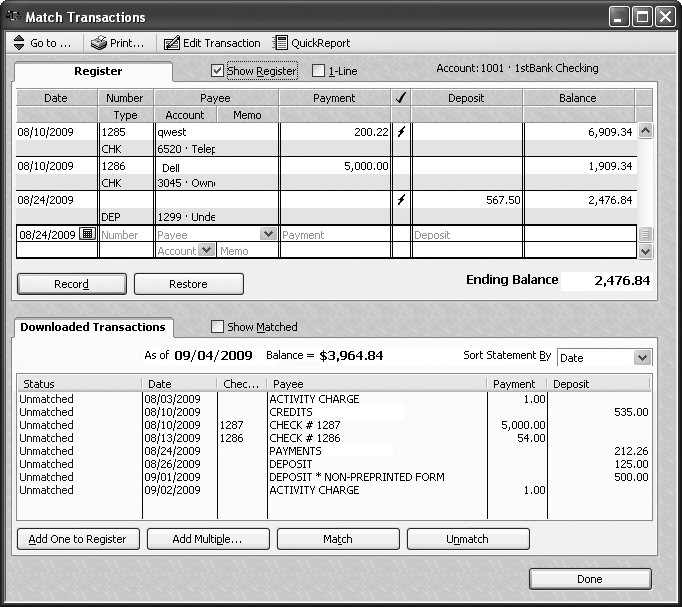
Every time you connect to your financial institution (by clicking Send/Receive in the Online Banking Center window), QuickBooks requests a statement of all the transactions that cleared since the last time you went online. After you connect, in the Items Received From Financial Institution box, you’ll see an entry for the statement QuickBooks retrieved. To view the downloaded transactions and pull them into your company file bank account, select the entry and then click View.
QuickBooks opens the Match Transactions dialog box and tries to match the downloaded transactions to the ones you already entered in QuickBooks. If QuickBooks automatically matches transactions, the Results of Automatic Transaction Matching dialog box tells you how many. Click OK to close the dialog box. At the bottom of the Match Transactions window on the Downloaded transactions tab, the status for those transactions is set to Matched and you don’t have to do anything to them. QuickBooks automatically marks them as cleared in the register. Transactions that the program can’t match have a status of Unmatched, as you can see in Figure 22-11. The next section tells you how to handle unmatched transactions
Note
The first time you download transactions for an online account, QuickBooks looks at transactions marked as cleared in your account register. For all subsequent downloads, the program tries to match only transactions that haven’t previously cleared.
If QuickBooks matches every transaction, your work is done. In the account register in the Cleared column, you’ll see a lightning bolt for every matched transaction. If you’re not so lucky, keep reading.
Unmatched checks
For checks that are payments for bills, you must first use the Pay Bills window to enter the transaction (Selecting Bills to Pay) so that your bills in QuickBooks show up as paid. For checks that aren’t linked to bills or refunds, select the check that you didn’t enter in QuickBooks and then click “Add One to Register”. In the Account box, choose the account to which you want to post the expense and then click Record. This technique works for deposits that aren’t linked to customer payments and bank charges.
Unmatched deposits
If transactions from the bank don’t include check numbers, QuickBooks scans transactions without check numbers in your account register for matching amounts. If the program doesn’t find a match, you have two options, depending on the type of transaction downloaded.
When you use Register mode, you must first record all your customer payments in QuickBooks and move deposits from the Undeposited Funds account into your bank account. If you have a deposit that doesn’t link to a customer payment, you can add the transaction to the register from the Match Transactions window. In the list of downloaded transactions, select the deposit, and then click “Add One to Register”. In the Account box, choose the account to post the deposit to and then click Record.
Bank charges
For charges including monthly service fees, bounced check charges, and so on, in the list of downloaded transactions, select the transaction and click “Add One to Register”. In the Account box, choose the account for the charge and then click Record.
Adding Multiple Transactions
If you have several unmatched transactions that you want to add to the register, click Add Multiple. The Add Multiple Transactions to QuickBooks opens and lists all the unmatched transactions. As you can see in Figure 22-12, the top half of the dialog box lists transactions that are either ready to go or are missing an account. After you choose accounts for the transactions that don’t have them, click Record.

Deleting Downloaded Transactions
Register mode has no way to delete transactions on the Downloaded Transactions tab. If you already reconciled your account and then downloaded the transactions, you might think you have to live with those unmatched transactions forever. With some fancy, though tedious footwork, though, you can get rid of those downloaded orphans. Here’s what you do:
Scroll in the register to find the reconciled transaction that pairs with an unmatched transaction. Click its Cleared cell until the cell is blank. An Asterisk in the cleared cell means the transaction is cleared; a checkmark indicates that it’s reconciled.
As soon as the Cleared cell is blank, QuickBooks automatically matches the register transaction and the downloaded transaction. You’ll see a lightning bolt in the Cleared cell to indicate the match. The downloaded transaction disappears from the Downloaded Transaction tab.
Now, click the Cleared cell again until you see a checkmark. The register transaction is back to being reconciled and the downloaded transaction is gone forever.