Chapter 10. Invoicing
Telling your customers how much they owe you (called accounts receivable) and how soon they need to pay is an important step in accounting. After all, if money isn’t flowing into your organization from outside sources, eventually you’ll close up shop, closing your QuickBooks company file with it.
Although businesses use several different sales forms to bill customers, the invoice is the most popular, and, unsurprisingly, customer billing is often called invoicing. This chapter begins by explaining the difference between invoices, statements, and sales receipts—each of which is a way of billing customers in QuickBooks—and when each is most appropriate.
In this chapter, you’ll learn how to fill in the QuickBooks versions of invoices, whether you’re invoicing for services, products, or both. If you track billable hours with QuickBooks, now’s when you tell the program to add your billable hour charges to invoices. Similarly, when you designate expenses as billable to customers, QuickBooks can chuck them into the invoices you create, too.
This chapter also explains how to handle a few special billing situations, like creating invoices when products you sell are on backorder. You’ll also learn how to create estimates for jobs in QuickBooks and then use them to generate invoices as you perform the work. And occasionally, you have to give money back to customers (like when they return the lime-green polyester leisure suits that suddenly went out of style), so you’ll also learn how to assign a credit to a customer’s account, which you can then deduct from the next invoice, or refund by cutting a refund check.
Note
Chapter 11 continues the billing lesson with instructions for producing statements that show your customers’ account status. It also explains how to create sales receipts when customers pay you right away. Chapter 12 explains how to get any kind of sales form into your customers’ hands, along with a few other time-saving techniques like finding transactions or memorizing them for reuse.
Choosing the Right Type of Form
In QuickBooks, you can choose from three different sales forms to document what you sell, and each form has its own strengths and limitations. Invoices can handle any billing task you can think of, so an invoice is the best choice if you have any doubts about which one to use. Table 10-1 summarizes what each of the sales forms can do. The sections that follow explain each form’s capabilities in detail and when to choose each one.
Action | Sales receipt | Statement | Invoice |
Track customer payments and balances | Yes | Yes | |
Accept payments in advance | Yes | Yes | |
Accumulate charges before sending sales form | Yes | Yes | |
Collect payment in full at time of sale | Yes | Yes | Yes |
Create summary sales transaction | Yes | Yes | Yes |
Apply sales tax | Yes | Yes | |
Apply percentage discounts | Yes | Yes | |
Use group items to add charges to form | Yes | Yes | |
Add long descriptions for items | Yes | Yes | |
Subtotal items | Yes | Yes | |
Include customer message | Yes | Yes | |
Include custom fields on form | Yes | Yes |
Sales Receipts
The sales receipt is the simplest sales form that QuickBooks offers and it’s also the shortest path between making a sale and having money in the bank (at least in QuickBooks). But the sales receipt is suitable only if your customers pay the full amount at the time of the sale—for example, in a retail store, restaurant, or beauty salon. Because sales receipts don’t include a field for customer payments that have been applied toward the total balance, you can’t use them to keep track of how much your customers owe (called accounts receivable and explained in detail on Accounts Receivable Aging Reports).
When you create and save a sales receipt in QuickBooks, the program immediately posts the money you receive to the Undeposited Funds account or the bank account you choose. As you’ll learn in this chapter and the next, invoices and statements take several steps to move from billing to bank deposits.
Despite their shortcomings in the customer payment department, sales receipts can handle sales tax, discounts, and subtotals—in fact, any item in your Item List. But when you operate a cash business, creating a sales receipt in QuickBooks for each newspaper and pack of gum your newsstand sells is not good use of your time. Instead, consider creating a sales receipt that summarizes a day’s or week’s sales, using a customer named Cash Sales created specifically for that purpose (see Memorizing a Batch Sales Transaction).
Statements
Suppose you’re a lawyer and you spend 15 minutes here and 15 minutes there working on a client’s legal problem over the course of a month. Each time you spend some time, that’s another charge to the client’s account. In QuickBooks, each of those charges is called a statement charge, and you enter them individually (Creating Statement Charges). If you track time in QuickBooks, though, it’s actually easier to add your time to an invoice (Adding Billable Time and Costs to Invoices).
Businesses often turn to statements when they charge the same amount each month, such as a fixed monthly fee for full-time work as a contract programmer. But memorized invoices (Memorized Transactions) are just as easy.
Where statements really shine is summarizing a customer’s account. Behind the scenes, a statement adds up all the accounts receivable transactions for the customer over a period of time, which includes statement charges, payments, and invoices. A statement shows the customer’s previous balance, any payments that have been made, overdue invoices that haven’t been paid, and any new charges on the account. From all that information, QuickBooks calculates the last number on a statement, which is the most important—how much money is outstanding, and whether or not it’s overdue.
Note
Although statements can track customer payments and balances, they don’t handle the following billing tasks:
Tracking sales tax.
Using Group items to add several items.
Typing multi-paragraph descriptions of services or products.
Subtotaling items.
Applying percentage discounts to items sold.
Including a customer message.
Including custom fields.
Summarizing the services and products sold. (On statements, each separate service or product you sell has to appear as a separate statement charge.)
Invoices
The bottom line: If statements or sales receipts don’t work, don’t be afraid to use invoices. They accept any item you’ve created in your Item List (see Chapter 5) without complaint, and they track what your customers owe you.
Besides the features in Table 10-1, an invoice is the only type of sales form that you can generate from an estimate (Comparing Estimates to Actuals). If you’re a general contractor and prepare a detailed estimate of the services and products for a job, you’ll save a huge chunk of time by turning that estimate into an invoice for billing.
Note
QuickBooks Premier and Enterprise editions include one more type of sales form: the sales order. In those editions, when you create a sales order for the products that a customer wants to buy, you can create an invoice for the items that are in stock and keep track of out-of-stock items that you’ll need to ship to your customer when a new shipment arrives (Using Pending Invoices for Backorders).
Sales Forms and Accounts
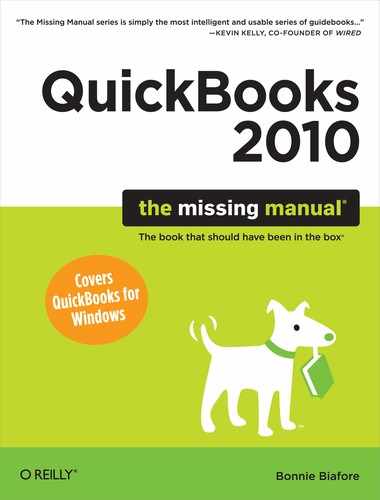
An invoice or other sales form is the first step in the flow of money through your company, so now’s a good time to look at how QuickBooks posts income and expenses from your invoices to the accounts in your chart of accounts. Suppose your invoice has the entries shown in Figure 10-1.
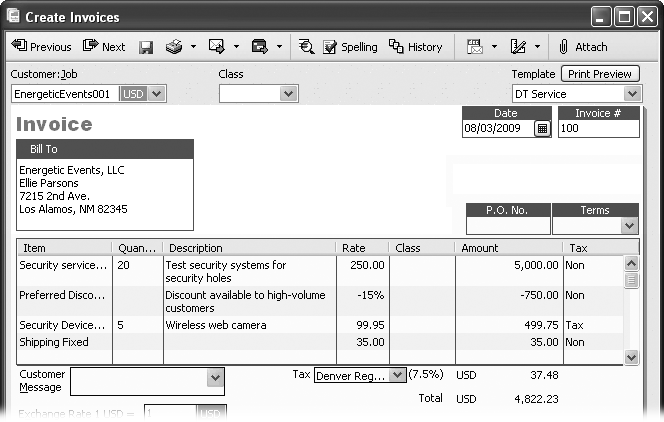
Table 10-2 shows how the amounts on the invoice post to accounts in your chart of accounts.
Account | Debit | Credit |
Accounts Receivable | 4822.23 | |
Services Revenue | 5000.00 | |
Product Revenue | 499.75 | |
Sales Discounts | 750 | |
Sales Tax Payable | 37.48 | |
Shipping | 35.00 | |
Cost of Goods Sold | 249.78 | |
Inventory | 249.78 | |
Total | 5822.01 | 5822.01 |
And, here’s why the amounts post the way they do:
You sold $5,000 of services and $499.75 of products, which is income. The income values appear as credits to your Services Income and Product Revenue accounts to show that you sold something. In this example, the discount is in an income account, so the discount is in the Debit column to reduce your income.
The sales tax you collect is a credit to the Sales Tax Payable account. Your shipping charge reduces your shipping expense account.
All those credits need to balance against a debit. Because your customer owes you money, the amount owed belongs in the Accounts Receivable account, indicated by the debit.
You also sold some products from inventory. You credit the Inventory account with the cost of the products, which decreases the Inventory account balance. You offset that credit with a debit to the Cost of Goods Sold account, which is an income statement account.
Creating Invoices
In QuickBooks, you have two ways to create invoices:
Create Invoices used to be your only option (QuickBooks 2007 and earlier) for creating invoices. It can still handle everything you throw at it: services, products, billable time, and billable expenses. This command is available in QuickBooks Pro, QuickBooks Premier, and QuickBooks Enterprise.
Invoice for Time & Expenses, available only in QuickBooks Premier and Enterprise editions, can do everything that the Create Invoices window can do, but it’s a real time-saver when you usually invoice for billable time and expenses. As you’ll learn in detail on Invoicing for Billable Time and Costs, you specify a date range and QuickBooks shows you all the customers who have billable time and expenses during that period. When you choose the customer or job and tell the program to create an invoice, it opens the Create Invoices window, fills in the usual fields, and automatically fills in the invoice table with the customer’s billable time and expenses. Once you’re in the Create Invoices window, you can add any other items you want, like products you sold or discounts you’re offering.
Invoices tell your customers everything they need to know about what they purchased and the payment they’re about to make. If you created your customers and jobs with settings such as payment terms and sales rep (Specifying additional customer information), filling in an invoice is almost effortless. As soon as you choose a customer and job in the Customer:Job field, QuickBooks fills in most of the fields for you.
Some fields on an invoice are more influential than others, but they all come in handy at some point. To understand the purpose of the fields on an invoice more easily, you can break an invoice up into three basic sections, as shown in Figure 10-2. Because the invoices you create for product sales include a few more fields than the invoices for services only, the following sections use a product invoice to explain how to fill in each field you might run into on the invoices you create. If the information that QuickBooks fills in for you is incorrect, these sections also tell you how to correct the problem.
Note
If you charge your customers based on the progress you’ve made, invoices are a little more complicated, but you’ll learn how to handle this situation on Creating Progress Invoices.
Creating an Invoice
In the sections that follow, you’ll find details about filling in all the fields on an invoice. For now, here’s the basic procedure for creating and saving one or more invoices using the Create Invoices command:
On the QuickBooks home page (in the Customer panel), click Invoices (or press Ctrl+I).
The Create Invoices window opens.
If you use QuickBooks Premier and you’ve turned on the preference to invoice for time and expenses (Time & Expenses), clicking Invoices on the Home page displays a shortcut menu with both invoicing commands. Choose Create Invoices from the shortcut menu. See Using the Invoice for Time and Expenses Command to learn how to use the other command on the shortcut menu, “Invoice for Time & Expenses”. If the preference for invoicing time and expenses isn’t turned on, clicking Invoices opens the Create Invoices window immediately.
In the Customer:Job box, choose the customer or job associated with the invoice.
When you choose a customer or job, QuickBooks fills in many of the invoice fields with values from the customer record (see Creating a New Customer), job record (Creating a New Job), and the preferences you set for them (Sales & Customers). For example, QuickBooks pulls the data for the Bill To address, Terms, and Rep fields from the customer or job record. Your Sales & Customers preferences provide the values for the Ship Via and FOB (which stands for “free on board” or the physical point at which the customer becomes responsible for damage to or loss of the shipment) fields come from.
Note
In QuickBooks Premier, if the preference for invoicing time and expenses is turned on and the customer or job has associated time or expenses, the Billable Time/Costs dialog box opens with the “Select the outstanding billable time and costs to add to this invoice” option selected. If you don’t want to add the time and expenses to this invoice, select the option whose label begins with “Exclude”, and then click OK. To learn more about invoicing for time and expenses, see Adding Billable Time and Costs to Invoices.
For each product or service sold, in the line-item table, enter the information for the item, including the quantity and price (or rate).
If you want, fill in the boxes below the line-item table, such as Customer Message and Memo.
You can also turn on the checkboxes below the line-item table to specify how to send the invoice. You’ll rarely need to change the sales tax rate associated with the customer, but you can if you need to.
Maintain your professional image by checking for spelling errors before you send your invoice.
To run the QuickBooks spell checker, in the Create Invoices window’s icon bar, click Spelling. If you checked spelling when you created your customers and invoice items, the main source of spelling errors is edits you’ve made to item descriptions. If the QuickBooks spell checker doesn’t work the way you want, change your Spelling preferences (Tax: 1099).
If you have additional invoices to create, simply click Save & New to save the current invoice and begin another.
To save the invoice you just created and close the Create Invoices window, click Save & Close. If you’re unhappy with the choices you made in the current invoice, click Clear to start over with a fresh, blank invoice.
Tip
In QuickBooks 2007 and earlier, you could print an invoice and then not save it by either clicking Clear, which erases the current invoice; Revert if you’re editing an existing invoice; or the Close button, which closes the Create Invoices window without saving the current invoice. If you create or modify an invoice and click the Print icon in QuickBooks 2008 or later, the program saves the invoice before printing it.
Filling in Invoice Header Fields
If you fill in all the fields in your customer and job records (see Chapter 4), QuickBooks takes care of filling in most of the invoice header section. Here’s what the header fields do and where QuickBooks gets the values it fills in automatically.
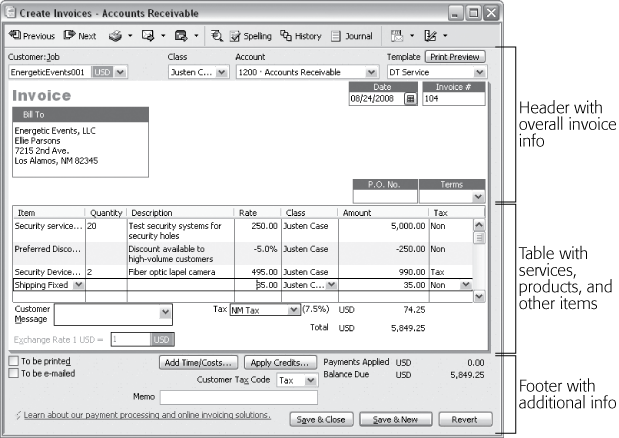
Choosing the customer or job
The selection you make in the Customer:Job field is your most important choice for any invoice. In addition to billing the correct customer for your work, QuickBooks uses the settings from your customer and job records to fill in many of the invoice fields.
To choose a customer or job, in the Customer:Job drop-down list, choose the customer or job you want, as shown in Figure 10-3.
Note
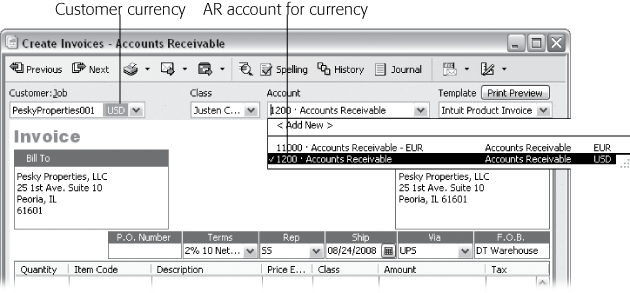
If you’ve turned on the preference for multiple currencies, the last column in the customer drop-down menu shows the currency for the customer.
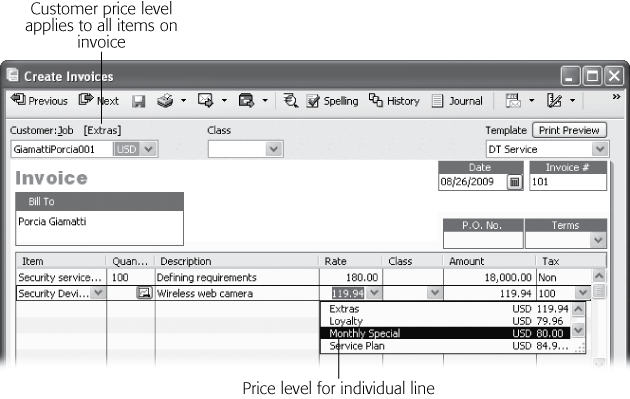
After you choose a customer, the “Price level” box appears to the right of the Customer:Job box if you’ve assigned a price level to the customer record (Designating payment information). When you add an invoice item and the price isn’t what you expect, the price level (which applies a discount or markup) may be the culprit. You can change a customer’s price level by editing the customer record (Adding Notes About Customers), or you can choose existing price levels to change the price you charge as you add items to your invoice (see the box on Adding a Message to the Customer).
Choosing an invoice template
The template you choose in the Template drop-down list (at the top right of the Create Invoices window) determines which fields appear on your invoices and how they’re laid out. For example, you might have two templates: one for printing on your company letterhead and the other for invoices you send electronically. Choosing a template before doing anything else is the best way to prevent printing the wrong invoice to your expensive stationery.
QuickBooks remembers the template you chose when you created your last invoice. If you use only one invoice template, choose it on your first invoice and the program chooses it for you from then on.
Note
Templates aren’t linked to customers. If you pick a template when you create an invoice for one customer, QuickBooks chooses that same template for your next invoice, regardless of which customer it’s for.
You can switch templates any time you want. When you choose a template, the Create Invoices window displays the fields and layout for the new template. If you’ve already filled in an invoice, changing the template doesn’t throw out the data; QuickBooks simply displays the data in the new template. However, QuickBooks won’t display settings like your company logo, fonts, and other formatting until you print or preview your invoice (Printing One Form).
Many small companies are perfectly happy with the invoice templates that QuickBooks provides. When you create your first invoice, you might not even think about the layout of the fields on the invoice. But if you run across a billing task that the current template can’t handle, don’t panic: You can choose from more than one built-in invoice template. And if you want your invoices to reflect your company’s style and image, you can create your own templates (see Managing Templates).
Before you accept the template that QuickBooks chooses, in the Template drop-down list, quickly select and review each of the following templates to see whether you like them better:
Intuit Product Invoice. If you sell products with or without services, the Intuit Product Invoice is set up to show information like the quantity, item code, price for each item, total charge for each item, sales tax, and shipping information—including the ship date, shipping method, and FOB.
Intuit Service Invoice. This invoice doesn’t bother with shipping fields because services are performed, not shipped. The template includes fields for item, description, quantity, rate, amount, tax, and purchase order number.
Intuit Professional Invoice. The only difference between this template and the Intuit Service Invoice is that this template doesn’t include a purchase order number field, and the quantity (Qty) column follows the Description column.
Progress Invoice. If you bill your customers based on the progress you’ve made on their jobs, the Progress Invoice has columns for your estimates, prior charges, and new totals. It appears in the Template drop-down list only if you turn on the preference for progress invoicing (see Jobs & Estimates).
Note
The Packing Slip template also appears in the Template drop-down list, but it isn’t an invoice template. When you ship products to customers, you can print an invoice and packing slip from within the Create Invoices window (see Printing Packing Slips).
Fixed Fee Invoice. This invoice drops the quantity and rate fields, since the invoice shows only the total charge. The template includes the date, item, description, tax, and purchase order number.
Time & Expense Invoice. If you bill your customers by the hour, this template includes a column for hours and hourly rate, and it calculates the resulting total. The Attorney’s Invoice template is identical to this one except in name.
The other header fields
As you can see in Figure 10-4, QuickBooks can fill in most of the remaining header fields for you. Although the following fields don’t appear on every template, here’s what you do to fill in any empty fields or change the ones that QuickBooks didn’t complete the way you want:
Class. If you turned on the class tracking feature (Accounting) to categorize your income and expenses in different ways, choose a class for the invoice. If you skip this box, QuickBooks reminds you that the box is empty when you try to save the invoice. Although you can save the invoice without a class, it’s important to assign classes to every transaction if you want your class-based reports to be accurate. For example, if you use classes to track income by partner and save an invoice without a class, the partner who delivered the services on the invoice might complain about the size of her paycheck.
Figure 10-4. If you work with multiple currencies, at the top of the Create Invoices window, the Account box shows the Accounts Receivable (AR) account for the invoice’s income. QuickBooks uses the Accounts Receivable account to store income in your home currency. To store income in other currencies, it creates additional Accounts Receivable accounts, such as Account Receivable-EUR (Receiving Payments for Invoiced Income).Date. QuickBooks fills in the current date, which is fine if you create invoices when you make a sale. But service businesses often send invoices on a schedule—the last day of the month is a popular choice. If you want to get a head start on your invoices, type or choose the invoice date you want. QuickBooks uses the same date for every subsequent invoice, making your end-of-month invoicing a tiny bit easier.
Invoice #. When you create your first invoice, type the number that you want to start with. For example, if you’d rather not reveal that this is your first invoice, type a number such as 245. Each time you create a new invoice, QuickBooks increases the number in the Invoice # box by one: 246, 247, and so on.
Tip
Press the plus (+) key or the minus (–) key to increase or decrease the invoice number by one, respectively. When you save the current invoice, QuickBooks considers its invoice number the starting point for subsequent numbers.
If your last invoice was a mistake and you delete it (Voiding and Deleting Invoices), you’ll end up with a gap in your invoice numbers. For example, when you delete invoice number 203, QuickBooks has already set the next invoice number to 204. Your invoice numbers don’t have to be sequential, but it’s easier to spot missing payments and other issues when your invoice numbers are in numeric order. If you notice the gap, in the Invoice # box, type the invoice number you want to use to get QuickBooks back on track.
Bill To. The Bill To field is essential when you mail your invoices. When the customer record includes a billing address (Specifying additional customer information), QuickBooks uses that address to fill in this field. If you email invoices, a billing address isn’t necessary—the customer name in the Bill To field identifies the customer on the emailed form.
Ship To. If you sell services, you don’t need an address to ship to, which is why the Intuit Service Invoice template doesn’t show the Ship To box. But when you sell products, you need a shipping address to send the products to your customer. When you use a template like Intuit Product Invoice, QuickBooks uses the shipping address from the customer record to fill in the Ship To field.
P.O. Number. If your customer issued a purchase order for the goods and services on your invoice, type that purchase order number.
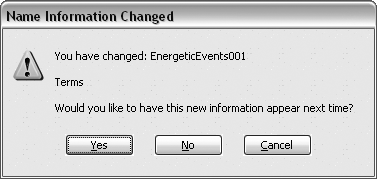
Terms. Typically, you set up the payment terms when you create customers, which you then use for every invoice. When the customer record includes payment terms (Specifying additional customer information), QuickBooks uses those terms to fill in this field. However, if you decide to change the payment terms—perhaps due to the customer’s failing financial strength—choose a different term, such as “Due on receipt”. When you save the invoice, QuickBooks offers to save that change to the customer record.
Note
If QuickBooks fills in fields with incorrect values, make the corrections on the invoice. You can’t lose: When you save the invoice, QuickBooks asks if you’d like the new values to appear the next time, as shown in Figure 10-5.
Rep. If you assigned a sales rep in the customer record (Specifying additional customer information), QuickBooks fills in this field for you. If the sales rep changes from invoice to invoice (for instance, when the rep is the person who takes a phone order) and you left the Rep field in the customer record blank, choose the right person.
Ship Date. QuickBooks fills in the current date. If you plan to ship on a different date (when the products arrive from your warehouse, for example), type or choose the ship date.
Ship Via. If you set the Usual Shipping Method preference (Sales & Customers), QuickBooks uses that value to fill in the Ship Via box. To choose a different shipping method for this invoice—for instance, when your customer needs the order right away—in the invoice Ship Via box, choose the shipping method you want.
FOB. This stands for “free on board” and signifies the physical point at which the customer becomes responsible for the shipment. That means that if the shipment becomes lost or damaged beyond the FOB point, it’s the customer’s problem. If you set the Usual FOB preference, QuickBooks uses that preference to fill in the FOB box. To choose a different location for this order, you have to type the FOB location you want.
Entering Invoice Line Items
If you dutifully studied Chapter 5, you already know about the different types of items you can add to an invoice. This section describes how to fill in a line in the line-item table to charge your customers for the things they buy. (The box on Group explains a shortcut for speeding up filling in invoice items.)
Note
The order in which you add items to an invoice is important. For example, when you add a Sub-total item, QuickBooks subtotals all the preceding items up to the previous Subtotal item (if there is one). QuickBooks does nothing to check that you add items in the correct order. You can add a Subtotal item as the first line item, even though that does nothing for your invoice. See Applying Subtotals, Discounts, and Percentage Charges for info on adding Sub-total, Discount, and Sales Tax items in the right order.
The column order in the line-item table varies from template to template, but this section and Figure 10-6 show the columns in the order they appear on the Intuit Product Invoice template:
Quantity. For products, type the quantity. For services you sell by the hour (or other unit of time), type the number of time units. (See Selecting Billable Time and Costs to learn how to select hours from a timesheet.) If you sell services at a flat rate, you can leave the Quantity cell blank and simply fill in the Amount cell.
Note
If you type a quantity for a product that exceeds how many you have on hand, QuickBooks Pro simply warns you that you don’t have enough. QuickBooks Premier displays the warning, and also tells you how many you have on hand, how many are on sales orders (Using Pending Invoices for Backorders), and the total you have available.
When you use the Intuit Product Invoice, the Quantity column comes first. After you choose an item, make sure to check the value in the Amount field. If the number looks too large or too small, the quantity you entered might not match the units for the item. For example, if you charge for developing training materials by the hour, but charge for teaching a training class by the day, the quantity for developing training materials has to be in hours and the quantity for teaching has to be in days.
Quantity doesn’t apply if the item is a discount, subtotal, or sales tax. If you choose one of these items after entering a quantity, QuickBooks removes the value in the Quantity field.
Figure 10-6. It seems odd to set the quantity before you choose an item, but that’s how the Intuit Product Invoice works. (You can customize an invoice to place the columns in the order you want; see Including basic company and transaction information.) If you realize that you entered the wrong quantity after you pick an item, simply double-click the Quantity field and type the correct quantity. After you’ve added your first line item, start another line item by clicking any field in the next empty line of the table.Item Code. From the Item drop-down list, choose an item (see Chapter 5 for details on items). Depending on the information you entered when you created the item in the Item List (Creating Items), QuickBooks will fill in the Description field and Price Each (or Rate) field for you.
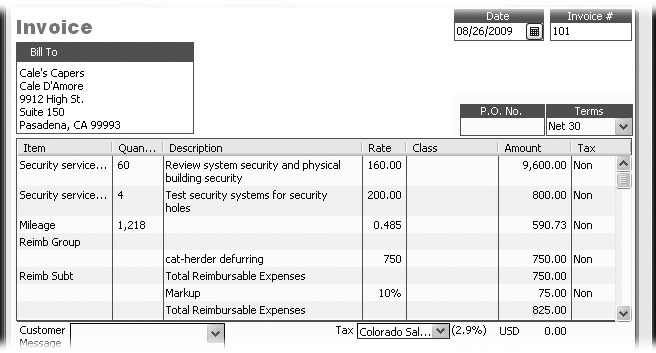
Description. You can keep the description that comes from the item record or you can edit it. For example, when you set up your inventory items with standard descriptions, you don’t have to change the description on the invoice. On the other hand, you can add detail to a generic description—like changing the description “Security service” to “Nightly rounds every two hours.”
Price Each (or Rate). Depending on the type of item you’re adding to the invoice, QuickBooks uses the value in the Sales Price field or Rate field in the item record (see Chapter 5). For example, an inventory part always uses the Sales Price field. Service items use the Rate field, unless a partner or subcontractor performs the work, in which case they use the Sales Price field.
If multiple currencies are turned on and you set up the customer to use a foreign currency, QuickBooks automatically applies the current exchange rate for that currency to item prices and service rates. To use a specific exchange rate in an invoice, fill in the “Exchange Rate 1 <currency> =” box with the exchange rate before you add items to the invoice. (If you didn’t change the exchange rate, delete the lines in the invoice, set the exchange rate, and then add the line items again.)
Note
Don’t forget that different items can use different units for their price. If you charge for a service by the hour, the value in the Rate or Price Each field is the price per hour and the value you type in the Quantity field should be the number of hours. Conversely, if you charge a fixed fee for your “How to Hack-Proof Your Business” seminar, leave the Quantity field blank (or type 1). Or, if you use the Time & Expense or Fixed Fee templates (The other header fields), you don’t have to remember these rules.
Amount. QuickBooks calculates the total in this field by multiplying the quantity by the value in the Price Each (or Rate) field. Nothing stops you from simply typing a value in this field, which is exactly what you want for a fixed-fee contract.
Tax. If you set up the taxable status of your customers (Designating payment information) and the items you sell (Service Items), QuickBooks automatically handles sales tax on your invoices. For example, when an item is taxable and the customer is liable for paying sales tax, the program calculates the total sales tax that appears below the table (see Figure 10-2 on Creating Invoices) by totaling all the taxable items on your invoice and multiplying by the tax rate set in the Tax box. (QuickBooks fills this box in with the sales tax item you set in the customer’s record.)
Tip
If you notice that the taxable status isn’t correct, don’t change the value in the Tax field. You’re better off correcting the customer’s or the item’s tax status so QuickBooks can calculate tax correctly in the future.
Inserting and deleting line items
Sometimes, you forget to add line items you need. For example, you’ve added several services and inventory items to your invoice, and then you realize that you need Subtotal items following the last service and last inventory items so that you can apply a shipping charge only to the inventory items.
Here’s how you insert and delete lines in the line-item table:
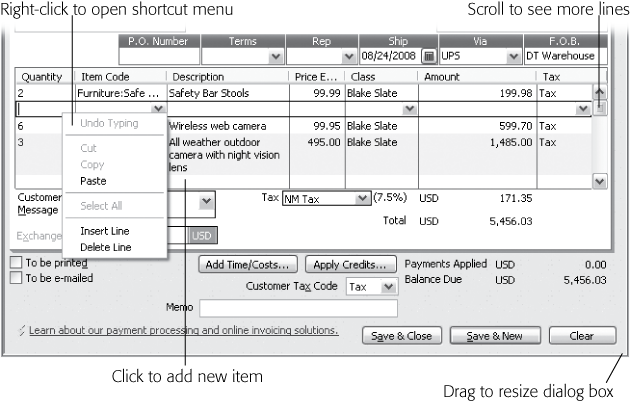
Insert a line. Right-click the line above which you want to insert a line, and then choose Insert Line from the shortcut menu. If you prefer keyboard shortcuts, press Ctrl+Insert instead.
Delete a line. Right-click the line you want to delete and choose Delete Line from the shortcut menu, or press Ctrl+Delete.
As shown in Figure 10-7, QuickBooks adjusts the invoice’s lines accordingly.
Applying Subtotals, Discounts, and Percentage Charges
Services, Inventory Parts, and Non-inventory Parts (see Chapter 5) are standalone items. When you add them to the line-item table, they don’t affect their neighbors in any way. However, with percentage discounts on what you sell or Other Charge items that calculate shipping as a percentage of price, the order in which you add items becomes crucial. And, if you want to apply a percentage to several items, you’ll also need one or more Subtotal items to make the calculations work.
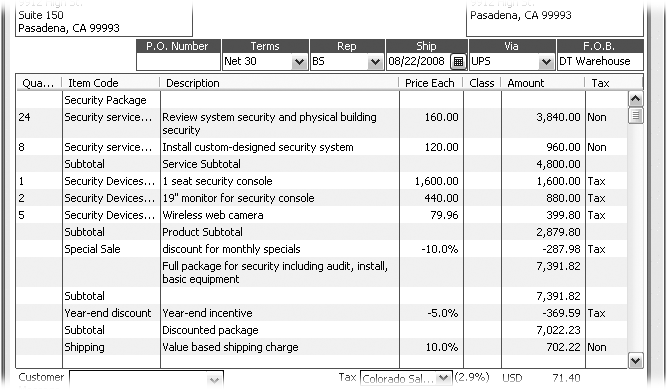
You first learned about Subtotal, Discount, and Other Charge items in Chapter 5. Figure 10-8 shows how to combine them to calculate percentage discounts and add markups to the items on your invoice.
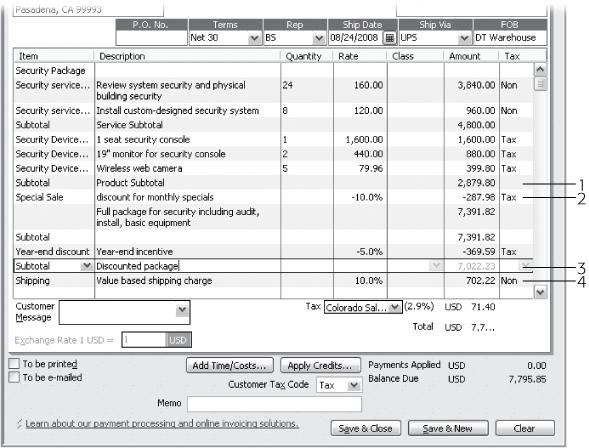
Here are the steps for arranging Subtotal, Discount, and Other Charge items to calculate percentages on invoice items:
If you want to discount several items on your invoice, add all the items you want to discount one after the other.
Even though the Balance Due field shows the total of all items, to apply a discount to all of them, you first need to add a Subtotal item to the line-item table.
Add a Subtotal item after the last item you want to discount, as shown by the Product Subtotal item in Figure 10-8.
The Subtotal item adds up all the preceding line items up to the previous Subtotal. For example, in Figure 10-8, the Services Total item is a subtotal of the Service items on the invoice. The Product Subtotal item adds up all items between the Services Total and the Product Subtotal items.
To apply a percentage discount or charge to the subtotal, simply add the Discount or Other Charge item to the line immediately below the Subtotal item.
If you’ve already added other items to your invoice, right-click the line immediately below the Subtotal item and choose Insert Line from the shortcut menu.
If you have additional items that you don’t want to include in the discount or charge, add those below the Discount or Other Charge item.
Adding a Message to the Customer
You can include a message to your customers on your invoices—for instance, reminding them that you’ll send your cousin Guido over if they don’t pay. In the Customer Message drop-down list, choose the message you want to include. The messages that appear in the drop-down list are the ones you’ve added to the Customer Message List (Customer Message). If the message you want to use doesn’t exist, in the drop-down list, click <Add New > to open the New Customer Message dialog box.
Choosing How to Send the Invoice
Below the line-item table, you’ll find two checkboxes that simplify sending your invoices to your customers: “To be printed” and “To be e-mailed”. But these checkboxes don’t tell the whole story because you actually have five options for sending invoices:
Print immediately. If you create only the occasional invoice and send it as soon as it’s complete, turn off both checkboxes. Instead, in the Create Invoices window icon bar, click the Print icon and follow the instructions on Printing One Form.
Print later. If you want to add the invoice to a queue to print later, turn on the “To be printed” checkbox. Then, you can print all the invoices in the queue, as described on Printing One Form.
Email immediately. In the Create Invoices window’s toolbar, click the Send icon (it looks like an envelope with a green arrow) and follow the instructions for emailing invoices on Choosing a Send Method.
Email later. If you want to add the invoice to a queue to email later, turn on the “To be e-mailed” checkbox. You can send all the invoices in the queue via email, as described on Choosing a Send Method.
Print and email later. You can turn on both checkboxes if you want to email invoices to get the ball rolling and then follow up with paper copies.
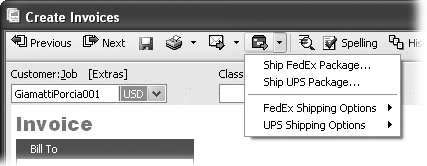
If you’re sending an invoice for products you’ve sold, you also have to ship those products to your customer. See the box on Adding a Memo to Yourself for a convenient and money-saving way to ship products.
Tip
See Spelling if you want to activate the preference that automatically turns on the “To be e-mailed” checkbox if the customer’s preferred send method is email. Choosing a Send Method explains how QuickBooks works with email programs.
Adding a Memo to Yourself
The Create Invoices window includes a Memo box, which works just like Memo boxes throughout QuickBooks. You can use this box to remind yourself about something special on the invoice or to summarize the transaction. For example, if the invoice is the first one for a new customer, you can note that in the Memo box. The memo appears in your sales reports, although it won’t print on the invoices you send to your customers.
Note
The Open Invoices report (choose Reports → Customers & Receivables → Open Invoices) is perfect when you want to see all the invoices for which you haven’t yet received payment. The report shows all the invoices for each customer and job, when they’re due, and the open balance. If the invoices are overdue, the Aging column shows just how late the invoices are.
Invoicing for Billable Time and Costs
When you work on a time-and-materials contract, you charge the customer for labor costs plus job expenses. Cost-plus contracts are similar except that you charge a fee on top of the job costs. Contracts like these are both low-risk and low-reward—in effect, you’re earning an hourly wage for the time you work. For these types of contracts, it’s critical that you capture all the expenses associated with the job or you’ll lose the profit that the contract offers.
QuickBooks helps you get those billable items into your invoices. You have to tell QuickBooks about every hour you worked and every expense you incurred for a job. But once you enter those things into QuickBooks, it’s easy to build an invoice that captures them. You can add billable time and costs to an invoice whenever the Create Invoices window is open. When you open the Create Invoices window in QuickBooks Pro or Premier, it reminds you about outstanding billable time and costs. QuickBooks Premier also has a separate command specifically for creating invoices for billable time and costs. The following sections tell you how to perform all these tasks.
Setting Up Invoicing for Time and Cost
In some industries, like consulting and law, invoicing for time and expenses is the norm. Other industries, like retail, never invoice for time and expenses.
Before you can pop your billable time and expenses into your invoices, you first need to record them as billable items and assign them to the correct customer or job. If you regularly invoice for billable time and expenses, you can also set up QuickBooks to include a special command for that task.
Here are the billable items you can add to your invoices and the chapters where you’ll learn how to track them:
Billable time. Chapter 8 (Entering Time in Timesheets) describes how to track your billable time and assign your hours to a customer or job.
Mileage. Chapter 8 (Recording Mileage Driven) describes how to track mileage and assign mileage to a customer or job.
Purchases and expenses related to a customer or job. Reimbursable expenses include products you purchase specifically for a job, services you get from a subcontractor, and other expenses such as shipping and postage. Chapter 9 describes how to make items and expenses reimbursable to a customer or job (Automating Recurring Bills) as you enter bills, checks, or credit card charges in QuickBooks.
If you use QuickBooks Premier or Enterprise, to set the preference for invoicing time and expenses, choose Edit → Preferences. In the icon bar, click Time & Expenses. On the Company Preferences tab, turn on “Create invoices from a list of time and expenses” checkbox. Leave this checkbox turned off if invoicing for time and expenses is the exception rather than the rule. (You can still add time and other costs to an invoice in the Create Invoices window. After you choose the customer or job, click Add Time/Costs below the line-item table.)
Adding Billable Time and Costs to Invoices
In QuickBooks Pro and QuickBooks Premier, you can add billable time and costs directly in the Create Invoices window. Here’s how:
Press Ctrl+I or choose Customers → Create Invoices to open the Create Invoices window. In the Customer:Job drop-down list, choose the customer or job you want to invoice.
If the customer or job has outstanding billable time or expenses, the Billable Time/Costs dialog box opens and automatically selects the “Select the outstanding billable time and costs to add to this invoice?” option.
In the Billable Time/Costs dialog box, click OK.
The “Choose Billable Time and Costs” dialog box opens.
To select the time and costs you want to add to the invoice, follow the instructions that begin with step 1 on Selecting Billable Time and Costs.
Using the Invoice for Time and Expenses Command
The QuickBooks Premier "Invoice for Time & Expenses” command shows you every customer with billable time and expenses waiting to be invoiced and how much there is of each type, so it’s hard to miss outstanding billable hours and reimbursable expenses.
Here’s how to put the “Invoice for Time & Expenses” command to use:
Choose Customers → “Invoice for Time & Expenses”. (Or, on the Home page, click the Invoices icon, and then choose “Invoice for Time & Expenses” on the drop-down menu.)
QuickBooks opens the “Invoice for Time & Expenses” window, which lists the customers and jobs that have billable time and expenses associated with them. The table shows the amount of billable time, expenses, and mileage for each customer and job. The Items column shows the reimbursable amount for products that you purchased specifically for the customer or job.
In the Date Range From and To boxes, type the starting and ending dates for the time and expenses you want to invoice for.
For example, if you want to invoice for billable time and expenses for the previous month, type the first and last day of the month, like 3/1/2010 and 3/31/2010. To invoice for all outstanding time and expenses up to a certain date, leave the Date Range From box blank, as shown in Figure 10-11.
To select a customer or job for invoicing, click anywhere in its row.
QuickBooks highlights the customer or job you select, as shown in Figure 10-11.
To choose specific billable time and costs to add to the invoice, turn on the “Let me select specific billable costs for this Customer:Job” checkbox.
Nothing happens until you click Create Invoice.
Click Create Invoice.
If you turned on the “Let me select specific billable costs for this Customer:Job” checkbox, QuickBooks opens the “Choose Billable Time and Costs” dialog box shown in Figure 10-12, which includes tabs for time, expenses, mileage, and products (items). This dialog box is the same one you see if you click Add Time/Costs in the Create Invoices window. Proceed to the next section to learn how to add billable time and costs to an invoice.

If you turned off the “Let me select specific billable costs for this Customer:Job” checkbox, the Create Invoices window opens with your invoice already filled out. All you have to do is save the invoice by clicking Save & Close.
Selecting Billable Time and Costs
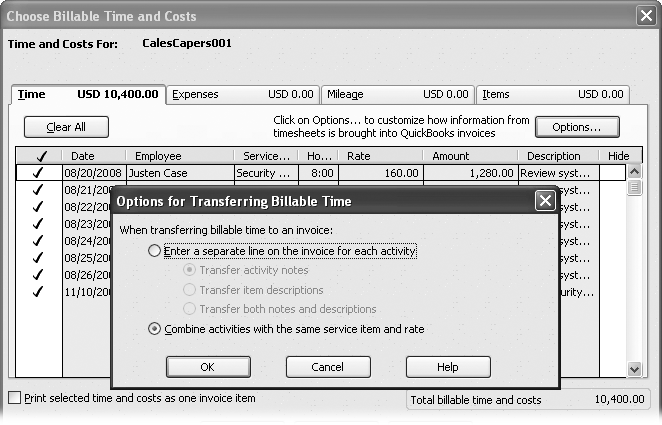
Regardless how you open the “Choose Billable Time and Costs” dialog box, the steps for selecting the billable time and costs to invoice are the same. Here’s what you do:
In the “Choose Billable Time and Costs” dialog box, to select all the entries on the Time tab, click Select All.
QuickBooks adds a checkmark in the checkmark column for every activity. To add or remove a row, click its checkmark cell to toggle it on or off.
Each tab in the dialog box shows the total value of the entries you’ve selected on that tab. The “Total billable time and costs” value below the table is the total of all the selected items on all four tabs.
If you want the invoice to include only one line for all the time and expenses you’ve selected, turn on the “Print selected time and costs as one invoice item” checkbox (below the table).
The Create Invoices window shows the separate entries so you can verify that the invoice is correct. The printed invoice shows only one line labeled Total Reimbursable Expenses.
Note
If you’ve created the invoice with one line for time and costs, it takes several steps to recreate it showing individual costs. To change an invoice back to a line-by-line listing, in the Create Invoices window, delete the Total Reimbursable Expenses line item. Click Add Time/Costs to open the “Choose Billable Time and Costs” dialog box and reselect all the entries you want. Turn off the “Print selected time and costs as one invoice item” checkbox and then click OK.
On the “Choose Billable Time and Costs” dialog box’s Expenses tab, click the checkmark cell for each expense (like meals, airfare, and other costs) you want to add to the invoice.
If you mark up expenses, such as phone calls and postage, the Expenses tab lets you track your markups. In the “Markup Amount or %” box, type the markup’s dollar value or percentage. Choose the income account for the markup. (The box on Invoicing for Backordered Products tells you how to apply different markups to different expenses.)
To have QuickBooks calculate the sales tax, turn on the “Selected expenses are taxable” checkbox. If the customer is tax exempt, QuickBooks doesn’t add sales tax no matter what.
Note
On the Expenses tab, the Memo column displays what you typed in the Memo field for the original vendor bill, check, or credit card charge. QuickBooks uses the entries in this column as the description on the invoice, so don’t leave these fields blank. If you didn’t enter a Memo in the original expense transaction, you’ll have to type the description for each expense once it’s added to the invoice.
Click the Mileage tab and select the mileage you want to add to the invoice.
Like you did on the Time tab, click Options to tell QuickBooks whether to show one line for mileage or a separate line for each activity.
On the Items tab, select any products that you bought specifically for the customer or job.
Click an item’s checkmark cell to add it to the invoice.
When you’ve selected all the billable items you want to add from every tab, click OK.
QuickBooks adds all the billable items you selected to the invoice, as shown in Figure 10-13. If it has everything you want to invoice, click Save & Close.
Checking for Unbilled Costs
Most Customers & Receivables reports focus on charges you’ve already invoiced. If you invoice customers for reimbursable expenses, forgetting to invoice for reimbursable costs takes a bite out of your profits. Be sure to regularly run the "Unbilled Costs by Job” report (choose Reports → Customers & Receivables → “Unbilled Costs by Job”) to look for job expenses that you’ve forgotten to invoice. This report shows costs that you designated as billable to a customer or job that haven’t yet been added to an invoice.
Invoicing for Backordered Products
Placing a product order to fulfill your customers’ orders is known as a backorder. If backorders are a regular part of your business day, you should consider finding suppliers who deliver more quickly, and maybe upgrading to QuickBooks Premier, which has a built-in sales order form for tracking backordered items. By combining a few of QuickBooks Pro’s features, you can also handle backorders.
When you tell your customers that a product is out of stock, they might ask you to handle the backorders in different ways. Here are the most common requests for backorders:
Remove the backordered items from the order. Customers in a hurry ask you to fill the order with only the products you have in stock. If they can’t find the backordered products anywhere else, they can call in a new order.
Ship all items at once. If convenience is more important than delivery date, you can hold the customer order until the backordered products arrive and ship the entire order at once.
Ship backordered items when they arrive. Many customers request that you process their orders for the products you do have in stock and then send the backordered products when you receive them.
If you remove backordered items from an order, you can ship the entire order and invoice the customer immediately. But when customers ask you to hold all or part of their orders until backordered products arrive, they usually expect you to invoice them for backordered products only when you ship them. You don’t want the income appearing in your account balances until the order ships.
Tip
If you need help remembering how customers want you to handle their backorders, store back-order preferences in a custom field in the customer record (Hiding Entries). An alternative approach is to add a note in the Customer Center (select the customer and click Edit Notes). Any information you add to the customer Notepad appears front and center whenever you select the customer on the Customers & Jobs tab.
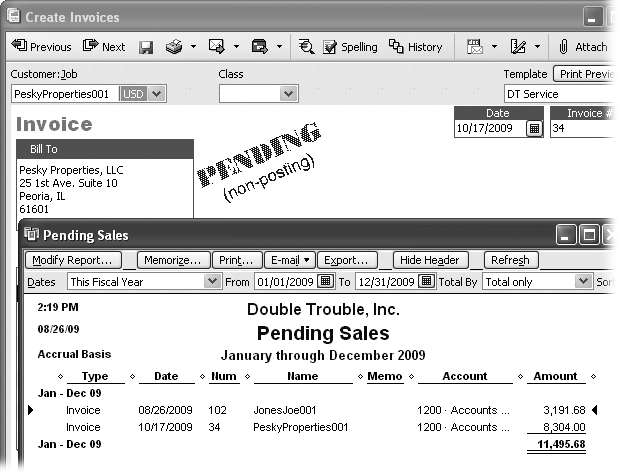
Using Pending Invoices for Backorders
In QuickBooks, setting an invoice status to Pending places it in a holding pattern with no income or expenses posting to your accounts. But they’re easy to spot in the Create Invoices window—QuickBooks adds a Pending stamp to the form. If you don’t use QuickBooks Premier, a pending invoice is the way to track backorders.
To set an invoice to Pending status, follow these steps:
Press Ctrl+I to open the Create Invoices window.
Fill in the invoice fields as usual (The other header fields).
Choose Edit → Mark Invoice As Pending (or right-click the Create Invoices window and choose Mark Invoice As Pending on the shortcut menu). After QuickBooks adds the “Pending (non-posting)” stamp to the invoice, as shown in the background in Figure 10-14, click Save & Close.
The invoice is ready for action, but none of the values post to income or expense accounts.
When the backordered products arrive, open the invoice in the Create Invoices window, choose Edit → “Mark Invoice as Final”, and then click Save & Close.
When you save the invoice, QuickBooks posts its values to the appropriate income and expense accounts.
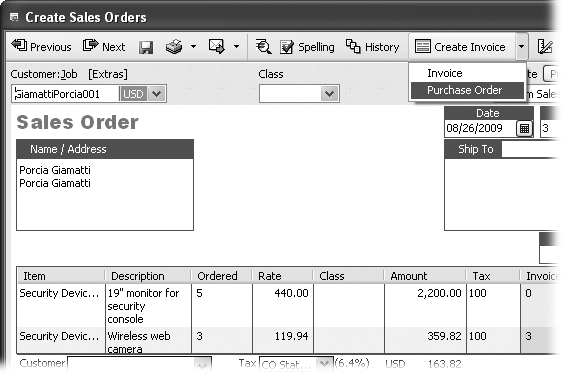
Using Sales Orders for Backorders
QuickBooks Premier and Enterprise have a Sales Order form, which is perfect for backorders. The Create Sales Orders window looks like the Create Invoices window, except that the item table includes an Ordered column, which holds the number of items the customer ordered but that you haven’t yet invoiced. In effect, it’s a record of how much stock you need to have on hand to fill the order.
Tip
To see all your sales orders at once, choose Reports → Sales and then select either “Open Sales Order by Customer” or “Open Sales Orders by Item”.
If you try to add more items to an invoice than you have in stock, you’ll see an error message warning of the shortfall. In QuickBooks Premier, this message tells you how many you have on hand, how many are on other sales orders, and the remaining quantity available. Because the products aren’t in stock, the remaining quantity is either zero or a negative number. (QuickBooks Pro simply warns you that you don’t have enough.) You can then cancel the invoice and create a sales order instead.
If you already know that your inventory is woefully low or nonexistent, simply create a sales order for the customer’s order. Then, if a review of your inventory shows that some items are in stock, you can create a partial invoice for the items you have and use the sales order to track the backordered items. Since the sales orders keep a running balance of backordered items, you can easily create a purchase order to restock the products you need. (See Chapter 19 to learn more about managing inventory.) Here are the steps (available only if you have QuickBooks Premier or Enterprise):
If you haven’t turned on the preference for using sales orders, do so now.
Choose Edit → Preferences. In the Preferences dialog box, click the Sales & Customers icon and click the Company Preferences tab. In the Sales Orders section, turn on the Enable Sales Orders checkbox.
On the Home page, click Sales Orders (or choose Customers → Create Sales Orders).
The Create Sales Orders window opens.
Fill in the fields for the sales order as you would the fields in an invoice (The other header fields).
The only difference is that the column where you record the quantity of items ordered is the Ordered column, instead of an invoice’s Quantity column.
In the toolbar, click Create Invoice.
The aptly named “Create Invoice Based on Sales Order(s)” dialog box opens.
To create a partial invoice for the items you have in stock, select the “Create invoice for selected items” option and then click OK.
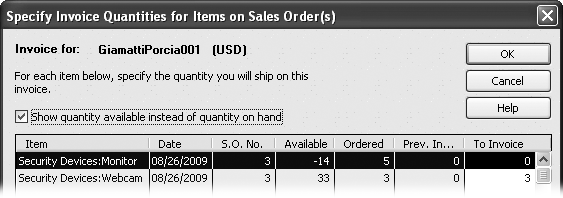
The “Specify Invoice Quantities for Items on Sales Order(s)” dialog box (Figure 10-15) appears. Turn on the “Show quantity available instead of quantity on hand” checkbox to see how many items are really available to ship. Quantity available is the quantity on hand minus the quantity on other sales orders or already used in assembly items.
Figure 10-15. The “Specify Invoice Quantities for Items on Sales Order(s)” dialog box lists each item on the sales order and shows how many items you have in stock. QuickBooks automatically fills in the To Invoice column with the number of items on hand because you usually invoice for only the products you can ship, but you can edit the quantity if you want to invoice for the full order.Click OK to create the invoice for the in-stock items.
QuickBooks opens the Create Invoices window and fills in the invoice. Click Save & Close.
Open the Create Sales Orders window again and click Previous until you see the sales order on which you based the invoice.
The quantity of backordered items appears in the Ordered column. It’s a good idea to place an order for the backordered items while it’s still fresh in your mind.
In the toolbar, click the down arrow to the right of Create Invoice, and then choose Purchase Order, as shown in Figure 10-16.
The “Create Purchase Order Based on the Sales Transaction” dialog box appears.
Select the “Create purchase order for selected items” option, and then click OK.
The “Specify Purchase Order Quantities for Items on the Sales Transaction” dialog box opens. QuickBooks automatically fills in the Preferred Vendor with the vendor you designated in the item record (Service Items) and the Qty cells with how many items you have to order to fulfill the backorder. If you purchase the items from multiple vendors, select only the items you want to purchase from one vendor and create the purchase order. You’ll have to create separate purchase orders for each vendor.
Click the checkmark cell for each item you want to order. If you want to order some spare inventory, edit the values in the Qty cells. Click OK when you’re done.
The Create Purchase Orders window appears already filled in with the items you’re ordering. Although QuickBooks fills in the Vendor box with the preferred vendor, you can choose a different vendor in the drop-down list.
When the Purchase Order is filled out the way you want, click Save & Close and send the purchase order to the vendor.
After you receive the items you ordered to replenish your inventory, return to step 4 to create a final invoice from the sales order.
Estimating Jobs
Many customers ask for an estimate before hiring you. If you’re good with numbers, you might tot up the costs in your head and scribble the estimate on a napkin. But creating estimates in QuickBooks not only generates a more professional-looking estimate, it also feeds numbers into your customer invoices as you perform the work. When you create an estimate in QuickBooks, you add the items you’ll sell or deliver and set the markup on those items.
QuickBooks estimates make short work of pricing small time and material jobs. But QuickBooks estimating isn’t for every business. Particularly in construction, where you might require hundreds or even thousands of items for a major project, you definitely don’t want to enter all the data you’d need to build the Item List for your project. That’s why most construction firms turn to third-party estimating packages, which come with databases of the services and products you need. Many of these estimating packages integrate with QuickBooks, which means you can import an estimate you created in another program and use it to produce your invoices (see Chapter 24).
Note
The totals on estimates don’t post to accounts in your chart of accounts. After all, an estimate doesn’t mean that your customer has committed to going ahead with the job. The estimates show the potential value of a job without showing up in your financial reports, like the Profit & Loss report. When you turn on the preference for estimates (Jobs & Estimates), QuickBooks creates a non-posting account, called Estimates, which is where it stores estimate values. (If you use account numbers, its account number is 4.)
Creating an Estimate
If you’ve mastered QuickBooks invoices, you’ll feel right at home with the fields that appear in a QuickBooks estimate. Figure 10-17 shows the Create Estimates window.

Here’s how you create an estimate and handle the small differences between invoices and estimates:
On the Home page, click Estimates (or choose Customers → Create Estimates).
QuickBooks opens the Create Estimates window and automatically chooses the Custom Estimate template in the Template box. If you’ve created your own estimate template (Editing an Existing Form in QuickBooks), choose your custom template from the Template drop-down list (QuickBooks automatically uses your custom template from then on).
As you do for an invoice, build your estimate by adding items to the line-item table (Entering Invoice Line Items).
In a blank line in the line-item table, in the Item drop-down list, choose the item that you want to add to the estimate. When you fill in the quantity, QuickBooks uses the cost and sales price from the item record to fill in the Cost, Amount, Markup, and Total fields.
The markup percentage is based on how much you pay for the item and the sales price you charge. If you want to apply a different markup percentage, click the item’s Markup cell. Either type the percentage you want to use or choose a price level (Adding a Message to the Customer) from the drop-down list. (The markup you add is only visible while you work on the estimate. When you print it or email it to your customer, only the cost and total columns appear in the form.)
To email the estimate to your customer, turn on the “To be e-mailed” checkbox.
QuickBooks queues up the estimate to be emailed later (Emailing One Form). For reasons unknown, you can’t queue up an estimate to print later. If you want to print an estimate, in the Create Estimates window’s toolbar, click the Print icon.
When the estimate is complete, click Save & Close to save the estimate and close the Create Estimates window.
After you’ve created an estimate and printed it or emailed it to your customer, you don’t do much with it until the customer gives you the nod for the job.
Creating Multiple Estimates
Whether you’re creating a second estimate because the customer thought the first price was too high, or creating separate estimates for each phase of a multiyear job, it’s easy to build and manage several estimates for the same job. You’ve got the following methods at your disposal:
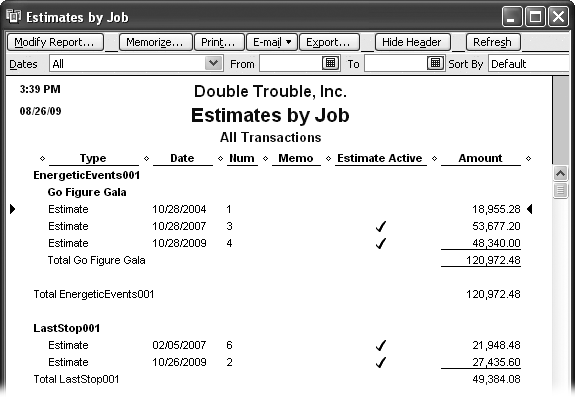
Creating an estimate. You can create additional estimates for a job simply by creating a new estimate (as described in the previous section). When you create additional estimates, QuickBooks makes them active so they appear in the Available Estimates dialog box (Comparing Estimates to Actuals) when you choose the corresponding customer in the Create Invoices window. Active estimates also appear in the Estimates by Job report, shown in Figure 10-18.
Figure 10-18. If you have too many estimates to click Previous and Next in the Create Estimates window, try looking at the “Estimates by Job” report. To display it, choose Reports → Jobs, Time & Mileage → “Estimates by Job”. This report includes an Estimate Active column, which displays a checkmark if the estimate is active. Double-click anywhere in the line to open that estimate in the Create Estimates window.Duplicating an estimate. If you want to play what-if games with an existing estimate, duplicate it and then make your adjustments. In the Create Estimates window, display the estimate you want to copy and then choose Edit → Duplicate Estimate or right-click the estimate and choose Duplicate Estimate from the shortcut menu. QuickBooks pulls everything from the existing estimate onto a new one, and it uses the next estimate number in sequence. After you make the changes you want, click Save & Close or Save & New. The box on Creating an Invoice from an Estimate tells you how to create boilerplate estimates, which is faster if you intend to duplicate the estimate frequently.
Finding an estimate. When you know the estimate you want exists, you can search for it based on the customer or job, when you created it, the estimate number, or the amount. Choose Edit → Find Estimates or right-click the Create Estimates window and then choose Find Estimates from the shortcut menu. In the Find Estimates dialog box, fill in what you know about the estimate and then click Find. If you click Advanced, QuickBooks opens the full-blown Find window, so you can set up more specific criteria (Advanced find methods).
Making an estimate inactive. When you create several estimates for the same work, eventually you and your customer will pick one to run with. Once you’ve picked an estimate, make the other estimates inactive by turning off their Estimate Active checkboxes. QuickBooks won’t display inactive estimates in the Available Estimates dialog box (Comparing Estimates to Actuals), but you still have a record of your other attempts, which you can see by clicking Next or Previous in the Create Estimates window or by running the “Estimates by Job” report.
To make an estimate inactive, in the Create Estimates window, display the estimate and then turn off the Estimate Active checkbox. Click Save & New to save the estimate while keeping the Create Estimates window open. If you want to make another estimate inactive, click Previous or Next until the estimate appears, and then repeat the steps.
Deleting an estimate. Deleting an estimate isn’t the no-no that deleting an invoice is. Your only risk is that you’ll realize you wanted to keep the estimate as soon as you delete it. In the Create Estimates window, display the estimate and then choose Edit → Delete Estimate or right-click the estimate in the Create Estimates window and then choose Delete Estimate from the shortcut menu. In the Delete Transaction dialog box, click OK to complete the deletion.
Creating an Invoice from an Estimate
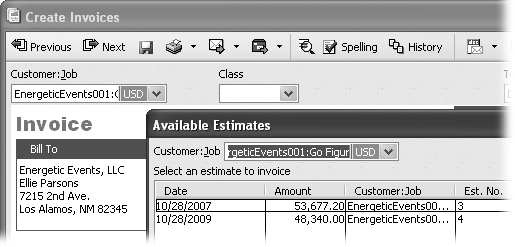
Whether you create one estimate for a job or several, you can generate invoices from your estimates. In fact, if you choose a customer or job for which estimates exist in the Create Invoices window, QuickBooks displays the Available Estimates dialog box, which lists all the active estimates for that customer or job. This section gives the steps for turning an entire estimate into an invoice. See Creating Progress Invoices to learn how to use estimates to generate progress invoices when you reach milestones on large projects.
To use an estimate to create an invoice, do the following:
Press Ctrl+I to open the Create Invoices window. In the Customer:Job drop-down list, choose the customer or job you want to invoice.
If one or more estimates exist for the customer or job, the Available Estimates dialog box opens, showing the active estimates for that customer or job, as shown in Figure 10-19. You don’t have to use your estimate to create your invoice if, say, you want to invoice for your actual time and materials. In this situation, click Cancel. The Available Estimates dialog box closes, and the Create Invoices window is ready for you to fill in the line-item table.
In the Available Estimates dialog box, click anywhere in the row for the estimate you want, and then click OK.
The Create Invoices window opens with the information from the estimate filled in.
Figure 10-19. To keep your customer happy, be sure to choose the estimate that the customer accepted. The Available Estimates dialog box shows the date, amount, and estimate number. Usually, the amount is the field you use to choose the agreed upon estimate. Alternatively, when you and the customer have agreed on an estimate, you can delete all the other estimates for that customer or make them inactive, so you have only one estimate to choose.Make any changes you want and then click Save & Close.
You’re done.
Comparing Estimates to Actuals
Customers who write you a blank check for a job are rare, so most jobs require estimates of what the work will cost. When you finish a job that you estimated, take some time to run the “Job Estimates vs. Actuals Summary” report to see how you did compared to your estimate. Do this a few times and the accuracy of your estimates should improve dramatically.
If you invoice jobs based on the progress you’ve made (next section), run the “Job Progress Invoices vs. Estimates” report. This report compares your estimate to actual performance through your most recent progress invoice.
Creating Progress Invoices
When you work on jobs and projects that take more than a few days, you probably don’t want to wait until the job is completely finished to charge for some of your work. Progress invoices include charges based on your estimate and the progress you’ve made on the job. These invoices are common for jobs that are broken into phases or when payments are made when you reach milestones. Since most large jobs start with an estimate, you won’t have to start from scratch when it’s time to invoice your customer. QuickBooks can convert your estimates into progress invoices with only a few additional pieces of information.
Note
To produce progress invoices, you first have to turn on the preferences for creating estimates and progress invoicing (Jobs & Estimates).
Progress Invoicing Options
Progress invoices are still invoices; they just happen to link to estimates you’ve created for a job. In the Create Invoices window, when you choose a customer or job, QuickBooks checks to see if an estimate exists. If there’s at least one estimate for the customer or job, QuickBooks opens the Available Estimates dialog box so you can choose an estimate to invoice against.
When you create your first progress invoice (select an estimate in the Available Estimates dialog box and then click OK), you can choose to invoice the entire estimate or only a portion, as shown in Figure 10-20. Following are the options that appear in the Create Progress Invoice Based On Estimate dialog box and when you might use them.
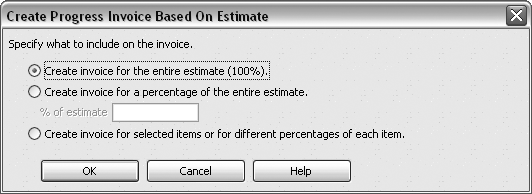
Create invoice for the entire estimate (100%). This option is perfect if you prepared an estimate to get approval before starting a job, and you completed the job in a short period of time. QuickBooks takes care of the grunt work of transferring all the services, products, and other items from the estimate to the invoice.
Create an invoice for the remaining amounts of the estimate. For every progress invoice after the first one for a job, you’ll see this option instead of “Create invoice for the entire estimate (100%)”. Use this option when you’re ready to create your last invoice for the job. Its sole purpose is to save you the hassle of calculating the percentages that haven’t yet been billed.
Create invoice for a percentage of the entire estimate. Choose this option if you negotiated a contract that pays a percentage when you reach a milestone, such as 15 percent when the house’s foundation is complete. (Of course, you and the customer have to agree that a milestone is complete; QuickBooks can’t help you with that.) This option is also handy if your contract specifies a number of installment payments. In the “% of estimate” box, type the percent you’ve completed.
Suppose your contract includes a clause that covers cost overruns, and the job ended up costing 20 percent more than the estimate. You might wonder how you can charge for that extra 20 percent. The trick is noticing that the “% of estimate” box doesn’t limit the percentage to 100 percent. In this example, type 120 percent for the last invoice to reflect the costs that exceeded the estimate.
Create invoice for selected items or for different percentages of each item. This option is the most flexible and a must if you bill your customers only for the work that’s actually complete. For example, if you’re building an office complex, one building might be complete while another is still in the framing phase. When you select this option, you can choose the services and products to include on the invoice and specify different percentages for each one.
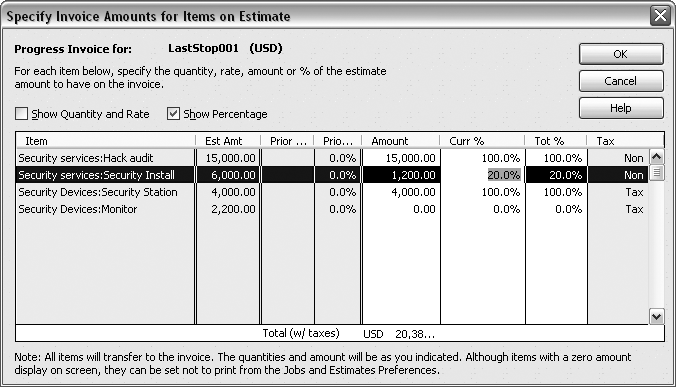
When you select this option and click OK, the “Specify Invoice Amounts for Items on Estimate” dialog box appears, initially showing your estimated amounts and any previously invoiced amounts. The next section tells you how to fill in this dialog box.
Fine-Tuning a Progress Invoice
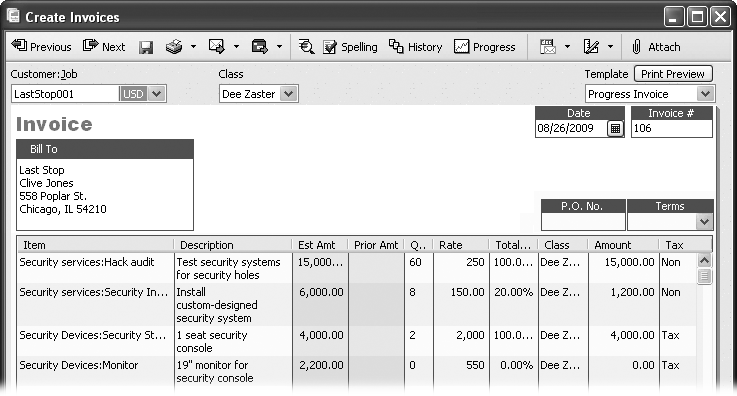
When you click OK in the Create Progress Invoice Based On Estimate dialog box (or the “Specify Invoice Amounts for Items on Estimate” dialog box when you choose items to invoice), QuickBooks automatically fills in the estimate items, percentages, and amounts, as shown in Figure 10-21. You don’t have to stick with the numbers that QuickBooks comes up with—you can reconfigure the charges on the invoice any way you want. (However, it’s always a good idea to review the customer’s contract and get approval before you make any increases or additions not covered by the contract.)
You can modify line items directly in a QuickBooks invoice, but that approach doesn’t create a history of your changes. If you want to keep a record of the changes you make between estimate and progress invoice, follow these steps instead:
Open the progress invoice in the Create Invoices window (press Ctrl+I and then click Previous until the progress invoice you want appears).
You can also open an invoice from the Customer Center. On the Customers & Jobs tab, select the customer you want. Then, in the Show drop-down list above the transactions table, choose Invoices. Double-click the invoice you want to open.
In the Create Invoices window’s icon bar, click Progress.
QuickBooks opens the “Specify Invoice Amounts for Items on Estimate” dialog box.
Before you begin changing values, make sure that the correct columns are visible. Turn on the “Show Quantity and Rate” checkbox or the Show Percentage checkbox.
QuickBooks remembers the checkboxes you turn on and turns the same ones on the next time you open the “Specify Invoice Amounts for Items on Estimate” dialog box.
To change a value for the progress invoice, click the cell that you want to change, as shown in Figure 10-22.
Changing a rate is a rare occurrence. However, it might happen, if, say, you have a contract that bumps your consulting rate by 10 percent for the next calendar year. If the job runs into the next calendar year, you can increase the rate for the hours worked in January.
Figure 10-22. You can change the cells in columns with a white background. The columns with a gray background show the values from the estimate and previous progress invoices. When you change a value, QuickBooks recalculates the other columns. For example, if you type a percentage in a Curr % (current percentage) cell, QuickBooks calculates the amount to invoice by multiplying your estimated amount by the current percentage. The Tot % column shows the total percentage including previously invoiced amounts and the current amount.To apply the changes, click OK.
The “Specify Invoice Amounts for Items on Estimate” dialog box closes, taking you back to the now modified progress invoice.
Save the progress invoice by clicking Save & New or Save & Close.
Handling Refunds and Credits
If a customer returns a product or finds an overcharge on their last invoice, you have two choices: issue a credit against the customer’s balance, or issue a refund by writing a check. In the bookkeeping world, the documents that explain the details of a credit are called credit memos. On the other hand, when a customer doesn’t want to wait to get the money she’s due or she isn’t planning to purchase anything else from you, a refund check is the logical solution. In either case, refunds and credits both begin with a credit memo, as shown in Figure 10-23.
Creating Credit Memos
Here’s how to create a credit memo:
On the Home page, click Refunds & Credits, or choose Customers → Create Credit Memos/Refunds.
QuickBooks opens the Create Credit Memos/Refunds window. If you stay on top of your invoice numbers, you’ll notice that the program automatically uses the next invoice number as the credit memo number.
As you would for an invoice, choose the Customer:Job.
Choose a class if you use classes; and, if necessary, choose the credit memo template you want to use.
In the line-item table, add a line for each item you want to credit.
Be sure to include all the charges you want to refund, including shipping charges and taxes.
If you want to print or email the credit memo, turn on the “To be printed” or “To be e-mailed” checkbox.
Click Save & Close when you’re done.
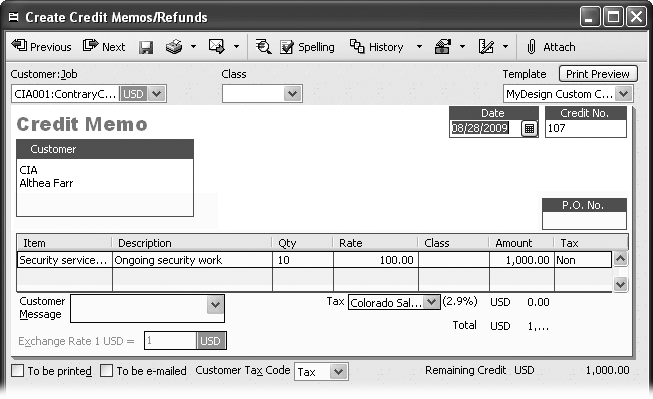
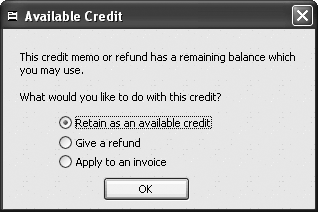
When you save a credit memo with an available credit balance, the Available Credits dialog box appears with three options for handling the credit, as shown in Figure 10-24.
Creating Refund Checks
If your customer is dreadfully disgruntled, you’ll probably want to write a refund check. If you didn’t do that when the Available Credit dialog box appeared (see the previous section), here’s how to do it now.
Open the Customer Center and select the disgruntled customer. In the Show drop-down list, choose Credit Memos.
The list of open credit memos for the customer appears.
Figure 10-24. When you save a credit memo with available credit, QuickBooks displays the Available Credit dialog box. If you choose “Give a refund”, QuickBooks opens the Write Checks window so you can write the refund check. Choosing “Apply to an invoice” works only if you have an open invoice for the customer. To keep the credit around and apply it (Applying Credits to Existing Invoices) to the next invoice you create for the customer, choose “Retain as an available credit”.Double-click the credit memo that you want to refund as a check.
The Create Credit Memos/Refunds window opens to that credit memo.
In the window’s toolbar, find the icon on the right that looks like a dollar bill with a hand above it. To create a refund check, click the down arrow to the right of this icon and choose “Give refund”.
The icon is Intuit’s way of showing that you’re going to give money back to your customer.
QuickBooks opens the “Issue a Refund” dialog box and fills in all the information you need to create the refund.
In the “Issue this refund via” box, the program chooses Check, and chooses the checking account you set in your checking preferences (Choosing the Bank Accounts You Use). If the red face staring at you from across the counter is your customer, choose Cash instead. Click OK.
If the “To be printed” checkbox is turned on, QuickBooks adds the check to the queue of checks waiting to be printed. To print the refund check right away, you need to find the check in your checking account register and open it in the Write Checks window (right-click the check transaction and choose Edit Check from the shortcut menu). Then, in the Write Checks window’s toolbar, click Print.
Note
If you’ve signed up for the QuickBooks Merchant Service (Importing a Delimited File) and accept credit card payments, you can also refund money via credit card.
Applying Credits to Existing Invoices
If a customer has an unpaid invoice or statement, you can apply a credit to that invoice or statement and reduce the amount that the customer owes. Applying a credit to an invoice is almost like receiving a payment, so when you choose a customer or job in the Receive Payments window, QuickBooks tells you if the customer has available credits and discounts. Here’s how to apply that credit to an invoice:
On the Home page, click Receive Payments.
QuickBooks opens the Receive Payments window.
In the Received From drop-down list, choose the customer whose credit you want to apply.
Below the invoice table, QuickBooks displays a message that the customer has available credit and shows the amount of the credit.
To select the invoice or statement to which you want to apply the credit, click anywhere in the line for the invoice or statement except the Checkmark column (Figure 10-25).
Clicking the Checkmark column chooses the invoice to receive a real payment from the customer.
Figure 10-25. If you didn’t choose a job in the Received From drop-down list, the Available Credits value represents the total credits available for all jobs for that customer. To select an invoice for a credit, click anywhere in the invoice row—except the Checkmark cell, which selects the invoice for payment.Click Discount & Credits.
QuickBooks opens the “Discount and Credits” dialog box, as shown in Figure 10-26. If you don’t see the credit you expect, it might apply to a different job or to the customer only. To apply one of the customer’s credits, click the checkmark for that credit to turn it on.
In the “Discount and Credits” dialog box, click Done.
After all this, the Receive Payments window doesn’t look very different, but there’s one important change: In the Credits column for the open invoice, you’ll see the value of the credit. The amount due won’t change until you receive the actual payment.
Figure 10-26. When you turn on credit checkmarks, the Credits Used value shows the total amount of credit you applied. Balance Due shows how much is still due on the invoice. If the original invoice balance is less than the available credit, QuickBooks applies only enough of the credit to set the invoice balance to zero. You can apply the remaining credit to another invoice by repeating the steps in this section.Click Save & Close to apply the credit to the invoice.
If you open the invoice in the Create Invoices window, you’ll see the credit amount in the Payments Applied field and the Balance Due reduced by the amount of the credit.
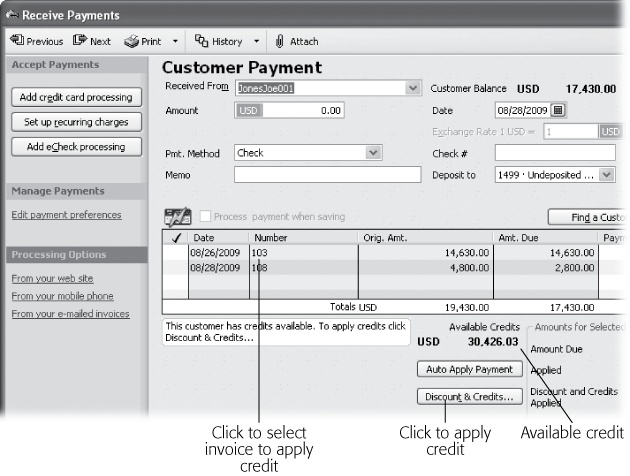
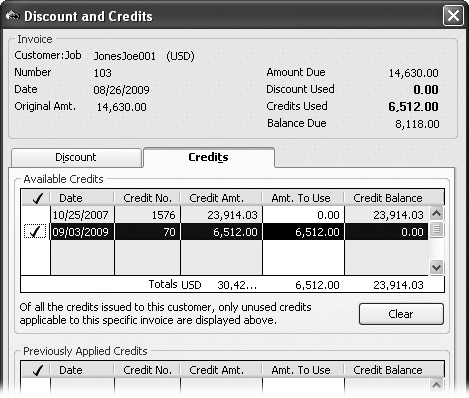
Applying Credits to New Invoices
If you create a new invoice for a customer who has a credit due, in the Create Invoices window, you’ll see the Apply Credits button (below the item table) come to life. Here’s how you apply a credit to reduce the balance of the invoice:
With the new invoice visible in the Create Invoices window (press Ctrl+I), click Apply Credits.
QuickBooks opens the Apply Credits dialog box, which looks like the “Discount and Credits” dialog box, except that it has only a Credits tab.
Turn on the checkmarks for each credit you want to apply to the invoice, and then click Done.
In the Create Invoices window, you’ll see the credit amount in the Payments Applied field and the Balance Due reduced by the amount of the credit.
Editing Invoices
If you’re still in the process of creating an invoice or sales receipt, you can jump to any field and change its value, delete lines, or insert new ones. Even after you’ve saved an invoice, editing is easy. Any time an invoice is visible in the Create Invoices window, you can click any field and make any change you want. If you’ve already printed the invoice, turn on the “To be printed” checkbox so that you don’t forget to reprint the form with the changes you made.
If you’ve received a payment against an invoice, editing that invoice is not the way to go, because the edits can disrupt the connections between payment, invoice, and accounts to the point that you’ll never straighten it out. If you undercharged the customer, simply create a new invoice with the missing charges on it. If you charged the customer for something she didn’t buy, issue a credit memo or refund (see Handling Refunds and Credits).
Voiding and Deleting Invoices
Sometimes, you want to eliminate an invoice—for instance, when you create an invoice by mistake and want to remove its values from your accounts. QuickBooks provides two options, but for your sanity’s sake, you should always void invoices that you don’t want rather than deleting them.
When you void an invoice, QuickBooks resets the dollar values to zero so that your account balances show no sign of the transaction. However, it also marks the transaction as void, so you know what happened to it when you stumble upon it in the future.
If you delete an invoice, QuickBooks truly deletes the transaction, removing the dollar values from your accounts and deleting any sign of the transaction. All that remains is a hole in your numbering sequence of invoices and an entry in the audit trail that says you deleted the transaction (Setting Access Rights). If your accountant or the IRS looks at your books a few years down the road, your chances of remembering what happened to the transaction are slim. If an invoice has a payment attached to it, deleting the invoice is even more problematic: You have to delete the bank deposit first, followed by the customer’s payment, and finally the invoice.
To void an invoice, do the following:
In the Customer Center, find the transaction you want to void (Searching with QuickBooks Centers), and then double-click it to open its window.
The window that opens depends on the type of transaction you double-clicked. For example, Create Invoices opens for an invoice, and Enter Sales Receipts opens for sales receipts.
When you see the invoice in its window, right-click in the window and then choose Void Invoice from the shortcut menu. (Or, choose Edit → Void Invoice.)
All the values in the form change to zero and QuickBooks adds the word “VOID:” to the Memo field. As a reminder of the reason that you voided the transaction, type the reason after “VOID:” in the Memo field.
Click Save & Close.
Note
If you open the Accounts Receivable register window, you might get nervous when you see the word Paid in the Amt Paid column of a voided transaction. Don’t get excited. Notice that the amount paid is zero. You’ll also see the word Void in the Description field. The word Paid in the Amt Paid column is QuickBooks’ somewhat skewed way of telling you the invoice is no longer open.