
When you first start your business, you may be the proud owner of every job title in your company: receptionist, sales rep, technician, bookkeeper, janitor, and CEO. But if your company is like most, you’ll eventually hire people to help you with all those tasks.
Unless you run an all-volunteer operation, sooner or later, your employees are going to want to get paid. When that time comes, you face the daunting task of dealing with payroll, which is the name for all the financial records you have to keep for employees’ salaries, wages, bonuses, withholdings, and deductions. If you decide to process payroll in QuickBooks, you should sign up for one of the payroll services that Intuit offers. To keep expenses low, you can choose a bare-bones service that provides only updated tax tables. At the other end of the spectrum, you can opt for Intuit’s full-service payroll. Or you can compromise somewhere in the middle.
After you choose a payroll service, your next task is to set up everything QuickBooks needs to calculate payroll amounts. You can walk through each step on your own or use an interview feature built into QuickBooks. (If you opt for Intuit’s full-service payroll [Recording Transactions from a Payroll Service], they do some of this setup for you.) Either way, the Payroll Setup interview keeps track of what you’ve done and what you still have to do.
Note
Intuit sometimes updates its payroll services between QuickBooks editions. That way, you get the latest tax tables, compliance information, bug fixes, and enhancements right away. So to keep this book’s instructions about Intuit payroll services up to date, they’re not actually in the book. Instead, you can read them in online Appendix D, which is available from this book’s Missing CD page at www.missingmanuals.com/cds. (Appendix D covers Intuit’s desktop payroll service, not its online payroll service.)
Another option is to outsource the headaches of payroll to a payroll-service company other than Intuit. If you go that route, then you simply use values from the payroll-service company’s reports to create a couple of transactions in QuickBooks for each payroll—to allocate salaries and wages, payroll taxes, and any other payroll expenses to the accounts in your chart of accounts. This chapter explains how to record these payroll transactions.
If you run a sole proprietorship, partnership, or a small Sub-chapter S corporation, you can withdraw money from the company as compensation without fussing over payroll. But to take advantage of retirement savings options like a Simplified Employee Pension (SEP), you have to deal with special rules regarding eligible compensation. For sole proprietors and partners, all you have to do to determine your eligibility for a SEP is calculate your compensation, which is based on company net profits. However, a Subchapter S corporation has to pay you an actual salary for you to be eligible for a SEP plan. In this chapter, you’ll learn how to record do-it-yourself payroll transactions, and how to pay yourself without payroll.
Shortly after you hire employees, you need to write their first paychecks, so setting up payroll can’t wait until employees are onboard. If you’re already running payroll with a payroll service, you probably have the info you need to set up QuickBooks’ payroll features. In that case, skip to Intuit Payroll Services to learn what Intuit’s payroll services have to offer. But if you’re new to payroll, read on to learn about the tax agency items you need and the payroll decisions you have to make before you hire anyone.
Part of the payroll process includes withholding taxes from employees’ paychecks and sending that money (along with your company’s payroll taxes) to the appropriate government agencies. Before you can do that, you need to get on the government’s radar. As you already know, anything tax-related spells paperwork, and payroll is no exception. Here are the IDs, accounts, and forms you need for payroll:
Employer Identification Number (EIN). If you’re a sole proprietor, your Social Security number acts as your business identification number when you fill out your tax return. For any other type of company, you need an EIN. If you don’t have one yet, you can apply for one online. Go to www.irs.gov and search for “Apply online EIN.”
An Electronic Federal Tax Payment System (EFTPS) account. The IRS requires that all federal taxes be paid electronically via EFTPS. (The box on Federal Taxes, Taxes, and More Taxes briefly describes the various payroll-related federal taxes you have to pay.) To sign up for EFTPS, head to www.eftps.gov/eftps and click the Enroll button. Sign up using your federal EIN (see the previous bullet point). After the IRS processes your enrollment, it mails you a four-digit PIN. Once you have that, back you go to the EFTPS website to log in again and use the PIN to create a password. That’s it! You’re now ready to pay your taxes electronically. When it’s time to remit taxes, you log into the EFTPS website, select the tax period and payment date, and fill in the amount. (If you subscribe to Intuit’s Enhanced Payroll service, you can use the E-File & Pay feature to log into the EFTPS website. That way, QuickBooks makes the payment and records the transaction. You can also tell QuickBooks to remember your EFTPS login credentials so you don’t have to re-enter them each time.)
A state payroll account. Each state is different. To learn about the IDs and forms that each state requires and the agencies that require them, head to payroll.intuit.com/support/compliance. You can also call your state’s Department of Revenue to find out what you need to do.
Once you have your EIN and payroll tax accounts set up, you’re ready to report and pay payroll taxes. Now all you need are some employees.
Hiring employees launches the paperwork journey. Here are the forms prospective employees have to fill out (and keep on file):
W-4. Each employee fills out one of these forms to specify his withholding allowance, such as single, married, and number of dependents. If employees want additional taxes withheld, they can write in the amount. If they want to change their withholdings, they simply fill in a new copy of the form. After you’ve activated an Intuit Payroll service, you can get a copy of this form in QuickBooks by choosing Employees→Employee Forms. You can also download this form from www.irs.gov/pub/irs-pdf/fw4.pdf.
I-9 (Employment Eligibility Verification). Once you make a job offer to a prospective employee, that person has to fill out this form so you can verify her identity and employment authorization. Although you don’t have to submit this form to any agency, you need to keep it on file in case a government representative asks for it. (Not having it may cost you a fine.) Your employee fills in basic info like name, address, Social Security number, birthdate, and so on. The form lists documents that are acceptable forms of identification, such as a driver’s license or Social Security card. After you check your employee’s document and say “Yup, that’s you!” you’re done. After you’ve activated an Intuit Payroll service, you can get a copy of this form in QuickBooks by choosing Employees→Employee Forms. To download this form, head to www.uscis.gov/files/form/i-9.pdf.
State withholding forms. Many states simply use the withholding allowances from employees’ W-4 forms as the state withholding allowance, whereas some require their own forms. If you live in Alaska, Florida, Nevada, South Dakota, Texas, or Washington, you’re in luck: You don’t have to withhold state income taxes. To learn about state forms, head to payroll.intuit.com/support/compliance.
Before you can set up your payroll service, you need to make a few payroll-related decisions:
How much? You need to decide the salary or wages you’ll pay for each position, as well as other monetary aspects of positions, like benefits, overtime, commissions, and bonuses. One way to figure out how much to offer workers is to research what other employers in your area are paying and the benefits they offer for similar positions.
How often? Your employees rely on receiving their paychecks on a regular schedule, such as every other week or twice a month. Payroll frequency is up to you. However, once you choose a schedule, you have to stick to it.
Pay period end date and paycheck date. The pay period end date is the day through which you pay people for the hours they work, and the paycheck date is, of course, the day you actually pay employees. For example, the paychecks you hand out could pay employees for hours worked through Sunday, but you don’t pay your employees for those hours until the following Friday. Make sure to allow enough time between the payroll cutoff date and payday to process payroll. In addition, if you use QuickBooks Direct Deposit (Recording Transactions from a Payroll Service), it takes two days after you submit direct deposit requests for those funds to be available in employees’ accounts. If you’re using Intuit’s Assisted Payroll service in the desktop version of QuickBooks, you have to submit your payroll and direct deposits requests by 5 p.m. two business days before payday (not including federal bank holidays).
Payroll involves all sorts of important details, but fortunately you don’t have to remember them all. Intuit offers several payroll services that handle the nitty-gritty: After you set up your Payroll items and employees, you simply fill out the hours your employees work each pay period, and the payroll service calculates paychecks, withholdings, and your employer payroll tax liability (how much your company owes). After that, all you have to do is get the money to the right places—and payroll services make that easy, too.
Intuit offers three levels of payroll service: a do-it-yourself version, a more helpful option that pitches in with the majority of payroll tasks, and a full-service option that takes care of everything except filling in the hours your employees work. You can sign up for either a desktop or online version of any of these service levels. This section describes what each option offers.
With an online Intuit payroll service, you don’t have to be in the office on payday, and you don’t even have to run QuickBooks. These services are available 24/7, and you can access them from anywhere with an Internet connection. You could be on vacation and still pay your employees on time by running payroll from your laptop, iPad, iPhone, or Android device. Intuit’s online payroll services integrate with QuickBooks, so you can download your payroll info and import it into your QuickBooks company file. (To see the most current features and pricing, head to http://payroll.intuit.com/payroll_services/online_payroll.jsp.)
Note
Time Tracking is an additional service that Intuit Online Payroll offers. Employees can log in and enter their hours, either by clocking in and out or by filling in a timesheet on a password-protected website. In addition, this service sends emails to remind your employees of time reporting deadlines. You then review their hours and either edit or approve them. This feature can keep you compliant with overtime rules, too.
If you use one of Intuit’s desktop payroll services, you prepare payroll from within QuickBooks, so the data is automatically recorded in your company file.
Note
Intuit payroll services charge by the month, not for each pay period, as many other services do. You pay the same fee whether you run payroll weekly, every two weeks, or bimonthly.
Here’s what each payroll service level offers (though keep in mind that the features listed here could change after this book is published):
Basic Payroll is a do-it-yourself option. You set everything up at the start. Then, for each payroll, you enter hours or payroll amounts, and QuickBooks uses tax tables to calculate payroll taxes and deductions for you. This service then spits out reports with the info you need to fill out the federal and state tax forms you have to file. Your job is to print the paychecks from QuickBooks (or use direct deposit), make tax deposits, and file your payroll tax forms.
Enhanced Payroll (the most popular) can handle preparing federal and state payroll forms. It provides up-to-date tax forms, fills in most of the tax-form info, and lets you make your tax deposits and file your tax forms electronically from within QuickBooks. This service sends you emails to remind you when payroll, forms, and payroll taxes are due, and to tell you when payroll is direct deposited, taxes have been paid, and tax authorities have accepted your tax forms. In QuickBooks, the Payroll Center reminds you when payroll and payroll taxes are due, and shows the status of direct deposit payments, electronic tax payments, and tax forms that you submitted through QuickBooks. It also archives your tax forms on your desktop as PDFs and displays a table of your most recently archived forms.
Full Service Payroll does it all. If you opt for this service, Intuit sets up payroll for you. (If you used another payroll service in the past, it transfers that data into Intuit payroll.) You don’t have to make federal and state payroll tax deposits, file required tax reports during the year, or prepare W-2 and W-3 forms at the end of the year—the service handles all these tasks for you. In addition, Intuit guarantees that your payroll and payroll tax deposits and filings will be accurate and on time. Of course, you have to send Intuit the correct data on time in the first place. But if this service then makes a mistake or misses a deadline, Intuit pays the resulting payroll tax penalties.
Lots of companies use outside payroll services (ADP and Paychex are two popular ones) to avoid the brain strain of figuring out tax deductions and complying with payroll regulations. When you use one of these services, you send it your payroll data. It then writes and distributes your company’s payroll checks and sends you reports about the transactions it processed. It even takes care of remitting payroll taxes and other withholdings to the appropriate agencies.
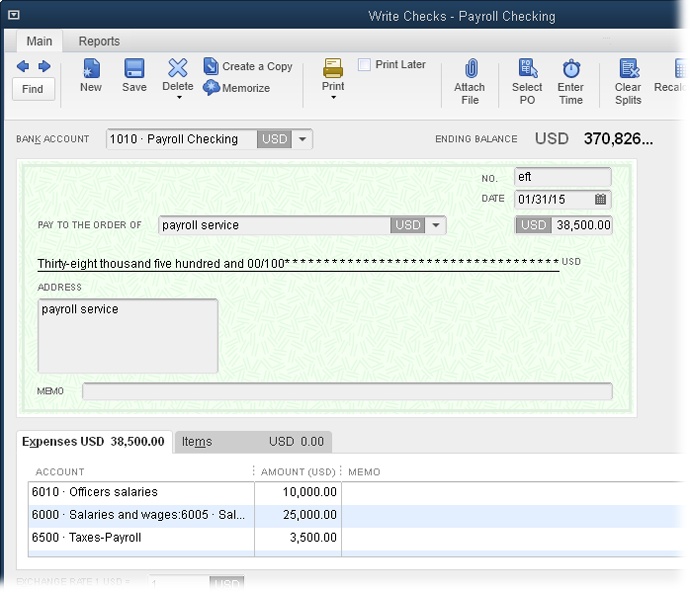
None of these payroll transactions appear in your QuickBooks company file until you add them. Fortunately, you don’t have to enter every last detail. You can simply create a journal entry debiting the payroll expense accounts and crediting your bank account (Creating Journal Entries). Or you can create a vendor for payroll and record a split transaction that distributes the money from your checking account into the appropriate expense accounts, as shown in Figure 15-1; here’s how:
Create a vendor for your payroll transactions.
On the QuickBooks Home Page, click the Vendors button. In the Vendor Center’s toolbar, click New Vendor→New Vendor. You don’t have to fill in all the fields in the New Vendor window; simply type something like Payroll Service in the Vendor Name box, and then click OK.
Figure 15-1. In most cases, your payroll falls into three categories: Officers salaries represent gross salaries for corporate officers. Salaries, as shown here (sometimes called “Salaries and wages”), represent the gross pay that employees receive on their paychecks. And payroll taxes are the employer payroll taxes that the company pays, such as Social Security and Medicare taxes.
Note
The example in Figure 15-1 and the instructions in this numbered list apply when your employees are paid using direct deposit, where the money is deposited into their bank accounts electronically. If you don’t use direct deposit, you also have to record the actual paychecks in QuickBooks (as explained in online Appendix D) in order to reconcile your bank account.
Press Ctrl+W or choose Banking→Write Checks.
In the Write Checks window’s Bank Account drop-down list, choose the account you use for your payroll.
In the No. field, type EFT for “electronic funds transfer.”
Most payroll services transfer the funds from your bank account electronically.
In the Pay To The Order Of field, type the name of the payroll vendor you just set up.
If necessary, on the window’s Expenses tab, fill in the Account and Amount fields for each payroll expense, as shown in Figure 15-1.
If the accounts are already in place but the values differ, simply edit the numbers in the Amount fields.
When the transaction is correct, click Save & Close.
Tip
If you turned on the preference to recall the last transaction (Tuning QuickBooks to Your Liking), QuickBooks automatically fills in the amounts and accounts the next time you record a transaction for the payroll service.
If you own a sole proprietorship, partnership, or Subchapter S corporation (named after Subchapter S of the U.S. tax code), you can take money out of the company for your personal use. These withdrawals go by different names depending on the type of company. For a sole proprietor, the money you withdraw is called owner’s draw, or simply draw. Partners withdraw money and call it partners’ draw. And if you’re a shareholder in a Subchapter S corporation, the money you withdraw is called a shareholders’ distribution.
If you don’t pay yourself a salary, you pay taxes when the company’s profits flow through to your personal tax return. However, if you’re a Subchapter S shareholder, you can pay yourself using a combination of salary and shareholders’ distribution. That way, you can contribute to a pension plan, like a SEP, based on your corporate salary.
This section explains how to pay yourself (and other partners and shareholders) no matter which type of business structure you’ve established.
As your company makes money, you can withdraw funds. The easiest way to do this in QuickBooks is to write a check (Paying Selected Bills) made out to you, as shown in Figure 15-2. If you’re a sole proprietor and own your own company, choosing the Owner’s Contribution/Draw account for the check tells QuickBooks to post the check to show that you’ve withdrawn equity from your company. You use the same process if you’re a partner except that you choose the Partners’ Contribution/Draw account instead. The Shareholders’ Distribution account shown in Figure 15-2 represents the draw account for shareholders in a Subchapter S corporation.
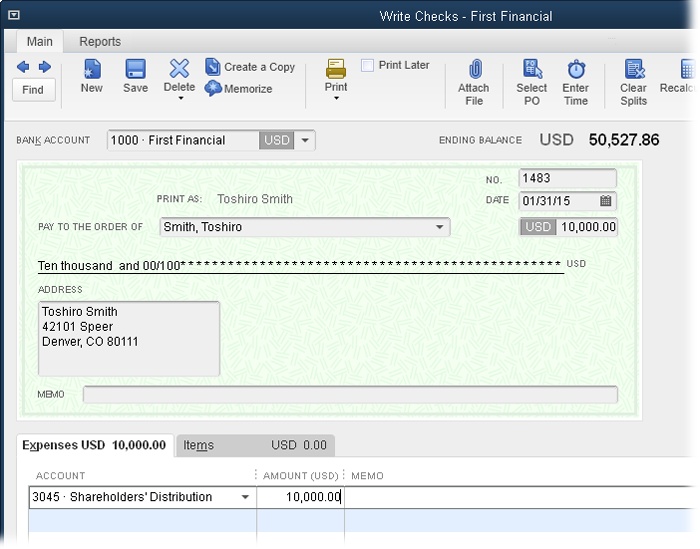
Figure 15-2. In the Write Checks window, on the Expenses tab, choose the draw account in the first blank Account cell, as shown here. When you save the check, QuickBooks debits that equity account, which decreases its balance.
Note
If you’re a sole proprietor, you typically make an initial investment of capital into your business. You record this investment into the Owner’s Contribution/Draw equity account as explained on Recording Owner’s Contributions. If your company runs low on cash later on, you can contribute more money and record this addition in the same account.
If shareholders withdraw money from a Subchapter S corporation for personal use, you may want to turn some of that shareholders’ distribution into salary so, for example, the partners can qualify to contribute to a retirement account. To prepare payroll in this situation, you have to calculate the applicable payroll withholdings (like federal and state taxes, Social Security, and Medicare) and company payroll taxes. (Alternatively, you can ask your accountant or bookkeeper to calculate them for you.) You also have to record payroll checks (if you issue them) and checks that you send to federal and state tax agencies for withholdings and payroll taxes, as shown in Figure 15-3. And don’t forget about preparing and filing federal and state payroll tax returns, including forms W-2 and W-3.
If partners take shareholders’ distributions, you can use a journal entry to recategorize some of those dollars as salary. For example, you could assign the money to a salary expense account called Officers Salaries, as shown in Figure 15-4. (You’ll learn about the Payroll Tax Payable credit in the next section, and you can read about how to handle the employer portion of payroll tax in online Appendix D, available from this book’s Missing CD page at www.missingmanuals.com.)
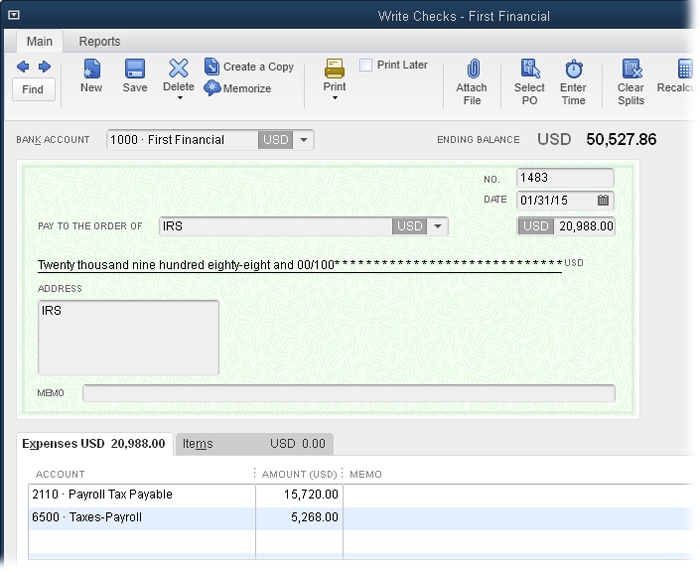
Figure 15-3. If you pay shareholders’ salaries in a Subchapter S corporation, the payroll taxes you remit to the IRS are split between two different accounts, as shown here: a liability account for the owner’s, partners’, or shareholders’ payroll withholdings (here, that’s Payroll Tax Payable) and an expense account for the employer payroll taxes (Taxes-Payroll).
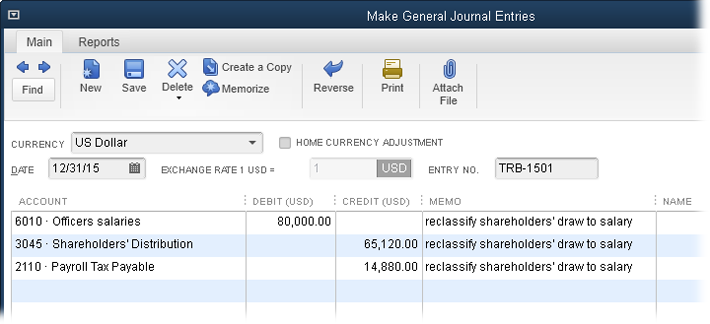
Figure 15-4. To recategorize a distribution as salary, you credit the Shareholders’ Distribution equity account and debit the salary expense account. The credit to the Shareholder’s Distribution equity account increases its balance (which decreased when you took the distribution), whereas the debit to the salary expense account shows your salary as an expense. The Payroll Tax Payable amount represents your employee portion of payroll tax withholdings.
After you reclassify shareholders’ distributions as salary, you still have to account for your payroll withholdings (such as the federal and state income taxes you pay) and other payroll taxes. When you remit payroll taxes to tax agencies like the IRS, you have to allocate them to the correct payroll accounts in your company file.
The journal entry in Figure 15-4 set your salary to $80,000. However, companies and employees split the bill for Social Security taxes and Medicare taxes. Because employees don’t know anything about remitting payroll tax withholdings, they let their employers include those withholdings in the employer’s payroll tax payments. The credit to the Payroll Tax Payable account in Figure 15-4 allocates part of the salaries paid to employee payroll tax withholdings so it appears in the Payroll Tax Payable current liability account.
When you remit payroll taxes, the amount you pay includes both the employer payroll taxes and employees’ payroll tax withholdings. That’s why the IRS check in Figure 15-3 is split between two accounts. The line assigned to the Taxes-Payroll account represents the employer portion of federal payroll taxes (which includes the employer’s portion of Social Security and Medicare taxes, and the employer’s federal unemployment tax). The line for Payroll Tax Payable, on the other hand, represents the employees’ payroll tax withholdings (estimated federal income tax and the employees’ portion of Social Security and Medicare taxes).